Go Back
- 2 ripe bananas - 1 cup dark chocolate chips - 1 tablespoon coconut oil - 1/2 cup crushed nuts (e.g., almonds or walnuts) - 1/4 cup shredded coconut (optional) - 4 lollipop sticks or wooden skewers - Sea salt for garnish - Sprinkles or chocolate drizzle - Flavored extracts (e.g., vanilla or almond) When I make chocolate-covered banana pops, I love using ripe bananas. They are sweet and creamy, perfect for this treat. You will also need dark chocolate chips. They melt well and add a rich flavor. Mixing in coconut oil helps the chocolate coat better, giving it a nice shine. I often add crushed nuts for a crunch. Almonds or walnuts work great. If you want a tropical twist, include shredded coconut. It adds flavor and a fun texture. Don't forget the lollipop sticks or wooden skewers to hold your pops! For extra flair, I suggest using sea salt to enhance the sweetness. You can also add colorful sprinkles or drizzle more chocolate on top. Flavored extracts, like vanilla or almond, can create a unique taste. With these ingredients, you can create a delightful frozen treat everyone will love! - Peel and cut the bananas into halves. - Insert a lollipop stick into the cut end of each banana half. To melt chocolate chips, start with a microwave-safe bowl. Add 1 cup of dark chocolate chips and 1 tablespoon of coconut oil. Microwave in 30-second bursts. Stir the chocolate between each burst. Stop when the chocolate is smooth and shiny. This mix of chocolate and oil keeps it creamy and easy to dip. Now, dip each banana half into the melted chocolate. Make sure to coat it evenly. Let any extra chocolate drip off. While the chocolate is still wet, you can roll or sprinkle the banana pops with crushed nuts or shredded coconut for extra crunch and flavor. Place the coated banana pops on a baking sheet lined with parchment paper. This helps stop them from sticking. Once all the banana pops are on the sheet, put it in the freezer. Let them freeze for at least 1 hour. This makes the chocolate nice and firm. Enjoy these treats right from the freezer! Choosing great ingredients makes a big difference. Here are my tips: - Using high-quality chocolate for better flavor: I recommend dark chocolate chips. They melt well and give a rich taste. Look for brands with at least 70% cocoa for the best flavor. This will make your pops taste gourmet! - Best types of bananas to use: Use ripe bananas. They should have some brown spots. This means they are sweet and soft. If they are too green, they won’t taste as good. Overripe bananas can be used but may be too mushy. Prep is key to making these treats shine. Follow these steps: - How to achieve a perfect chocolate coating: Make sure your chocolate is melted smoothly. Stir well after each 30-second microwave interval. A smooth coating looks and tastes better. Dip the bananas quickly and evenly. - Keeping the pops from sticking: Line your baking sheet with parchment paper. This keeps the pops from sticking and makes cleanup easy. Place them on the sheet right after coating. Serving your banana pops creatively adds fun. Here are some ideas: - Creative ways to display banana pops: Stick them in a cup filled with rice or sugar. This holds them upright. You can also use a cake stand for a fancy look. - Pairing with dips or sauces: Chocolate-covered banana pops taste great with dips. Try peanut butter or caramel sauce. You can also serve them with yogurt for a fresh twist. {{image_2}} You can play with flavors in your chocolate-covered banana pops. Try using different chocolates. Milk chocolate is sweet and creamy. Dark chocolate adds a rich taste. White chocolate gives a sweet twist. You can even use ruby chocolate for a fruity flavor. Adding spices can bring more depth. A pinch of cinnamon gives warmth. For a kick, try a touch of cayenne. These simple changes make your treats unique. If you want nut-free options, seeds are a great choice. Sunflower seeds add a nice crunch. Pumpkin seeds also bring a tasty twist. You could even use crushed cereal for a fun topping. This adds a crispy layer while keeping it nut-free. Your banana pops will still be delicious and safe for all. For those who are vegan, you can use dairy-free chocolate. Many brands offer great dairy-free options. This way, everyone can enjoy this treat. If you are watching your sugar intake, try sugar-free chocolate. These options keep your pops tasty without the extra sugar. Enjoy these chocolate-covered banana pops in a way that fits your diet! To store your banana pops, place them in an airtight container. This keeps them fresh. If you do not have a container, wrap them in plastic wrap. Make sure to seal it tight. You want to keep air out. This prevents freezer burn. Freezer burn makes food dry and less tasty. You can store banana pops in the freezer for about two months. After that, they may lose flavor. Look for signs of spoilage. If you see ice crystals, that means they are not fresh. The chocolate may also look dull or dry. When you want to eat a banana pop, take it out of the freezer. Let it sit for about five minutes. This helps the chocolate soften a bit. You can also run it under warm water for a few seconds. Just be careful not to let it melt too much. Enjoy your treat when it is soft enough to bite! Yes, you can use other fruits! Here are some great options: - Strawberries: They dip well and taste sweet. - Pineapple: Cut into chunks for a tropical twist. - Apples: Slice them and dip for a crunchy treat. - Mango: Its sweetness pairs nicely with chocolate. These fruits add fun and flavor to your frozen treats! You can pair your pops with tasty sides. Here are some ideas: - Fresh fruit salad: It adds a refreshing touch. - Yogurt: Serve it as a dip for extra creaminess. - Nut butter: A great option for extra protein. - Whipped cream: It makes for a fun, sweet contrast. These sides enhance the experience and make it even more delightful! Chocolate-covered banana pops have some health benefits. Bananas provide fiber and potassium. Dark chocolate has antioxidants and may improve heart health. However, watch the portion sizes. They are a treat, so enjoy them in moderation. This way, you can savor the sweetness while keeping it balanced! These chocolate-covered banana pops are simple and fun to make. You need a few ripe bananas, dark chocolate, coconut oil, and your choice of toppings. After preparing and coating the bananas, freeze them for a delicious treat. Use high-quality ingredients and explore flavor variations for extra fun. In the end, these pops offer a tasty snack that's easy to customize. Enjoy your homemade treats any time!

Chocolate Covered Banana Pops

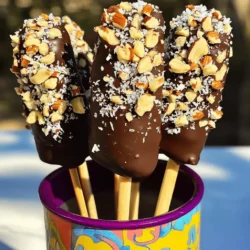
Indulge in a delicious treat with these Chocolate Covered Banana Pops! Perfect for a sweet snack or a fun treat, these easy-to-make pops combine ripe bananas and rich dark chocolate, topped with nuts and coconut for added crunch. In just 15 minutes of prep time, you can create a fun dessert that will impress everyone. Click through for the full recipe and make your snack time unforgettable!

Ingredients
  

2 ripe bananas

1 cup dark chocolate chips

1 tablespoon coconut oil

1/2 cup crushed nuts (e.g., almonds or walnuts)

1/4 cup shredded coconut (optional)

4 lollipop sticks or wooden skewers

Instructions
 

Begin by peeling the bananas and cutting them in half crosswise. Insert a lollipop stick into the cut end of each banana half.

    In a microwave-safe bowl, combine the dark chocolate chips and coconut oil. Microwave in 30-second intervals, stirring between each, until the chocolate is smooth and fully melted.

      Dip each banana half into the melted chocolate, ensuring they are coated evenly. Let any excess chocolate drip off.

        While the chocolate is still wet, roll or sprinkle the banana pops with crushed nuts and shredded coconut, if using.

          Place the coated banana pops on a parchment-lined baking sheet to prevent sticking.

            Once all the banana pops are coated, transfer the baking sheet to the freezer and let them freeze for at least 1 hour until the chocolate is firm.

              Serve the chocolate-covered banana pops directly from the freezer for a refreshing treat!

                Prep Time: 15 minutes | Total Time: 1 hour 15 minutes | Servings: 4

                  - Presentation Tips: Place the pops in a cup or stand them upright in a container filled with rice or sugar to keep them upright for a fun and festive display!