Skip to content
DisclaimerTerms Of UseGDPR PolicyCookie Policy

Recipes Pursuit

  • Home
  • Drinks
  • Appetizers
  • Dinner
  • Dessert
  • About
  • Contact
  • Privacy Policy
DisclaimerTerms Of UseGDPR PolicyCookie Policy

NO-ING-IMG

To make these no-bake key lime pie bars, gather the following items: - 1 ½ cups graham cracker crumbs - 1/3 cup unsweetened shredded coconut - 1/4 cup granulated sugar - 1/2 cup unsalted butter, melted - 1 (8 oz) package cream cheese, softened - 1 (14 oz) can sweetened condensed milk - 1/2 cup fresh key lime juice (or regular lime juice) - 1 tablespoon lime zest - Pinch of salt - Whipped cream for topping (optional) - Lime slices for garnish (optional) While the bars taste great on their own, you can make them even prettier. Consider adding: - Whipped cream: A dollop on top adds creaminess. - Lime slices: Fresh slices enhance the look and flavor. If you need to swap ingredients, here are some easy options: - Graham cracker crumbs: Use crushed cookies or digestive biscuits. - Unsweetened shredded coconut: Omit it if you prefer a plain crust. - Cream cheese: Try mascarpone for a different flavor. - Sweetened condensed milk: Use coconut cream for a dairy-free option. - Key lime juice: Regular lime juice works just as well. These substitutions keep the essence of the bars while allowing for some personal twists. Happy cooking! First, grab a mixing bowl. Add 1 ½ cups of graham cracker crumbs, 1/3 cup of unsweetened shredded coconut, and 1/4 cup of granulated sugar. Then pour in 1/2 cup of melted unsalted butter. Stir this mix until everything is well combined. You want the crumbs to stick together nicely. Next, take an 8x8-inch baking dish and grease it lightly. Press the crumb mixture firmly into the bottom of the dish. Use a measuring cup to pack it down evenly. This step is key for a good base. Once done, put the dish in the fridge while you work on the filling. In a clean mixing bowl, beat 1 package of softened cream cheese with an electric mixer until it's smooth. Gradually add in 1 can of sweetened condensed milk, mixing until well combined. This should create a creamy texture. Now, it’s time to add the fun flavors! Pour in 1/2 cup of fresh key lime juice and add 1 tablespoon of lime zest. Don’t forget a pinch of salt to balance the taste! Mix until the filling is smooth and vibrant in color. Take the chilled crust out of the fridge. Pour the key lime filling over the crust. Use a spatula to spread it evenly. Once the filling is smooth, cover the dish with plastic wrap. Place it back in the fridge for at least 4 hours. This helps the bars set properly. When they are firm, remove the bars from the dish, cut them into squares, and serve. For a special touch, top each bar with whipped cream and a slice of lime. Enjoy this easy and tangy delight! To get the best crust, use fresh graham cracker crumbs. You can crush them easily with a rolling pin. Mix the crumbs with shredded coconut, sugar, and melted butter. Make sure it feels moist but not soggy. When you press it down, pack it tightly. This step helps the crust hold its shape when you cut the bars. Start with softened cream cheese for a smooth filling. If it's too cold, it will be lumpy. Beat it well with an electric mixer until creamy. Gradually add sweetened condensed milk while mixing. This method keeps it from clumping. Lastly, add lime juice and zest slowly. This lets all the flavors blend nicely. The key to a great flavor is the right amount of key lime juice. Use fresh juice for a bright taste. If fresh limes are hard to find, regular lime juice will work too. A pinch of salt helps enhance the flavors. Always taste the mixture before you pour it into the crust. Adjust the lime or sweetness if needed. {{image_2}} To make coconut key lime bars, add unsweetened shredded coconut to the crust. This gives the bars a tropical twist. You can mix in about one-third cup of shredded coconut. This extra flavor makes each bite more exciting. It pairs well with the tartness of the key lime filling. You can also turn these into frozen key lime pie bars. After pouring the filling over the crust, freeze the bars instead of chilling them. Allow them to freeze for about four hours. Once set, cut them into squares. These bars are refreshing on hot days and perfect for summer gatherings. Want to boost the flavor? Consider adding some zest! Mix in more lime zest for a stronger lime taste. You can also add a splash of vanilla extract to the filling. This creates a richer flavor profile. Experiment with these enhancements to discover your favorite version of these bars. To keep your no-bake key lime pie bars fresh, store them in the fridge. Use an airtight container or cover the dish with plastic wrap. This helps maintain their creamy texture and tangy flavor. Aim to chill them for at least four hours before serving. This allows the filling to set properly. You can freeze these bars for longer storage. Cut them into squares before freezing. Wrap each square in plastic wrap. Then, place them in a freezer-safe bag. They freeze well and make for a quick treat. Just remember to let them thaw in the fridge before serving. When stored properly, these bars last up to one week in the fridge. If frozen, they can last up to three months. Always check for any changes in texture or smell before eating. Keeping them well-wrapped helps avoid freezer burn. Enjoy the zesty flavor and creamy texture even after some time! Yes, you can use regular limes. The taste will change a bit. Key limes are smaller, tarter, and have a unique flavor. If you use regular limes, your bars will be less tangy. Still, they will taste great. Just make sure to use fresh juice for the best taste. The bars are set when they are firm to the touch. Chill them for at least four hours. You can check by lightly pressing the top. If it feels solid and not jiggly, they are ready. They should also hold their shape when you cut them. Absolutely! These bars are perfect for making ahead. You can prepare them a day or two in advance. Just keep them covered in the fridge. They will stay fresh and tasty. This makes them a great choice for parties or gatherings. We explored key lime bars from start to finish. You learned about ingredients, step-by-step directions, and tips for success. Variations gave you fun ideas to try, like coconut or frozen bars. Storage tips ensured your treats stay fresh longer. Remember, with a few simple steps, you can enjoy these delicious bars anytime. Don't hesitate to experiment with flavors! Enjoy your baking and the smiles it brings.

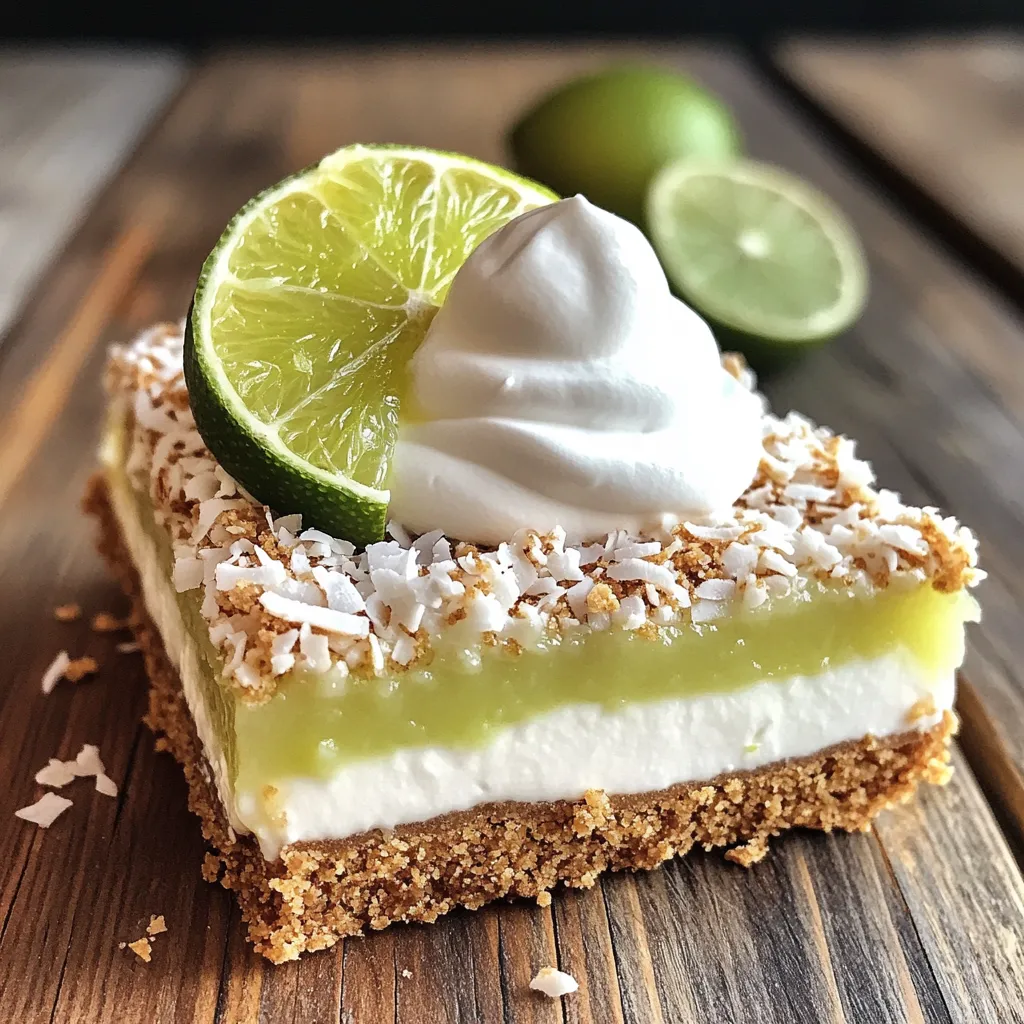
No-Bake Key Lime Pie Bars Easy and Tangy Delight

Get ready to make a treat that shines with zesty delight! My No-Bake Key Lime Pie Bars are easy to

- 4 bone-in, skin-on chicken thighs - 2 cups red grapes, washed and stemmed - 2 tablespoons fresh rosemary, finely chopped - 4 cloves garlic, minced - 3 tablespoons olive oil - 1 tablespoon balsamic vinegar The main ingredients create a tasty balance. Bone-in chicken thighs keep the meat juicy and tender. The skin crisps up nicely in the oven. Red grapes add a sweet touch. They burst with flavor when roasted. Fresh rosemary brings an earthy note. Garlic adds depth to the dish. Olive oil helps the chicken brown well. Balsamic vinegar gives a tangy kick. - Honey for sweetness - Lemon slices - Salt and black pepper Optional ingredients can enhance your dish. Honey adds a nice sweetness. Use it if you love that extra touch. Lemon slices brighten the flavors. They add a zesty layer to the chicken. Salt and black pepper are must-haves for seasoning. A pinch of each can elevate the meal. Feel free to adjust these to your taste. Start by mixing olive oil, minced garlic, chopped rosemary, balsamic vinegar, honey, salt, and pepper in a large bowl. This mix will be your magic marinade. It adds flavor and moisture to the chicken. Take a moment to enjoy the fresh scent of rosemary and garlic. Next, toss the chicken thighs in the marinade. Make sure each piece is well coated. Let the chicken sit for at least 15 minutes. This step is key to getting the best flavor. If you have more time, marinating longer will deepen the taste. Now it’s time to prepare for roasting. Lay the marinated chicken on a large baking sheet, skin-side up. Leave space between each thigh to ensure even cooking. Scatter the washed red grapes around the chicken. Add lemon slices on and around the chicken. The lemon adds a nice zing. Preheat your oven to 425°F (220°C). Roast the chicken and grapes for 30-35 minutes. The chicken should reach an internal temperature of 165°F (75°C). You want the skin to turn golden and crispy. This step gives the dish its delicious texture. Enjoy the wonderful aroma filling your kitchen! When picking chicken, choose bone-in, skin-on thighs. They stay juicy and tender. Look for fresh, plump grapes. Red grapes add sweetness and color to the dish. Check for firmness and bright color. For great flavor, marinate the chicken for at least 15 minutes. If you have time, let it sit for up to 2 hours. The longer it marinates, the better the taste. This helps the chicken soak up all the rosemary and garlic flavors. To get crispy skin, make sure the chicken is skin-side up. Don't crowd the pan; leave space around each thigh. This allows hot air to circulate, making the skin crisp. Keep an eye on the cooking time. Aim for a golden color and an internal temperature of 165°F. {{image_2}} You can switch up the grapes for other fruits. Apples and pears work well. They add a sweet crunch. Cut them into chunks and toss them in with the chicken. This change gives a nice twist to the dish. You might also try figs for a rich flavor. The key is to pick fruits that roast well. Rosemary is great, but you can use other herbs. Thyme is a good choice and adds a lovely taste. Oregano or sage can also work. Each herb brings a unique flavor to the dish. You can mix and match based on what you like. Fresh herbs usually taste best, but dried herbs can work too. If you need a gluten-free meal, this recipe is easy to adapt. All main ingredients are naturally gluten-free. Just check your balsamic vinegar for any hidden gluten. For a low-carb option, skip the honey and use fewer grapes. Adding more veggies can also make it lower in carbs. Try bell peppers or zucchini with the chicken. To keep your sheet-pan rosemary chicken and grapes fresh, follow these tips: - Cool Down: Let the chicken and grapes cool to room temperature. - Use Airtight Containers: Store leftovers in airtight containers. This helps keep them fresh. - Refrigerate Promptly: Place the containers in the fridge within two hours. They will last for 3 to 4 days. - Freezing: If you need to store them longer, freeze the chicken and grapes. Use freezer-safe bags or containers. They can last for up to 3 months. Reheating the dish properly keeps its great taste and texture. Here’s how: - Oven Method: Preheat your oven to 350°F (175°C). Place the chicken and grapes on a baking sheet. Heat for 20 to 25 minutes, or until warm. - Microwave Method: Place on a microwave-safe plate. Heat in short bursts of 1 minute. Check and stir in between. This prevents drying out. - Skillet Method: Heat a skillet over medium heat. Add a splash of water or broth. Place chicken in the skillet. Cover and heat for about 5 minutes. This adds moisture. Pair your sheet-pan rosemary chicken and grapes with these ideas: - Crusty Bread: Serve with warm, crusty bread to soak up juices. - Steamed Vegetables: Add a side of steamed broccoli or green beans for color and nutrients. - Salad: A fresh green salad with a light vinaigrette adds a nice crunch. - Rice or Quinoa: Serve over rice or quinoa for a filling meal. These grains absorb the flavors well. Cooking sheet-pan rosemary chicken takes about 30-35 minutes. The chicken needs to reach an internal temperature of 165°F (75°C). To check this, use a meat thermometer in the thickest part of the thigh. This ensures the chicken is safe to eat and juicy. Yes, you can use boneless chicken thighs. They will cook faster, usually in about 25-30 minutes. The flavor will still be great, but the skin won’t get as crispy. Try to choose thighs with some fat to keep them juicy. Sheet-pan rosemary chicken pairs well with many sides. Here are some tasty ideas: - Steamed vegetables: Broccoli or green beans add color and nutrition. - Crusty bread: Perfect for soaking up those tasty juices. - Rice or quinoa: These grains complement the dish and add heartiness. - Salad: A fresh green salad with vinaigrette balances the meal. These sides will enhance your meal and make it even better! This blog post guides you to make a tasty sheet-pan rosemary chicken. You learned about key ingredients like chicken thighs, grapes, and rosemary. I shared step-by-step instructions to help you prepare and roast the dish. Tips on selecting quality ingredients and achieving crispy skin will elevate your cooking. You can also explore variations and storage options to enjoy your meal later. Remember, cooking can be fun and rewarding. With these tips, you can impress your family and friends with a delicious dish. Enjoy your cooking adventure!

Sheet-Pan Rosemary Chicken and Grapes Flavor Boost

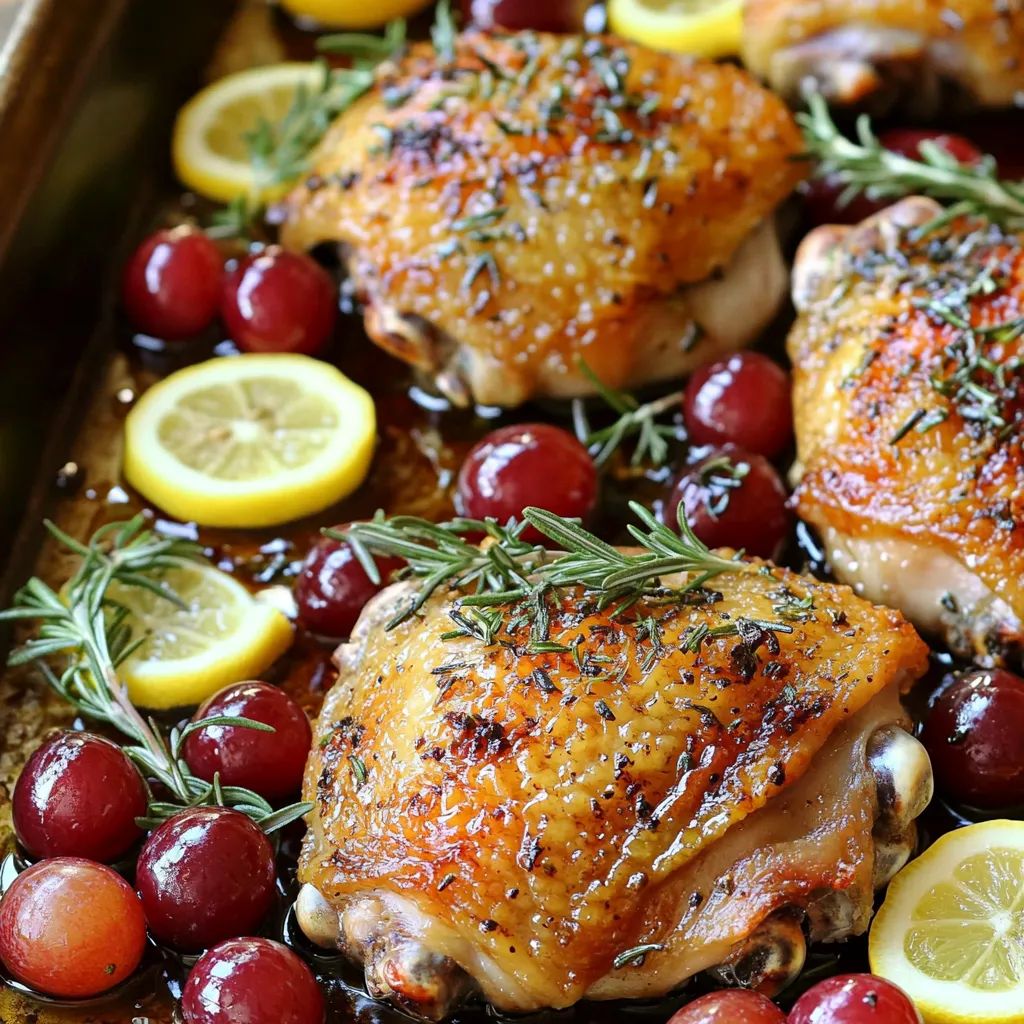
Are you ready to elevate your dinner game? In this blog post, I’ll show you how to make a delicious

- 1 pound beef sirloin, thinly sliced - 3 tablespoons soy sauce - 2 tablespoons brown sugar - 1 tablespoon sesame oil - 2 cloves garlic, minced - 1 teaspoon grated ginger - 1 tablespoon rice vinegar The star of this dish is the beef sirloin. It cooks fast and stays juicy. The soy sauce acts as a base, adding deep flavor. The brown sugar brings a touch of sweetness. Sesame oil gives a rich taste. Garlic and ginger add a nice aroma. Rice vinegar adds a bit of tang. - 2 green onions, chopped - 1 cup shredded carrots - 1 cup steamed broccoli florets Green onions are great for garnish and add flavor. Shredded carrots bring some crunch. Steamed broccoli boosts the nutrition while adding color. - 2 cups cooked jasmine rice - Cooking method options: minute rice or jasmine rice Jasmine rice is the perfect grain for this dish. You can use minute rice for speed or traditional jasmine rice for more flavor. Both options work well. To make the marinade, mix these in a bowl: - 3 tablespoons soy sauce - 2 tablespoons brown sugar - 1 tablespoon sesame oil - 2 cloves garlic, minced - 1 teaspoon grated ginger - 1 tablespoon rice vinegar Stir well until the sugar dissolves. Add the thinly sliced beef to the marinade. Make sure every piece is coated. Let it marinate for at least 15 minutes. This step adds lots of flavor. Heat a large skillet or wok on medium-high heat. Once hot, add the marinated beef. Cook for about 3-4 minutes. Stir often to ensure even browning. You want the beef cooked through but still tender. When done, remove the skillet from the heat. Stir in 2 chopped green onions for a fresh touch. Grab your serving bowls. Start by adding a generous scoop of jasmine rice to each one. Then, top the rice with the cooked beef. Add shredded carrots and steamed broccoli on top. For a final touch, sprinkle sesame seeds over the bowls. This adds a nice crunch and looks great too. Serve the bowls immediately for the best taste and texture. For the best flavor, marinate the beef for at least 15 minutes. This time allows the sauce to soak in well. If you're in a hurry, try marinating for just 5 minutes. Even a short time can add great taste. To get the best texture, cook the beef over high heat. This helps it brown nicely. Keep a close eye on it. Cook for about 3-4 minutes. Overcooking will make the beef tough. Remove it from heat as soon as it’s browned. Pair your rice bowl with fresh veggies like steamed broccoli and shredded carrots. For a pop of color, add some green onions on top. A sprinkle of sesame seeds makes it look fancy and appealing. Use a wide bowl for a beautiful presentation! {{image_2}} You can use chicken or tofu in this dish. For chicken, slice it thinly like the beef. Use the same marinade and cook it for about 5 minutes. If you choose tofu, opt for firm or extra-firm varieties. Press it to remove extra water, then cube it. Marinate just like the beef. Cook it until golden brown, about 3-4 minutes. For a vegetarian option, try using mushrooms or tempeh. Both have great texture and soak up flavors well. This way, you can enjoy the same taste while keeping it meat-free. Adjust the sweetness and spice to fit your taste. If you like it sweeter, add more brown sugar. For spice, try adding a splash of sriracha or red pepper flakes. If you need an alternative to soy sauce, consider coconut aminos. It’s lower in sodium and gluten-free. Another option is tamari, which is also gluten-free. This allows more people to enjoy your dish without dietary concerns. Feel free to mix up the veggies in your bowl. You can add bell peppers, snap peas, or zucchini. These add color and crunch. If you want something seasonal, try asparagus in spring or sweet corn in summer. Swap out the steamed broccoli for fresh spinach or kale. These greens add a nice touch and boost nutrition. Using a variety of vegetables keeps the dish fresh and exciting. To keep your Minute Korean BBQ Beef Rice Bowls fresh, follow these steps: - Refrigeration: Place leftovers in a sealed container. Store in the fridge for up to 3 days. This keeps the beef and veggies safe to eat. - Freezing Tips: If you want to save your meal longer, freeze it. Use freezer-safe bags or containers. Make sure to remove as much air as possible. You can freeze for up to 2 months. This helps preserve the taste and texture. When you are ready to enjoy your leftovers, here’s how to reheat them: - Best Methods: Use a microwave or stovetop to reheat. Both methods keep the flavor and texture good. If using a microwave, cover the bowl with a lid or a microwave-safe wrap. This keeps moisture in. - Time and Temperature: Heat in 1-minute intervals. Stir in between to ensure even heating. Aim for an internal temperature of 165°F. This ensures your meal is safe and warm. Minute Rice is a brand of instant rice. It cooks quickly, usually in about 5 minutes. You just add boiling water, cover it, and let it sit. This rice has a soft texture and works well in many dishes, like our Korean BBQ Beef Rice Bowls. Yes, you can use different cuts of beef. Some good options are flank steak or ribeye. These cuts are tender and flavorful. You can also use ground beef for a quicker option. Just be sure to adjust the cooking time if you choose a different cut. To make these rice bowls gluten-free, use gluten-free soy sauce. Look for tamari sauce as a great substitute. You can also check for gluten-free rice vinegar. Always read labels to ensure all products meet your needs. This way, you can enjoy the flavors without worry. This blog post covers how to make a tasty beef bowl. You learned about key ingredients like beef sirloin, soy sauce, and jasmine rice. We discussed marinating the beef for maximum flavor and assembling delicious bowls with veggies. You can also adapt the recipe with different proteins and sauces. Remember, proper storage is key to leftovers. Use these tips to impress at the dinner table. Enjoy making this dish, and feel free to be creative with your ingredients!

Minute Korean BBQ Beef Rice Bowls Flavorful and Quick

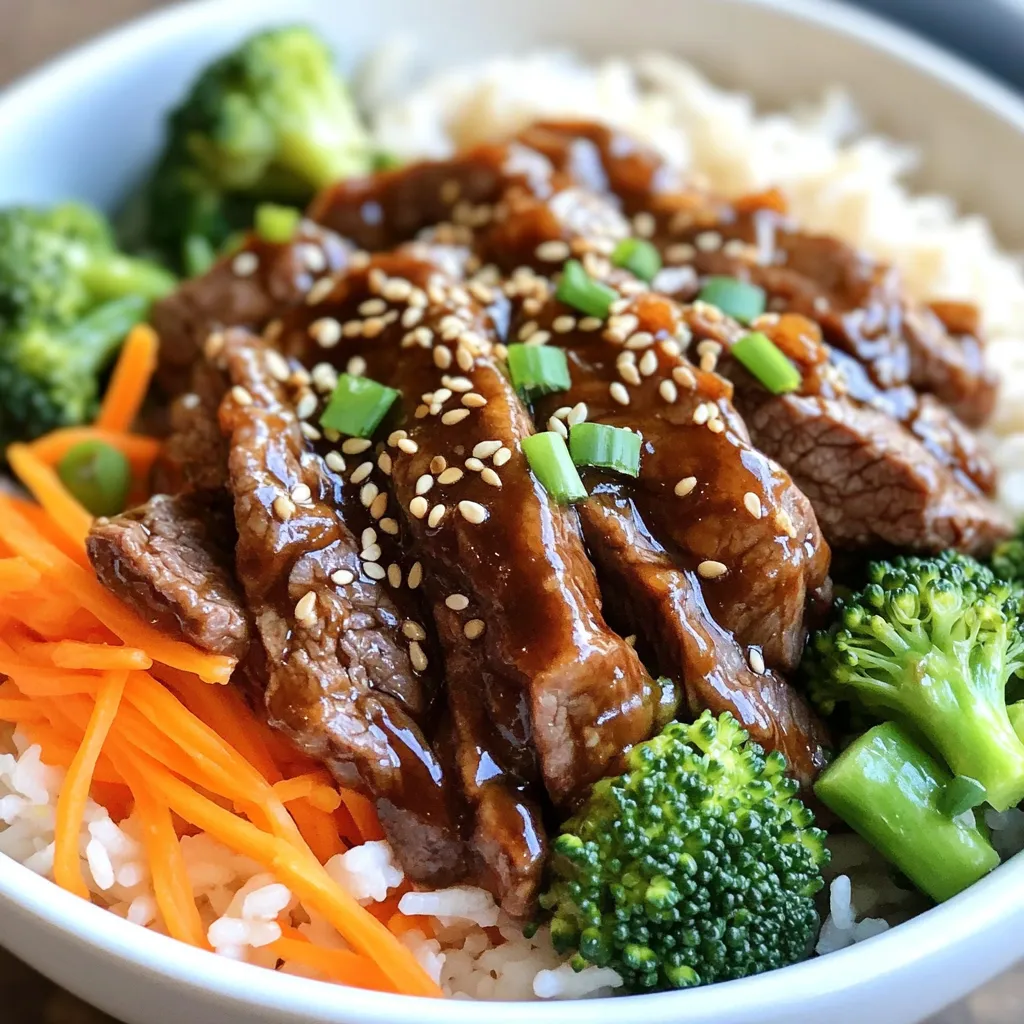
Craving a quick, tasty meal? These Minute Korean BBQ Beef Rice Bowls are your answer! With juicy beef sirloin, rich

For this delicious One-Pan Creamy Spinach Artichoke Ravioli Bake, gather these key ingredients: - 12 oz fresh or frozen cheese ravioli - 1 cup fresh spinach, chopped - 1 cup canned artichoke hearts, drained and roughly chopped - 1 cup ricotta cheese - 1 cup mozzarella cheese, shredded - ½ cup Parmesan cheese, grated - 2 cups marinara sauce - 1 teaspoon garlic powder - ½ teaspoon onion powder - Salt and pepper to taste To add a fresh touch, consider these optional garnishes: - Fresh basil leaves These will enhance the dish's flavor and look great on the table. When buying ingredients, here are some helpful tips: - Ravioli: Look for fresh or frozen cheese ravioli at your local grocery store. Check the freezer section if fresh isn't available. - Spinach: Fresh spinach is best. If using frozen, ensure it's thawed and drained before adding. - Artichoke hearts: Canned artichokes are easy to find. Choose ones packed in water for less sodium. - Cheeses: Go for whole-fat ricotta, mozzarella, and Parmesan for the creamiest texture. - Marinara sauce: Choose a brand with natural ingredients, or make your own for richer flavors. These tips will help you select the best ingredients for your creamy bake. Enjoy the process! First, set your oven to 375°F (190°C). This is the perfect heat for baking. Next, grab a large oven-safe skillet. This will help all the flavors mix well. Now, pour the marinara sauce into the skillet. Heat it over medium heat. Add in the chopped spinach and artichokes. Then, sprinkle in the garlic powder, onion powder, salt, and pepper. Stir everything for about 2-3 minutes. You want the spinach to wilt a bit. Once that is done, gently fold in the ravioli. Make sure each piece is coated with the sauce. In a bowl, mix together the ricotta, half of the mozzarella, and half of the Parmesan cheese. Spoon dollops of this cheese mix evenly over the ravioli. This adds a creamy touch to your dish. Finally, sprinkle the rest of the mozzarella and Parmesan on top. Cover the skillet with a lid or aluminum foil. Place it in the oven and bake for 20 minutes. After that, take off the lid or foil. Bake for another 10-15 minutes until the cheese turns golden and bubbly. Be careful when you take it out! Let it sit for a couple of minutes to cool before serving. To make perfect ravioli, start with fresh or high-quality frozen ones. Cook the ravioli gently to avoid breaking them. Boil them in salted water for about 4-5 minutes. Test a piece to see if it’s firm yet soft. Drain them carefully. Add them straight to your sauce for the best flavor. Stir gently to coat without breaking. If you don't have ricotta cheese, try cottage cheese. Blend it until smooth for a similar texture. You can also mix cream cheese with a little milk. For mozzarella, use provolone or gouda for a different taste. If you’re lactose intolerant, look for dairy-free cheese options. These can work well in this dish too. One common mistake is overcooking the ravioli. This makes them mushy. Always check them a minute before the time is up. Another mistake is not seasoning the sauce enough. Taste it before you add the ravioli. Lastly, don’t skip the baking step. This melds the flavors and creates a nice golden crust. Enjoy the process and have fun! {{image_2}} This dish is already vegetarian, but you can enhance it. Add more veggies, like bell peppers or mushrooms. You can also use different types of cheese. Try goat cheese for a tangy twist. Fresh herbs like parsley or thyme can add a lovely flavor. For a gluten-free option, use gluten-free ravioli. Many stores offer these now. You can also make your own from scratch using gluten-free flour. Ensure your marinara sauce is gluten-free too. Check labels to avoid hidden gluten. Want to add protein? Cooked chicken, shrimp, or sausage work well. Just mix them in when you add the ravioli. You can also throw in other vegetables, like zucchini or kale. They add color and nutrients to your bake. To keep your One-Pan Creamy Spinach Artichoke Ravioli Bake fresh, store leftovers in an airtight container. Place it in the fridge within two hours of cooking. It will last for 3 to 4 days. When you’re ready to eat, check for any off smells or changes in texture. You can freeze this dish if you want to save some for later. Wait until the dish cools completely. Cut it into portions and wrap each piece in plastic wrap. Then, place the wrapped pieces in a freezer-safe bag. This can last up to 3 months in the freezer. Just remember to label the bag with the date. To reheat, you can use the oven or microwave. If using the oven, preheat it to 350°F (175°C). Place the ravioli bake in an oven-safe dish. Cover it with foil to keep it moist. Heat for about 20-25 minutes or until warm. If using a microwave, heat in short bursts, stirring in between. Make sure it’s hot all the way through before serving. Enjoy your meal! Yes, you can use frozen ravioli. Just make sure to add a few extra minutes to the cooking time. This helps them cook through nicely. Frozen ravioli is convenient and still tastes great. Just follow the same steps in the recipe, and you will enjoy a delicious meal. To make this dish healthier, try these tips: - Use whole wheat ravioli for extra fiber. - Add more fresh veggies like bell peppers or zucchini. - Swap out ricotta cheese for low-fat cottage cheese. - Use less cheese overall or choose reduced-fat cheese. These changes keep the flavors while making it lighter and more nutritious. If you need a substitute for ricotta cheese, try one of these: - Cottage cheese works well and gives a similar texture. - Cream cheese mixed with a bit of milk can also work. - Silken tofu is a great vegan option for a creamy texture. These options will keep your dish creamy and delicious. This blog post covered how to make ravioli from start to finish. We explored the key ingredients, step-by-step cooking instructions, and tips to get it just right. You learned about fun variations like vegetarian and gluten-free options. We also discussed storage tips for leftovers. Now, you have the tools to create a delicious dish. Enjoy experimenting with flavors. Remember, cooking is about having fun, so dive in and make it yours!

One-Pan Creamy Spinach Artichoke Ravioli Bake Delight

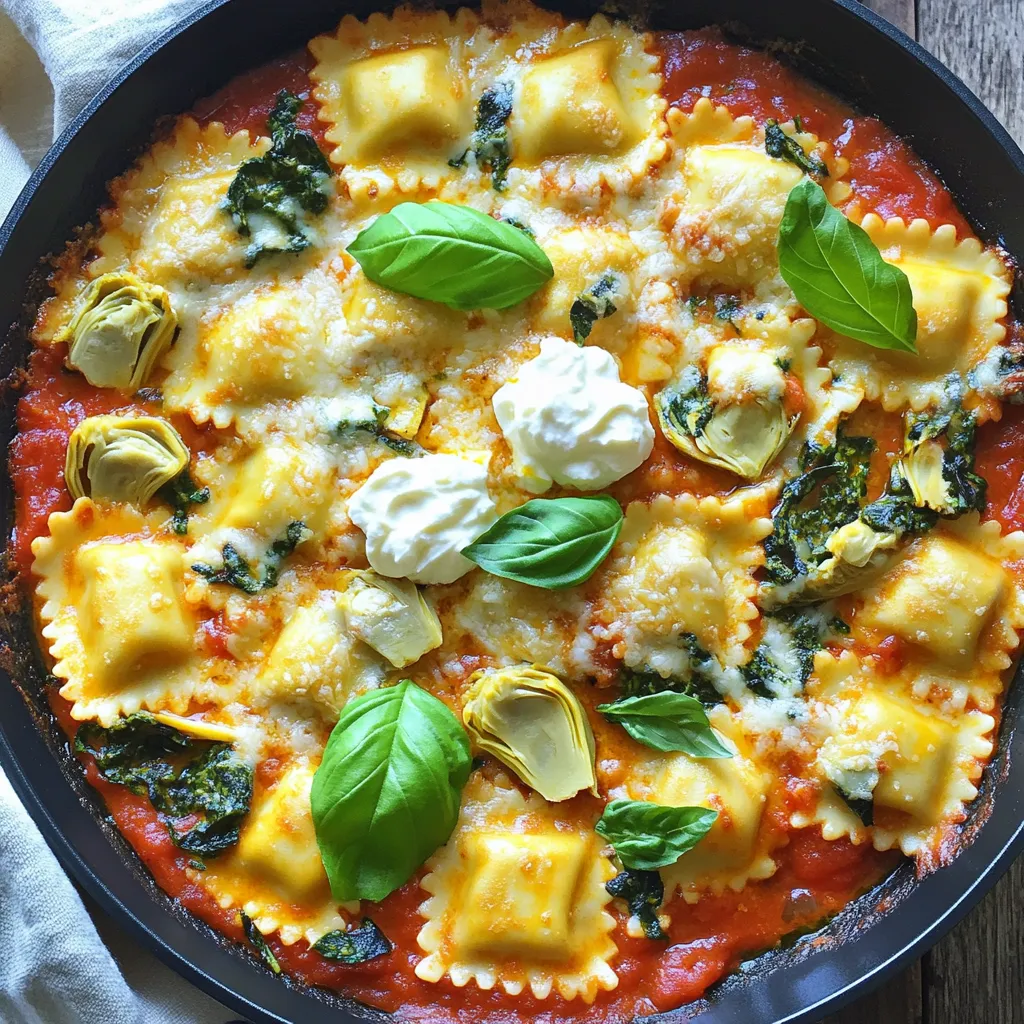
If you’re craving a creamy, cheesy meal that’s easy to make, you’re in the right place! My One-Pan Creamy Spinach

- 1 cup orzo pasta - 2 cups broccoli florets - 1 tablespoon olive oil - 3 cloves garlic, minced - 2 cups vegetable broth - 1 cup heavy cream - 1 cup grated Parmesan cheese - 1 teaspoon Italian seasoning - Salt and pepper to taste - Fresh parsley, chopped (for garnish) To make this One-Pot Creamy Broccoli Alfredo Orzo, gather your ingredients first. You need orzo pasta, which cooks quickly and has a lovely, chewy texture. Broccoli florets add color and nutrition. The olive oil gives flavor and helps cook the garlic. Minced garlic adds a warm aroma and taste. For the sauce, you'll use vegetable broth and heavy cream. The broth adds depth, while the cream makes it rich. Grated Parmesan cheese brings a salty, nutty taste. Italian seasoning adds herbs that enhance the dish. Finally, you need salt and pepper for seasoning. Fresh parsley is perfect for garnishing and adding a pop of color. This combination will create a creamy, dreamy dish that you can enjoy with family or friends. Prepare to have a delightful meal ready in no time! - Step 1: Sautéing garlic and toasting orzo Start by heating 1 tablespoon of olive oil in a large pot over medium heat. Add 3 minced garlic cloves. Sauté them for about 1 minute. You want the garlic to smell great but not burn. Next, stir in 1 cup of orzo pasta. Cook it for 2 minutes while stirring often. This toasts the orzo, adding a nice flavor. - Step 2: Adding broccoli and vegetable broth Now, pour in 2 cups of vegetable broth. Toss in 2 cups of broccoli florets. Bring the pot to a boil. Once boiling, lower the heat to a simmer. Cover the pot and let it cook for 10 to 12 minutes. The orzo should be tender and soak up most of the liquid. - Step 3: Cooking until tender and creamy After the orzo and broccoli cook, stir in 1 cup of heavy cream and 1 cup of grated Parmesan cheese. Add 1 teaspoon of Italian seasoning, salt, and pepper to taste. Mix everything well until the cheese melts. The sauce should be creamy. If it’s too thick, add a splash of vegetable broth or water. Let it sit for a few minutes to thicken. This dish is ready to serve! - How to avoid overcooking broccoli To keep broccoli bright and crisp, add it at the same time as the orzo. Cooking it with the pasta helps it stay crunchy. Cook for about 10-12 minutes until tender but not mushy. - Best practices for creamy sauce consistency For a rich and creamy sauce, add heavy cream gradually. Mix it well with the melted cheese. If the sauce is too thick, add a splash of vegetable broth or water. This keeps your dish smooth and dreamy. - Adjusting flavors with seasoning Taste your dish as you cook. You can always add more salt, pepper, or Italian seasoning. Start with a little, then build up to your perfect flavor. A pinch of nutmeg can also add warmth. - Ideal accompaniments for the dish This dish pairs well with garlic bread or a fresh salad. A simple green salad adds crunch and freshness. If you like protein, grilled chicken or shrimp complements the flavors nicely. - Plating tips for presentation Serve in wide bowls for a nice view of the creamy orzo and broccoli. Sprinkle fresh parsley on top for color. A little extra Parmesan cheese adds a gourmet touch. Make your dish look as good as it tastes! {{image_2}} You can customize this recipe easily. First, try using different vegetables. Instead of broccoli, use peas, spinach, or bell peppers. Each vegetable brings a unique flavor. Mix and match for fun. If you want a dairy-free creamy sauce, swap heavy cream with coconut milk or cashew cream. Both options add creaminess. They also give a nice taste. Nutritional yeast can replace Parmesan cheese for a cheesy flavor without dairy. To make your dish heartier, add proteins like chicken or shrimp. Cook them separately and mix them in at the end. This adds a satisfying bite and more nutrition. You can also experiment with spices and herbs. Try adding red pepper flakes for heat or basil for freshness. A sprinkle of lemon juice before serving can brighten the flavors. These simple changes can transform your dish into something new and exciting. To store leftovers, place the creamy broccoli Alfredo orzo in an airtight container. Make sure to let it cool first to avoid steam build-up. You can keep it in the fridge for up to three days. If you want to save it for longer, freezing is a great option. Just scoop single servings into freezer-safe bags or containers. Remove as much air as you can before sealing. For long-term storage, the orzo will stay fresh in the freezer for about three months. Label the bags with the date. This helps you keep track of how long it’s been stored. When you’re ready to eat it, you can thaw it in the fridge overnight or use the microwave. Reheating creamy broccoli Alfredo orzo can be easy if you follow the right methods. The best way is to use the stove. Pour the orzo into a pot. Add a little vegetable broth or water to keep it moist. Heat it over low to medium heat, stirring often. This way, it stays creamy and doesn’t dry out. Another method is using the microwave. Place the orzo in a microwave-safe bowl. Add a splash of liquid and cover it loosely. Heat in short bursts of 30 seconds, stirring in between. This helps it heat evenly. Enjoy your delicious meal again without losing its texture! Can I use another type of pasta? Yes, you can use other pasta shapes. Choose small ones like penne or shells. Just adjust the cooking time based on the pasta you choose. How do I make it vegan? To make this dish vegan, swap the heavy cream for coconut cream or cashew cream. Use nutritional yeast instead of Parmesan for a cheesy flavor. What can I do if I don't have heavy cream? If you lack heavy cream, use whole milk or a mix of milk and cornstarch. This keeps the dish creamy while lightening it up. How long does it take to cook orzo? Orzo cooks in about 10-12 minutes. Keep an eye on it to avoid overcooking. Can I prepare this recipe in advance? Yes, you can make this dish ahead of time. Store it in the fridge for up to three days. Reheat it gently on the stove. Add a splash of broth to restore creaminess. This dish combines orzo, broccoli, and a creamy sauce for a tasty meal. I shared step-by-step instructions to make cooking simple. You learned helpful tips to avoid overcooking and how to enhance flavors. Consider trying different vegetables or proteins for variety. Don't forget to store leftovers well and reheat them carefully. Enjoy experimenting with this recipe to make it your own. Happy cooking!

One-Pot Creamy Broccoli Alfredo Orzo Delight

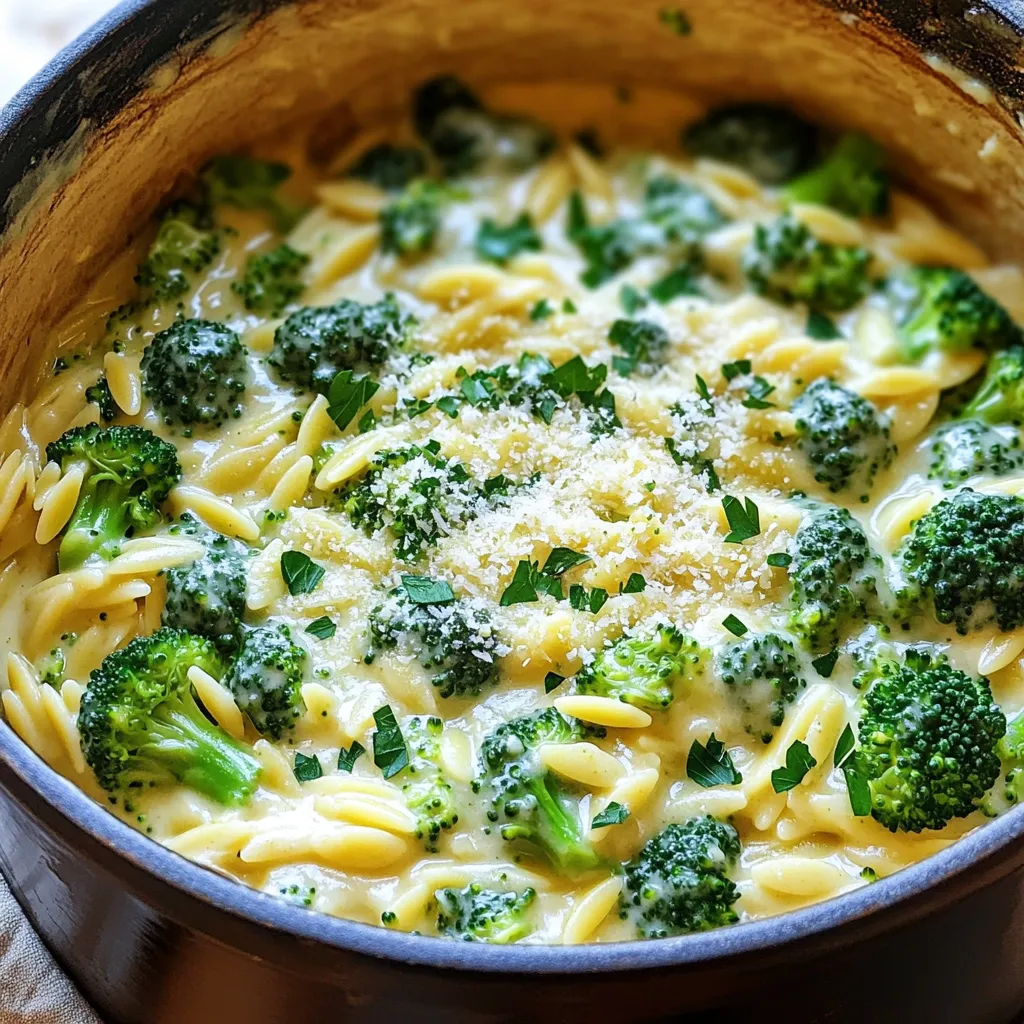
Welcome to One-Pot Creamy Broccoli Alfredo Orzo Delight! If you love quick, tasty meals, this dish is perfect for you.

- 1 ½ cups graham cracker crumbs - ½ cup unsalted butter, melted - ½ cup hazelnut spread - 16 oz cream cheese, softened - ½ cup powdered sugar - 1 teaspoon vanilla extract - 1 cup heavy whipping cream - ½ cup chopped hazelnuts - 2 ounces dark chocolate, grated The ingredients for No-Bake Chocolate Hazelnut Cheesecake Bars are simple and fun. The crust starts with graham cracker crumbs mixed with melted butter. This forms a tasty base for our cheesecake. Next, the filling combines cream cheese, hazelnut spread, powdered sugar, and vanilla. This mix creates a rich and creamy texture. For the topping, we whip heavy cream until soft peaks form. This lightens the filling and adds a fluffy texture. Chopped hazelnuts give a nice crunch on top. Finally, grated dark chocolate adds a touch of elegance and flavor. When you gather these ingredients, you set the stage for a treat that is both easy and delicious. Don’t forget to chill the bars for the best results. - In a medium bowl, mix 1 ½ cups of graham cracker crumbs with ½ cup of melted butter. - Press the mixture evenly into a 9x9-inch baking pan. - Chill the crust in the refrigerator for about 15 minutes. This helps it firm up. - In a large mixing bowl, beat 16 ounces of softened cream cheese until smooth. - Add ½ cup of powdered sugar, ½ cup of hazelnut spread, and 1 teaspoon of vanilla extract. Mix until creamy. - In a separate bowl, whip 1 cup of heavy cream until soft peaks form. - Gently fold the whipped cream into the cream cheese mixture. This step makes the filling light and fluffy. - Spread the cheesecake filling evenly over the chilled graham cracker crust. Use a spatula to smooth the top. - Sprinkle ½ cup of chopped hazelnuts over the cheesecake layer. Press them slightly into the filling. - Cover the pan with plastic wrap and refrigerate for at least 4 hours. For the best taste, chill overnight. This allows the bars to set. To get a smooth cheesecake filling, start with softened cream cheese. This helps it blend well. Beat it until it is fluffy with no lumps. Add the hazelnut spread and sugar slowly. This makes sure they mix in evenly. Folding whipped cream correctly is key. Once you whip it to soft peaks, use a spatula. Gently fold it into the cream cheese mixture. This keeps your filling light and airy. Avoid stirring too hard, as this can deflate the cream. If you want to prepare these bars in advance, it’s easy! You can make the crust and the filling a day ahead. Just chill the bars overnight for the best flavor and texture. For optimal chilling, aim for at least four hours. This gives the cheesecake time to set properly. If you can wait overnight, you’ll get a firmer, better slice. For garnishing, sprinkle chopped hazelnuts on top after spreading the filling. You can also add grated dark chocolate for extra flair. This makes the bars look pretty and tasty. Pair these bars with coffee or a glass of milk. The rich flavors complement each other well. You can also serve them with fresh berries for a bright touch. {{image_2}} You can switch up the flavor of your cheesecake bars in fun ways. Try using different nut spreads like almond or peanut butter. Each spread brings a unique taste to the bars. You can also add coffee or caramel for a rich twist. Just mix these extras into the cream cheese filling. They will enhance the flavor in a delightful way. If you need to make dietary changes, you have options. For a gluten-free crust, use crushed gluten-free cookies instead of graham crackers. This keeps the base tasty and safe. You can also find vegan cream cheese at many stores. This allows you to create a vegan version of these bars without losing the creamy texture. Toppings can make your bars even better. Fresh fruits like sliced strawberries or raspberries add a nice touch. They bring brightness and flavor to each bite. You can also try different types of chocolate. White chocolate or milk chocolate can add sweetness. Sprinkle these over the cheesecake or mix them into the filling for more fun flavors. To store leftover cheesecake bars, first, cover them with plastic wrap. This keeps them fresh and prevents them from drying out. You can also place them in an airtight container. A glass or plastic container works well. Make sure it is sealed tightly. If you want to freeze the cheesecake bars, first cut them into squares. Wrap each piece in plastic wrap. Then, place them in a freezer bag or container. This keeps them safe from freezer burn. When ready to eat, take them out and let them thaw in the fridge for a few hours. You can serve them cold or let them sit at room temperature for a bit. In the refrigerator, these bars last about 5 days. Look for signs of spoilage like a change in smell or color. If the bars feel slimy or have mold, it’s best to throw them away. Always check before eating! Yes, you can use low-fat cream cheese. It will change the texture and flavor. The bars may be less creamy and rich. Low-fat options can also be a bit grainy. For the best taste, full-fat cream cheese works best. However, if you want to cut calories, low-fat is still a fine choice. I recommend chilling these bars for at least 4 hours. For the best results, overnight chilling is ideal. This gives the cheesecake time to set properly. The longer they chill, the firmer they will be. Make sure to cover them well with plastic wrap to keep them fresh. Yes, you can make these bars without hazelnuts. You can use other nuts like almonds or pecans. If you want a different flavor, try using peanut butter or almond butter. You could also add a fruit topping like strawberries or bananas. Be creative and enjoy! You now have all the tools to make delicious hazelnut cheesecake bars. We covered the key ingredients, from the crunchy crust to the creamy filling. The step-by-step guide ensures your bars turn out great every time. Remember, achieving the right texture is vital, and planning ahead can save you time. Feel free to explore flavor variations and toppings to suit your taste. With proper storage, your bars will stay fresh for longer. Enjoy your tasty creation and share it with others!

No-Bake Chocolate Hazelnut Cheesecake Bars Delight

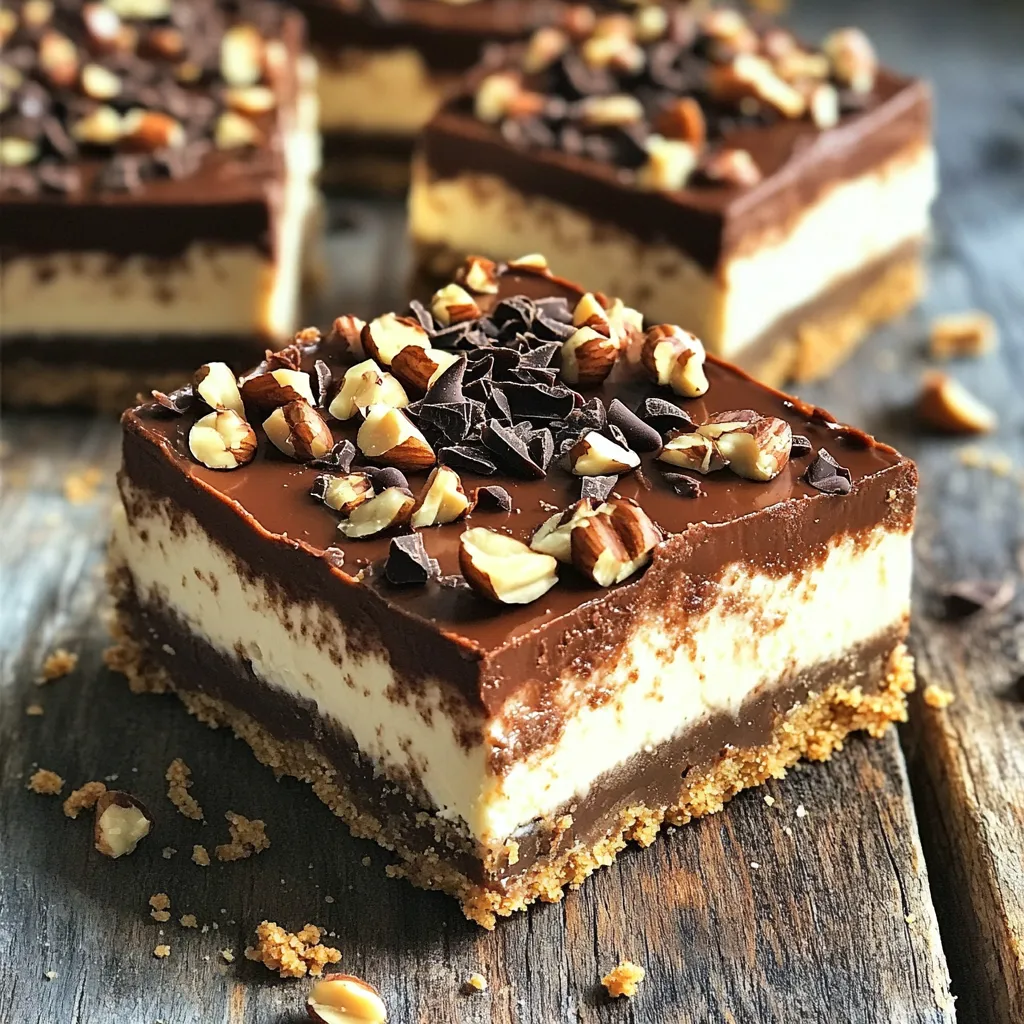
Are you ready for a dessert that’s easy and oh-so-delicious? No-Bake Chocolate Hazelnut Cheesecake Bars blend rich chocolate and creamy

- 1 cup unsweetened almond milk - 1/2 cup pure pumpkin puree - 1/4 cup chia seeds - 2 tablespoons maple syrup - 1 teaspoon vanilla extract - 1 teaspoon pumpkin pie spice - 1/4 teaspoon salt - Optional toppings: Greek yogurt, crushed walnuts, and a sprinkle of cinnamon To make high-protein pumpkin pie chia pudding, gather these simple ingredients. Each one plays a key role in the flavor and texture of the dish. Unsweetened almond milk gives a creamy base without added sugar. Pure pumpkin puree adds rich flavor and nutrition. Chia seeds are essential for thickening and they boost protein. Maple syrup sweetens the pudding naturally. Vanilla extract adds warmth, while pumpkin pie spice brings that cozy, seasonal essence. Finally, a pinch of salt enhances all the flavors. You can top your pudding with Greek yogurt for extra protein, crushed walnuts for crunch, and a sprinkle of cinnamon for an extra touch. Enjoy the process of gathering these ingredients. Each one helps create a delightful dessert that is both tasty and filling. 1. Combine almond milk, pumpkin puree, and vanilla extract. In a medium bowl, add 1 cup of unsweetened almond milk, 1/2 cup of pure pumpkin puree, and 1 teaspoon of vanilla extract. Whisk until it is smooth. 2. Mix in chia seeds, maple syrup, pumpkin pie spice, and salt. Next, add 1/4 cup of chia seeds, 2 tablespoons of maple syrup, 1 teaspoon of pumpkin pie spice, and 1/4 teaspoon of salt. Stir well to mix all the ingredients. 3. Rest and stir the mixture. Let this mixture sit for about 5 minutes. After that, stir again to keep the chia seeds from settling at the bottom. 1. Cover and refrigerate the pudding. Once mixed, cover the bowl. Place it in the fridge for at least 2 hours or overnight. This time allows the chia seeds to absorb liquid. 2. Highlighting waiting time for thickening. As it chills, the pudding will thicken. The longer it sits, the creamier it becomes. 1. Stir and adjust consistency if necessary. When ready to serve, remove the pudding from the fridge. Give it a good stir. If it’s too thick, add a splash of almond milk to reach your preferred texture. 2. Tips for presentation. Serve the pudding in individual cups or bowls. Top each serving with a dollop of Greek yogurt, a sprinkle of crushed walnuts, and a dusting of cinnamon. This adds a festive touch and makes it look great! - Ensuring proper mixing: Start by mixing the almond milk and pumpkin puree well. Use a whisk to blend until smooth. This step is key, as it helps the chia seeds soak up the flavors evenly. - Avoiding clumping of chia seeds: After adding chia seeds, stir the mixture thoroughly. Allow it to sit for five minutes, then stir again. This helps prevent chia seeds from clumping together. - Modifying maple syrup to taste: I recommend starting with two tablespoons of maple syrup. After mixing, taste the pudding. You can always add more if you like it sweeter. - Alternatives for natural sweeteners: If you want alternatives, consider using honey or agave syrup. You can also try mashed bananas for a fruity twist. - Nutritional information for chia seeds: Chia seeds are packed with protein, fiber, and omega-3 fatty acids. Just two tablespoons have around 140 calories, 5 grams of protein, and 10 grams of fiber. - Nutritional information for pumpkin: Pumpkin is low in calories and high in vitamins. One half-cup of pumpkin puree has about 40 calories, 2 grams of protein, and is rich in vitamin A. These ingredients make your chia pudding not only tasty but also healthy! {{image_2}} You can make this chia pudding even more fun. Want to add chocolate? Just mix in cocoa powder. Start with one tablespoon and adjust to your taste. You can also switch the almond milk for other plant-based milks. Oat milk gives it a creamy texture, while coconut milk adds a nice flavor. To pump up the protein, try adding protein powder. Vanilla or chocolate flavors work well. Just mix in a scoop with the other ingredients. For toppings, Greek yogurt is a great choice. It adds creaminess and more protein. You can also add nuts or seeds for a crunchy texture. This pudding shines during the holidays. You can add extra spices like nutmeg or cloves to make it festive. In summer, fresh fruits are a perfect addition. Try berries or sliced bananas for a refreshing twist. These variations keep your chia pudding exciting throughout the year! To store leftover chia pudding, transfer it to a clean, airtight container. Make sure to seal it tightly. This keeps it fresh and prevents odors from your fridge. You should refrigerate it right away. The ideal refrigeration time is up to five days. The pudding stays fresh for about five days in the fridge. After this time, it may lose its taste and texture. Signs of spoilage to watch for include a sour smell or a watery layer on top. If you see mold, toss it out immediately. You can freeze the pudding for longer storage. To do this, pour it into freezer-safe containers. Leave some space at the top since it will expand when frozen. Thawing is simple: just move it to the fridge overnight. Stir it well before serving to restore its creamy texture. What can I use instead of chia seeds? You can use flaxseeds as a great alternative. Ground flaxseeds work well. Can I use sweetened almond milk? Yes, sweetened almond milk is fine. Just adjust the maple syrup to taste. How long does the pudding keep in the fridge? This pudding lasts up to five days in the fridge. Store it in a sealed container. Can I use fresh pumpkin instead of canned puree? Absolutely! Just cook and puree the fresh pumpkin until smooth. Is this recipe vegan-friendly? Yes, this recipe is vegan-friendly. All the ingredients are plant-based. How high is the protein content in this pudding? This pudding has about 8 grams of protein per serving. Chia seeds add a good amount. What are the health benefits of chia seeds and pumpkin? Chia seeds are high in fiber and omega-3s. Pumpkin is rich in vitamins and antioxidants. Can I prepare this without refrigeration? Yes, but chilling helps the pudding thicken. It’s best to refrigerate for at least two hours. Is it possible to make this gluten-free? This recipe is already gluten-free. All ingredients are safe for gluten-free diets. You can make a tasty chia pudding with simple ingredients like almond milk and pumpkin. In this blog, we covered how to prepare, flavor, and store it. The pudding is rich in nutrients and easy to tweak to your taste. Remember, patience is key while it thickens in the fridge. Enjoy it as a healthy treat or a seasonal delight! Now, go ahead and create your own delicious version. You'll love the taste and the health benefits it brings!

High-Protein Pumpkin Pie Chia Pudding Delight

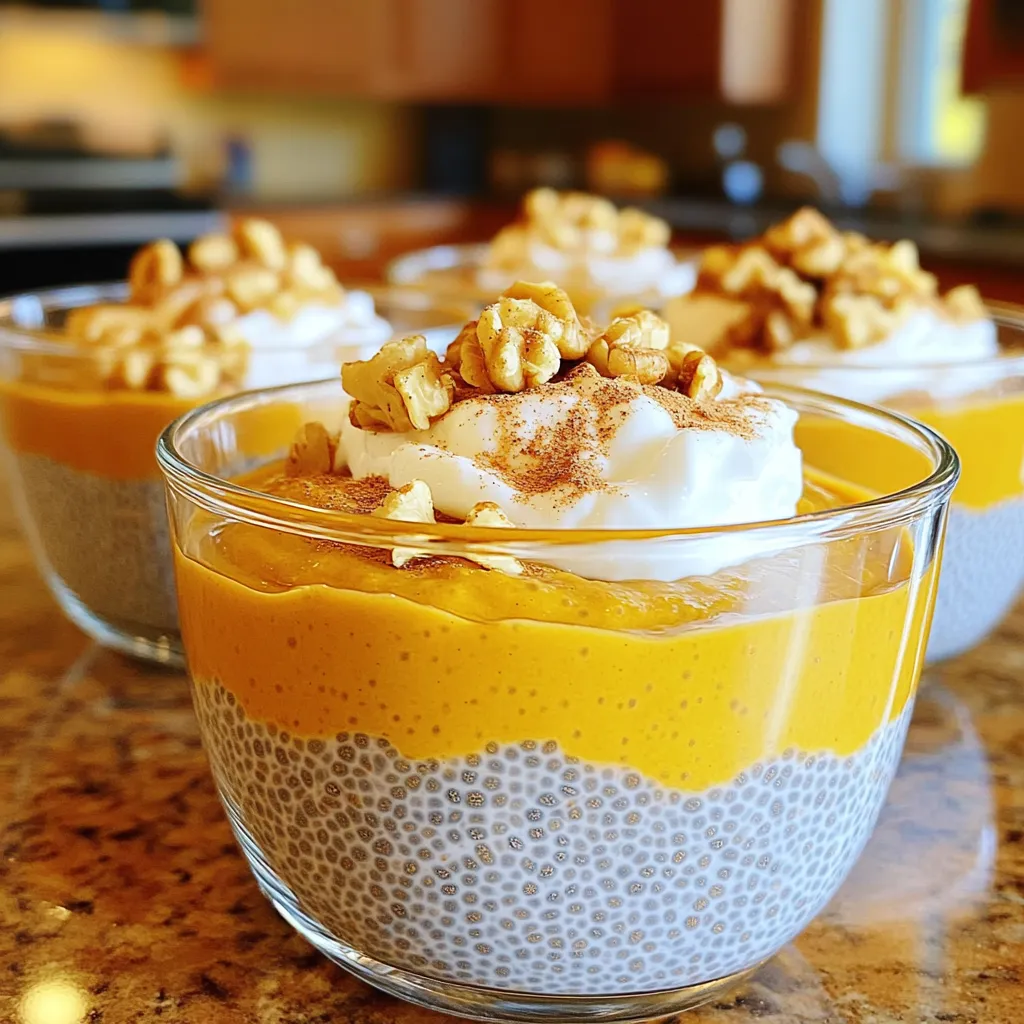
Love pumpkin pie but want a healthier twist? You’ll enjoy my High-Protein Pumpkin Pie Chia Pudding Delight! This creamy, delicious

- 1 cup vanilla ice cream - 1/2 cup milk (whole or almond) - 1/2 cup cream cheese, softened - 1/2 cup apple pie filling - 2 tablespoons caramel sauce (plus extra for drizzling) - 1 teaspoon vanilla extract - 1/4 teaspoon ground cinnamon To create the perfect Caramel Apple Cheesecake Milkshake, start with rich vanilla ice cream. This gives your shake a creamy base. Add milk, either whole or almond, for a smooth texture. The cream cheese adds a cheesecake-like flavor that is key to this recipe. Next, apple pie filling brings in sweet and spiced apple notes. You can use store-bought or homemade. Caramel sauce is a must for that sweet, gooey goodness. It enhances the flavor and adds a lovely drizzle. Lastly, vanilla extract and ground cinnamon round out the taste. They add depth and warmth to your shake. These ingredients blend together to create a delightful treat. - Whipped cream - Crushed graham crackers - Apple slices Now for the fun part! Once you blend your milkshake, it’s time to make it look amazing. Start with a generous dollop of whipped cream on top. This adds fluffiness and extra creaminess. Next, sprinkle crushed graham crackers to mimic a cheesecake crust. This gives a nice crunch and flavor contrast. Finally, add a slice of fresh apple on the rim of the glass. This not only looks great but also adds a fresh touch. These simple toppings make your milkshake even more special. - First, gather all your ingredients. You need vanilla ice cream, milk, and cream cheese. - Also, get apple pie filling, caramel sauce, vanilla extract, and ground cinnamon. - In a blender, combine the vanilla ice cream, milk, softened cream cheese, apple pie filling, caramel sauce, vanilla extract, and ground cinnamon. - Blend on high speed until smooth and creamy. Make sure everything mixes well. - After blending, taste the mixture. If you want more sweetness, add extra caramel or a bit more cinnamon. Blend briefly again to mix. - Next, pour the milkshake into tall glasses. Fill them about three-quarters full. - Then, top each milkshake generously with whipped cream. Don’t be shy! - Drizzle more caramel sauce on top of the whipped cream. This adds a sweet touch. - To mimic a cheesecake crust, sprinkle crushed graham crackers over the whipped cream. - Finally, garnish with a fresh slice of apple on the rim of the glass. This makes it look nice and tasty! You can easily change the sweetness of your milkshake. If you like it sweeter, add more caramel sauce. You can also try different ice creams. Chocolate or cinnamon ice cream can bring new flavors to your shake. Getting the right texture is key. Blend your ingredients on high speed until smooth and creamy. If it's too thick, add a bit more milk. Always taste your mixture. This helps you decide if it needs more caramel or cinnamon. Make your milkshake look fun and fancy. Use tall, decorative glasses for serving. This makes your drink stand out. Top it with whipped cream and a drizzle of caramel. Sprinkle crushed graham crackers on top for a cheesecake touch. Add an apple slice on the glass for a fresh look. {{image_2}} You can spice up your milkshake with different flavors. Try adding nutmeg or ginger for warmth. These spices bring a cozy feel to each sip. If you want a fruity twist, swap the apple pie filling. Use cherry or blueberry filling instead. Each choice gives a new taste. If you're looking for dairy-free options, use almond milk and coconut cream. These choices keep your milkshake creamy without dairy. For a lower sugar option, replace the caramel sauce with a sugar-free version. You can also use fresh apples for natural sweetness. In fall, add pumpkin spice for a festive touch. This will make your milkshake feel like autumn in a glass. For the holidays, mix in crushed peppermint candies. This gives a fun, minty flavor that’s perfect for celebrations. These seasonal twists enhance the taste and make it special. To store leftovers, pour the milkshake into an airtight container. This keeps air out and helps it stay fresh. You can store it in the fridge for up to two days. However, for the best taste, enjoy it right away. You can freeze the milkshake for later use. Pour it into a freezer-safe container, leaving some space at the top. The milkshake can last for up to three months in the freezer. To thaw, move the container to the fridge for a few hours. When ready, stir well and add a splash of milk if needed. This helps it regain a creamy texture. If you have extra milkshake, get creative! Use it in desserts like cakes or brownies. You can also make a fun milkshake float by adding soda. Layer the milkshake in a glass with ice cream for a parfait. This way, you can enjoy the flavor in new ways! A Caramel Apple Cheesecake Milkshake is a sweet, creamy drink. It mixes flavors of caramel, apple, and cheesecake. You get a smooth texture from the ice cream and cream cheese. The apple pie filling adds a fruity twist. Ground cinnamon gives warmth and spice. Every sip feels like a dessert. Yes, you can make this milkshake vegan. Use dairy-free ice cream and almond milk. Replace cream cheese with a vegan cream cheese option. Look for caramel sauce that is dairy-free. These swaps keep all the yummy flavors while being plant-based. To thicken your milkshake, add more ice cream. You could also use frozen fruit or ice. If it's too thin, blend in extra cream cheese. Blend in small amounts until you reach your desired thickness. This milkshake stays fresh in the fridge for about 1 day. After that, it may lose its creamy texture. It’s best to enjoy it right after making it. If you have leftovers, give it a good stir before drinking. You now know how to make a delicious Caramel Apple Cheesecake Milkshake. We covered key ingredients, from vanilla ice cream to caramel sauce. The step-by-step instructions help you blend it into a creamy delight. Don’t forget the toppings—whipped cream and crushed graham crackers will impress anyone. Feel free to customize the flavors to your liking. Experiment with different ice creams or spice blends. With proper storage, your milkshake can stay fresh longer, letting you enjoy it anytime. Your next dessert just got a tasty upgrade!

Caramel Apple Cheesecake Milkshake Creamy Delight

Craving something sweet and creamy? Let me introduce you to the Caramel Apple Cheesecake Milkshake! This tasty treat brings together

- 1 package (16 oz) refrigerated crescent roll dough - 1/2 cup brown sugar - 1 tablespoon ground cinnamon - 1/4 cup unsalted butter, melted - 1/2 cup powdered sugar - 1 tablespoon milk - 1/4 teaspoon vanilla extract - 1/2 cup chopped pecans or walnuts (optional) To make cinnamon roll bites, you need a few key items. First, the refrigerated crescent roll dough is the base. It rolls out easily and gives a soft, flaky texture. Next, we have brown sugar and ground cinnamon. This combo creates a sweet, warm filling. The melted butter helps everything stick together and adds rich flavor. You will also need powdered sugar, milk, and vanilla extract for the icing. This makes your bites even sweeter. Lastly, add chopped pecans or walnuts if you like some crunch in your treat. If you don’t have crescent roll dough, try using puff pastry or biscuit dough. Both options work well. For the filling, you can swap brown sugar with coconut sugar or maple sugar. These can offer a different taste. If you want a dairy-free version, use coconut oil instead of butter. For the milk, almond or oat milk are great choices. They keep the recipe yummy while making it friendly for everyone. You will want a mini muffin tin to bake these bites. It helps them hold shape and cook evenly. A rolling pin is handy for flattening the dough. You will also need a whisk and mixing bowls to combine your icing and filling. These tools help make the process smooth and fun. 1. Preheating the oven: Start by heating your oven to 375°F (190°C). This step gets your oven ready for baking. 2. Unrolling and pinching seams of the dough: Open the package of crescent roll dough. Unroll it on a clean surface. Pinch the seams together to form a rectangle. This helps keep the filling inside. 1. Combining brown sugar and cinnamon: In a small bowl, mix the brown sugar and ground cinnamon. This blend adds that sweet, warm flavor. 2. Preparing melted butter: Melt the unsalted butter in a microwave or on the stove. You need this to make the filling stick. 1. Spreading butter and cinnamon mixture: Brush the melted butter evenly over the dough. Then, sprinkle your cinnamon-sugar mix over the butter. If you like nuts, add them now. 2. Rolling and cutting the dough log: Roll the dough tightly from one short side to the other. Cut the log into 1-inch pieces. Each piece will be a delicious bite. 1. Placing dough pieces in muffin tin: Place each cut piece into the muffin tin. Make sure they fit nicely in each cup. 2. Baking time and temperature: Bake the bites for 12-15 minutes. Look for a golden brown color. That’s when they are ready! 1. Whisking ingredients for icing: In a bowl, whisk together powdered sugar, milk, and vanilla extract. This will make a sweet drizzle for your bites. 2. Adjusting for desired consistency: If the icing is too thick, add more milk. If it’s too thin, add more powdered sugar. You want it just right for drizzling. To get even browning, make sure you space each bite well in the muffin tin. This allows hot air to flow around them while baking. If they touch, they may not brown nicely. Check for doneness by looking for a golden color. If they look pale, give them a few more minutes. You can also insert a toothpick into the center. If it comes out clean, they are done. These bites taste great warm or cold. If you serve them warm, the icing will melt and soak in. For a nice touch, heat them for a few seconds in the microwave. Pair your cinnamon roll bites with coffee or tea. The warm spices blend well with both drinks. You can even sprinkle some extra cinnamon on top of your cup for a fun twist. Decorate your bites with toppings like extra icing or chopped nuts. Drizzle the icing creatively for a beautiful look. Serving on a colorful platter makes them pop. You can use small cupcake liners to hold each bite, adding a touch of charm. Arrange them in a circle for a fun display. {{image_2}} You can make your cinnamon roll bites even better with small changes. Try adding spices like nutmeg or cardamom for a warm twist. Vanilla or almond extract can also boost the flavor. If you love chocolate, sprinkle in some chocolate chips. Fresh fruits like blueberries or diced apples can add a sweet, juicy touch. Just think about what flavors you enjoy most! You can easily adapt these bites for different diets. For a gluten-free option, swap the crescent roll dough for a gluten-free version. Many brands make great alternatives. If you want vegan bites, use plant-based butter and milk. You can also find vegan-friendly crescent dough. These swaps keep all the yummy flavors while fitting your needs. Make your cinnamon roll bites special for each season! In fall, add pumpkin puree to the dough for a cozy taste. You can also mix in warm spices like nutmeg and allspice. For the holidays, try adding ginger and cloves to your filling. These spices make your bites festive and perfect for gatherings. Each season brings new flavors to explore! You can store cinnamon roll bites at room temperature or in the fridge. If you plan to eat them within a day, keep them at room temperature. Just place them in an airtight container. If you want to keep them longer, store them in the fridge. They can last up to a week when chilled. To reheat your cinnamon roll bites, the oven is best. Preheat your oven to 350°F (175°C). Place the bites on a baking sheet and heat for about 5-10 minutes. This keeps them warm and crispy. The microwave can work too. Heat them for about 15-20 seconds. But, they may become soft and lose texture. You can freeze cinnamon roll bites before or after baking. If freezing before baking, wrap the bites tightly in plastic wrap. Store them in a freezer bag for up to two months. When ready, bake them straight from the freezer. If freezing after baking, let them cool first. Place them in an airtight container. They can last for about three months in the freezer. Cinnamon roll bites last about 3 days at room temperature. Store them in an airtight container. If you want them fresh longer, you can refrigerate them for up to a week. They may lose some softness in the fridge, so consider warming them before serving. Yes, you can make the dough ahead of time. Roll it up and cut it into pieces. Cover the pieces and store them in the fridge for up to 24 hours. This way, you can bake them fresh when you are ready to enjoy. If you want to skip walnuts, try pecans or almonds. You can also use seeds like sunflower seeds or leave them out entirely. The bites will still taste great without nuts. Look for a golden brown color on top. You can also poke one with a toothpick. If it comes out clean, they are done. Enjoy that warm, sweet smell while they bake! Yes, you can use puff pastry. It will give a flakier texture to the bites. Roll it out and follow the same steps as with the crescent dough. Just keep an eye on the baking time, as it may differ slightly. In this blog post, we covered how to make cinnamon roll bites, including essential ingredients and step-by-step instructions. I shared tips for perfect baking, serving suggestions, and storage info. You can adapt the recipe with different flavors, making it fun for any season. Remember, these bites are best served warm. With a few simple swaps and variations, you can enjoy this easy treat in many ways. Happy baking!

Ingredient Cinnamon Roll Bites Scrumptious and Simple

Craving something sweet and easy? These Ingredient Cinnamon Roll Bites are just what you need! With just a few simple

- 1 package (16 oz) potato gnocchi - 1 cup pumpkin puree - 1 cup heavy cream - 1/2 cup grated Parmesan cheese - 2 tablespoons butter - 2 cloves garlic, minced - 1/2 teaspoon nutmeg - Salt and pepper to taste - Fresh sage leaves for garnish For this creamy pumpkin Alfredo gnocchi, I love using simple ingredients that pack a punch. The potato gnocchi serves as a soft and chewy base. You can find them in stores, or you can make your own if you're feeling adventurous. Pumpkin puree gives a rich flavor and a lovely orange color. You can use canned pumpkin or make your own from fresh pumpkin. Heavy cream adds that velvety texture we crave in a sauce. Next, the Parmesan cheese melts beautifully into the sauce. This adds a salty, nutty flavor. Butter and minced garlic bring a warm aroma to the dish. To finish it off, nutmeg adds a warm spice. Finally, fresh sage leaves make a great garnish. They give a nice touch and a fresh flavor. Enjoy the blend of these ingredients in your dish! - Begin by boiling salted water in a large pot. - Add the gnocchi carefully. Watch them closely. - Cook until they float to the top, which takes about 2-3 minutes. - Once they float, scoop them out and set aside. - In a large skillet, melt the butter over medium heat. - Add minced garlic and sauté it for about 1 minute. - Stir until the garlic is fragrant, but be careful not to burn it. - Next, pour in the pumpkin puree and heavy cream. - Mix well and cook for 2-3 minutes until warmed through. - Add the grated Parmesan cheese and nutmeg to the sauce. - Stir until the cheese melts and the sauce is smooth. - Season with salt and pepper to taste. - Gently add the cooked gnocchi to the sauce. - Stir to coat the gnocchi evenly, letting it simmer for one more minute. - Remove from heat and let it thicken slightly before serving. To make a smooth sauce, avoid lumps by stirring constantly. When you add the Parmesan cheese, do it slowly. This helps it melt evenly. Remember, high heat can cause lumps, so keep your heat medium-low. You can boost flavor by adding spices like cinnamon or chili powder. They add warmth and depth. Fresh herbs like thyme or rosemary can also enhance the dish. Just sprinkle them in right after adding the cream. Pair this dish with a green salad or garlic bread. These sides balance the creamy sauce. For plating, use a shallow bowl to show off the gnocchi. A sprinkle of sage on top makes it look fancy. {{image_2}} You can make this dish lighter. Try using low-fat cream instead of heavy cream. It works well and cuts calories. Another option is to use plant-based cheese. This choice helps if you're vegan or lactose intolerant. It gives a nice flavor too. You can add sautéed vegetables for extra nutrition. Spinach or mushrooms blend well with the sauce. They add color and taste. You might also want to try different cheeses. Gouda or mozzarella can give a new twist to the dish. Each cheese brings a unique flavor. You can choose between store-bought and homemade gnocchi. Store-bought is quick and easy. Homemade gnocchi has a special touch and can be fun to make. If you need a gluten-free option, look for gluten-free gnocchi. Many brands offer tasty alternatives that work great in this dish. To store your creamy pumpkin Alfredo gnocchi, place leftovers in an airtight container. Make sure to let the dish cool to room temperature before sealing. This helps keep it fresh. In the fridge, it stays good for about 3-4 days. To freeze your gnocchi, allow it to cool completely. Then, transfer it to a freezer-safe container or bag. Remove as much air as possible before sealing. This way, it can last up to 2 months in the freezer. When you want to enjoy it again, thaw it overnight in the fridge. The best way to thaw gnocchi is in the fridge for several hours or overnight. This keeps the texture nice. After thawing, heat it gently in a skillet over low heat. You may add a splash of cream to help restore its rich flavor. To make homemade gnocchi, you need few basic ingredients. Use 2 cups of mashed potatoes, 1 cup of all-purpose flour, and 1 egg. Start by boiling potatoes until soft. Then, mash them and let them cool. Mix in the flour and egg. Knead lightly until smooth. Cut the dough into small pieces and roll them into small logs. Cut logs into bite-sized pieces and press with a fork for texture. For perfect texture, avoid overworking the dough. This keeps gnocchi light and fluffy. Use a light touch when rolling and cutting. Yes, you can use fresh pumpkin. Start by cutting a pumpkin in half and removing the seeds. Roast the halves in the oven at 400°F for about 45 minutes. Once soft, scoop out the flesh and mash it. Fresh pumpkin has a richer flavor. It can taste sweeter and less processed than canned. However, canned pumpkin is convenient and consistent in texture. If you need a substitute for heavy cream, try using whole milk mixed with butter. Combine 3/4 cup of milk with 1/4 cup of melted butter. This gives a creamy texture. You can also use coconut cream for a dairy-free option. Just remember, each substitute may change the flavor slightly, so adjust spices as needed. This blog post covered how to make a creamy pumpkin gnocchi dish. We discussed key ingredients such as gnocchi, pumpkin puree, and heavy cream. You learned step-by-step instructions for cooking gnocchi and making a rich sauce. Tips and variations helped you enhance flavor and explore healthy options. Finally, storage info ensured your leftovers stay fresh. Enjoy creating and sharing this dish, and feel free to experiment with your own twists!

Creamy Pumpkin Alfredo Gnocchi Delightful Dinner Option

If you’re craving a cozy, delicious meal, then you’re in luck! This Creamy Pumpkin Alfredo Gnocchi is a perfect dish

Older posts
Newer posts
← Previous Page1 … Page8 Page9 Page10 … Page82 Next →

dsad

© 2026 Recipes Pursuit • Built with GeneratePress

Our Policies

  • Copyright Policy
  • Cookie Policy
  • GDPR Policy
  • Privacy Policy
  • Disclaimer
  • Terms Of Use

More Information

  • Home
  • About
  • Contact
  • Appetizers
  • Dessert
  • Dinner
  • Drinks
©2026, Recipes Pursuit About Back To Top