Skip to content
DisclaimerTerms Of UseGDPR PolicyCookie Policy

Recipes Pursuit

  • Home
  • Drinks
  • Appetizers
  • Dinner
  • Dessert
  • About
  • Contact
  • Privacy Policy
DisclaimerTerms Of UseGDPR PolicyCookie Policy

NO-ING-IMG

To make cilantro lime rice, you need a few simple ingredients. Each one adds flavor and freshness. Here’s what you’ll need: - 1 cup jasmine rice - 2 cups vegetable broth - 1/4 cup fresh cilantro, chopped - Zest of 1 lime - Juice of 1 lime - 1 tablespoon olive oil - 1 clove garlic, minced - Salt to taste These ingredients come together to create a rice dish that is fresh and bright. Jasmine rice gives a nice texture, while the vegetable broth adds depth. The lime juice and zest bring a zesty kick, and cilantro offers a burst of herbal flavor. Each component plays a role in making this rice special. You can find the full recipe to guide you through the cooking process. - Rinse jasmine rice under cold water. - Sauté garlic in olive oil. To start, rinse the jasmine rice under cold water. This step is vital. It washes away excess starch. This way, your rice will stay fluffy, not sticky. Next, take a medium pot and heat olive oil on medium heat. Add minced garlic and sauté it for about one minute. You want the garlic to smell great but not brown. Overcooked garlic can taste bitter. - Add rice and toast with garlic. - Pour in broth and bring to a boil. - Cover and simmer until liquid is absorbed. Once the garlic is fragrant, add the rinsed rice to the pot. Stir the rice for one to two minutes. This toasting step adds depth to the flavor. After the rice is slightly toasted, pour in the vegetable broth. Bring this mixture to a boil. When it starts boiling, reduce the heat to low. Cover the pot with a lid and let it simmer. Cook until all the liquid is absorbed, about 15 to 18 minutes. - Let rice rest, then fluff. - Stir in lime zest, lime juice, and cilantro. After cooking, remove the pot from heat and let it sit, covered, for another five minutes. This resting time is key. It allows the rice to finish cooking in its steam. After resting, fluff the rice gently with a fork. Then stir in the lime zest, lime juice, and chopped cilantro. Mix until everything is well combined. Season with salt to taste. This step adds the fresh, zesty flavor that makes this rice special. For the full recipe, check the original mentioned above. To make great rice, start by rinsing it under cold water. This step takes away extra starch. If you skip this, your rice may get sticky. Cooking time is also key. After boiling, reduce the heat right away. This helps the rice cook evenly without burning. Using fresh ingredients makes a big difference. Fresh cilantro adds a bright taste. Squeeze in a bit more lime juice for extra zing. You can also try adding seasonings like cumin or chili powder. This will give your rice a unique kick. For the full experience, check the Full Recipe and see how these tips shine. {{image_2}} You can easily change this recipe to fit your taste. For a healthier twist, swap jasmine rice for brown rice or quinoa. Brown rice adds a nutty flavor and more fiber. Quinoa is a great option if you want a gluten-free choice. Both alternatives cook differently, so adjust the water and time as needed. This will help you keep the same great taste while adding extra nutrition. Feel free to try different herbs too. If you want a twist, use parsley or dill instead of cilantro. Each herb brings its own flavor, giving you many options for your rice. Experiment and find your favorite combo! Adding vegetables can take your cilantro lime rice to the next level. Sweet corn or colorful bell peppers add a pop of color and flavor. You can mix them in while the rice cooks. This makes the dish more vibrant and nutritious. For some extra zest, think about adding spices. A pinch of cumin or chili powder can add warmth and depth. You could also try a dash of smoked paprika for a unique taste. These spices enhance the rice without overpowering its fresh flavors. For the full recipe, check out the Zesty Cilantro Lime Rice recipe above! To keep your cilantro lime rice fresh, use airtight containers. Glass or plastic containers work well. Make sure to let the rice cool before sealing it. This helps prevent moisture build-up. Store the rice in the fridge for up to four days. If you want to keep it longer, freeze it. Place the rice in freezer-safe bags, and remove as much air as possible. When reheating cilantro lime rice, the best methods are in the microwave or on the stove. For the microwave, place the rice in a bowl with a splash of water. Cover it with a damp paper towel to keep it moist. Heat it for one to two minutes, stirring halfway through. If you prefer using the stove, add the rice to a pan with a little water. Stir it over low heat until it's warm. This helps the rice stay soft. Always check the texture. If it feels dry, add a bit more water. Enjoy your flavorful side dish! For the full recipe, check the earlier section. You can serve cilantro lime rice with many tasty dishes. It pairs well with grilled chicken or fish. Tacos and burritos are also great choices. For a vegetarian option, try it with black beans or sautéed veggies. This rice complements spicy dishes too, balancing heat with its fresh flavor. Yes, you can make cilantro lime rice in advance. Cook it a day before your meal and store it in the fridge. Let it cool before putting it in a container. When ready to serve, just reheat it on the stove or in the microwave. Add a splash of lime juice to refresh the flavor. Yes, this recipe is gluten-free. Jasmine rice and vegetable broth do not contain gluten. Always check the broth label to ensure it is gluten-free. This makes it a great option for those with gluten sensitivities. To add spice, you can mix in diced jalapeños or chili powder. For a smoky flavor, try adding chipotle powder. You can also serve it with a hot sauce on the side. Adjust the heat to your liking for a bold twist. You now have a simple and tasty recipe for cilantro lime rice. We covered the main ingredients, step-by-step cooking, and helpful tips. You learned ways to enhance flavors and make variations. Storing and reheating tips ensure your rice stays fresh. Use this guide to elevate your meals. Enjoy creating this dish that pairs well with many foods. You’ll impress your family and friends with this easy recipe!

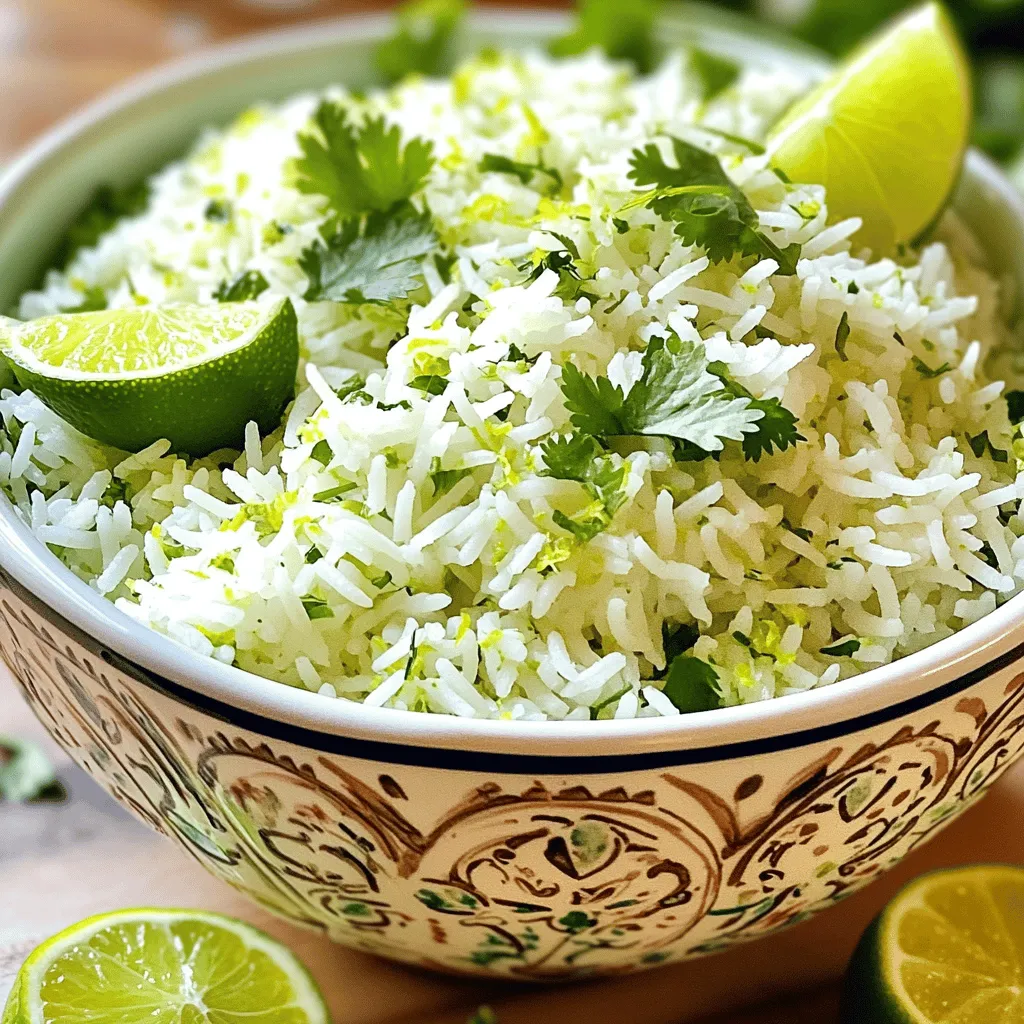
Cilantro Lime Rice Fresh and Flavorful Side Dish

Looking for a bright and zesty side dish? Cilantro lime rice is the answer! This easy recipe offers fresh flavors

- 2 cups cherry tomatoes, halved - 1 lb fresh mozzarella balls (bocconcini), drained - 1 cup fresh basil leaves - 1/2 cup balsamic glaze - 2 tablespoons extra-virgin olive oil - Salt and pepper to taste - Optional: 1 avocado, diced - Mixing bowl - Serving platter - Cutting board and knife Gathering the right ingredients is key to making a great Balsamic Glazed Caprese Salad. Freshness plays a big role in the taste. For the tomatoes, I love using cherry tomatoes. They are sweet and juicy. Halving them makes it easy to mix in with the other ingredients. Next, we need mozzarella balls, also called bocconcini. They are creamy and soft, which adds a nice texture. Make sure to drain them well so the salad doesn’t get watery. Fresh basil leaves bring a lovely aroma and flavor. Don’t forget to tear them gently to unlock their full taste. Balsamic glaze is the star of this dish. It adds a sweet and tangy flavor. Extra-virgin olive oil enhances the richness. A little salt and pepper will help to balance everything. If you want a creamy touch, consider adding diced avocado. It makes the dish even more satisfying. For tools, you only need a mixing bowl to combine everything. A serving platter is great for a nice presentation. A cutting board and knife help with cutting tomatoes and avocado. With these fresh ingredients and basic tools, you are ready to create a beautiful and tasty salad. For the complete cooking steps, check the Full Recipe. - Step 1: Combine cherry tomatoes and mozzarella. Start by halving the cherry tomatoes. Next, add the fresh mozzarella balls to a large mixing bowl. This mix is colorful and fresh. - Step 2: Add optional avocado for added creaminess. If you want more creaminess, dice an avocado and fold it in gently. It gives a richer taste that many enjoy. - Step 3: Incorporate fresh basil leaves. Tear fresh basil leaves into smaller pieces. This helps release their strong flavor. Add them to the bowl for a fresh aroma. - Step 4: Drizzle balsamic glaze and olive oil. Pour about half a cup of balsamic glaze over the salad. Add two tablespoons of extra-virgin olive oil. This adds a sweet and tangy punch. - Step 5: Season with salt and pepper. Lightly sprinkle salt and pepper over the mixture. This step is key to enhancing all the flavors. - Step 6: Gently toss to combine. Use a large spoon to gently toss all the ingredients together. This ensures every piece gets coated in the glaze and oil. - Step 7: Allow salad to sit to meld flavors. Let the salad sit for about five to ten minutes. This waiting time helps the flavors blend well together. - Step 8: Serve on a platter or individual bowls. Transfer the salad to a serving platter or individual bowls. For a nice touch, drizzle extra balsamic glaze on top. Try this easy recipe for Balsamic Glazed Caprese Salad to impress your friends and family. You can find the full recipe above. - Use high-quality balsamic glaze. This makes a big difference in taste. - Use fresh ingredients for best flavor. Ripe tomatoes and fresh basil shine here. - Garnish with whole basil leaves. This adds color and a nice touch. - Drizzle more balsamic glaze on top. It makes the salad look even better. - Avoid over-tossing the salad. Too much mixing can break the mozzarella. - Don't skip the resting time. Letting the salad sit helps the flavors meld. For a detailed guide, check the Full Recipe. {{image_2}} You can make your Balsamic Glazed Caprese Salad even better. Here are a few ways: - Include grilled corn or zucchini for a sweet touch. - Mix in sliced cucumbers for a nice crunch. These additions bring new flavors and textures. Grilled corn adds sweetness and a smoky taste. Zucchini provides a light, fresh flavor. Sliced cucumbers make every bite crisp and refreshing. Balsamic glaze is great, but you can try other dressings too: - Try a citrus vinaigrette instead of balsamic for a bright flavor. - Use pesto to add an herb-forward taste. Citrus vinaigrette will give your salad a zesty kick. Pesto will make it more fragrant and rich. Both options change the salad's character while keeping it fresh. You can easily adjust this salad for different diets: - Make it vegan by omitting mozzarella. - Choose gluten-free options for any added ingredients. Omitting mozzarella allows everyone to enjoy this dish. You can add more veggies or fruits in its place. These adjustments keep the salad tasty and inclusive. For the best flavor, stick to fresh ingredients and stay true to your tastes. To keep your Balsamic Glazed Caprese Salad fresh, refrigerate it in an airtight container. This helps preserve the flavors and texture. Try to consume the leftovers within 2 days for the best taste. Freezing this salad is not recommended. The fresh ingredients lose their texture and flavor when frozen. You will enjoy this salad best when it's fresh. No reheating is needed for this salad. It is best served chilled, right from the fridge. Enjoy the crisp and fresh taste as is! For the full recipe, check out the [Full Recipe]. Yes, but best to add dressing just before serving. This keeps the salad fresh. If you mix it too early, the tomatoes can get soggy. I suggest preparing the salad a few hours in advance. Just store the tomatoes, mozzarella, and basil separately. You can add the balsamic glaze right before serving for the best taste. Use burrata or feta cheese as alternatives. Burrata gives a creamy texture, while feta adds a salty kick. Both options work well in this salad. If you want a stronger flavor, feta is a great choice. Burrata is perfect for a soft and rich bite. No, balsamic glaze is thicker and sweeter than vinegar. The glaze has a syrupy texture and rich flavor. It makes the salad taste special. You can use balsamic vinegar in a pinch, but it won’t be as sweet or thick. For this recipe, I recommend sticking with balsamic glaze for the best results. For the full recipe, check the ingredients and steps mentioned earlier. This blog post showed you how to make a tasty balsamic glazed Caprese salad. We covered the main ingredients, tools, and step-by-step instructions to create this fresh dish. Remember to use great ingredients and let the flavors meld for the best taste. Try fun variations and storage tips to keep your salad fresh. By following these guidelines, you will enjoy a delicious salad that impresses everyone. Now, it’s time to gather your ingredients and get started! Enjoy your creation!

Balsamic Glazed Caprese Salad Fresh and Flavorful Dish

Are you ready to elevate your salad game? This Balsamic Glazed Caprese Salad is fresh, flavorful, and simple to make.

To make a tasty Vegetable Pad Thai, gather these ingredients: - 8 oz rice noodles - 2 tablespoons vegetable oil - 2 cloves garlic, minced - 1 cup firm tofu, cubed - 1 cup bean sprouts - 1 carrot, julienned - 1 red bell pepper, thinly sliced - 1 cup bok choy, chopped - 3 green onions, sliced - 2 tablespoons soy sauce - 2 tablespoons tamarind paste - 1 tablespoon sugar - 1/2 teaspoon chili powder (optional) - Crushed peanuts and lime wedges for garnish This list covers all you need for a delicious meal that bursts with flavor. Using fresh ingredients often gives the best taste and texture in Vegetable Pad Thai. Fresh veggies like bell peppers and bok choy hold their crunch and flavor. However, frozen options work well too. They can save you time and still taste great. If you choose frozen, pick ones without added sauces. They should be simple vegetables. You can thaw them before cooking or toss them right into the skillet. Just add a minute to the cooking time. You can easily customize Vegetable Pad Thai to fit your diet. If you need it vegan, keep the tofu and skip any animal products. For gluten-free meals, swap soy sauce with tamari. Here are some more substitutions you can make: - Tofu: Use tempeh or chickpeas for protein. - Rice noodles: Try zucchini noodles or gluten-free pasta. - Veggies: Feel free to add or change vegetables, like broccoli or snap peas. These swaps keep your dish flavorful while meeting your needs. For the full recipe, check the original instructions. Start by soaking the rice noodles in hot water. Let them sit for about 20 minutes. They should soften nicely. Drain the noodles and set them aside. This step is key for a good texture. In a large skillet or wok, heat the vegetable oil over medium-high heat. Add the minced garlic and sauté it for 30 seconds. You want to smell the garlic but not burn it. Next, add the cubed tofu. Cook it until golden brown on all sides. This takes about 5 to 7 minutes. Once the tofu is ready, stir in the julienned carrot and thinly sliced red bell pepper. Cook these for another 2 to 3 minutes. They should be slightly tender but still crisp. Now, add the chopped bok choy and bean sprouts. Stir-fry for about 2 more minutes. Push the vegetable mix to one side of the skillet. Add the soaked noodles to the other side. Pour in the soy sauce, tamarind paste, and sugar. If you like spice, sprinkle in the chili powder. Stir everything together well. Finally, add the sliced green onions. Mix until the noodles and veggies heat through. This takes about 2 minutes. Remove from heat. Serve hot and garnish with crushed peanuts and lime wedges. Don't forget to squeeze the lime over your dish before eating! For a complete guide, check out the Full Recipe. To soak rice noodles, start with hot water. Use a bowl and pour the hot water over the noodles. Let them soak for about 20 minutes. Check if they are soft. If they are, drain them and set aside. This step makes your noodles more tender and easy to stir-fry later. Don’t soak them too long, or they may fall apart. Making Pad Thai sauce at home is easy. You need just a few key ingredients: soy sauce, tamarind paste, and sugar. Mix two tablespoons of soy sauce, two tablespoons of tamarind paste, and one tablespoon of sugar in a bowl. Stir until the sugar dissolves. This sauce gives your dish a sweet and tangy flavor. Adjust the taste by adding chili powder for a kick, if you like heat. Garnishing your Vegetable Pad Thai adds color and crunch. Use crushed peanuts for a nutty flavor. Sprinkle them on top just before serving. Lime wedges add a fresh burst when squeezed. You can also add sliced green onions for a pop of green. These simple touches make your dish look inviting and taste even better. {{image_2}} Tofu is a great source of protein for Vegetable Pad Thai. If you want a change, try chickpeas or tempeh. Both options add texture and flavor. You can also use seitan for a more meat-like bite. Just remember to adjust cooking times. Cook chickpeas until heated. For tempeh, sauté until golden. Seitan cooks quickly, so add it near the end. To make Vegetable Pad Thai gluten-free, swap soy sauce for tamari. Tamari offers a similar taste without gluten. Also, check your rice noodles. Most are gluten-free, but it's good to verify. You can even try zucchini noodles for a fresh twist. They add crunch and color to your dish. Spice levels can really change your meal. If you like it mild, skip the chili powder. You can also reduce it to suit kids or those who dislike heat. For a spicy kick, add fresh chili or chili flakes on top. Always taste as you go. This helps you find the right balance. You can also serve lime wedges on the side. This adds a fresh zing that brightens the flavors. For the Full Recipe, check the detailed instructions above. To keep your Vegetable Pad Thai fresh, store it in an airtight container. Make sure it cools down before putting it in the fridge. You can keep it for up to three days. If you want to enjoy it later, place it in the freezer. For the best taste, reheat your Vegetable Pad Thai on the stove. Add a splash of water or soy sauce to help it heat evenly. Stir it often to prevent sticking. Heat it until it’s hot but not too dry. You can also use a microwave. Just cover it to keep moisture in. To freeze your Vegetable Pad Thai, portion it into containers. Leave some space at the top for expansion. It can last for about one month in the freezer. When you’re ready to eat, thaw it overnight in the fridge. Reheat it as mentioned above for the best results. You can find the full recipe for Vegetable Pad Thai earlier in this article. Pad Thai comes from Thailand. It became popular in the 1930s. The dish mixes rice noodles, veggies, and often meat or tofu. It reflects Thai culture and flavors. The dish gained fame for its balance of sweet, salty, and sour tastes. Yes, you can. If you skip tamarind, use lime juice instead. Lime gives a fresh, tangy taste. You can also add a bit of vinegar for extra sourness. Adjust sugar to keep balance. Homemade Pad Thai lasts about 3 to 4 days in the fridge. Store it in an airtight container. This keeps the flavors fresh. When you reheat, add a splash of water to avoid dryness. Serve Vegetable Pad Thai with a side of spring rolls or a fresh salad. You can also pair it with a light soup. For drinks, try iced tea or coconut water. These options will enhance your meal. For the complete dish, refer to the Full Recipe. This article covered how to make a delicious Vegetable Pad Thai. We went over key ingredients, cooking steps, and useful tips. You learned about substitutions for diets and how to store leftovers. Each section aimed to help you create a tasty meal. Remember, cooking is all about fun and trying new things. With practice, you'll make your perfect Pad Thai. Enjoy your cooking journey!

Vegetable Pad Thai Flavorful and Easy Weeknight Meal

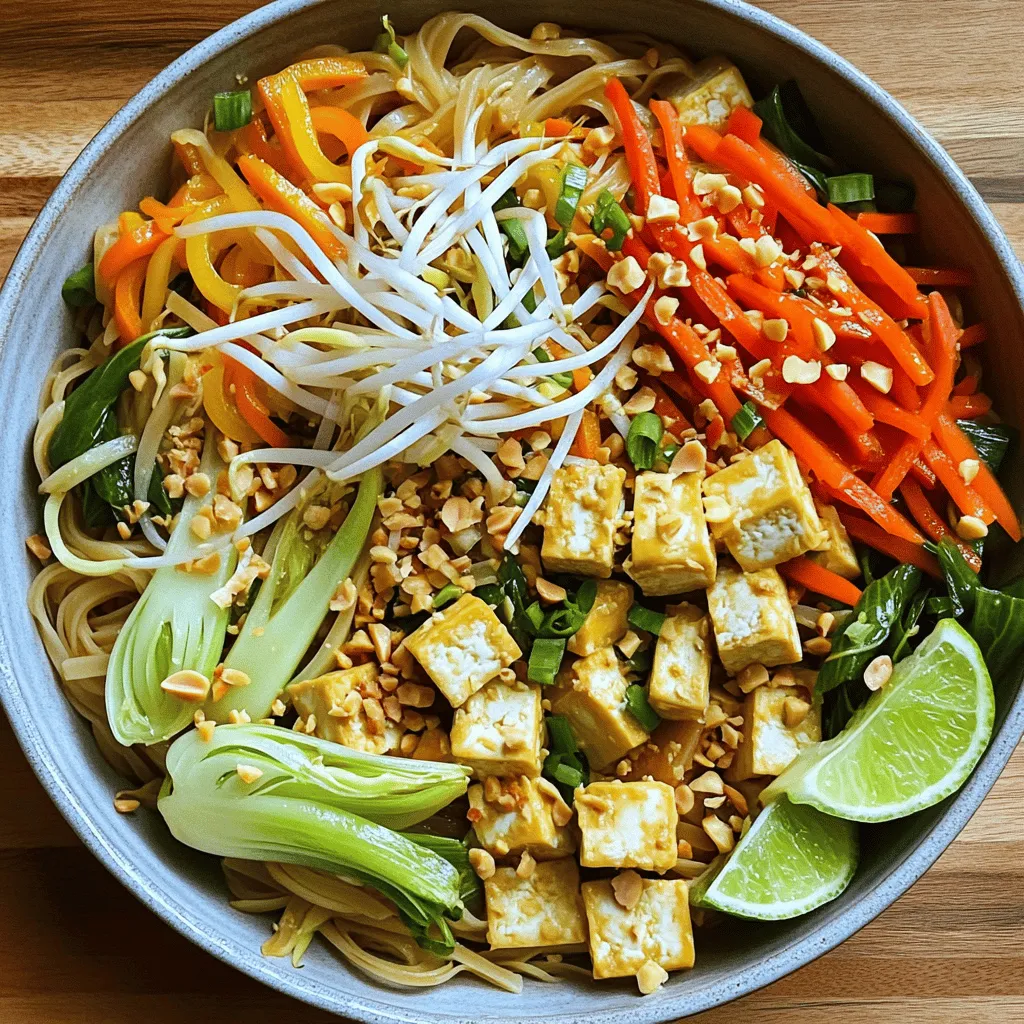
If you crave a quick, tasty dinner, Vegetable Pad Thai is your answer. This dish bursts with flavor and colors,

- 4 boneless, skinless chicken breasts - 2 tablespoons olive oil - Zest and juice of 2 lemons - 3 cloves garlic, minced - 2 teaspoons fresh thyme leaves (or 1 teaspoon dried) - 1 teaspoon salt - ½ teaspoon black pepper - Lemon slices - Fresh thyme sprigs Choosing the right ingredients makes your dish shine. Here are some tips: - Chicken Breasts: Look for fresh, plump chicken breasts. They should be pale pink without any dark spots. - Lemons: Select firm lemons with bright yellow skin. They should feel heavy for their size, indicating juiciness. - Garlic: Choose firm heads of garlic without any soft spots. Fresh garlic will have a strong scent. - Thyme: If using fresh thyme, choose sprigs that are vibrant green. Avoid any that look wilted or brown. - Olive Oil: Use extra virgin olive oil for the best flavor. Check the label for a harvest date to ensure freshness. These tips will help you create a Lemon Thyme Grilled Chicken that is fresh and full of flavor. For the full recipe, check the detailed instructions in the next section! To start, gather your ingredients. You need olive oil, lemon zest, lemon juice, minced garlic, thyme, salt, and black pepper. In a small bowl, whisk the olive oil, lemon zest, and lemon juice. Then add the minced garlic, thyme, salt, and black pepper. Mix until it looks smooth and bright. This marinade gives the chicken its fresh and zesty flavor. Next, get your chicken breasts ready. Place them in a large resealable bag or a shallow dish. Pour the marinade over the chicken. Make sure each piece is coated well. Seal the bag or cover the dish tightly. Let it sit in the fridge for at least 30 minutes. If you have more time, letting it marinate for up to 4 hours adds even more flavor. Now, let’s grill! Preheat your grill to medium-high heat. If you are using a grill pan, heat it on the stove. Once hot, take the chicken out of the marinade. Let any extra marinade drip off. Discard the leftover marinade. Place the chicken on the grill. Cook for about 6-7 minutes on each side. You want the internal temperature to reach 165°F (75°C). This ensures the chicken is safe to eat and perfectly cooked. Avoid flipping often. This helps get nice grill marks and cooks the chicken evenly. After cooking, transfer the chicken to a plate. Let it rest for about 5 minutes. This helps keep the juices in. You can slice the chicken if you want. For a nice touch, serve it with lemon slices and fresh thyme sprigs on top. For the complete recipe, check [Full Recipe]. To get those nice grill marks, heat your grill well. Preheat it to medium-high. Place the chicken on the grill and let it cook without moving it. This will create those beautiful lines. After about 6-7 minutes, flip the chicken to the other side. Always use tongs to avoid piercing the meat. This way, the juices stay inside. To keep your chicken juicy, marinate it well. Use the marinade for at least 30 minutes. For more flavor, let it sit for up to 4 hours. When you grill, watch the time closely. Overcooking dries out the chicken. Cook until it reaches 165°F. Let it rest for about 5 minutes after grilling. This allows the juices to redistribute, making each bite tender. Some common mistakes can ruin your dish. First, don’t skip the marinating step. It adds flavor and keeps the chicken moist. Second, avoid flipping the chicken too often. This prevents the grill marks from forming. Lastly, don’t rush the cooking. Use a meat thermometer to check the temperature. Proper cooking ensures a safe and tasty meal. For more details, check the Full Recipe. {{image_2}} You can mix things up with herbs and flavors. Try rosemary or oregano for a twist. Basil adds a fresh taste, while cilantro brings a bright note. For a smoky flavor, add some smoked paprika. You can also throw in some red pepper flakes to give it heat. These additions can change the dish's vibe completely. Grilling brings out the best in lemon thyme chicken. It gives a nice char and smoky flavor. If it rains or you want an easier method, the oven works too. You can bake the chicken at 400°F for about 25-30 minutes. Use a meat thermometer to check for 165°F inside. Both methods make juicy chicken, but grilling adds that extra touch. Pair this chicken with fresh sides for a complete meal. A light salad with mixed greens and a lemon vinaigrette works well. Roasted vegetables like asparagus or zucchini complement the dish nicely. You could also serve it over rice or quinoa for a filling option. For a fun touch, add lemon slices and fresh thyme sprigs on top when serving. This makes the plate pop with color and flavor. Check out the Full Recipe for more ideas! After enjoying your delicious Lemon Thyme Grilled Chicken, you might have some leftovers. Store them in an airtight container. This keeps the chicken fresh. Always refrigerate it within two hours after cooking. The chicken stays good for up to three days in the fridge. When reheating, check for any signs of spoilage first. If you smell something off or see any discoloration, it’s best to toss it. If you want to keep your Lemon Thyme Grilled Chicken longer, freezing is a great option. First, let the chicken cool completely. Then, wrap each piece tightly in plastic wrap. After that, place the wrapped chicken in a freezer-safe bag. This helps prevent freezer burn. Label the bag with the date. Frozen grilled chicken can last up to three months. When you’re ready to eat, just thaw it in the fridge overnight. To keep the flavors intact while reheating, use the oven. Preheat it to 350°F (175°C). Place the chicken in an oven-safe dish. Add a splash of chicken broth or water to keep it moist. Cover the dish with foil to trap the steam. Heat for about 15-20 minutes, or until warm. If you're in a hurry, you can use a microwave. Heat in short bursts, around 1-2 minutes, checking often. This way, you enjoy your Lemon Thyme Grilled Chicken just like when it was fresh. For the full recipe, check the earlier sections. The best way to marinate chicken is to use a mix of oil, acid, herbs, and spices. Start with oil to keep the chicken moist. Add an acid, like lemon juice, for flavor and tenderizing. Fresh herbs, such as thyme, bring brightness. A little salt and pepper enhance the taste. For my Lemon Thyme Grilled Chicken, I whisk olive oil, lemon zest, and juice with garlic and thyme. Pour this over the chicken and let it sit for at least 30 minutes in the fridge. This allows the flavors to soak in well. Yes, you can substitute dried thyme for fresh thyme. Use one-third of the amount if you're using dried thyme. For example, if the recipe calls for 2 teaspoons of fresh thyme, use about 1 teaspoon of dried thyme. Fresh thyme gives a bright flavor, while dried thyme is more intense. Adjust the amount to suit your taste. To check if the chicken is fully cooked, use a meat thermometer. The internal temperature should reach 165°F (75°C). Insert the thermometer into the thickest part of the chicken. If you don’t have a thermometer, cut into the chicken. The meat should be white and the juices should run clear. For my Lemon Thyme Grilled Chicken, perfect cooking ensures a juicy and flavorful meal. Always let it rest for a few minutes after cooking to keep it moist. For the full recipe, you can check the details provided earlier. In this blog post, we explored the key ingredients for marinating chicken, along with tips for selecting the best ones. We walked through each step for marinating and grilling to make perfect chicken. I shared tricks to ensure juicy meat and avoid common errors. You also learned about variations, storage tips, and answered common questions. With this knowledge, you can create tasty grilled chicken every time. Enjoy experimenting and impress your friends!

Lemon Thyme Grilled Chicken Fresh and Flavorful Meal

If you’re craving a meal that’s both fresh and flavorful, look no further than Lemon Thyme Grilled Chicken. This dish

To make a perfect chocolate lava cake, gather these key items: - 1/2 cup unsalted butter (plus extra for greasing) - 1 cup dark chocolate chips (at least 60% cocoa) - 2 large eggs - 2 large egg yolks - 1/4 cup granulated sugar - 1/4 cup all-purpose flour - 1 teaspoon vanilla extract - Pinch of salt These ingredients create a rich, gooey center that melts in your mouth. The dark chocolate chips give your cake a deep flavor. Use high-quality chocolate for the best taste. While your cake is great on its own, consider these optional garnishes: - Powdered sugar - Fresh berries (like raspberries or strawberries) A sprinkle of powdered sugar adds a sweet touch. Fresh berries bring a pop of color and a tart contrast to the rich chocolate. When picking chocolate, always look for high cocoa content. Chocolates with 60% cocoa or more provide a rich taste. Avoid cheap chocolates, as they can taste waxy. For a smoother melt, choose chocolate chips over bars. They melt evenly, which helps create that perfect lava center. Always check for freshness, as old chocolate can lose flavor. For the full, delightful experience, don’t forget to check out the Full Recipe. Start by preheating your oven to 425°F (220°C). This step is key for a good bake. Next, take four ramekins and grease them with butter. Make sure to cover the sides and bottom well. Then, dust each ramekin with flour. This helps the cakes come out easily after baking. In a microwave-safe bowl, combine 1/2 cup of unsalted butter and 1 cup of dark chocolate chips. Use chocolate that has at least 60% cocoa for the best flavor. Heat in the microwave for 20 seconds at a time. Stir after each interval until the mix is melted and smooth. Let it cool for a few minutes. In a separate bowl, whisk together 2 large eggs, 2 large egg yolks, and 1/4 cup of granulated sugar. Beat for about 3-4 minutes until it's frothy and thickened. Once ready, pour the melted chocolate mixture into the egg mix. Add 1 teaspoon of vanilla extract and a pinch of salt. Stir gently to mix well without overdoing it. Finally, sift in 1/4 cup of all-purpose flour and fold it in carefully. Your batter is now ready! For the full recipe, see the section above. To get that dreamy lava center, timing is key. Bake the cakes for 12 to 14 minutes. The edges should look firm, but the center must still jiggle. This means the cake is done. If you bake too long, the center will not flow. Always watch the clock closely, as ovens can vary. One common mistake is not greasing the ramekins well. If you skip this step, your cake might stick. Dusting with flour helps too. Another mistake is overmixing the batter. This can lead to a tough texture. Mix just until combined for a tender cake. Lastly, don't open the oven door too soon. This can cause the cakes to collapse. Serve your lava cakes warm for the best experience. You can dust them with powdered sugar for a touch of sweetness. Fresh berries add a pop of color and flavor. A scoop of vanilla ice cream on the side makes it extra special. For a twist, drizzle with caramel or chocolate sauce. Enjoy with friends and family for a fun dessert! {{image_2}} You can play with flavors in your chocolate lava cake. Adding fruit can make it special. Try mixing in raspberry or orange zest. You can also add a splash of espresso for a coffee twist. These flavors blend well with rich chocolate. You can even use flavored chocolate, like mint or hazelnut, to change the taste. If you want a gluten-free lava cake, use almond flour or a gluten-free mix. Replace the all-purpose flour with these options. This swap keeps the cake tasty and soft. Just check that your chocolate is gluten-free too. Many brands offer great options that fit this need. To make a vegan lava cake, replace eggs with flaxseed meal or aquafaba. Use vegan butter and dark chocolate that has no milk. You can mix one tablespoon of flaxseed meal with three tablespoons of water for each egg. Let it sit until it thickens. This will help bind the cake. The result is a delicious treat, perfect for everyone. For more details on how to make this cake, check out the Full Recipe. I know that sometimes we have leftovers after making decadent chocolate lava cake. To store them right, let them cool first. Then, cover each ramekin tightly with plastic wrap. You can also use an airtight container if you prefer. This keeps them fresh for up to two days in the fridge. If you want to enjoy them later, make sure to store them before they dry out. When you are ready to enjoy your leftover lava cake, preheat your oven to 350°F (175°C). Place the ramekins on a baking sheet. Heat them in the oven for about 10-12 minutes. This warms the cake, and the center should become gooey again. You can also microwave them for about 30 seconds. Just check to make sure the center is warm but not overcooked. Yes, you can freeze the lava cake! Wrap each ramekin tightly with plastic wrap and then foil. This helps to prevent freezer burn. They can stay in the freezer for up to three months. When you want to eat one, thaw it in the fridge overnight. Then, reheat it as mentioned above. Enjoy your delicious treat whenever you want! For the full recipe, check out the link above. Lava cake and fondant cake both have a rich chocolate flavor. However, they differ in texture and baking. Lava cake has a warm, gooey center. Fondant cake is fully baked, which makes it dense and solid. Lava cake cooks for a shorter time, so the center stays soft. Fondant cake, on the other hand, uses a layer of rolled fondant for decoration. Yes, you can prepare the batter ahead of time. Just fill the ramekins and cover them. Place them in the fridge for up to 24 hours. When you're ready to bake, just add a few minutes to the cooking time. The result will still be a delicious, gooey lava cake. If your lava cake is not gooey, it might be overbaked. Baking for too long will cook the center fully. Make sure to check the baking time closely. The edges should be firm, while the center must remain soft and jiggly. If the center is set, it won't have that lovely lava effect. In this post, we covered how to make a perfect chocolate lava cake. We discussed essential ingredients and tips for choosing quality chocolate. I guided you through step-by-step instructions, ensuring your cake has the right gooey center. We also explored fun variations, proper storage, and answered common questions. Making this cake is a delicious journey. With practice, you'll master this dessert. Enjoy the sweet rewards of your hard work.

Decadent Chocolate Lava Cake Perfect for Any Occasion

Looking to impress your friends or family? The Decadent Chocolate Lava Cake is your answer! This rich, gooey dessert melts

- 4 boneless, skinless chicken breasts - 1/4 cup olive oil - 3 tablespoons fresh lemon juice - Zest of 1 lemon - 3 cloves garlic, minced - 2 tablespoons fresh rosemary, chopped - 2 tablespoons fresh thyme, chopped - 1 teaspoon salt - 1/2 teaspoon black pepper - Lemon slices for grilling and garnish To make Zesty Lemon Herb Grilled Chicken, you need simple and fresh ingredients. You will love how these flavors come together. The key is using fresh herbs and ripe lemons. The olive oil adds a rich taste and helps the chicken stay moist. Fresh lemon juice and zest brighten the dish. Garlic gives it that extra depth of flavor. You can feel the herbs in every bite, thanks to the rosemary and thyme. When you mix these ingredients, think about the balance of flavors. The salt and pepper bring out the natural taste of the chicken. You can also use lemon slices for grilling. They not only add flavor but also look great on the plate. - Grill or grill pan - Medium bowl - Whisk - Resealable plastic bag or shallow dish Using the right tools makes cooking easy and fun. A grill or grill pan gives you that perfect char. A medium bowl is great for mixing your marinade. The whisk helps combine the ingredients well. A resealable plastic bag or shallow dish is perfect for marinating. This way, the chicken soaks up all the flavors. Each tool helps you make this dish a hit at your table. For the full recipe, check out the detailed steps provided. - In a medium bowl, whisk together the olive oil, lemon juice, lemon zest, minced garlic, chopped rosemary, chopped thyme, salt, and black pepper to create your marinade. - Place the chicken breasts in a resealable plastic bag or a shallow dish. Pour the marinade over the chicken. Seal the bag or cover the dish. Refrigerate for at least 30 minutes, up to 4 hours for more flavor. - Preheat your grill to medium-high heat. This setting helps achieve nice grill marks. - If you're using a charcoal grill, let the coals heat until they are covered with white ash. This shows they are ready for cooking. - Remove the chicken from the marinade and discard the excess. - Place the chicken breasts on the grill. Cook for 6-7 minutes on each side. Ensure the internal temperature reaches 165°F (75°C). The chicken should not be pink in the center. - In the last few minutes, add lemon slices to the grill. This gives them a lovely caramelized flavor. - Once cooked, take the chicken off the grill. Let it rest for about 5 minutes. This helps keep it juicy. - Slice the chicken and serve it warm. Garnish with the grilled lemon slices and any extra herbs if you like. For the full recipe, check the detailed instructions listed above. To get the best flavor, marinate the chicken longer. I suggest at least one hour, but four hours is even better. This helps the chicken soak up all the tasty lemon and herb goodness. Always use fresh herbs when you can. They add a bright taste that dried herbs can't match. When grilling, avoid flipping the chicken too often. This helps create nice grill marks and keeps the juices inside. Let the chicken rest for five minutes after cooking. This helps the juices settle, making each bite juicy and flavorful. Pair your zesty chicken with grilled vegetables or a crisp salad. The fresh flavors balance each other well. You can also serve it with a fresh lemon vinaigrette. This adds a nice zing and ties the meal together. For the complete recipe, check the Full Recipe. {{image_2}} You can change the herbs for a new taste. Use basil or parsley for a fresh twist. These herbs give a lighter flavor. If fresh herbs are hard to find, dried herbs work too. Just use less since dried herbs are stronger. Want a kick? Add crushed red pepper flakes to your marinade. This spice gives your chicken a nice heat. You can also serve it with a spicy dipping sauce. This will make your meal exciting and bold. Grilling is great, but don’t stop there! You can bake or pan-sear the chicken. For baking, preheat your oven to 375°F. Place the chicken on a baking sheet and cook for about 25 minutes. Check that the internal temperature is 165°F. Pan-searing is a fast way to cook too. Just heat a little oil in a skillet and cook for about 6-7 minutes on each side. Both methods keep the chicken juicy and flavorful. After cooking, allow the chicken to cool. Store it in an airtight container. This keeps it fresh. You can refrigerate it for up to four days. Check it for signs of spoilage before eating. Use it in salads or wraps for quick meals. To freeze grilled chicken, wrap it tightly in plastic wrap. Then place it in a freezer bag. Squeeze out the air to prevent freezer burn. It can last up to three months in the freezer. When ready to eat, thaw it overnight in the fridge. For quick thawing, place it in cold water. Reheat grilled chicken in the oven for even heat. Set the oven to 350°F (175°C) and cover it with foil. This helps keep the moisture in. You can also use a microwave. Heat it in short bursts to avoid drying it out. Add a splash of water to keep it juicy. You can check the chicken's doneness by using a meat thermometer. The safe internal temperature for chicken is 165°F (75°C). Insert the thermometer into the thickest part of the chicken. If it reads 165°F, your chicken is safe to eat. If you don't have a thermometer, cut into the chicken. The meat should be white with no pink inside. Yes, you can use other cuts! Thighs, drumsticks, or even wings work well. Just remember, cooking times will change. Thighs usually take a bit longer than breasts. Drumsticks may need around 10 minutes more on the grill. Always check that they reach 165°F for safety. Absolutely! Grilled chicken is great for meal prep. To make it easy, grill a batch at once. Store the cooked chicken in an airtight container. It stays fresh in the fridge for up to four days. You can slice it for salads or wraps. It’s a quick and healthy option for busy days. Lemon pairs great with many herbs. Here are some top picks: - Rosemary - Thyme - Oregano - Basil These herbs bring out the zesty flavor of lemon. You can mix and match to find your favorite blend. Each herb adds a unique taste, making your grilled chicken even better. For the best flavor, always use fresh herbs when you can. In this blog post, we explored a tasty grilled chicken recipe with lemon and herbs. We covered the ingredients, tools needed, and step-by-step instructions for marinating and grilling. I also shared helpful tips for flavor enhancement and variations for spice lovers. Remember, you can store leftovers easily and repurpose them into meal prep. Grilling chicken can be simple and fun. Enjoy experimenting with flavors and make your meal special. Keep it fresh, and happy cooking!

Zesty Lemon Herb Grilled Chicken Flavorful Delight

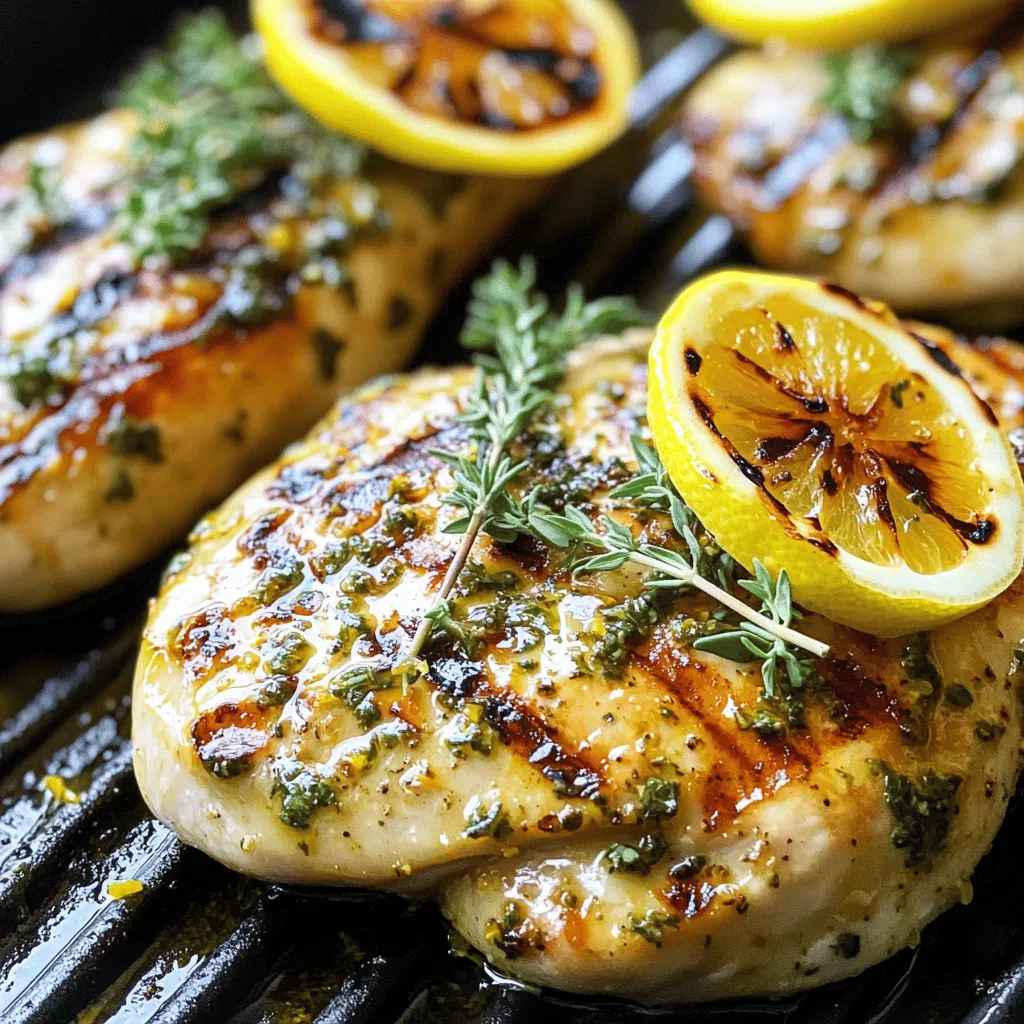
Are you ready to elevate your dinner game? My Zesty Lemon Herb Grilled Chicken is the perfect dish for anyone

To make creamy garlic Parmesan risotto, you will need: - 1 cup Arborio rice - 4 cups vegetable broth - 1 cup finely chopped onion - 2 cloves garlic, minced - 1 cup grated Parmesan cheese - 2 tablespoons olive oil - 2 tablespoons unsalted butter - Salt and pepper to taste - Fresh parsley, chopped for garnish For this recipe, gather these items: - A large, heavy-bottomed skillet - A saucepan - A wooden spoon or spatula - A ladle - A cutting board and knife To make your dish even more special, you can add: - Extra grated Parmesan cheese - Lemon zest for a fresh twist - Toasted pine nuts for crunch - Sliced green onions for color This list covers all the essentials you'll need for a perfect creamy garlic Parmesan risotto. If you want to explore the full recipe and get all the steps in detail, check out the Full Recipe. Start by heating the vegetable broth in a saucepan. Use medium heat until it simmers. Keep it warm on the stove. This step is key. Warm broth helps rice cook evenly and absorb flavors better. In a large, heavy skillet, heat the olive oil and one tablespoon of butter. Use medium heat for this. Add the finely chopped onion. Cook it until it looks clear, about five minutes. Then, stir in the minced garlic. Cook for one to two minutes more. Watch it closely. You don't want the garlic to brown. Now, add the Arborio rice to the skillet. This rice is special for risotto. Toast it for two to three minutes, stirring often. You want it to look a bit clear around the edges. This step adds flavor to the dish. Next, it’s time to add the warm broth. Use a ladle for this. Pour in one ladle at a time. Stir often and wait until most of the liquid is gone before adding more. Keep doing this for about 18 to 20 minutes. The rice should be creamy and slightly firm. When the rice is done, take the skillet off the heat. Stir in the last tablespoon of butter and the grated Parmesan cheese. Mix well until everything is creamy. Taste it and add salt and pepper if needed. Let it sit for a minute. This helps the flavors come together. Serve it hot, and don't forget to garnish with fresh parsley for a lovely touch. For the full recipe, check out the detailed instructions. To achieve that perfect creamy texture in your risotto, use Arborio rice. This rice has a high starch content. As you cook it, the starch releases and makes the dish creamy. Stirring often helps release more starch, which enhances the creaminess. I like to add the broth slowly. This method allows the rice to absorb the liquid fully. Keep the broth warm on the stove, as cold broth can shock the rice and ruin the texture. Start by toasting the Arborio rice briefly in olive oil and butter. This step adds a nice nutty flavor. Stir the rice constantly to avoid burning it. When adding broth, use a ladle and let the rice absorb most of the liquid before adding more. This slow process ensures even cooking. You can also add the cheese and butter off the heat. This keeps the risotto creamy and helps the flavors meld beautifully. One common mistake is adding too much broth at once. This causes the rice to cook unevenly and can ruin the creamy texture. Another mistake is not stirring enough. Stirring helps release the starch and create creaminess. Be careful not to overcook the rice; it should be al dente, with a slight bite. Lastly, avoid using pre-grated cheese. Freshly grated Parmesan melts better and adds more flavor to your risotto. For the complete recipe, check out the Full Recipe above. {{image_2}} For a rich twist, add mushrooms. Use any type you like. Chop them up and sauté with the onion. The mushrooms will soak up the garlic flavor. This addition makes the risotto creamy and earthy. I love using cremini or shiitake mushrooms. They add a nice depth to the dish. For a fresh and vibrant option, try spinach and peas. Add fresh spinach at the end of cooking. It wilts quickly and keeps its bright color. Toss in frozen peas for extra sweetness. They blend well with the creamy texture of the risotto. This variation is not just colorful; it’s also packed with nutrients. Want to make it heartier? Add protein like chicken or shrimp. Cook the chicken separately and mix it in at the end. For shrimp, sauté them until pink and add them just before serving. This gives a nice contrast to the creamy risotto. You can even use cooked sausage or tofu for a different flavor. Explore these variations to make your creamy garlic parmesan risotto unique. For more ideas, check out the Full Recipe. To store leftover risotto, first let it cool. Place it in an airtight container. This keeps moisture in and prevents drying. You can store it in the fridge for up to three days. If you want to keep it longer, freezing is an option. When reheating risotto, add a splash of broth or water. This helps bring back the creamy texture. Heat it gently in a pot over low heat. Stir often to ensure even heating. You can also use a microwave, but be careful not to overcook it. Stir halfway through to warm it evenly. Yes, you can freeze risotto. Use a freezer-safe container and fill it, leaving some space for expansion. Risotto can be frozen for up to two months. When ready to eat, thaw it in the fridge overnight. Reheat as mentioned above for the best taste. Follow the [Full Recipe] to enjoy this creamy dish, and remember these storage tips for the best leftovers! The best rice for risotto is Arborio rice. This rice is short-grain and has high starch content. As you cook it, Arborio rice releases starch. This starch creates that creamy texture we love in risotto. Other good options include Carnaroli and Vialone Nano. These types also have great absorbency and flavor. Yes, you can make risotto vegan! To do this, simply replace the butter and cheese. Use olive oil instead of butter. For cheese, try nutritional yeast or a vegan cheese. Also, make sure the broth is vegetable-based. This way, you keep the rich flavor while making it plant-based. You know risotto is done when it is creamy and slightly firm. The rice should be al dente, which means it has a little bite. Taste a small spoonful to check. If it’s soft but still has a slight chew, it’s ready. The risotto should flow on the plate but hold its shape. If your risotto is overcooked, it can become mushy. To fix this, add a bit of broth or water. Stir gently to rehydrate the rice. You can also mix in some fresh herbs or lemon juice. This adds flavor and brightness. If it’s too far gone, consider using it in a soup or as a filling for stuffed peppers or vegetables. For the full recipe of Creamy Garlic Parmesan Risotto, check out the earlier sections! This blog post covered everything you need to make risotto. We discussed the key ingredients, the right tools, and how to prepare your dish step by step. I shared tips for perfect texture and variations to try. We also explored how to store and reheat your risotto. Now you are ready to create your own tasty risotto. With practice, you'll make a dish that impresses everyone. Enjoy experimenting with flavors and textures when you cook!

Creamy Garlic Parmesan Risotto Easy Dinner Delight

If you crave a warm and comforting meal, look no further than my creamy garlic parmesan risotto. This easy dinner

- 2 ripe mangos, diced - 1 large avocado, diced - 1 small red onion, finely chopped - 1-2 jalapeños, seeded and minced (adjust for spice level) - 1/4 cup fresh cilantro, chopped - 2 tablespoons lime juice - 1 teaspoon honey (optional) - Salt and pepper to taste To make the best spicy mango salsa with avocado, you need to focus on quality ingredients. Start with ripe mangos. They add sweetness and flavor. Look for mangos that yield slightly when pressed. This means they are ripe and ready. Next, the avocado provides creaminess. Choose an avocado that is just ripe. It should feel soft but not mushy. This balance adds a nice texture to your salsa. Red onion brings a sharp bite to the mix. Finely chop it to release its flavor without overpowering the salsa. Jalapeños give the salsa its heat. Adjust the number based on your spice preference. For a milder dish, remove the seeds. Fresh cilantro adds a burst of freshness. I love adding lime juice for its zesty kick. Honey is optional but can balance the spice and enhance sweetness. Finally, season with salt and pepper to taste. You can find the full recipe at [Full Recipe]. 1. Dice the mangos and avocado: Start with two ripe mangos. Cut them into small cubes. Next, take one large avocado and slice it into pieces of the same size. This keeps the texture nice. 2. Finely chop the red onion: Use one small red onion. Chop it finely to mix well with the other ingredients. The onion adds a nice crunch and flavor. 3. Mince jalapeños to taste: Take one to two jalapeños. Remove the seeds if you want less heat. Mince them finely. Adjust the amount based on how spicy you like it. 1. Combine ingredients in a mixing bowl: In a large bowl, add the diced mangos, avocado, red onion, and minced jalapeños. This is where the magic begins! 2. Stir in cilantro and lime juice: Add a quarter cup of chopped cilantro and two tablespoons of lime juice. These ingredients bring freshness and a zesty kick. 3. Mix gently to avoid mashing the avocado: Take a spatula and mix everything slowly. Be careful not to mash the avocado. You want nice chunks to enjoy in each bite. For the complete recipe details, refer to the Full Recipe. For the best taste, always use ripe, sweet mangos. They add natural sweetness and depth. When choosing your jalapeños, you can adjust the spice level based on your taste. If you want it hotter, add more jalapeños. For less heat, use fewer. This way, you control how spicy the salsa becomes. Presentation matters! Serve your salsa in a decorative bowl. Add a sprinkle of fresh cilantro on top for a pop of color. It makes your dish look more inviting. Pair it with colorful tortilla chips. Use red, blue, and yellow chips for a fun and vibrant display. This not only enhances the look but also makes it more fun to eat. For the Full Recipe, check back to see how to make this delicious dip come to life! {{image_2}} You can have fun with this salsa by swapping ingredients. If you can't find ripe mangos, try peaches or pineapple instead. Both fruits add a sweet twist. You can also change up the herbs. Use green onions or parsley for a new flavor profile. This salsa shines when served with tacos or taco bowls. It adds a fresh kick that brightens each bite. You can also pair it with grilled meats or seafood. The sweetness of the mango and the creaminess of the avocado balance the heat from the jalapeños. Enjoy this versatile dip with your favorite dishes! For the complete recipe, check out the Full Recipe section above. To keep your spicy mango salsa fresh in the refrigerator, use an airtight container. This helps keep out air and moisture. Store it in the fridge right after making it. It usually lasts about 3 to 5 days. The longer it sits, the more the flavors mix, but the avocado can brown. To slow this down, add lime juice before storing. You can also press plastic wrap directly onto the salsa’s surface. This can help reduce browning. If you notice any browning on top, just scrape it off before serving. Yes, you can freeze spicy mango salsa, but it may change the texture. To freeze, place the salsa in a freezer-safe container or bag. Leave some space for expansion. It should last up to 3 months in the freezer. When you’re ready to use it, thaw it in the fridge overnight. Avoid microwave thawing, as it can make it watery. After thawing, stir gently to mix the ingredients back together. Some separation may occur, but it will still taste great! To change the heat, use more or fewer jalapeños. For more heat, add extra minced jalapeños. If you want less heat, use only one or skip them entirely. You can also remove the seeds, which hold the most heat. Another tip is to add more mango or avocado. Their sweetness can balance out the spice. Yes, you can make this salsa ahead of time. To keep it fresh, store it in an airtight container in the fridge. The salsa tastes better after sitting for a bit, as the flavors mix. I suggest letting it chill for about 15 to 30 minutes before serving. Just be careful not to let it sit too long. The avocado may brown, so add it right before you serve. This salsa is packed with nutrients. Mangos are high in vitamin C and fiber. They help boost your immune system and improve digestion. Avocados add healthy fats, which are great for your heart. They also have potassium, which helps control blood pressure. Red onions are rich in antioxidants and minerals. Together, these ingredients create a dip that's both tasty and good for you. For the full recipe, check the Tropical Heat: Spicy Mango Salsa with Avocado section. This blog post shared how to make a tasty spicy mango salsa. You learned about the key ingredients like ripe mangos and jalapeños, along with tips for mixing and presentation. I also offered ideas for variations and storage methods so you can enjoy it longer. Remember, you can adapt the recipe to fit your taste, making it perfect for any dish. Making this salsa can bring fresh flavors to your meals, and I hope you enjoy every delicious bite.

Spicy Mango Salsa with Avocado Flavorful Fresh Dip

Looking for a fresh dip that packs a punch? You’re in the right place! This Spicy Mango Salsa with Avocado

- 2 medium sweet potatoes, peeled and diced - 1 can (15 oz) black beans, drained and rinsed - 8 corn tortillas - 1 tablespoon olive oil - 1 teaspoon cumin - 1 teaspoon smoked paprika - 1/2 teaspoon garlic powder - 1/2 teaspoon chili powder - Salt and pepper to taste - 1 ripe avocado, sliced - 1/2 cup crumbled feta or cotija cheese (optional) - Fresh cilantro, chopped, for garnish - Lime wedges, for serving These ingredients create a colorful and tasty taco. Sweet potatoes give a nice sweetness. Black beans add protein and fiber. Corn tortillas hold everything together. For the seasonings, olive oil helps everything stick and adds flavor. Cumin and smoked paprika give a warm taste. Garlic and chili powder add depth. Don't forget salt and pepper to taste. Avocado slices add creaminess, while feta or cotija cheese brings a salty kick. Fresh cilantro adds brightness. Lime wedges are perfect for squeezing on top. For the full recipe, check the section where I guide you through the cooking steps. Enjoy cooking these tasty tacos! - Preheat the oven to 425°F (220°C). - Toss diced sweet potatoes with olive oil and seasonings. Start by peeling two medium sweet potatoes. Dice them into even cubes. This helps them roast evenly. In a large bowl, add the sweet potatoes, one tablespoon of olive oil, and the spices. You will need one teaspoon of cumin, one teaspoon of smoked paprika, half a teaspoon of garlic powder, and half a teaspoon of chili powder. Add salt and pepper to taste. Mix well to coat all the pieces. - Spread seasoned sweet potatoes on a baking sheet. - Roast for 25-30 minutes, tossing halfway through. Next, spread the sweet potatoes in a single layer on a lined baking sheet. Make sure they are not crowded. This helps them caramelize nicely. Roast them in the oven for 25 to 30 minutes. Toss them halfway through to ensure even cooking. You'll know they are done when they are tender and slightly golden. - Heat black beans in a saucepan. - Warm tortillas and assemble tacos with sweet potatoes, black beans, and toppings. While the sweet potatoes roast, heat one can of black beans in a small saucepan over medium heat. Stir them until warm. You can add a pinch of salt and pepper for flavor. Now, warm the corn tortillas. You can place them on a skillet for a few minutes or warm them in the oven for about two to three minutes. When everything is ready, it’s time to assemble the tacos. Take a warm tortilla and add a spoonful of roasted sweet potatoes. Next, add a scoop of black beans. You can top with sliced avocado, crumbled cheese, and fresh cilantro. Serve your tacos with lime wedges for a bright finish. This recipe is sure to please everyone! For the full recipe, check out the details above. To achieve perfect roasted sweet potatoes, start with the right size. Cut them into even cubes, about half an inch. This helps them cook evenly. Toss them in olive oil and spices until they are well coated. Spread them out on the baking sheet without crowding. This allows them to roast, not steam. For warming tortillas, you have a few easy options. You can use a skillet on medium heat. Place one tortilla in the pan for about 30 seconds on each side. This makes them soft and warm. Another method is to wrap a stack of tortillas in foil and place them in the oven for a few minutes. This warms them without making them dry. When presenting your taco platter, arrange the tacos in a circle on a large plate. This makes them look inviting. Add fresh cilantro on top for a pop of color. Serve lime wedges in a small bowl for squeezing over the tacos. For sides and drinks, consider pairing these tacos with a light salad or some chips and salsa. A refreshing drink like iced tea or lemonade complements the flavors well. You can also try a light beer for a fun twist. For the full recipe, check out the Sweet Potato Black Bean Tacos section above. {{image_2}} You can easily switch up the beans in this recipe. Try using pinto beans or kidney beans. They offer a different taste and texture. If you want protein, add grilled chicken or tofu. Both work well with sweet potatoes. For toppings, the options are endless. You can use shredded lettuce or diced tomatoes. If you want a kick, add jalapeños or hot sauce. For a creamy touch, try sour cream or yogurt. Each topping adds its own flavor to your tacos. These tacos can easily fit many diets. For a vegan version, skip the cheese and use plant-based toppings. You can also use avocado as a creamy option. Make sure to check that your tortillas are vegan. If you need gluten-free tacos, choose corn tortillas. They are naturally gluten-free and tasty. For a low-carb version, use lettuce wraps instead of tortillas. This keeps all the flavors while cutting carbs. You can store leftover tacos in the fridge. Place them in an airtight container. They stay fresh for about three days. For the best taste, keep the filling separate from the tortillas. If you want to freeze them, wrap the tacos in foil or plastic wrap. They can last for up to three months in the freezer. Just remember to thaw them overnight in the fridge before reheating. To reheat your tacos, use the oven for best results. Preheat to 350°F (175°C). Place the tacos on a baking sheet. Heat for about 10-15 minutes. This method keeps them crispy. You can also microwave them. Just place them on a microwave-safe plate. Heat for 1-2 minutes. But, this may make the tortillas soft. Preparing your ingredients ahead saves time. You can peel and dice the sweet potatoes a day before. Store them in cold water in the fridge. This keeps them fresh and ready to roast. You can also cook the black beans in advance. Store them in an airtight container in the fridge. For quick meals, try making taco bowls. Use the sweet potatoes and black beans over rice or quinoa. Add your favorite toppings like avocado or cheese. This way, you enjoy the same great flavors with less effort throughout the week. If you want more recipes, check out the Full Recipe for sweet potato black bean tacos. What can I use instead of corn tortillas? You can use flour tortillas or lettuce leaves. Both work well for holding the filling. Can I make these tacos ahead of time? Yes, you can prep the sweet potatoes and beans in advance. Store them in the fridge. Warm them up when you’re ready to eat. How spicy are sweet potato black bean tacos? These tacos are mildly spicy. Adjust the chili powder to your taste for more heat. What’s the best way to peel and dice sweet potatoes? To peel sweet potatoes, use a vegetable peeler. Cut off the ends first, then peel. For dicing, cut the sweet potato in half. Slice each half into planks, then cut them into small cubes. How do I know when my sweet potatoes are done roasting? Sweet potatoes are done when they feel soft and look slightly caramelized. You can test them by poking with a fork. If it goes in easily, they are ready. This blog shared a simple recipe for sweet potato black bean tacos. You learned about key ingredients, preparation steps, and great toppings. I highlighted tips for roasting sweet potatoes and warming tortillas perfectly. Plus, I provided ways to modify the recipe for different diets. As you make these tacos, remember to have fun with the process. Get creative with toppings and side dishes. Enjoy the flavors and share your creations. Happy cooking!

Savory Sweet Potato Black Bean Tacos Recipe

Are you ready to spice up taco night? My Savory Sweet Potato Black Bean Tacos bring flavor and fun to

- 2 cups rolled oats - 1 cup walnuts, chopped - 1/2 cup honey or maple syrup - 1/4 cup nut butter (almond or peanut) - 1/2 cup dried fruit (cranberries or raisins) - 1/4 teaspoon salt - 1/2 teaspoon cinnamon - 1/2 teaspoon vanilla extract Gathering the right ingredients is key to making delicious maple walnut granola bars. I love using rolled oats as my base. They give the bars great texture and hold everything together. Chopped walnuts add a wonderful crunch and rich flavor. You can choose honey or maple syrup as a sweetener. Both options work well. When I make these bars, I always include nut butter, either almond or peanut. This adds creaminess and helps bind the mixture. Dried fruit like cranberries or raisins adds sweetness and chewiness. A pinch of salt enhances the flavors, while cinnamon brings warmth and a hint of spice. Lastly, a touch of vanilla extract rounds out the taste, making the bars extra special. - Calories per serving: About 150 - Macronutrient breakdown: - Carbohydrates: 20g - Protein: 4g - Fat: 7g These granola bars are not just tasty; they offer health benefits too. Rolled oats provide fiber, which can help keep you full. Walnuts are rich in omega-3 fatty acids, good for heart health. Honey and maple syrup give you quick energy, perfect for a snack. Nut butter adds protein, making these bars great for an active day. Overall, these maple walnut granola bars are simple to make and pack a nutritious punch. For the full recipe, check out the link. Enjoy making your own at home! 1. Preheat your oven to 350°F (175°C). 2. Line an 8x8-inch baking dish with parchment paper. Leave a bit hanging over the sides for easy removal. 3. Gather all your ingredients and measure them out. This makes mixing easier. 1. In a large bowl, combine the rolled oats, chopped walnuts, salt, and cinnamon. Stir well to mix everything together. 2. In a small saucepan, melt the honey (or maple syrup) and nut butter over low heat. Stir until smooth. 3. Remove from heat and add the vanilla extract. Pour this mixture over the dry ingredients. 4. Add the dried fruit and mix until all the ingredients are coated. 5. Transfer the mixture to your prepared baking dish. Press it down firmly with a spatula or your hands. The more tightly packed, the better they will hold together. 6. Bake in the preheated oven for 20-25 minutes. Look for a golden brown edge. 1. After baking, let the granola cool in the pan for about 10 minutes. 2. Use the parchment paper to lift the granola out of the pan. 3. Place it on a cutting board and let it cool completely. 4. Once cool, cut it into bars or squares. Store in an airtight container for up to a week. For the full recipe, refer to the earlier section. Enjoy your delicious maple walnut granola bars! To get chewy bars, use more nut butter and syrup. For crunchier bars, add more oats and nuts. The key is also packing the mixture tightly. When you press it down firmly, it holds together better after baking. You can add spices like nutmeg or ginger for extra flavor. I often use a dash of vanilla extract too. If you want more crunch, try adding seeds like pumpkin or sunflower. You can also swap walnuts for almonds or pecans for a different taste. One common mistake is overmixing. This can make your bars too dense. On the other hand, undermixing can lead to uneven flavor. Always check your baking time. If you want chewy bars, take them out when they are lightly golden. For crunchier bars, leave them in a bit longer. For the full recipe of Maple Walnut Granola Bars, check out the recipe section. {{image_2}} You can easily change the flavor of your maple walnut granola bars. One fun idea is to add chocolate chips. They blend well with the maple and nuts. Just mix in about half a cup before baking. You can also switch up the dried fruits. Try using apricots, dates, or figs instead of cranberries or raisins. Each fruit offers a unique taste. If you need gluten-free options, choose certified gluten-free oats. This keeps the bars safe for those with gluten sensitivities. For vegan substitutions, replace honey with maple syrup. Use almond or cashew butter to keep it plant-based. These swaps make the bars fit many diets without losing flavor. You can customize the portions based on your needs. If you want smaller snacks, make mini bars or bites. Simply spread the mixture thinner in the baking pan. This way, you can cut them into bite-sized pieces. For meal prep, think about cutting larger bars. This helps with easy grab-and-go meals. You can store them in snack bags for a quick treat during the week. To keep your homemade granola bars fresh, store them in an airtight container. I recommend using a glass jar or a plastic container with a tight lid. This helps keep moisture out and maintains their crunch. Place the container in a cool, dark place, like a pantry or cupboard. Avoid storing them in places with high heat or direct sunlight. If stored correctly, your granola bars can last for about a week. After that, they may lose their texture and flavor. Signs of spoilage include a change in smell or taste, or if they feel soft instead of crunchy. Always check for any signs of mold before you eat them. You can also freeze granola bars for longer storage. To freeze, wrap each bar tightly in plastic wrap. Place them in a freezer-safe bag or container. This way, they won’t stick together. When you're ready to enjoy one, take it out and let it thaw at room temperature for about 30 minutes. You can also microwave it for a few seconds for a warm treat. Yes, you can make these bars without nuts. Use seeds instead, like pumpkin or sunflower seeds. This keeps the texture crunchy. You can also add more dried fruit or use coconut flakes for extra flavor. To substitute honey, use maple syrup or agave nectar. Both options provide sweetness without using animal products. They blend well with the other ingredients. Use the same amount as you would for honey. For chewy bars, bake them for 20 to 25 minutes. Watch for a golden edge. If you prefer crunchier bars, bake for a few extra minutes. Just be careful not to overbake, as they can dry out. You can find pre-made bars at most grocery stores. Look in the snack aisle or the health-food section. Many brands offer maple walnut flavors. However, homemade bars taste fresher and can be customized. To enhance flavor, try adding spices like nutmeg or ginger. You can also mix in chocolate chips or different dried fruits. Another great option is to add a bit of orange zest for freshness. Experiment with flavors to find your favorite combination. For the full recipe of Maple Walnut Granola Bars, check out the recipe section above. You learned how to make delicious maple walnut granola bars. We covered each step, from gathering ingredients to baking and storing. Remember, you can customize flavors or adjust for dietary needs. Making these bars lets you enjoy healthy snacks that fit your taste. Keep these tips handy to avoid mistakes and create the perfect texture. Enjoy your homemade treats; they make snacking fun and easy!

Maple Walnut Granola Bars Simple and Delightful Recipe

Looking for a tasty snack that’s easy to make? These Maple Walnut Granola Bars are the perfect choice! Packed with

Older posts
Newer posts
← Previous Page1 … Page77 Page78 Page79 … Page82 Next →

dsad

© 2026 Recipes Pursuit • Built with GeneratePress

Our Policies

  • Copyright Policy
  • Cookie Policy
  • GDPR Policy
  • Privacy Policy
  • Disclaimer
  • Terms Of Use

More Information

  • Home
  • About
  • Contact
  • Appetizers
  • Dessert
  • Dinner
  • Drinks
©2026, Recipes Pursuit About Back To Top