Skip to content
DisclaimerTerms Of UseGDPR PolicyCookie Policy

Recipes Pursuit

  • Home
  • Drinks
  • Appetizers
  • Dinner
  • Dessert
  • About
  • Contact
  • Privacy Policy
DisclaimerTerms Of UseGDPR PolicyCookie Policy

NO-ING-IMG

This recipe for chocolate chip pancakes is simple and quick. You can whip it up in about 20 minutes. The pancakes are fluffy and packed with tasty chocolate chips. They make a great breakfast or snack. Here are the main ingredients you will need: - 1 cup all-purpose flour - 2 tablespoons sugar - 1 tablespoon baking powder - 1/2 teaspoon baking soda - 1/4 teaspoon salt - 1 cup buttermilk (or regular milk with 1 tablespoon vinegar) - 1 large egg - 2 tablespoons melted butter (plus extra for cooking) - 1/2 teaspoon vanilla extract - 1/2 cup chocolate chips These ingredients blend perfectly to create soft, sweet pancakes. You can make your pancakes even better with some fun toppings. Consider these options: - Fresh berries - Banana slices - Maple syrup These toppings add color, flavor, and extra joy to your meal. Enjoy mixing and matching to find your favorite combinations! 1. Start by gathering all your ingredients. This helps you stay organized. 2. In a medium bowl, mix the dry ingredients: flour, sugar, baking powder, baking soda, and salt. Whisk until they blend well. 3. In another bowl, combine the wet ingredients: buttermilk, egg, melted butter, and vanilla. Stir until smooth. 4. Pour the wet mix into the dry mix. Fold gently until just combined. A few lumps are okay; don’t overmix. 5. Carefully add the chocolate chips into the batter. 1. Heat a non-stick skillet or griddle over medium heat. Add a little butter to the pan. 2. Once hot, pour about 1/4 cup of batter for each pancake. 3. Wait until bubbles form on the surface. The edges should look set, usually after 2-3 minutes. 4. Flip the pancake and cook for another 1-2 minutes. They should turn golden brown. 5. Remove the pancakes and keep them warm. Repeat with the remaining batter. - Use fresh ingredients for the best flavor. - Avoid overmixing; it can make the pancakes tough. - Make sure your skillet is at the right heat. Too hot can burn them, too low can make them soggy. - Keep the pancakes warm in a low oven while cooking the rest. - Serve them with fresh berries or banana slices for an extra treat. - For a full recipe, check out the Chocolate Chip Pancake Delight section above. When making chocolate chip pancakes, avoid common pitfalls. One big mistake is overmixing the batter. This makes pancakes tough. Gently mix until just combined. It’s okay to have lumps. Another mistake is cooking at too high a heat. This can burn the outside while leaving the inside raw. Keep the heat medium for even cooking. Lastly, don't skip the melted butter. It adds flavor and helps with texture. To make fluffy pancakes, use fresh baking powder. Old baking powder loses its power. Also, separate the wet and dry ingredients. Mix them just before cooking. Letting the batter sit too long can make it dense. For extra fluffiness, add a bit of baking soda. The bubbles help lift the pancakes. Use buttermilk or add vinegar to regular milk for a light texture. Serve your chocolate chip pancakes warm. You can add fresh berries or banana slices on top. A drizzle of maple syrup makes them even better. For a twist, try whipped cream or a scoop of ice cream. You can also sprinkle nuts or coconut for added crunch. Enjoy these treats as breakfast or dessert! Check out the Full Recipe to get started. {{image_2}} You can easily make gluten-free chocolate chip pancakes. Just use a gluten-free flour blend. Make sure the blend has xanthan gum for better texture. Follow the same steps from the Full Recipe. These pancakes will be fluffy and tasty, just like the original. If you want vegan chocolate chip pancakes, swap a few ingredients. Use almond milk or oat milk instead of dairy milk. Replace the egg with a flax egg, which you make by mixing one tablespoon of ground flaxseed with three tablespoons of water. Let it sit for five minutes to thicken. Use coconut oil instead of butter. Again, follow the same steps from the Full Recipe. You will enjoy a light and yummy pancake! Add unique flavors to your pancakes for fun twists. Try mixing in a teaspoon of cinnamon for warmth. You can also use dark chocolate chips or white chocolate chips for different tastes. For a fruity twist, fold in fresh blueberries or sliced strawberries. These small changes can make your pancakes exciting and delicious! After a fun breakfast, you might have some pancakes left. To store them, let the pancakes cool down first. Once cool, stack them with a piece of parchment paper in between each pancake. This step keeps them from sticking together. Place the stack in an airtight container. You can store them in the fridge for up to three days. When you're ready to eat those leftover pancakes, you have a few options. The best way is to use a skillet. Heat it over medium heat and add a bit of butter. Place your pancake in the skillet for about one minute on each side. This method keeps them soft and tasty. You can also use a microwave. Place the pancake on a plate and cover it with a damp paper towel. Heat for about 20-30 seconds. Freezing pancakes is easy and great for quick meals. To freeze, follow these steps: first, let the pancakes cool completely. Then, stack them with parchment paper in between. This keeps them from freezing as one solid block. Next, place the stack in a freezer-safe bag or container. You can freeze them for up to two months. When you want one, just reheat it using the instructions above. This makes breakfast a breeze! For the full recipe, check out the section above. Yes, you can make chocolate chip pancakes without buttermilk. If you don’t have buttermilk, use regular milk. Just add one tablespoon of vinegar to the milk. Let it sit for five minutes. This will give you a similar tangy flavor. It’s an easy swap that works great! You can tell your pancakes are done when bubbles form on the surface. Look for the edges to look set and a bit dry. This usually takes about 2-3 minutes on one side. When you flip them, cook for another 1-2 minutes until golden brown. A perfectly cooked pancake has a slight bounce when you press it. If you don’t have chocolate chips, there are many tasty options. You can use chopped nuts like walnuts or pecans. Dried fruit like raisins or cranberries also works well. For a fun twist, try adding peanut butter chips or white chocolate. Your pancakes will still taste amazing! In this post, we explored how to make delicious chocolate chip pancakes. We covered the key ingredients and optional toppings to enhance flavor. The step-by-step instructions guide you through preparations and cooking. I shared tips for avoiding common mistakes and achieving fluffy results. You can also try gluten-free or vegan variations. Lastly, I discussed storage and reheating for leftovers and answered common questions. Now, you're ready to enjoy homemade pancakes anytime! Happy cooking!

Chocolate Chip Pancakes Easy and Tasty Delight

Looking for a quick, delicious breakfast? You’ve found it! In this post, I’ll guide you through making easy and tasty

- 1 pound boneless, skinless chicken breasts, sliced into strips - 1 red bell pepper, sliced - 1 green bell pepper, sliced - 1 yellow onion, sliced - 3 tablespoons olive oil - 2 tablespoons fajita seasoning (store-bought or homemade) - 1 lime, juiced - Salt and pepper to taste The main ingredients in this dish are quite simple. The chicken gives you protein and makes the meal filling. The bell peppers and onion add flavor and color. Olive oil keeps everything moist and helps the spices stick. Fajita seasoning packs a punch, adding a mix of spices. Lime juice brightens the dish, making it fresh. - Flour or corn tortillas, for serving - Fresh cilantro, chopped (for garnish) Tortillas are an easy way to serve fajitas. They hold the juicy chicken and veggies well. You can choose flour or corn based on your taste. Fresh cilantro gives a nice touch and adds a pop of color. - Caloric value: About 350 calories per serving - Protein content: Roughly 30 grams per serving - Dietary restrictions: Gluten-free option available with corn tortillas This recipe is not only tasty but also nutritious. Each serving offers about 350 calories, making it a balanced meal. It has a good amount of protein, which is important for muscle health. If you need a gluten-free meal, just use corn tortillas instead of flour. For the full recipe, check out the detailed steps and tips. To start, slice the chicken and vegetables. Take one pound of boneless, skinless chicken breasts. Cut them into strips. Then, grab one red bell pepper, one green bell pepper, and one yellow onion. Slice these into thin strips too. Next, mix everything in a large bowl. Add the sliced chicken, red bell pepper, green bell pepper, and onion. Drizzle three tablespoons of olive oil over the mixture. Squeeze the juice of one lime over it too. This adds a nice zing! Now, sprinkle two tablespoons of fajita seasoning, along with some salt and pepper, over the mixture. Toss the ingredients together. Make sure everything is coated well. This step is key for flavor. Before you bake, preheat your oven to 400°F (200°C). This is essential for even cooking. While the oven heats, line a large baking sheet with parchment paper. This makes cleanup easy later. Once the oven is ready, spread the chicken and vegetables evenly across the prepared sheet pan. Lay them out in a single layer. This helps them cook properly without steaming. Bake in the preheated oven for 20 to 25 minutes. Check that the chicken is cooked through and the veggies are tender. You want them to be slightly charred for extra flavor. When done, remove the sheet pan from the oven. Let it cool for a couple of minutes before serving. This helps the juices settle. Serve the fajitas hot with warm tortillas. Don’t forget to top them with fresh cilantro! For the full recipe, check the earlier section. - Checking doneness: The best way to check if your chicken is done is to use a meat thermometer. Insert it into the thickest part of the chicken. It should read at least 165°F (74°C). If you don’t have a thermometer, cut into a piece of chicken. It should be white without any pink inside. - Avoiding dryness: To keep your chicken juicy, avoid overcooking. Bake just until it reaches the right temperature. Remember, the chicken will keep cooking a little after you take it out of the oven. - Marinating suggestions: Marinating your chicken can boost flavor. Use lime juice, olive oil, and fajita seasoning. Let it sit for at least 30 minutes. For more flavor, try adding garlic or chipotle peppers. - Additional spices to consider: You can mix in other spices like smoked paprika or cumin. These spices add depth and warmth to your dish. Try to experiment with different blends for unique tastes. - Best practices for serving on the table: Serve the fajitas straight from the sheet pan. This keeps them warm and sizzling. Let everyone build their own tortillas with the chicken and veggies. - Creative platter ideas: Use a large platter to display your fajitas. Add bowls with toppings like sour cream, guacamole, and salsa. This makes your meal look inviting and fun for guests. {{image_2}} You can easily switch up the protein in this recipe. If you want to use beef, try flank steak. Slice it thin and marinate it just like chicken. The flavors will still shine through. For a vegetarian twist, use chickpeas or tofu. Both options soak up flavors well. You can toss them in the same seasoning mix. This makes a tasty meal for everyone. Using seasonal veggies can elevate your fajitas. In summer, add zucchini and corn for a fresh taste. In autumn, try sweet potatoes or butternut squash. These veggies add sweetness and texture. Always adjust based on freshness. Check your local market for the best produce. This not only makes your dish better but also supports local farmers. You can change up the spice blend for more variety. Use smoked paprika for a deeper flavor. Add chili powder for a kick. Each spice mix can give a unique taste. You can also add sweetness with fruits. Pineapple chunks or mango slices can brighten your dish. They melt into the mix and offer a delightful contrast to savory flavors. For the full recipe, click [Full Recipe]. After enjoying your Sheet Pan Chicken Fajitas, store any leftovers in the fridge. Use airtight containers to keep them fresh. This way, the flavors stay locked in. Make sure to cool the fajitas before sealing the containers. They can last for about three to four days in the fridge. When you're ready to eat leftovers, reheating them properly is key. The best way is to use the oven. Preheat the oven to 350°F (175°C). Spread the fajitas on a baking sheet and heat for about 10-15 minutes. This keeps them crispy. If you're in a hurry, the microwave works too. Place the fajitas in a microwave-safe dish and cover it with a damp paper towel. Heat for about one to two minutes. Make sure to check if it's hot all the way through. Freezing fajitas is a great option for meal prep. To freeze, let the fajitas cool completely. Then, place them in freezer-safe bags or containers. Remove as much air as possible to prevent freezer burn. They can last up to three months in the freezer. When you're ready to enjoy them, thaw the fajitas overnight in the fridge. For a quick option, you can use the microwave to defrost. Make sure to heat them thoroughly before serving. Enjoy your flavorful meal anytime! Sheet pan chicken fajitas can last in the fridge for 3 to 4 days. Make sure to store them in an airtight container. If you want to keep them longer, freeze them. They can last up to 3 months in the freezer. Just make sure to thaw them in the fridge before reheating. Yes, you can prepare the chicken and veggies ahead of time. Slice the chicken and vegetables a day before. Mix them with oil and spices and store them in the fridge. This makes cooking quick and easy when you are ready to eat. Leftover fajitas are great for many meals. You can make fajita bowls with rice or quinoa. They also work well in tacos or wraps. Add them to omelets for breakfast or mix them into a salad for a tasty lunch. Absolutely! Sheet pan chicken fajitas are perfect for meal prep. You can portion them into containers for the week. Just reheat them when you are ready to eat. This makes it easy to have a healthy meal ready in no time. This blog post covered key ingredients for chicken fajitas, cooking steps, and tips for perfect dishes. I shared ideas for variations and how to store leftovers. You can adapt these fajitas to fit any taste or diet. The recipe is simple and great for meal prep. With proper cooking and storage, you can enjoy delicious meals all week. Dive into this tasty dish and make it your own!

Sheet Pan Chicken Fajitas Flavorful and Easy Meal

If you’re craving a tasty and easy meal, my Sheet Pan Chicken Fajitas recipe is just for you! This dish

To make these Vanilla Almond Cupcakes, you need the following: - 1 ½ cups all-purpose flour - 1 cup granulated sugar - ½ cup unsalted butter, softened - 2 large eggs - 1 cup milk (or almond milk for a nutty flavor) - 2 teaspoons vanilla extract - 1 teaspoon almond extract - 1 ½ teaspoons baking powder - ½ teaspoon baking soda - ¼ teaspoon salt - Sliced almonds and powdered sugar for garnish You can swap some ingredients if needed. If you want a dairy-free option, use almond milk instead of regular milk. For a lighter cupcake, replace butter with applesauce. You can also use coconut oil for a hint of coconut flavor. If you can't find almond extract, you can double the vanilla extract. This will still give you a great taste. Garnishes can add a nice touch to your cupcakes. Try adding sliced almonds on top for crunch. A dusting of powdered sugar makes them look sweet and inviting. You can also drizzle melted chocolate for a richer flavor. Fresh berries can add color and a burst of freshness. {{ingredient_image_1}} First, preheat your oven to 350°F (175°C). This step is key for good baking. While it heats, line a 12-cup muffin pan with paper liners. This makes for easy cupcake removal later. In a large bowl, cream together the softened butter and sugar. Use an electric mixer for best results. Beat them until the mix is light and fluffy. Next, add the eggs one at a time. Make sure to mix well after each egg. Then, stir in the vanilla and almond extracts. In another bowl, whisk together the flour, baking powder, baking soda, and salt. Gradually add this dry mix to the wet mix. Alternate with the milk for a smooth batter. Make sure not to overmix. Now, spoon the batter into the cupcake liners. Fill each one about two-thirds full. This allows space for rising. Place the muffin pan in the preheated oven. Bake for 18 to 20 minutes. To check if they are done, insert a toothpick into the center. If it comes out clean, they are ready. Once baked, take the pan out of the oven. Let the cupcakes cool in the pan for 5 minutes. After that, transfer them to a wire rack to cool completely. Once cool, you can dust them with powdered sugar. Top with sliced almonds for a lovely finish. Enjoy your delicious Vanilla Almond Cupcakes! To make the best vanilla almond cupcakes, start with room temperature ingredients. This helps your butter and eggs mix well. Use a scale for measuring flour to get it just right. Too much flour can make cupcakes dry. I recommend using an electric mixer to cream the butter and sugar. This makes your batter light and fluffy. When mixing dry and wet ingredients, do it gently. Overmixing can lead to tough cupcakes. One common mistake is not preheating the oven. This can lead to uneven baking. Another mistake is filling the cupcake liners too full. Fill them only two-thirds full to allow room for rising. Also, avoid opening the oven door too soon. This can cause the cupcakes to sink. If you skip the cooling time, the frosting may melt off. To keep your cupcakes moist, use milk or almond milk in the batter. Almond milk adds a nice nutty flavor. Adding a little more butter can also help. Once baked, let them cool on a wire rack. For extra moisture, you can brush them with a simple syrup. This is just equal parts water and sugar heated until dissolved. It keeps your cupcakes fresh and soft for days. Pro Tips Use Room Temperature Ingredients: Ensure that your butter and eggs are at room temperature for better incorporation, resulting in a lighter and fluffier cupcake. Don’t Overmix the Batter: Mix until just combined to prevent dense cupcakes. A few lumps are okay; they’ll bake out. Almond Milk for Extra Flavor: Substitute regular milk with almond milk to enhance the nutty flavor profile of your cupcakes. Garnish Just Before Serving: Dust powdered sugar and add sliced almonds right before serving to keep the toppings fresh and visually appealing. {{image_2}} You can easily add a chocolate twist to your vanilla almond cupcakes. Just mix in 1/3 cup of cocoa powder with the dry ingredients. This change gives a rich chocolate flavor that pairs well with almond. You can also fold in chocolate chips for extra sweetness. This variation delights chocolate lovers while keeping that almond essence. Want to make these cupcakes gluten-free? Simply swap the all-purpose flour for a gluten-free blend. Make sure it includes xanthan gum for texture. This helps your cupcakes rise and stay moist. You can also use almond flour, which adds a lovely nutty taste. Just remember, gluten-free cupcakes can be denser, so watch your baking time closely. Adding a filling can create a fun surprise in your cupcakes. After baking and cooling, you can cut a small hole in the center of each cupcake. Fill it with your favorite jam or cream. Strawberry jam adds a fruity punch, while whipped cream offers lightness. Top with sliced almonds for a beautiful finish. This extra step makes your cupcakes even more delightful! To keep your vanilla almond cupcakes fresh, store them in an airtight container. Place them on the counter for up to three days. If your kitchen is warm or humid, refrigerate them to prevent spoilage. Make sure to let them cool completely before sealing. Freezing is a great way to save cupcakes for later. First, let them cool fully. Wrap each cupcake tightly in plastic wrap. Then, place them in a freezer-safe bag or container. They can freeze well for up to three months. When you are ready to eat, thaw them in the fridge overnight. Cupcakes taste best when fresh, but you can extend their life. Avoid leaving them out for long periods. If you notice any mold or smell, it’s best to throw them away. Always check for freshness before serving. Yes, you can use almond milk. It adds a nice nutty flavor. Just swap it for regular milk in equal amounts. This change makes the cupcakes even more delicious and keeps them moist. Cupcakes are done when a toothpick comes out clean. Insert it into the center of a cupcake. If it’s clean, they are ready. If the toothpick has batter on it, bake for a few more minutes. The tops should also look golden brown. If you lack almond extract, use vanilla extract instead. This keeps the flavor balanced. You can also use hazelnut extract for a different taste. Adjust the amount to suit your flavor preference. We covered the key steps to make delicious cupcakes. You learned about the right ingredients and how to mix them well. I shared baking tips to help you avoid common mistakes. You also found out how to store them for long-lasting freshness. Try out different flavors and make it your own. Enjoy sharing these treats with family and friends. Happy baking!

Vanilla Almond Cupcakes Delightful and Easy Recipe

Are you ready to bake some Vanilla Almond Cupcakes that everyone will love? In this delightful and easy recipe, I’ll

For a hearty and flavorful Instant Pot chili, you will need: - 1 pound ground turkey or beef - 1 can (15 oz) kidney beans, drained and rinsed - 1 can (15 oz) black beans, drained and rinsed - 1 can (15 oz) diced tomatoes, with juices - 1 cup bell peppers (red and green), chopped - 1 small onion, finely chopped - 2 cloves garlic, minced - 2 tablespoons chili powder - 1 tablespoon cumin - 1 teaspoon paprika - ½ teaspoon smoked paprika - 1 teaspoon salt - ½ teaspoon black pepper - 1 cup vegetable broth or chicken broth These ingredients create a rich base for your chili, packed with protein and fiber. You can make your chili even better with some fun toppings: - Sour cream - Shredded cheese - Green onions - Jalapeños Feel free to swap out any ingredients for your diet. Want it vegetarian? Try lentils instead of meat. Enjoy experimenting! For the full recipe, check out the steps in the next section. 1. Sautéing the meat and vegetables: Start by turning on your Instant Pot. Select the Sauté mode. Add 1 pound of ground turkey or beef. Break it up with a spatula. Cook until it is browned, which takes about 5-7 minutes. If there is excess grease, drain it. 2. Adding spices and mixing ingredients: Next, toss in the chopped onion and bell peppers. Cook these for 2-3 minutes until they soften. Then, add 2 cloves of minced garlic. Cook for about 30 seconds until you smell the garlic. Now, add your spices: 2 tablespoons of chili powder, 1 tablespoon of cumin, 1 teaspoon of paprika, ½ teaspoon of smoked paprika, 1 teaspoon of salt, and ½ teaspoon of black pepper. Stir everything well to coat the meat and veggies. 1. Using the Instant Pot: Pour in 1 can of diced tomatoes with their juices. Then add 1 can of kidney beans and 1 can of black beans, both drained and rinsed. Finally, add 1 cup of vegetable or chicken broth. Stir until everything is well combined. Secure the lid on the Instant Pot and set the valve to Sealing. Choose Manual or Pressure Cook for 15 minutes. 2. Quick release method and post-cooking steps: After cooking, perform a quick release. Carefully turn the valve to Venting. Once the steam stops, open the lid and stir the chili. Taste it and adjust the seasoning if you need to. Let it sit for about 10 minutes. This helps the flavors blend. - Presentation tips for a visually appealing dish: Serve your chili in deep bowls. This makes it look great on the table. - Garnishing options to enhance flavor: Top with a dollop of sour cream, a sprinkle of shredded cheese, and sliced green onions or jalapeños. These add color and extra flavor to every bite. For the full recipe details, refer to the [Full Recipe]. To make your chili just right, focus on the texture. If you want a thick chili, add less broth. For a soupier chili, add more broth or diced tomatoes. Stir well to mix the ingredients as you go. Adjusting spice levels is easy. Taste your chili after it cooks. If it needs more heat, add chili powder or diced jalapeños. If it’s too spicy, add a bit of sour cream or cheese to cool it down. One common mistake is overcooking or undercooking the meat. Ground turkey or beef should be browned first. If you skip this step, the meat can turn tough. Follow the sauté instructions closely for the best results. Another mistake is forgetting to sauté your veggies. This step builds flavor. When onions and peppers cook first, they add a sweet taste to the chili. Always sauté before adding other ingredients for the best flavor. For the full recipe, check out the Hearty Instant Pot Chili section. {{image_2}} You can make a tasty vegetarian or vegan chili. Start by swapping out meat for plant-based options. Use lentils or crumbled tofu instead of ground turkey or beef. For the broth, replace chicken broth with vegetable broth. Add extra veggies for more flavors and nutrients. Consider these additions: - Zucchini - Carrots - Corn - Mushrooms - Bell peppers Beans also play a key role. You can keep kidney beans and black beans or add chickpeas for variety. These choices make your chili hearty and satisfying without meat. Adjusting the heat of your chili is simple. If you want it spicy, add more chili powder or hot sauce. You can also include different chili peppers. Try jalapeños or serranos for heat. You could also use chipotle peppers for a smoky flavor. For a milder chili, limit the chili powder and skip spicy peppers. Use sweet peppers or bell peppers instead. Balance is key; taste as you go to find your perfect level of spice. With these variations, you can create a chili dish that matches your tastes. Explore these options to make your meal more exciting! Check the Full Recipe for ingredient details. To keep your chili fresh, follow these tips: - Refrigeration: Let the chili cool down to room temperature. Then, pack it in an airtight container. Store it in the fridge for up to 4 days. - Freezing: For longer storage, freeze the chili. Use freezer-safe bags or containers. Make sure to leave some space for expansion. When it comes to reheating chili, flavor is key. Use these methods: - Stovetop: Pour the chili into a pot and heat on low. Stir often. This helps keep the flavors rich and thick. - Microwave: Place chili in a microwave-safe bowl. Heat for 1-2 minutes. Stir halfway to ensure even heat. For best results, heat it slowly. This way, you can enjoy all the delicious flavors from your full recipe. It takes about 40 minutes to make Instant Pot chili. Here’s the breakdown: - Prep Time: 15 minutes. You chop the onions, bell peppers, and garlic. Then, you brown the meat. - Cooking Time: 15 minutes in the Instant Pot. This is when all the flavors blend. - Pressure Release: 10 minutes. Let the pressure drop naturally before opening. Yes, you can use canned beans! Canned beans save time and effort. They are already cooked, so you just rinse and add them. Here are some benefits of using canned beans: - Convenience: You skip the soaking and long cooking time. - Flavor: Canned beans keep a good taste and texture. - Variety: You can choose different types, like kidney or black beans. You can serve Instant Pot chili in many fun ways! Here are some great options: - Serve it in deep bowls. This helps keep the chili warm. - Add toppings like sour cream or shredded cheese. They add creaminess and flavor. - Pair it with cornbread or tortilla chips. These sides complement the chili well. - Add a fresh salad on the side for a crunchy contrast. For the full recipe, check out the Hearty Instant Pot Chili section! You learned how to make delicious Instant Pot chili from the key ingredients to cooking tips. From sautéing the meat to choosing toppings, each step matters. Avoid common mistakes and customize your chili to fit any diet. Store leftovers correctly, and you can enjoy meals later. Remember, making chili in the Instant Pot is both quick and easy. With practice, you'll find your perfect recipe. Enjoy cooking and impressing others with your chili skills!

Instant Pot Chili Flavorful and Hearty Dish

Looking for a warm and comforting meal? Instant Pot chili is a perfect choice! It’s hearty, flavorful, and easy to

- 4 large whole wheat tortillas - 1 cup purple cabbage, shredded - 1 red bell pepper, thinly sliced - 1 yellow bell pepper, thinly sliced - 1 carrot, julienned - 1 cucumber, thinly sliced - 1 avocado, sliced - 1 cup fresh spinach leaves - ½ cup hummus (your favorite flavor) - Juice of 1 lime - Salt and pepper to taste - Sesame seeds for garnish Each veggie in your wrap adds great nutrition. Purple cabbage has antioxidants that help fight disease. Red and yellow bell peppers are high in vitamin C, which boosts your immune system. Carrots give you beta-carotene for healthy eyes. Cucumbers are hydrating and low in calories. Avocados add healthy fats and fiber. Spinach is rich in iron and vitamins A and K. Together, these veggies make a colorful and healthy meal. If you can’t find purple cabbage, use green cabbage instead. Any sweet pepper works well if you don’t have red or yellow. You can swap carrots for zucchini or radishes for a crunchy bite. Instead of fresh spinach, try arugula for a peppery flavor. If you need a substitute for hummus, use cream cheese or guacamole. These swaps keep your wraps tasty and fresh! Start by gathering all your veggies. You will need to shred the purple cabbage. Use a sharp knife to julienne the carrot. Cut the red and yellow bell peppers into thin slices. Slice the cucumber and avocado too. Place the shredded cabbage, sliced peppers, julienned carrot, and cucumber in a bowl. Squeeze juice from the lime over the veggies. Add salt and pepper, then mix well. This mix adds a burst of flavor to your wraps. Grab a large whole wheat tortilla. Lay it flat on a clean surface. Spread about two tablespoons of hummus over the tortilla. Leave about one inch of space around the edges. On one side, place a handful of fresh spinach. Next, add a portion of your mixed veggies and a few slices of avocado. This colorful mix makes your wrap look great. To roll your wrap, first fold the edges inward. This step keeps the filling from falling out. Now, start rolling tightly from the side with the filling. Roll toward the opposite end, keeping it snug. If you roll too loosely, the wrap may fall apart. Once you finish rolling, slice each wrap in half diagonally for a nice presentation. Arrange them on a platter and sprinkle sesame seeds on top for extra crunch. For the full recipe, check the full recipe section. To keep your veggie wraps crisp, use fresh vegetables. Check for bright colors and firm textures. Wash all produce before cutting to remove dirt. Store your wraps in the fridge wrapped in parchment paper. This helps keep them fresh longer. Always assemble wraps just before eating for the best taste. You can easily change the veggies based on what you like. Try adding roasted red peppers or zucchini for a new twist. For some heat, add jalapeños or hot sauce. You can also switch up the hummus flavor. Garlic, red pepper, or olive tapenade can add a fun kick. Don’t be afraid to mix and match! Serve your rainbow veggie wraps with a side of fruit or a salad. They also pair well with extra hummus for dipping. Consider a light vinaigrette on the side for added flavor. For a fun touch, cut wraps into small pieces and serve as party bites. Your guests will love these colorful treats! {{image_2}} You can make your rainbow veggie wraps heartier by adding protein. Here are some tasty options: - Grilled chicken strips - Tofu cubes - Chickpeas or black beans - Cooked quinoa - Sliced turkey or ham These proteins boost the flavor and add nutrients. When you mix them in, ensure they blend well with your veggies. If you follow a vegan or gluten-free diet, you still can enjoy these wraps. Choose gluten-free tortillas made from rice or corn. For protein, try: - Hummus - Tempeh - Lentils - Nuts or seeds These options keep your meal healthy and flavorful. Be creative with your choices to suit your taste. Using seasonal ingredients makes your wraps fresh and exciting. Here are some swaps for each season: - Spring: Add asparagus or snap peas. - Summer: Use zucchini or cherry tomatoes. - Fall: Swap in roasted sweet potatoes or kale. - Winter: Try shredded brussels sprouts or carrots. These swaps keep your wraps vibrant and full of life. You can always check the Full Recipe for more ideas on how to mix flavors. To store leftover wraps, place them in a clean container. Use a tight lid to keep air out. This helps maintain freshness and taste. You can keep them in the fridge for up to three days. If you see any moisture, add a paper towel inside the container. This absorbs extra moisture and keeps the wraps crisp. Meal prepping is a fun way to make healthy eating easy. Start by prepping all your veggies in advance. Store them in separate containers. When you are ready to eat, just grab a tortilla, add your veggies, and roll! This saves time during busy days. You can also spread hummus on your tortillas ahead of time. Just remember to keep the wraps in the fridge until you are ready to enjoy. Freezing wraps is a great option for long-term storage. To do this, wrap each one tightly in plastic wrap. Place them in a freezer bag and remove as much air as possible. Label the bag with the date. You can freeze wraps for up to three months. When you’re ready to eat, thaw them in the fridge overnight. Then, enjoy them cold or warm them up in a skillet for a few minutes. If you want to skip tortillas, try lettuce leaves. Romaine or butter lettuce works well. You can also use rice paper wraps for a fun twist. These options keep the wrap light and fresh. Yes, you can make these wraps ahead of time. Wrap them in plastic wrap to keep them fresh. Store them in the fridge for up to a day. Just keep the wraps away from moist ingredients to keep them crisp. To prevent sogginess, spread hummus only on the tortilla, not the veggies. Drain any excess water from veggies before adding them. Wrap tightly to keep air out, which helps maintain texture. Enjoy these wraps fresh for the best taste! This blog post covered how to make delicious vegetable wraps. We explored key ingredients and their nutrition. You learned how to prepare vegetables and roll your wraps tightly. I shared tips to keep them fresh and how to customize based on your taste. In addition, I offered ideas for seasonal ingredients and different proteins. Finally, I discussed storage tips for leftovers and meal prep. Enjoy making these wraps, and feel free to get creative with your ingredients!

Rainbow Veggie Wraps Packed with Nutrients and Flavor

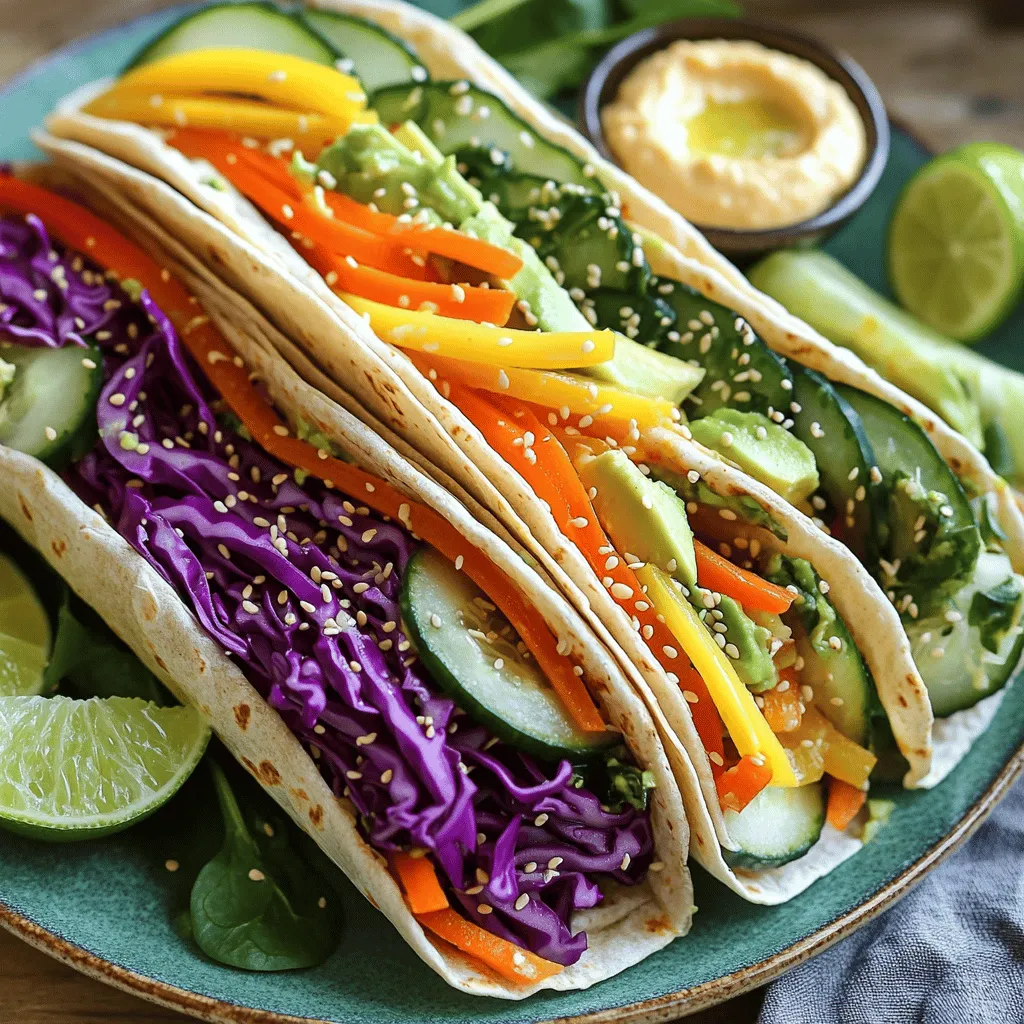
Looking for a quick and healthy meal? These Rainbow Veggie Wraps offer a burst of color, flavor, and nutrients! Each

- 2 pounds small Yukon gold potatoes, scrubbed - 1 cup plain Greek yogurt - 1/4 cup mayonnaise - 2 tablespoons Dijon mustard - 1 tablespoon apple cider vinegar - 2 green onions, finely chopped - 1/4 cup fresh parsley, finely chopped - 1 tablespoon fresh dill, finely chopped - Salt and pepper to taste - 1/2 teaspoon garlic powder - 1/2 teaspoon smoked paprika When you make potato salad, choosing the right ingredients is key. Yukon gold potatoes work great. They have a creamy texture and hold their shape well. You want them to be tender but not mushy. For the dressing, I love using plain Greek yogurt. It adds creaminess without too many calories. The mayonnaise gives it that classic flavor. Dijon mustard adds a nice tang. Apple cider vinegar brightens the dish up. Fresh herbs make a big difference. I use green onions, parsley, and dill. They add freshness and color. Salt, pepper, garlic powder, and smoked paprika round out the taste. These spices enhance the flavor but do not overpower it. - Greek yogurt alternatives: You can use sour cream or any plant-based yogurt. - Vegan mayonnaise options: Try avocado or a store-bought vegan mayo. - Fresh herbs vs. dried herbs: Use dried herbs if fresh isn’t available, but reduce the amount. Substitutions help if you have dietary needs or preferences. Feel free to mix and match based on what you have. Each change can give a unique twist to your potato salad. Just remember to keep the flavors balanced. For the full recipe, check out Creamy Herb-Infused Potato Salad. Enjoy making it your own! To start, focus on the potatoes. Use small Yukon gold potatoes for the best flavor. First, scrub them well under running water. This removes dirt and ensures a clean dish. Next, place the cleaned potatoes in a large pot. Cover them with cold water and add a pinch of salt. This helps season the potatoes while they cook. For equipment, you need a large pot, a colander, a mixing bowl, and a whisk. A sharp knife will help you cut the potatoes easily. Now, let’s mix the dressing. In a mixing bowl, combine one cup of plain Greek yogurt, one-fourth cup of mayonnaise, and two tablespoons of Dijon mustard. Add one tablespoon of apple cider vinegar for a tangy kick. Then, sprinkle in half a teaspoon of garlic powder and smoked paprika. Whisk these together until smooth. For the right consistency, make sure to whisk thoroughly. If it feels too thick, you can add a splash of water or more vinegar. This helps create a creamy texture that coats the potatoes well. It’s time to put everything together. Carefully cut the cooled potatoes into bite-sized pieces. Place them in the bowl with your dressing. Gently toss the potatoes to coat them without breaking them. You want them to stay intact for a nice presentation. Before serving, taste the salad. Adjust the flavors with extra salt and pepper if needed. Once you’re happy with the taste, cover the bowl with plastic wrap. Refrigerate for at least one hour. This allows the flavors to blend beautifully. Serve chilled and enjoy your delicious potato salad! To avoid mushy potatoes, choose small Yukon gold potatoes. They hold their shape well. When boiling, add a pinch of salt. This helps the potatoes stay firm. Cook them until just tender. Test with a fork; they should break through easily but not fall apart. For seasoning, start with salt and pepper. After mixing the potatoes with the dressing, taste and adjust. Add more salt or pepper if needed. A splash of apple cider vinegar brings brightness. It balances the creaminess of the yogurt and mayo. You can also add garlic powder for a subtle kick. Serve your potato salad in a large, shallow bowl. This makes it look inviting. Garnish with extra fresh herbs on top. Parsley and dill add color and freshness. A sprinkle of smoked paprika gives it a nice touch. For an extra layer of flavor, serve with lemon wedges on the side. This allows guests to add a bit of zest to their portions. Remember, presentation matters! A well-presented dish makes it more appealing. Enjoy your creamy herb-infused potato salad with family and friends! For the full recipe, check the section above. {{image_2}} To create a tangy twist in your potato salad, consider adding some extra ingredients. Here are a few ideas: - 1/2 cup diced pickles: This adds a nice crunch and flavor. - 1 tablespoon capers: A bit of saltiness enhances the dish. - 1 tablespoon lemon juice: This brightens the flavors and adds zest. You can also include hard-boiled eggs or crispy bacon. Both options add richness and texture. For hard-boiled eggs, chop them up and mix them in gently. For bacon, cook until crispy, then crumble and fold into the salad just before serving. You can easily modify this recipe to fit various diets. For gluten-free options, simply ensure all your ingredients are certified gluten-free. Most of the ingredients, like potatoes and many mustards, are naturally gluten-free. If you need a dairy-free alternative, swap out the Greek yogurt and mayonnaise for a vegan version. Use a plant-based yogurt and a dairy-free mayo. These options will keep your potato salad creamy without dairy. These variations make the dish fun and adaptable for different tastes and dietary needs. To store leftover potato salad, place it in an airtight container. This keeps it fresh longer. Glass or plastic containers work well. Make sure the lid is tight to prevent air from getting in. Potato salad can last about 3 to 5 days in the fridge. Check for signs of spoilage. If you see any mold or it smells sour, throw it away. Always trust your senses; if it looks or smells off, it’s best not to eat it. What types of potatoes are best for potato salad? I recommend using Yukon gold or red potatoes. They hold their shape well after cooking. Their creamy texture makes for a great salad. Can I prepare the potato salad in advance? Yes, you can make it a day ahead. Let it chill in the fridge overnight. This helps the flavors mix well. Is potato salad safe to leave out? Potato salad should not sit out for more than two hours. Bacteria can grow in warm temperatures. Always keep it chilled until serving. How do I make potato salad less creamy? To make it less creamy, reduce the mayo or yogurt. You can add diced veggies for crunch. Mustard also adds flavor without creaminess. Can I use roasted potatoes instead of boiled? Absolutely! Roasted potatoes add a nice flavor. Just cut them into bite-sized pieces and let them cool before mixing. How do I spice up my potato salad further? You can add chopped pickles or olives for tang. Try adding fresh herbs like basil or cilantro. A dash of hot sauce can also give it a kick. In this post, we covered how to make a tasty potato salad. You learned about the important ingredients, prep steps, and tips for the best flavor and texture. We also discussed variations, storage methods, and common questions. With this guide, you can create a potato salad that suits your taste and needs. Finding the right balance of flavor and texture will impress your friends and family. Enjoy making your version and have fun experimenting with new ideas!

Classic Potato Salad Tasty and Simple Recipe Ideas

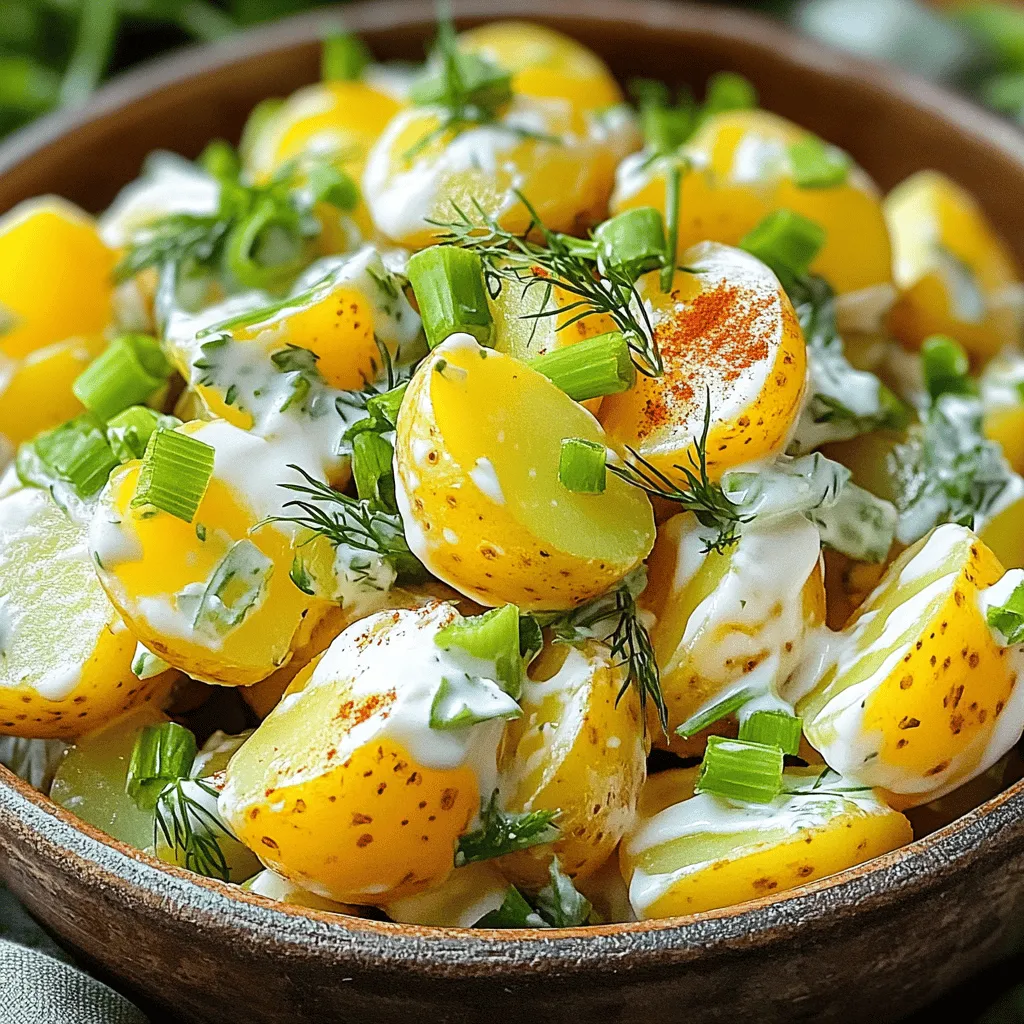
If you’re craving a delicious side dish that’s a hit at gatherings, look no further! This classic potato salad recipe

- 1 block firm tofu, drained and pressed - 2 tablespoons cornstarch - 2 tablespoons soy sauce - 1 tablespoon sesame oil - 1 teaspoon garlic powder - 1 teaspoon onion powder - 1 teaspoon smoked paprika - Salt and pepper to taste - Chopped green onions - Sesame seeds - Cooking spray (or olive oil spray) To make crispy air fryer tofu, gather these ingredients. Start with firm tofu. Drain and press it well. This step helps remove excess water. Next, you need cornstarch. It creates a crispy layer. Soy sauce and sesame oil add flavor. The garlic and onion powders enhance taste. Smoked paprika brings a subtle smokiness. Don’t forget salt and pepper for seasoning. For garnish, have green onions and sesame seeds ready. You can use cooking spray to prevent sticking. With these ingredients, you can create a tasty dish. Each item plays a role in making your tofu crispy and delicious. Want to see the full recipe? Check out the [Full Recipe]. - Preheat the air fryer to 375°F (190°C). - Cut the pressed tofu into bite-sized cubes, about 1 inch. - In a bowl, mix soy sauce, sesame oil, garlic powder, onion powder, smoked paprika, salt, and pepper. - Add the tofu cubes to the bowl and toss to coat. Let it sit for 10 minutes. - Sprinkle cornstarch over the marinated tofu and toss gently to coat each piece. - Grease the air fryer basket with cooking spray to prevent sticking. - Place the tofu cubes in a single layer in the basket. - Air fry at 375°F for 15-20 minutes. Shake the basket halfway for even cooking. - The tofu is ready when it's golden brown and crispy. This simple process leads to a tasty dish, as shown in the full recipe. - Use firm or extra-firm tofu for best results. - Press tofu for a minimum of 30 minutes for extra crispiness. Choosing the right tofu is key to getting that perfect crunch. Firm or extra-firm tofu holds its shape well during cooking. If you use soft tofu, it may turn mushy. Pressing the tofu removes excess water, which helps it crisp up. You can press it by wrapping it in a clean towel and placing a weight on top. Let it sit for at least 30 minutes. This step is simple yet vital for great texture. - Ensure tofu is in a single layer for even cooking. - Experiment with different air fryer settings if available. When you air fry, arrange the tofu in a single layer. This allows hot air to circulate around each piece. If they overlap, some pieces may stay soft. If your air fryer has settings for different foods, try them! Adjusting the temperature or time can help you find your perfect crisp. - Pair with your favorite dipping sauces. - Serve as an appetizer or add to salads and grain bowls. Crispy air fryer tofu tastes great on its own, but dipping sauces can elevate it! Try soy sauce, sweet chili sauce, or spicy sriracha. You can serve the tofu as an appetizer or toss it in salads and grain bowls. It adds protein and crunch to any meal. Whether you enjoy it plain or dressed up, this tofu is sure to please! For the full recipe, check out the section above. {{image_2}} You can switch up the taste of your crispy air fryer tofu easily. Try using different sauces for marinating. Teriyaki sauce adds a sweet touch, while spicy sriracha gives a fiery kick. You can also mix in fresh herbs like thyme or rosemary. These herbs bring a nice aroma and depth to the dish. Experimenting with flavors keeps your meals fun and exciting. Air frying is great, but you have other options. Baking tofu in the oven works well too. Set your oven to 400°F (200°C) for about 25-30 minutes. This method gives the tofu a nice crunch. Another option is pan-frying. Heat a little oil in a skillet and cook until golden. This method gives the tofu a different texture and flavor. Adjusting your seasonings can make a big difference. You might like more garlic or paprika. Personalize the seasoning levels to fit your taste. If you love spice, add chili flakes for a hot kick. This small change can elevate your dish and make it truly your own. You can find the full recipe [here](#). To store leftover tofu, place it in an airtight container. This keeps it fresh. I recommend eating it within three days. Tofu can lose its flavor and texture if kept longer. To reheat tofu, use the air fryer or oven. This helps keep the crispiness. Avoid using the microwave. Microwaving can make the tofu soggy and unappealing. Can tofu be frozen? Yes, it can. However, the texture may change after freezing. It’s best to freeze tofu before cooking it. Press and cube the tofu first for best results. This way, you prepare it well for cooking later. You can bake or pan-fry tofu. For baking, preheat your oven to 400°F (200°C). Cut the tofu into cubes and coat them with oil and cornstarch. Spread the cubes on a baking sheet. Bake for 25-30 minutes until golden. For pan-frying, heat oil in a skillet. Add the tofu cubes and cook until crispy on all sides. Both methods yield tasty, crispy tofu. Silken tofu is softer and won't crisp as well. It may break apart easily. If you want to use silken tofu, try using it in soups or sauces instead. For crispy tofu, stick with firm or extra-firm varieties. They hold their shape and absorb flavors better. Try these tasty sauces: - Soy sauce mixed with sesame oil - Spicy sriracha mayo - Sweet chili sauce - Peanut sauce These sauces add flavor and make the tofu shine. You can mix and match based on your taste! For more ideas, check the Full Recipe. In this blog post, I shared tips for making crispy air fryer tofu. We discussed key ingredients like firm tofu, cornstarch, and flavorful seasonings. You learned how to marinate and cook the tofu for the best crunch. I also included storage tips and variations to keep your meals exciting. Crispy tofu is easy to prepare and very versatile. Try it with different sauces or in your favorite dishes. Enjoy your cooking journey and savor every bite of your delicious creations!

Crispy Air Fryer Tofu Delicious and Easy Recipe

If you’re craving a crispy, delicious snack, look no further! This crispy air fryer tofu recipe is easy to master.

To make tasty quinoa stuffed peppers, gather these main ingredients: - 4 large bell peppers (any color) - 1 cup quinoa, rinsed - 2 cups vegetable broth - 1 can (15 oz) black beans, drained and rinsed - 1 can (15 oz) diced tomatoes, drained - 1 cup corn (fresh, frozen, or canned) - 1 small red onion, diced - 2 garlic cloves, minced - 1 teaspoon cumin - 1 teaspoon chili powder - Salt and pepper to taste - 1 cup shredded cheese (cheddar or a blend) - Fresh cilantro, for garnish - Lime wedges, for serving These ingredients come together to create a filling and healthy meal. You can customize your stuffed peppers with a few fun twists. Here are some ideas: - Add meat: Ground turkey or beef can make the dish heartier. - Use different grains: Try brown rice or farro for a change. - Add veggies: Spinach or zucchini boosts the veggie content. - Change the cheese: Feta or pepper jack gives a new flavor. These variations keep the dish exciting and cater to different tastes. Quinoa stuffed peppers are not just tasty; they are healthy too! Here’s a quick look at the benefits: - High in protein: Quinoa and black beans are great protein sources. - Rich in fiber: The beans and veggies help with digestion. - Low in fat: This dish is light, especially if you skip extra cheese. - Vitamins and minerals: Bell peppers are packed with vitamin C and antioxidants. Making this dish keeps your meal healthy and satisfying. You can find the full recipe above to get started on your delicious cooking adventure! Start by preheating your oven to 375°F (190°C). While it heats, grab your bell peppers. Cut off the tops and scoop out the seeds and membranes. This helps the peppers cook evenly. Place the peppers upright in a baking dish. Make sure they stand steady. This step helps hold in all the tasty filling. In a medium saucepan, mix your rinsed quinoa with vegetable broth. Turn up the heat and bring it to a boil. Once boiling, lower the heat, cover it, and let it simmer. This should take about 15 minutes. The quinoa will become fluffy and absorb all the liquid. Keep an eye on it to avoid burning! Now, it's time to sauté your veggies. Heat a large skillet over medium heat. Add the diced red onion and minced garlic. Cook them for about 3-4 minutes. You want them to be soft and clear. Next, stir in the black beans, diced tomatoes, and corn. Add cumin, chili powder, salt, and pepper. Cook this for another 5 minutes. Everything should be hot and well-mixed. Once done, add the cooked quinoa to the skillet. Mix it all together. Remove it from heat and stir in half of the cheese. This makes the filling creamy and rich. For the full recipe, follow the instructions to stuff and bake your peppers. Enjoy your delicious creation! To cook quinoa just right, rinse it first. Rinsing removes bitter saponins. Use a pot and add one cup of quinoa with two cups of vegetable broth. Bring it to a boil, then lower the heat. Cover and let it simmer for about 15 minutes. You will know it's done when all the liquid is absorbed, and it looks fluffy. Fluff it with a fork for best results. To make sure your peppers are tender, choose large, firm ones. Cut off the tops and remove the seeds. Place them upright in a baking dish. Cover with foil before baking. Bake them for 25 minutes covered and then 10 minutes uncovered. This method steams the peppers and helps them cook evenly. You want them soft but still holding their shape. Quinoa stuffed peppers shine with fresh toppings. Try garnishing with chopped cilantro for a bright taste. Lime wedges add a zesty kick that enhances the flavors. You can serve them with a side salad or some avocado slices. Enjoy them warm for a hearty meal. For a twist, drizzle some hot sauce or yogurt on top. For the full recipe, check the detailed section above. {{image_2}} Want to add meat to your quinoa stuffed peppers? You can! Ground turkey or beef works great. Just cook the meat in the skillet before adding the veggies. Use about one pound of meat. Brown it first, then add the onions and garlic. Mix the cooked quinoa with the meat for a hearty meal. This adds protein and flavor to your dish. If you're looking for a vegan option, it's easy to make swaps. Instead of cheese, use vegan cheese or skip it altogether. You can add more veggies like zucchini or spinach for added nutrition. Tofu crumbles also work well. Just sauté them with the onions and garlic. This keeps the dish tasty and vegan-friendly. Do you like it spicy? You can adjust the heat level easily. Add chopped jalapeños or a pinch of cayenne pepper to your quinoa mix. For a milder option, use sweet paprika instead of chili powder. You can also serve hot sauce on the side for those who want more heat. This way, everyone can enjoy their meal just the way they like it. For more delicious ideas, check out the Full Recipe! To store leftover stuffed peppers, first let them cool down. Once they are cool, wrap each pepper in plastic wrap or foil. You can also place them in an airtight container. This keeps the peppers fresh and helps avoid drying out. Store them in the fridge for up to 3 days. To reheat your stuffed peppers, preheat the oven to 350°F (175°C). Place the peppers in a baking dish. You can add a splash of water to help steam them. Cover the dish with foil to keep moisture in. Bake for about 20 minutes, or until heated through. You can also microwave them on a microwave-safe plate. Microwave for 2-3 minutes, checking halfway. If you want to freeze your stuffed peppers, use freezer-safe containers or bags. Wrap each pepper tightly in plastic wrap before placing them in the container. You can freeze them for up to 3 months. When ready to eat, thaw them overnight in the fridge. Reheat as mentioned above. This way, you can enjoy a healthy meal anytime! For the full recipe, be sure to check out the detailed steps. Yes, you can use other grains. Brown rice or farro works well. These grains have a nice texture and flavor. Just make sure to cook them first. Adjust the cooking time based on the grain you choose. Quinoa is light and fluffy, but others can add a hearty bite. Cooked stuffed peppers last about 3 to 5 days in the fridge. Store them in an airtight container. Ensure they cool before sealing to keep them fresh. Reheat them in the oven or microwave when you're ready to eat. They taste great even after a few days! Quinoa stuffed peppers pair well with a fresh salad. A simple green salad adds a nice crunch. You can also serve them with salsa or guacamole for extra flavor. For a heartier meal, enjoy with a side of rice or crusty bread. These sides balance the meal beautifully. Quinoa stuffed peppers are a healthy and tasty dish you can make easily. We covered the right ingredients, cooking methods, and creative variations. You learned how to cook quinoa perfectly and ensure your peppers are tender. Remember, you can customize this recipe to fit any diet. In summary, stuffed peppers are fun, delicious, and good for you. Enjoy trying different flavors and serving them to friends and family!

Savory Quinoa Stuffed Peppers Easy and Healthy Meal

Looking for a quick and healthy meal? You’ve found it! Savory quinoa stuffed peppers are tasty, easy to make, and

- 1 pound shrimp, peeled and deveined - 2 tablespoons olive oil - 1 teaspoon chili powder - 1 teaspoon garlic powder - 1 teaspoon cumin - ½ teaspoon smoked paprika - Salt and pepper to taste - 8 small corn or flour tortillas - 1 cup shredded cabbage - 1 avocado, sliced - ½ cup fresh cilantro, chopped - 1 lime, cut into wedges - ¼ cup creamy cilantro-lime sauce (store-bought or homemade) These ingredients create tasty shrimp tacos. You can find the full recipe for Zesty Quick Shrimp Tacos in the main article. Each ingredient plays a role in the flavor and texture of your meal. - Prep time: 10 minutes - Cook time: 10 minutes - Total time: 20 minutes - Servings: 4 This recipe is quick and perfect for busy weeknights. You can make a meal for four people in just 20 minutes. Enjoy the fun of cooking with simple steps and fresh flavors! First, take your shrimp and put them in a bowl. Add the olive oil, chili powder, garlic powder, cumin, smoked paprika, salt, and pepper. Toss the shrimp until they are coated well with the spices. This step adds flavor right from the start. Next, heat a non-stick skillet over medium-high heat. Make sure the skillet is hot before you add the shrimp. This helps to sear them nicely. Once the skillet is hot, add the seasoned shrimp. Cook the shrimp for about 2 to 3 minutes on one side. When they turn pink and opaque, flip them over. Cook for another 2 to 3 minutes on the other side. When they are done, take them off the heat. The shrimp should be tender and juicy, packed with flavor. While the shrimp cooks, it’s time to warm the tortillas. Take another skillet and heat it on medium. Place the tortillas in the skillet for about 30 seconds on each side. You want them soft and pliable. Warming the tortillas makes them easier to fold and eat. Now, it’s time to put it all together! Start by adding a handful of shredded cabbage to each tortilla. This adds crunch and freshness. Next, layer a few shrimp on top of the cabbage. Then, add slices of avocado and a sprinkle of fresh cilantro. Finally, drizzle with the creamy cilantro-lime sauce. Add lime wedges on the side for squeezing over the tacos. This dish is not only quick to make but also colorful and delicious. For the full recipe, check out the details above! To cook shrimp well, timing is key. Shrimp cooks fast. Aim for about 2-3 minutes per side in a hot skillet. Overcooked shrimp can become rubbery. Keep a close eye on them. Look for a bright pink color. The shrimp should also look opaque. If they still look gray, give them more time. Perfectly cooked shrimp is juicy and tender. To boost flavor, try adjusting the seasonings. Add a pinch of cayenne for heat. A splash of lime juice brightens the taste. Fresh herbs can also add depth. Consider changing up the toppings. Instead of cabbage, try slaw or diced tomatoes. You can also use radishes or pickled onions for a tangy crunch. Each option brings a new twist to your tacos. For more ideas, check out the Full Recipe. {{image_2}} You can switch up the protein in your tacos. Chicken works great and is easy to cook. Just cut it into small pieces and season like you do with shrimp. You can also try fish, like tilapia or cod. They cook fast and add a nice flavor. For a vegetarian option, use black beans or grilled veggies. Both choices are tasty and filling. If you need gluten-free options, corn tortillas are perfect. They add a nice crunch and flavor. You can also use lettuce leaves as a wrap for a fresh twist. This keeps your tacos light and fun. Try using thinly sliced sweet potatoes or jicama for a unique wrap. This gives you a new texture and taste. Sauces can change your taco game. You can make a creamy sauce with yogurt, lime, and cilantro if you want a fresh kick. For something spicier, add hot sauce or jalapeños. Store-bought sauces work too. Look for a good salsa or chipotle sauce to simplify your meal. You can even mix and match sauces for more flavor! For the full recipe, check out the [Full Recipe]. To keep your leftover tacos fresh, store them in an airtight container. This helps prevent them from drying out. Place the shrimp and toppings in separate containers. This way, the tortillas stay soft. You can keep them in the fridge for up to two days. Make sure to eat them quickly for the best taste. If you want to save some shrimp, you can freeze it. First, cook the shrimp as you would for the tacos. Once cooled, place it in a freezer-safe bag. Squeeze out any air before sealing. The shrimp will stay good for about three months in the freezer. When you’re ready to eat, thaw the shrimp in the fridge overnight. To reheat, you can use a skillet over medium heat. Heat until warm, about 3-4 minutes. This keeps the shrimp juicy and flavorful. Enjoy your tasty shrimp tacos again! For a complete recipe, check out the Full Recipe. Yes, you can use frozen shrimp. Just make sure to thaw them properly. First, place the shrimp in a bowl of cold water for about 10-15 minutes. Change the water once or twice. This helps them thaw quickly and safely. Avoid using hot water, as it can cook the shrimp unevenly. After thawing, pat them dry with paper towels. This step prevents the shrimp from steaming when cooked. If you don't have lime, you have options. Use lemon juice for a similar tart flavor. Orange juice can add a sweeter taste. Even grapefruit juice works well. Each citrus option brings its unique twist. Just keep the amount the same, so the flavor balance stays right. These tacos have a mild heat level, thanks to the chili powder. If you want more spice, add cayenne pepper or diced jalapeños. Start with a small amount and taste as you go. You can also try hot sauce for an extra kick. Adjusting the heat level is easy, and it can make your meal just right for your taste. This blog post covered a quick and tasty shrimp taco recipe. With just 20 minutes, you can have a meal that serves four. We looked at ingredients, cooking steps, storage tips, and even variations. In the end, these shrimp tacos offer a fun way to enjoy seafood. Try different proteins and toppings to keep it fresh. Enjoy your cooking experience, and make it your own!

Quick Shrimp Tacos Flavorful and Easy Weeknight Meal

Looking for a quick and tasty dinner? You’re in the right place! These Quick Shrimp Tacos come together in just

- 1 cup broccoli florets - 1 bell pepper (any color), sliced - 1 carrot, julienned - 1 zucchini, sliced - 1 cup sugar snap peas - 2 cloves garlic, minced - 1-inch piece fresh ginger, grated - 3 tablespoons soy sauce - 1 tablespoon sesame oil - 1 tablespoon vegetable oil - 1 teaspoon sesame seeds (for garnish) - Salt and pepper to taste To make this easy vegetable stir fry, gather all these ingredients first. This helps you stay organized. Fresh veggies work best, so choose bright and firm ones. I love using colorful bell peppers for a pop of color. The garlic and ginger add a lovely aroma too. For the sauces, use soy sauce and sesame oil for rich flavor. Be sure to check your pantry for these items before you start cooking. They make the dish taste great. You can find the full recipe in the article. Enjoy cooking this quick and healthy meal! - Wash and chop all vegetables. - Set them aside in separate bowls for easy access. When you prepare the veggies, it helps to have them ready. This makes cooking fast and fun. I love to chop my broccoli into small florets. The colors of the vegetables make the dish pop! - In a large wok or frying pan, heat the vegetable oil over medium-high heat. Heat is key for a great stir fry. You want the oil hot enough to sizzle. This helps to cook the veggies quickly, keeping them crisp and tasty. - Add minced garlic and grated ginger. - Stir-fry for about 30 seconds until fragrant. Garlic and ginger add a punch of flavor. They smell amazing when they hit the hot oil. This step wakes up your taste buds and sets the stage for your dish. - Add broccoli and carrots, cook for about 2 minutes. - Incorporate bell pepper, zucchini, and sugar snap peas. - Stir-fry until the vegetables are tender-crisp (3-4 minutes). Start with hard veggies, like carrots, that need more time. Then, add softer ones like zucchini. Keep stirring to cook evenly. You want each bite to be crunchy but cooked through. - Pour in soy sauce and sesame oil, stir well. - Season with salt and pepper, remove from heat. - Garnish with sesame seeds before serving. Soy sauce gives a salty taste that pairs well with the veggies. The sesame oil adds a nutty touch. Stir everything well to coat the veggies. Top with sesame seeds for a finishing touch. Serve this stir fry over rice or quinoa for a complete meal. You can find the full recipe above for more details! To keep your vegetables tender-crisp, watch the cooking times. Different veggies cook at different rates. Start with those that take longer, like broccoli or carrots. Use high heat to get the right stir-fry technique. It helps to cook the veggies quickly while keeping them bright and crunchy. Want to boost the flavor? Add more soy sauce or ginger for that extra kick. If you like heat, try using chili oil. It adds a nice spice that makes the dish exciting. You can also mix in sesame oil for a rich, nutty taste. These small tweaks can take your stir fry to the next level. Presentation matters! Serve your stir fry with a sprinkle of fresh herbs, like cilantro or parsley. It adds a pop of color and freshness. Use colorful bowls to enhance visual appeal, too. Bright plates make the dish more inviting and fun to eat. A well-presented meal can make even simple recipes feel special. For the full recipe, check out the details provided earlier in this article. {{image_2}} You can add protein to your vegetable stir fry for extra nutrition. Here are some tasty options: - Chicken: Cut boneless chicken into small pieces. Cook it before adding veggies. - Tofu: Use firm tofu. Press it to remove water, then cube and fry until golden. - Shrimp: Peel and devein shrimp. Add them to the pan when the veggies are almost done. Cook proteins until they are fully cooked. This usually takes about 5-7 minutes, depending on the type you choose. Feel free to mix and match seasonal veggies. Some great choices include: - Bell peppers: They add color and sweetness. - Carrots: Cut them into thin strips for quick cooking. - Broccoli: Try using cauliflower for a fun twist. You can also mix in leafy greens. Spinach and kale are great options. Add them at the end, so they wilt but stay vibrant. Sauce can change the whole flavor of your stir fry. Here are some fun alternatives: - Teriyaki sauce: This adds a sweet and savory taste. - Sweet and sour sauce: It gives a tangy kick. - Tamari: This is a gluten-free soy sauce. It works well if you need a gluten-free option. Try a mix of sauces for a unique flavor. Just keep the balance right to enjoy the best taste. For the full recipe, check out the details above. After making your vegetable stir fry, let it cool down. Store any leftovers in a container. The best options are glass or BPA-free plastic. These containers help keep the stir fry fresh. Make sure to seal them tightly to prevent air from getting in. You can store it in the fridge for up to three days. Freezing your stir fry is a great option if you want to keep it longer. First, let it cool completely. Then, pack it into freezer-safe bags or containers. Remove as much air as possible to avoid freezer burn. You can freeze it for up to two months. When you're ready to enjoy it, thaw it in the fridge overnight or use the microwave. When reheating, aim to keep the veggies crisp. The microwave works, but it can make the dish soggy. Instead, heat it on the stovetop. Use a non-stick pan over medium heat. Add a splash of water or oil to help steam it. Stir often until it's heated through. This method keeps the vegetables tender-crisp and tasty. For the full recipe, check out the vibrant vegetable stir fry section! Yes, you can use frozen vegetables for stir fry. They are quick and easy. Frozen veggies are often frozen at their peak freshness. This helps keep their color and nutrients. However, they can release extra water when cooked. This may make your stir fry a bit soggy. To avoid this, cook them on high heat. Stir them often to help evaporate the water. You can pair your vegetable stir fry with many tasty sides. Here are some ideas: - Cooked rice or quinoa for a filling base. - Noodles for an extra fun texture. - A side salad for added crunch and freshness. - Spring rolls for a tasty appetizer. To make your stir fry spicier, try these tips: - Add red pepper flakes or chili powder while cooking. - Use hot sauce to give it a kick. - Stir in a dash of sriracha or chili oil for heat. - Add fresh jalapeños or serrano peppers for more flavor. Making a vegan stir fry is simple! Just swap out the following: - Use tamari instead of soy sauce for a gluten-free option. - Replace any meat with tofu or tempeh for protein. - Check sauces to ensure they are plant-based. These easy swaps keep the dish tasty and filling. Yes, this recipe is great for meal prep! Here are some tips: - Cook a big batch and store it in containers. - Keep the rice or quinoa separate until serving to prevent sogginess. - Store in the fridge for up to four days. - To freeze, cool the stir fry first, then put it in airtight containers. - Reheat in a pan for best results. For the full recipe, check out the Vibrant Vegetable Stir Fry section! This blog post covered how to make a tasty vegetable stir-fry. We discussed main ingredients, preparation steps, and flavor tips. Remember to cook vegetables until they're tender-crisp for the best texture. You can add proteins or try new sauces for variety. Store leftovers properly to keep them fresh. Enjoy your delicious meal and feel free to experiment. Cooking should be fun! With these tips, you can make great meals every time.

Easy Vegetable Stir Fry Quick and Healthy Meal Idea

Looking for a quick and healthy meal? This Easy Vegetable Stir Fry is your answer! Packed with colorful veggies and

Older posts
Newer posts
← Previous Page1 … Page67 Page68 Page69 … Page82 Next →

dsad

© 2026 Recipes Pursuit • Built with GeneratePress

Our Policies

  • Copyright Policy
  • Cookie Policy
  • GDPR Policy
  • Privacy Policy
  • Disclaimer
  • Terms Of Use

More Information

  • Home
  • About
  • Contact
  • Appetizers
  • Dessert
  • Dinner
  • Drinks
©2026, Recipes Pursuit About Back To Top