Skip to content
DisclaimerTerms Of UseGDPR PolicyCookie Policy

Recipes Pursuit

  • Home
  • Drinks
  • Appetizers
  • Dinner
  • Dessert
  • About
  • Contact
  • Privacy Policy
DisclaimerTerms Of UseGDPR PolicyCookie Policy

NO-ING-IMG

- 2 tablespoons olive oil - 1 medium onion, diced - 2 carrots, sliced - 2 celery stalks, sliced - 3 garlic cloves, minced - 1 teaspoon dried thyme - 1 teaspoon dried rosemary - 4 cups chicken broth - 2 cups cooked chicken, shredded - 1 cup frozen peas - Salt and pepper to taste - 2 cups all-purpose flour - 1 tablespoon baking powder - 1/2 teaspoon salt - 1/4 cup unsalted butter, melted - 1 cup milk - 1 tablespoon fresh parsley, chopped (for garnish) Gather these ingredients before you start cooking. Each item plays a key role in building flavor and creating that perfect comfort dish. The olive oil gives a nice base, while the onion, carrots, and celery add depth. Fresh garlic, thyme, and rosemary lift the dish with aromatic notes. The chicken broth provides the rich liquid that brings everything together. For the dumplings, the flour and baking powder create a light texture, while butter and milk ensure they stay moist. Fresh parsley is the cherry on top, adding color and a hint of freshness. You can find the full recipe in the cooking section. Step 1: Sauté the vegetables Start by heating 2 tablespoons of olive oil in a large pot over medium heat. Add 1 medium diced onion, 2 sliced carrots, and 2 sliced celery stalks. Cook the veggies until they soften, about 5 to 7 minutes. This step builds a solid base for your soup. Step 2: Aromatics and seasonings Next, stir in 3 minced garlic cloves, 1 teaspoon of dried thyme, and 1 teaspoon of dried rosemary. Cook for another minute until the herbs give off their great smell. This adds depth to your dish. Step 3: Add chicken and peas Pour in 4 cups of chicken broth and bring the mix to a simmer. Add 2 cups of shredded cooked chicken and 1 cup of frozen peas. Season with salt and pepper to taste. This mix is where the comfort comes from! Step 4: Mix dumpling ingredients In a separate bowl, combine 2 cups of all-purpose flour, 1 tablespoon of baking powder, and 1/2 teaspoon of salt. Stir in 1/4 cup of melted unsalted butter and 1 cup of milk. Mix until just combined; the dough should be a bit sticky. Step 5: Drop dumplings into broth Spoon dollops of the dumpling batter over your simmering soup. Cover the pot with a lid. Let the dumplings steam for about 15 minutes. They should puff up and cook through. Step 6: Cooking time and tips After 15 minutes, remove the pot from heat and let it sit for a few minutes. You can adjust the seasoning if needed. Serve your chicken and dumplings in deep bowls. Garnish with fresh parsley for a nice touch. For the complete recipe, check the Full Recipe. - How to achieve fluffy dumplings For fluffy dumplings, mix the ingredients just until combined. Do not overmix! Drop the batter onto the simmering broth. Cover the pot tightly. This helps steam the dumplings, making them light and airy. - Best practices for seasoning Season your broth with salt and pepper as you go. Taste often! You can add more thyme or rosemary for extra flavor. Fresh herbs at the end make a big difference too. - Timing for perfect chicken texture Cook the chicken until it’s tender but not dry. If you use cooked chicken, add it late in the cooking process. This keeps it juicy and flavorful. - Presentation ideas Serve the chicken and dumplings in deep bowls. A sprinkle of fresh parsley on top brightens the dish. For a rustic touch, use a wooden spoon to serve. - Recommended side dishes Pair with a simple green salad or crusty bread. These sides balance the richness of the dumplings. - Storage recommendations for leftovers Store leftovers in an airtight container. They last up to three days in the fridge. Reheat gently to avoid mushy dumplings. For longer storage, freeze the soup without dumplings. Add fresh dumplings when you reheat. Enjoy making this hearty comfort meal with these tips! For the full recipe, check the section above. {{image_2}} You can switch up the proteins in this dish. Try using turkey or beef instead of chicken. Both options add unique flavors and are just as hearty. If you prefer a healthier twist, consider using shredded cooked turkey. It works great and has a lighter taste. Adding veggies is another fun way to change things. Corn and green beans blend well with the soup. They add color and extra nutrients. You can toss in a cup of frozen corn or fresh green beans for a crunchy bite. If you need gluten-free dumplings, it's simple. Just replace all-purpose flour with a gluten-free blend. Be sure to check the label for a good mix that works for baking. This will help keep your dumplings fluffy and light. For dairy-free options, use almond milk or oat milk instead of regular milk. You can also swap out unsalted butter for coconut oil. These changes keep the flavor while making it suitable for different diets. Enjoy your meal without worry! For the Full Recipe, click here to create your own delicious chicken and dumplings. After enjoying your chicken and dumplings, you may want to save some for later. Here are some best practices for refrigeration: - Cool Quickly: Let the dish cool to room temperature. This helps prevent bacteria growth. - Use Airtight Containers: Store leftovers in airtight containers. This keeps your meal fresh. - Refrigerate Promptly: Place the containers in the fridge within two hours. This keeps food safe. If you want to save chicken and dumplings for a longer time, follow these freezing tips: - Freeze in Portions: Divide your chicken and dumplings into smaller portions. This makes it easier to thaw. - Label and Date: Write the date on each container. This helps you track how long they’ve been in the freezer. - Use Freezer Bags: Use freezer bags for less space. Squeeze out as much air as possible before sealing. When you are ready to enjoy your stored chicken and dumplings, you can reheat them easily. Here’s how to reheat on the stovetop: - Use a Saucepan: Place the leftovers in a saucepan over medium heat. - Add Liquid: If the dish seems dry, add a splash of chicken broth or water. This helps to keep it moist. - Stir Often: Stir the mixture as it heats. This ensures even warming and prevents sticking. For quick reheating, here are some microwave reheating tips: - Use a Microwave-Safe Bowl: Transfer your chicken and dumplings to a microwave-safe bowl. - Cover the Bowl: Cover it with a microwave-safe lid or plate. This traps steam and keeps moisture in. - Heat in Intervals: Heat for one minute and stir. Repeat until heated thoroughly. This helps prevent hot spots. By following these storage and reheating tips, you can enjoy your chicken and dumplings at their best! How long does it take to make Classic Chicken and Dumplings? It takes about 60 minutes to make Classic Chicken and Dumplings. You will need 20 minutes to prep and 40 minutes for cooking. Can I use rotisserie chicken in this recipe? Yes, you can use rotisserie chicken! It saves time and adds great flavor. Just shred the meat and add it to your pot. What can I serve with Chicken and Dumplings? Chicken and Dumplings pair well with a simple green salad or steamed vegetables. You can also add some crusty bread to soak up the broth. Can I make dumplings ahead of time? I do not recommend making dumplings too far ahead. They are best when fresh. However, you can prepare the dough and refrigerate it for a few hours. How to modify the recipe for larger servings? To serve more people, simply double the ingredients. You can use a larger pot to ensure even cooking. For the complete cooking steps, check out the Full Recipe. In this blog post, we explored a delicious Classic Chicken and Dumplings recipe. We covered ingredients, step-by-step instructions, and tips for perfect fluffiness. You learned about variations, storage options, and common questions. I hope you feel ready to try this comforting dish. It’s easy, tasty, and perfect for sharing. Enjoy cooking and make it your own!

Classic Chicken and Dumplings Hearty Comfort Meal

Who doesn’t love a warm bowl of Classic Chicken and Dumplings? This hearty dish brings comfort and joy, especially on

- 1 pound ground beef - 1/2 cup breadcrumbs - 1/4 cup grated Parmesan cheese - 1/4 cup fresh parsley, chopped - 1 clove garlic, minced - 1 egg, beaten - Salt and pepper to taste - 2 cups marinara sauce - 4 sub rolls - 1 cup shredded mozzarella cheese - Olive oil for drizzling Gather these ingredients to make the best meatball subs. Each one plays a key role in flavor and texture. The ground beef gives a hearty base. Breadcrumbs hold everything together. Parmesan cheese adds a salty kick. Fresh parsley brightens up the dish. Garlic brings in deep flavor, while the egg binds the mix. Marinara sauce coats the meatballs and keeps them moist. Sub rolls hold it all, and mozzarella melts into gooey goodness. - Spices for added flavor - Extra cheese varieties - Additional toppings (onions, peppers) Feel free to jazz up your meatball subs! Adding spices can change the flavor. Try red pepper flakes for heat or Italian seasoning for depth. Extra cheese can make it richer. You can also add toppings like sautéed onions or sweet bell peppers. These options let you customize your subs to fit your taste. Want to explore more? Check out the Full Recipe for more ideas! 1. Preheat your oven to 375°F (190°C). This step is key for cooking meatballs evenly. 2. In a large bowl, mix together the ground beef, breadcrumbs, Parmesan cheese, parsley, garlic, beaten egg, salt, and pepper. Be sure not to overmix. Just combine it well. 3. Form the mixture into meatballs, about 1 inch wide. Place them on a baking sheet. 4. Bake the meatballs for 20-25 minutes. They should be golden and cooked through. 5. While the meatballs bake, heat the marinara sauce in a saucepan over medium heat. Stir it gently as it warms. 1. Once the meatballs are done, add them to the marinara sauce. Let them simmer for 5 minutes. This adds flavor. 2. Open the sub rolls and drizzle a bit of olive oil on the inside. This gives a nice touch. 3. Spoon the meatballs and sauce into each sub roll. Use plenty of sauce for extra flavor. 4. Top each sub with shredded mozzarella cheese. The more, the better! 1. Return the subs to the oven for 5-7 minutes. Bake until the cheese melts and bubbles. 2. To get the best cheese melt, you can broil for the last minute. Keep an eye on them to avoid burning. Follow these steps for the perfect meatball subs. Enjoy the delicious flavors! - How to avoid dry meatballs To keep your meatballs moist, do not overmix the meat. Combine the ingredients gently. Adding breadcrumbs helps too. They soak up moisture and keep meatballs juicy. - Best practices when mixing meat Use your hands to mix the meat and other ingredients. This way, you control how much you mix. Just combine until mixed; don’t squeeze the meat too much. - Ensuring perfect cheese melt For a great cheese melt, place the subs in a hot oven. Bake them until the cheese bubbles. Using shredded cheese helps it melt quickly and evenly. - Garnishing options Fresh parsley adds color and flavor. You can also sprinkle some crushed red pepper for a kick. Parmesan cheese on top gives a nice finish too. - Side dishes that pair well Serve your meatball subs with a side salad for freshness. Crispy fries or sweet potato fries are also great. A warm bowl of soup can round out the meal perfectly. {{image_2}} You can switch up the meat in your meatball subs. Turkey or chicken meatballs are leaner options. They still pack great flavor. Just follow the same recipe steps. You'll get tasty results without the extra fat. If you want to try something different, go for vegetarian meatball subs. There are many great recipes using lentils or beans. These options provide a hearty texture and rich taste. You won't miss the meat at all! Sauce can make or break your meatball sub. You can use different marinara options to suit your taste. A roasted garlic marinara adds a nice touch. Or, try a basil marinara for a fresh twist. If you want some heat, consider spicy sauce additions. A dash of red pepper flakes can spice things up. You can also mix in hot sauce for more kick. Customize your sauce to make each sub unique! The bread you choose can change everything. Using different types of rolls can add fun. A soft hoagie roll is classic, but a crusty baguette works too. Don't forget about gluten-free options. There are many tasty gluten-free rolls available. They make it easy for everyone to enjoy meatball subs. No matter what bread you choose, it should hold the filling well. This keeps your subs messy-free and delicious! For the full recipe, check out the instructions above. To keep your meatball subs fresh, store them in the fridge. Use an airtight container. This helps prevent them from drying out. You should eat them within three days for the best taste. For meal prep, freezing works well. Wrap each sub tightly in plastic wrap. Then place them in a freezer bag. They can stay fresh for up to three months. When you are ready to eat, just thaw them in the fridge overnight. To reheat your meatball subs, use the oven for the best texture. Preheat the oven to 350°F (175°C). Place the subs on a baking sheet. Cover them with foil to keep them moist. Heat for about 15 minutes. This makes the bread crispy and the cheese melty. If you’re in a hurry, use the microwave. Just place the sub on a microwave-safe plate. Heat for 1-2 minutes. Check to see if it is warm throughout. Keep in mind, the bread might get soft this way. For more flavor, drizzle a bit of olive oil on top before reheating. Remember to enjoy your meatball subs with a side of extra marinara sauce for dipping. It’s a great way to add flavor back into your meal! For the full recipe, check out the earlier section. You can use crushed crackers or oats. Ground almonds work well too. For gluten-free diets, try almond flour or crushed cornflakes. These options help bind your meatballs while adding flavor. To keep meatballs moist, do not overmix the meat. Add an egg and some grated cheese. These ingredients help trap moisture. Cooking them in sauce also keeps them tender. Yes, you can make meatballs ahead. Form them and place on a tray. Freeze them before cooking for later use. You can also cook them and store in the fridge. Reheat them in sauce for quick meals. You can use provolone or gouda for a different taste. Feta adds a nice tangy touch. For a sharper flavor, try aged cheddar. Each cheese will give your meatball subs a unique twist. For the full recipe, check out the [Full Recipe]. You learned how to make easy meatball subs with simple steps. We covered main ingredients, from ground beef to marinara sauce. I shared tips on avoiding dry meatballs and suggested variations like turkey or veggie options. Remember, you can store leftovers for later use. Get creative with sauces and toppings to suit your taste. Enjoy making this dish with your own twists! Simple, fun, and delicious—meatball subs are a win for any meal.

Easy Meatball Subs Tasty and Simple Recipe Guide

Craving a hearty meal that’s quick and easy? Look no further than my Easy Meatball Subs! This tasty dish combines

To make a great baked ziti, you need these key ingredients: - 12 ounces ziti pasta - 2 tablespoons olive oil - 1 onion, chopped - 3 cloves garlic, minced - 1 pound ground beef or turkey - 1 can (28 ounces) crushed tomatoes - 1 can (15 ounces) tomato sauce - 2 teaspoons dried Italian herbs (basil, oregano, thyme) - Salt and pepper to taste - 2 cups ricotta cheese - 2 cups shredded mozzarella cheese - 1 cup grated Parmesan cheese - Fresh basil or parsley, for garnish Using high-quality ingredients makes a big difference. Fresh pasta, ripe tomatoes, and good cheese all add to the dish's taste. When you choose the best, your baked ziti will shine. You can easily customize your baked ziti with some tasty add-ins. Here are a few ideas: - Protein alternatives: Use ground turkey, Italian sausage, or even plant-based meat for a twist. - Vegetable options: Spinach, bell peppers, or mushrooms can boost nutrition and flavor. Add them to the meat sauce or mix them in with the pasta. These options let you make the dish your own. You can create a ziti that fits your taste and dietary needs. To cook the ziti pasta, boil a large pot of salted water. Add the ziti and cook it until it's al dente, which means it should be firm but not hard. This usually takes about 8-10 minutes. Stir the pasta often to keep it from sticking together. Drain the pasta in a colander, but do not rinse it. Rinsing washes away the starch that helps the sauce cling to the pasta. To avoid overcooking the pasta, set a timer. Check the pasta a minute or two before the time is up. If you see it’s close to done, take it off the heat. Remember, it will cook a bit more when you bake it. While the pasta cooks, heat olive oil in a large skillet over medium heat. Add chopped onion and minced garlic. Cook these for about 3-4 minutes until the onion is soft and clear. This step builds a strong flavor base. Next, add the ground meat. I like using beef or turkey. Break it apart with a wooden spoon and cook until it’s brown, which takes about 5-7 minutes. Make sure to cook it all the way to avoid any pink spots. Once the meat is cooked, mix in crushed tomatoes and tomato sauce. Add dried herbs, salt, and pepper. Let this simmer for about 10 minutes. This time allows the flavors to blend well. In a large bowl, combine the cooked ziti pasta with ricotta cheese. Stir in half of the mozzarella cheese until well mixed. This step adds creaminess to the dish. Now, fold in the meat sauce. Mix until everything is well combined. Transfer this mixture into a greased baking dish. Spread it out evenly. Top with the rest of the mozzarella cheese and grated Parmesan cheese. Layering cheese gives the best melt and flavor. Preheat your oven to 375°F (190°C). This step is crucial for even cooking. Cover the baking dish with aluminum foil. Bake it for 25 minutes. This keeps the moisture in. After that, remove the foil and bake for another 15 minutes. This step allows the cheese to brown and bubble, making it extra delicious. Let the baked ziti cool for a few minutes before serving. This cooling time helps set the layers. For an extra touch, you can garnish with fresh basil or parsley. To keep your baked ziti moist, use enough sauce. A dry dish lacks flavor. Add a little extra tomato sauce if needed. This adds moisture and keeps it tasty. For a cheesy top, broil your ziti for a few minutes after baking. This will give a nice golden crust without burning it. Mushy pasta ruins baked ziti. Always cook the ziti to al dente. This keeps the pasta firm during baking. It helps avoid a soggy dish. Season your sauce well. Not enough seasoning can make your dish bland. Use salt, pepper, and herbs to boost the flavor. Baked ziti pairs well with a fresh salad. A simple green salad with a light dressing works great. You can also serve garlic bread on the side. It adds crunch and flavor. For a drink, a medium-bodied red wine like Chianti complements baked ziti nicely. It enhances the flavors without overpowering them. {{image_2}} You can easily make baked ziti vegetarian. Try using plant-based proteins like lentils or tempeh. They add texture and flavor. You can also add spinach or mushrooms. These veggies boost nutrition and taste. Spinach adds a fresh touch. Mushrooms give a hearty feel. They make the dish rich and satisfying. For those needing gluten-free options, choose gluten-free pasta. Many brands offer quality choices that taste great. Make sure your sauces are gluten-free. Always check the labels. This way, everyone can enjoy baked ziti without worry. Don’t be afraid to experiment! Different cheeses can change the whole dish. Try mixing in gouda or provolone for a unique twist. You can also add spicy elements for heat. A dash of red pepper flakes can make it exciting. Just remember to balance flavors to keep it comforting. To keep your baked ziti fresh, place it in an airtight container. This helps keep moisture in and prevent drying out. It’s best to refrigerate leftovers within two hours of cooking. Baked ziti usually lasts about 3 to 5 days in the fridge. Just make sure to check for signs of spoilage before eating. If it looks off or smells bad, it’s better to toss it. You can freeze baked ziti both before and after baking. If you want to freeze it before cooking, assemble the dish as usual. Then, cover it tightly with plastic wrap and foil. Label it with the date. It can stay in the freezer for up to 3 months. If you freeze it after baking, let it cool completely first. Wrap it well and store it in a freezer-safe container. To thaw frozen baked ziti, move it to the fridge the night before you plan to eat it. This helps it thaw slowly and safely. When you're ready to reheat, preheat your oven to 375°F (190°C). Cover the dish with foil to keep it moist and bake for about 30 minutes. Remove the foil for the last 10 minutes to crisp the cheese. Enjoy your comforting meal again! Baking ziti takes about 40 minutes. First, cover it with foil and bake for 25 minutes. Then, take off the foil and bake for an extra 15 minutes. This helps the cheese melt nicely and get a bit bubbly. You can adjust the time if you like it more crispy. Yes, you can make baked ziti ahead of time! Prepare it fully and store it in the fridge for up to two days. Just cover it well with foil. You can also freeze it for up to three months. If frozen, let it thaw in the fridge overnight before baking. To reheat baked ziti, use the oven. Preheat it to 350°F (175°C). Place the ziti in an oven-safe dish. Add a splash of water or sauce to keep it moist. Cover it with foil and heat for about 20 minutes. This keeps the pasta from drying out and helps the cheese stay creamy. For a quick reference, check out the [Cheesy Comfort Baked Ziti](#). In this post, I shared how to make a delicious baked ziti. I covered essential ingredients, cooking techniques, and common mistakes to avoid. Remember, using high-quality ingredients makes a big difference. You can customize your dish with add-ins and variations. Proper storage ensures you enjoy leftovers later. With these tips, you can create a tasty meal that your family will love. Check out the full recipe for Cheesy Comfort Baked Ziti to get started. Happy cooking!

Simple Baked Ziti Flavorful and Comforting Recipe

Looking for a dish that’s easy to make and packed with flavor? This Simple Baked Ziti recipe is your answer!

To make a hearty and flavorful classic vegetable soup, you need simple, fresh ingredients. Here is what you will need: - 2 tablespoons olive oil - 1 large onion, diced - 3 cloves garlic, minced - 2 medium carrots, diced - 2 celery stalks, diced - 1 medium potato, diced - 1 zucchini, diced - 1 bell pepper (any color), diced - 1 cup green beans, cut into 1-inch pieces - 1 can (14 oz) diced tomatoes (with juice) - 6 cups vegetable broth - 2 teaspoons dried thyme - 1 teaspoon dried oregano - Salt and pepper to taste - 1 cup fresh spinach, chopped - 1 tablespoon lemon juice - Fresh parsley for garnish These ingredients create a vibrant mix. Each one adds its own flavor and nutrition to the soup. Fresh vegetables make this dish colorful and appealing. You can find these ingredients at any grocery store. If you want to make this meal even better, use seasonal produce. This enhances the taste and supports local farmers. For a complete guide to making this classic soup, you can refer to the Full Recipe. 1. In a large pot, heat the olive oil over medium heat. 2. Add the diced onion and sauté for about 5 minutes. The onion should become soft and clear. 3. Next, add the minced garlic. Sauté it for 1-2 minutes. The aroma will fill your kitchen. 4. Now, stir in the diced carrots and celery. Cook these for another 5 minutes. They will start to soften and sweeten. 1. Add the diced potato, zucchini, bell pepper, and green beans to the pot. Stir occasionally for about 5 minutes. 2. Pour in the can of diced tomatoes along with their juice. Then, add the vegetable broth. 3. Mix in the dried thyme, oregano, salt, and pepper. Bring the soup to a boil. 4. Reduce the heat to low. Let it simmer uncovered for 20-25 minutes. The veggies should be tender. 1. Stir in the chopped spinach. Cook for an additional 2-3 minutes until it wilts. 2. Finish with a squeeze of lemon juice. This adds a fresh zing to the soup. 3. Taste the soup and adjust seasoning if needed. You want it to be just right. These steps make a warm and hearty dish. For the complete recipe, refer to the Full Recipe. Enjoy! To make your soup shine, use fresh herbs. Basil, thyme, and parsley work wonders. They add depth and freshness. Dried herbs also help, so don’t hesitate to use them. For seasoning, add salt and pepper early. This helps the flavors blend well. Taste as you go to get it just right. Sautéing is key for great flavor. Start with onion and garlic in olive oil. Cook them until soft and fragrant. This builds a rich base. When adding vegetables, cut them small for even cooking. Stir often to keep them from burning. For a lovely presentation, ladle soup into bowls and sprinkle fresh parsley on top. This adds color and flavor. Serve with crusty bread or a light salad. This makes your meal complete and satisfying. You can also pair it with a drizzle of olive oil for extra richness. {{image_2}} Classic vegetable soup is great for adding your favorite ingredients. You can include protein options like beans or lentils. They add heartiness and nutrients. Use canned black beans or cooked lentils for ease. You can also swap out vegetables. If you have leftover veggies, toss them in. Sweet potatoes, peas, or corn work well. Be creative! This soup is naturally vegan and gluten-free. It uses vegetable broth and fresh produce. If you need gluten-free options, check the broth label. Most brands are safe, but some may contain wheat. For a more hearty dish, add quinoa or gluten-free pasta. These options keep it filling without gluten. Using seasonal ingredients makes your soup fresh and tasty. In winter, root vegetables shine. Carrots, potatoes, and turnips are great choices. In spring, use fresh peas, asparagus, or kale. For summer, zucchini, tomatoes, and bell peppers are ideal. In fall, butternut squash or pumpkin adds warmth. For the full recipe, try the Hearty Garden Medley Soup. It brings all these ideas together for a flavorful and satisfying meal. After you make your Classic Vegetable Soup, let it cool to room temperature. Then, store leftovers in an airtight container. Place the container in the fridge. Your soup will stay fresh for about 3 to 5 days. When ready to eat, check for any odd smells or colors. If it looks good, you’re all set! To freeze your soup, first cool it completely. Use freezer-safe containers or bags. Leave some space at the top, as the soup will expand when frozen. Label each container with the date. Your soup will keep well in the freezer for up to 3 months. When you’re ready to enjoy it, thaw it in the fridge overnight. Reheat soup on the stove for best results. Pour the soup into a pot and heat it over medium heat. Stir it often to prevent burning. You can also use the microwave. Place the soup in a microwave-safe bowl. Heat it in short bursts, stirring in between. This will ensure even heating. Adjust seasoning if needed before serving. Classic Vegetable Soup lasts about 3 to 5 days in the fridge. Store it in an airtight container. This keeps it fresh and safe to eat. If you want it to last longer, consider freezing it instead. Just remember to cool the soup completely before putting it in the freezer. Yes, you can make Classic Vegetable Soup in a slow cooker. Start by heating the olive oil in a pan. Sauté the onion and garlic for a few minutes, then add them to the slow cooker. Next, add all the diced vegetables, diced tomatoes, and vegetable broth. Season with thyme, oregano, salt, and pepper. Cook on low for 6 to 8 hours or on high for 4 to 5 hours. Stir in the spinach and lemon juice just before serving. Classic Vegetable Soup pairs well with several side dishes. Here are some great options: - Crusty bread for dipping - Grilled cheese sandwiches for a classic combo - A fresh garden salad for extra crunch - Cheese and crackers for a light touch This blog post covered everything you need for a great Classic Vegetable Soup. You learned about key ingredients, steps to prepare and cook the soup, plus tips to enhance flavors. We also explored variations for different diets and how to store leftovers for later. Classic Vegetable Soup is simple and offers many options. Enjoy creating your own version! You’ll love how fresh and hearty it tastes.

Classic Vegetable Soup Hearty and Flavorful Delight

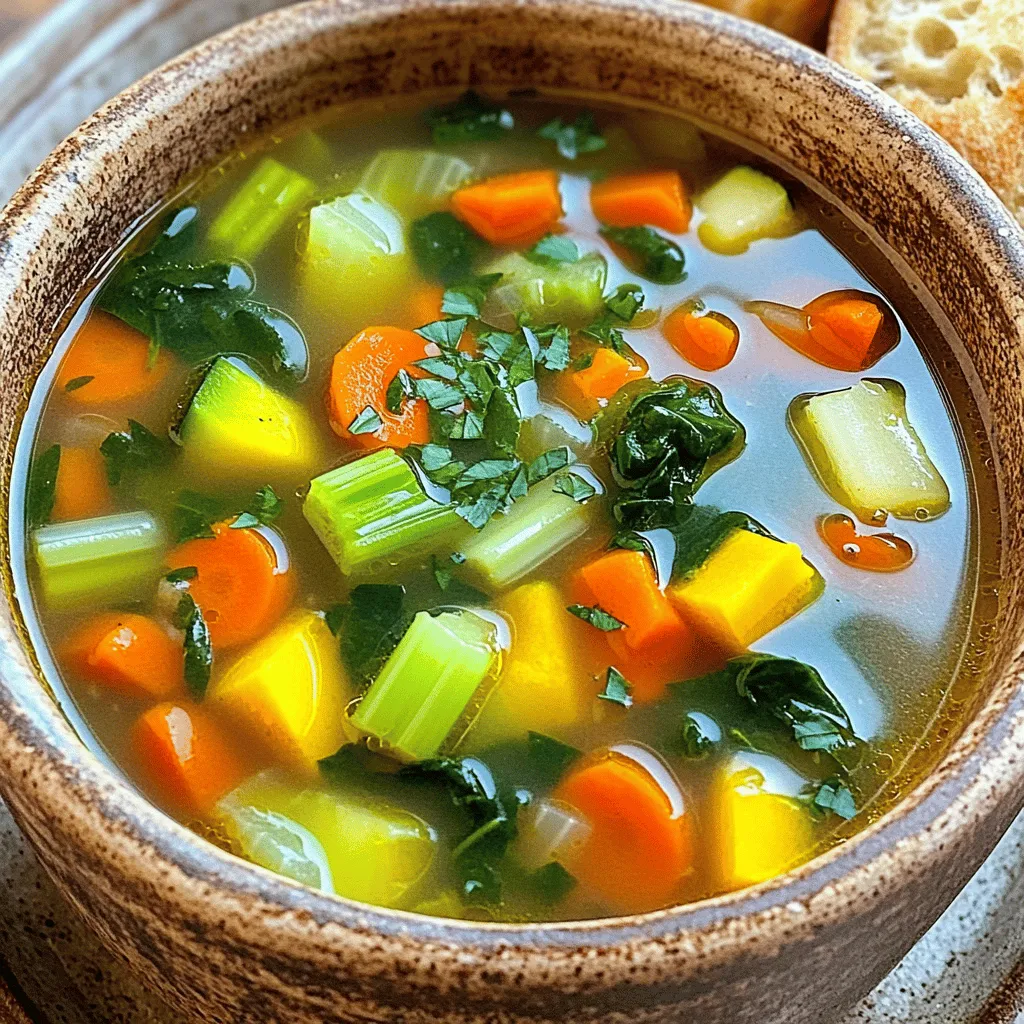
Are you ready to warm your soul with a bowl of Classic Vegetable Soup? This hearty and flavorful delight is

- Brioche Bread: This soft, buttery bread gives your casserole a rich flavor. Cut it into 1-inch cubes for the best texture. - Eggs and Dairy Products: Use 3 large eggs, 2 cups of whole milk, and 1/2 cup of heavy cream. These ingredients create a creamy base that binds the bread together. - Sweetening Agents and Spices: Brown sugar, vanilla extract, ground cinnamon, and nutmeg add depth. These flavors meld beautifully and make your casserole delightful. - Walnuts and Fruits: Chopped walnuts add crunch. Diced apples, like Granny Smith, bring a tart sweetness. You can mix both for a tasty twist. - Powdered Sugar: A light dusting of powdered sugar on top makes the casserole look fancy. It also adds a touch of sweetness without overpowering the dish. For the complete recipe, check out the Full Recipe. - Preheating the Oven Start by preheating your oven to 350°F (175°C). This ensures even baking. A hot oven helps the casserole rise and brown nicely. - Greasing the Baking Dish Next, grease a 9x13 inch baking dish. Use butter or cooking spray for easy cleanup. This step prevents sticking and makes serving simple. - Whisking the Wet Ingredients In a large bowl, whisk together the eggs, whole milk, heavy cream, brown sugar, vanilla extract, cinnamon, and nutmeg. Mix until everything blends smoothly. This mixture gives your casserole its rich flavor. - Incorporating the Bread Add the cubed brioche bread into the egg mixture. Gently fold the bread into the mix. This helps the bread soak up the flavors. Let it sit for about 10 minutes. This waiting time ensures the bread absorbs all the yummy liquids. - Covering and Baking Pour the mixture into the greased baking dish. Spread it out evenly. Then, cover the dish with aluminum foil. Bake for 30 minutes to let it cook through. - Final Baking Stage After 30 minutes, remove the foil. Bake for an extra 15 to 20 minutes. This makes the top golden brown. The center should feel set and firm. Once done, let it cool a bit before dusting with powdered sugar. Enjoy this warm, cozy treat! For the complete recipe, check out the Full Recipe. Choosing the right bread is key. I love using brioche for its soft texture. You can also try challah, which works well too. Avoid bread that is too dense, as it won't absorb flavors well. Next, allow time for absorption. After mixing the egg and milk mixture with the bread, let it sit. Ten minutes is ideal. This gives the bread time to soak up the liquid. If you skip this step, your casserole may turn out dry. You can prepare the casserole the night before. Just mix the ingredients and store it in the fridge. This saves time in the morning. When ready to bake, take it out of the fridge. Let it sit for a few minutes to warm up. This helps it cook evenly. For storing leftovers, keep them in an airtight container. You can enjoy the casserole for up to three days. Reheat in the oven or microwave. For the full recipe, check out the section above. {{image_2}} You can change the flavor of your baked French toast casserole in fun ways. - Adding Different Fruits: You can add any fruit you like. Strawberries, blueberries, or bananas work great. Chop them into small pieces and mix them in with the bread. This adds sweetness and color. If you want a tart kick, try using raspberries or blackberries. They pair well with the creamy texture too. - Using Different Bread Types: While brioche is soft and sweet, feel free to experiment. Use challah for a richer taste or sourdough for a bit of tang. Whole grain bread offers a healthy twist. You can even mix different breads for unique flavors and textures. Toppings make your casserole even more special. Here are some ideas: - Syrups and Compotes: Maple syrup is classic, but you can try fruit syrups too. A berry compote adds a fresh taste. Just cook down your favorite berries with a bit of sugar. Pour it over the casserole for a colorful touch. - Nut Butters or Chocolate: Spread peanut butter or almond butter on top for a nutty flavor. Drizzle melted chocolate for a sweet treat. You can even mix these with the fruit for a delightful twist. These toppings add richness and keep things exciting. For the full recipe, follow the steps in the Cinnamon Apple Baked French Toast Casserole section. Enjoy the endless possibilities of toppings and flavors! To keep your baked French toast casserole fresh, store leftovers in an airtight container. This will help preserve flavor and texture. If you do not have a container, you can cover it tightly with plastic wrap or aluminum foil. Store it in the fridge as soon as it cools. Storage Duration: You can keep the casserole in the refrigerator for about three to four days. If you want to enjoy it later, freezing is a great option. Freezing Before Baking: You can freeze the casserole before baking. Assemble it in the dish but do not bake it. Cover it tightly with plastic wrap, then foil. This keeps out air and prevents freezer burn. It can last in the freezer for up to two months. Thawing and Reheating: To use the frozen casserole, take it out and let it thaw overnight in the fridge. Once thawed, you can bake it as directed in the Full Recipe. If you need it fast, you can bake it straight from the freezer. Just add about 10-15 minutes to the baking time. Enjoy your tasty dish! The best bread for French toast casserole is brioche. Brioche is soft, sweet, and holds moisture well. It gives a rich flavor to the dish. You can also use challah or French bread. Both options absorb the egg mixture nicely. Yes, you can make this recipe gluten-free. Use gluten-free bread that you enjoy. Many brands offer gluten-free options that work well. Just ensure the other ingredients, like milk and eggs, are also gluten-free. You can store leftovers in the fridge for up to three days. Place the casserole in an airtight container to keep it fresh. Reheat individual portions in the microwave or oven for the best taste. Absolutely! You can prepare the casserole the night before. Just follow the recipe but stop before baking. Cover it and place it in the fridge. In the morning, simply bake it as directed. Reheat the casserole in the oven for the best results. Preheat the oven to 350°F (175°C) and cover the dish with foil. Bake for about 15-20 minutes until warm. You can also use a microwave for quick reheating. You can add many toppings to enhance the flavor. Some favorites include fresh fruits like berries or bananas. Nuts, whipped cream, or maple syrup also work great. Get creative and mix what you love. Yes, this dish is perfect for brunch! It looks beautiful and tastes amazing. Guests will love the warm, sweet flavors. Pair it with coffee or juice for a complete meal. Yes, you can freeze the casserole. Prepare it as directed, but do not bake it. Cover it well and freeze for up to two months. When ready, thaw it overnight in the fridge and bake as usual. You can find the full recipe for this delicious Cinnamon Apple Baked French Toast Casserole in the article above. In this blog post, we covered how to make a tasty French toast casserole. You learned about key ingredients like brioche bread and eggs, plus optional toppings such as walnuts. The step-by-step instructions showed you how to mix, bake, and perfect your dish. I shared tips on storing and making it ahead of time. Finally, we explored fun variations and FAQs. Now you have all the tools to create a delightful casserole. Enjoy every bite!

Baked French Toast Casserole with Flavorful Toppings

Ready to elevate your breakfast game? This Baked French Toast Casserole is a fun and easy dish you can enjoy

To make tasty spicy roasted chickpeas, you'll need: - 1 can (15 oz) chickpeas, drained and rinsed - 2 tablespoons olive oil - 1 teaspoon smoked paprika - 1 teaspoon cumin - 1/2 teaspoon cayenne pepper (adjust to taste) - 1 teaspoon garlic powder - 1 teaspoon onion powder - Salt to taste These ingredients are the core for a crunchy and flavorful snack. The chickpeas provide protein and fiber. The olive oil helps them roast well. The spices add a punch of flavor that makes them irresistible. You can make your roasted chickpeas even better with a few garnishes: - Freshly chopped cilantro - Chopped parsley Adding these herbs gives a fresh touch and brightens the dish. Plus, they look great when served. Feel free to play with the spices! Here are some fun ideas: - Add a sprinkle of chili powder for more heat. - Try curry powder for a different twist. - Use lemon zest for a fresh citrus flavor. These variations let you customize your snack. You can transform basic roasted chickpeas into something special. Check out the Full Recipe for more details and ideas! To start, gather your ingredients. You will need one can of chickpeas. Make sure to drain and rinse them well. This removes extra sodium and helps with texture. Next, pat them dry with a clean kitchen towel. Removing moisture is key for crispiness. Then, take a mixing bowl. Add the dried chickpeas, two tablespoons of olive oil, and your spices. Use one teaspoon each of smoked paprika, cumin, and garlic powder. Add half a teaspoon of cayenne pepper for heat and one teaspoon of onion powder. Don’t forget to add salt to taste. Mix until every chickpea is coated in the spices. This step adds tons of flavor. Now, preheat your oven to 400°F (200°C). Line a baking sheet with parchment paper. This keeps the chickpeas from sticking and makes cleanup easy. Spread the seasoned chickpeas in a single layer on the baking sheet. This helps them roast evenly. Place the baking sheet in the oven. Roast for 25 to 30 minutes. Halfway through, shake the baking sheet to move the chickpeas around. This ensures they cook evenly. You want them to turn golden and crispy. For the best crunch, the drying step is vital. If your chickpeas are moist, they won’t crisp up. After roasting, let them cool for a few minutes. This cooling time helps them firm up. If they aren’t as crispy as you want, pop them back in the oven for another five minutes. Taste them and adjust seasoning if needed. You can garnish with fresh cilantro or parsley for a pop of color. Check out the Full Recipe for more details. Enjoy your crunchy and flavorful snack! When picking chickpeas, always go for canned ones. They are tender and ready to use. Check the can for a good seal and no dents. If you prefer dried chickpeas, soak them overnight. This will help them cook well. Rinse chickpeas before using to remove any excess salt or starch. One big mistake is not drying the chickpeas enough. Wet chickpeas won’t become crispy. Make sure to pat them dry with a towel. Another mistake is overcrowding the baking sheet. Spread them out in a single layer for the best crunch. Lastly, don’t skip the spices! They add flavor and make your snack pop. To boost flavor, try adding lemon zest or lime juice. It gives a fresh taste that pairs well with spices. You can also mix in some nutritional yeast for a cheesy flavor. If you want more heat, add extra cayenne pepper. Using fresh herbs like cilantro or parsley at the end adds color and taste. For the full recipe, check out the steps above. Enjoy your flavorful snack! {{image_2}} You can change the spices to get new flavors. Try adding curry powder for an Indian twist. For a Mediterranean touch, use za'atar or sumac. Want something sweet? Add a sprinkle of cinnamon and a bit of brown sugar. Each option gives you a new taste experience. You can mix in nuts or seeds for a crunch boost. Pumpkin seeds or almonds work well. If you want less oil, use cooking spray instead of olive oil. You can even add nutritional yeast for a cheesy flavor without dairy. These add-ins keep your snack healthy and fun. If you like spice, add more cayenne pepper. For a milder snack, reduce the cayenne. You can also use smoked paprika for flavor without the heat. Taste the mix before cooking to find the right balance for your palate. Enjoy the heat as you explore different spice levels! After you enjoy your spicy roasted chickpeas, you may have some left. To keep them crispy, store them in an airtight container. If you don’t have one, a zip-top bag works well too. Avoid using a container that lets in air. This air can make them soft and chewy. You can keep roasted chickpeas for about three days at room temperature. If you want them to last longer, store them in the fridge. They can stay fresh for up to a week in there. Just remember, the longer they sit, the less crunchy they become. If you want to reheat your chickpeas, use the oven for the best results. Preheat your oven to 350°F (175°C). Spread the chickpeas on a baking sheet and heat for about 10 minutes. This way, they regain their crunch. You can also microwave them, but they may not taste as good. For the best flavor, stick with the oven! For the full recipe, check the section above. Spicy roasted chickpeas are a great snack. They are high in protein and fiber. This means they help keep you full longer. Chickpeas also contain vitamins and minerals. They are low in fat, making them a healthy choice. The spices add flavor without added calories. Eating them can support gut health and aid digestion. Plus, they are a fun way to enjoy plant-based protein. Yes, you can make spicy roasted chickpeas in an air fryer! Using an air fryer can give you an even crunchier texture. Just follow the same steps as the oven method. Preheat your air fryer to 400°F (200°C). Toss the chickpeas with oil and spices as usual. Place them in the air fryer basket in a single layer. Cook for about 15-20 minutes, shaking the basket halfway through. Check for crispiness before serving. The full recipe is already vegan-friendly! The main ingredient, chickpeas, is plant-based. You use olive oil and spices, which are all vegan. Just ensure any garnishes you choose are also vegan. Fresh herbs like cilantro or parsley work well here. Enjoy your tasty and healthy snack without any animal products! Spicy roasted chickpeas are simple to make. We covered necessary ingredients and optional garnishes. Then, we explored different seasoning styles and provided step-by-step cooking tips. I shared how to pick the best chickpeas and avoid common mistakes. Plus, I offered ways to adjust heat levels. Now, you can enjoy crispy, tasty chickpeas at home. Remember, storage matters for keeping them fresh. Experiment with flavors to find your favorite!

Spicy Roasted Chickpeas Crunchy and Flavorful Snack

Looking for a crunchy snack that’s packed with flavor? You’ll love spicy roasted chickpeas! They are easy to make and

- 1 lb boneless, skinless chicken thighs - 2 tablespoons olive oil - 2 teaspoons garlic powder - 2 teaspoons paprika - 1 teaspoon dried oregano - 1 teaspoon ground cumin - Salt and pepper to taste - 2 cups cooked brown rice or quinoa - 1 cup cherry tomatoes, halved - 1 cucumber, diced - 1 red onion, thinly sliced - 1 cup feta cheese, crumbled - 1 cup tzatziki sauce (store-bought or homemade) - Fresh parsley, chopped for garnish When making easy chicken gyro bowls, the right ingredients are key. You start with chicken thighs. These are juicy and flavorful, perfect for grilling. Use olive oil to help cook the chicken and add flavor. Garlic powder, paprika, dried oregano, and ground cumin give the dish its classic gyro taste. Don’t forget to add salt and pepper to enhance all these flavors. For the base, use cooked brown rice or quinoa. Both add heartiness and nutrients. Next, fresh veggies are a must. Cherry tomatoes, cucumber, and red onion bring freshness and crunch. Top it off with crumbled feta cheese. This adds creaminess and saltiness that pairs well with the other ingredients. Finally, drizzle tzatziki sauce over the top. This cool sauce balances the spices perfectly. To garnish, sprinkle some fresh parsley. These ingredients come together for a tasty and simple meal. For the complete recipe, check out the Full Recipe. Start by gathering your chicken thighs. In a large bowl, combine the chicken with olive oil and spices. Use 2 teaspoons of garlic powder, 2 teaspoons of paprika, 1 teaspoon of dried oregano, and 1 teaspoon of ground cumin. Add salt and pepper to taste. Mix everything well until the chicken is fully coated. This marinade gives the chicken a deep flavor that you will love. Next, heat your grill or skillet over medium-high heat. Once it's hot, place the marinated chicken on it. Cook the chicken for about 6 to 7 minutes on each side. You want it to be golden brown and cooked all the way through. When finished, take the chicken off the heat and let it rest for a few minutes. This helps keep the juices inside. After resting, slice the chicken into strips. Now it’s time to build your gyro bowls. Start by adding a layer of cooked brown rice or quinoa at the bottom of each bowl. This base is filling and tasty. Next, top the rice with your sliced chicken. Then, add extra toppings like cherry tomatoes, diced cucumber, and thinly sliced red onion. Don’t forget to sprinkle crumbled feta cheese on top! Finally, drizzle tzatziki sauce over everything and add some fresh parsley for a nice touch. Enjoy your flavorful chicken gyro bowls! For the full recipe, check out the section above. To keep your chicken juicy, marinate it well. Use olive oil, garlic powder, paprika, oregano, cumin, salt, and pepper. This blend adds flavor and moisture. Cook the chicken on medium-high heat for about 6-7 minutes on each side. This ensures a golden crust while sealing in juices. Let the chicken rest for a few minutes before slicing. This step is key. It allows the juices to redistribute, keeping every bite moist. Layer your ingredients for the best look. Start with a base of brown rice or quinoa. This adds height and a nice color. Next, add the sliced chicken. Place it in the center for a focal point. Then, arrange cherry tomatoes, cucumber, and onion around the chicken. The colors should pop and create a feast for the eyes. Finish with crumbled feta and a drizzle of tzatziki sauce on top. A sprinkle of parsley adds a fresh touch. For a complete meal, think about sides. A simple green salad pairs well. It adds crunch and freshness. You can also serve pita bread on the side. This gives a nice touch to your gyro bowls. If you want more flavor, try adding olives or pickled onions. They add a tangy bite that complements the dish. For drinks, serve with a light lemonade or sparkling water. This balances the rich flavors in your gyro bowls. {{image_2}} You can switch the chicken for beef, lamb, or tofu. Beef adds a rich flavor. Lamb brings a unique taste with spices. Tofu is a great choice for a vegan option. Just make sure to adjust the cooking time based on the protein you choose. For beef or lamb, cook until they reach your desired doneness. Tofu needs to be grilled or sautéed until golden and crispy. Making your chicken gyro bowl gluten-free is simple. Just use quinoa, as it is naturally gluten-free. For a vegan bowl, swap the chicken for marinated tofu or chickpeas. You can use a dairy-free tzatziki made with coconut yogurt. This way, everyone can enjoy this tasty meal, no matter their diet. To boost flavors, try adding spices like smoked paprika or cumin. Fresh herbs like dill or mint can brighten the dish. Consider drizzling with hot sauce for heat. You could also experiment with different sauces, like tahini or a spicy yogurt sauce. Each addition can make your gyro bowl feel fresh and new. For the full recipe, check out the Easy Chicken Gyro Bowls section! To keep your chicken gyro bowls fresh, store them in the fridge. Place the leftovers in an airtight container. This helps prevent moisture loss and keeps flavors intact. If you want to save them for longer, you can freeze the chicken and veggies. Use freezer-safe containers or bags. Make sure to label them with the date. When you're ready to enjoy your leftovers, reheating is key. The best way is to use a skillet. Heat over medium heat and add a splash of water to keep the chicken juicy. Stir gently until warmed through. You can also use the microwave, but cover the bowl to prevent dryness. Heat in short bursts, stirring in between. Leftover chicken gyro bowls last about 3 to 4 days in the fridge. For frozen leftovers, aim to eat them within 2 to 3 months for the best taste. Always check for any signs of spoilage before you dig in. If it looks or smells off, better toss it! A gyro bowl is a fun twist on a classic gyro. It has all the same great flavors, but in a bowl. Instead of pita bread, you layer ingredients in a bowl. Usually, it starts with a base of rice or quinoa. Then, you add marinated chicken, fresh veggies, and a creamy sauce. It’s a healthy and tasty meal that you can enjoy any time. Yes, making tzatziki sauce at home is easy! You just need a few simple ingredients. Here’s a quick recipe: - 1 cup Greek yogurt - 1 cucumber, grated and drained - 2 cloves garlic, minced - 1 tablespoon olive oil - 1 tablespoon lemon juice - Salt to taste Mix all the ingredients in a bowl. Let it chill in the fridge for about 30 minutes. This will help the flavors blend. You can enjoy this tzatziki with your gyro bowl or as a dip! You can customize your gyro bowl in many ways. Here are some ideas: - Different proteins: Swap chicken for beef, lamb, or tofu. - Extra toppings: Add olives, bell peppers, or spinach for more flavor. - Sauce options: Try different sauces like spicy harissa or a tangy vinaigrette. - Grains: Use quinoa, couscous, or even a salad base instead of rice. Feel free to mix and match until you find your perfect combo! For the full recipe of Easy Chicken Gyro Bowls, check out the instructions above. This blog post covered tasty gyro bowls made with chicken thighs and fresh veggies. You learned how to prepare the marinade, cook the chicken, and assemble your bowls. With tips on presentation and storage, you can enjoy these meals later. Don't forget, you can swap proteins and add your favorite flavors. Gyro bowls are fun and easy to customize, perfect for healthy eating. Try these ideas, and enjoy making a meal your friends and family will love!

Easy Chicken Gyro Bowls Flavorful and Simple Meal

Are you ready to savor a simple yet delicious meal? In this blog, I’ll show you how to make easy

To create the perfect roasted garlic green beans, you need the right ingredients. Here’s what you should gather: - 1 pound fresh green beans, trimmed - 6 cloves garlic, minced - 3 tablespoons olive oil - 1 teaspoon lemon zest - Salt and pepper to taste - 1 tablespoon balsamic glaze (optional) - ¼ cup shaved Parmesan cheese (optional) These ingredients are simple but pack a lot of flavor. Fresh green beans give you a nice crunch. Garlic adds depth, while olive oil helps everything roast evenly. Lemon zest brightens the dish. You can add balsamic glaze for sweetness and Parmesan cheese for a creamy touch. Using fresh ingredients makes a big difference. They enhance the taste and make your meal feel special. This recipe is flexible, so feel free to adjust the seasonings to your liking. For the full recipe, refer to the earlier section. Enjoy cooking! - Preheat your oven to 400°F (200°C). - Prepare a baking sheet with parchment paper. This helps with easy cleanup. - In a large bowl, combine the trimmed green beans and minced garlic. - Drizzle olive oil over the green beans and garlic, then add lemon zest, salt, and pepper. Toss well until the green beans are coated. - Spread the mixture evenly on the prepared baking sheet. - Roast in the oven for 15-20 minutes, stirring halfway through. This ensures even cooking and browning. You can find the full recipe above for more details on how to make these roasted garlic green beans a delicious side dish! To avoid overcooking green beans, aim for a bright green color. Roast them for 15 to 20 minutes at 400°F (200°C). Check for tenderness by tasting. If they snap easily, they're done. Stir them halfway through roasting. This helps them cook evenly and get crispy. To make roasted garlic green beans even better, consider adding spices. A pinch of red pepper flakes gives heat. Try a sprinkle of smoked paprika for a smoky touch. Fresh herbs like thyme or parsley add brightness and depth too. Using fresh garlic gives a strong flavor. Dried garlic works in a pinch, but fresh is best. Add the garlic with the green beans, so it roasts nicely. This creates a sweet, nutty flavor. Roasted garlic green beans pair well with many main dishes. They complement steak, chicken, or fish perfectly. For a meatless meal, serve them with quinoa or a hearty grain. Presentation matters too. Arrange the green beans on a platter. Drizzle balsamic glaze for a shiny finish. Top with shaved Parmesan for a touch of elegance. This makes the dish beautiful and appetizing. For the full recipe, check out the complete guide. {{image_2}} You can make roasted garlic green beans a bit lighter. Use less olive oil and skip the cheese. This keeps the flavor while cutting calories. You can also switch green beans for other veggies. Try broccoli, asparagus, or zucchini for a fresh twist. Want to make your green beans even tastier? Experiment with sauces like soy sauce or teriyaki. These add a nice umami kick. You can also add nuts for some crunch. Almonds or walnuts work great and give extra flavor. Take advantage of seasonal veggies too. In summer, add cherry tomatoes for a sweet burst. In fall, mix in bell peppers for a pop of color. These additions make your dish fun and fresh. You can find many ways to enjoy roasted garlic green beans with what's in season. For the full recipe, check out the details above! To keep your roasted garlic green beans fresh, store them in an airtight container. Line the container with a paper towel to absorb moisture. This helps the beans stay crisp. Roasted garlic green beans last up to four days in the fridge. If you want to enjoy them later, make sure to cool them completely before storing. Freezing is a great way to save extra green beans. First, let them cool completely. Then, spread them out on a baking sheet in a single layer. Freeze them for about an hour until firm. After that, transfer them to a freezer bag or container. Make sure to press out as much air as possible. Roasted green beans can stay fresh for up to three months in the freezer. To reheat, simply toss them in a pan over medium heat until hot. You can also microwave them for a quick option. Watch for signs of spoilage to keep your beans safe. If they turn mushy or develop an off smell, it's time to discard them. You may also notice changes in color. If they look dull or brown, it’s best to throw them away. Always trust your senses when it comes to food safety. Can I use frozen green beans for this recipe? Yes, you can use frozen green beans. Just thaw and dry them first. Frozen beans may need a few extra minutes to roast. Keep an eye on them to avoid mushiness. How do I make garlic green beans without roasting? You can sauté the green beans in a pan. Heat olive oil, add minced garlic, and then toss in the green beans. Cook them for about five to seven minutes until they are tender and vibrant. What are the nutritional benefits of green beans? Green beans are low in calories but rich in vitamins. They provide vitamin C, vitamin K, and fiber. These nutrients support immune health and aid digestion. They are also a good source of antioxidants, which help fight free radicals. How does roasted garlic benefit health? Roasted garlic has many health benefits. It can boost your immune system and lower blood pressure. Garlic also has anti-inflammatory properties. These benefits come from compounds like allicin, which is more potent when cooked. Can I make this recipe vegan? Absolutely! Just skip the Parmesan cheese. The dish remains tasty with the garlic and olive oil flavors. You could add a sprinkle of nutritional yeast for a cheesy flavor if you want. What are some protein options to add to the dish? You can add grilled chicken, shrimp, or tofu. These options pair well with green beans. Simply toss them in before roasting, or serve them on the side. Roasting green beans with garlic is simple and tasty. We covered ingredients, tips, and variations. These beans pair well with many dishes. You can tweak the recipe to suit your taste and needs. Experimenting with flavors keeps it fresh and fun. Enjoy your roasted garlic green beans! Happy cooking, and make it your own!

Roasted Garlic Green Beans Flavorful Side Delight

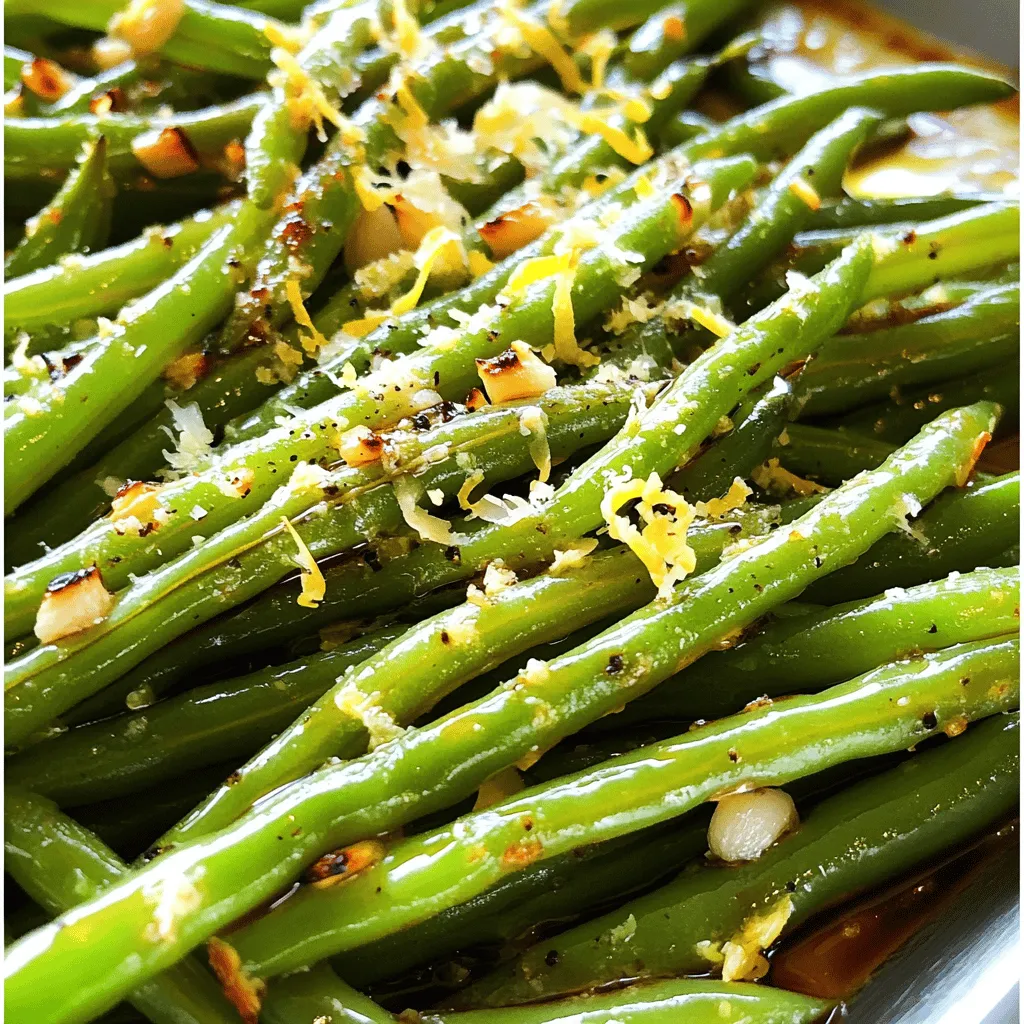
Looking for a side dish that wows? Roasted Garlic Green Beans are the answer! They’re easy to make and pack

- 8 ounces pasta (fusilli or penne) - 2 cups broccoli florets - 1 cup heavy cream - 1 cup grated Parmesan cheese - 2 cloves garlic, minced - 2 tablespoons olive oil - 1 teaspoon lemon zest - Salt and pepper to taste - Red pepper flakes (optional, for heat) - Fresh basil or parsley for garnish Gathering the right ingredients makes cooking easier. Start with 8 ounces of your favorite pasta, like fusilli or penne. Next, grab 2 cups of fresh broccoli florets. They add color and nutrition. For the creamy sauce, you need 1 cup of heavy cream. This gives the dish its rich texture. You also need 1 cup of grated Parmesan cheese. It brings a salty, nutty flavor. Don’t forget the garlic! You will want 2 cloves, minced finely. They add a lovely aroma. You also need 2 tablespoons of olive oil for cooking. For a bit of brightness, get 1 teaspoon of lemon zest. It lifts the flavors. You will also need salt and pepper to taste. If you like heat, add red pepper flakes. Finally, fresh basil or parsley will make a nice garnish. For the full recipe, check out the Creamy Broccoli Pasta section. It will guide you step-by-step to make this tasty meal. Happy cooking! 1. Bring salted water to a boil. Use a big pot for more room. 2. Cook pasta as per package instructions. Stir it occasionally to prevent sticking. 3. Add broccoli in the last 3 minutes. This keeps it bright and crunchy. 1. Sauté garlic in olive oil. Heat the oil over medium heat until it shimmers. 2. Add heavy cream and lemon zest. Stir well to combine, and let it simmer gently. 3. Stir in Parmesan cheese. Mix until it melts and makes the sauce creamy. 1. Toss pasta and broccoli with the sauce. Make sure everything is well-coated. 2. Adjust consistency with reserved pasta water. Add a little water for a smoother sauce. 3. Season to taste. Use salt, pepper, and red pepper flakes if you like heat. This process creates a delicious meal in just 25 minutes. You can find the full recipe linked above. To get that creamy texture, start with good heavy cream. It thickens well and adds depth. When you mix in the cheese, it helps bind everything together. If your sauce feels too thick, use pasta water. This water has starch that makes everything smoother. Just add a bit at a time until you reach the right consistency. Seasoning is key. Always taste your dish before serving. Add salt and pepper gradually. You can also sprinkle in some red pepper flakes for a spicy kick. Adjusting the seasoning lets you find the flavor balance you love. Prep your ingredients before you start cooking. Chop the broccoli and mince the garlic earlier. This makes cooking faster and easier. Use a one-pot method. Cooking the pasta and broccoli together saves you time and dishes. Everything cooks in the same pot. This method also helps the pasta soak up flavors from the sauce. Pair your creamy broccoli pasta with a fresh salad. A simple green salad with lemon dressing works well. You can also serve it with warm garlic bread. For a drink, a light white wine complements the dish nicely. For garnishing, fresh herbs add color and flavor. Sprinkle chopped basil or parsley on top before serving. You can also add more grated Parmesan for a cheesy finish. These small touches make your meal look and taste amazing. If you want to see the full recipe, check it out [here](#). {{image_2}} For a gluten-free option, choose gluten-free pasta. Many brands offer pasta made from rice, quinoa, or lentils. These options cook well and taste great in this creamy dish. If you want a dairy-free sauce, you can use coconut cream instead of heavy cream. Nutritional yeast adds a cheesy flavor without dairy. Look for vegan cheese to mix in for added creaminess. To make your creamy broccoli pasta even better, think about adding protein. Cooked chicken or sautéed shrimp works well. These options make the meal more filling and tasty. You can also boost nutrition by adding more veggies. Spinach and peas blend nicely with broccoli. They add color and freshness to your dish. Try different cheeses to change the flavor. Gouda or cheddar can add a unique twist. Mixing in goat cheese gives a tangy taste. Herbs and spices can also elevate your dish. Fresh basil, thyme, or parsley brighten the flavor. A touch of nutmeg can add warmth and depth. Experiment with these to find your favorite combination. For the full recipe, check out the link above. To store leftover creamy broccoli pasta, let it cool first. Place it in an airtight container. This helps keep the pasta fresh. Glass or BPA-free plastic containers work well. They prevent spills and help maintain flavor. Yes, you can freeze creamy broccoli pasta! To freeze, portion it into smaller containers. This way, you can reheat just what you need. To reheat, use the stove or microwave. Add a splash of cream or water to keep it moist. Stir often to prevent clumping and ensure even heating. For safe consumption, eat refrigerated creamy broccoli pasta within three to five days. If frozen, it can last up to three months. Look for signs of spoilage, such as off smells or mold. If it looks or smells bad, it’s best to toss it. Always trust your senses when deciding if food is safe to eat. For the full recipe, check out the Creamy Broccoli Pasta section. I recommend using fusilli or penne pasta. These shapes hold sauce well. Fusilli's twists and penne's tubes grab the creamy sauce, making each bite delicious. You can also try rotini or farfalle. They add a fun twist to your dish. Yes, you can prep it ahead of time. Cook the pasta and broccoli, then mix them with the sauce. Store everything in the fridge for up to two days. When ready to eat, simply reheat it. Add a splash of pasta water to keep it creamy. To thicken your sauce, try adding more cheese. Parmesan melts well and adds creaminess. You can also stir in a little cornstarch mixed with water. Heat it gently until thick. This method keeps the texture smooth. Absolutely! This dish is easy to make vegetarian. Just use vegetable broth instead of chicken stock. All other ingredients are already vegetarian-friendly. You can also add more veggies like peas or spinach for extra color and taste. Yes, frozen broccoli works fine. It can save time and is just as nutritious. However, frozen broccoli can be softer. To avoid mushiness, cook it for a shorter time. Add it to the pasta during the last few minutes of cooking. To boost the flavor, try adding more garlic or fresh herbs. You can also sprinkle in some red pepper flakes for heat. A splash of lemon juice brightens the dish. Experiment with your favorite spices to find what you love. For the full recipe, check the main section. This pasta dish features simple ingredients to make a creamy delight. We covered how to cook the pasta and blend a tasty garlic cream sauce. Tips for perfecting texture and time-saving techniques ensure success every time. You can also explore variations to suit your diet and taste. In the end, this creamy broccoli pasta is not just easy to make. It’s also customizable and delicious, making it perfect for any meal. Enjoy creating your version and savor every bite!

Creamy Broccoli Pasta Comforting and Quick Meal

Looking for a quick meal that warms your heart? This Creamy Broccoli Pasta is your answer! With just a few

To make savory apple pie overnight oats, gather these simple ingredients: - 1 cup rolled oats - 1 ½ cups almond milk (or any milk of your choice) - 1 medium apple, peeled and diced - 1 tablespoon maple syrup (or honey) - 1 teaspoon ground cinnamon - ½ teaspoon vanilla extract - 2 tablespoons Greek yogurt (optional for creaminess) - 2 tablespoons raisins or chopped walnuts (optional) - A pinch of salt This mix brings a balance of flavors and textures. The oats give you a good base, while the apple adds sweetness. Maple syrup and cinnamon work together to create that classic apple pie taste. If you choose to add Greek yogurt, it makes the oats creamy and rich. Raisins or walnuts bring in some extra chewiness and crunch. Each serving packs a nutritious punch. This meal is not only delicious but also keeps you full. With the right mix of carbs, fiber, and protein, it supports your energy needs. Check the Full Recipe for all the details on how to prepare this tasty dish! 1. First, take a mixing bowl or a mason jar. 2. In it, combine 1 cup rolled oats and 1 ½ cups almond milk. Stir well to blend. 3. Next, add 1 medium apple, peeled and diced. 4. Pour in 1 tablespoon maple syrup and 1 teaspoon ground cinnamon. 5. Add ½ teaspoon vanilla extract and a pinch of salt. Stir until all is mixed. 6. If you want, fold in 2 tablespoons Greek yogurt for creaminess. 7. You can also add 2 tablespoons raisins or chopped walnuts for crunch. 1. Cover your bowl or seal the mason jar. 2. Place it in the fridge for at least 4 hours, but overnight is best. 3. In the morning, stir your oats well. If they are too thick, add a splash of almond milk. 4. Serve your Apple Pie Overnight Oats cold. 5. Top with more diced apples, a sprinkle of cinnamon, and a drizzle of maple syrup if you like. 6. Enjoy this quick and tasty meal! For the complete recipe, check the Full Recipe. To make your Apple Pie Overnight Oats, start the night before. This meal needs time to soak. Mix the oats and almond milk in a jar. Stir well so the oats absorb the milk. Add your diced apple, maple syrup, cinnamon, vanilla, and salt. Make sure everything is well mixed. If you want extra creaminess, fold in Greek yogurt. For texture, add raisins or walnuts. After mixing, seal the jar and place it in the fridge. For longer freshness, store your oats in an airtight container. This helps keep them tasty for up to five days. You can also prep several jars at once. This makes breakfast easy all week. You can change the sweetness of your overnight oats. Maple syrup adds a rich flavor. Honey offers a lighter sweetness. Try both to see which you like best. Spices also change the taste. If you love warmth, add more cinnamon. Nutmeg can enhance the pie flavor too. You can even mix in ginger for a kick. Adjust these spices to match your personal taste. Enjoy experimenting with flavors! {{image_2}} To make your Apple Pie Overnight Oats even better, you can play with flavors. Start by adding different fruits. Berries like blueberries or strawberries give a fresh twist. Bananas also add sweetness and creaminess. Try mixing apple slices with your favorite fruits for a fun surprise. You can also incorporate nut butters. Peanut butter brings a rich flavor. Almond butter adds a hint of nuttiness. Just stir in a tablespoon or two when mixing your oats. This makes your meal more filling and adds healthy fats. Need a gluten-free option? Simply use gluten-free rolled oats. They work just as well and taste great. Check that your milk choice is also gluten-free. For a vegan version, swap Greek yogurt for a plant-based yogurt. You can replace honey with maple syrup for sweetness. These changes keep the meal tasty while fitting your dietary needs. Explore these options to keep your Apple Pie Overnight Oats exciting and healthy! For more details, check the Full Recipe. You can store Apple Pie Overnight Oats in the fridge for up to five days. Keeping them in a sealed container helps keep them fresh. I recommend using mason jars or plastic containers with lids. These containers keep the oats moist and tasty. Yes, you can freeze overnight oats! To freeze, pour the oats into an airtight container. Make sure to leave some space at the top since they will expand when frozen. To thaw, move the container to the fridge the night before you want to eat them. In the morning, stir well and add a splash of almond milk if needed. Enjoy your Apple Pie Overnight Oats cold or warm! For the full recipe, check out the earlier section. How long do overnight oats last in the fridge? Overnight oats can last for up to 5 days in the fridge. Keep them in a sealed container. This makes meal prep easy for the week. Can I use quick oats instead of rolled oats? You can use quick oats, but they will be softer. Rolled oats hold their shape better and give more texture. Is it necessary to soak oats overnight? Soaking oats overnight helps them absorb liquid. This makes them softer and creamier. You can soak them for at least 4 hours if short on time. What can I add to make it more filling? You can add nuts, seeds, or peanut butter for more protein. Greek yogurt can also make it creamier and more filling. Can I heat Apple Pie Overnight Oats? Yes, you can heat them in the microwave. Just warm them for about 30 seconds. Stir well and enjoy! Is it okay to skip Greek yogurt? Yes, you can skip Greek yogurt. It adds creaminess but is not required. If you want a vegan option, leave it out. For the full recipe, check out the details mentioned above. Apple Pie Overnight Oats offer a tasty and healthy breakfast. We covered key ingredients like oats, apple, and maple syrup. I shared easy steps for mixing and refrigeration. You can adjust sweetness and flavors for your liking. Storing them is simple, with tips for freshness. Try different fruits and nut butters for fun variations. Keep exploring and enjoy your mornings with this delicious meal!

Savory Apple Pie Overnight Oats Simple and Healthy Meal

Do you love apple pie but want a healthier option? Try my Savory Apple Pie Overnight Oats! This simple meal

Older posts
Newer posts
← Previous Page1 … Page66 Page67 Page68 … Page82 Next →

dsad

© 2026 Recipes Pursuit • Built with GeneratePress

Our Policies

  • Copyright Policy
  • Cookie Policy
  • GDPR Policy
  • Privacy Policy
  • Disclaimer
  • Terms Of Use

More Information

  • Home
  • About
  • Contact
  • Appetizers
  • Dessert
  • Dinner
  • Drinks
©2026, Recipes Pursuit About Back To Top