Skip to content
DisclaimerTerms Of UseGDPR PolicyCookie Policy

Recipes Pursuit

  • Home
  • Drinks
  • Appetizers
  • Dinner
  • Dessert
  • About
  • Contact
  • Privacy Policy
DisclaimerTerms Of UseGDPR PolicyCookie Policy

NO-ING-IMG

To make your Avocado Egg Breakfast Burrito, gather these fresh ingredients: - 2 large eggs - 1 ripe avocado, mashed - 1 small tomato, diced - 1/4 cup black beans, rinsed and drained - 1/4 cup shredded cheddar cheese - 2 whole wheat tortillas - 1 tablespoon olive oil - Salt and pepper to taste - 1/2 teaspoon cumin - Fresh cilantro, chopped (for garnish) - Hot sauce (optional, for serving) Choosing the best ingredients makes your burrito taste even better. Here are some tips: - Eggs: Look for eggs with bright yellow yolks. This shows they are fresh. - Avocado: Select avocados that yield slightly when you press them. They should not be too soft or hard. - Tomatoes: Pick firm tomatoes with vibrant colors. A ripe tomato adds great flavor. - Black beans: If using canned beans, check for low sodium options. This keeps your dish healthy. - Cheese: Choose fresh cheddar cheese from the deli. It melts nicely and tastes great. If you don't have all the ingredients, here are some simple swaps: - Eggs: You can use egg whites or a vegan egg substitute if preferred. - Avocado: Greek yogurt or hummus can replace avocado for a creamy texture. - Beans: Substitute black beans with pinto beans or chickpeas for a different flavor. - Cheese: Try feta or dairy-free cheese if you want a change. - Tortillas: Use corn tortillas or lettuce wraps for a gluten-free option. By picking fresh ingredients and considering swaps, you can make this meal just right for you! To make the avocado egg breakfast burrito, start by whisking the eggs. Use a medium bowl to mix in the cumin, salt, and pepper. Heat the olive oil in a non-stick skillet over medium heat. Once hot, pour in the egg mixture. Let it cook undisturbed for about 1 minute. Then, gently stir the eggs with a spatula. Cook until the eggs are scrambled and just set, about 2-3 more minutes. Remove the skillet from heat. In a separate bowl, combine the mashed avocado, diced tomato, and black beans. Mix these ingredients until just combined. You can add a pinch of salt if needed. When preparing the tortillas, lay each one on a flat surface. Spread half of the avocado mixture on each tortilla, leaving space around the edges. Next, divide the scrambled eggs evenly between the two tortillas. Sprinkle the shredded cheddar cheese over the eggs. To roll the burrito, carefully fold in the sides of the tortilla. Then roll from the bottom to the top. For added texture, place the burritos seam-side down on the skillet for about 1 minute on medium heat. This step is optional but gives a nice crisp. - Whisking eggs: 2 minutes - Cooking eggs: 3-4 minutes - Mixing avocado and beans: 2 minutes - Spreading and rolling tortillas: 3 minutes - Crisping burritos (optional): 1 minute Overall, the total time for this dish is about 20 minutes. This recipe is quick, simple, and full of flavor. For more details, check the full recipe. To make fluffy scrambled eggs, start with fresh eggs. Crack them into a bowl and whisk well. This adds air, making them light. Use a non-stick skillet and medium heat. Heat the skillet before adding oil. Pour in the eggs and let them cook for a minute. Stir gently with a spatula, folding the eggs. This helps them cook evenly. Remove them from heat when they are soft but set. You can easily change the flavors in your burrito. Add spices like paprika or chili powder for heat. For a fresh taste, mix in chopped herbs like cilantro or parsley. Want more texture? Add sautéed peppers or onions. You can also switch the cheese type. Try feta or pepper jack for a twist. If you love heat, drizzle hot sauce over the top before serving. To make your breakfast even better, add a side of fruit. Sliced oranges or berries brighten the plate. You could also serve your burrito with a small salad. A light green salad complements the meal well. For a drink, consider fresh orange juice or a smoothie. These choices will round out your breakfast with nutrition and flavor. For the full recipe, check out the details above and get cooking! {{image_2}} You can easily make this burrito vegetarian. Just skip the eggs and cheese. Try using tofu instead. Scramble firm tofu with spices to mimic the egg flavor. You can also add more veggies like bell peppers or spinach. For a vegan option, use plant-based cheese. It melts nicely and adds flavor. Toppings can change your burrito game. Try fresh salsa for a zesty kick. You might like pico de gallo or a smooth guacamole. Hot sauce adds heat. You can also drizzle creamy ranch or chipotle sauce on top. Each topping gives a fresh taste, making your meal exciting. Want more protein? Add cooked chicken or turkey for a heartier meal. Black beans are great but consider adding some quinoa or lentils too. You can mix in cooked bacon for a savory crunch. Each protein boost makes your burrito filling and satisfying. To keep your avocado egg breakfast burrito fresh, store it in the fridge. Wrap each burrito in foil or plastic wrap. Place them in an airtight container. This way, they stay moist and tasty for up to three days. When you are ready to eat, you can reheat your burrito. The best way is to use a skillet. Heat it over medium heat for about 3-4 minutes on each side. This keeps the tortilla crispy. You can also use a microwave. Heat it for 30-45 seconds. But the tortilla may get soft in the microwave. If you want to make these burritos ahead of time, freezing works great. Wrap each burrito tightly in plastic wrap. Then, place them in a freezer bag. They can last up to two months in the freezer. When you want one, just thaw it in the fridge overnight. Then, reheat it using the skillet method for the best taste. For the full recipe, check out the steps above. If you want to skip cheese, try using nutritional yeast. It adds a cheesy flavor without dairy. You can also use hummus for creaminess or avocado instead. Both options keep the taste rich and satisfying. Yes! You can prepare the filling the night before. Just store the eggs, avocado mix, and tortillas separately in the fridge. In the morning, warm them up and assemble your burrito. This saves time and gives you a tasty breakfast fast. To make the burrito healthier, swap regular tortillas for whole grain or corn tortillas. You can also reduce the cheese or use a low-fat version. Adding more veggies, like spinach or bell peppers, boosts fiber and nutrients too. Absolutely! You can use pinto beans, kidney beans, or even lentils. Each type adds a unique flavor and texture. Just rinse and drain them like black beans before mixing into your burrito. For extra flavor, try adding spices like smoked paprika or chili powder. Fresh herbs like parsley or basil can also enhance taste. A squeeze of lime juice brightens the dish nicely too. Yes! This burrito is great for meal prep. You can make several and freeze them. When you need a quick meal, just reheat a burrito in the microwave or oven for a warm, delicious breakfast. Store leftover burritos in an airtight container in the fridge for up to three days. If freezing, wrap each burrito in plastic wrap and place in a freezer bag. This keeps them fresh for up to three months. Definitely! If you like heat, add diced jalapeños or hot sauce to the filling. For milder flavors, skip the hot sauce and use sweet bell peppers instead. Adjust it to suit your taste. In this post, I shared the key steps to making a delicious burrito. I walked you through selecting fresh ingredients and gave tips on preparations and cooking. You learned how to customize flavors and try new variations. Storing and reheating burritos can keep meals fresh and tasty. Remember, you can easily swap ingredients to fit your own taste. With these tips, you'll make burritos that everyone loves. Enjoy your cooking, and happy eating!

Avocado Egg Breakfast Burrito Simple and Tasty Meal

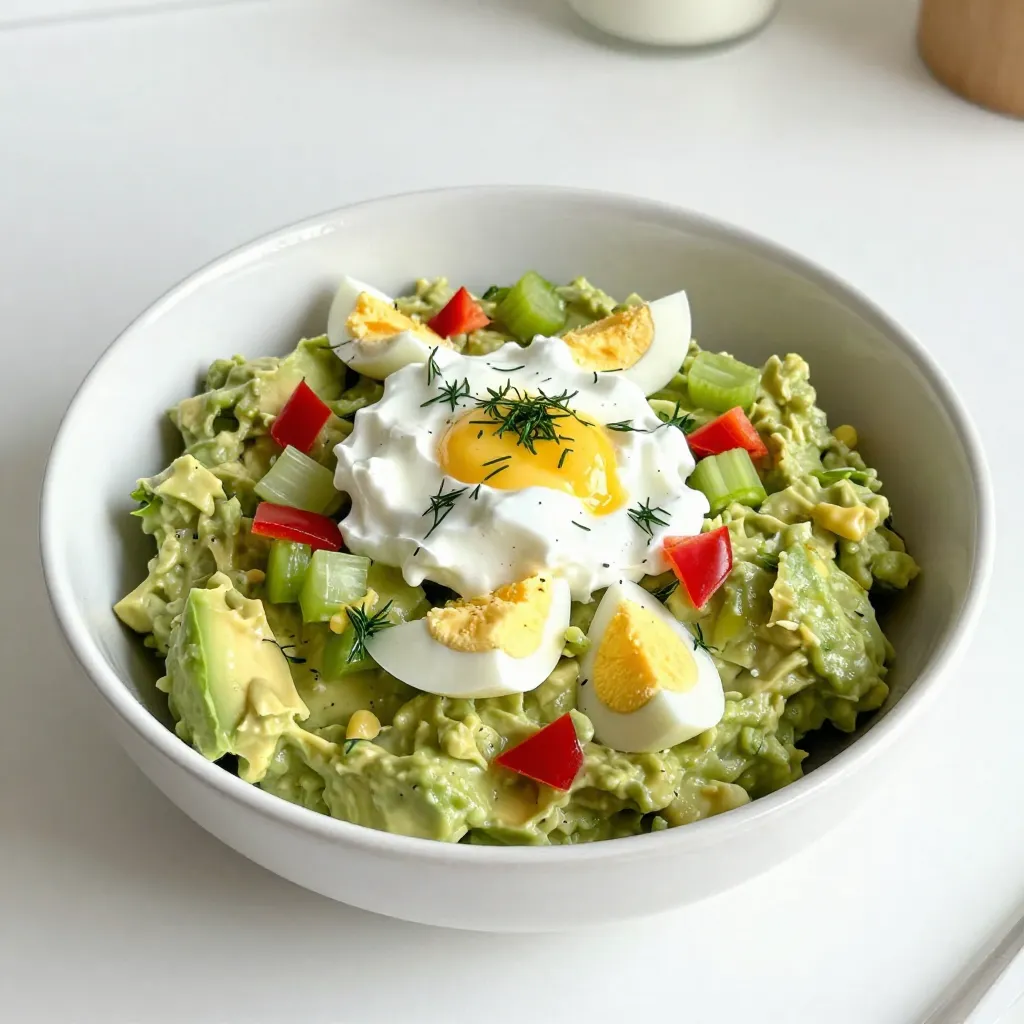
Are you ready to elevate your breakfast game? The Avocado Egg Breakfast Burrito is a simple, tasty meal that packs

- 1 pound large shrimp, peeled and deveined - 3 tablespoons olive oil - 2 tablespoons fresh lemon juice - Zest of 1 lemon - 3 cloves garlic, minced - 2 tablespoons fresh parsley, chopped - 1 tablespoon fresh dill, chopped - 1 teaspoon salt - ½ teaspoon black pepper - Skewers (soaked in water if wooden) - Each serving has about 200 calories. - Shrimp provide a great source of protein, around 20 grams per serving. - Rich in vitamins B12 and D, plus important minerals like selenium and iodine. - Fresh herbs give more taste than dried ones. Use fresh parsley and dill for the best flavor. - Choose large shrimp for this dish. They hold up well on the grill and have a nice bite. When making Lemon Herb Grilled Shrimp, I always use the freshest ingredients. This makes a big difference in taste. For the full recipe, check out the details above! To make the marinade, you need to mix some simple ingredients. In a bowl, combine: - 3 tablespoons olive oil - 2 tablespoons fresh lemon juice - Zest of 1 lemon - 3 cloves garlic, minced - 2 tablespoons fresh parsley, chopped - 1 tablespoon fresh dill, chopped - 1 teaspoon salt - ½ teaspoon black pepper Mix these well until they blend into a smooth mixture. This marinade adds deep flavor to the shrimp. Marinating is key for juicy shrimp. It helps the flavors soak in. Letting it sit for a while makes a big difference. Now, it’s time to marinate the shrimp. You should let them sit in the marinade for at least 30 minutes. If you have more time, an hour is even better. This longer time really allows the shrimp to absorb all the tasty flavors. When adding shrimp, toss them gently in the marinade. Make sure each shrimp gets coated well. This way, every bite will burst with flavor. Next, you will grill the shrimp. First, preheat your grill to medium-high heat. This will help the shrimp cook evenly. Once hot, thread the marinated shrimp onto skewers. Use about 4-5 shrimp per skewer. Grill the shrimp for about 2-3 minutes on each side. Look for them to turn pink and opaque. Be careful not to overcook them. Overcooked shrimp can become tough and chewy. After grilling, remove the shrimp from the grill. Serve them right away for the best taste. For a full recipe, check out the detailed instructions above. Overcooking shrimp is easy to do. If you cook them too long, they get tough. The best way to avoid this is to watch the color. When shrimp turn pink, they are done. Aim for just 2-3 minutes on each side. When using skewers, space the shrimp evenly. This helps them cook at the same time. If you crowd the skewers, some shrimp may not cook well. Soak wooden skewers in water to prevent burning. For side dishes, think light and fresh. A crisp salad pairs well with grilled shrimp. You can also serve rice or quinoa for a filling option. Grilled veggies add color and flavor too. For garnishing, a sprinkle of fresh parsley adds a nice touch. Lemon wedges on the side brighten the plate. You can also drizzle garlic butter sauce over the shrimp for extra flavor. Want to add spice? Try a pinch of cayenne or red pepper flakes. This gives your shrimp a nice kick. You can also mix in a bit of smoked paprika for depth. If you want to try different marinades, use yogurt or buttermilk. These add creaminess and tang. You can also use lime juice instead of lemon for a twist. Check out the Full Recipe for more ideas! {{image_2}} You can enjoy lemon herb shrimp in many ways. Grilling is popular, but you can also bake or use an air fryer. - Oven-baked lemon herb shrimp: Preheat your oven to 400°F. Spread the marinated shrimp on a baking sheet lined with parchment paper. Bake for 8-10 minutes, or until they turn pink and are cooked through. This method keeps them juicy and tender. - Air fryer lemon herb shrimp: Preheat your air fryer to 400°F. Place the marinated shrimp in a single layer in the air fryer basket. Cook for about 6-8 minutes. Check them halfway and shake the basket for even cooking. This method gives you a nice crisp without added fat. Changing up flavors can make this dish even more fun. - Adding different herbs: You can mix in other fresh herbs like basil, cilantro, or thyme. Each herb brings a unique taste. For example, cilantro gives a fresh, zesty kick that pairs well with lemon. - Incorporating citrus zest: Besides lemon, try lime or orange zest. This adds a new layer of flavor and brightens the dish. A hint of grapefruit zest can also add a lovely twist. You can make this dish fit various dietary needs. - Gluten-free options: The recipe is naturally gluten-free. Just ensure your olive oil and other ingredients are gluten-free, if needed. - Low-carb variations: The shrimp are low in carbs already. Serve them on a bed of greens or cauliflower rice for a filling yet carb-friendly meal. You can skip the bread or heavy sides. You can find the full recipe in the main article and explore these tasty variations for your next meal! To keep leftover lemon herb grilled shrimp fresh, place them in an airtight container. Make sure the shrimp cool down first. This helps prevent condensation, which can make them soggy. Store the shrimp in the fridge. They will last for up to three days. If you want to eat them later, consider freezing them. Reheating shrimp can be tricky. To keep them tender, use low heat. You can warm them in a skillet with a splash of olive oil. Heat for a few minutes until they are warm. Avoid using a microwave, as it can make shrimp rubbery. Instead, aim for even heating to maintain their texture. To freeze lemon herb grilled shrimp, first let them cool completely. Then, place them in a freezer-safe bag. Squeeze out as much air as you can before sealing. This helps prevent freezer burn. Shrimp can be frozen for up to three months. When ready to cook, thaw them in the fridge overnight. This keeps them safe and helps maintain quality. You can tell shrimp are done by their color and texture. Cooked shrimp turn pink and opaque. They should feel firm to the touch. If they curl into a tight “C” shape, they might be overcooked. Aim for a gentle curve for perfect texture. Remember, shrimp cook fast, so watch them closely. Yes, you can use frozen shrimp. Just make sure to thaw them first. The best way to thaw shrimp is in the fridge overnight. If you need them quick, place them in a bowl of cold water for about 15-20 minutes. Avoid hot water, as it can lead to uneven cooking. Pat them dry before marinating for best results. Lemon herb grilled shrimp pairs well with many sides. Here are some great options: - Garlic bread - Grilled vegetables - Rice or quinoa - Fresh salad with a light dressing For drinks, consider white wine or iced tea. They complement the bright flavors nicely. To add spice to your shrimp, try these suggestions: - Mix in red pepper flakes into the marinade - Add diced jalapeños or fresh chili peppers - Serve with a spicy dipping sauce Experiment with different levels of heat to find your perfect kick! For the full recipe, check the section above. This blog post covered everything you need for lemon herb grilled shrimp. We discussed the right ingredients, how to prepare the marinade, and tips to grill perfectly. I shared ways to avoid common mistakes and offered ideas for serving. You can try different cooking methods or adjust the recipe for your diet. Now, you can enjoy tasty shrimp that impresses family and friends. Follow the steps, and you’ll serve delicious dishes again and again.

Lemon Herb Grilled Shrimp Fresh and Flavorful Delight

Ready to impress your guests with a dish that’s fresh, easy, and bursting with flavor? My Lemon Herb Grilled Shrimp

- 4 large eggs - 1 ripe avocado - 2 tablespoons Greek yogurt - 1 tablespoon Dijon mustard - 1 tablespoon lemon juice - 2 tablespoons chopped fresh dill (or parsley) - Salt and pepper to taste - Optional: 1/4 cup diced celery for crunch - Optional: 1/4 cup chopped red bell pepper for color When you make creamy avocado egg salad, you need some key ingredients. First, eggs are the star of the dish. They provide protein and a nice texture. Next, ripe avocado adds a smooth, creamy taste that makes the salad rich. Greek yogurt is another must-have. It brings tanginess and keeps the salad light. Dijon mustard adds a little kick. Lemon juice brightens the flavors and keeps the avocado fresh. Fresh herbs, like dill or parsley, give it a burst of color and taste. You can add salt and pepper to fit your taste. For some crunch, you might want to toss in diced celery. Red bell pepper can add a pop of color and sweetness. These optional add-ins are great but not necessary. Each ingredient plays a part in making this salad tasty. Enjoy the mix of flavors and textures in every bite! {{ingredient_image_1}} To make the best creamy avocado egg salad, start with perfect boiled eggs. Place four large eggs in a saucepan. Cover them with cold water, about an inch above the eggs. Bring the water to a boil over medium-high heat. Once it boils, cover the pan and remove it from heat. Let the eggs sit for 12 minutes. This method ensures soft yet firm eggs. After 12 minutes, it’s time to cool those eggs. Fill a large bowl with cold water and ice. Carefully transfer the eggs to the ice bath. Let them cool for about 5-7 minutes. This step makes peeling easier and stops the cooking process. Next, it’s time to prepare the avocado. Choose a ripe avocado by gently squeezing it. It should feel slightly soft but not mushy. Cut the avocado in half and remove the pit. Use a spoon to scoop out the flesh and place it in a large mixing bowl. Now, let’s mash! Use a fork to mash the avocado until it’s creamy. You want some texture, so don’t overdo it. A few small lumps add character to your salad. Now, we combine everything for the best flavor. Peel the cooled eggs and chop them into small pieces. Add the chopped eggs to the mashed avocado. Next, stir in two tablespoons of Greek yogurt, one tablespoon of Dijon mustard, and one tablespoon of lemon juice. These ingredients add creaminess and tang. If you want extra crunch and color, add optional diced celery and chopped red bell pepper. Stir gently until all ingredients are well combined. Finally, season with salt and pepper to taste. For serving, you can enjoy this egg salad on whole grain bread, in lettuce wraps, or simply on its own. Each option offers a tasty experience! For a great egg salad, focus on seasoning. Start with salt and pepper. They bring out flavors. If you want, add a pinch of garlic powder or paprika for warmth. The texture matters too. Aim for a creamy mix. Mash the avocado well. It should blend smoothly with the eggs. You can customize the ingredient ratios. If you love avocado, add more. Want it tangy? Increase the Dijon mustard or lemon juice. Experiment with fresh herbs. Dill gives a bright taste, but parsley works well too. Store your egg salad in an airtight container. This keeps it fresh for longer. It lasts about 3 days in the fridge. If you added crunchy veggies, they may lose crispness. For best results, eat it within two days. To keep leftovers good, avoid mixing in all the ingredients at once. Store the egg salad base and add any crunchy bits just before serving. This keeps everything fresh and tasty. Egg salad pairs well with whole grain bread. It also tastes great in lettuce wraps. Want something fun? Try serving it in avocado halves. This adds color and makes a pretty plate. You can also use it as a dip. Serve with crackers or veggie sticks for a fun snack. For a twist, add it to a salad for extra protein. The options are endless! Pro Tips Use Fresh Ingredients: Always opt for ripe avocados and fresh herbs to enhance the flavor of your egg salad. Adjust Creaminess: Customize the creaminess by adding more or less Greek yogurt based on your preference. Perfectly Cooked Eggs: For easy peeling, use older eggs instead of fresh ones, as they tend to peel more easily. Meal Prep Friendly: This salad can be made ahead of time and stored in the refrigerator for up to 2 days. Just add fresh herbs before serving! {{image_2}} You can easily swap Greek yogurt for cottage cheese or silken tofu. These choices still keep the creaminess but change the flavor. If you want fresh taste, try using sour cream instead. For herbs, fresh basil or cilantro can add a unique twist. You can also try using smoked paprika instead of Dijon mustard for a smoky flavor. Adding vegetables can take your egg salad to new heights. Chopped green onions or diced pickles give great crunch. You can also mix in some grated carrots or even corn for extra sweetness. If you love cheese, consider stirring in crumbled feta or shredded cheddar. Both add a rich taste that blends well with the avocado. To make this salad vegan, replace the eggs with chickpeas. Mash them like you would the avocado. For an egg-free option, use firm tofu to mimic the texture. If you're low-carb, skip the bread and serve it in lettuce wraps. For gluten-free needs, just make sure your mustard and any seasoning are certified gluten-free. This way, everyone can enjoy a delicious meal! Each serving of creamy avocado egg salad has about 250 calories. Here’s how the macronutrients break down: - Protein: 12 grams - Fat: 20 grams - Carbohydrates: 10 grams This dish is rich in healthy fats from avocado and eggs. It also provides key vitamins and minerals like: - Vitamin E - Vitamin K - Folate - Potassium These nutrients support heart health and boost immunity. Avocados are superfoods. They contain good fats that can lower bad cholesterol. Eggs are protein powerhouses. They provide essential amino acids for muscle growth and repair. Greek yogurt adds creaminess and protein. It also has probiotics, which support gut health. This salad combines all these benefits into one tasty dish. For a filling meal, a serving size is about one cup. This recipe serves four, making it perfect for a family. If you have specific dietary needs, feel free to adjust. You can reduce the portion for a snack or add more eggs for protein. Yes, you can make egg salad in advance. It saves time on busy days. To prepare ahead, follow these tips: - Boil the eggs and cool them as usual. - Mash the avocado and mix it with yogurt and mustard. - Add the eggs right before serving. This keeps the eggs fresh. - Store the salad in an airtight container in the fridge. - Use it within two days for the best taste. Creamy avocado egg salad lasts about 2-3 days in the fridge. Always check for signs of spoilage. Look for: - A change in color or texture. - An off smell that doesn’t smell fresh. - Excess liquid in the container. If you notice any of these signs, it’s best to discard the salad. Freezing avocado egg salad is not recommended. Avocados become mushy when frozen. However, here are some tips: - If you must freeze it, leave out the avocado until you thaw it. - Store the salad in a freezer-safe container. - Thaw it in the fridge overnight before serving. - Mix in fresh avocado just before you eat it. This keeps the salad tasty and fresh. This blog post covered how to make a creamy avocado egg salad. We explored key ingredients like eggs, avocado, and Greek yogurt. I shared step-by-step instructions for boiling eggs and preparing the salad. You learned tips for perfecting the dish and how to store it. We also discussed various healthy swaps and dietary options. In conclusion, this recipe offers a tasty, nutritious choice. You can easily customize it to suit your tastes. Now, bring your creativity to the kitchen and enjoy the process!

Creamy Avocado Egg Salad Quick and Healthy Recipe

Are you ready for a delicious twist on a classic dish? This Creamy Avocado Egg Salad is not only easy

To make Peanut Butter Apple Nachos, gather these simple ingredients: - 2 large apples (varieties like Granny Smith or Honeycrisp) - 1/2 cup creamy peanut butter - 1/4 cup granola (your favorite blend) - 1/4 cup mini chocolate chips - 1/4 cup shredded coconut (unsweetened) - 2 tablespoons honey or maple syrup - A pinch of cinnamon (optional) - Sliced almonds or walnuts for topping (optional) These ingredients create a fun and tasty snack. The apples provide crunch, while peanut butter adds creaminess. You can choose any apples you like. I often use Granny Smith for their tartness or Honeycrisp for sweetness. The granola adds texture, and the mini chocolate chips bring a nice touch of sweetness. Feel free to swap ingredients based on what you have. You can use almond butter instead of peanut butter, or even skip the chocolate chips if you want. Experiment and make it your own! For the full recipe, check out the details shared above. - First, wash and slice apples into wedges or rounds. - Next, arrange apple slices on a large plate to create the base. - In a microwave-safe bowl, combine peanut butter and honey or maple syrup. - Microwave the mixture for 20-30 seconds until softened. - Stir the mixture to ensure a smooth texture before drizzling. - Drizzle the peanut butter mixture evenly over the apples. - Add granola, chocolate chips, and shredded coconut on top. - Garnish with nuts and a pinch of cinnamon if you like. These steps make a fun and tasty treat. You can find the full recipe above for more details. Enjoy your Peanut Butter Apple Nachos! - Serve on a colorful platter for visual appeal. - Use small bowls for extra toppings. When you present your peanut butter apple nachos, think colorful. A vibrant platter makes it fun to eat. It draws attention and entices everyone to dig in. Small bowls filled with toppings let people pick their favorites. This adds a personal touch to each plate. - Alternative nut butters like almond or cashew. - Options for gluten-free granola. If you want to switch things up, try other nut butters. Almond or cashew butter adds a nice twist. For those who need gluten-free options, look for gluten-free granola. This way, everyone can enjoy the dish without worry. - Experimenting with spices like nutmeg or cardamom. - Adding fruit like bananas or berries for variety. For a fun flavor boost, add spices like nutmeg or cardamom. Just a sprinkle can change the taste. Also, you can mix in other fruits. Slices of banana or berries add color and taste. They make the nachos even more exciting! For the full recipe, check out the complete instructions on how to make this dish. {{image_2}} You can switch up the nut butter for fun. Almond butter works great in this recipe. It has a milder taste that pairs well with apples. Sunflower seed butter is another option. It’s nut-free and tasty. For a creamier texture, try adding a layer of Greek yogurt. This gives your nachos a rich and smooth feel. If you want a healthier treat, go for dark chocolate chips. They have less sugar and add a nice flavor. You can also cut back on honey or syrup. This keeps your nachos sweet but lowers the sugar. You can even skip them if you want a lighter snack. Get creative with themed nachos! For fall, sprinkle cinnamon and pumpkin spice on the apples. This adds a warm flavor perfect for the season. If you want a tropical twist, add pineapple and shredded coconut. This gives a bright, fun taste that takes you to the beach. Experimenting with flavors makes every batch unique and exciting. To keep your Peanut Butter Apple Nachos fresh, refrigerate them in an airtight container. They stay good for up to 1 day. To prevent apples from browning, sprinkle them with lemon juice before storing. This helps keep their bright look and crisp taste. These nachos are best enjoyed fresh. If you do have leftovers, eat them cold for the best flavor. You can also drizzle a bit more peanut butter on top before eating. This makes them feel new again and adds more taste. Freezing nachos is not a great idea. The apples will lose their crunch and flavor. If you want to freeze, try freezing the peanut butter or other toppings instead. This way, you can prepare fresh nachos later with better taste and texture. Peanut Butter Apple Nachos are best enjoyed fresh. They last about one day in the fridge. To keep them fresh, store them in an airtight container. Apples can brown quickly, so add lemon juice to slices to slow this down. You can prepare some parts ahead of time. Slice the apples and store them in water with lemon juice. This keeps them from browning. Mix the peanut butter and honey in advance too. Just warm it up before drizzling on the apples when you're ready to serve. If you need a nut-free option, try sunflower seed butter. It tastes great and is safe for kids with nut allergies. You can also use almond butter or cashew butter if you prefer. Different spreads can change the flavor while keeping it yummy. Yes, this recipe is perfect for kids! It’s fun and easy to make. Kids love to help create their own nachos. You can also add other toppings like sliced bananas or berries for extra fun. These Peanut Butter Apple Nachos are easy, fun, and tasty. We covered the ingredients, steps, and great tips. You can customize them with different toppings and flavors. Remember, you can store leftovers in the fridge for one day. If you want a quick snack or dessert, this recipe works well. Enjoy your nachos, and have fun making them your way!

Peanut Butter Apple Nachos Easy and Fun Recipe

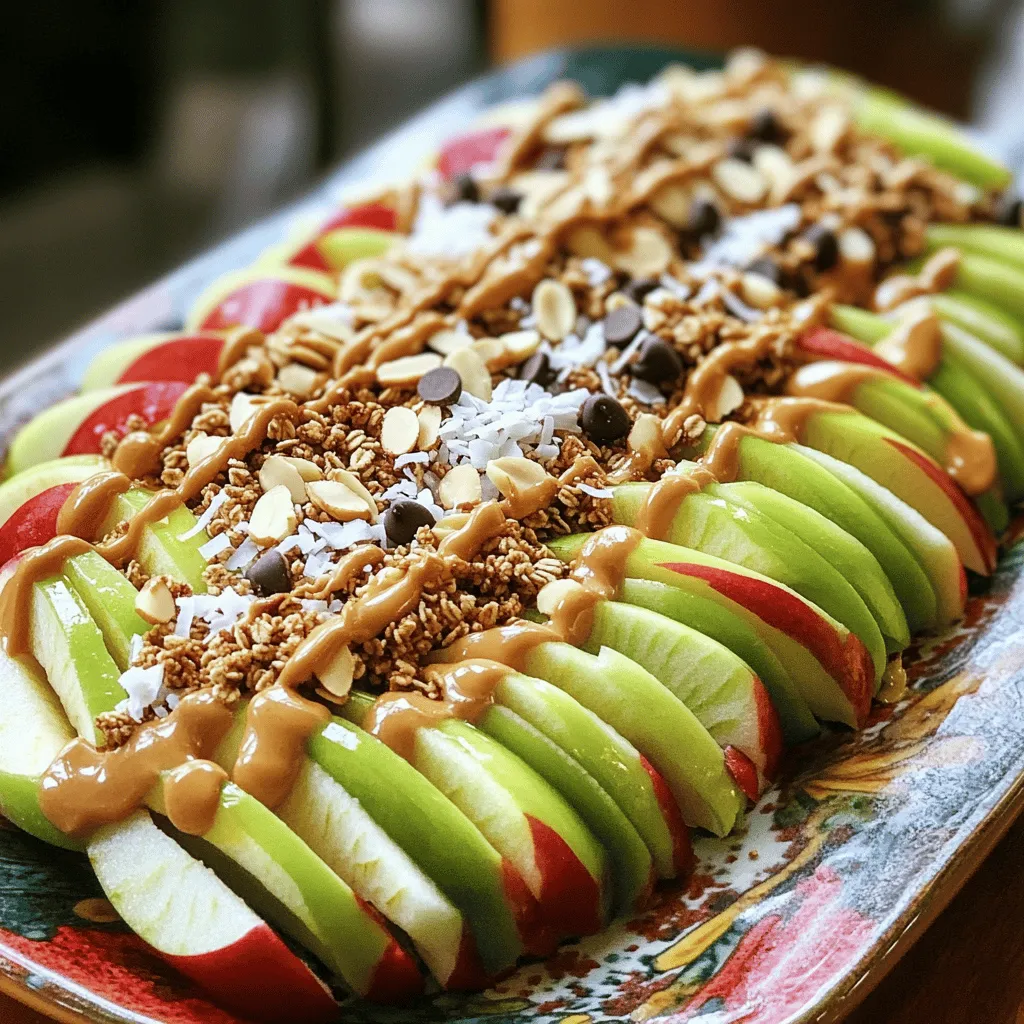
If you’re looking for a quick, tasty snack that’s fun to make, I’ve got just the thing! Peanut Butter Apple

To make the best strawberry lemonade popsicles, start with fresh strawberries. You need about 2 cups. Choose strawberries that are ripe, sweet, and bright red. They should be hulled and sliced for easy blending. Fresh strawberries give the popsicles their rich flavor and vibrant color. Next, you will need 1 cup of freshly squeezed lemon juice. This usually comes from about 4 to 6 lemons. Fresh lemon juice adds a tangy kick that balances the sweetness. You can squeeze the lemons by hand or use a juicer. Be sure to remove any seeds for a smooth texture. For sweetness, you have options. I recommend using 1/2 cup of honey or agave syrup. You can adjust this amount to fit your taste. Honey adds a floral note, while agave syrup is milder. Both sweeteners blend well and enhance the overall flavor. These ingredients come together to create a refreshing summer treat. For the full recipe, check the details above. First, gather fresh strawberries. You need two cups of hulled and sliced strawberries. Place them in a blender. Add one cup of water to the blender. Blend until smooth. This creates a bright, sweet strawberry purée. Set it aside in a bowl. Next, take a separate bowl. Squeeze four to six lemons to get one cup of fresh lemon juice. Add half a cup of honey or agave syrup. This will sweeten your lemonade. Then, pour in the remaining cup of water. Stir well until the sweetener is all mixed in. This lemonade base gives a nice tang to your popsicles. Now, combine the strawberry purée with the lemonade base in the blender. Blend briefly to mix well. Taste it to check the sweetness. If you want it sweeter, add more honey or agave. Once you are happy with the taste, pour the mixture into popsicle molds. Leave a little space at the top for expansion. You can add lemon slices or strawberry halves for a fun look. Insert popsicle sticks and freeze for at least six hours. To pop them out, run warm water over the molds for a few seconds. Then gently pull them out. Enjoy your tasty strawberry lemonade popsicles! You can change the sweetness of your popsicles easily. If you want them sweeter, add more honey or agave syrup. Start with half a cup, then taste the mix. If it needs more sweetness, add a tablespoon at a time. Mix well after each addition. For less sweetness, reduce the sweetener. Lemon juice adds a nice tang, which can balance the sweetness. To get your popsicles out of the molds, use warm water. After freezing, run warm water over the outside of the molds for a few seconds. This works like magic! It helps loosen the popsicles. Then, gently pull them out. If they still stick, run the water a bit longer. Avoid using too much force to prevent breakage. Blending is key for smooth popsicles. Start with the strawberries and a cup of water. Blend until it’s a nice puree. This gives great flavor and color. Next, mix the lemon juice and sweetener in a bowl. Stir until the sweetener dissolves. Then, pour this mix into the strawberry puree. Blend briefly to combine. This keeps the popsicles smooth and tasty. For a fun twist, try blending in some herbs or other fruits! For the full recipe, check the instructions above. {{image_2}} You can add herbs to your strawberry lemonade popsicles for a new flavor. Mint is a great choice. It adds coolness and freshness. You can also try basil. Its sweet and savory taste pairs nicely with lemon and strawberries. To use herbs, just chop them finely and mix them into your popsicle blend. Start with a tablespoon of chopped herbs and adjust to your taste. Mixing in other fruits can make your popsicles even more exciting. You can use blueberries, raspberries, or peaches. Each fruit brings its own taste. For example, raspberries add a tart flavor that contrasts well with sweet strawberries. Just blend these fruits with your strawberries. Aim for a mix of two cups of fruit total for a good balance. If you want creamy popsicles, you can add yogurt or coconut milk. Both options give a rich texture. Greek yogurt adds protein, while coconut milk adds a tropical twist. To use yogurt, blend one cup with the fruit. For coconut milk, add half a cup to your mixture. This change makes your popsicles taste like a dessert. You can still follow the full recipe for the base, just swap out some water for dairy. You can freeze strawberry lemonade popsicles for up to two months. After that, they may lose flavor and texture. Make sure they are fully frozen before you store them. This usually takes about six hours. Use a sturdy airtight container to keep your popsicles fresh. Silicone molds work well for easy release. If you use plastic molds, ensure they are sealed tightly. This prevents freezer burn and keeps your popsicles tasting great. To keep your popsicles fresh, store them away from strong-smelling foods. You can use wax paper between popsicles to avoid sticking. Check the popsicles for any signs of ice crystals before serving. If you see them, this may mean they have been in the freezer too long. For best results, enjoy them within a month. For the full recipe, check it out above. Strawberry lemonade popsicles can last up to two months in the freezer. Be sure to keep them in a sealed container. This helps prevent freezer burn and keeps them fresh. Yes, you can use frozen strawberries. Just make sure to thaw them first. This way, they blend easily and give you that smooth texture. You may need to adjust the sweetness since frozen fruit can taste different. If you prefer, you can use maple syrup or simple syrup. You could even use sugar, but dissolve it in warm water first. Adjust the amount to suit your taste. Absolutely! You can mix in fruits like blueberries or raspberries. Just ensure they pair well with lemon. This adds fun flavors and more color to your popsicles. No, you don’t need fancy molds. Any ice cube tray or small cups work too. Just insert sticks after you fill them. You can even use paper cups if you don’t have sticks. Yes, you can use lime juice instead. Lime gives a different tangy flavor. You could also use another citrus juice, but keep the balance in mind. They are ready when they are solid all the way through. If you press down on them and they feel hard, they are good to go. You can also do a taste test if you’re unsure. Yes, just replace honey with agave syrup or maple syrup. Both are great vegan options. This keeps your popsicles sweet without using animal products. Yes, they can be healthy! They use fresh fruit and can have less sugar than store-bought popsicles. You control the sweetness and can avoid additives. Run warm water over the outside of the molds for a few seconds. This helps loosen them. Then gently pull them out. If you’re careful, they should come out easily. For the full recipe, check out the detailed instructions above! In this article, we explored how to make delicious strawberry lemonade popsicles. We discussed key ingredients like fresh strawberries, lemon juice, and sweeteners. I provided step-by-step instructions, helpful tips, and fun variations to customize your popsicles. Proper storage methods ensure they stay fresh longer. Enjoy experimenting with this simple recipe. You’ll create tasty treats that everyone will love. Happy freezing!

Strawberry Lemonade Popsicles Refreshing Summer Treat

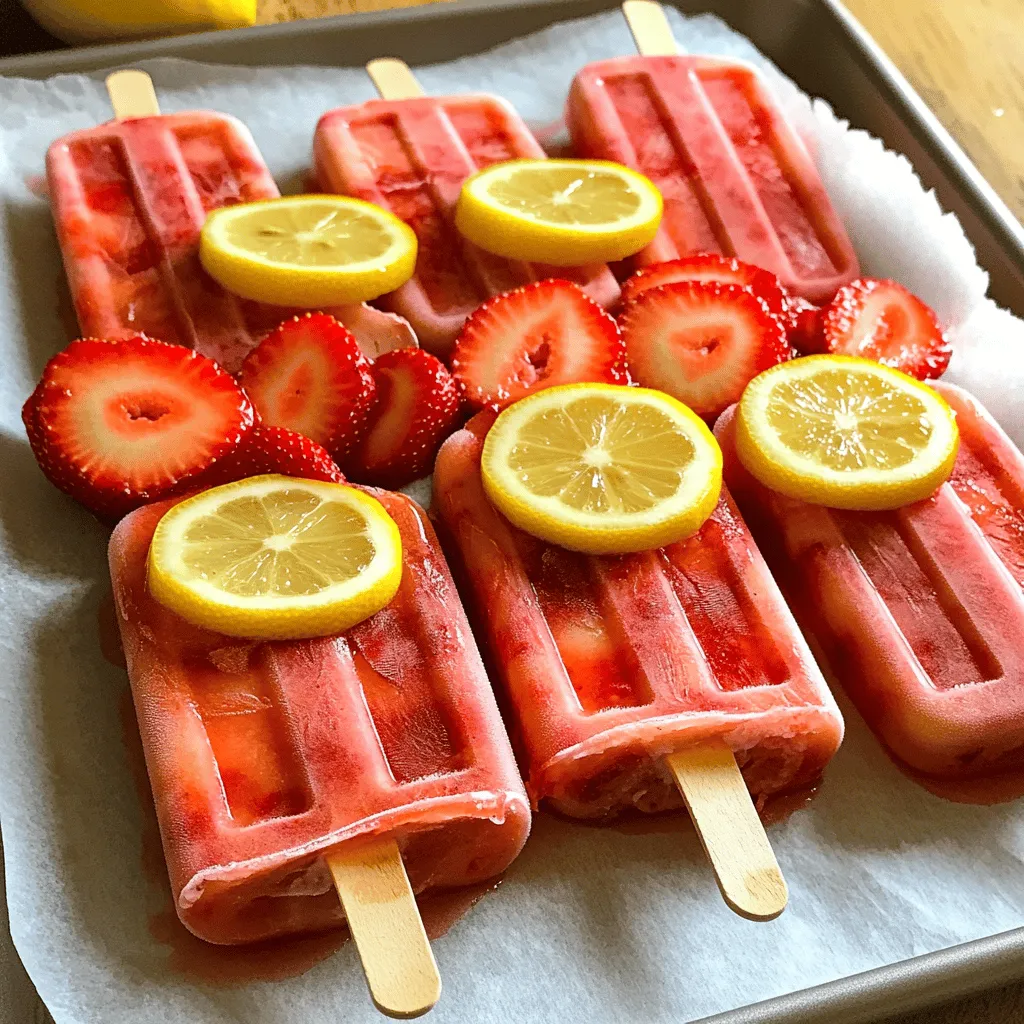
Summer is here, and there’s no better way to cool off than with refreshing Strawberry Lemonade Popsicles. These tasty treats

- 1 large eggplant, cut into thin strips - 1 cup breadcrumbs (preferably panko) - 1/2 cup grated Parmesan cheese - 1 teaspoon garlic powder - 1 teaspoon onion powder - 1 teaspoon dried oregano - 1/2 teaspoon salt - 1/4 teaspoon black pepper - 2 large eggs, beaten - Olive oil spray To make crispy baked eggplant fries, you'll need simple and fresh ingredients. The eggplant is the star of the dish. Cut it into thin strips to make it fry-like. Using panko breadcrumbs gives an extra crunch, which I love. The grated Parmesan cheese adds a nice cheesy flavor. Don't forget the garlic and onion powders. These spices boost the taste without overpowering the eggplant. Dried oregano gives a hint of fresh herb flavor. Salt and black pepper bring everything together. Finally, you'll need two beaten eggs to help the breadcrumbs stick. A light spray of olive oil makes them crispy in the oven. - Baking sheet - Parchment paper - Shallow bowls for mixing - Whisk for beating eggs Gathering the right tools makes this cooking process easier. A baking sheet lined with parchment paper helps the fries bake evenly. Use shallow bowls for mixing ingredients so you can easily dip the eggplant. A whisk is perfect for beating the eggs, making them fluffy. With these ingredients and tools, you are ready to create a tasty snack. For the complete instructions, check out the full recipe! - Preheat the oven to 425°F (220°C). - Line a baking sheet with parchment paper. - In one bowl, mix breadcrumbs and seasonings. - In another bowl, beat the eggs. - Take each eggplant strip and dip it first in the eggs. Then, coat it with the breadcrumb mix. - Arrange the coated eggplant fries on the baking sheet. - Lightly spray the fries with olive oil. - Bake for 20-25 minutes. Flip them halfway through to ensure even cooking. Enjoy this simple yet delicious treat! For a detailed guide, check the Full Recipe. To make your eggplant fries extra crispy, use panko breadcrumbs. They add great crunch. Another trick is to lightly spray the fries with olive oil before baking. This helps them brown nicely. Before you coat the eggplant, salt it. Salting draws out moisture. This step makes your fries crispier. After salting, let the strips rest. This allows more moisture to escape, improving texture. Serve your crispy eggplant fries with marinara or tzatziki sauce. These dips enhance the flavors. You can also enjoy them as an appetizer or a side dish. They pair well with many meals. For the full recipe, check the details above. {{image_2}} You can spice up your eggplant fries in fun ways. Try adding cayenne pepper or chili flakes to the breadcrumb mix for a kick. If you love fresh flavors, mix in herbs like basil or thyme. These additions bring new life to the dish. Making these fries gluten-free is easy. Simply swap regular breadcrumbs for gluten-free ones. You can also use almond flour or crushed nuts. Both options give a nice crunch without gluten. Want a vegan version? It’s simple! Replace the eggs with a flaxseed meal mixture. Just mix one tablespoon of flaxseed with three tablespoons of water and let it sit until it thickens. For cheese flavor, use nutritional yeast instead of Parmesan. This way, you get the same great taste without any animal products. For the full recipe, check out the complete guide to crispy baked eggplant fries. After enjoying your crispy baked eggplant fries, store any leftovers in an airtight container. This keeps them fresh and prevents them from getting soggy. I recommend eating them within 2-3 days. They taste best when fresh, but you can still enjoy them later. You can also freeze cooked eggplant fries for later. First, let them cool completely. Then, place them in a single layer on a baking sheet and freeze until solid. After that, transfer them to a freezer-safe bag or container. When you're ready to eat, reheat them straight from the freezer. For the best crispness, set your oven to 425°F (220°C) and bake for about 15-20 minutes. This way, they stay crunchy and delicious. To make crispy baked eggplant fries, follow these simple steps: 1. Preheat your oven to 425°F (220°C) and line a baking sheet with parchment paper. 2. Cut one large eggplant into thin strips. 3. In a shallow bowl, mix 1 cup of breadcrumbs with 1/2 cup of grated Parmesan cheese, 1 teaspoon of garlic powder, 1 teaspoon of onion powder, 1 teaspoon of dried oregano, 1/2 teaspoon of salt, and 1/4 teaspoon of black pepper. 4. In another bowl, beat 2 large eggs until well mixed. 5. Dip each eggplant strip in the eggs, allowing excess to drip off, then coat in the breadcrumb mix. 6. Place the fries on the baking sheet in a single layer. 7. Spray lightly with olive oil for extra crispiness. 8. Bake for 20-25 minutes, flipping halfway, until golden brown. This method gives you crispy fries! If you want a gluten-free version, use gluten-free breadcrumbs instead of regular ones. Cutting eggplant for fries takes a bit of care. Aim for uniform strips, about 1/4 inch thick. This helps them cook evenly. - Start by washing the eggplant well. - Cut off both ends of the eggplant. - Stand it upright and slice it lengthwise into planks. - Cut each plank into thin strips to resemble fries. This technique ensures each fry gets crispy and delicious. Yes! You can use other vegetables to create tasty baked fries. Try these options: - Zucchini: Slice into strips like eggplant for a lighter option. - Carrots: Cut into thin sticks for a sweet and crunchy bite. - Sweet Potatoes: Slice into fry shapes for a hearty alternative. Each veggie brings a unique flavor. Experiment to find your favorite! To keep your eggplant fries crispy, store them in an airtight container. They taste best within 2-3 days. - Reheat them in the oven at 375°F (190°C) for about 10 minutes. This helps restore their crunch. - Avoid microwaving, as it makes them soggy. With these tips, your fries will stay tasty and crispy! You can find the full recipe for crispy baked eggplant fries in the recipe section of this article. It includes all the details you need for prep and cooking! This blog post covered how to make crispy baked eggplant fries. We discussed ingredients, tools, and step-by-step instructions. I shared tips for extra crispiness and suggested serving ideas. You can also explore variations for dietary needs and storage options. Now, you have all the information to try this tasty dish. Enjoy your cooking adventure!

Crispy Baked Eggplant Fries for a Tasty Snack

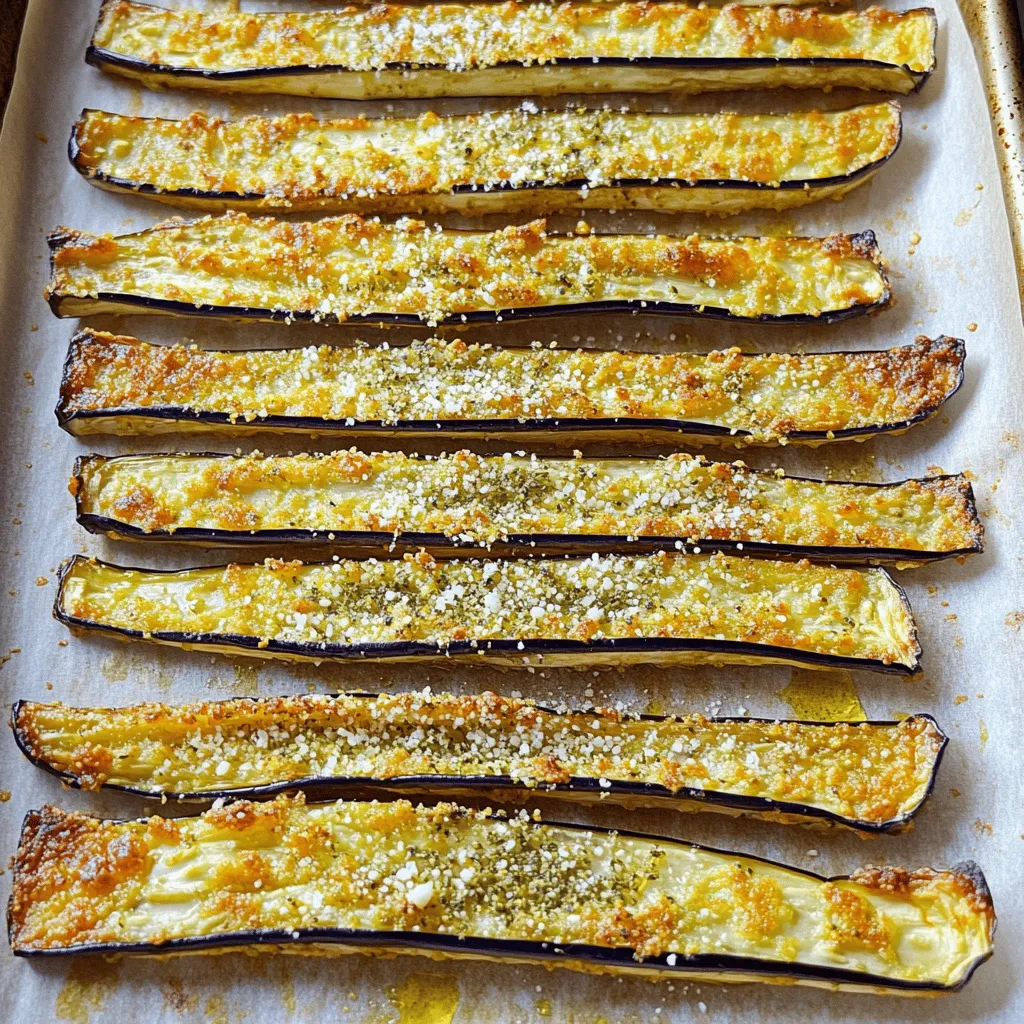
Are you ready for a delicious snack that’s both crispy and healthy? Crispy baked eggplant fries are your new best

- 2 cups cooked jasmine or basmati rice (preferably day-old) - 1 lb chicken breast, diced - 2 tablespoons soy sauce - 1 tablespoon sesame oil - 1 cup mixed vegetables (peas, carrots, bell peppers) - 2 garlic cloves, minced - 1 small onion, finely chopped - 3 green onions, chopped - 2 eggs, beaten - Salt and pepper to taste - Optional: chili flakes for heat When I make chicken fried rice, I love using day-old rice. It clumps nicely and fries well. Fresh rice often gets mushy. Diced chicken breast brings protein and flavor. You can easily swap it out for shrimp or tofu if you prefer. Soy sauce adds a savory touch. Sesame oil gives a nice nutty flavor. I often add peas, carrots, and bell peppers for color and crunch. Aromatics like garlic and onion build a strong base. Green onions add a fresh bite at the end. If you want some heat, add chili flakes for a spicy kick. Beat some eggs if you like. They add richness and texture. Feel free to adjust salt and pepper to suit your taste. Check out the Full Recipe for more details on preparing this dish! - Prep Your Ingredients: Ensure your cooked rice is cold and clumped together. Chop and dice your chicken and vegetables. Having everything ready makes cooking easier and faster. - Cook the Chicken: Heat 1 tablespoon of sesame oil in a large skillet. Stir-fry the chicken until it turns golden brown, about 5-7 minutes. Set the chicken aside when done. - Sauté Aromatics and Veggies: In the same skillet, add a bit more oil if needed. Toss in the chopped onion and minced garlic. Cook for 1-2 minutes until they smell great. Then, add the mixed vegetables and cook for another 3-4 minutes until softened. - Scramble the Eggs: Push the veggies to one side of the skillet. Pour the beaten eggs into the empty space. Scramble them until just cooked, then mix them into the vegetables. - Add Rice and Chicken: Add the cold rice to the skillet with the cooked chicken. Drizzle with soy sauce and stir well. Break apart any rice clumps as you mix everything together. Cook for another 3-5 minutes for a light fry. - Final Touches: Stir in the chopped green onions. You can add chili flakes if you like some heat. Adjust the seasoning with more soy sauce, salt, or pepper if needed. Serve hot and enjoy your meal! For the complete recipe, check out the Full Recipe section. For chicken fried rice, I recommend jasmine or basmati rice. These types have the right texture and flavor. Jasmine rice is slightly sticky, which helps it clump together well when frying. Basmati rice is fluffy, which adds a nice bite to your dish. Using day-old rice is key. Fresh rice can be too wet and make your meal mushy. To elevate your chicken fried rice, consider adding extra sauces or spices. Soy sauce is a must, but you can also try oyster sauce for depth. A splash of rice vinegar adds brightness. If you enjoy heat, sprinkle in some chili flakes or a little sriracha. Fresh herbs like cilantro or basil can also brighten the dish. For the best results, use a large skillet or wok. A wok heats evenly and allows for great stir-frying. If using a skillet, make sure it has high sides. This helps when tossing your ingredients. Preheat your skillet well before adding oil. This step ensures your rice fries nicely instead of steaming. {{image_2}} You can switch up the protein in your chicken fried rice. Shrimp adds a nice seafood twist. Just make sure to cook the shrimp until pink and firm. Tofu is a great option for a plant-based meal. Use firm tofu, pressed and cubed, to get a nice texture. Beef can also work well. Choose flank steak or sirloin for quick cooking. Simply slice it thinly and stir-fry until browned. Each protein brings its own flavor and texture to the dish. Want a meatless version? It’s easy! Use tofu or just load up on veggies. A mix of bell peppers, broccoli, and snap peas gives you great taste. You can make a simple soy sauce mix to season it. Add a dash of sesame oil for rich flavor. This way, you still enjoy delicious fried rice without any meat. Perfect for vegans and vegetarians! To make your fried rice more fun, add extra ingredients. Pineapple chunks give a sweet bite that pairs well with savory flavors. Eggplant can add a unique texture too. Just cube it and sauté it with the other veggies. You can also toss in some spinach or zucchini for more color and nutrients. These additions bring variety and keep your taste buds excited. To store your chicken fried rice, place it in an airtight container. Make sure it cools first. This helps keep the rice fresh in the fridge. It can last for 3 to 4 days. If you want to keep it longer, consider freezing it instead. To freeze your fried rice, follow these steps: - Let the rice cool completely. - Scoop it into freezer-safe bags or containers. - Remove as much air as possible to prevent freezer burn. - Label with the date and freeze for up to 3 months. This way, you can enjoy your chicken fried rice later! When reheating your chicken fried rice, avoid losing its flavor. Here are some good methods: - Stovetop: Place rice in a skillet with a splash of water. Cover and heat over low. Stir occasionally until hot. - Microwave: Use a microwave-safe bowl. Add a few drops of water. Cover loosely and heat in 1-minute bursts, stirring in between. These methods keep your fried rice tasty and prevent it from becoming dry. Answer: Generally, 3-4 days when stored in an airtight container. It’s best to cool it down before putting it in the fridge. This helps keep it fresh. Answer: Yes, frozen mixed vegetables can be a convenient option for this recipe. They save time and add color. Just toss them in while cooking. They will heat up quickly in the pan. Answer: Day-old jasmine or basmati rice is ideal as it’s less sticky. Freshly cooked rice can be too soft and clumpy. Day-old rice has a firmer texture and fries better. Answer: Yes, it's a great make-ahead meal and can be stored for later use. You can cook it in advance and reheat it when you’re ready to eat. This saves time on busy nights. Answer: Yes, all cooking can be done in one skillet or wok for easy clean-up. This makes the cooking process simple and fun. You won’t have to wash many dishes afterward! This chicken fried rice recipe is both simple and satisfying. You start with quality rice and fresh ingredients. The steps are clear and easy to follow; you can customize it to your taste. Don’t forget the tips for storage and reheat methods to keep it fresh. Whether you enjoy chicken or prefer veggie options, this dish is perfect for any meal. Now, get cooking and enjoy a tasty plate of fried rice!

Easy Chicken Fried Rice Tasty Weeknight Recipe

Looking for a quick and tasty dinner? This Easy Chicken Fried Rice recipe is here to save your busy evenings!

To make these jars, you need some key items. Here’s what you will need: - 8 oz cream cheese, softened - 1 cup powdered sugar - 1 cup whipped cream (store-bought or homemade) - 1/2 cup unsweetened cocoa powder - 1 teaspoon vanilla extract - 1 cup chocolate cookie crumbs (like Oreos or chocolate graham crackers) - 4 tablespoons unsalted butter, melted - 1/4 cup chocolate chips for garnish - Fresh raspberries or strawberries for garnish These ingredients create a rich and creamy dessert that is sure to please. You will need a few tools for this recipe. Here’s a list to help you: - Mixing bowls - Electric mixer - Spatula - Measuring cups and spoons - Jars or cups for serving These tools will make the process smooth and fun. If you need alternatives or have allergies, there are options. You can use: - Low-fat cream cheese for a lighter option. - Coconut cream instead of whipped cream for a dairy-free choice. - Gluten-free cookie crumbs for a gluten-free version. Check for allergens in your ingredients to keep everyone safe. If you want the full recipe, it's available for those who love to dive deeper into the details. To start, you need to prepare each layer of the cheesecake jars. First, make the chocolate cookie crust. Mix 1 cup of chocolate cookie crumbs with 4 tablespoons of melted butter in a bowl. Stir until the crumbs are fully coated. This will give your jars a tasty base. Next, prepare the cheesecake filling. In a mixing bowl, beat 8 oz of softened cream cheese until it gets smooth. Slowly add 1 cup of powdered sugar while mixing. Then, add 1/2 cup of unsweetened cocoa powder and 1 teaspoon of vanilla extract. Mix well until it’s silky smooth. This filling is rich and chocolatey. When mixing the cheesecake filling, be gentle when adding the whipped cream. You’ll need 1 cup of whipped cream for this. Fold it into your chocolate mixture using a spatula. Do this carefully to keep it light and airy. This step is key to a good texture. You want it to be fluffy and rich. Now, it’s time to layer your jars. Start with 2 tablespoons of the chocolate cookie crust at the bottom. Press it down lightly. Then, add 3 tablespoons of the cheesecake filling over the crust. Repeat these layers until the jars are full. Aim for at least two layers of each. Finish with a layer of cheesecake on top. For a nice touch, sprinkle chocolate chips on the top before serving. You can also add fresh raspberries or strawberries for color. Remember to chill your jars for at least 2 hours. This helps everything set up nicely. Enjoy your beautiful and delicious no-bake chocolate cheesecake jars! For the complete recipe, check the [Full Recipe]. To get the best texture, start with room-temperature cream cheese. This helps it mix easily. Use an electric mixer to beat it until smooth. Avoid lumps for a creamy filling. When adding whipped cream, fold it in gently. This keeps the mixture light and fluffy. Also, use unsweetened cocoa powder for a rich taste. Always make sure your ingredients are fresh for the best flavor. One common mistake is not chilling the jars long enough. Letting them chill for at least two hours is key. If you skip this step, the cheesecake may not set properly. Another mistake is over-mixing the whipped cream. This can make the filling dense instead of airy. Lastly, don’t skip the chocolate cookie crumbs layer. This adds a crunchy texture that balances the creamy cheesecake. To make assembly simple, gather all your tools and ingredients first. Use a clear jar to show off the layers. Start with the cookie mixture at the bottom. A spoon or small scoop makes layering easy. Alternate layers of cookie and cheesecake until the jar is full. Finish with cheesecake on top for a nice look. This helps create a balanced bite every time. For the final touch, use chocolate chips and berries as a garnish. These add color and extra flavor. For a complete guide to making these delicious jars, check out the Full Recipe. {{image_2}} You can easily switch up the flavor of your no-bake chocolate cheesecake jars. For a fresh twist, add mint extract. Use one teaspoon for a nice minty taste. You can also mix in crushed mint candies for extra crunch. If you prefer fruity notes, try raspberry or strawberry. Swirl in a fruit puree before layering. This adds bright flavor and color. Toppings can change the whole look and taste of your dessert. I love using chopped nuts for some extra crunch. Walnuts or pecans work well. You can also drizzle caramel sauce over the top for a sweet treat. For a fun twist, add crushed candy bars or even sprinkles. Choose your favorite toppings to make it your own. Want a lighter version of this dessert? You can swap regular cream cheese for low-fat cream cheese. You can also use Greek yogurt instead of whipped cream. This adds protein and cuts some fat. Consider using honey or maple syrup instead of powdered sugar for sweetness. These small changes keep the flavor while making it healthier. For more tips on making these delicious jars, check the Full Recipe. You can store your No-Bake Chocolate Cheesecake Jars in the fridge. Keep them in an airtight container. They will stay fresh for about 3 to 5 days. If you want to keep them longer, freezing is a great option. To freeze the jars, cover them tightly with plastic wrap or foil. Place them in a freezer-safe container. They can last up to 2 months in the freezer. When you’re ready to enjoy, move them to the fridge overnight to thaw. Do not refreeze after thawing. No need to reheat No-Bake Chocolate Cheesecake Jars. They are best served cold. If they seem a little soft after thawing, you can gently mix them to restore texture. Add a few fresh toppings, like berries or chocolate chips, for a fresh look and taste before serving. No-Bake Chocolate Cheesecake Jars last for about 3 to 5 days in the fridge. Make sure to cover them tightly. This keeps them fresh and tasty. If you want them to last longer, you can freeze them. However, the texture may change after thawing. Yes, you can use low-fat cream cheese! It will still taste great. However, the texture might be a bit different. Low-fat cream cheese can make your cheesecake less rich. If you want a lighter option, this is a good choice. If you need a substitute for whipped cream, try using cool whip or whipped topping. You can also whip coconut cream for a dairy-free option. Another choice is to use Greek yogurt. It adds creaminess and a bit of tang. Just remember, it will change the flavor slightly. For the full recipe, check out the instructions above! This article walked you through making no-bake chocolate cheesecake jars. You learned about key ingredients, tools, and substitutions. I detailed steps for mixing and layering, plus tips for the best texture. You discovered flavor variations and topping ideas, along with how to store and freeze these desserts. In conclusion, making these cheesecake jars is fun and easy. Customize them to fit your taste and enjoy delightful treats anytime.

No-Bake Chocolate Cheesecake Jars Easy and Delicious

Craving a rich and creamy dessert without the hassle of baking? Look no further! No-Bake Chocolate Cheesecake Jars are your

- 1 ripe pineapple, diced - 2 ripe mangos, diced - 1 papaya, peeled and diced - 1 cup strawberries, hulled and halved - 1 kiwi, peeled and sliced - 1 banana, sliced - Juice of 2 limes - 2 tablespoons honey (or maple syrup) - 1 teaspoon grated fresh ginger - Fresh mint leaves for garnish Each fruit in this salad brings its own unique taste. The pineapple adds a sweet tang. Mangos provide a creamy texture. Papaya is soft and sweet. Strawberries give a burst of juiciness. Kiwi adds a zesty note, while banana is sweet and smooth. For the flavor enhancers, fresh lime juice brightens the whole dish. Honey or maple syrup adds sweetness. Grated ginger gives a warm spice that makes it special. I love to garnish with fresh mint leaves. They add a nice green touch and a refreshing aroma. When you prepare this tropical fruit salad, use ripe fruits for the best flavor. You can find the full recipe above to guide you through each step. This salad is perfect for any occasion. Enjoy making it! To start, you need to prepare the fruits. First, take your ripe pineapple. Cut off the top and bottom. Stand it upright and slice off the skin. Remove any brown eyes. Now, dice the fruit into small, bite-sized pieces. Next, grab your mangos. Cut off the sides of the pit. Score the flesh in a grid pattern but do not cut the skin. Then, scoop out the cubes with a spoon. For the papaya, slice it in half and remove the seeds. Use a spoon to scoop out the flesh, then dice it into small pieces. Now, let’s move on to the strawberries. Remove the green tops and cut them in half. Finally, peel the kiwi and slice it into rounds. Do the same for the banana, slicing it into thin pieces. Now that the fruits are ready, grab a large mixing bowl. Carefully add all the diced fruits you prepared. Gently mix them together. Next, let’s make the lime dressing. In a small bowl, whisk together the juice of two limes, two tablespoons of honey, and one teaspoon of grated fresh ginger. Make sure it is well combined. It’s time to bring it all together! Drizzle the lime dressing over the mixed fruits. Use a spatula to gently toss the salad. Be sure not to mash the fruits. Let the salad sit for about ten minutes. This allows the flavors to meld together. When ready to serve, give the salad a light toss again. You can transfer it to a nice serving bowl or individual bowls. For a pop of color and freshness, garnish it with fresh mint leaves. Enjoy your Tropical Fruit Salad with Lime! For the complete recipe, check out the [Full Recipe]. To make a great tropical fruit salad, you need ripe fruits. Here’s how to pick the best ones: - Pineapple: Look for a sweet smell at the base. The skin should be firm, not too soft. - Mango: Choose mangoes that give slightly when you press them. They should smell sweet. - Papaya: A ripe papaya feels soft to the touch. Its skin should be mostly yellow. - Strawberries: Pick bright red berries with no white tips. They should be firm and fresh. - Kiwi: A ripe kiwi gives a little when you press it. The skin should be smooth. - Banana: Select bananas with a few brown spots. They should feel slightly soft. Balancing sweetness with lime juice is key. Here are some tips to get it just right: - Taste the fruit: Some fruits are sweeter than others. Adjust the honey based on their sweetness. - Lime juice: Start with a little lime juice. You can always add more if needed. - Honey or maple syrup: If the salad needs more sweetness, add a bit more honey or syrup. Serving your tropical fruit salad at the right temperature is important. Follow these best practices: - Chill the salad: Let it sit in the fridge for about 30 minutes before serving. This helps the flavors blend. - Serve cold: Cold fruit is more refreshing. Use chilled bowls for serving. - Enjoy soon after making: This salad tastes best fresh. If it sits too long, the fruits can get mushy. For the complete recipe, check out the [Full Recipe]. {{image_2}} You can make your tropical fruit salad even more exciting! Try adding papaya or coconut for a twist. Papaya brings a sweet flavor and creamy texture. Coconut adds a chewy bite and a touch of island vibes. You can use fresh shredded coconut or even toasted coconut flakes for crunch. If you want, pineapple and mango are great to mix in too, giving it extra sweetness. Want a vegan or gluten-free option? This salad is perfect for you! All the fruits are naturally vegan and gluten-free. You can replace honey with maple syrup for a vegan sweetener. Ensure any added toppings, like granola, are gluten-free. This way, everyone can enjoy a refreshing bowl of tropical goodness. Bored with plain lime dressing? Let’s spice it up! You can add a pinch of cinnamon or nutmeg to the lime dressing. This twist gives your salad a warm, cozy flavor. It’s a fun way to explore new tastes. You can also try adding fresh herbs, like basil or cilantro, for a unique touch. These herbs will add a fresh note and surprise your taste buds. For the full recipe, don’t forget to check out the Tropical Paradise Fruit Salad! To keep your tropical fruit salad fresh, store it in a sealed container. This helps prevent air from getting in. Use a bowl with a lid or plastic wrap. Place it in the fridge right after serving. This way, you retain the bright colors and flavors. You can keep the tropical fruit salad in the fridge for about 2 to 3 days. After that, the fruit may get mushy or lose its taste. Check for any signs of spoilage before eating. If it smells bad or looks off, throw it away. Freezing tropical fruit salad is not the best choice. The texture of the fruit changes when frozen. If you want to freeze it, freeze the fruits separately. Pineapple, mango, and papaya freeze well. Just remember, once you thaw them, they will not be the same. For the best taste, enjoy your salad fresh! To make this tropical fruit salad, follow these simple steps: 1. Start by preparing all the tropical fruits. Dice the pineapple, mangos, and papaya into bite-sized pieces. Halve the strawberries and slice the kiwi and banana. 2. In a large mixing bowl, combine all the diced fruits. Gently mix them together, so they stay whole. 3. In a small bowl, whisk together the lime juice, honey, and grated fresh ginger until well combined. 4. Drizzle the lime dressing over the mixed fruits. Toss gently to coat all the fruit evenly without mashing them. 5. Let the salad sit for about 10 minutes at room temperature. This helps the flavors meld together. 6. When ready to serve, give the salad a light toss again. Transfer it to a serving bowl or individual bowls. 7. Garnish with fresh mint leaves for a pop of color and extra freshness. Yes, you can use other fruits! Feel free to swap out or add any of your favorites. Here are some great options: - Blueberries - Raspberries - Dragon fruit - Coconut - Oranges Mixing in different fruits keeps things fun and fresh. Just remember, keep the flavors balanced! The tropical fruit salad is best when fresh. Store it in the fridge for up to 2 days. To keep it fresh: - Use an airtight container. - Avoid adding the dressing until you serve it. This way, the fruits stay crisp and flavorful! This blog post explored how to create a tropical fruit salad. We discussed fresh fruits like pineapple, mango, and strawberries. I shared tips for mixing in flavor enhancers like lime juice and honey. You learned about adjusting sweetness and best serving practices. In the end, this salad is fresh, fun, and healthy. You can customize it to fit your taste. Try different fruits or add spices. Enjoy tropical flavors any time!

Tropical Fruit Salad with Lime Refreshing Delight

Are you ready to brighten your day with a Tropical Fruit Salad with Lime? This vibrant dish bursts with fresh

To make Garlic Parmesan Roasted Asparagus, gather these ingredients: - 1 pound fresh asparagus, trimmed - 3 tablespoons olive oil - 4 cloves garlic, minced - 1/2 cup grated Parmesan cheese - 1 teaspoon lemon zest - Salt and black pepper, to taste - 1/4 teaspoon red pepper flakes (optional) - Fresh parsley, chopped (for garnish) Fresh asparagus: Look for bright green stalks. They should be firm and not limp. This veggie is the star of the dish. Olive oil: Choose a good quality oil for great flavor. It helps the asparagus roast nicely and adds richness. Garlic: Fresh garlic adds a strong and savory taste. Mince it well to spread the flavor evenly. Parmesan cheese: Grated cheese gives a salty and nutty flavor. It also creates a delicious crust when roasted. Lemon zest: This adds a bright note. Just a little zest gives a fresh taste without being too sour. Seasoning options: Salt and black pepper enhance all the flavors. Red pepper flakes add a hint of heat, if you like spice. Gather these ingredients, and you are ready to make a tasty side dish that everyone will love! Check out the Full Recipe for step-by-step instructions. Start by washing the asparagus. Rinse it under cold water to remove dirt. Next, snap the tough ends off. This helps keep the dish tender. You can also trim about an inch from the bottom if you like. Preheat your oven to 425°F (220°C). This step is key for getting that nice, crispy texture. On a large baking sheet, lay out the cleaned asparagus in one layer. Drizzle three tablespoons of olive oil over the asparagus. This adds flavor and helps it roast nicely. Now, take four cloves of minced garlic and sprinkle them over the asparagus. Garlic adds a rich taste. Next, grab half a cup of grated Parmesan cheese and sprinkle it evenly over the top. For a bit of zing, add one teaspoon of lemon zest. Season with salt and black pepper to taste. If you want some heat, toss in 1/4 teaspoon of red pepper flakes. Gently toss everything together to coat the asparagus well. Roast the asparagus for 12 to 15 minutes. Keep an eye on them. You want them tender and slightly crispy. If you like your asparagus extra crispy, this step is for you. After roasting, switch your oven to broil for 2 to 3 minutes. Watch closely to avoid burning. This adds a lovely golden top. Once done, take it out and garnish with chopped fresh parsley. Enjoy your Garlic Parmesan Roasted Asparagus! For the complete recipe, check out the Full Recipe section. To get the best texture for your asparagus, choose fresh stalks. Look for bright green color and firm stems. Trim the ends to remove any tough parts. When roasting, spread the asparagus in a single layer on the baking sheet. This helps them cook evenly. Roast them until they are just tender but still crisp, about 12 to 15 minutes. If you want a bit of crunch, try broiling for a few minutes at the end. Garlic and Parmesan are key to flavor in this dish. Use fresh garlic for a strong taste. Mince it well so it spreads across the asparagus. The cheese should be finely grated. This helps it melt nicely and coat the stalks. Adding lemon zest adds a bright, fresh note. If you like some heat, sprinkle in red pepper flakes. They add great flavor without being too spicy. Garlic Parmesan roasted asparagus pairs well with many main dishes. Try it with grilled chicken or steak for a balanced meal. It also goes well with fish, adding a nice crunch to your plate. For a vegetarian option, serve it with quinoa or rice. Garnish with chopped parsley for a pop of color and added freshness. This dish also makes a great side for holiday meals or parties. Enjoy the vibrant flavors and great texture! {{image_2}} You can switch the Parmesan cheese for other tasty options. Try using pecorino for a saltier flavor. Feta cheese gives a creamy touch. A mix of mozzarella and cheddar can add a fun twist. Each cheese brings its unique taste and texture, making the dish your own. Feel free to mix in other veggies for added color and flavor. Baby carrots add sweetness and crunch. Cherry tomatoes bring juiciness and brightness. Broccoli florets work well too. Just chop them to similar sizes as the asparagus for even cooking. This way, you create a vibrant veggie medley. Spice it up with different seasonings! Try adding a splash of balsamic vinegar for tang. A sprinkle of garlic powder can boost the garlic flavor. For a kick, use smoked paprika or cayenne pepper. You can also experiment with dried herbs like oregano or thyme. These small changes can make a big difference in taste. For the full recipe, check out the detailed instructions above. After enjoying Garlic Parmesan Roasted Asparagus, you may have some leftovers. To store them, let the asparagus cool to room temperature first. Then, place them in an airtight container. This method keeps the asparagus fresh and tasty for up to three days. Remember to keep them in the fridge. If you want to keep them longer, consider freezing. When you’re ready to eat the leftovers, reheating is simple. You can use the oven for best results. Preheat your oven to 350°F (175°C). Spread the asparagus on a baking sheet. Heat for about 10 minutes, or until they are warm. This method helps maintain their crispiness. You can also use the microwave, but it may make them soggy. If you choose the microwave, heat for 30 seconds at a time. Freezing Garlic Parmesan Roasted Asparagus is a great option for long-term storage. First, let the asparagus cool completely. Then, place them in a single layer on a baking sheet. Freeze them for an hour. Once they are frozen, transfer them to a freezer bag. Remove as much air as possible before sealing. They can be stored in the freezer for up to three months. When you’re ready to use them, cook them straight from frozen. Just add a few extra minutes to your roasting time. For the full recipe, check the earlier section. You can serve Garlic Parmesan Roasted Asparagus with many dishes. This side goes well with grilled chicken, steak, or seafood. It also pairs nicely with pasta or quinoa. For a lighter meal, try it with a fresh salad. The flavors of garlic and Parmesan enhance almost any dish. Yes, you can use frozen asparagus. However, fresh asparagus gives the best taste and texture. If using frozen, thaw it first and drain any excess water. This helps avoid sogginess. You may need to adjust the cooking time slightly, as frozen asparagus cooks faster. To make Garlic Parmesan Roasted Asparagus vegan, replace the Parmesan with a plant-based cheese. Nutritional yeast also adds a cheesy flavor without dairy. You can use olive oil and keep the garlic. Just follow the same steps in the Full Recipe for great results. You learned how to make garlic parmesan roasted asparagus. We covered key ingredients, step-by-step instructions, and helpful tips. I shared ways to enhance flavors, try variations, and store leftovers. Remember, this dish is easy to make and packed with great taste. I hope you enjoy creating and sharing it! Happy cooking!

Garlic Parmesan Roasted Asparagus Easy Side Dish

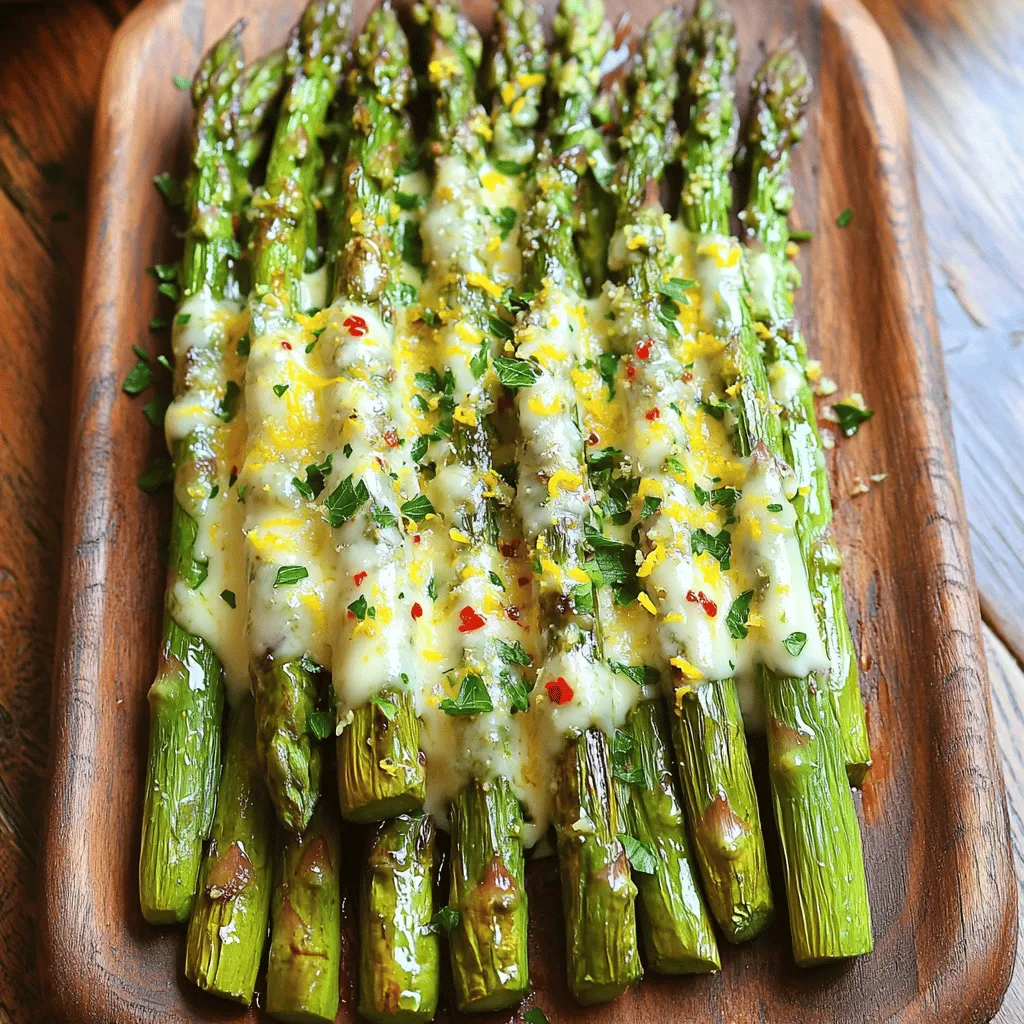
Looking for a simple side dish that dazzles? Garlic Parmesan Roasted Asparagus is my go-to! With fresh asparagus, rich garlic,

Older posts
Newer posts
← Previous Page1 … Page62 Page63 Page64 … Page82 Next →

dsad

© 2026 Recipes Pursuit • Built with GeneratePress

Our Policies

  • Copyright Policy
  • Cookie Policy
  • GDPR Policy
  • Privacy Policy
  • Disclaimer
  • Terms Of Use

More Information

  • Home
  • About
  • Contact
  • Appetizers
  • Dessert
  • Dinner
  • Drinks
©2026, Recipes Pursuit About Back To Top