Skip to content
DisclaimerTerms Of UseGDPR PolicyCookie Policy

Recipes Pursuit

  • Home
  • Drinks
  • Appetizers
  • Dinner
  • Dessert
  • About
  • Contact
  • Privacy Policy
DisclaimerTerms Of UseGDPR PolicyCookie Policy

NO-ING-IMG

To make a delicious Chocolate Strawberry Smoothie, you need a few simple ingredients. Here’s what you will need: - 1 cup fresh strawberries, hulled - 1 ripe banana, frozen - 1 cup unsweetened almond milk (or milk of choice) - 2 tablespoons cocoa powder - 1 tablespoon honey or maple syrup - 1 tablespoon chia seeds (optional) - Ice cubes (optional) Each ingredient plays an important role. The strawberries give a fresh taste. The frozen banana adds creaminess and sweetness. Almond milk makes it smooth. Cocoa powder brings that rich chocolate flavor. Honey or maple syrup adds extra sweetness, but you can adjust it to your taste. Chia seeds are optional but they add fiber and nutrients. Ice cubes make the smoothie thicker and colder, which is great for hot days. Gather these ingredients, and you're ready to create your tasty treat. For the full recipe, check the section above. - Step 1: Prepare the ingredients Start by preparing your ingredients. Hull one cup of fresh strawberries. Peel one ripe banana if it isn’t already frozen. - Step 2: Combine ingredients in the blender In your blender, combine the hulled strawberries, frozen banana, and one cup of unsweetened almond milk. - Step 3: Blend until smooth Add two tablespoons of cocoa powder and one tablespoon of honey or maple syrup. If you want, add one tablespoon of chia seeds for extra nutrition. Blend everything on high until it’s smooth and creamy. - Step 4: Adjust sweetness and re-blend if needed Taste your smoothie. If it needs more sweetness, add more honey or maple syrup. Blend again briefly to mix. - Step 5: Serve the smoothie Pour your smoothie into chilled glasses. Enjoy it right away for the best taste. For a fun touch, garnish with whole strawberries and cocoa powder. You can find the complete details in the Full Recipe. To get the best Chocolate Strawberry Smoothie, focus on the right texture. For a creamy blend, use a frozen banana. It adds natural sweetness and thickness. If you want it thicker, add ice cubes. Blend until smooth, then check the consistency. Balancing sweetness is key. Start with one tablespoon of honey or maple syrup. Taste before adding more. Some strawberries are sweeter than others, so adjust based on what you use. You can add even more nutrition with extras. Chia seeds bring fiber and omega-3s. Try adding a scoop of protein powder for a boost. You can also use spinach for a green twist that won’t change the flavor much. For the full recipe, check the details above. {{image_2}} You can have fun with this chocolate strawberry smoothie. Here are some cool ideas to try: - Different Fruits: Swap strawberries for other fruits. Raspberries or blueberries work great. They add new flavors and colors to your drink. You can also mix fruits for a fun twist. - Alternative Sweeteners: If you want less sugar, use agave or stevia instead of honey or maple syrup. These options can make your smoothie sweet without adding too many calories. - Dairy-Free and Vegan Options: Use coconut milk or oat milk to keep it dairy-free. These milks add extra creaminess. Check the labels to ensure they are vegan if that matters to you. These variations let you create your perfect chocolate strawberry smoothie. You can find more ideas in the Full Recipe section. Enjoy experimenting! You may have some smoothie left after making your Chocolate Strawberry Bliss Smoothie. Storing it well keeps it fresh. Here are some simple tips: - Refrigeration tips: Place your smoothie in the fridge within two hours of making it. Use a lid to cover the container. This keeps it cool and fresh for up to 24 hours. - Best containers for storage: Use glass jars or BPA-free plastic containers. These materials help keep flavors intact. Choose containers that seal tightly to prevent spills and air from getting in. - Freezing smoothies for later: You can freeze the smoothie if you have more than one serving. Pour it into ice cube trays or freezer-safe bags. When you’re ready to enjoy it, let it thaw overnight in the fridge. Blend it again if needed for a smooth texture. Storing your smoothie correctly ensures you enjoy that delightful flavor later! For the full recipe, check the section above. Can I use frozen strawberries instead of fresh? Yes, you can use frozen strawberries. They make the smoothie cold and thick. Frozen fruit is great for a creamy texture. Just toss them in the blender, and you're ready to go. What can I use instead of almond milk? You can use any milk you like. Regular cow's milk, soy milk, or oat milk are good choices. Each will change the flavor a bit. Choose what you enjoy most for your smoothie. How many calories are in a chocolate strawberry smoothie? This smoothie has about 200-250 calories per serving. The calories depend on the milk and sweeteners you choose. Using less sweetener can help cut calories too. Can I make this smoothie ahead of time? Yes, you can prepare it ahead. Store it in the fridge for up to 24 hours. Just give it a good shake or stir before drinking. The taste will still be fresh! Is this smoothie healthy? Yes, this smoothie is quite healthy! It has fruit, fiber, and some good fats from chia seeds. The cocoa powder adds antioxidants. Just watch the sweetener if you're cutting back on sugar. For the full recipe, check out the Chocolate Strawberry Bliss Smoothie. You learned how to make a delicious chocolate strawberry smoothie. Fresh strawberries, a ripe banana, and almond milk create a tasty treat. I shared steps to blend it perfectly, tips for adjustments, and cool variations to try. You also got storage tips for leftovers. Smoothies are easy to enjoy, healthy, and customizable. Now you can sip on this great drink any time!

Chocolate Strawberry Smoothie Delightfully Simple Recipe

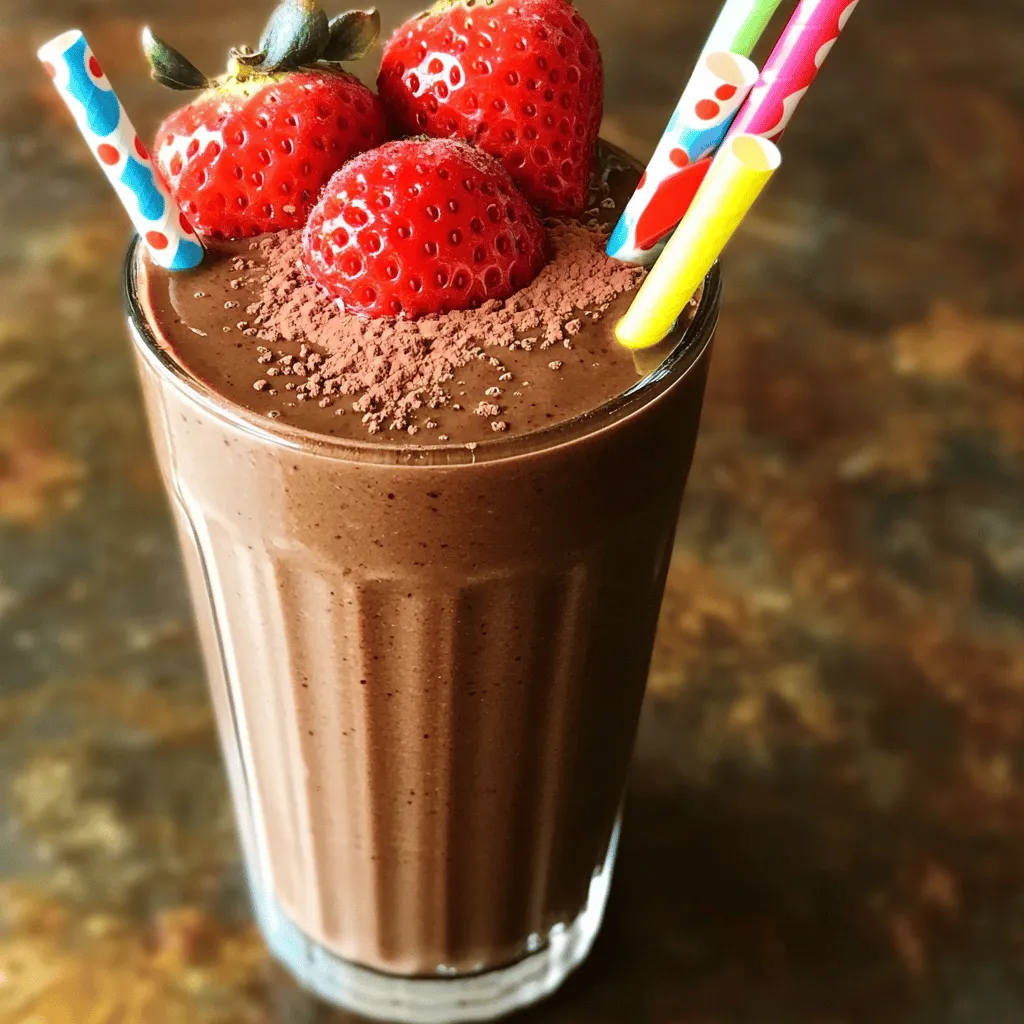
Craving a sweet treat that’s also good for you? Look no further! This Chocolate Strawberry Smoothie is simple to make

- 2 ripe peaches - 8 ounces burrata cheese - 3 cups of arugula or mixed salad greens - 1/4 cup toasted pecans - 3 tablespoons extra-virgin olive oil - 2 teaspoons balsamic glaze - Salt and pepper to taste - Fresh basil leaves for garnish The key to a great Grilled Peach Burrata Salad lies in selecting the best ingredients. Start with ripe peaches that feel slightly soft when you press them. They should have a sweet smell, indicating they are ready to eat. Next, choose fresh burrata cheese. Burrata is creamy and rich. It adds a luxurious touch to your salad. You want to look for burrata that has a soft texture and a fresh taste. For greens, arugula or mixed salad greens work well. They provide a peppery or mild flavor that balances the sweetness of the peaches and the creaminess of the burrata. To add crunch and flavor, use toasted pecans. Toasting them brings out their nutty taste. You can do this in a dry skillet over medium heat for a few minutes. Extra-virgin olive oil is essential for drizzling. It adds richness and depth. Balsamic glaze provides a sweet-tart flavor that elevates the salad. Finally, don’t forget the seasoning. A touch of salt and pepper enhances all the flavors. Garnish with fresh basil leaves for a pop of color and an aromatic touch. For the full experience, check out the Full Recipe, where I guide you through each step of making this vibrant dish. First, preheat your grill or grill pan over medium heat. This step is key for the best flavor. While it heats up, prepare the peaches. Cut them in half and remove the pits. Brush the cut sides of the peaches with olive oil. Sprinkle a bit of salt on them for extra taste. Once the grill is ready, place the peach halves cut side down on the grill. Cook them for about 3-4 minutes. Watch for nice grill marks and a slight softening. When done, remove them from the grill and let them cool down a bit. This cooling step helps keep their shape when you slice them. In a large serving bowl, add your arugula or mixed greens. Tear the burrata cheese into large pieces. Place the burrata on top of the greens. Next, cut the grilled peaches into slices or wedges. Add these peach slices to the salad. Finally, sprinkle the toasted pecans over the top. Drizzle the remaining olive oil and balsamic glaze over the salad. Add salt and pepper to taste. Toss the salad gently to mix. Be careful not to break the burrata too much. Garnish with fresh basil leaves before serving. For the full recipe, check out the details above. To get those perfect grill marks, always start with a clean grill. Preheat your grill to medium heat. This will help the peaches cook evenly. Brush the cut sides of the peaches with olive oil. This adds flavor and helps them not stick. Place the peaches cut side down on the grill. Cook them for about 3-4 minutes. Look for those beautiful grill marks and a slight softening. Tearing burrata cheese is easy. Use your hands instead of a knife. This keeps the texture nice and creamy. Be gentle when you tear it apart. If you pull too hard, it may break too much. To keep burrata creamy, serve it fresh. Let it sit at room temperature for a few minutes before serving. This helps bring out the flavor. For a beautiful presentation, use a large white platter. This makes the colors pop. You can also use clear glass bowls for a nice look. Pair this salad with a light white wine. A chilled Sauvignon Blanc or Pinot Grigio works great. For sides, try grilled bread or a light soup. This adds a nice touch to your meal. For the full recipe, check out the detailed instructions above. {{image_2}} You can change the fruit in this salad. Try using nectarines or plums. They add a sweet twist. You can also use apricots for a unique flavor. For cheese, if you can't find burrata, use fresh mozzarella or goat cheese. Both will still give a creamy texture. Want to make this salad heartier? Add grilled chicken or shrimp. They pair well with the sweet peaches. For a vegetarian option, toss in some chickpeas. They add protein and make the dish filling. You can also use nuts, like grilled tofu, for extra crunch. Balsamic glaze is great, but you can try other dressings too. A lemon vinaigrette brightens the dish. You can also use a honey mustard dressing for a sweet kick. If you're feeling adventurous, make a homemade dressing! Mix olive oil, lemon juice, and herbs for a fresh flavor. The Full Recipe gives you a solid base to try these changes. To store leftovers from your grilled peach burrata salad, place them in an airtight container. This keeps the salad fresh. I recommend using glass containers. They help maintain the salad's taste and prevent spills. Make sure to separate the peaches from the greens if you can. This keeps everything crisp. In the fridge, the salad stays fresh for about 2 days. The peaches may soften, so eat them quick! If you want to freeze the grilled peaches, do it right after cooking. They can last up to 3 months. Just remember, freezing may change their texture. To reheat grilled peaches, use the microwave for about 30 seconds. This warms them up without drying them out. For serving, mix the salad lightly. Add fresh greens if needed. Drizzle with more olive oil or balsamic glaze for extra flavor. Enjoy your salad as if it was just made! If you can't find burrata cheese, try these options: - Fresh mozzarella - Goat cheese - Ricotta cheese - Feta cheese Each option brings its own flavor to the salad. Fresh mozzarella offers creaminess, while goat cheese adds tang. Ricotta is mild and light, and feta adds a salty kick. Yes, you can prep parts of the salad ahead. Here are some tips: - Grill the peaches a few hours early. - Store them in the fridge to keep them fresh. - Mix the greens and cheese just before serving. This way, your salad stays crisp and tasty. To make a vegan version, use these swaps: - Substitute burrata with vegan cheese like cashew or almond cheese. - For the balsamic glaze, skip honey. Use maple syrup instead. These changes keep the salad both delicious and plant-based. This blog post shared a simple yet delightful grilled peach salad recipe. You learned about the main ingredients, from juicy peaches to creamy burrata. I provided step-by-step instructions to grill and assemble your salad. I also shared tips for perfecting your grilling technique and offered fun variations and storage tips. Enjoy making this salad as a fresh dish for any meal. It’s versatile and sure to impress!

Grilled Peach Burrata Salad Fresh and Flavorful Dish

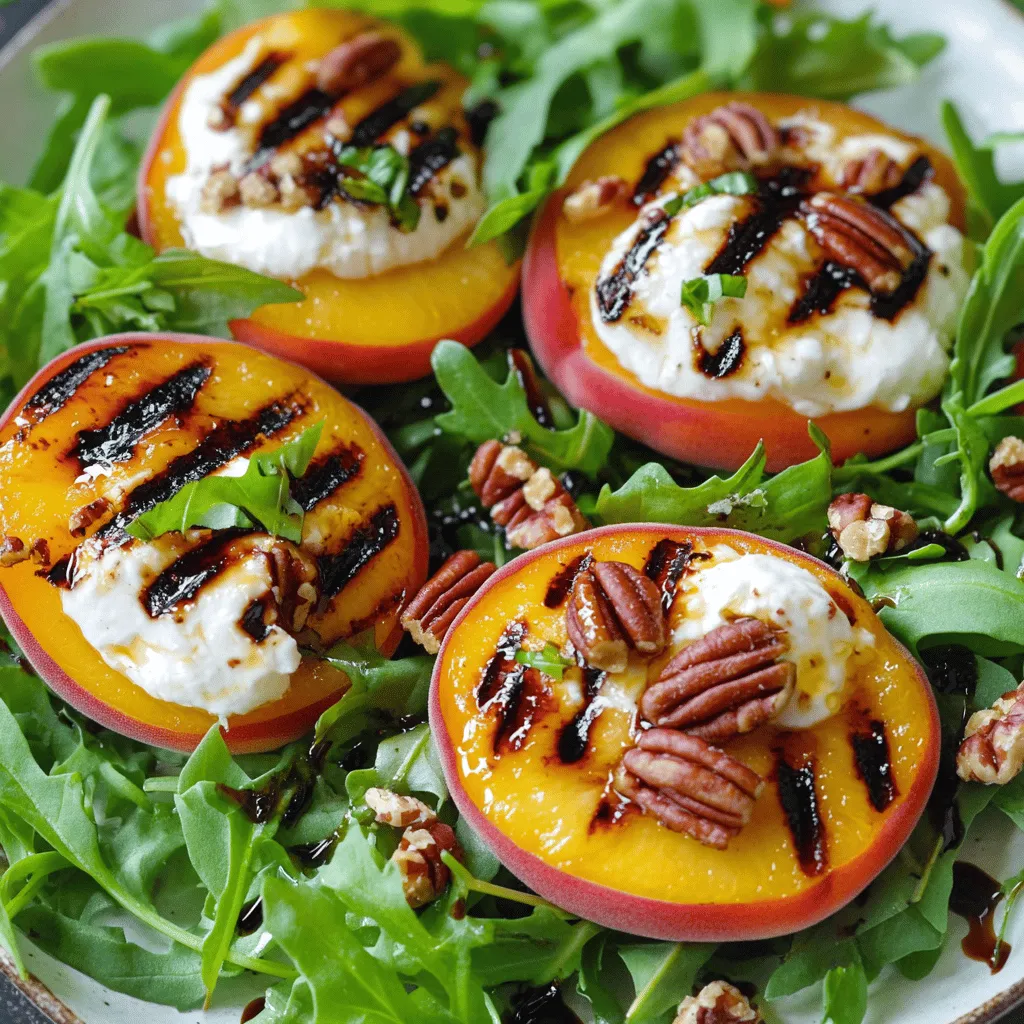
Looking for a fresh and vibrant dish that’s perfect for any season? My Grilled Peach Burrata Salad combines sweet, juicy

Here’s what you need for easy veggie egg rolls. These ingredients make a tasty filling that everyone will love. - 1 cup green cabbage, finely shredded - 1 cup carrots, grated - 1 red bell pepper, diced - 1/2 cup bean sprouts - 2 green onions, chopped - 3 cloves garlic, minced - 1 tablespoon fresh ginger, grated - 2 tablespoons soy sauce - 1 teaspoon sesame oil - 1 package egg roll wrappers - Oil for frying - Salt and pepper to taste These fresh veggies give your egg rolls a great crunch and flavor. Feel free to change some veggies if you like. You can check out the full recipe for more details on how to make them. First, heat 1 tablespoon of oil in a skillet over medium heat. Add 3 cloves of minced garlic and 1 tablespoon of grated ginger. Sauté for about 1 minute. The smell will be amazing! Next, toss in 1 cup of shredded green cabbage, 1 cup of grated carrots, 1 diced red bell pepper, and 1/2 cup of bean sprouts. Stir-fry these veggies for about 5 minutes. You want them to soften just a bit. Now, season your mixture with 2 tablespoons of soy sauce, 1 teaspoon of sesame oil, and salt and pepper to taste. Mix well and cook for another 2-3 minutes. Once done, remove it from heat and let it cool slightly. Now comes the fun part! Lay out an egg roll wrapper on a clean surface. Make sure one corner is facing you. Place about 2 tablespoons of your veggie filling in the center. Fold the bottom corner over the filling. Then, fold in the sides and roll it tightly to the top corner. To seal the egg roll, use a little water. This helps keep it closed. Repeat this process with the remaining wrappers and filling. For cooking, heat about an inch of oil in a deep pan or fryer to 350°F (175°C). Carefully fry the egg rolls in batches. Be sure not to overcrowd the pan. Fry for about 3-4 minutes on each side. You want them golden brown and crispy. Once done, use a slotted spoon to remove them and drain on paper towels. This will soak up any extra oil. Enjoy your crispy veggie delight! Check out the Full Recipe for more details. - Ideal oil temperature for frying: Heat your oil to 350°F (175°C). This is the sweet spot for crispy egg rolls. Use a thermometer for accuracy. If the oil is too cool, the egg rolls will soak up oil and become greasy. - Avoiding soggy egg rolls: To keep them crispy, do not overcrowd the pan when frying. Fry in small batches. Also, drain the cooked egg rolls on paper towels to remove excess oil. This helps maintain crispiness. - Recommended sauces and garnishes: Serve your egg rolls with sweet chili sauce or soy sauce for dipping. These add a nice kick. Garnish with sesame seeds and sliced green onions for a fresh touch. This not only enhances flavor but also makes your dish look appealing. - How to tweak the filling for taste: You can customize the filling based on your taste. Try adding mushrooms for an earthy flavor or some spice with chopped jalapeños. Fresh herbs like cilantro or basil can also boost freshness. Adjust the soy sauce for saltiness, and feel free to experiment with different veggies. For the full recipe, check out the Crispy Veggie Delight Egg Rolls section. {{image_2}} You can change up the filling to your taste. Here are some ideas: - Alternative vegetables: Try using mushrooms, zucchini, or spinach. These add flavor and color. You can also mix in broccoli or corn for extra crunch. - Vegetarian protein options: Consider adding tofu or tempeh. These options give a nice texture and boost protein. You could also use chickpeas or lentils for a hearty filling. You can make your egg rolls healthier with simple swaps: - Baking vs. frying: Baking is a great way to enjoy egg rolls with less oil. Brush them with a little oil and bake at 400°F (200°C) for about 20 minutes. Flip them halfway for even cooking. - Gluten-free wrapper options: If you want a gluten-free version, look for rice paper or corn tortillas. These can hold your filling well and are easy to work with. Just soak the rice paper before wrapping. For the full recipe, check out the Crispy Veggie Delight Egg Rolls section. Enjoy experimenting! To store uncooked egg rolls, you can freeze them for later use. First, lay them out in a single layer on a baking sheet. Make sure they don’t touch each other. This will prevent them from sticking. Place the sheet in the freezer for about one to two hours. Once they are frozen, transfer them to a zip-top bag. This keeps them fresh and ready for cooking. When you want to cook them, you can fry them straight from the freezer. There is no need to thaw. Just add a few extra minutes to the frying time. This way, you get crispy, delicious egg rolls every time. To store cooked egg rolls, let them cool to room temperature first. Then, place them in an airtight container. It is best to put parchment paper between layers to prevent sticking. You can keep them in the fridge for about three to four days. When reheating, use an oven or air fryer. This will help keep them crispy. Preheat your oven to 350°F (175°C). Place the egg rolls on a baking sheet and heat for about 10 minutes. If using an air fryer, set it to 350°F and heat for about 5 to 7 minutes. Enjoy your egg rolls again without losing that tasty crunch! To get a crunchy texture, follow these tips: - Use Cold Oil: Start with cold oil when frying. This helps the egg rolls crisp up nicely. - Do Not Overcrowd: Fry in small batches. Too many at once will lower the oil temperature. - Drain Well: After frying, place them on a rack or paper towel. This helps keep them crispy. Yes, you can prepare them in advance! Here’s how: - Prepare the Filling: You can make the filling a day early. Store it in the fridge. - Wrap Them Later: Wrap the egg rolls just before frying. This keeps them fresh and crisp. - Freeze Uncooked Rolls: If you want to prepare ahead, freeze uncooked egg rolls. This works well for later. Here are some great dipping sauces: - Sweet Chili Sauce: It adds a sweet and spicy kick. - Soy Sauce: A classic choice that complements the flavors. - Peanut Sauce: For a nutty twist, this is a tasty option. Leftover egg rolls can last in the fridge for about three days. - Store in an Airtight Container: This keeps them fresh longer. - Reheat in Oven: For best results, reheat them in the oven. This helps restore their crunch. For the full recipe, check the Crispy Veggie Delight Egg Rolls section above! In this blog post, I shared a simple recipe for delicious veggie egg rolls. You learned about the ingredients, preparation steps, and cooking methods. With tips, variations, and storage info, making these egg rolls is easy. Try the simple techniques, and enjoy your tasty treats. Customize your filling for more fun flavors. You'll impress your friends with this tasty snack that's fresh and healthy!

Easy Veggie Egg Rolls Quick and Flavorful Snack

Looking for a quick and tasty snack? These Easy Veggie Egg Rolls are just what you need! Packed with colorful

- 2 lbs chicken wings - 1/4 cup gochujang (Korean chili paste) - 2 tablespoons soy sauce - 2 tablespoons honey - 2 tablespoons sesame oil - 3 cloves garlic, minced - 1 tablespoon fresh ginger, grated - 1 tablespoon rice vinegar - 1 teaspoon sesame seeds - 3 green onions, sliced (for garnish) - Salt and pepper to taste - Quantities for Each Ingredient: For the best flavor, use 2 lbs of chicken wings. The marinade needs 1/4 cup of gochujang, 2 tablespoons each of soy sauce, honey, and sesame oil, and 3 cloves of minced garlic. Add 1 tablespoon of grated ginger and rice vinegar. Use 1 teaspoon of sesame seeds and 3 green onions for garnish. Finally, season with salt and pepper. - Tips for Freshness: Always choose fresh chicken wings. Look for ones that are plump and have a nice color. Fresh garlic and ginger will enhance the taste of your marinade. Store your ingredients in cool, dry places. - Alternative Chicken Cuts: If you want, you can use chicken drumsticks or thighs instead of wings. They cook well and absorb the flavors nicely. - Vegan Options: For a plant-based twist, try using cauliflower or tofu. Both options can be marinated the same way. Adjust cooking times to ensure they get crispy. For more details on how to prepare these delicious wings, check the Full Recipe. Mixing Ingredients To start, you need to mix the marinade. In a large bowl, combine these ingredients: - 1/4 cup gochujang - 2 tablespoons soy sauce - 2 tablespoons honey - 2 tablespoons sesame oil - 3 cloves garlic, minced - 1 tablespoon fresh ginger, grated - 1 tablespoon rice vinegar - Salt and pepper to taste Stir until everything blends well. This mix gives the wings a rich flavor. Importance of Gochujang Gochujang is a key ingredient in this dish. It adds heat and depth. Its unique taste makes these wings stand out. Without it, the dish loses its authentic Korean flavor. Best Practices for Marination Now, it's time to marinate the chicken. Place the chicken wings in a large zip-top bag. Pour the marinade over them. Make sure every wing gets coated well. Seal the bag tightly. This keeps flavors trapped inside. Duration for Optimal Flavor Let the wings sit in the fridge. Ideally, marinate for at least 1 hour. For even more flavor, you can let them sit overnight. This time allows the marinade to soak in deeply. Oven Preheating Before you cook, preheat your oven to 400°F (200°C). This step is crucial for crispy wings. While the oven heats, prepare your baking sheet. Baking Techniques for Crispy Wings Line a baking sheet with parchment paper for easy cleanup. Remove the wings from the marinade. Let the excess drip off. Place the wings in a single layer on the sheet. Bake for 25-30 minutes. Flip the wings halfway through cooking. This helps them crisp up nicely. After baking, they should be golden and crunchy. For the complete cooking instructions, see the Full Recipe. Recommended Marinade Time Marinating the wings is key to great flavor. I suggest marinating for at least one hour. If you can, try to marinate overnight. This lets the wings soak up all the tasty goodness. Adjusting Spice Levels Want less heat? You can use less gochujang. Mixing in some honey can balance it out too. For more spice, add extra gochujang or some chili flakes. Taste the marinade before you add the wings. Adjust it to your liking! Techniques for Baking To get crisp wings, place them on a wire rack over a baking sheet. This allows air to circulate around the wings. Bake at 400°F for 25-30 minutes. Flip them halfway through for even cooking. Broiling for Extra Crunch For an extra crunch, broil the wings for the last 5 minutes. Keep an eye on them so they don’t burn. This step gives you a wonderful crispy texture that everyone loves! Best Sides to Accompany Serve your wings with a side of steamed rice or a fresh salad. Pickled vegetables can also add a nice touch. They balance the heat and add a fresh flavor. Dipping Sauces to Include Pair your wings with a cool dipping sauce. A mix of yogurt with herbs works well. You can also use a spicy mayo for those who love heat. Enjoy mixing and matching to find your favorite! For full details on how to make this dish, check out the Full Recipe. {{image_2}} You can change the flavor of your Spicy Korean Chicken Wings in fun ways. - Sweet and Spicy Mix: Add brown sugar or maple syrup to the marinade. This mix adds a nice sweetness that balances the heat from the gochujang. It creates a rich and tasty sauce. - Citrus-infused Options: Squeeze fresh lime or orange juice into the marinade. This adds a zesty kick that brightens the dish. It also helps cut through the richness of the wings. You don't have to bake the wings. Here are some easy alternatives. - Air Fryer Instructions: Toss the marinated wings in the air fryer. Set it at 375°F (190°C) for about 25 minutes. Flip them halfway for even crispiness. This method makes them crunchy without frying in oil. - Grilling Techniques: Grill the wings for a smoky flavor. Preheat the grill to medium-high. Grill for about 20 minutes, turning often. This method gives the wings a nice char and keeps them juicy. Get creative and mix in flavors from around the world. - Korean Fusion Ideas: Try adding kimchi or serving with a kimchi slaw. This adds texture and a tangy flavor that pairs well with the wings. - Spicy Korean Wing Bowls: Serve the wings over rice or noodles. Top with fresh vegetables and a drizzle of sesame oil. This creates a fun and filling meal. Explore these variations and make the recipe your own. Check out the Full Recipe for more tips! - Best Practices for Leftovers: After cooking, let the wings cool. Place them in an airtight container. Store them in the fridge for up to three days. This keeps them fresh and safe to eat later. - Safe Marination Instructions: If you marinate wings, do so in the fridge. Never leave them out at room temperature. Marinate for at least one hour, but overnight gives the best flavor. - How to Keep Wings Crispy: Reheat wings in the oven. Preheat to 350°F (175°C). Place wings on a baking sheet. Bake for about 10-15 minutes until hot and crispy. - Ideal Temperature and Duration: Aim for an internal temperature of 165°F (74°C). This ensures safety and great taste. - Freezing Before or After Cooking?: You can freeze wings both ways. Freeze raw wings in marinade for up to three months. Cooked wings can also be frozen. Just ensure they cool completely before freezing. - Proper Packaging Techniques: Use freezer bags or airtight containers. Remove as much air as possible to avoid freezer burn. Label with the date for easy tracking. For more details on preparing these tasty wings, check out the Full Recipe. Spicy Korean chicken wings can be a tasty treat. They have protein from the chicken. However, they also have some sugar and fat from the marinade. Here’s a quick look at the nutrition: - Calories: About 320 per serving - Protein: 24 grams - Fat: 22 grams - Carbohydrates: 8 grams To make them healthier, you can use less honey or bake instead of frying. Yes, you can use frozen chicken wings. Just make sure to thaw them first. Here’s how: - Thawing: Place the wings in the fridge overnight. - Quick Thaw: If you’re short on time, use cold water. Submerge the wings in a sealed bag for 1-2 hours. Once thawed, follow the cooking instructions as usual. Pair these wings with tasty sides. Here are some suggestions: - Rice: Steamed white or brown rice balances the spice. - Vegetables: A fresh salad adds crunch. - Dipping Sauces: Try ranch or blue cheese dressing. - Beverages: Serve with cold beer or sweet tea. You can easily change the spice level of your wings. Here are some tips: - Mild: Use less gochujang or add more honey. - Medium: Stick to the recipe without changes. - Extra Spicy: Add chili flakes or sriracha to the marinade. Taste the marinade before adding the wings to get it just right. For the complete steps on making spicy Korean chicken wings, check out the Full Recipe. It includes everything you need to know for a delicious outcome. In this post, we explored how to make Spicy Korean Chicken Wings. We covered essential ingredients, from chicken wings to marinade tips. You learned how to prepare the marinade, marinate the chicken, and bake for crispy results. We shared tips for flavor, crispiness, and storage, plus different cooking methods and variations. These wings can be a crowd-pleaser. They are simple to make and full of flavor. Follow these steps, and enjoy your tasty creation!

Spicy Korean Chicken Wings Bold and Flavorful Dish

Are you ready to fire up your taste buds? Spicy Korean Chicken Wings are a bold and flavorful dish that

- 2 lbs Yukon Gold potatoes - 4 cloves garlic - 1 cup sharp cheddar cheese - ½ cup cream cheese - ½ cup whole milk - 4 tablespoons unsalted butter The key to cheesy garlic mashed potatoes is the Yukon Gold potatoes. They are creamy and buttery. I always peel and chop them before boiling. Garlic adds a rich flavor. I use four cloves, minced finely. For cheese lovers, sharp cheddar gives a nice kick. Cream cheese helps create a smooth texture. Whole milk thins the mixture out. Unsalted butter adds richness. - Salt and pepper - 2 tablespoons fresh chives To bring out the best flavors, I sprinkle in salt and pepper. Chives add a pop of color and fresh taste. They make the dish look great on the table. - Cream alternatives (e.g., sour cream, Greek yogurt) - Types of cheese to consider If you want to switch things up, I recommend using sour cream or Greek yogurt. These will keep the dish creamy but change the taste a bit. You can also try other cheeses. Gouda or mozzarella work well for a different flavor. For the full recipe, check out the link. First, start with 2 lbs of Yukon Gold potatoes. Peel and chop them into even pieces. Rinse the potatoes under cold water to remove any dirt. Next, place the chopped potatoes in a large pot. Cover them with cold water and add a pinch of salt. Bring the water to a boil over medium-high heat. Once boiling, lower the heat to medium-low. Cook the potatoes for 15 to 20 minutes until they are fork-tender. While the potatoes cook, take 4 cloves of minced garlic. In a small saucepan, melt 4 tablespoons of unsalted butter over medium heat. Add the minced garlic to the butter. Sauté the garlic for about 2 minutes until it smells great. Be careful not to let it brown, as this can make it bitter. Once ready, set the garlic aside to mix later. After draining the cooked potatoes, return them to the pot. Pour the melted garlic butter over the potatoes. Next, add ½ cup of cream cheese and 1 cup of sharp cheddar cheese. Pour in ½ cup of whole milk too. Season with a sprinkle of salt and pepper. Use a potato masher or electric mixer to mash the potatoes until they are smooth and creamy. If the mix feels too thick, add more milk to reach the texture you like. Once mashed, taste the potatoes and adjust the seasoning with more salt and pepper if needed. Transfer the cheesy garlic mashed potatoes to a serving dish. For a lovely finish, sprinkle 2 tablespoons of chopped fresh chives on top. This adds a nice touch and enhances the flavor. For the complete recipe, check out the [Full Recipe]. To make cheesy garlic mashed potatoes creamy, start with warm ingredients. Cold milk or butter can cool down the potatoes and make them gummy. Instead, warm the milk and butter together before adding them to the mix. When mashing, use a potato masher for a rustic feel, or an electric mixer for smoothness. Mix gently to avoid overworking the potatoes, which can make them gluey. You can boost the taste of your mashed potatoes with herbs. Fresh rosemary or thyme adds a nice touch. Just chop them finely and mix in at the end. For an extra layer of flavor, consider adding crispy bacon or roasted garlic. This creates a rich, savory taste that pairs perfectly with the cheese. Want to save time? Use a pressure cooker. It cooks potatoes quickly, cutting your prep time in half. You can also pre-cook the potatoes. Boil them in advance and store them in the fridge. When you’re ready, just reheat them and mash. This way, you can enjoy cheesy garlic mashed potatoes without the wait. For the full recipe, check out the earlier section. {{image_2}} You can change the cheese for fun flavors. Try gouda for a smoky taste. Mozzarella adds a stretchy, creamy texture. You can even mix cheeses! This makes your mashed potatoes unique. Each cheese brings its own style. Go wild with combinations to find your favorite. Want to keep it vegan? Use plant-based cream cheese. Swap regular milk for almond or oat milk. Nutritional yeast can give a cheesy flavor. It’s packed with nutrients too! These changes keep the taste great without dairy. You can enjoy cheesy garlic mashed potatoes in a new way. Feeling bold? Add jalapeños for heat. They give an extra kick. Hot sauce can also spice things up. Experiment with spices like paprika for a smoky note. These flavors can make your dish exciting. Don't be afraid to try new things! The world of flavors is at your fingertips. To store leftovers, place the mashed potatoes in an airtight container. Make sure to cool them first. They will stay fresh in the fridge for up to three days. If you notice any change in smell or appearance, it's best to toss them. If you want to freeze cheesy garlic mashed potatoes, scoop them into a freezer-safe bag. Flatten the bag to save space. They can be frozen for up to two months. When you're ready to eat, move them to the fridge overnight to thaw. You can reheat mashed potatoes on the stovetop or in the microwave. For stovetop, add a little milk and heat on low. Stir often to keep them smooth. In the microwave, heat in short bursts, stirring in between. Always add a splash of milk to keep them creamy and moist. This helps prevent dryness and makes them taste fresh. To make cheesy garlic mashed potatoes from scratch, start with Yukon Gold potatoes. Peel and chop them into even pieces. Boil them until fork-tender. While they cook, melt butter in a pan and sauté minced garlic until it smells great. Once the potatoes are done, drain them and return them to the pot. Add the garlic butter, cream cheese, sharp cheddar cheese, and milk. Mash everything together until smooth. Add salt and pepper to taste, then serve warm. You can find the full recipe [here](#). Yes, you can make cheesy garlic mashed potatoes ahead of time. Prepare them as usual, then cool them before storing. Place them in an airtight container in the fridge. They will stay fresh for up to three days. When ready to serve, reheat them on the stove or in the microwave. Add a little milk to bring back the creamy texture. Yukon Gold potatoes are the best choice for cheesy garlic mashed potatoes. They have a creamy texture and a rich flavor. Other good options include Russet potatoes, but they can be a bit drier. Yukon Golds give you the perfect creaminess without needing too much butter or cream. If your mashed potatoes turn out watery, don't worry! You can fix them. Start by placing them back in a pot over low heat. Cook them gently to evaporate some moisture. Stir them frequently to prevent sticking. If they still seem wet, mash in a little instant potato flakes. This will absorb extra liquid and help thicken them up. Absolutely! You can add other flavors for fun twists. Try mixing in roasted garlic for a deeper taste. Fresh herbs like chives or thyme add a nice touch. For a bit of heat, diced jalapeños work well. You can even stir in crispy bacon bits for extra crunch and flavor. Get creative and enjoy your mashed potatoes! Cheesy garlic mashed potatoes are simple and delicious! We covered important ingredients, step-by-step instructions, and creative variations. You can easily adapt this dish with different cheeses or make it vegan. Remember to store your leftovers properly so they stay tasty. With my tips, you can achieve a creamy texture and bold flavors. Try these mashed potatoes at your next meal for a satisfying side. Enjoy experimenting with flavors and making it your own!

Cheesy Garlic Mashed Potatoes Comforting Side Dish

Looking for a side dish that brings warmth and comfort? Cheesy Garlic Mashed Potatoes are your answer! These creamy, cheesy

- 1 can (15 oz) chickpeas, drained and rinsed - 1 tablespoon olive oil - 1 teaspoon chili powder - 1 teaspoon cumin - ½ teaspoon smoked paprika - Salt and pepper to taste - 8 small corn or flour tortillas - 1 avocado, sliced - 1 cup red cabbage, shredded - ½ cup salsa (your choice of spiciness) - Fresh cilantro, for garnish - Lime wedges, for serving Gathering the right ingredients is key for crispy chickpea tacos. Start with one can of chickpeas. Rinse and drain them well. This makes sure they are clean and ready. Olive oil adds a nice crunch, so use a tablespoon. Spice things up with chili powder and cumin. Each needs a teaspoon. Add ½ teaspoon of smoked paprika for flavor depth. Don’t forget salt and pepper to taste. For the tacos, grab eight small tortillas. You can choose between corn or flour. They both taste great! Next, it’s time for toppings. Slice one avocado for creaminess. Shred one cup of red cabbage for crunch. Add ½ cup of salsa to bring some zest. Fresh cilantro makes a lovely garnish. Lastly, serve lime wedges for a zesty kick. For the Full Recipe, follow the detailed steps to make this dish unforgettable! First, you need to preheat your oven to 425°F (220°C). This high heat helps the chickpeas get crispy. Next, prepare a baking sheet by lining it with parchment paper. This makes cleaning up easy later. Take your can of chickpeas, drain them, and rinse them well. Use a paper towel to pat them dry. Drying the chickpeas is key for crispiness. In a mixing bowl, toss the dried chickpeas with olive oil, chili powder, cumin, smoked paprika, salt, and pepper. Make sure every chickpea gets coated with the spices and oil. Spread them out in a single layer on the baking sheet. Roast them in the oven for about 25-30 minutes. Shake the pan halfway through to ensure even cooking. When they turn golden-brown and crispy, they are ready. While the chickpeas roast, warm the tortillas in a dry skillet over medium heat. Heat them for about 30 seconds on each side. This makes them soft and easy to fold. Once the chickpeas are crispy, take them out of the oven. Start assembling your tacos by placing a good amount of chickpeas on each tortilla. Top them with sliced avocado, shredded red cabbage, and your favorite salsa. Finish with fresh cilantro and serve with lime wedges on the side for a zesty kick. Check the Full Recipe for more details! To get crispy chickpeas, drying them well is key. After draining, use a paper towel to pat them dry. This removes moisture and helps them crisp up in the oven. If they are wet, they will steam instead of roast. Next, the oven temperature is also vital. Preheat your oven to 425°F (220°C). This high heat helps the chickpeas turn golden brown and crunchy. Spread them out in a single layer on the baking sheet. If they’re too crowded, they won’t roast well. You can easily boost the flavor of your chickpeas. Try adding garlic powder or onion powder along with the spices. A pinch of cayenne pepper adds nice heat, too. If you like it spicy, adjust the heat level by using a hotter salsa. You can also add sliced jalapeños for an extra kick. Experiment with different spices to find the mix you love. For the full recipe, you can refer to the Crispy Chickpea Tacos section above. {{image_2}} You can swap chickpeas for other legumes. Black beans or lentils work well here. They offer great texture and flavor. If you prefer tofu, use firm tofu. Press the tofu to remove extra liquid. Then, cube and season it like the chickpeas. This option is perfect for vegans. It gives a nice protein boost while staying plant-based. Think outside the box with your tacos! Try Mediterranean flavors by adding hummus and olives. You can also go for a Thai twist. Use peanut sauce, cucumber, and fresh herbs for a bright taste. Don't forget to mix up your veggies! Carrots, bell peppers, or even roasted corn can add a fun crunch. Each variation makes the dish feel new and exciting! For the full recipe, visit the main section of this article. To keep your chickpeas crispy, store them in an airtight container. Avoid moisture. You can keep them for up to three days in the fridge. If they lose crispness, reheat them before serving. For longer storage, consider freezing them. Make sure they are cool before freezing. When reheating, use an oven or an air fryer. This keeps them crispy. Preheat your oven to 375°F (190°C) and bake for about 10 minutes. If you assembled your tacos, remove toppings before reheating. Warm the tortillas separately in a skillet. Reheat the chickpeas and then reassemble your tacos for the best taste and texture. Crispy chickpea tacos can stay fresh in your fridge for about 3 days. To keep them tasting great, store the chickpeas and tortillas separately. This way, the tortillas won't get soggy. Place the leftover chickpeas in an airtight container. Wrap the tortillas in foil or plastic wrap. Yes, you can prep chickpeas ahead of time! To make meal prep easy, roast a batch of chickpeas and store them in the fridge. You can roast them up to 3 days before you plan to make tacos. Just reheat them in the oven for a few minutes before assembling your tacos. If you want to switch things up, try using other legumes or fillings. Black beans or lentils work well as a base. You can even use crumbled tofu for a different texture. Each option brings its own flavor and nutrition to your tacos. This blog post covered how to make crispy chickpea tacos. You learned about the key ingredients, step-by-step instructions, and tips for success. These tacos are tasty, fun, and easy to make. You can swap ingredients to match your taste. Enjoy them fresh or store leftovers for later. Cooking can be rewarding, and these tacos prove it. Dive into making your first batch!

Crispy Chickpea Tacos Flavorful and Easy Recipe

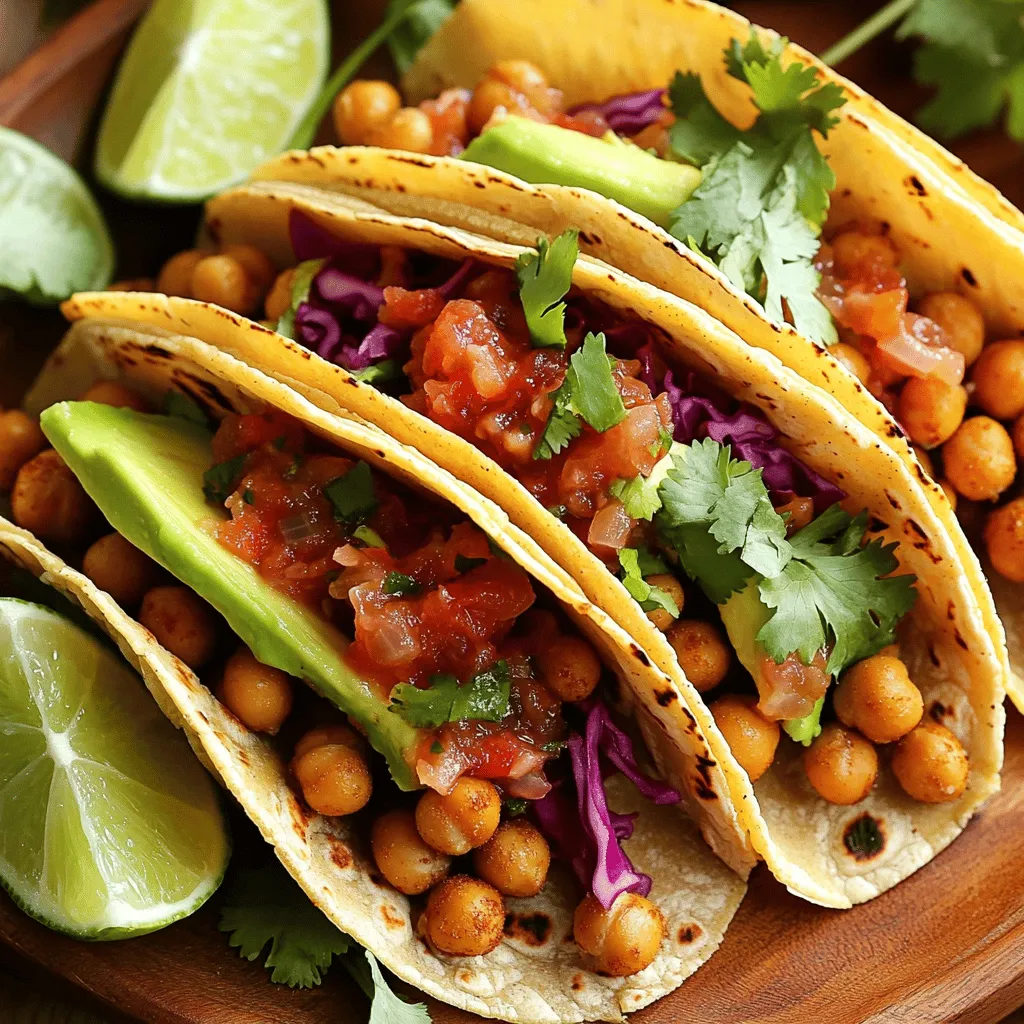
Are you ready to dive into a delicious treat that’s both crispy and satisfying? With my Crispy Chickpea Tacos recipe,

- Cauliflower florets - Flour and almond milk mixture - Buffalo sauce The star of this Vegan Buffalo Cauliflower Bowl is the cauliflower. I choose fresh cauliflower florets for a great texture. The batter combines flour, almond milk, garlic powder, onion powder, smoked paprika, and salt. This simple mixture coats the cauliflower. It helps the buffalo sauce stick well. Buffalo sauce brings heat and flavor. I use a vegan version to keep it plant-based. The sauce adds zest to the dish. You can find many brands at the store or make your own if you prefer. - Cooked quinoa - Fresh vegetables - Vegan ranch dressing The base of the bowl is cooked quinoa. It gives a hearty feel and packs in protein. Quinoa is easy to make and cooks quickly. I often prepare it ahead of time. Fresh veggies brighten the bowl. I like cherry tomatoes, cucumber, and avocado for their flavors and colors. These ingredients add crunch and creaminess. You can use any veggies you love. A drizzle of vegan ranch dressing adds creaminess. It balances the spice from the buffalo sauce. You can find store-bought options or make your own with simple ingredients. - Fresh parsley - Sesame seeds - Lime wedges Garnishes elevate the dish. I like to sprinkle fresh parsley on top for color and freshness. Sesame seeds add a nice crunch. Lime wedges can give a zesty kick when squeezed over the bowl. For the full recipe, check out the detailed instructions to make this delicious meal. - Preheat the oven: Set your oven to 450°F (230°C). Line a baking sheet with parchment paper. - Prepare the batter: In a bowl, whisk together 1 cup of flour, 1 cup of almond milk, 1 teaspoon of garlic powder, 1 teaspoon of onion powder, 1 teaspoon of smoked paprika, and 1/2 teaspoon of salt. Mix until smooth. - Coat the cauliflower florets: Take each cauliflower floret and dip it into the batter. Make sure each piece is well coated. Let any extra batter drip off. - Bake the cauliflower in the oven: Place the coated florets on the prepared baking sheet. Spread them out in a single layer. Bake for 20-25 minutes. Flip them halfway through for even cooking. They should be golden and crispy. - Mix baked cauliflower with buffalo sauce: In a separate bowl, toss your baked cauliflower with 1 cup of buffalo sauce. Make sure each floret is fully coated. - Return to oven for additional crispiness: Place the coated cauliflower back on the baking sheet. Bake for another 10 minutes to get that extra crispiness. - Layer quinoa and toppings: In serving bowls, start with a base of 2 cups of cooked quinoa. Top it with the buffalo cauliflower, halved cherry tomatoes, diced cucumber, and sliced avocado. - Final garnishing touches: Drizzle with vegan ranch dressing if you like. A sprinkle of chopped parsley adds a fresh look. For an added zing, serve with lime wedges on the side. For the full recipe, check out the details above! To get your buffalo cauliflower nice and crispy, follow these tips: - Baking Techniques: Preheat your oven to 450°F (230°C). This high heat helps the cauliflower crisp up nicely. Line your baking sheet with parchment paper to prevent sticking. This makes cleanup easy, too! - Flipping the Cauliflower Florets: Halfway through baking, flip the cauliflower florets. This step ensures even cooking. You want both sides to get golden and crunchy. Want to amp up the flavor? Try these ideas: - Adding Spices to the Batter: Mix in extra spices into the batter. I love adding cayenne pepper for heat or a dash of cumin for depth. Experiment to find what you like best! - Suggested Dipping Sauces: Pair your buffalo cauliflower with sauces. Vegan ranch dressing is a classic choice. You can also try a spicy tahini sauce or a cool avocado dip. They all add a nice touch. Meal prep can save you time: - Making Ahead of Time: You can prepare the cauliflower in advance. Bake it and toss it in buffalo sauce. Store it in the fridge for up to three days. - Storing Excess Buffalo Cauliflower: Keep leftovers in an airtight container. This keeps them fresh. To reheat, use the oven to maintain that crispiness. You won’t want to lose that crunch! For the complete recipe, check out the Full Recipe section. Enjoy your cooking! {{image_2}} For those with dietary needs, it's easy to swap some ingredients. - Gluten-free options: Use gluten-free flour in place of all-purpose flour. This keeps the batter light and crispy without gluten. - Nut-free alternatives: If you avoid nuts, substitute almond milk with oat milk or soy milk. Both provide a creamy base without nuts. You can serve your buffalo cauliflower in fun ways. - Wraps vs. bowls: Try wrapping the buffalo cauliflower in a tortilla for a tasty wrap. It makes a great lunch option. - Adding proteins like chickpeas or tofu: For extra protein, mix in roasted chickpeas or grilled tofu. This adds more texture and makes the meal more filling. Adjust the heat of your buffalo cauliflower to suit your taste. - Adjusting buffalo sauce heat: If you like it milder, mix the buffalo sauce with a bit of vegan ranch dressing. This tones down the spice while keeping flavor. - Alternative sauces for varying flavors: You can also use BBQ sauce or a sweet chili sauce. Both give a new twist to the dish while keeping it exciting. For the full recipe, check the instructions above. Enjoy your cooking journey! After you enjoy your Vegan Buffalo Cauliflower Bowl, store leftovers right away. Keep them fresh by placing them in an airtight container. Make sure to refrigerate them within two hours of serving. This helps prevent bacteria growth. I recommend using glass containers. They do not absorb odors or stains. Plus, they are great for reheating. If you want to store the bowl separately, keep the quinoa and toppings in different containers. This keeps everything fresh and tasty. When it's time to eat leftovers, you have two main options: the oven or the microwave. The oven gives you a crispy finish. Preheat it to 350°F (175°C). Spread the cauliflower on a baking sheet and heat for about 10-15 minutes. This method keeps the cauliflower crispy and delicious. The microwave is faster. Place your bowl in the microwave and heat for 1-2 minutes. Check to see if it’s warm, then stir and heat again if needed. The downside? The cauliflower may lose some crispiness. Freezing your buffalo cauliflower is a great way to save it for later. To freeze, let the cauliflower cool completely. Then, place it in a freezer-safe bag or container. Squeeze out the air to prevent freezer burn. This way, you can enjoy it for up to three months. When you are ready to eat, take the cauliflower out to thaw. You can leave it in the fridge overnight. To reheat, put it in the oven at 350°F (175°C) for about 15 minutes. This will help restore its crispiness. You can also microwave it, but the oven works best for keeping that crunch. For the full recipe, check out the details at [Full Recipe]. Yes, this bowl can be gluten-free. Use gluten-free flour in the batter. This way, you can enjoy the dish without worry. All other ingredients are naturally gluten-free. Be sure to check the buffalo sauce label, as some brands may add gluten. You can use frozen cauliflower. Just thaw it first and drain any excess water. This helps the batter stick better. Frozen cauliflower may not be as crispy, but it still tastes great. Cooking times might be a bit shorter, so keep an eye on it. To reduce heat, use less buffalo sauce. You can also mix the sauce with a bit of almond milk. This makes it milder. Another option is to add more avocado or cucumber, which can balance the spice. Don't worry; you can still enjoy full flavor! You can store leftovers in the fridge for up to three days. Keep them in an airtight container. For longer storage, freeze the buffalo cauliflower in a freezer-safe bag. It can last up to three months. Just reheat in the oven for the best texture. This bowl pairs well with many sides. A simple green salad adds freshness. Try a light vinaigrette for balance. You can also enjoy it with a cold drink, like lemonade or iced tea. A crisp white wine can enhance the flavors too. For a hearty meal, serve with crusty bread or wraps. For more ideas, check out the Full Recipe. This blog post explored how to make a Vegan Buffalo Cauliflower Bowl. We covered key ingredients like cauliflower, quinoa, and buffalo sauce. You learned step-by-step instructions for baking and assembling your bowl. I shared tips to perfect crispiness and offer meal prep suggestions. Variations allow for personal touches. Lastly, safe storage info ensures your leftovers remain fresh. Enjoy creating your own delicious bowl. With these guidelines, you’ll make a tasty meal that satisfies your cravings and dietary needs.

Vegan Buffalo Cauliflower Bowl Flavorful and Filling Meal

Are you ready to spice up your meal routine? This Vegan Buffalo Cauliflower Bowl hits all the right notes. With

- 2 cups all-purpose flour - 1 teaspoon sugar - 1 teaspoon salt - 1 teaspoon baking powder - 3/4 cup warm water - 1/4 cup plain yogurt - 2 tablespoons olive oil - 3 cloves garlic, minced - 2 tablespoons fresh cilantro, chopped - Melted butter for brushing To make easy garlic naan, you need a few simple items. First, grab some all-purpose flour. This is the base that gives naan its soft texture. Next, sugar adds a touch of sweetness, while salt enhances the flavor. Baking powder helps it rise and become fluffy. You’ll also need warm water to mix with the yogurt and olive oil. Yogurt adds creaminess and helps the naan stay soft. Olive oil makes the dough smooth and adds flavor. Don’t forget the garlic! Fresh garlic gives that classic taste. Finally, cilantro adds a fresh touch, and melted butter makes everything better. Gather these ingredients, and you will be on your way to making soft, flavorful naan. For the complete recipe, check out the Full Recipe. In a large bowl, combine the following dry ingredients: - 2 cups all-purpose flour - 1 teaspoon sugar - 1 teaspoon salt - 1 teaspoon baking powder Mix these well. Make sure there are no lumps. This step sets a good base for your naan. Next, in a separate bowl, whisk together: - 3/4 cup warm water - 1/4 cup plain yogurt - 2 tablespoons olive oil Whisk until smooth and creamy. This mixture adds moisture and flavor to your naan. Now, combine the wet and dry ingredients. Pour the wet mixture into your dry bowl. Use your hands or a spatula to mix until a dough forms. Knead the dough on a floured surface for about 5-7 minutes. You want it smooth and elastic. If it’s too sticky, add a little more flour. Place the kneaded dough in a greased bowl. Cover it with a damp cloth. Let it rise for at least 1 hour. It should double in size. This step is key for a fluffy naan. Once the dough has risen, punch it down. Divide it into 6 equal pieces. Roll each piece into a ball. Let them rest for another 10 minutes. This makes rolling easier. Preheat a non-stick skillet or cast-iron pan over medium-high heat. Roll out each dough ball into an oval or circle, about 1/4-inch thick. Sprinkle minced garlic and chopped cilantro on top. Press lightly to make them stick. Cook the naan on the hot skillet for 1-2 minutes on each side. Look for slight charring and puffing. After cooking, brush the hot naan with melted butter right away. This makes it rich and tasty. For the complete recipe, check the Full Recipe section. Kneading is key to making soft naan. It helps develop gluten in the dough. This gives the naan its fluffy texture. When you knead, use your palms to push the dough. Fold over and repeat. Do this for about 5 to 7 minutes. The dough should feel smooth and elastic when done. Garlic and cilantro add great taste to naan. Use fresh garlic for the best flavor. Mince it finely and sprinkle it on the dough. For cilantro, chop it well and press it lightly into the dough. This helps the flavors mix well while cooking. You can also play with the amount of garlic and cilantro to match your taste. For the best naan, heat your skillet well. A non-stick skillet or cast-iron pan works great. Set the heat to medium-high. This helps the naan puff up nicely. Cook each side for 1 to 2 minutes. Look for a slight char, which adds flavor. If needed, adjust the heat for even cooking. The right heat makes all the difference in cooking naan perfectly. For the complete recipe, check out the Full Recipe. {{image_2}} You can add cheese for a tasty twist. When you roll out the dough, place some cheese in the center. Fold the dough over the cheese and seal it well. This gives you a gooey, cheesy center that melts perfectly. Try using mozzarella or feta for different flavors. The cheese adds creaminess that pairs well with the garlic. Using herbs like parsley or dill can elevate your naan. Fresh herbs add color and flavor. Simply chop the herbs and mix them into the dough or sprinkle them on top. This gives your naan a fresh taste. You can even use a mix of herbs for a unique flavor. It’s a fun way to switch things up! If you need a gluten-free option, substitute regular flour with gluten-free flour. Look for a blend that works well for breads. This option allows everyone to enjoy naan. Just make sure to follow the same steps in the recipe. The texture may differ slightly, but it will still be soft and tasty. Enjoy your gluten-free garlic naan with your favorite dishes! To keep your naan fresh, wrap it in plastic wrap. This helps seal in moisture. You can also place it in an airtight container. Make sure to store naan at room temperature for up to two days. For longer storage, the fridge is not ideal. It can dry out the naan. To reheat naan, use a skillet. Heat it on medium-low. Place the naan in and cover it with a lid. This keeps the steam in and revives its softness. You can also use an oven. Preheat it to 350°F (175°C). Wrap the naan in foil and heat for about 10 minutes. This method keeps the naan warm and soft. To freeze naan, let it cool completely first. Then, stack the naan with parchment paper between each piece. Wrap the stack tightly in plastic wrap. Place it in a freezer bag and squeeze out the air. Naan can last for up to three months in the freezer. To thaw, leave it in the fridge overnight or use the microwave for a quick option. This way, your Easy Garlic Naan will taste fresh when you need it! Yes, you can make naan without yeast. Instead, use baking powder. This makes the naan rise and stay soft. The dough will still be fluffy and delicious. Just mix the baking powder into your dry ingredients. This option saves time and gives a tasty result. To make naan more flavorful, add spices and toppings. You can mix in some cumin or coriander with the flour. For a kick, try adding red chili flakes. Toppings are fun too! You can sprinkle sesame seeds or even cheese on top. Fresh herbs like parsley or dill also add great taste. Garlic naan pairs well with many dishes. It is great with curries like butter chicken or palak paneer. You can also enjoy it with lentil soups or stews. For a lighter option, try it with yogurt dips or fresh salads. Naan is perfect for scooping up all that flavor! Easy garlic naan is simple and delicious. You learned the key ingredients and how to mix them. I showed you step-by-step instructions for making the dough. With some kneading and resting, you can create fluffy naan. I also shared tips for flavor and cooking techniques to enhance your dish. Don’t forget to try the tasty variations. Proper storage keeps your naan fresh for later. Now, you can enjoy homemade naan any time! Try it tonight with your favorite meal for a satisfying treat.

Easy Garlic Naan Soft and Flavorful Dinner Choice

Are you ready to elevate your dinner experience with an easy recipe? This Easy Garlic Naan is soft, flavorful, and

To make a classic Caprese salad, you need the best ingredients. Here’s what you’ll need: - 4 ripe tomatoes, sliced - 8 ounces fresh mozzarella cheese, sliced - Fresh basil leaves, torn - 3 tablespoons extra virgin olive oil - 1 tablespoon balsamic reduction - Salt and freshly ground black pepper to taste Fresh tomatoes are key. Look for ones that are firm yet slightly soft. They should smell sweet and earthy. The mozzarella should be fresh and creamy. I prefer the one packed in water. For the basil, use fresh leaves, not dried. They add a burst of flavor. While the classic recipe shines on its own, you can add a few items for extra flavor: - Avocado slices for creaminess - Pine nuts or walnuts for crunch - Red onion for a sharp taste These ingredients can enhance the salad’s texture and flavor. Avocado adds creaminess. Nuts give a nice crunch. Red onion can bring some zing. Choosing top-quality ingredients is crucial for the best Caprese salad. Here’s how to ensure you get the best: - Choose tomatoes that are in season; they taste much better. - Select mozzarella that is made daily. It should be soft and moist. - Look for vibrant green basil. Avoid any yellow or brown spots. - Use high-quality extra virgin olive oil for rich flavor. When you select fresh ingredients, your salad will taste amazing. Remember, the best flavors come from using the best products. For the full recipe, check out the Caprese Delight section. To make a classic Caprese salad, start with fresh ingredients. Choose four ripe tomatoes. Slice them evenly. Next, take eight ounces of fresh mozzarella cheese. Slice it into nice, thick rounds. Now, grab some fresh basil leaves. Tear them gently into smaller pieces. This adds a nice burst of flavor. Gather three tablespoons of extra virgin olive oil. This oil brings richness. You'll also need one tablespoon of balsamic reduction for a sweet touch. Lastly, have salt and freshly ground black pepper ready for seasoning. Now, let's build your salad. On a large serving platter, layer the sliced tomatoes and mozzarella cheese. Alternate them, slightly overlapping each piece. This makes it look pretty and inviting. Next, scatter the torn basil leaves all over the top. This adds a fresh aroma and taste. Drizzle the extra virgin olive oil evenly across the salad. This step is key for flavor. Then, swirl the balsamic reduction on top for that sweet tang. It makes the salad pop. Finally, season generously with salt and freshly ground black pepper to taste. Let the salad sit for five minutes before serving. This allows the flavors to mix well. Serve it fresh for the best taste. You can enjoy it as a side dish or a light meal. Pair it with crusty bread or grilled meats for a delightful meal. If you want to explore more, check out the full recipe for tips and tricks. To keep your Caprese salad fresh, use ripe tomatoes. Look for ones that feel firm yet slightly soft. The color should be bright red. Choose fresh mozzarella that is creamy and moist. If possible, buy it from a local market. Fresh basil should be vibrant green and fragrant. Avoid wilted or brown leaves. One big mistake is slicing tomatoes too far in advance. This makes them watery and less tasty. Avoid using old cheese that lacks flavor or texture. Don't skip the olive oil and balsamic reduction; they add depth. Lastly, don’t forget to season. Salt and pepper boost all the flavors in the salad. For a richer taste, let your salad sit for five minutes after you prepare it. This waiting time lets the flavors mix well. Try using flavored olive oils, like garlic or herb-infused. For added sweetness, use high-quality balsamic reduction. Finally, experiment with other herbs like oregano or thyme for a twist. You can find the full recipe for Caprese Delight in the previous section. Enjoy! {{image_2}} If you have special dietary needs, you can still enjoy Caprese salad. For those who are lactose intolerant, try using vegan mozzarella. It's a great dairy-free option. If you want to lower fat, use a light mozzarella cheese. You can also skip the cheese altogether and add more tomatoes or avocado. I love to change the Caprese salad with the seasons. In summer, add peaches or watermelon for a sweet twist. In fall, use roasted butternut squash instead of tomatoes. You can even add some grilled zucchini or eggplant for a fun touch. These swaps keep your salad fresh and exciting. To make your Caprese salad even better, pair it with crusty bread or bruschetta. A glass of chilled white wine, like Pinot Grigio, complements the flavors well. You can also serve it alongside grilled chicken or fish for a complete meal. These pairings enrich the experience and make each bite a delight. For the full recipe, check out the Caprese Delight. To keep your Caprese salad fresh, store leftovers in an airtight container. This helps maintain flavor and texture. Place the salad in the fridge right after serving. If you can, keep the dressing separate. This will stop the salad from getting soggy. When you’re ready to eat again, just drizzle the dressing on top before serving. When prepping your Caprese salad, cut the ingredients right before serving. If you want to prep ahead of time, keep each item in its own container. Store sliced tomatoes, mozzarella, and basil separately. This keeps everything fresh and tasty. You can assemble the salad in minutes when you’re ready to eat. Fresh mozzarella lasts about one week in the fridge. Ripe tomatoes stay good for four to five days. Basil wilts quickly, so use it within three days for the best taste. Once the salad is made, eat it within one day for the best flavor. The longer it sits, the less fresh it will taste. For the full recipe, check out the Caprese Delight section. Caprese Salad comes from Italy, specifically the island of Capri. It reflects the colors of the Italian flag: red, white, and green. This salad is simple yet delicious. Farmers in Italy first made it with fresh ingredients. They wanted to taste summer in every bite. Today, it remains a favorite worldwide. Yes, you can prep some parts ahead. Slice the tomatoes and cheese, but don’t mix them yet. Keep them in the fridge to stay fresh. You can add the basil and dress the salad right before serving. This way, it stays bright and tasty. The best tomatoes for Caprese Salad are ripe and juicy. Heirloom or vine-ripened tomatoes work great. They offer rich flavor and good texture. Look for tomatoes that feel heavy for their size. Avoid hard or blemished ones. Fresh, high-quality tomatoes make a big difference in taste. To make Caprese Salad vegan, replace mozzarella with a plant-based cheese. You can use tofu or cashew cheese for a creamy texture. Another option is to skip the cheese altogether and use extra tomatoes or avocados. This keeps the salad fresh and light, plus it’s still very tasty. Classic Caprese Salad is healthy and full of nutrients. It has fresh tomatoes, healthy fats from olive oil, and protein from cheese. On average, one serving has about 250 calories. It also offers vitamins A and C, calcium, and healthy fats. This makes it a great choice for a light meal or side dish. For specific values, check the [Full Recipe]. Making a classic Caprese salad is simple. You need fresh ingredients and clear steps. Start with good tomatoes and mozzarella. Assemble them well and add flavor with simple touches. Remember to store leftovers right. This salad is great for any meal. By knowing the tips and variations, you can enjoy it all year. Keep experimenting with your own ideas to add fun. Enjoy this tasty dish that always impresses.

Classic Caprese Salad Flavorful Summer Delight

If you love fresh flavors and simple dishes, you’ll adore the Classic Caprese Salad. This dish celebrates summer with juicy

- 2 medium zucchinis, sliced into thin rounds - 1 cup breadcrumbs (panko or regular) - 1/2 cup grated Parmesan cheese - 1 teaspoon garlic powder - 1 teaspoon onion powder - 1/2 teaspoon paprika - Salt and pepper to taste - 2 large eggs, beaten - Olive oil spray or cooking oil To make crispy zucchini chips, you start with fresh zucchinis. Choose medium-sized ones for the best texture. They should feel firm and not have soft spots. Next, you need breadcrumbs. I like using panko for extra crunch. Grated Parmesan cheese adds a nice flavor and helps with browning. For seasoning, I use garlic powder, onion powder, and paprika. These spices give the chips a warm taste. Don’t forget to add salt and pepper. They help bring out the flavors. You’ll also need two large eggs. Beaten eggs help the breadcrumbs stick to the zucchini slices. Finally, have some olive oil spray or cooking oil on hand. This oil helps the chips crisp up nicely in the oven. Together, these ingredients create a simple and tasty snack. Check out the Full Recipe for step-by-step instructions. - Preheat your oven to 225°F (110°C). - Line a baking sheet with parchment paper. First, set the oven temperature. This low heat helps the zucchini dry out. Next, grab your baking sheet and cover it with parchment paper. This keeps the chips from sticking and makes cleanup easy. - Mix together breadcrumbs, Parmesan, and spices. In a shallow bowl, combine breadcrumbs, grated Parmesan, garlic powder, onion powder, paprika, salt, and pepper. This blend adds flavor and crunch. Use your hands or a fork to mix well. You want an even coating for the zucchini. - Dip zucchini in beaten eggs and then dredge in breadcrumb mixture. - Place coated slices on the baking sheet. Take each zucchini slice and dip it into the beaten eggs. Let any extra egg drip off. Next, dredge the slice in the breadcrumb mix. Press gently to make sure it sticks well. Place each coated slice on the baking sheet in a single layer. This step is key for even cooking. - Spray or drizzle with oil and bake until crispy. Now, lightly spray or drizzle the tops of the zucchini with olive oil. This helps them turn golden brown and crisp. Bake the zucchini in the preheated oven for 1 to 1.5 hours. Flip them halfway through for even cooking. When they are crispy and golden, take them out. Let them cool for a few minutes to get even crunchier. For the full recipe, check back to see how easy it can be to make crispy zucchini chips! To make your zucchini chips truly crispy, I recommend using panko breadcrumbs. They add a great crunch that regular breadcrumbs don’t quite match. Also, slicing the zucchini thinly is key. Aim for about 1/8 inch thick. Thinner slices bake more evenly and become crispier. If you want to prep in advance, you can store your zucchini slices in the fridge. Keep them in a sealed container with a paper towel. This absorbs extra moisture. For baked chips, let them cool completely before storing. Use an airtight container to keep them fresh. When serving your crispy zucchini chips, consider a rustic bowl or a wooden platter. This adds a nice touch. You can garnish with fresh parsley for color. Pair them with a homemade dip like tzatziki or marinara for extra flavor. These ideas make for an inviting presentation that will impress your guests. {{image_2}} You can change up the flavor of your crispy zucchini chips easily. Try adding different spices to the breadcrumb mix. For a spicy kick, use cayenne pepper or chili powder. If you love herbs, add dried oregano or basil. You can even mix in some Italian seasoning for a classic taste. Experimenting with flavors makes the recipe exciting every time! If you want to switch things up, consider using almond flour or gluten-free breadcrumbs. Almond flour gives your chips a nutty flavor and works well for those avoiding gluten. Gluten-free breadcrumbs give a great crunch without any wheat. Both options taste fantastic and keep your chips crispy. For those who follow a vegan diet, you can make simple swaps. Instead of eggs, use a flaxseed meal mixed with water as a binder. For the cheese, try using nutritional yeast or a vegan cheese substitute. These changes keep the chips tasty while fitting your dietary needs. Enjoy your crispy zucchini chips guilt-free! To keep your leftover zucchini chips fresh, follow these steps: - Cool Completely: Let the chips cool down at room temperature. This helps them stay crisp. - Use Airtight Containers: Place the chips in a clean, dry, airtight container. This keeps moisture out. - Layer with Paper Towels: Place paper towels between layers of chips. This absorbs any excess moisture. For best results, eat your zucchini chips within a few days. However, if stored properly, they can last up to a week. To bring back that crunch when reheating, do this: - Oven Method: Preheat your oven to 350°F (175°C). Spread the chips on a baking sheet. Bake for about 5-10 minutes. Keep an eye on them to avoid burning. - Air Fryer Method: If you have an air fryer, set it to 350°F (175°C). Heat the chips for about 3-5 minutes. This method works great for restoring crispiness. Using these methods will help your chips taste fresh again, just like when they first came out of the oven. For more details, check the Full Recipe. To make crispy zucchini chips, follow these steps: 1. Slice Zucchini: Cut 2 medium zucchinis into thin rounds. 2. Mix Coating: In a bowl, combine 1 cup breadcrumbs, 1/2 cup grated Parmesan, garlic powder, onion powder, paprika, salt, and pepper. 3. Prepare Eggs: Beat 2 large eggs in a separate bowl. 4. Coat Zucchini: Dip zucchini slices in eggs, then coat with the breadcrumb mix. 5. Bake: Place on a baking sheet and lightly spray with olive oil. Bake at 225°F for 1 to 1.5 hours until crispy. This easy method gives you a crunchy snack. For the full recipe, check out the complete guide. Yes, you can fry zucchini chips for a different texture. Frying gives a crispier finish. Here’s how: - Heat Oil: Use a deep fryer or a pan with enough oil. - Fry in Batches: Carefully place coated zucchini slices in hot oil. Do not overcrowd the pan. - Cook Until Golden: Fry until golden brown, usually 2-3 minutes per side. Frying can yield a richer flavor, but baking is healthier and easier. Zucchini chips pair well with many dips. Here are some tasty options: - Tzatziki Sauce: A cooling cucumber yogurt dip. - Marinara Sauce: A classic tomato-based sauce. - Ranch Dressing: Creamy and tangy for a nice contrast. - Hummus: Adds a nutty flavor and is great for dipping. Choose your favorite or mix and match! To keep zucchini chips crisp, follow these tips: - Slice Thinly: Thin rounds help them cook evenly. - Use Salt: Sprinkle salt on slices before coating. Let them sit for 15 minutes to draw out moisture. - Pat Dry: After salting, dry the slices with paper towels. - Bake Low and Slow: Baking at a low temperature helps moisture escape. These steps keep your chips crunchy and delicious! This blog post covered how to make tasty zucchini chips from fresh zucchinis. You learned about the needed ingredients and step-by-step instructions to bake them until crispy. I shared tips for achieving the best texture and ways to store your chips. Zucchini chips can be a healthy snack or side dish. With simple swaps, you can make them fit any diet. Enjoy experimenting with flavors and sharing your crispy creations. Happy cooking!

Crispy Zucchini Chips Delicious and Easy Snack Recipe

Craving a crunchy snack that’s both tasty and healthy? You’ve come to the right place! Learn how to make crispy

Older posts
Newer posts
← Previous Page1 … Page61 Page62 Page63 … Page82 Next →

dsad

© 2026 Recipes Pursuit • Built with GeneratePress

Our Policies

  • Copyright Policy
  • Cookie Policy
  • GDPR Policy
  • Privacy Policy
  • Disclaimer
  • Terms Of Use

More Information

  • Home
  • About
  • Contact
  • Appetizers
  • Dessert
  • Dinner
  • Drinks
©2026, Recipes Pursuit About Back To Top