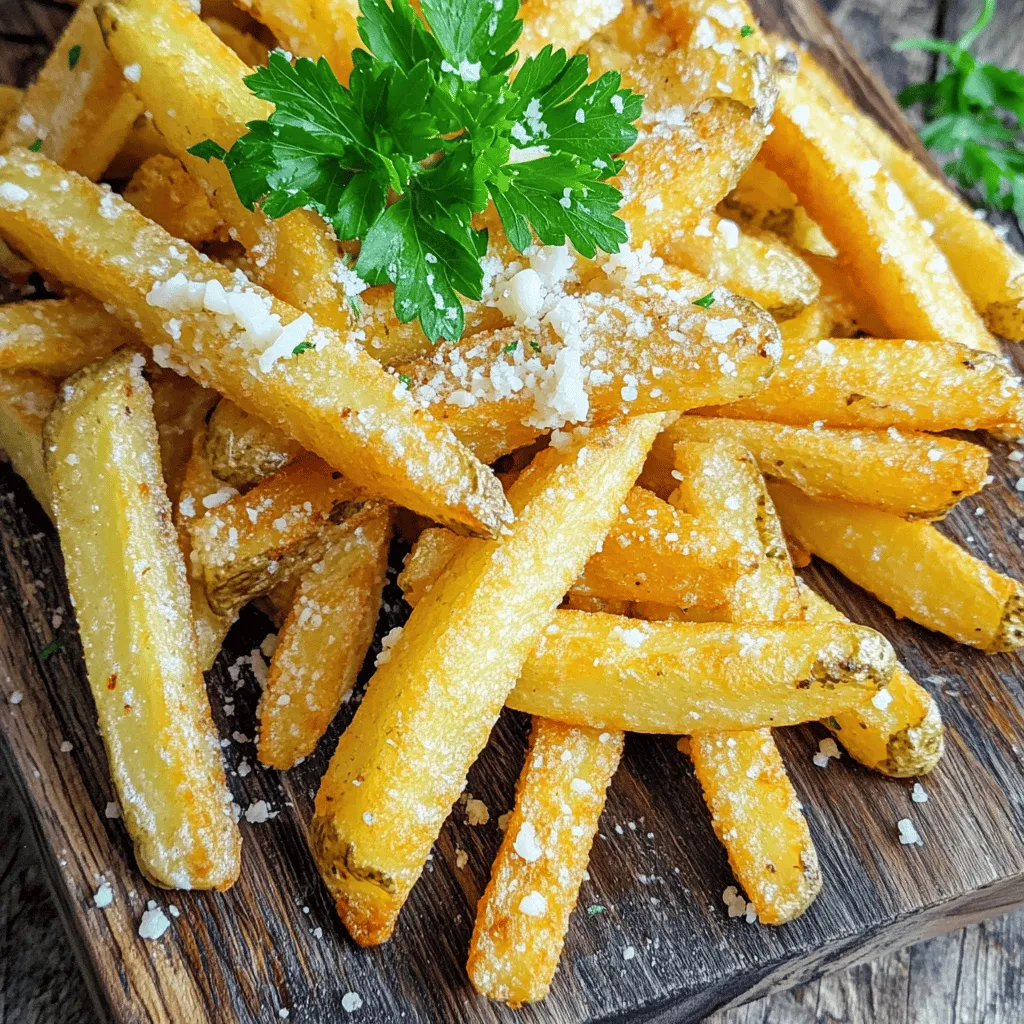
Irresistible Air Fryer Garlic Parmesan Fries Recipe
If you crave a tasty snack, these Air Fryer Garlic Parmesan Fries are a must-try! Crispy on the outside and
If you crave a tasty snack, these Air Fryer Garlic Parmesan Fries are a must-try! Crispy on the outside and
. Enjoy your delicious, healthy breakfast! Mixing dry ingredients First, grab a large mixing bowl. Add 1 cup of whole wheat flour, 2 tablespoons of poppy seeds, 1 tablespoon of baking powder, and 1/4 teaspoon of salt. Don’t forget the zest! Add 1 teaspoon of lemon zest and 1 tablespoon of coconut sugar. Whisk these dry ingredients together until they blend well. Combining wet ingredients In a separate bowl, mix 1 cup of almond milk, 1 large egg (or a flax egg), 2 tablespoons of melted coconut oil, and 2 tablespoons of fresh lemon juice. Stir until everything is well blended. This mix brings the flavor and moisture. Merging the mixtures Now, pour the wet ingredients into the dry mix. Gently stir the two together until they just combine. It’s okay if a few lumps remain. Overmixing can make the pancakes tough, and we want them light and fluffy. Heating the skillet Heat a non-stick skillet over medium heat. Add a little coconut oil to keep things from sticking. Let the skillet warm up for a few minutes before adding batter. Portioning the batter Use about 1/4 cup of pancake batter for each pancake. Pour the batter onto the skillet. Make sure to leave space between them so they can grow! Flipping and cooking time Cook the pancakes for 2-3 minutes. Watch for bubbles to form on the surface. When the edges look set, it’s time to flip them. Cook for another 1-2 minutes until golden brown. Keep them warm as you finish cooking the rest of the batch. Stack the pancakes on a plate. Drizzle with maple syrup for sweetness. Add fresh berries and a sprinkle of lemon zest on top. This adds a pop of color and makes your breakfast look beautiful. Enjoy your delightful meal! For the full recipe, check out the detailed instructions. To make your healthy lemon poppy seed pancakes even tastier, consider these simple tips: - Add vanilla extract: Just a teaspoon boosts flavor. - Spices like cinnamon or nutmeg: These add warmth and depth. - Mix-ins: Try adding blueberries or sliced bananas for natural sweetness. Getting the perfect pancake fluffiness is all about technique: - Don’t overmix the batter: Stir gently; lumps are fine. Overmixing makes pancakes tough. - Skillet temperature: Aim for medium heat. Too hot burns the outside before the inside cooks. Watch out for these common pitfalls: - Overmixing the batter: This leads to dense pancakes. Remember, gentle mixing is key. - Not enough cooking time: Cook until bubbles form on top. This ensures they cook through. {{image_2}} You can easily change the taste of your Healthy Lemon Poppy Seed Pancakes. Start with different flours. Try oat flour, almond flour, or even a gluten-free blend. Each flour brings a unique flavor and texture. If you want to add a twist, mix in fruits or nuts. Blueberries, bananas, or chopped walnuts work great. These additions not only enhance taste but also boost nutrition. For gluten-free pancakes, use a gluten-free flour mix. You can swap the egg for a flax egg to make them vegan. To make a flax egg, mix one tablespoon of ground flaxseed with three tablespoons of water. Let it sit for five minutes until it thickens. Adjust cooking times if needed, as gluten-free pancakes may cook faster. You can have fun with seasonal flavors. In spring, add fresh berries like strawberries or raspberries. In fall, pumpkin puree or spices like cinnamon can enhance the flavor. In winter, try using citrus zest from oranges or grapefruits. This way, your pancakes will always taste fresh and exciting. For the full recipe, check [Full Recipe]. To keep your pancakes fresh, place them in an airtight container. You can stack them with parchment paper between each pancake to avoid sticking. Store them in the fridge for up to three days. This method helps maintain their taste and texture. When you want to enjoy your leftover pancakes, there are a few ways to reheat them. The best way is to use a skillet over low heat. This warms them evenly and keeps them soft. You can also use a microwave, but use a microwave-safe plate and cover them with a damp paper towel. This keeps them moist. To freeze pancakes, let them cool completely first. Layer them with parchment paper, then place them in a freezer-safe bag. This way, they won’t stick together. You can freeze them for up to one month. When you’re ready to eat, just thaw them overnight in the fridge. Reheat them in a skillet or microwave when you want to enjoy your Healthy Lemon Poppy Seed Pancakes again. To make these pancakes, start by mixing the dry ingredients. In a bowl, whisk 1 cup of whole wheat flour, 2 tablespoons of poppy seeds, 1 tablespoon of baking powder, 1/4 teaspoon of salt, 1 teaspoon of lemon zest, and 1 tablespoon of coconut sugar. In another bowl, blend 1 cup of almond milk, 1 large egg, 2 tablespoons of melted coconut oil, and 2 tablespoons of fresh lemon juice. Combine both mixtures, then cook them on a heated skillet. For the full recipe, refer to the earlier section. Yes, you can! Use a flax egg instead. To do this, mix 1 tablespoon of ground flaxseed with 2.5 tablespoons of water. Let it sit for about 5 minutes until it thickens. This works great as a binder in pancakes. You can use any milk you prefer. Options include soy milk, oat milk, or cow's milk. Each will give a slightly different flavor but will still work well in the recipe. To make fluffier pancakes, focus on not overmixing the batter. A few lumps are okay. You can also add an extra teaspoon of baking powder. This helps create more air pockets, making the pancakes light and fluffy. Yes, you can substitute regular all-purpose flour for whole wheat flour. However, whole wheat flour adds more fiber and nutrients. If you want a lighter texture, all-purpose flour works just fine. These pancakes are a healthier choice. Each serving (2 pancakes) typically has about 150 calories, 4 grams of protein, 3 grams of fiber, and 7 grams of sugar, depending on substitutes used. They are also rich in vitamins from the lemon zest. These healthy lemon poppy seed pancakes are simple and tasty. We covered every step, from mixing ingredients to cooking. You learned how to enhance flavor and avoid common mistakes. Plus, we explored variations to fit your dietary needs. Proper storage keeps leftovers fresh, and reheating tips help maintain texture. Now you can enjoy these pancakes anytime. Make them your own and share them with friends and family. Enjoy your cooking journey!](https://recipespursuit.com/wp-content/uploads/2025/06/4fc9cb8f-b0de-401d-bb93-2c406e6faa2f.webp)
Are you ready to start your morning with a burst of flavor? These Healthy Lemon Poppy Seed Pancakes are not
. In this post, we covered how to make Cheesy Broccoli Bites. You now know the ingredients, preparation steps, and tips for making these tasty snacks. Don't forget variations and storage options to keep things fresh. These bites are not only easy to prepare but fun to share. With simple swaps, you can customize them to suit anyone’s taste. Enjoy your cooking and create a perfect dish that everyone will love. You have the tools, so get baking!](https://recipespursuit.com/wp-content/uploads/2025/06/debddc44-90e0-4a34-ba02-8ebdea89121e.webp)
Looking for a healthy snack that everyone will love? Try my Cheesy Broccoli Bites! These tasty little snacks are packed
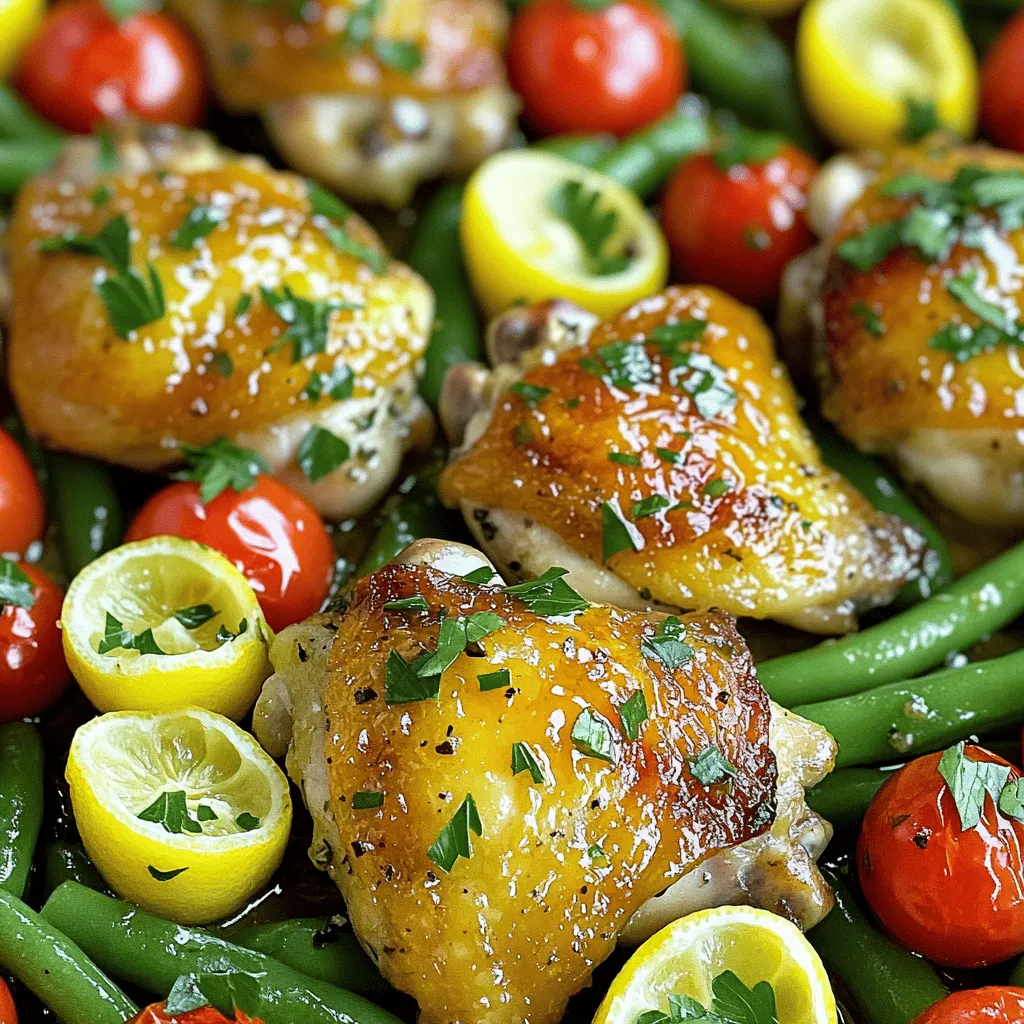
Ready for a delicious meal that’s easy to whip up? My One Pan Lemon Herb Chicken is packed with flavor

Looking for a quick and tasty snack that packs a nutrition punch? Strawberry Coconut Energy Balls are your answer! With
![To make tasty lemon blueberry muffins, you need a few key ingredients. Here’s what you’ll need: - 1 ½ cups all-purpose flour - 1 teaspoon baking powder - ½ teaspoon baking soda - ¼ teaspoon salt - ½ cup unsalted butter, softened - ½ cup granulated sugar - 2 large eggs - 1 teaspoon vanilla extract - Zest of 1 lemon - ½ cup buttermilk (or ½ cup milk with 1/2 teaspoon vinegar) - 1 ½ cups fresh blueberries - 2 tablespoons lemon juice (optional) These ingredients create a fluffy muffin with a bright lemon flavor. Flour, baking powder, and baking soda: Flour gives structure to the muffins. Baking powder and baking soda help them rise. Butter and sugar for sweetness: Softened butter makes muffins rich. Granulated sugar adds sweetness that balances the tartness of the lemons. Eggs, vanilla extract, and lemon zest for flavor: Eggs bind the ingredients. Vanilla adds warmth. Lemon zest brings a fresh, citrusy aroma. Buttermilk and fresh blueberries: Buttermilk keeps the muffins moist. Fresh blueberries add juiciness and bursts of flavor. Optional: lemon juice for an extra zing: Adding lemon juice enhances the lemon taste. It brightens the overall flavor profile. For the full recipe, check out the [Full Recipe]. This will guide you step by step to create these delightful muffins. First, preheat your oven to 375°F (190°C). This step is key for even baking. Next, prepare your muffin tin. You can line it with paper liners or lightly grease it. In a medium bowl, whisk together the dry ingredients. Combine 1 ½ cups of flour, 1 teaspoon of baking powder, ½ teaspoon of baking soda, and ¼ teaspoon of salt. Mixing these well ensures your muffins rise nicely. Now, let's make the batter. In a large bowl, cream together ½ cup of softened butter and ½ cup of granulated sugar. Use a hand mixer or stand mixer for about 3-4 minutes. You want it light and fluffy. Next, add in 2 large eggs, one at a time. Mix well after each egg. Then stir in 1 teaspoon of vanilla extract and the zest of 1 lemon. The zest adds a bright flavor! It's time to combine everything. Start by adding the dry mixture to the butter mix in parts. Begin with a third of the flour mixture. Then add ½ cup of buttermilk. Repeat this process until all the dry mix and buttermilk are combined. Mix until just combined; avoid overmixing. Now, gently fold in 1 ½ cups of fresh blueberries and 2 tablespoons of lemon juice. Use a spatula and be careful not to mash the berries. Divide the batter evenly into the muffin cups. Fill each cup about ¾ full for best results. Bake in your preheated oven for 18-20 minutes. To check for doneness, insert a toothpick into the center of a muffin. If it comes out clean, they are ready! Once baked, let the muffins cool in the pan for 5 minutes. Then transfer them to a wire rack to cool completely. Enjoy this delightful recipe! For the full details and ingredients, check the Full Recipe. To make your lemon blueberry muffins fluffy, avoid overmixing the batter. Mixing too much can lead to tough muffins. Mix just until the ingredients blend together. This keeps the muffins light and airy. Check the freshness of your baking powder. Old baking powder may not rise well. To test it, add a teaspoon of baking powder to warm water. If it bubbles, it’s good to use. If not, buy a new one. Serve your muffins warm or at room temperature for the best taste. Warm muffins have a lovely, soft texture. For a nice touch, dust them with powdered sugar. Add a twist of lemon peel on top for a pop of color. One common mistake is overfilling muffin cups. Fill each cup about ¾ full to allow room for rising. This helps prevent spills and keeps your muffins shaped nicely. Another mistake is forgetting to adjust baking time for different ovens. Each oven heats slightly differently. Check your muffins a few minutes early. Use a toothpick to test their doneness; it should come out clean. {{image_2}} For gluten-free muffins, you can use almond flour or a gluten-free blend. These flours work well and keep the muffins light. Mix the dry ingredients well to avoid clumps. When baking, watch the time closely. Gluten-free muffins may need a few extra minutes to set. To make these muffins vegan, replace eggs with flaxseed meal or applesauce. For each egg, mix one tablespoon of flaxseed meal with three tablespoons of water. Let it sit until it thickens. Use dairy-free butter and almond or oat milk for a creamy texture. These swaps keep the muffins moist and tasty. You can make these muffins even better with spices. A pinch of cinnamon or nutmeg adds warmth and depth. Want to mix it up? Try adding other fruits like raspberries or strawberries. They pair nicely with lemon and blueberries, giving you a burst of flavor in every bite. Check the Full Recipe to see how to make these tasty treats! To keep your lemon blueberry muffins fresh, store them at room temperature. Place them in an airtight container. This keeps them soft for about two days. If you want to keep them longer, store them in the fridge. Just remember, the cold can change the texture a bit. Freezing muffins is a great way to save them for later. Wrap each muffin tightly in plastic wrap. Then, place them in a freezer bag. They can last up to three months in the freezer. When you’re ready to enjoy one, thaw it at room temperature or warm it in the microwave. Homemade lemon blueberry muffins usually stay tasty for about two to three days at room temperature. If stored in the fridge, they can last about a week. Look for signs that your muffins have gone stale. If they feel dry or hard, it’s time to toss them. Also, if you notice any mold, it’s best to throw those away. Enjoy your muffins while they're fresh! For the complete recipe, check out the Full Recipe. Yes, you can use frozen blueberries. They work well in your batter. Here are some tips: - Do not thaw the blueberries. Add them straight from the freezer to keep them firm. - Dust them in flour before adding. This helps prevent them from sinking in the batter. - Adjust baking time slightly. Frozen berries can make the batter cooler, so you may need an extra minute or two. To check if your muffins are done, use the toothpick test. Here's how: - Insert a toothpick into the center of a muffin. - If it comes out clean or with a few crumbs, the muffins are ready. - Look for a golden-brown top and a slight dome shape. To bring your muffins back to life, follow these methods: - Oven method: Preheat your oven to 350°F (175°C). Wrap muffins in foil and heat for about 10-15 minutes. - Microwave method: Place a muffin on a microwave-safe plate. Heat for about 10-15 seconds. Add a cup of water in the microwave to keep them moist. To reduce the sweetness, try these tips: - Cut back on sugar: Reduce the sugar by ¼ cup or more, based on your taste. - Use alternative sweeteners: Consider using honey or agave syrup, which are less sweet than sugar. - Add more lemon zest: This can balance sweetness with a tangy flavor. For the full recipe, check out the full recipe for zesty lemon blueberry bliss muffins. Enjoy! You learned how to make delicious lemon blueberry muffins. We covered essential ingredients, step-by-step instructions, and helpful tips. I shared ways to store your muffins and tasty variations to try. Remember to avoid common mistakes for the best results. With these tips, you can impress anyone with your baking. Enjoy your muffins fresh or explore fun twists to make them unique! Happy baking!](https://recipespursuit.com/wp-content/uploads/2025/06/dd476640-b24a-4aaa-84d1-51e48ceb0eaa.webp)
Looking for a delicious treat that’s easy to make? You’ve come to the right place! My Lemon Blueberry Muffins are

Looking for a quick meal that tastes great? You’re in the right place! Easy chicken burritos are simple to make
![To make a great sesame ginger noodle salad, you'll need some key ingredients. Here’s a list of the main items: - 8 ounces rice noodles - 1 cup shredded carrots - 1 red bell pepper, thinly sliced - 1 cucumber, julienned - ¼ cup green onions, sliced - ¼ cup fresh cilantro, chopped - ¼ cup sesame seeds (toasted) These ingredients bring bright colors and flavors to the dish. The rice noodles serve as the base, while the veggies add crunch and nutrition. The dressing makes this salad shine. Here’s what you will need: - 3 tablespoons soy sauce (or tamari for gluten-free) - 2 tablespoons sesame oil - 1 tablespoon ginger, grated - 1 tablespoon honey or maple syrup - 1 tablespoon rice vinegar - 1 clove garlic, minced This dressing balances salty, sweet, and tangy notes. It coats the noodles and veggies perfectly. Feel free to mix and match! Here are some ideas for substitutions and add-ons: - Swap rice noodles for soba noodles or quinoa for a different texture. - Use any colorful veggies you like: snap peas, radishes, or even broccoli. - Add protein like grilled chicken, shrimp, or tofu for a heartier meal. - For a spicy kick, add a dash of chili flakes or sriracha. These options let you customize the salad to your taste and what you have at home. For the full recipe, check out the detailed steps. Start by boiling water in a large pot. Make sure the water is at a rolling boil. Add 8 ounces of rice noodles to the pot. Cook them for about 5-7 minutes, or as the package says. When the noodles are soft, drain them in a colander. Rinse them under cold water. This helps to stop the cooking and keep them from sticking together. While the noodles cook, prepare your vegetables. Grab a cutting board and a sharp knife. Shred 1 cup of carrots using a grater. Thinly slice 1 red bell pepper. Julienne 1 cucumber into long, thin strips. Chop ¼ cup of green onions and ¼ cup of fresh cilantro. Keep the veggies ready to mix into your salad. In a small bowl, combine the dressing ingredients. Start with 3 tablespoons of soy sauce. Add 2 tablespoons of sesame oil for a rich flavor. Grate 1 tablespoon of ginger and put it in the bowl. Add 1 tablespoon of honey or maple syrup for sweetness. Mix in 1 tablespoon of rice vinegar and 1 clove of minced garlic. Whisk everything together until well combined. In a large mixing bowl, add the cooked rice noodles. Then, toss in the shredded carrots, sliced bell pepper, julienned cucumber, and chopped green onions and cilantro. Pour the dressing over all the ingredients. This is where the magic happens! Gently toss all the ingredients to coat them in the dressing. For a crunchy touch, sprinkle ¼ cup of toasted sesame seeds on top. You can serve the salad right away or chill it in the fridge for 15-30 minutes. This allows the flavors to blend. Present it in a large bowl, and add some extra cilantro and sesame seeds for a beautiful look. Enjoy this fresh, quick meal! Check the [Full Recipe] for detailed steps and tips. When cooking rice noodles, always start with boiling water. This step is key. Add the noodles and stir them gently. It helps them cook evenly. Follow the package instructions for timing, usually about 5-7 minutes. After cooking, drain the noodles well. Rinse them under cold water to stop cooking. This keeps them from getting mushy. A little oil can prevent them from sticking together. Fresh herbs can take your salad to new heights. I love using cilantro for its bright flavor. Add it right before serving for the best taste. You can also try mint or basil. These herbs pair well with the sesame dressing and add freshness. For a little kick, consider adding some chopped green onions. They add a nice crunch and sharp taste. The dressing is where you can make this salad your own. If you like it sweeter, add more honey or maple syrup. For a tangy kick, increase the rice vinegar. You can also swap soy sauce with tamari if you need it gluten-free. Taste the dressing as you mix it, and adjust until it’s just right for you. This way, every bite of your noodle salad will be perfect. For the full recipe, make sure to check it out! {{image_2}} You can easily add protein to your sesame ginger noodle salad. Some great options include: - Grilled chicken - Shrimp - Tofu (firm or extra-firm) - Edamame Each protein brings a unique flavor and texture. Grilled chicken adds a smoky taste. Shrimp gives a sweet, briny punch. Tofu can soak up flavors well. Edamame gives a nice crunch and is packed with protein. Feel free to swap in your favorite veggies! You can use: - Snap peas for crunch - Broccoli florets for a hearty bite - Red cabbage for color and texture - Avocado for creaminess Mixing different vegetables keeps your salad fresh and exciting. Each swap can change the dish's flavor and feel. To keep the salad gluten-free, use tamari instead of soy sauce. For a vegan option, replace honey with maple syrup. You can also choose gluten-free rice noodles. These simple swaps make the salad accessible for all diets. You can enjoy this dish while keeping it healthy and inclusive. For the full recipe, check back to the main section! You can store any leftover sesame ginger noodle salad in an airtight container. Keep it in the fridge for up to two days. The noodles and veggies stay fresh and tasty this way. It’s best to keep the dressing separate if possible. This helps maintain the crunchiness of the vegetables. Freezing this noodle salad is not recommended. Noodles can become mushy once thawed. Plus, fresh veggies lose their crunch in the freezer. If you want to prepare ahead, make the dressing and chop the veggies. Store them separately. You can cook the noodles fresh later. If you want to enjoy the salad warm, gently reheat the noodles first. Place them in a pot with a little water over low heat. Stir until warmed through. Avoid high heat to prevent overcooking. After warming, mix in the cold veggies and dressing. This keeps your salad fresh and delicious. For the full recipe, check it out in the main section. To make this salad vegan, swap honey for maple syrup. Use tamari instead of soy sauce for a gluten-free option. The rest of the ingredients are plant-based, so you’re good to go! Yes, you can prepare this salad in advance. Make the noodles and cut the veggies ahead of time. Just store them separately in the fridge. Mix them with the dressing when you are ready to eat. This keeps everything fresh and crunchy. A typical serving of this salad has about 250 calories. It contains: - 5 grams of protein - 11 grams of fat - 36 grams of carbs It offers vitamins and minerals from fresh veggies. It’s a balanced meal or side dish. To boost the crunch, add nuts or seeds. Try sliced almonds or chopped peanuts. You can also add crispy rice or fried shallots. These will make each bite extra fun! You learned how to make a tasty Sesame Ginger Noodle Salad. We discussed the main ingredients, step-by-step cooking, and storage tips. You can swap veggies or add protein for your taste. Feel free to try the tips for the best flavor and enjoy leftovers easily. I hope you feel inspired to create your version of this fresh salad. Enjoy your meal!](https://recipespursuit.com/wp-content/uploads/2025/06/4b7e00d0-a695-4b36-ae89-3d363a158520.webp)
Looking for a quick and tasty meal? This Savory Sesame Ginger Noodle Salad is the answer! You can mix fresh
![- Fresh spinach (1 cup) - Ripe banana (1) - Fresh lime juice (to taste) - Frozen pineapple chunks (1/2 cup) - Frozen mango chunks (1/2 cup) - Coconut water (1/2 cup) - Plain Greek yogurt (1/2 cup) - Chia seeds (1 tablespoon) - Honey or agave syrup (optional, 1 tablespoon) I love using fresh ingredients in my Tropical Green Smoothie. The fresh spinach adds a nice green color and lots of nutrients. The ripe banana sweetens the drink and gives it a creamy texture. A squeeze of fresh lime juice brightens the flavor perfectly. For a fruity twist, I use frozen pineapple and mango chunks. They make the smoothie cold and refreshing. Plus, they are great for adding natural sweetness without extra sugar. I also add coconut water. It hydrates and gives a subtle tropical taste. Plain Greek yogurt makes the smoothie creamy and adds protein. Chia seeds are my secret for a nutritional boost; they provide fiber and healthy fats. If you like your smoothie sweeter, honey or agave syrup works well. These ingredients come together to create a delicious drink. For the full recipe, check out the details above. First, wash and dry 1 cup of fresh spinach. Make sure to remove any dirt or grit. Then, peel and cut 1 ripe banana into smaller pieces. This makes blending easier. Next, prepare your frozen fruits. You will need 1/2 cup each of frozen pineapple and frozen mango chunks. Now, it's time to blend! In a blender, combine the spinach, banana, 1/2 cup of frozen pineapple, and 1/2 cup of frozen mango. Pour in 1/2 cup of coconut water and 1/2 cup of plain Greek yogurt. Add 1 tablespoon of chia seeds and a squeeze of lime juice for a zesty touch. Blend on high until you achieve a smooth and creamy texture. If needed, stop and scrape down the sides of the blender. After blending, taste your smoothie. If you want it sweeter, add 1 tablespoon of honey or agave syrup. Blend again for a few seconds. Pour the smoothie into glasses or bowls. For an extra special touch, garnish with more chia seeds or some slices of fresh fruit. Enjoy your delicious Tropical Green Smoothie! For the full recipe, refer to the beginning of this article. Choosing ripe bananas is key. A ripe banana is sweet and creamy. Look for yellow skin with brown spots. This means it’s ready for your smoothie. For fresh spinach, pick bright green leaves. Avoid yellow or brown spots. Fresh spinach adds nutrients and flavor. When it comes to frozen tropical fruits, choose quality brands. Look for fruit with no added sugar. Pineapple and mango should be bright in color. This means they are ripe and tasty. You can also freeze your own fruit. Just chop and freeze them in a bag. This gives you control over freshness. To get the right thickness, use the right amount of liquid. If your smoothie is too thick, add more coconut water. Start with half a cup and adjust as needed. For a thicker smoothie, use less liquid or add more yogurt. Blending is important too. Start on low speed to mix ingredients. Then switch to high speed for a smooth finish. If you see lumps, stop blending and scrape the sides. Blend again until smooth. This ensures a creamy texture. To boost nutrition, consider adding superfoods. Chia seeds are great; they add fiber and protein. Protein powders can help if you need extra energy. Just one scoop can make a difference. Other nutrient-rich add-ins include flaxseeds or spinach. They both add healthy fats and vitamins. You can also try nut butter for creaminess. Each adds its own unique flavor and health benefits. For the full recipe, check out the Tropical Green Smoothie 🥭. {{image_2}} You can change up the fruit in your Tropical Green Smoothie. Try adding kiwi for a tangy twist. Papaya also works well, giving your drink a creamy texture. You can mix and match your favorite fruits. For greens, consider kale or Swiss chard. These options add nutrition and a different taste. Each choice brings a unique flavor to your smoothie. If you want a dairy-free version, swap Greek yogurt for coconut yogurt. This keeps it creamy and adds a hint of coconut flavor. For sweetness, use maple syrup or agave instead of honey. These options are great for vegans. They let you enjoy the smoothie without any animal products. To add more flavor, consider spices like ginger or turmeric. They not only taste great but also add health benefits. Fresh herbs like mint can give your smoothie a refreshing lift. Just add a few leaves to the blender and blend it up. These small changes can take your Tropical Green Smoothie to the next level. For the full recipe, check out the details above. To store leftover smoothies, pour them into a clean glass jar. Leave some space at the top. Seal the jar tightly with a lid. This keeps air out and helps maintain freshness. If you want to store it longer, you can freeze the smoothie. Use an ice cube tray to freeze small portions. Then, transfer the cubes to a freezer bag. This way, you can blend a quick smoothie later. Pre-portion ingredients for quick smoothies. Place the spinach, banana, and frozen fruit in freezer bags. Store them in the freezer. When you want a smoothie, just grab a bag. For dry ingredients like chia seeds, keep them in a labeled jar. This makes them easy to access. You can also mix your dry ingredients ahead of time. This way, you have everything ready for a fast drink. You can keep prepared smoothies in the fridge for up to 24 hours. After that, they may lose flavor and nutrients. If the smoothie changes color or smells sour, it has gone bad. Always check before drinking. Freshness matters for taste and health. To enjoy the Tropical Green Smoothie at its best, drink it soon after making it. For more detailed instructions, refer to the [Full Recipe]. Yes, you can use fresh fruits. However, the texture and flavor will change. Frozen fruits make the smoothie cold and thick. Fresh fruits may result in a thinner drink. If you choose fresh fruit, add ice to keep it chilled. To thicken your smoothie, try these tips: - Use more frozen fruit. This adds body and chill. - Add a banana. Bananas make the smoothie creamy. - Include extra Greek yogurt. It adds protein and thickness. - Blend less. A shorter blend keeps some texture. Yes, the Tropical Green Smoothie can aid in weight loss. It is low in calories and packed with nutrients. Here’s a quick breakdown: - Spinach is low in calories but high in fiber. - Fruits provide natural sweetness and vitamins. - Greek yogurt adds protein, which helps you feel full. This smoothie is refreshing and nutritious. You can check the Full Recipe for a detailed guide to make it! This blog post covered how to create a delicious Tropical Green Smoothie. I shared the best fresh and frozen ingredients and gave you step-by-step instructions. You learned tips for picking the best produce and ways to boost your smoothie’s flavor and nutrition. Remember, you can easily customize it to fit your taste! Have fun experimenting with different fruits and ingredients. Enjoy your healthy smoothie and all its benefits!](https://recipespursuit.com/wp-content/uploads/2025/06/884e278c-2a05-421a-b837-a11d98d6d223.webp)
Looking for a tasty way to boost your health? My Tropical Green Smoothie is both refreshing and nutritious! Packed with
![For the chicken, you need the following items: - 1 lb boneless, skinless chicken breasts, cut into bite-sized pieces - 1 teaspoon garlic powder - 1/2 teaspoon salt - 1/4 teaspoon black pepper - 2 teaspoons dried Italian herbs (like oregano, basil, or thyme) These ingredients add flavor to the chicken. The herbs give it a fresh taste, while the garlic powder adds a nice kick. For the breading, gather these ingredients: - 1 cup breadcrumbs (I prefer Italian seasoned) - 1/2 cup grated Parmesan cheese Mix these two together. The breadcrumbs give a crispy coating, and the Parmesan adds a rich, cheesy flavor that pairs well with chicken. For the final touches, you will need: - 1 cup marinara sauce - 1 cup shredded mozzarella cheese - 2 tablespoons fresh parsley, chopped (for garnish) - Olive oil spray These toppings give the dish its classic Chicken Parmesan feel. The marinara sauce brings moisture, while the mozzarella melts beautifully on top. The parsley adds a pop of color and freshness to the dish. For the complete recipe, you can refer to the [Full Recipe]. First, preheat your oven to 400°F (200°C). This step is key for a good bake. Next, line a baking sheet with parchment paper. This keeps the bites from sticking. In a bowl, mix the chicken pieces with garlic powder, dried herbs, salt, and black pepper. Make sure every piece gets coated. This helps build flavor in each bite. Now, grab another bowl. Combine the breadcrumbs and grated Parmesan cheese. This will give your bites a nice crunch and rich taste. Take each chicken piece and dip it into the breadcrumb mix. Press it gently so the breading sticks well. Place the coated chicken on your baking sheet. Keep them spaced out for even cooking. Lightly spray the breaded chicken with olive oil. This helps get that golden crust we all love. Bake the chicken in the preheated oven for 15-20 minutes. You want them golden brown and cooked through. Check that the internal temperature reaches 165°F (75°C). After baking, take the sheet out. Spoon marinara sauce over each chicken bite. Top with shredded mozzarella cheese. The sauce and cheese add great flavor. Return the baking sheet to the oven. Bake for another 5-7 minutes until the cheese is melted and bubbly. Once done, remove from the oven. Garnish with fresh parsley for a pop of color. Serve warm with extra marinara sauce on the side for dipping. Enjoy your tasty snack! For the full recipe, refer to the previous section. To make sure your chicken bites are crispy, follow these steps: - Use Parchment Paper: Line your baking sheet with parchment paper. This helps the bites crisp up without sticking. - Spray with Olive Oil: Lightly spray the breaded chicken with olive oil. This small step adds flavor and helps create a golden crust. - Avoid Overcrowding: Place the chicken bites in a single layer with space between them. This helps hot air circulate and keeps them crispy. The right sauce makes these bites shine. Here are my favorite options: - Marinara Sauce: This classic pairing adds rich flavor. Serve it warm for dipping. - Ranch Dressing: For a creamy twist, ranch dressing offers a cool balance to the savory chicken. - Buffalo Sauce: If you like heat, drizzle some buffalo sauce over the bites for a spicy kick. Here are some pitfalls to watch out for: - Skipping the Marinade: Don’t skip seasoning the chicken before breading. This adds a lot of flavor to the bites. - Not Checking Temperature: Always check the internal temperature. Chicken should reach 165°F (75°C) for safety. - Baking Too Long: Baking too long can dry out the chicken. Keep an eye on them to ensure they stay juicy. Following these tips will help you create perfect Baked Chicken Parmesan Bites every time! For the complete recipe, check out the Full Recipe section. {{image_2}} Want a kick? Add some heat! You can make spicy chicken parmesan bites by adding crushed red pepper flakes to the breadcrumb mix. Start with a teaspoon. If you want it hotter, add more. You can also dip the chicken pieces in hot sauce before breading them. This gives a tasty kick that balances well with the cheese. You can enjoy these bites even if you avoid gluten. Instead of regular breadcrumbs, use gluten-free breadcrumbs. Many stores sell these. You can also make your own by grinding gluten-free bread. Just ensure your chicken and cheese are gluten-free too. This way, everyone can enjoy a delicious snack without worry. Cheese makes everything better, right? You can switch up the cheeses for different tastes. Instead of mozzarella, try provolone or gouda for a richer flavor. You can also mix in some cheddar for a sharp bite. Experiment with a blend of cheeses to find your perfect match. Cheese variations can make each bite unique and fun to eat. For the complete recipe, check the Full Recipe section. To store your baked chicken parmesan bites, let them cool completely. Place them in an airtight container. Keep the container in the fridge. They stay fresh for about three to four days. If you want to keep them longer, freezing is a good option. When you're ready to eat the leftovers, preheat your oven to 350°F (175°C). Place the bites on a baking sheet. Heat them for about 10-15 minutes. This method helps keep them crispy. You can also use a microwave, but they may not stay crunchy. To freeze these bites, first arrange them on a baking sheet. Freeze them for about an hour until they are firm. After that, transfer them to a freezer-safe bag. Be sure to remove as much air as possible. They stay good in the freezer for up to three months. When you want to eat them, thaw overnight in the fridge before reheating. For the full recipe, check the earlier section. You can prepare the chicken bites a day before. Follow the steps until you coat the chicken. Place the coated bites on a baking sheet and cover them with plastic wrap. Keep them in the fridge overnight. When you're ready to bake, simply remove the wrap and bake as directed. This saves you time and keeps your bites fresh. Yes, you can use chicken thighs. They add a richer flavor and stay moist. Just cut the thighs into bite-sized pieces like the breasts. The cooking time stays the same. Check that the internal temperature reaches 165°F (75°C) for safety. These bites pair well with many sides. Consider serving them with a fresh salad, garlic bread, or veggies. You can also add a side of dipping sauce like marinara or ranch. For a fun twist, serve them in a sub roll for a mini chicken parmesan sandwich. - Full Recipe - Baked Chicken Parmesan Bites In this post, we covered how to make tasty Baked Chicken Parmesan Bites. We looked at key ingredients, like chicken and toppings, along with crisping tips and sauce ideas. I shared simple step-by-step instructions to guide you through the recipe. We also explored fun variations and how to store leftovers. Now, you can enjoy great bites at home anytime. Remember, a little practice yields the best results! Keep these tips in mind for your next cooking adventure.](https://recipespursuit.com/wp-content/uploads/2025/06/2fe5a04b-2b1a-44d4-99cd-f55d9693097e.webp)
Looking for a tasty snack that’s easy to make? You’re in the right spot! I’ll show you how to whip
