Skip to content
DisclaimerTerms Of UseGDPR PolicyCookie Policy

Recipes Pursuit

  • Home
  • Drinks
  • Appetizers
  • Dinner
  • Dessert
  • About
  • Contact
  • Privacy Policy
DisclaimerTerms Of UseGDPR PolicyCookie Policy

NO-ING-IMG

- 1 cup whole wheat flour - 1 teaspoon baking soda - 1 teaspoon baking powder - 1 teaspoon cinnamon - 1/4 teaspoon nutmeg - 1/4 teaspoon salt - 1/4 cup honey or maple syrup - 1/2 cup unsweetened applesauce - 2 large eggs - 1 teaspoon vanilla extract - 1 1/2 cups grated carrots (about 3 medium carrots) - 1/2 cup crushed pineapple, drained - 1/4 cup chopped walnuts (optional) - 1/4 cup raisins (optional) These muffins are not just tasty; they are good for you too. Whole wheat flour adds fiber, which helps with digestion. Carrots bring vitamins A and K, which are great for your eyes and skin. The honey or maple syrup gives natural sweetness without the guilt. Applesauce keeps the muffins moist, cutting down on oil or butter. Plus, the walnuts and raisins add healthy fats and extra nutrients. You can swap eggs for applesauce to make these muffins vegan. Use almond flour instead of whole wheat flour for a gluten-free option. For sweeteners, agave syrup works well if you want a different flavor. You can also use mashed bananas instead of honey for a fruity twist. These swaps let you enjoy the muffins your way! First, you need to preheat your oven to 350°F (175°C). This step is crucial for even baking. Next, line your muffin tin with paper liners. This helps with easy removal and cleanup later. In a large mixing bowl, combine the following dry ingredients: - 1 cup whole wheat flour - 1 teaspoon baking soda - 1 teaspoon baking powder - 1 teaspoon cinnamon - 1/4 teaspoon nutmeg - 1/4 teaspoon salt Stir these well to blend them. Make sure there are no lumps. This ensures even flavor and texture in your muffins. In another bowl, whisk together: - 1/4 cup honey or maple syrup - 1/2 cup unsweetened applesauce - 2 large eggs - 1 teaspoon vanilla extract Mix until everything is well combined. The mixture should appear smooth. Achieving the right consistency is key for moist muffins. Now, pour the wet mixture into the dry ingredients. Stir gently until just combined. Be careful not to overmix. Overmixing can lead to tough muffins. Finally, fold in the grated carrots, crushed pineapple, and any optional nuts or raisins. Mix until they are evenly distributed. Now your batter is ready! For the full recipe, check the section above. To keep your muffins moist, use unsweetened applesauce. It adds sweetness and moisture without extra fat. Also, be careful with baking time. Overbaking can dry out your muffins. Aim for 18 to 22 minutes, and check for doneness with a toothpick. For extra flavor, try adding spices like ginger or allspice. These spices give warmth and depth to the muffins. You can also mix in add-ins like chopped walnuts or raisins. They add texture and a sweet bite. Experiment with different nuts or fruits to find your favorite combo. Make your muffins look lovely by topping them with a sprinkle of cinnamon or chopped nuts before baking. After they cool, place them on a pretty plate. This adds charm and invites people to enjoy them. Serve warm with a dollop of Greek yogurt for a creamy touch. Your muffins will not only taste great but also look beautiful! {{image_2}} To adapt this recipe for gluten-free diets, you can use gluten-free flour blends. These blends often include rice flour, almond flour, or oat flour. Just make sure the blend has a binding agent, like xanthan gum. Replace the whole wheat flour with an equal amount of your chosen gluten-free blend. The muffins will still stay moist and tasty. To make these muffins vegan-friendly, swap the eggs for flaxseed meal. Mix 1 tablespoon of flaxseed meal with 3 tablespoons of water for each egg. Let it sit for a few minutes until it thickens. You can also use maple syrup as your sweetener. This keeps the muffins sweet while staying plant-based. You can customize these muffins with various flavor add-ins. Consider adding chocolate chips for a sweet twist. Dried fruits, like apricots or cranberries, can also work well. You might even try using shredded coconut for added texture. Just remember not to add too much; a half-cup of extras keeps the balance perfect. To keep your muffins fresh, store them in an airtight container. This helps keep moisture in and air out. You can place parchment paper between layers to avoid sticking. For best results, keep them at room temperature for up to three days. If you want to keep them longer, consider refrigerating them. Just remember to seal them well to prevent drying. Freezing muffins is a great way to save them for later. First, let the muffins cool completely. Then, wrap each muffin in plastic wrap tightly. Place them in a freezer bag or an airtight container. You can freeze them for up to three months. When ready to enjoy, just take out a muffin and let it thaw at room temperature or microwave it for a quick heat-up. To reheat muffins without drying them out, use a microwave or an oven. In the microwave, heat for about 15-20 seconds. Check to see if it's warm enough. If using the oven, preheat it to 350°F (175°C). Place the muffins on a baking sheet and warm for about 5-10 minutes. This keeps them soft and tasty. Yes, you can substitute some ingredients. Here are common swaps: - Whole wheat flour: Use all-purpose flour or oat flour for a different texture. - Honey or maple syrup: Agave nectar or coconut sugar can work too. - Eggs: Use flaxseed meal mixed with water for a vegan option. - Applesauce: Replace with mashed banana for a sweeter taste. Each swap can change the taste or texture slightly. Experiment to find what you like best. Check the muffins at 18 minutes. Insert a toothpick into the center. If it comes out clean, they are done. You can also look for a golden color on top. The muffins should spring back when you touch them lightly. If they sink in, they need more time. Serve these muffins warm for the best flavor. You can sprinkle a little cinnamon on top for extra taste. Pair them with Greek yogurt for creaminess. A side of fresh fruit also works well. You can enjoy them as a snack or a tasty breakfast. Check the Full Recipe for more ideas! In this blog post, we explored how to make healthy carrot cake muffins, starting with the key ingredients. We discussed their health benefits, such as fiber and vitamins, and offered ingredient substitutions for various diets. The step-by-step instructions covered everything from mixing to baking, plus tips to keep muffins moist and visually appealing. In conclusion, making these muffins can be simple and enjoyable. With the right ingredients and techniques, you create a tasty treat that suits many diets. Enjoy your baking adventure!

Healthy Carrot Cake Muffins Nutritious and Tasty Treat

Looking for a guilt-free treat that satisfies your sweet tooth? Try my Healthy Carrot Cake Muffins! Packed with whole ingredients

Here’s what you need for Garlic Parmesan Green Beans. Make sure you have fresh items for the best taste. - 1 pound fresh green beans, trimmed - 3 tablespoons olive oil - 4 cloves garlic, minced - 1/2 cup grated Parmesan cheese - 1 teaspoon lemon zest - Salt and pepper to taste - 1/4 teaspoon red pepper flakes (optional) - Fresh parsley, chopped (for garnish) Gather all these ingredients before you start cooking. Fresh green beans give the best flavor and crunch. The minced garlic brings aroma and taste. Parmesan cheese adds creaminess and richness. Lemon zest lifts the dish with a bright note. Salt and pepper enhance all the flavors. You can add red pepper flakes for a bit of heat. Finally, fresh parsley not only looks nice but adds freshness. This simple list is all you need for a tasty side dish. You can find the Full Recipe for detailed steps on how to prepare this dish. Enjoy each bite of these flavorful green beans! 1. Start by bringing a pot of salted water to a boil. This step is key for bright green beans. 2. Add the green beans to the boiling water. Blanch them for 3-4 minutes. They should be tender-crisp and vibrant. 3. Prepare an ice bath in a large bowl. This will stop the cooking and keep the beans bright. 4. Once blanched, drain the beans and transfer them to the ice bath. Let them sit for a few minutes before draining again. 1. Heat a large skillet over medium heat. Add the olive oil when the pan is hot. 2. Toss in the minced garlic. Sauté for 1-2 minutes until it smells amazing. Do not let it brown, as burnt garlic tastes bitter. 3. Add the blanched green beans to the skillet. Toss them in the garlic oil so they are well coated. Sauté for 3-4 more minutes until hot. 1. Remove the skillet from heat. Stir in the grated Parmesan cheese and lemon zest. 2. Season with salt and pepper to taste. If you want some heat, add red pepper flakes. 3. Toss everything until the cheese coats the green beans evenly. 4. Transfer the green beans to a serving platter. Garnish with fresh parsley before serving. These steps will lead you to a delicious dish that's easy to make. For more details, check out the Full Recipe. - Choosing the freshest green beans: Look for bright green beans with a firm feel. They should snap easily when bent. Fresh beans taste better and have a nice crunch. - Best practices for sautéing garlic without burning: Use medium heat to cook your garlic. This way, it will turn fragrant without browning too much. Stir it often to keep it from sticking and burning. If it starts to brown, it will taste bitter. - Optional ingredients for added flavor: You can add lemon juice for a citrus kick. A sprinkle of balsamic vinegar adds a sweet tang. For more texture, try adding toasted nuts like almonds or pine nuts. - Recommended side dishes to pair with the recipe: Garlic Parmesan green beans go well with grilled chicken or fish. They also pair nicely with quinoa or rice. For a complete meal, serve them alongside a fresh salad. For the complete recipe, check out the [Full Recipe]. {{image_2}} You can change the flavor of Garlic Parmesan Green Beans by using different cheeses. Try using feta or goat cheese for a tangy twist. For a creamy option, blend in some cream cheese or ricotta. Each cheese adds its own taste and texture, making the dish unique. You can also add more vegetables to your green beans. Carrots, bell peppers, or cherry tomatoes work great. Just chop them into small pieces and sauté them with the garlic. This not only adds color but also boosts the nutrition of the dish. If you follow a vegan diet, you can make Garlic Parmesan Green Beans without dairy. Use nutritional yeast instead of Parmesan. It gives a cheesy flavor without the milk. You can also use olive oil or coconut oil for a tasty base. For a low-carb variation, skip the Parmesan cheese altogether. Instead, focus on the garlic and olive oil for flavor. You can still enjoy the crunch of the green beans while keeping the carbs down. These variations let you customize the dish to fit your taste and dietary needs. For the full recipe, check out the details above. To store leftovers, place the green beans in an airtight container. This keeps them fresh and tasty. You can keep them in the fridge for up to three days. Make sure to let them cool before sealing. When reheating, use a skillet over low heat. This method helps keep the green beans crisp. Stir them often to avoid burning. You can also microwave them for 30 seconds, then check. If they need more time, heat in short bursts. For freezing, I suggest you place them in a freezer-safe bag. Remove as much air as possible before sealing. They will last for up to three months. When ready to eat, thaw in the fridge overnight before reheating. For the full recipe, check the earlier section. Can I use frozen green beans for this recipe? Yes, you can use frozen green beans. They can save time but may change the texture. You should thaw them first and pat them dry. This helps the green beans cook better and not become mushy. How do I make this dish gluten-free? This dish is naturally gluten-free. Just ensure that your Parmesan cheese does not contain gluten. Most brands are safe, but check the label to be sure. What is the best way to blanch green beans? To blanch green beans, boil water in a pot and add salt. Once it boils, add the green beans for 3-4 minutes. They should look bright green. Quickly move them to ice water to stop cooking. This keeps them crisp and bright. How can I make the green beans crispy? To make crispy green beans, ensure you do not overcook them during blanching. After sautéing, let them cook for a minute longer in the pan. This helps to achieve that nice crunch. What can I serve with Garlic Parmesan Green Beans? These green beans pair well with grilled chicken, steak, or fish. You can also serve them with pasta or rice for a complete meal. They add a nice pop of flavor to any plate. How to adjust recipe servings for larger groups? You can easily double or triple the recipe. Just make sure you have a large enough skillet or cook in batches. The cooking time may vary slightly, so keep an eye on the green beans. For the full recipe, refer to the earlier section. In this blog post, we explored how to make Garlic Parmesan Green Beans. We covered the ingredients, step-by-step instructions, and helpful tips. You learned about variations and how to store leftovers. These green beans are tasty and easy to make. Feel free to adjust flavors based on your taste. Enjoy making this dish for your family and friends. A simple recipe can elevate any meal!

Garlic Parmesan Green Beans Flavorful and Easy Recipe

Are you ready to elevate your veggie game? In this Garlic Parmesan Green Beans recipe, you’ll discover how simple it

- 2 cups fresh strawberries, hulled and sliced - Fresh mint leaves (for garnish) - 3 tablespoons sugar (for strawberries) - 1/2 cup powdered sugar - 1 cup heavy whipping cream - 1/2 cup vanilla yogurt - 1 cup angel food cake, torn into bite-sized pieces When making a Strawberry Shortcake Trifle, fresh ingredients shine. You need ripe strawberries. They bring bright flavor and color. Slice them and mix with sugar. This step helps release their juices. Let them sit for about 15 minutes. This wait time develops their sweet taste. Sweetening agents play a key role. I use sugar to enhance the strawberries. Powdered sugar adds sweetness to the cream. It helps create a smooth texture. You can adjust the sugar to fit your taste. For the creamy components, I whip heavy cream. It adds richness and lightness. Mixing in vanilla yogurt gives it a nice tang. The balance of cream and yogurt makes it delightful. Don't forget the cake base! Angel food cake is perfect. It’s light and fluffy. Tear it into small pieces for easy layering. This texture absorbs the strawberry juices well. Each ingredient is important. Together, they create a delightful treat. Find the full recipe to guide you through each step. - First, slice your fresh strawberries. - In a bowl, combine the sliced strawberries with 3 tablespoons of sugar. - Gently toss the strawberries to coat them in sugar. - Let the strawberries sit for about 15 minutes. This helps them release their juices. - In a mixing bowl, pour in 1 cup of heavy cream. - Use an electric mixer on medium speed to whip the cream. - Keep whipping until it starts to thicken. - Gradually add in 1/2 cup of powdered sugar and 1 teaspoon of vanilla extract. - Continue to whip until you see soft peaks form. - Take 1 cup of torn angel food cake pieces. - In a separate bowl, mix the cake with 1/2 cup of vanilla yogurt. - Stir gently until they are just combined. - Start by placing a layer of the yogurt-coated cake in a large trifle dish. - Next, add a layer of the sugared strawberries over the cake. - Spoon a layer of whipped cream on top of the strawberries. - Repeat the layering until all ingredients are used. - Finish with a layer of whipped cream on top. You can find the full recipe for this delightful dessert to make it a breeze! To get soft peaks, start with cold cream. Use a clean bowl and beaters. Whip the cream on medium speed. Stop when it holds a soft shape but is not stiff. Too much whipping can turn cream into butter. Keep a close eye on it as you whip. Layer your trifle in clear glass cups or mason jars. This shows off the pretty colors and textures. Start with cake, then strawberries, and finish with whipped cream. You can also use a large trifle dish for a grand look. Serve chilled for a refreshing treat. You can adjust the sugar based on your taste. If you want it sweeter, add a bit more sugar. For a healthier option, try using honey or agave. These can add a nice twist to your trifle. {{image_2}} You can mix up your trifle by using different fruits. Blueberries and raspberries are great choices. They add color and flavor to your dessert. You can also try combining fruits for a fun twist. For example, use peaches or cherries with strawberries. This gives your trifle a new taste every time. If you need a gluten-free dessert, don't worry! You can swap the angel food cake for gluten-free cake. Look for gluten-free brands or make your own. This way, everyone can enjoy this tasty treat without worry. Want to add a fun twist? Try using flavored yogurt instead of vanilla. Strawberry or lemon yogurt can make your trifle pop! You can also add extracts to the cream. A little almond or coconut extract can change the flavor entirely. Experiment with these ideas to find your favorite mix. For the full recipe, follow the directions above and enjoy your delightful dessert! To keep your Strawberry Shortcake Trifle fresh, store it in the fridge. Use a covered dish to prevent it from absorbing odors. This trifle lasts about 2 to 3 days in the fridge. However, the layers may start to blend over time, so enjoy it sooner rather than later. Can you freeze Strawberry Shortcake Trifle? I do not recommend freezing it. The whipped cream and yogurt may separate when thawed. If you want to freeze it, consider freezing each component separately. For the best results, freeze the cake and strawberries. Thaw them in the fridge before assembling. This keeps the texture nice and fresh. To make Strawberry Shortcake Trifle from scratch, follow these simple steps: - Combine sliced strawberries with sugar and let them sit. - Whip heavy cream with powdered sugar and vanilla until thick. - Mix torn angel food cake with vanilla yogurt. - Layer the cake in a trifle dish. - Add strawberries and whipped cream on top. - Repeat layers, finishing with whipped cream. This process creates a delightful dessert, perfect for any occasion. You can find the full recipe above for detailed instructions. For a stunning presentation, I suggest serving the trifle in glass cups or mason jars. This way, you can see the beautiful layers of cream, cake, and strawberries. You can serve it chilled for a refreshing treat. Each serving should be about one cup, which is enough to satisfy without being too filling. Yes, you can make the trifle a day ahead. Just keep it covered in the fridge. This allows the flavors to meld nicely. However, I recommend adding the whipped cream on the day you serve it. This keeps it light and fluffy. With this tip, you can enjoy the trifle without stress on the day of your gathering! Making a Strawberry Shortcake Trifle is simple and fun. You need fresh strawberries, whipped cream, yogurt, and angel food cake. The layers create a sweet, creamy delight. Use tips like proper whipping and stylish presentation for the best results. In the end, this trifle is perfect for any occasion. Feel free to mix in other fruits or flavors. Enjoy making your dessert, and share it with friends and family!

Strawberry Shortcake Trifle Delightful and Creamy Treat

Are you ready to treat yourself? My Strawberry Shortcake Trifle is the perfect way to enjoy a sweet and creamy

- 1 can (15 oz) black beans, drained and rinsed - 1 cup corn kernels (fresh, canned, or frozen) - 1 medium red bell pepper, diced - 1 small red onion, finely chopped - 1 jalapeño, seeded and minced - 1 cup cherry tomatoes, halved - 1/4 cup fresh cilantro, chopped - Juice of 2 limes - 2 tablespoons olive oil - 1 teaspoon cumin - Salt and pepper to taste Zesty Black Bean Salsa shines because of its simple yet vibrant ingredients. First, you need black beans. These are rich in protein and fiber, making them a healthy choice. Drain and rinse them well to remove extra sodium. Next, corn kernels add a sweet crunch. You can use fresh, canned, or frozen corn. Each option works well and brings a bit of sweetness to the salsa. Red bell pepper gives a crisp texture and bright color. Dice it into small pieces for even bites. Then, for a bit of heat, add jalapeño. Be sure to seed it first to control the spice level. Red onion adds a sharp flavor that balances the salsa. Finely chop it so it blends well. Cherry tomatoes bring juiciness and a pop of color. Halve them to release their juices. Fresh cilantro adds a burst of freshness. Chop it finely and mix it in. Lime juice wakes up the flavors. Use fresh limes for the best taste. Olive oil helps to carry the flavors and adds richness. Cumin gives a warm, earthy note. Lastly, season with salt and pepper to taste. You can find the full recipe [here](#). Each ingredient plays a role in creating this fresh and flavorful delight. To make Zesty Black Bean Salsa, follow these simple steps. Start by gathering your ingredients. In a large bowl, mix the black beans, corn, diced red bell pepper, chopped red onion, minced jalapeño, and halved cherry tomatoes. This mix gives the salsa great color and texture. Next, grab a small bowl. In it, whisk together the lime juice, olive oil, cumin, salt, and pepper. This dressing adds a zesty kick to the salsa. Make sure to whisk until everything blends well. Now, pour the dressing over your mixture in the large bowl. Gently toss everything together. You want every ingredient to have some dressing on it. This step makes each bite flavorful. After mixing, taste the salsa. If you want more zing, add extra lime juice or some salt and pepper. Adjusting the flavor to your liking is key for a delicious salsa. Cover the bowl with plastic wrap. Place it in the fridge for at least 30 minutes. Chilling helps the flavors mix together better. When you serve it, the salsa will taste fresh and vibrant. For the full recipe, check out the [Full Recipe]. Enjoy making your Zesty Black Bean Salsa! To make your Zesty Black Bean Salsa stand out, start with lime juice. Adding more acidity brightens the whole dish. Fresh lime juice wakes up the flavors. Try to use two limes for that perfect kick. Next, think about spices. If you want heat, add some cayenne or paprika. A little goes a long way. You can also increase the jalapeño if you like spice. Choosing the right beans is key. I recommend using high-quality black beans. They add creaminess and depth. If you prefer, try pinto beans for a different taste. When serving, the bowl matters. Choose a bright, colorful bowl to catch the eye. A vibrant bowl makes your salsa look even more inviting. Garnishing adds a nice touch. Sprinkle extra cilantro on top for freshness. You can also add lime wedges for a pop of color and flavor. Pair your salsa with crispy tortilla chips. This classic combo never fails. It makes for a fun and tasty appetizer. For a fancy twist, serve with cucumber slices instead of chips. {{image_2}} You can change the beans in this salsa. Try pinto or kidney beans for a twist. Each bean brings a unique taste and texture. You can also switch up the peppers. Use a green bell pepper for a milder flavor. A poblano pepper adds a smoky touch. For a burst of sweetness, add fruits like diced mango or pineapple. These fruits give your salsa a fresh and bright flavor. You can make this salsa mild or spicy. For a mild version, use less jalapeño. If you love heat, add more jalapeño or use a spicier pepper. You can also try hot sauce for extra kick. Just a few drops can really spice things up! Adjust the spice to your taste for the perfect balance. Feel free to explore these variations as you make your Zesty Black Bean Salsa. The full recipe will guide you through the basics. Enjoy creating your own unique version! After making Zesty Black Bean Salsa, you may have some leftovers. Store them in an airtight container. Place the container in the fridge. This salsa stays fresh for about 3-5 days. If you want to keep it longer, consider freezing it. Use a freezer-safe container or bag. The salsa can last for up to 3 months in the freezer. Just remember to leave some space in the container. This will allow for expansion as it freezes. If you freeze the salsa, thaw it in the fridge overnight. This keeps the texture nice. You can also run the bag under cool water for a quick thaw. When it’s time to serve, enjoy it cold. Zesty Black Bean Salsa tastes great right out of the fridge. If you prefer it warm, heat it gently on the stove. Stir often to avoid burning. You can also microwave it. Just heat in short intervals, stirring in between. Zesty Black Bean Salsa lasts about 3 to 5 days in the fridge. Store it in an airtight container to keep it fresh. The flavors only get better as it sits, so enjoy it within that time for the best taste. Yes, you can make this salsa ahead of time. I often prepare it a day before a gathering. The ingredients meld well, creating a rich flavor. Just remember to let it chill for at least 30 minutes before serving. You can serve Zesty Black Bean Salsa with tortilla chips for a crunchy snack. It also pairs well with grilled meats, tacos, or quesadillas. Use it as a topping for salads or bowls. It's versatile and adds a fresh kick to many dishes. Absolutely, Zesty Black Bean Salsa is vegan-friendly. It contains no animal products, making it a safe choice for plant-based diets. This recipe is not just tasty; it's also healthy and full of nutrients. Enjoy it guilt-free! For the full recipe, check out the detailed instructions provided above. You learned how to make Zesty Black Bean Salsa with simple ingredients and steps. Use black beans, corn, peppers, and spices for great flavor. Remember to chill the salsa for the best taste. Try different beans and heat levels for fun variations. Store leftovers well to enjoy later. This dish is perfect for gatherings or snacks. Make it your own with options and tips shared here. Dive in and craft a salsa that you will love!

Zesty Black Bean Salsa Fresh and Flavorful Delight

Are you ready to spice up your snacking routine? This Zesty Black Bean Salsa packs a flavorful punch that’s fresh

- 1 pound Brussels sprouts, trimmed and halved - 3 tablespoons balsamic vinegar - 2 tablespoons maple syrup - 2 tablespoons olive oil - 2 cloves garlic, minced - Salt and pepper to taste - Optional: 1/4 cup chopped pecans for added crunch - Optional: Fresh parsley for garnish You need fresh Brussels sprouts for this dish. Look for bright green sprouts with tight leaves. They should feel firm to the touch. If they look yellow or soft, skip them. Balsamic vinegar adds a rich flavor. It balances well with the sweetness of maple syrup. Olive oil helps the sprouts roast nicely. Garlic brings a lovely aroma and taste. If you want a crunchy twist, add pecans. They give a great texture contrast. Fresh parsley adds a pop of color and freshness. This dish is simple, yet the flavors shine. You can find the Full Recipe for detailed steps and cooking times. Enjoy cooking! - Preheat the oven to 400°F (200°C). - Prepare the Brussels sprouts by trimming and halving them. Start by cutting off the stem end, then slice them in half. This helps them cook evenly. When you trim and halve the sprouts, you expose more surface area. This is key for getting that nice caramelization. - Mix halved Brussels sprouts with olive oil, garlic, salt, and pepper. - Spread on a baking sheet, cut side down, and roast for 20 minutes. In a large bowl, add the halved sprouts. Pour in the olive oil and add minced garlic. Sprinkle with salt and pepper. Toss everything together. Make sure every sprout gets coated. This step is so important for flavor! Once mixed, spread the Brussels sprouts on a baking sheet. Place them cut side down. This helps them brown nicely. Roast in the oven for 20 minutes. You want them tender with a touch of crispness. - Combine balsamic vinegar and maple syrup in a bowl. - Drizzle over roasted sprouts and toss before returning to the oven. While the sprouts roast, mix balsamic vinegar and maple syrup in a small bowl. The sweet maple balances the tart vinegar. After 20 minutes, take the sprouts out of the oven. Drizzle the balsamic-maple mix over them. Toss gently to coat. Return to the oven for another 10 to 15 minutes. This allows the glaze to thicken and stick. The sprouts will turn a beautiful brown color, making them even more tempting. For the full recipe, check the details above. To get even roasting, make sure to cut the Brussels sprouts in half. This helps them cook evenly. Spread them out on the baking sheet. If they are too crowded, they will steam instead of roast. Toss the sprouts with the glaze after the first roast. This ensures every piece gets a tasty coating. You can add herbs like thyme or rosemary for extra flavor. A pinch of garlic powder also works well. If you want a twist, try using red wine vinegar instead of balsamic vinegar. It gives a nice tang. You can also use apple cider vinegar for a sweeter taste. Balsamic glazed Brussels sprouts pair well with roasted chicken or grilled steak. They can be a great side for holiday meals, too. You can also serve them as a tasty appetizer. Just place them on a platter and let your guests dig in! For the full recipe, check out the earlier section. {{image_2}} You can easily adjust this recipe for different diets. For a vegan option, simply replace the maple syrup with agave syrup. Use olive oil to keep it plant-based. If you are gluten-free, this recipe is already safe. All the ingredients are gluten-free. Just ensure the balsamic vinegar is pure. Want to spice things up? Add chili flakes for some heat. Smoked paprika gives it a nice, smoky flavor. You can also swap the maple syrup for honey if you prefer. Agave syrup works well too. Each sweetener brings a unique taste to the dish. For extra crunch, try adding almonds or walnuts. They add a great texture contrast. You can also mix in other veggies. Carrots or sweet potatoes work well with Brussels sprouts. They not only add color but also enhance the taste. This recipe is versatile and fun to customize. Check out the Full Recipe for more ideas! To keep your balsamic glazed Brussels sprouts fresh, store them in the fridge. Use an airtight container to keep them safe. This way, they stay crisp and tasty. Leftovers can last up to three days in the refrigerator. Just make sure they are cool before sealing them up. When you want to enjoy your leftovers, use the oven or a skillet for reheating. Both methods keep the sprouts crispy. If you use the microwave, they might get soggy, which we want to avoid. Reheat in the oven at 350°F for about 10 minutes. If using a skillet, heat it on medium-low, then add the Brussels sprouts, stirring gently until warm. If you have extra sprouts, freezing is a great option. First, let them cool completely. Then, spread them on a baking sheet in a single layer. Freeze them for about an hour until solid. After that, transfer them into a freezer bag or container. When you want to use them, thaw them in the fridge overnight. Reheat them in the oven or skillet, as mentioned before. Enjoy your tasty leftovers! When you pick Brussels sprouts, look for small, bright green balls. They should feel firm and heavy. Avoid sprouts that are yellow or wilted. Fresh sprouts have tightly packed leaves and a nice smell. If you find sprouts with some dirt, that's okay! It means they are fresh from the farm. Yes, you can use frozen Brussels sprouts. They are handy and save time. However, fresh sprouts taste better. Frozen ones might not get as crispy when cooked. If you use frozen, thaw them first and pat them dry. This helps them roast better. These sprouts pair well with many dishes. You can serve them with roasted chicken or grilled steak. They also go great with quinoa or rice. If you want a veggie option, try them with stuffed peppers or a grain salad. The sweet and tangy flavor of the sprouts adds a nice touch. You can tell Brussels sprouts are done when they are golden brown and tender. They should have a nice caramelized look. If you pierce one with a fork, it should feel soft. A bit of a crisp outer layer also means they are perfect. This article has covered how to make balsamic glazed Brussels sprouts. You learned about the ingredients, step-by-step instructions, and tips for the best results. I shared variations for dietary needs and flavor changes. I also discussed how to store leftovers and answered your common questions. Now, you can enjoy a healthy, tasty side dish that pairs well with many meals. Give it a try and impress your friends and family!

Balsamic Glazed Brussels Sprouts Tasty Side Dish Recipe

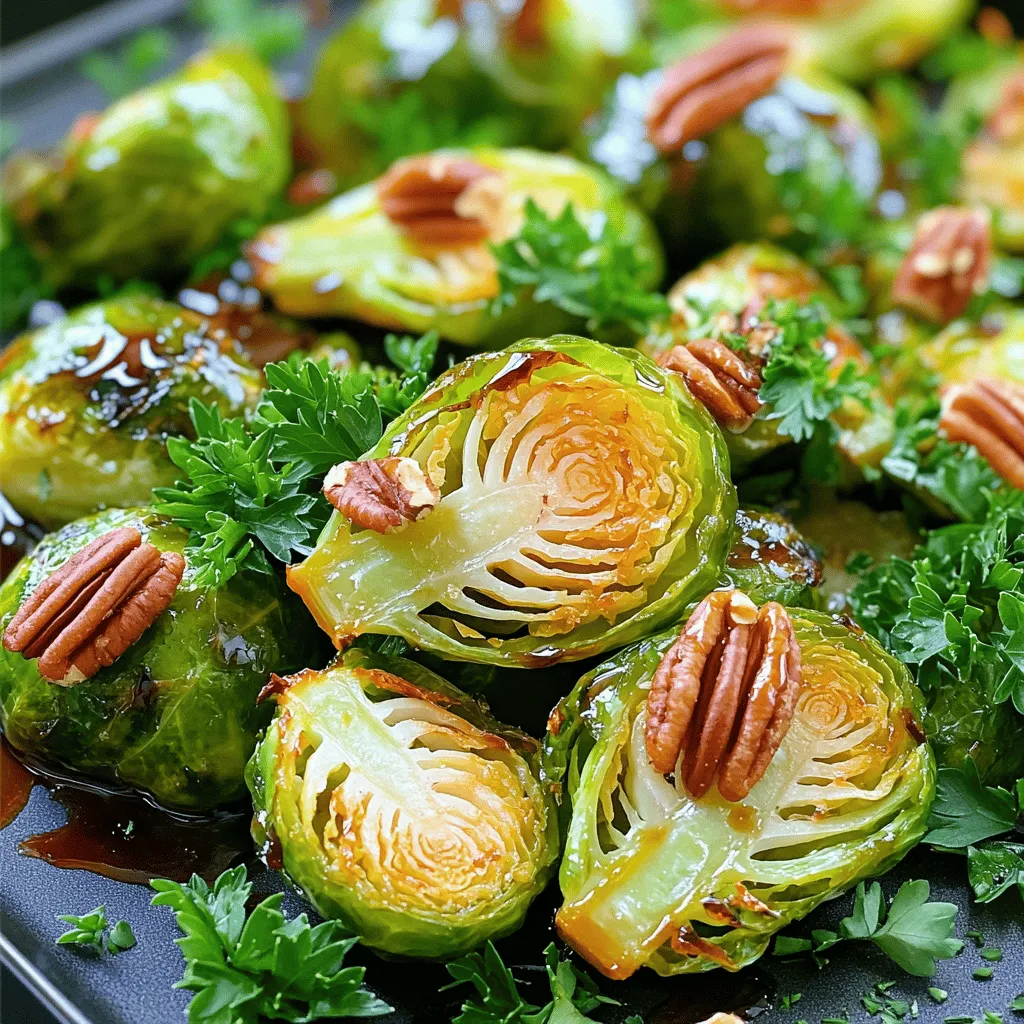
Looking for a quick and tasty side dish? Balsamic Glazed Brussels Sprouts are the answer! This easy recipe packs a

- 1 cup dried chickpeas (soaked overnight) - 1 small onion, roughly chopped - 3 cloves garlic, minced - 1/4 cup fresh parsley, chopped - 1/4 cup fresh cilantro, chopped - 1 teaspoon ground cumin - 1 teaspoon ground coriander - 1/2 teaspoon baking powder - 1 teaspoon salt - 1/2 teaspoon black pepper - 2 tablespoons olive oil (plus more for brushing) - Optional: pinch of cayenne pepper for heat Soaking chickpeas is key. It helps them soften and blend well. You must soak them overnight. This step also makes them easier to digest. Fresh herbs add a bright flavor. They enhance the falafel's taste and aroma. Dried herbs can work, but fresh is best. For spices, you can mix it up. If you don’t have cumin, try paprika. If you want heat, add more cayenne. Customize this recipe to fit your taste. Check the [Full Recipe](#) for more details on cooking! - Step 1: Start by draining and rinsing your soaked chickpeas. This helps get rid of excess salt and improves the taste. - Step 2: In a food processor, combine the drained chickpeas, chopped onion, minced garlic, parsley, cilantro, cumin, coriander, baking powder, salt, black pepper, and cayenne if you want some heat. Pulse the mixture until it forms a coarse paste. Make sure to scrape down the sides. You want some texture, so don’t over-process it. - Step 3: Transfer the falafel mixture to a bowl and refrigerate for at least 30 minutes. This helps the mixture firm up, making it easier to shape. - Step 4: Preheat your air fryer to 375°F (190°C). This step is key to getting crispy falafel. - Step 5: Once chilled, form the falafel mixture into small balls or patties, about 1.5 inches in diameter. This size will cook evenly. - Step 6: Brush the formed falafel lightly with olive oil on all sides. This will give them a nice golden color. Arrange the falafel in the air fryer basket in a single layer. Don’t overcrowd them; you may need to cook in batches. - Step 7: Air fry the falafel for 12-15 minutes. Flip halfway through to ensure they cook evenly. You want them to be golden brown and crispy. For the full recipe, check out the Crispy Air Fryer Falafel . Enjoy making these delicious bites! To get the best results, set your air fryer to 375°F (190°C). This temperature helps cook the falafel evenly. Avoid overcrowding the basket. If you fill it too full, the falafel won’t cook well. They need space to crisp up nicely. Cook your falafel in batches for a perfect crunch. When they have room, they crisp better. Brushing them lightly with olive oil before cooking adds flavor and helps them brown. This small step makes a big difference! Consider adding spices like smoked paprika or a pinch of cayenne pepper for heat. They can bring a new twist to your falafel. For serving, I recommend pairing them with tahini sauce or yogurt dip. A colorful platter with fresh veggies makes a great presentation! For the full recipe, check above. {{image_2}} You can make your falafel even better. Try adding herbs like mint or dill. These add fresh tastes. You can also use spices for heat. A pinch of cayenne pepper gives a nice kick. Paprika or chili powder can work too. Adjust the spice to fit your taste. Using canned chickpeas is a great shortcut. Just rinse them well. They save time and still taste good. If you want to keep it vegan, you can swap olive oil. Use avocado oil or sunflower oil instead. Both work well and keep it tasty. Falafel is super versatile. You can wrap it in pita bread with fresh veggies. It makes a great sandwich. You can also toss it in salads for extra crunch. Pair falafel with dips like tahini or hummus. These add creaminess and flavor. You can even serve it with a yogurt sauce for a cool touch. For the full recipe, check out the crispy air fryer falafel. To keep your cooked falafel fresh, store them in an airtight container. Use a container that fits well, so they don’t move around too much. You can place parchment paper between layers to keep them from sticking. Cooked falafel lasts about 3 to 5 days in the fridge. If you want to save them longer, consider freezing. For freezing, use a freezer-safe container. Make sure to separate layers with parchment paper as well. This way, they won’t freeze together. Cooked falafel can last up to three months in the freezer. When reheating falafel, I recommend using an air fryer. It keeps them crispy and tasty. Set your air fryer to 350°F (175°C) and heat for about 5 to 7 minutes. If you use a microwave, the falafel may turn soft. To avoid this, place a paper towel under them in the microwave. This helps absorb moisture and keeps them from getting too soggy. Always check that they are heated through before serving. Following these tips helps you enjoy your falafel just as much as when they were fresh. You can tell when falafel is done by its color and texture. They should turn golden brown and feel firm. If you insert a toothpick, it should come out clean. If not, give them a few more minutes. You can make falafel without soaking chickpeas, but it’s not the best option. Dried chickpeas need soaking to soften. If you skip this step, your falafel will be hard and dry. If you’re in a pinch, you can use canned chickpeas instead. Just rinse and drain them well. Air fryer falafel pairs well with many sides. You can serve them with tahini sauce or yogurt dip. Adding fresh veggies like cucumbers and tomatoes adds a nice crunch. You can also put them in wraps with lettuce and sauce for a meal. Cooked falafel can last in the fridge for about four days. Store them in an airtight container to keep them fresh. If you want to keep them longer, consider freezing them. Set your air fryer to 375°F (190°C) for falafel. This temperature allows them to cook evenly and get crispy. Cooking for 12-15 minutes works well. Remember to flip them halfway for even cooking. For the full recipe, check out the crispy air fryer falafel! In this post, we explored a simple way to make crispy air fryer falafel. We covered key ingredients like soaked chickpeas, fresh herbs, and spices. I shared step-by-step instructions to help you prepare and cook your falafel easily. You learned useful tips for achieving the perfect texture and flavor. Try different herbs or spices to find your favorite taste. This recipe is not just healthy but also fun to make. Enjoy your falafel on wraps, salads, or with dips.

Easy Air Fryer Falafel Simple and Flavorful Recipe

Looking for a quick and tasty way to enjoy falafel? This Easy Air Fryer Falafel recipe is simple and packed

To make Creamy Sun-Dried Tomato Pasta, gather these key ingredients: - 12 ounces pasta (fettuccine or penne works best) - 1 cup sun-dried tomatoes packed in oil, drained and chopped - 1 cup heavy cream - 1/2 cup grated Parmesan cheese - 2 cloves garlic, minced - 1 small onion, finely chopped - 2 tablespoons olive oil - 1 teaspoon dried basil - 1 teaspoon dried oregano - Salt and pepper to taste - Fresh basil leaves for garnish These ingredients blend to create a rich and tasty dish. The sun-dried tomatoes add a lovely tang, while the cream makes it smooth. For this dish, I recommend using fettuccine or penne. Both shapes hold the sauce well. Fettuccine is flat and wide, which helps catch the creamy sauce. Penne, with its tubular shape, traps bits of sun-dried tomatoes and herbs. Any pasta you like can work, but these two are my favorites. If you have specific dietary needs, here are some swaps to consider: - Gluten-Free Pasta: Use gluten-free pasta to make this dish suitable for those with gluten sensitivities. - Dairy-Free Cream: Substitute heavy cream with coconut cream or a nut-based cream for a dairy-free option. - Nutritional Yeast: If you want to skip cheese, sprinkle nutritional yeast for a cheesy flavor without dairy. These alternatives keep the dish tasty while meeting your needs. For the full recipe, check out the details above. Start by boiling water in a large pot. Add salt to the water for flavor. Once it boils, add 12 ounces of your choice of pasta. I recommend fettuccine or penne. Cook the pasta until it is al dente, which usually takes 8 to 10 minutes. After cooking, reserve 1 cup of the pasta water. Then, drain the pasta and set it aside. In a large skillet, heat 2 tablespoons of olive oil over medium heat. Once the oil is hot, add 1 finely chopped small onion. Sauté the onion for about 3 to 4 minutes until it softens. Next, add 2 minced garlic cloves and cook for another minute. The garlic should smell nice and fragrant. Now, stir in 1 cup of chopped sun-dried tomatoes. Cook these together for about 2 minutes. This step brings out rich flavors that make the dish special. Pour in 1 cup of heavy cream and let it come to a gentle simmer. Next, add 1/2 cup of grated Parmesan cheese. Stir well until the cheese melts. Add 1 teaspoon of dried basil and 1 teaspoon of dried oregano for extra flavor. Mix everything until it is smooth. If the sauce seems too thick, slowly add some reserved pasta water until you reach the right consistency. Now, add the drained pasta to the skillet and toss it well in the creamy sauce. Season with salt and pepper to taste. Serve hot, garnished with fresh basil leaves and more Parmesan if you like. For the full recipe, check the details provided above. To get that smooth and creamy sauce, start with heavy cream. It gives a rich flavor. When you add the cream, let it simmer gently. This helps it thicken. If your sauce is too thick, use reserved pasta water. Add a little at a time until it’s just right. You can make this dish even better by adding more flavors. Consider tossing in some fresh spinach or arugula. These greens add color and taste. You can also mix in cooked chicken or shrimp for protein. If you like spice, red pepper flakes work well too. For a tangy twist, add a splash of lemon juice. One mistake is cooking the pasta too long. It should be al dente, not mushy. Also, don’t rush the sauce. Let it simmer to develop flavor. Be careful not to add too much salt before tasting. The sun-dried tomatoes and cheese are already salty. Lastly, remember to toss the pasta in the sauce. This helps every bite stay coated and flavorful. For the full recipe, check out Creamy Sun-Dried Tomato Pasta. {{image_2}} You can easily make this dish vegetarian. Just skip any meat. Add more veggies like spinach or mushrooms. They cook down nicely and add extra flavor. You can also toss in some cherry tomatoes for a fresh burst. If you want more texture, add artichoke hearts or zucchini. Each option makes this pasta even more colorful and tasty. For a heartier meal, add protein. Grilled chicken pairs well with the creamy sauce. Simply slice the chicken and mix it in before serving. Shrimp also works great. Cook the shrimp in the skillet before adding the sun-dried tomatoes. This adds a nice seafood flavor. You can even use cooked sausage for a spicy kick. All these proteins make the pasta more filling. If you need a gluten-free option, use gluten-free pasta. There are many good brands available. They cook similarly to regular pasta. You can also try zucchini noodles, known as zoodles. They are light and refreshing. Just sauté them briefly to keep some crunch. This way, you can enjoy the creamy sun-dried tomato sauce without the gluten. For the full recipe, check out the Creamy Sun-Dried Tomato Pasta details above! To keep your creamy sun-dried tomato pasta fresh, store it in an airtight container. Let the pasta cool to room temperature before sealing it. This helps prevent moisture build-up inside the container. Place it in the fridge if you plan to eat it within three days. When you're ready to enjoy your pasta again, reheat it gently. You can use a skillet over low heat. Add a splash of water or cream to help loosen the sauce. Stir often, so it heats evenly. You can also microwave it in a bowl covered with a damp paper towel. This keeps the moisture in and warms it up nicely. Heat in 30-second intervals and stir in between. If you want to save leftovers for later, freezing is a great option. Place the cooled pasta in a freezer-safe container or bag. Squeeze out as much air as possible before sealing. This helps prevent freezer burn. It can last in the freezer for up to three months. To thaw, move it to the fridge overnight or use the microwave for a quicker option. When reheating, add a bit more cream to revive the sauce's creaminess. For the full recipe, check out the details above. Creamy Sun-Dried Tomato Pasta lasts about three to five days in the fridge. Store it in an airtight container. This keeps it fresh and safe to eat. Make sure to let it cool down before putting it in the fridge. When you are ready to eat, just reheat it in the microwave or on the stove. Add a little water or cream to help loosen the sauce if it thickens. Yes, you can use fresh tomatoes, but the flavor will change. Sun-dried tomatoes have a strong, rich taste. Fresh tomatoes are juicy and lighter in flavor. If you choose fresh tomatoes, try using a mix of cherry or grape tomatoes. Roast them beforehand to intensify their flavor. This step will help mimic that deep taste of sun-dried tomatoes. This pasta goes well with many dishes. Here are some ideas: - Grilled chicken or shrimp for added protein - A side salad with greens and a light dressing - Garlic bread for a crunchy, buttery side - Steamed vegetables like broccoli or asparagus for a healthy touch These sides balance the rich creaminess of the pasta and make your meal complete. You can find the Full Recipe for all the details you need to make this dish. In this post, we covered essential ingredients for Creamy Sun-Dried Tomato Pasta, cooking steps, and tips to avoid mistakes. I shared variations for dietary needs and proper storage methods. Remember, the key to great pasta is a creamy sauce and fresh flavors. Experiment with your favorite ingredients. Enjoy the process, and you will make a dish that shines every time!

Creamy Sun-Dried Tomato Pasta Simple and Speedy Meal

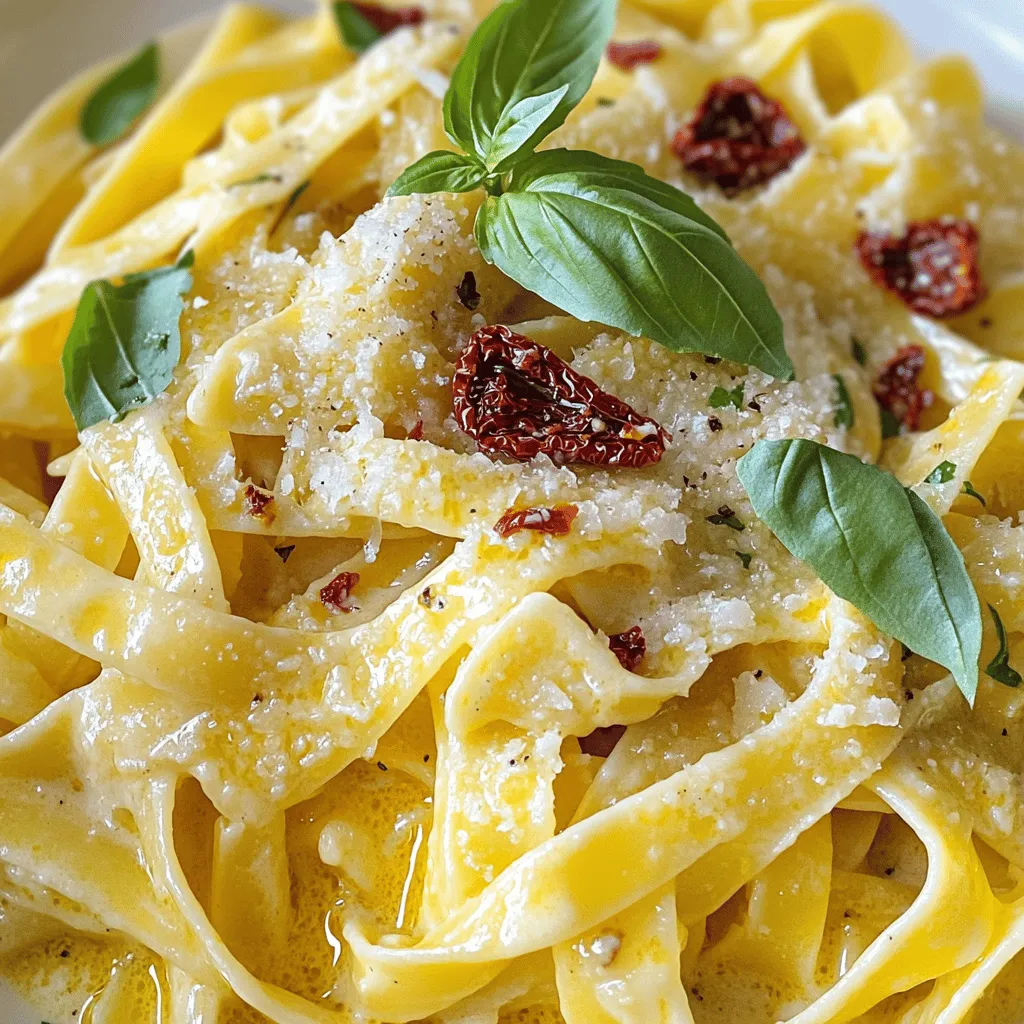
Are you ready for a delicious meal that takes hardly any time to prepare? My Creamy Sun-Dried Tomato Pasta is

- 1 cup full-fat Greek yogurt - 1 medium cucumber, grated and excess moisture squeezed out - 2 cloves garlic, minced - 1 tablespoon olive oil - 1 tablespoon fresh dill, finely chopped - 1 tablespoon lemon juice - Salt and pepper to taste When making tzatziki, the ingredients shine through. Full-fat Greek yogurt is key for a creamy base. It gives the sauce that rich texture. The cucumber adds freshness and crunch. Always grate the cucumber and squeeze out the moisture. This step keeps your tzatziki from becoming watery. Garlic is a must for flavor. Freshly minced garlic brings a punch that I adore. Olive oil adds richness and helps blend the flavors. Fresh dill gives a lovely herbal note. I always use fresh when possible. Lemon juice brightens the sauce and adds zing. Lastly, season with salt and pepper to enhance all these flavors. These ingredients come together to create a vibrant, fresh sauce. You can find the full recipe to guide you through the process. Enjoy making it! Start by grating the cucumber. Use a box grater for quick work. After grating, you must remove excess moisture. This step is crucial for a creamy tzatziki. Place the grated cucumber into a clean kitchen towel. Squeeze it tightly to eliminate as much water as possible. If you skip this, your tzatziki may become watery. In a mixing bowl, add 1 cup of full-fat Greek yogurt. This yogurt gives a rich and creamy base. Next, stir in the grated cucumber. Make sure it mixes well with the yogurt. Now, add 2 cloves of minced garlic for flavor. Garlic adds a nice kick to the sauce. Then, drizzle in 1 tablespoon of olive oil. Follow this with 1 tablespoon of fresh dill and 1 tablespoon of lemon juice. Stir everything together until well combined. This blend creates a fresh, vibrant flavor. Now, it’s time to season your tzatziki. Add salt and pepper to taste. Adjust it based on your preference. Once seasoned, cover the bowl and refrigerate for at least 30 minutes. This chilling time helps the flavors meld beautifully. After chilling, your tzatziki is ready to serve. Enjoy it with pita bread, veggie sticks, or grilled meats. For the full recipe, refer to the earlier section. To make great tzatziki, you must remove moisture from the cucumber. Too much water makes the sauce runny. Grate the cucumber, then squeeze it in a clean towel. This step is key for a thick, creamy texture. The fresher the cucumber, the better your sauce will be. You can boost the taste of tzatziki with extra herbs and spices. Dill is a classic choice. Try adding mint for a refreshing twist. A pinch of cumin gives a warm depth. You might also like a dash of paprika for color and flavor. Experiment to find your favorite mix! Tzatziki pairs well with many dishes. It’s perfect with grilled meats, like lamb or chicken. Use it as a dip for pita bread or veggie sticks. You can also spread it on sandwiches or wraps for a creamy touch. It adds a fresh flavor to any meal. For a fun twist, serve it in a rustic bowl, drizzled with olive oil. {{image_2}} You can easily make tzatziki sauce healthier. Just swap the full-fat yogurt for low-fat yogurt. This change cuts fat but keeps the creamy texture. You can also try plant-based yogurts. Look for options made from almond or coconut milk. These can give a different flavor and still taste great. Want to mix things up? Add different herbs or spices to your tzatziki. Mint adds a fresh taste. You can also try cumin for warmth. A hint of smoked paprika gives a nice twist. Each option changes the flavor and makes it unique. Experiment to find the blend you love most. Think about flavors from other cuisines to jazz up tzatziki. Try adding a splash of soy sauce for an Asian twist. You could also mix in some harissa for a North African kick. Each of these ideas gives tzatziki a new life and makes it exciting to eat. To keep your tzatziki sauce fresh, store it in an airtight container. This helps protect it from air and other smells in the fridge. Make sure to use a clean spoon each time you scoop it out. This avoids adding bacteria to your sauce. Always cover the container tightly. Tzatziki sauce stays good in the refrigerator for about 3 to 5 days. After this time, the flavors may start to fade, and the texture can change. If you see any signs of spoilage, like mold or unusual smells, it’s best to throw it away. Always check before you use it. Yes, you can freeze tzatziki sauce! However, it may change in texture after thawing. To freeze it, place the sauce in a freezer-safe container. Leave some space at the top for expansion. You can also freeze it in ice cube trays for easy portions. When you’re ready to use it, thaw it in the fridge overnight. Stir well before serving. For the best taste, try to use it within two months. For the full recipe, check out the Crisp & Creamy Classic Tzatziki Sauce. Tzatziki sauce is fresh and tasty. It comes from a mix of simple ingredients. Here’s what you need: - 1 cup full-fat Greek yogurt - 1 medium cucumber, grated and excess moisture squeezed out - 2 cloves garlic, minced - 1 tablespoon olive oil - 1 tablespoon fresh dill, finely chopped - 1 tablespoon lemon juice - Salt and pepper to taste Each ingredient adds a unique flavor. Greek yogurt gives it creaminess. Cucumber adds crunch and freshness. Garlic brings a nice zing. Olive oil adds richness, while dill and lemon juice brighten the taste. Tzatziki sauce stays good in the fridge for about 3 to 5 days. Make sure to store it in an airtight container. This keeps out air and other smells. If you see any changes in color or smell, it’s best to throw it away to stay safe. Yes, you can make tzatziki sauce ahead of time! It tastes even better after sitting for a while. I suggest making it at least 30 minutes before serving. This allows the flavors to mix well. You can also prepare it the day before for a party. Just keep it chilled in the fridge until you’re ready to serve. Tzatziki sauce goes great with many dishes. Here are some tasty ideas: - Grilled meats, like chicken and lamb - Pita bread or pita chips - Fresh veggies, like carrots and cucumbers - Gyros or wraps - Falafel Try it as a dip or a condiment. Its cool, fresh taste adds something special to any meal. For the full recipe, check out the earlier section! In this blog post, we explored the recipe for tzatziki sauce. We discussed the main and additional ingredients, providing step-by-step instructions. I shared tips for the best consistency and flavor. You discovered exciting variations and best storage practices. Tzatziki sauce is easy to make and a great addition to many meals. Try it with grilled foods, wraps, or as a dip. With a few simple tweaks, you can make it your own. Enjoy crafting this refreshing sauce!

Classic Tzatziki Sauce Fresh and Flavorful Recipe

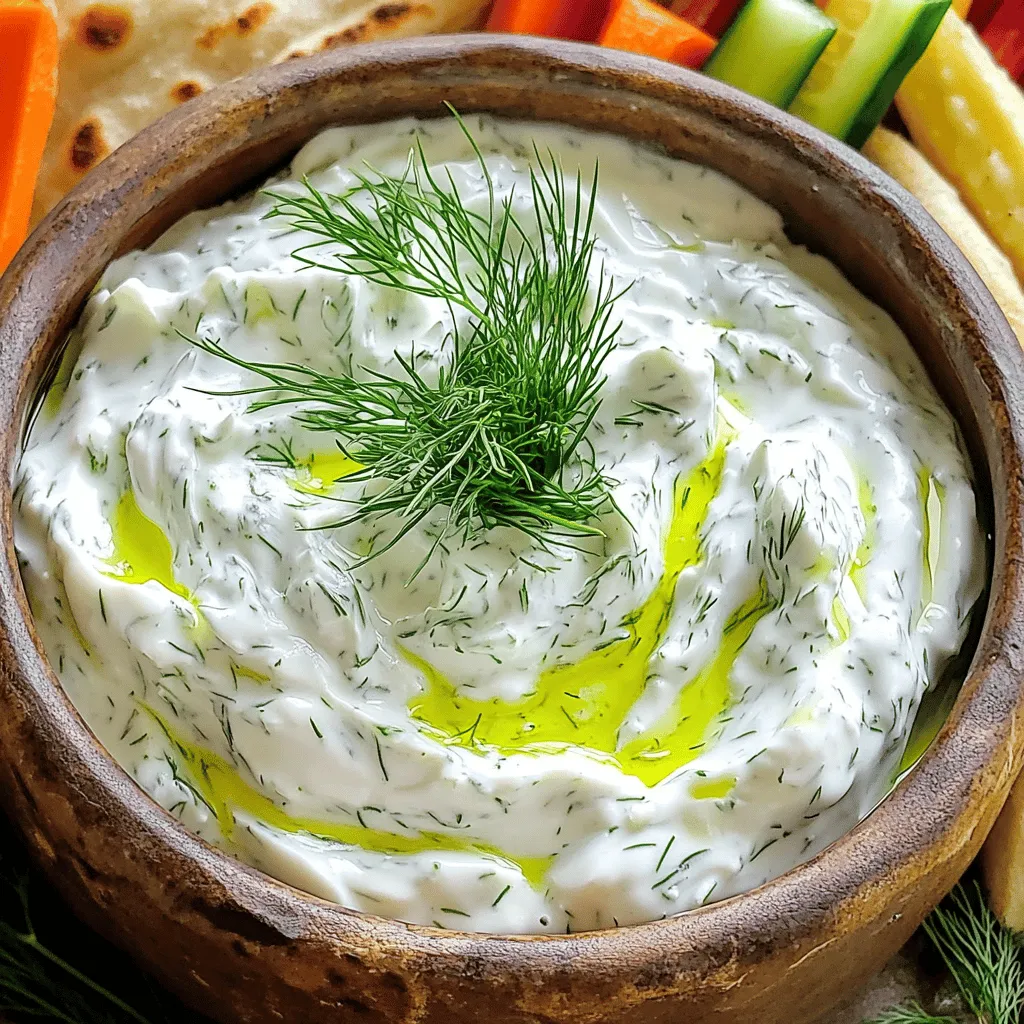
If you’re craving a fresh and flavorful dip, look no further than classic tzatziki sauce. This simple recipe combines creamy

- 2 cups cooked chicken breast, shredded - 1 cup black beans, drained and rinsed - 1 cup corn kernels (fresh or frozen) - 1 red bell pepper, diced - 1 jalapeño, seeds removed and finely chopped - 1 avocado, diced - ½ cup cherry tomatoes, halved - 1 cup romaine lettuce, chopped - ½ cup cilantro, chopped The main ingredients make this salad colorful and tasty. Chicken adds protein and flavor. Black beans offer fiber and a nice texture. Corn gives sweetness and crunch. Fresh vegetables like bell peppers, jalapeño, and avocado bring a burst of color and freshness. Cherry tomatoes and romaine lettuce keep things light and crisp. Cilantro adds a fresh herb taste that brightens the dish. - Juice of 2 limes - 3 tablespoons olive oil - 1 teaspoon cumin - 1 teaspoon chili powder - Salt and pepper to taste The dressing is simple yet bold. Lime juice adds a zesty kick. Olive oil gives smoothness and richness. Cumin and chili powder bring warmth and depth. Salt and pepper help enhance all the flavors. This dressing ties the salad together and keeps it delicious. - Crushed tortilla chips - Fresh herbs (Cilantro) Garnishes add a fun touch to your salad. Crushed tortilla chips give a nice crunch. Fresh cilantro on top makes it look pretty and adds flavor. These little extras make each bite even better. For the full recipe, check out the detailed instructions to make this salad shine! 1. Cooking and shredding chicken First, cook your chicken. You can grill, bake, or boil it. I prefer boiling for easy shredding. Cook it until the center reaches 165°F. Let it cool, then shred it with two forks. This gives you nice, tender pieces for the salad. 2. Preparing beans and corn For the beans, use canned black beans. Drain and rinse them well. This removes excess salt and keeps the salad fresh. If you're using frozen corn, cook it according to package directions. Fresh corn works too! Just cut it off the cob. 1. Mixing the salad components In a large bowl, combine the shredded chicken, black beans, corn, diced red bell pepper, chopped jalapeño, diced avocado, halved cherry tomatoes, and chopped romaine lettuce. This mix creates a colorful, tasty base. 2. Whisking together the dressing In a small bowl, whisk the lime juice, olive oil, cumin, chili powder, salt, and pepper. Mix until it’s smooth. This dressing adds a zesty kick. Once mixed, pour it over the salad and gently toss everything together. Finally, fold in the chopped cilantro for extra freshness. 1. Serving presentation ideas Serve the salad in bowls or on plates. For a fun touch, sprinkle crushed tortilla chips on top. This adds a nice crunch and makes it look appealing. 2. Portioning for 4 servings This recipe makes four servings. Use a measuring cup to portion out equal amounts. This way, everyone gets a nice helping of all the flavors. Enjoy your delicious Southwest Chicken Salad! For the full recipe, check out the details above. To cook chicken well, use boneless, skinless breasts. Season them with salt, pepper, and a sprinkle of cumin. Bake at 375°F for about 25 to 30 minutes. This keeps the chicken juicy and tender. Let it cool before shredding. When seasoning, add spices gradually. Start with a little cumin and chili powder. Taste as you go. This way, you control the flavor. Remember, you can always add more, but you can't take it out! For extra flavor, consider fresh herbs like cilantro or parsley. They add brightness to the dish. You can also try spices like smoked paprika or garlic powder. Both can give your salad a nice kick. Using fresh ingredients is key. Fresh corn adds sweetness. Fresh peppers bring crunch. Canned beans work well too, but rinse them to remove excess salt. You can make this salad ahead of time. Just store it in the fridge for up to two days. Keep the dressing separate to avoid sogginess. Mix it in just before serving for fresh taste. For leftovers, use an airtight container. This keeps them safe and fresh. You can enjoy your salad for lunch the next day, but try to eat it within 24 hours for the best flavor. Ready to try making your own delicious Southwest Chicken Salad? Check out the Full Recipe for all the details! {{image_2}} You can switch up the protein in your Southwest Chicken Salad. Grilled shrimp adds a nice touch. The shrimp gets a smoky flavor when grilled. You can also use steak for a hearty option. Just grill it, slice it up, and toss it in. If you want a vegetarian dish, try tofu. Firm tofu works best. Just press it, cube it, and sauté until golden. This gives it a great texture. Want to change the flavor a bit? Add mango or pineapple for a sweet twist. These fruits brighten the dish and add a fun texture. You can also try different dressings. A creamy avocado dressing can bring richness. Or, a zesty lime vinaigrette can kick up the flavor. Experiment with what you enjoy! If you need gluten-free options, use corn tortillas instead of chips. This keeps the crunch but makes it safe for gluten-free diets. For low-carb changes, skip the corn and chips. You can add more veggies instead. This will keep the salad filling without the extra carbs. Enjoy the flavors while making it fit your needs! To keep your Southwest Chicken Salad fresh, store it in an airtight container. This helps prevent air and moisture from spoiling your food. Place it in the fridge right after serving. Your salad should stay good for about 3 to 4 days. Just check for any signs of spoilage before eating. Can Southwest Chicken Salad be frozen? Yes, you can freeze it, but some ingredients may change. The veggies and avocado might not taste great after thawing. For freezing, place the salad in a freezer-safe container. It will last up to 3 months. To thaw, move it to the fridge overnight before serving. For reheating leftover chicken, the best method is to use the microwave. Heat it in short bursts of 30 seconds. Stir it between intervals to ensure even heating. You can also use a skillet on low heat. Just add a splash of water to keep it moist. Don't forget to check the temperature before serving! Can I use canned beans? Yes, you can use canned beans in your salad. Just make sure to drain and rinse them. This helps reduce the salt and any added preservatives. Canned black beans are a great option. They save time and add flavor. What type of chicken is best for this salad? Cooked chicken breast works best for this salad. It has a mild taste that blends well with the other ingredients. You can use leftover chicken or rotisserie chicken for ease. Shredded chicken helps mix in better with the salad. How healthy is Southwest Chicken Salad? Southwest Chicken Salad is quite healthy. It has lean protein from chicken, fiber from beans, and vitamins from fresh veggies. This salad offers a balanced meal, packed with nutrients. Calorie count and serving size concerns One serving of this salad has around 300-400 calories. This depends on how much dressing you use. A good serving size is about 2 cups. Adjust portions based on your diet needs. What can I use instead of lime juice? If you don’t have lime juice, you can use lemon juice. It adds a nice tang. Apple cider vinegar is another good choice for a different flavor. Just remember to adjust the amount to taste. Options for a dairy-free dressing For a dairy-free dressing, try using avocado or tahini. Both add creaminess without dairy. You can also mix olive oil with vinegar and herbs for a light dressing. Just ensure it fits your taste preferences. In this article, we explored making a delicious Southwest Chicken Salad. We covered ingredients like chicken, black beans, and fresh veggies, along with dressings to enhance flavor. Preparation steps are easy, and I shared tips for the best taste. We also discussed variations for proteins and dietary needs. Finally, proper storage advice ensures freshness. Enjoy your tasty salad while knowing it can adapt to your taste! It’s a great meal choice that’s quick to prepare and full of flavor.

Savory Southwest Chicken Salad Easy and Flavorful Dish

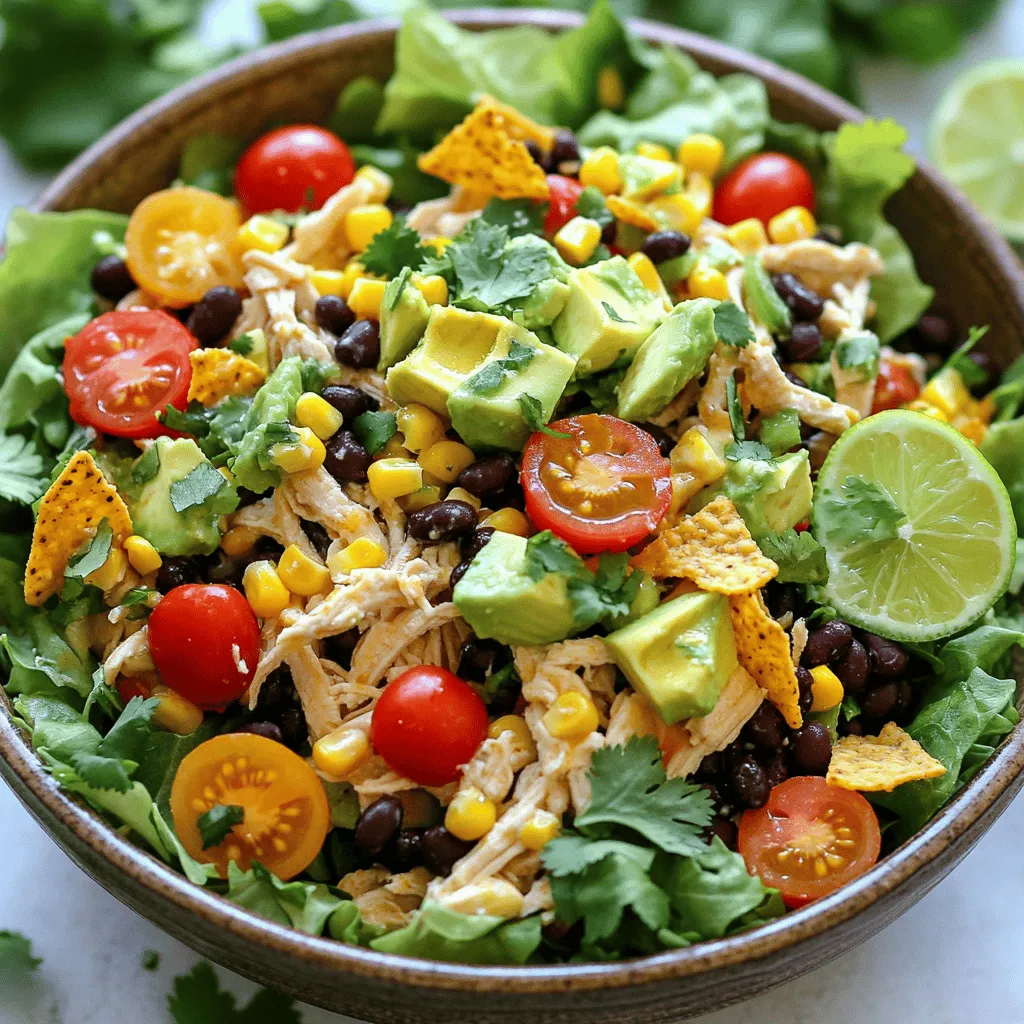
Looking for a tasty meal that’s quick and easy to make? You’ve found it! This Savory Southwest Chicken Salad is

To make lemon blueberry pancakes, you need these key ingredients: - 1 cup all-purpose flour - 2 tablespoons sugar - 1 tablespoon baking powder - 1/2 teaspoon salt - 1 cup milk - 1 large egg - 2 tablespoons unsalted butter, melted - Zest of 1 lemon - 1/4 cup fresh lemon juice - 3/4 cup fresh blueberries (or frozen, thawed) These ingredients work together to create a fluffy pancake. The lemon zest and juice add a bright flavor that pairs well with the sweet blueberries. For a special touch, consider these optional ingredients: - Powdered sugar - Extra blueberries Dusting the pancakes with powdered sugar makes them look fancy. Adding more blueberries on top gives a burst of flavor. You can easily swap some ingredients if needed: - Use whole wheat flour instead of all-purpose flour for a nutty taste. - Replace milk with almond milk or oat milk for a dairy-free option. - For a lighter pancake, use egg whites instead of a whole egg. These substitutions keep the flavor high while fitting different diets or preferences. Feel free to experiment and find what you like best in this lemon blueberry pancake recipe! To make lemon blueberry pancakes, start with a large bowl. Combine the flour, sugar, baking powder, and salt. Whisk these dry ingredients until they blend well. Then, grab another bowl for the wet mix. Pour in the milk, add the egg, melted butter, lemon zest, and lemon juice. Stir this mixture until it is smooth. Next, pour the wet mix into the dry mix. Stir gently. It’s okay if there are some lumps; don’t overmix! Now, fold in the blueberries carefully. You want them spread evenly in the batter. Heat a non-stick skillet over medium heat. If needed, grease it with a little butter or oil. Use a ladle to pour about 1/4 cup of batter for each pancake. Cook until you see bubbles on the surface, about 2-3 minutes. Then, flip the pancakes and cook for another 2-3 minutes until golden brown. Repeat this with the rest of the batter. To make perfect pancakes, use fresh ingredients. Fresh blueberries and lemon give the best taste. Make sure not to overmix your batter. A few lumps are fine and help keep pancakes fluffy. Keep your skillet at medium heat. Too high heat can burn the pancakes. If you're unsure, do a test pancake first. If it cooks too fast, lower the heat. Avoid overmixing the batter. This leads to flat, tough pancakes. Also, don’t skip the resting time. Letting the batter sit for a few minutes helps the pancakes rise better. Make sure your skillet is at the right temperature. If it’s too hot, the outside cooks too fast while the inside stays raw. Lastly, use enough blueberries. They add flavor and make your pancakes look great! For the complete recipe, check out the Full Recipe section. To make fluffier pancakes, use fresh baking powder. This means your pancakes will rise well. Mix the dry and wet ingredients separately first. Then, combine them gently. Overmixing makes pancakes dense. Leave some lumps in the batter; that's okay! Adding a bit more milk can also help. For the best flavor, use fresh lemons. The zest brings a strong lemon taste. You can add a pinch of vanilla extract to the batter for depth. If you want more blueberry flavor, add extra blueberries. Mixing in a bit of lemon zest with the blueberries boosts the taste. Serve with maple syrup or honey to enhance sweetness. You will need a few simple tools. A large mixing bowl works well for combining ingredients. A whisk is great for mixing the batter. Use a ladle for pouring batter onto the skillet. A non-stick skillet or griddle is best for cooking. A spatula helps flip the pancakes easily. Don't forget a plate for serving! For the full recipe, check out the details above. {{image_2}} You can mix up the flavors in your lemon blueberry pancakes. Try using fresh strawberries, raspberries, or blackberries. Each fruit adds a unique taste. For a tropical twist, add diced mango or pineapple. These fruits pair well with lemon. They create a fun and fruity breakfast. You can also combine different fruits for a mixed fruit pancake. If you need a gluten-free option, swap out the all-purpose flour for a gluten-free blend. Many brands offer great substitutes that work well in pancakes. Make sure your baking powder is gluten-free, too. You can also add a tablespoon of cornstarch to help with texture. This keeps the pancakes light and fluffy. To make vegan lemon blueberry pancakes, replace the egg with a flax egg. Mix one tablespoon of ground flaxseed with three tablespoons of water. Let it sit for a few minutes to thicken. Substitute the milk with almond milk or soy milk. For butter, use coconut oil or a vegan butter alternative. This way, you can enjoy the same delicious lemon blueberry pancakes without any animal products. For the full recipe, check out the details above. To keep leftover pancakes fresh, stack them in an airtight container. Separate layers with parchment paper to prevent sticking. Store them in the fridge for up to three days. This method keeps them tasty and ready for a quick meal. Reheat pancakes in the microwave for about 20-30 seconds. If you want them crispy, use a skillet over medium heat. Heat each side for about one minute. This adds a nice texture while warming them up. You can freeze pancakes for easy meals. Place cooled pancakes in a single layer on a baking sheet. Freeze until solid, then transfer them to a freezer bag. They will last for about two months. When you want to eat them, just reheat as mentioned above. Enjoy your lemon blueberry pancakes any time! For the full recipe, check the earlier section. To make lemon blueberry pancakes from scratch, gather your ingredients first. You will need flour, sugar, baking powder, salt, milk, an egg, melted butter, lemon zest, lemon juice, and blueberries. Start by mixing the dry ingredients in one bowl. In another bowl, whisk together the wet ingredients. Combine both bowls gently; lumps are okay. Then, fold in the blueberries. Cook on a hot skillet for about 2-3 minutes on each side. You can find the full recipe in the article above. Yes, you can use frozen blueberries for this recipe. Just make sure to thaw them first. Thawed blueberries mix well into the batter. They add a sweet burst of flavor just like fresh ones. However, they may bleed color into the batter, creating a lovely blue hue. The best way to serve lemon blueberry pancakes is warm. You can dust them with powdered sugar for a nice touch. Adding extra blueberries on top makes them even better. Serve with maple syrup or whipped cream for added sweetness. Enjoy them with your favorite drink for a perfect breakfast! In this post, we covered the essential ingredients for delicious pancakes and added serving options. We shared step-by-step cooking tips and highlighted common mistakes to avoid. You learned ways to enhance your pancakes and explore different variations, including gluten-free and vegan options. Finally, we offered storage tips for leftovers and answered common questions. Now, you have all the tools needed for making great pancakes. Enjoy cooking and eating them!

Lemon Blueberry Pancakes Delicious and Easy Recipe

If you’re craving a sweet and zesty breakfast, you need to try my Lemon Blueberry Pancakes! They’re light, fluffy, and

Older posts
Newer posts
← Previous Page1 … Page58 Page59 Page60 … Page82 Next →

dsad

© 2026 Recipes Pursuit • Built with GeneratePress

Our Policies

  • Copyright Policy
  • Cookie Policy
  • GDPR Policy
  • Privacy Policy
  • Disclaimer
  • Terms Of Use

More Information

  • Home
  • About
  • Contact
  • Appetizers
  • Dessert
  • Dinner
  • Drinks
©2026, Recipes Pursuit About Back To Top