Skip to content
DisclaimerTerms Of UseGDPR PolicyCookie Policy

Recipes Pursuit

  • Home
  • Drinks
  • Appetizers
  • Dinner
  • Dessert
  • About
  • Contact
  • Privacy Policy
DisclaimerTerms Of UseGDPR PolicyCookie Policy

NO-ING-IMG

To make the Easy Veggie Buddha Bowl, gather these simple ingredients: - 1 cup quinoa, rinsed - 2 cups vegetable broth or water - 1 cup cherry tomatoes, halved - 1 medium cucumber, diced - 1 red bell pepper, diced - 1 cup roasted sweet potatoes (about 1 medium sweet potato) - 1 avocado, sliced - 1 cup kale or spinach, chopped - 1/4 cup hummus - 2 tablespoons tahini - Juice of 1 lemon - Salt and pepper to taste - 2 tablespoons olive oil Feel free to add more flavors or textures with these options: - Sesame seeds - Microgreens - Fresh herbs You can mix and match these ingredients to fit your taste. Adding nuts or seeds gives a nice crunch. You can also try different greens like arugula or Swiss chard. This Buddha bowl is not only tasty but also healthy. Here is a basic breakdown per serving: - Calories: 450 - Protein: 12g - Carbohydrates: 55g - Fiber: 12g - Fat: 20g This dish is full of nutrients. Quinoa gives protein and fiber. Sweet potatoes add vitamins and minerals. Enjoy making this colorful and filling meal! For the full recipe, check the linked details. To cook the quinoa, start by rinsing 1 cup of quinoa under cold water. This step helps remove any bitter taste. Next, in a medium pot, mix the rinsed quinoa with 2 cups of vegetable broth or water. Bring this mixture to a boil over medium-high heat. Once it boils, reduce the heat to low and cover the pot. Let it simmer for about 15 minutes until the quinoa is fluffy and all the liquid is gone. After cooking, remove it from heat and let it sit for a few minutes. Finally, fluff it with a fork to get it nice and airy. Preheat your oven to 400°F (200°C). Take 1 medium sweet potato and peel it. Cut the sweet potato into small cubes. Then, toss the cubes with 2 tablespoons of olive oil, salt, and pepper in a bowl. Spread the sweet potato cubes on a baking sheet. Roast them in the oven for about 25 to 30 minutes. Make sure to flip them halfway through for even cooking. They should be golden and fork-tender when done. Grab a large serving bowl to assemble your Buddha bowl. Start by adding the cooked quinoa as the base. On one side, layer the chopped kale or spinach. Next, arrange sections of cherry tomatoes, diced cucumber, roasted sweet potatoes, and avocado slices on top. This colorful display not only looks good but also adds diverse flavors. For the dressing, whisk together tahini, lemon juice, a pinch of salt, and a bit of water to thin it out. Drizzle this over your bowl. Finally, add dollops of hummus on the side. You can sprinkle optional garnishes like sesame seeds or fresh herbs for extra flair. Enjoy your tasty creation! To cook quinoa, rinse it well first. This removes the bitter coating. Use a ratio of 1 cup quinoa to 2 cups vegetable broth or water. Bring it to a boil over medium-high heat. Then reduce the heat and cover it. Let it simmer for about 15 minutes. Once done, fluff it with a fork. This gives you light and fluffy quinoa. You can choose a mix of colors and flavors for your bowl. Great options include: - Cherry tomatoes - Cucumbers - Red bell peppers - Roasted sweet potatoes - Kale or spinach These veggies add crunch and freshness. Feel free to swap in your favorites. Just make sure they are bright and nutritious. Dressing can make or break your Buddha bowl. A simple tahini dressing is my go-to. Just mix tahini, lemon juice, salt, and a splash of water. Whisk until smooth. If you want a change, try these ideas: - Use yogurt for creaminess. - Add garlic for extra flavor. - Mix in herbs for freshness. Make sure to drizzle it over the bowl before serving. This adds flavor and ties it all together. For the full recipe, check the details I shared earlier. {{image_2}} You can add protein to your Buddha bowl easily. Tofu works great. Just cube and sauté it. Chickpeas are another good choice. Use canned chickpeas for quick prep. Both options add healthy protein and flavor. You can also try tempeh or lentils for variety. These add texture and make your meal filling. While quinoa is tasty, you can switch grains. Brown rice is a classic option. It’s hearty and adds a nice chew. Farro gives a nutty flavor and chewy texture. You might also enjoy barley or bulgur for something unique. Each grain changes the bowl’s taste and feel. Experiment to find your favorite! Toppings can elevate your Buddha bowl. Consider adding seeds like pumpkin or sunflower seeds. They add crunch and nutrition. Nuts like almonds or walnuts also work well. You can sprinkle them on top for extra flavor. Fresh herbs like cilantro or parsley can brighten the dish, too. Don’t forget avocado for creaminess, which pairs perfectly with the tahini dressing. Feel free to explore these variations and make the bowl your own. For a complete recipe, check the Full Recipe link. To store leftovers, let your Buddha bowl cool first. Place it in an airtight container. You can keep it in the fridge for up to three days. If you have leftover dressing, store it separately in a small jar. This keeps everything fresh and tasty. When ready to eat, reheat the quinoa and veggies gently. Use the microwave for quick warming. Heat in short bursts of 30 seconds to avoid overcooking. You can warm up the sweet potatoes in the oven for a crispy texture. Add a splash of water to keep it moist. Meal prep makes life easier! Cook a big batch of quinoa and roasted sweet potatoes. Store them in separate containers. You can mix and match veggies based on what you like. This way, your Buddha bowl can stay fresh all week. Just add the dressing before serving for the best taste. You can find the Full Recipe linked above for more detailed steps. A Buddha bowl is a colorful dish with various healthy foods. It includes grains, veggies, and proteins. The name comes from the bowls' round shape, resembling a Buddha's belly. You can mix and match your favorite ingredients for a fun meal. Yes, you can prepare a Buddha bowl ahead of time. Cook the grains and roast the veggies first. Store them in separate containers. When ready to eat, just assemble and add your dressing. This makes lunch or dinner quick and easy. To make this recipe vegan, skip any animal products. Hummus and tahini are already vegan. For gluten-free, use quinoa as your base. Quinoa is naturally gluten-free. Always check labels on store-bought products for hidden gluten. You can try many dressings for your Buddha bowl. Some good options include: - Balsamic vinaigrette - Lemon-tahini dressing - Avocado dressing - Spicy peanut sauce - Simple olive oil and vinegar These will add different flavors to your dish. For the complete cooking instructions, check out the [Full Recipe] for the Easy Veggie Buddha Bowl. You learned how to make a tasty Buddha Bowl. We covered required and optional ingredients, ensuring you have the right base. You now know how to cook quinoa and prepare roasted sweet potatoes. With my tips, you can customize your bowl with different veggies, proteins, and dressings. Storing leftovers and meal prep can keep your meals fresh. Embrace this healthy option for any meal or snack. Enjoy creating your perfect Buddha Bowl!

Easy Veggie Buddha Bowl Healthy and Tasty Recipe

Looking for a healthy meal that’s both delicious and easy to make? You’ve found it! This Easy Veggie Buddha Bowl

- 4 medium sweet potatoes, peeled and cut into 1-inch cubes - 3 tablespoons pure maple syrup - 2 tablespoons olive oil - 1 teaspoon cinnamon - ½ teaspoon nutmeg - Salt and pepper to taste - ¼ cup chopped pecans (optional) - Fresh thyme leaves for garnish You can change the sweetener if you want. Honey or agave syrup works well. For the garnish, try different nuts like walnuts or almonds. They add nice crunch too. Sweet potatoes are rich in vitamins A and C. They also have potassium, which is great for your heart. Maple syrup provides antioxidants, helping to fight off free radicals. Adding pecans boosts healthy fats and protein, making this dish not just tasty but also nutritious. Start by prepping the sweet potatoes. First, peel them and cut them into 1-inch cubes. This size is key. Even cubing helps the sweet potatoes cook evenly. If some pieces are big and others are small, they won't cook at the same rate. Next, mix the sweet potatoes with olive oil and maple syrup. Add cinnamon, nutmeg, salt, and pepper. Toss everything together until the sweet potatoes are well-coated. This mixture gives them their sweet, warm flavor. Now, preheat your oven to 400°F (200°C). This step is important for the right texture. If the oven isn’t hot enough, the sweet potatoes may turn mushy. Spread the sweet potato mix on a baking sheet lined with parchment paper. Make sure they are in a single layer. This allows them to roast evenly. After about 15 minutes, stir the sweet potatoes. This helps them brown all over. After about 25 to 30 minutes, check if they are golden brown and tender. They should feel soft when pierced with a fork. In the last 5 minutes, sprinkle chopped pecans on top for crunch. Once they are done, take them out of the oven and let them cool slightly. Garnish with fresh thyme leaves for a pop of color and flavor. These final touches make your dish look and taste great. For the full recipe, check the detailed cooking instructions above. - Overcooking or undercooking sweet potatoes: This can ruin the dish. Aim for a tender inside and a caramelized outside. Check them a few minutes before the timer goes off. A fork should pierce easily but not mushy. - Skipping the stirring step during roasting: Stirring halfway through ensures even cooking. It helps all sides get that lovely caramelization. Don’t skip this step! - Adding spices like paprika or cayenne for heat: If you like a kick, sprinkle in some paprika or cayenne. This brings out sweet potatoes’ natural sweetness and adds depth. Just a pinch can change the dish. - Using flavored oils for an extra kick: Swap regular olive oil for garlic or herb-infused oil. This adds a layer of flavor. It’s an easy boost that makes a big difference. - Pairing with meats or as a vegetarian dish: Maple roasted sweet potatoes pair well with pork, chicken, or beef. They also shine on their own. Serve them as a vegetarian side, and they will impress everyone. - Ideal occasions for this recipe: This dish suits any fall gathering. Think family dinners, Thanksgiving, or holiday feasts. It’s colorful and festive, making it a perfect addition to your table. For the [Full Recipe], click here. {{image_2}} You can change this recipe with seasonal ingredients. For example, add Brussels sprouts. They pair nicely with sweet potatoes. Just chop them in half and mix them in before roasting. You can also adjust spices to fit each season. In fall, add more cinnamon and nutmeg. In spring, try lighter spices like lemon zest. If you follow a vegan diet, this recipe is easy to adapt. The maple syrup and olive oil keep it plant-based. For a gluten-free option, skip any toppings that may contain gluten. Use nuts or seeds as a topping for crunch. They add protein and healthy fats. You can spice things up with international flavors. Try adding cumin or smoked paprika for a twist. You can make a sweet potato casserole by mixing in marshmallows or a crunchy topping. Just layer cooked sweet potatoes with your favorite ingredients. This way, you create a new dish from a classic recipe. For the full recipe, check the detailed instructions above. To keep your maple roasted sweet potatoes fresh, store them in an airtight container. This helps lock in flavor and moisture. Place the container in the fridge. Leftovers will last for about 3 to 5 days. Make sure to let them cool completely before sealing. This keeps them from getting soggy. When reheating, the oven is best. Preheat it to 350°F (175°C) and place the sweet potatoes on a baking sheet. Bake for about 15 minutes or until heated through. This method keeps them crispy. If you use a microwave, heat in short bursts. Stir in between to help them warm evenly. Microwaving can make them soft, so I prefer the oven. Yes, you can freeze maple roasted sweet potatoes! First, let them cool completely. Spread them in a single layer on a baking sheet. Freeze for a few hours until they are firm. Then, transfer them to a freezer-safe bag. This way, they won’t stick together. When you're ready to eat, thaw them overnight in the fridge. Reheat them in the oven for the best texture. Roasting sweet potatoes takes about 25 to 30 minutes at 400°F (200°C). The time may change based on the size of the cubes. Smaller pieces cook faster, while larger ones need more time. Make sure to stir them halfway through. This helps them cook evenly and get that nice golden color. Yes, you can prep these sweet potatoes in advance. Just mix everything and store it in the fridge. I recommend roasting them fresh for the best taste. If you have leftovers, reheat them in the oven. This keeps them crispy and delicious. These sweet potatoes pair well with many dishes. Try serving them with grilled chicken or pork. They also go great with a fresh salad or steamed green beans. For drinks, apple cider or a light white wine complements the flavors nicely. You can find the detailed full recipe for Maple Roasted Sweet Potatoes [here](#). Maple roasted sweet potatoes are a tasty and healthy dish you can enjoy anytime. We covered the ingredients, preparation, and roasting techniques to make them perfect. Remember to avoid common mistakes for the best flavors. You can also explore variations to fit your diet or seasonal tastes. Don't forget to store leftovers properly and reheat them to keep that crispiness. This recipe is not just a side; it’s a versatile dish for many occasions. Enjoy making and tasting this delightful dish!

Maple Roasted Sweet Potatoes Flavorful Autumn Side

Fall is here, and it’s time to enjoy the rich flavors of the season! Maple roasted sweet potatoes make a

- 1 can (15 oz) chickpeas, drained and rinsed - 2 tablespoons olive oil - 1 teaspoon smoked paprika - 1/2 teaspoon garlic powder - 1/2 teaspoon cumin - 1/2 teaspoon sea salt - 1/4 teaspoon black pepper - 1/4 teaspoon cayenne pepper (optional) - Fresh herbs for garnish (like parsley or cilantro) - Additional seasoning ideas To make crunchy roasted chickpeas, you start with basic ingredients. I always use one can of chickpeas. Make sure to drain and rinse them well. This helps remove excess salt. Next, you need olive oil. It adds flavor and helps crisp the chickpeas. Smoked paprika is key for that rich, smoky taste. You can also play with seasoning. Garlic powder, cumin, sea salt, black pepper, and cayenne pepper work great. The cayenne adds heat if you like a spicy kick. When it comes to garnishes, fresh herbs like parsley or cilantro add color and flavor. You can even experiment with other spices. Think of your favorite flavors and add them in. For the full recipe, follow the steps to create this tasty snack. - Preheat your oven to 400°F (200°C). - Line a baking sheet with parchment paper. - Drain and rinse one can of chickpeas. - Dry the chickpeas thoroughly with a towel. - This step is key to making them crunchy. - In a large bowl, add the dried chickpeas. - Pour in 2 tablespoons of olive oil. - Toss the chickpeas until they are well coated. - Next, add 1 teaspoon of smoked paprika. - Include 1/2 teaspoon garlic powder and 1/2 teaspoon cumin. - Add 1/2 teaspoon sea salt, 1/4 teaspoon black pepper, and optional cayenne. - Mix until the spices are evenly distributed. - Spread the seasoned chickpeas in a single layer on the baking sheet. - Place them in the preheated oven. - Roast for 30-35 minutes, shaking the pan halfway through. - Look for a golden brown color and crunchiness. - Once they are done, remove them and let them cool. - They will become even crunchier as they cool down. - You can garnish with fresh herbs if you like. Check out the Full Recipe for more details on making crunchy roasted chickpeas. To get that perfect crunch, start by drying your chickpeas well. After rinsing, use a clean towel to absorb excess moisture. This step is key for crispiness. Aim for a roasting temperature of 400°F (200°C). Roast them for 30 to 35 minutes, shaking the pan halfway through. This ensures even cooking and browning. Chickpeas love bold flavors. Try pairing them with smoked paprika, garlic powder, and cumin for a savory kick. If you want heat, add cayenne pepper. Adjust spice levels by adding more or less according to your taste. You can also switch it up with herbs or spices you enjoy, like curry powder or Italian seasoning. Crunchy roasted chickpeas are versatile. Enjoy them as a snack straight from the bowl. Sprinkle them over salads for added crunch. You can also mix them into soups for texture. Try using them in your favorite recipes, like grain bowls or wraps, for a tasty twist. For full details on how to make this delicious snack, check out the Full Recipe. {{image_2}} Chickpeas pack a punch in nutrition. They offer about 15 grams of protein per cup. This makes them a great choice for those looking to boost their protein intake. They also contain about 12 grams of dietary fiber. Fiber helps keep your digestive system happy. Chickpeas are rich in vitamins and minerals too. They provide iron, magnesium, and folate. Iron is key for energy, while magnesium supports muscle and nerve function. Folate is important for cell growth and metabolism. These nutrients make chickpeas a smart snack choice. Snacking on chickpeas has many benefits. They can help you feel full. This can reduce the urge to snack on less healthy foods. Their high fiber content aids digestion and keeps your gut healthy. Eating chickpeas regularly can lower cholesterol levels. This helps keep your heart in good shape. Chickpeas fit well in a balanced diet. They can replace higher-calorie snacks. Try them instead of chips or candy. You can add them to salads or soups for extra nutrition. They help you stay energized throughout the day. While chickpeas are mostly safe, be mindful of seasonings. Some spices may cause allergies. For example, garlic can trigger reactions in some people. Check labels if you buy pre-made seasonings. Chickpeas are vegan and gluten-free. This makes them suitable for many diets. You can enjoy them without worry if you have dietary restrictions. They are a versatile ingredient that anyone can use. Enjoy them in various ways with peace of mind. You can make crunchy roasted chickpeas sweet or savory. For a sweet twist, try adding cinnamon and a sprinkle of brown sugar. This gives a nice caramelized flavor. For savory options, explore spices like curry powder or Italian herbs. You can even mix in some chili powder for heat. Global seasoning ideas can bring new tastes to your chickpeas. Use za’atar for a Middle Eastern flair or garam masala for an Indian touch. Each spice blend adds a unique flavor, making your snack exciting. For a faster and crispier snack, use an air fryer. Set it to 400°F (200°C) and cook for about 15-20 minutes. Shake the basket halfway through for even crunch. The air fryer gives you a delicious result in less time. If you prefer the stovetop, try pan-roasting. Heat a pan over medium heat, then add the seasoned chickpeas. Cook them for about 10-15 minutes, stirring often. This method creates a nice crunch, but be careful not to burn them. If you want a quick snack, there are great brands out there. Look for brands like Biena or The Good Bean. They offer tasty, crunchy roasted chickpeas in various flavors. You can find them in grocery stores or online. You can buy crunchy roasted chickpeas at many health food stores or supermarkets. Check the snack aisle to discover different options. You might find some unique flavors that you love. For the full recipe, check out the Crunchy Roasted Chickpeas section above! To keep your roasted chickpeas crunchy, store them in an airtight container. You can use a glass jar or a plastic container with a good seal. Place the container in a cool, dry spot. Avoid storing them in the fridge, as moisture can make them soft. If you have a lot left, consider freezing them. Just remember to re-crisp them in the oven before eating. Yes, you can use dried chickpeas, but they require more work. First, soak the dried chickpeas overnight. Then, cook them until tender. This can take 1-2 hours. Once cooked, drain and dry them well before roasting. Using dried chickpeas gives you control over texture and flavor, but it does take more time. Crunchy roasted chickpeas are great on their own, but they also pair well with many dishes. Here are a few ideas: - Salads: Toss them on top for added crunch. - Soups: Use them as a garnish for your favorite soup. - Dips: Serve with hummus or guacamole for a fun snack. - Trail Mix: Mix them with nuts and dried fruit for a healthy treat. - Wraps: Add them to wraps for extra texture. You can also use them in recipes like grain bowls or as toppings for baked potatoes. For the full recipe, check out the Crunchy Roasted Chickpeas section above. This article covered the essential ingredients and methods to make roasted chickpeas. We explored tips for getting the perfect crunch and suggested various flavors and serving ideas. Remember, chickpeas offer great health benefits, including protein and fiber. You can easily adjust flavors to suit your taste. Try different methods, like the air fryer, for more options. Use this guide to enjoy tasty, crunchy snacks that boost your diet. Get creative with flavors and have fun in the kitchen!

Crunchy Roasted Chickpeas Tasty Snack Ideas

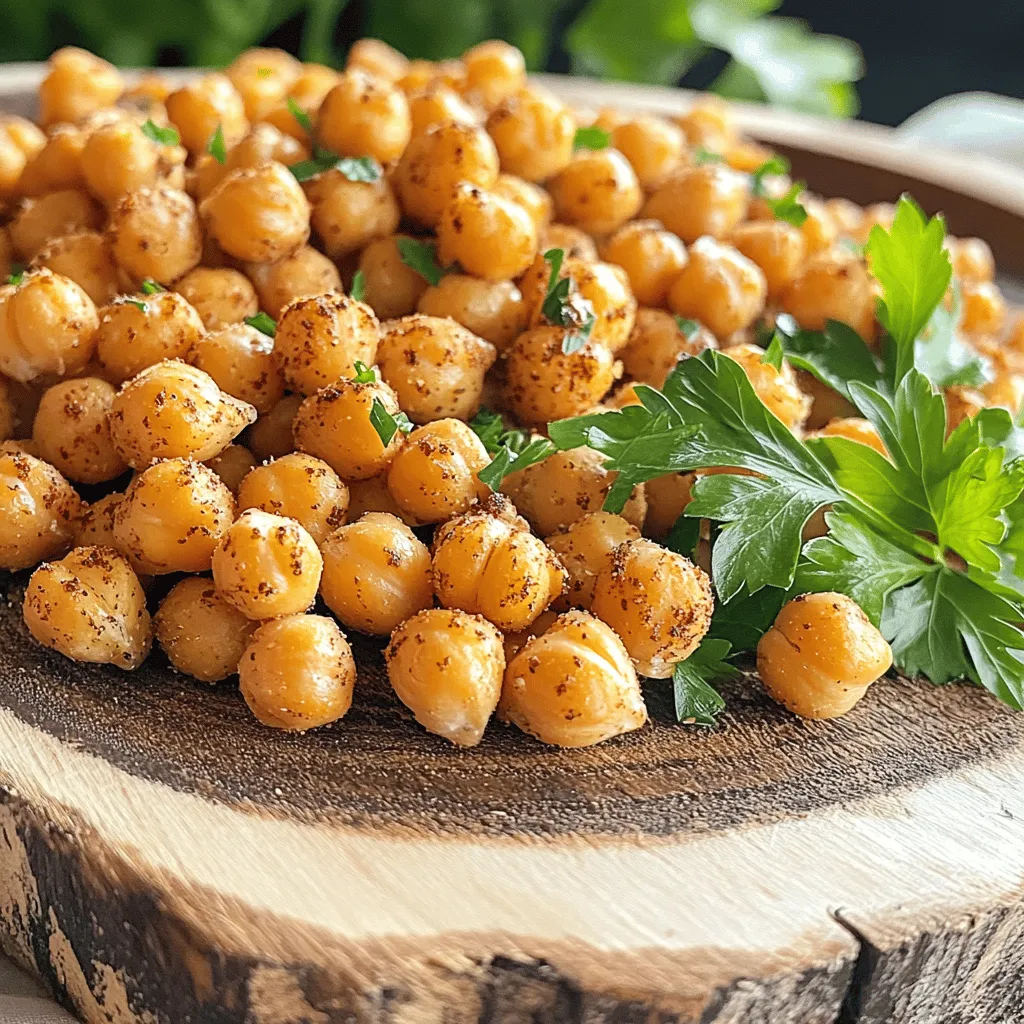
Looking for a healthy snack that’s crunchy and full of flavor? You’ve come to the right place! In this post,

To make these tasty burritos, gather these key ingredients: - 2 cups cooked chicken, shredded - 1 ripe avocado, diced - 1 cup cooked rice (brown or white) - 1 cup black beans, rinsed and drained - 1 cup corn kernels (fresh, frozen, or canned) These items form the base of your burrito. The chicken gives protein, while avocado adds creaminess. Rice provides a nice texture, and beans and corn add flavor and fiber. You can enhance your burritos with these optional treats: - 1/2 cup shredded cheddar cheese - 1/4 cup chopped fresh cilantro - 2 tablespoons lime juice - Sour cream or Greek yogurt, for serving These extras bring more flavor and make your dish look great. Cheese adds richness, and cilantro gives a fresh taste. Lime juice adds zing, and sour cream or yogurt provides creaminess. Calories per serving: Each burrito has about 400 calories. This can vary based on your choices. Health benefits of key ingredients: - Chicken is a great source of protein. - Avocado is full of healthy fats. - Black beans offer fiber and iron. - Corn provides vitamins and minerals. Possible substitutions: If you want to swap any items, try these ideas: - Use grilled veggies instead of chicken for a vegetarian option. - Quinoa can replace rice for added protein. - Any type of beans works well if you don’t have black beans. For the full recipe and cooking steps, check out the [Full Recipe]. To start, shred your cooked chicken. You can use store-bought rotisserie chicken or cook your own. Just make sure it’s nice and tender. Next, take a ripe avocado and cut it in half. Remove the pit and scoop the flesh into a bowl. Dice the avocado into small pieces. Then, do the same with a medium tomato. Dice it finely, so it mixes well with the other ingredients. Now that your ingredients are prepped, it's time to fill the tortillas. Lay one tortilla flat on a clean surface. Spoon about 1/4 of your filling mixture right in the center of the tortilla. This includes the chicken, avocado, rice, beans, corn, and tomato. Once you have your filling, fold in the sides of the tortilla. Then, roll it up tightly from the bottom to the top. This will help keep everything inside. Repeat this for the other tortillas until you use all the filling. For cooking, you can grill the burritos. Heat a skillet over medium heat. Place the burritos seam side down in the skillet. Grill each side for 2-3 minutes until they turn golden brown. If you prefer, you can bake them in the oven. Preheat your oven to 375°F (190°C). Place the burritos on a baking sheet and bake for about 15-20 minutes. This will make them crispy without needing to flip them. Enjoy your Chicken Avocado Burritos warm! For the full recipe, check out the details above. To cook chicken well, I suggest using a few great methods. Grilling adds a lovely char. Baking keeps the chicken juicy. If you have a slow cooker, it makes chicken super tender. For flavoring, try marinating the chicken. Use lime juice, garlic, and cumin for a zesty taste. Let it sit for at least 30 minutes. You can also season with salt and pepper. Choosing ripe avocados is key. Look for avocados that feel soft but not mushy. A darker skin can also mean ripeness. When you press gently, it should give a little. To keep avocados fresh, store them in the fridge. If you cut an avocado, sprinkle lime juice on it. This helps slow browning. Keeping the pit in also works wonders! For sides, I love serving burritos with fresh salsa or a simple salad. Chips and guacamole are also a hit. They add crunch and flavor. You can customize serving by adding hot sauce or cheese on top. Try a dollop of sour cream or Greek yogurt. It makes every bite creamy and delicious. For the full recipe, check the details above. {{image_2}} If you want a meat-free choice, swap chicken for tofu or extra beans. Tofu gives a nice texture. Choose firm tofu, and press it to remove water. Then, cut it into cubes and sauté until golden. You can also add more black beans or pinto beans for protein. This way, the dish stays filling and tasty without meat. Want some heat? Add jalapeños or your favorite hot sauce for spice. You can mix chopped jalapeños into the filling. If you love heat, drizzle hot sauce over the top before serving. This adds a kick and makes your burrito more exciting. Adjust the spice level to fit your taste. For a breakfast twist, swap some ingredients for morning flavors. Use scrambled eggs instead of chicken. You can also add diced bell peppers or onions to the mix. This creates a hearty breakfast burrito. Serve with salsa or avocado on top for a fresh touch. Enjoy this version any time of day! For the full recipe, check out the [Full Recipe]. To keep your burritos fresh, store them properly. First, let the burritos cool down to room temperature. Wrap each burrito tightly in plastic wrap. Then, place them in an airtight container. For refrigeration, they can last up to three days. This helps preserve their flavor and texture. If you want to freeze them, wrap the burritos in foil after the plastic wrap. This adds an extra layer of protection. Label the container with the date. Frozen burritos can last up to three months. When you’re ready to eat, thaw them overnight in the fridge. To reheat your burritos, use a skillet for the best results. Heat the skillet over medium heat. Place the burrito seam side down and cook for about 3-4 minutes on each side. This method keeps the outside crispy while warming the inside. You can also use the microwave. Place the burrito on a microwave-safe plate. Cover with a damp paper towel to keep it moist. Heat for about 1-2 minutes. Check to make sure it’s hot all the way through. Leftover burritos stored in the fridge last about three days. After this, they lose flavor and quality. If you freeze them, they can last up to three months. Always check for signs of spoilage before eating. This way, you ensure your meal is safe and tasty. If you want to try this recipe, check out the Full Recipe for Chicken Avocado Burritos. Yes, you can make Chicken Avocado Burritos ahead of time. Prepare the filling and store it in the fridge. Use an airtight container to keep it fresh. You can also wrap the filled burritos in foil or plastic wrap. This keeps them tasty until you are ready to eat. When it’s time to serve, just warm them in a skillet or the oven. This makes meal prep easy and quick. If you want a plant-based option, you can replace chicken with beans or tofu. Black beans work well, adding protein and fiber. You can also try chickpeas or lentils. For tofu, use firm or extra-firm tofu. Just sauté it until golden. These options make the burrito delicious and filling without meat. To keep avocados fresh, use lime juice right after cutting. The acid in lime juice slows browning. You can also store cut avocado in water, covering it well. Just make sure to drain it before using. If you mix avocados with other ingredients right away, they stay green longer. In this post, I shared how to make delicious Chicken Avocado Burritos. We discussed essential ingredients like chicken, avocado, and black beans. I also offered tips on cooking, storing, and even variations for different tastes. Whether you want a spicy twist or a vegetarian option, there’s something for everyone. Creating your burrito can be fun and rewarding. With these tips, you’ll make a dish everyone loves. Enjoy your cooking and happy eating!

Savory Chicken Avocado Burritos Easy and Delicious Recipe

Are you ready to savor a meal that combines tender chicken and creamy avocado? In my easy and delicious Chicken

To make Mexican Street Corn Salad, gather fresh and vibrant ingredients. This salad bursts with flavor and is perfect for any gathering. The prep time is just 15 minutes, and it serves 4-6 people. Here’s what you need: - 4 ears of corn, husked and grilled - 1 cup cherry tomatoes, halved - 1/4 cup red onion, finely chopped - 1/2 cup feta cheese, crumbled - 1/4 cup cilantro, chopped - 1 lime, juiced - 2 tablespoons olive oil - 1 teaspoon chili powder - Salt and pepper to taste - 1 avocado, diced (optional) These ingredients create a colorful and tasty dish. The corn gives sweetness, while the lime adds a zing. Feta cheese brings creaminess, and chili powder adds warmth. You’ll need a few simple tools: - Grill for charring the corn - Large mixing bowl for combining - Small bowl for whisking the dressing - Knife for chopping vegetables - Cutting board for easy prep Having these items ready makes cooking smooth and quick. Enjoy the process as you prepare this delightful salad! Start by gathering all your ingredients. You will need fresh corn, tomatoes, onion, and cheese. Make sure your ingredients are washed and ready to go. Next, husk the corn. Remove all the green leaves and silk. This helps the corn grill better. Now, preheat your grill to medium-high heat. Place the husked corn directly on the grill. Turn it every few minutes. This helps it cook evenly. Grill the corn for about 8-10 minutes. Look for nice char marks. This adds great flavor. After grilling, take the corn off the grill. Let it cool for a bit. Once cool, use a sharp knife to cut the kernels off the cob. In a large bowl, mix the corn kernels with halved cherry tomatoes. Add finely chopped red onion and crumbled feta cheese. In a small bowl, whisk together lime juice, olive oil, chili powder, salt, and pepper. Pour this dressing over the salad mix. Gently toss everything together. Make sure the dressing coats all the ingredients. If you want, fold in diced avocado for creaminess. Taste your salad and adjust the seasoning as needed. This step is key for great flavor. For the full recipe, you can refer back to the earlier section. Enjoy this bright and tasty delight! Grilling corn adds a nice smoky flavor. Start with fresh ears of corn. Husk them first, removing all silk. Preheat your grill to medium-high heat. Place the corn directly on the grill grates. Turn them every few minutes. Grill for about 8-10 minutes. Look for those nice char marks! Once done, let the corn cool a bit before cutting the kernels off. This keeps the corn juicy and sweet. To make your salad pop, consider adding extra spices. A sprinkle of smoked paprika can add depth. If you like heat, try adding cayenne or jalapeños. Fresh lime juice brightens the flavors, so don't skip it. Mixing in diced avocado gives a creamy texture. You can also add black beans for protein and a nice color contrast. Serve your Mexican street corn salad in a big bowl or individual cups. Garnish with fresh cilantro and a sprinkle of chili powder for a pop of color. If you want a crunchy side, add tortilla chips. This salad is best fresh but can chill in the fridge for a bit. Pair it with grilled meats or fish for a full meal. For the full recipe to make this bright and tasty delight, check the Full Recipe section above! {{image_2}} To give your Mexican Street Corn Salad a kick, add jalapeños. Chop them finely and mix them in. You can also try using a hotter chili powder. This will boost the spice without changing the flavor too much. If you love heat, drizzle some hot sauce over the top before serving. It adds a nice touch! To make this salad vegan, swap the feta cheese for a plant-based alternative. You can also skip the cheese altogether. Use a bit more avocado to keep the creaminess. For added flavor, try adding nutritional yeast. This gives a cheesy taste without using dairy. Your friends won’t even know it’s vegan! Feel free to get creative with extra ingredients. Black beans bring protein and fiber. They also add a nice texture. You can toss in some diced bell peppers for crunch. If you like a bit of sweetness, add some corn from a can or frozen corn. Just make sure to drain it well. These additions can take your salad to the next level! You can find the full recipe above. Store leftover Mexican Street Corn Salad in an airtight container. This keeps the salad fresh. Place it in the fridge right after serving. It will stay good for about three days. Avoid letting it sit out for too long. I do not recommend freezing this salad. Freezing affects the texture of corn and tomatoes. If you freeze it, the salad may become mushy when thawed. Enjoy it fresh instead for the best taste. You can serve this salad cold or at room temperature. If you prefer it warm, gently heat it on the stove. Use low heat and stir often to keep it from burning. Never microwave it, as this can make the salad soggy. Mexican Street Corn Salad is a tasty dish inspired by elote, a popular Mexican street food. It features grilled corn mixed with fresh veggies and bold flavors. You will enjoy the sweet corn, tangy lime, and creamy feta. This salad is colorful and packed with nutrients. It’s a perfect side dish for summer cookouts or a light meal. Yes, you can use frozen corn in this salad. Just make sure to thaw it first. You can quickly microwave it or let it sit at room temperature. Frozen corn is often sweet and tender, making it a great choice. However, grilling fresh corn adds a nice smoky flavor that elevates the dish. Mexican Street Corn Salad can last about 3 to 5 days in the fridge. Store it in an airtight container to keep it fresh. The flavors will blend and deepen over time. Just remember, if you add avocado, it may brown faster. You can always add fresh avocado right before serving for the best taste. In this post, we explored how to make delicious Mexican Street Corn Salad. We covered key ingredients and equipment needed for this tasty dish. I provided step-by-step instructions, along with tips, variations, and storage info to ensure your salad shines. You can enjoy this recipe any time. It is simple, fun, and packed with flavor. With the right ingredients and techniques, you will impress everyone at your next meal. Get ready to share your new favorite dish!

Mexican Street Corn Salad Bright and Tasty Delight

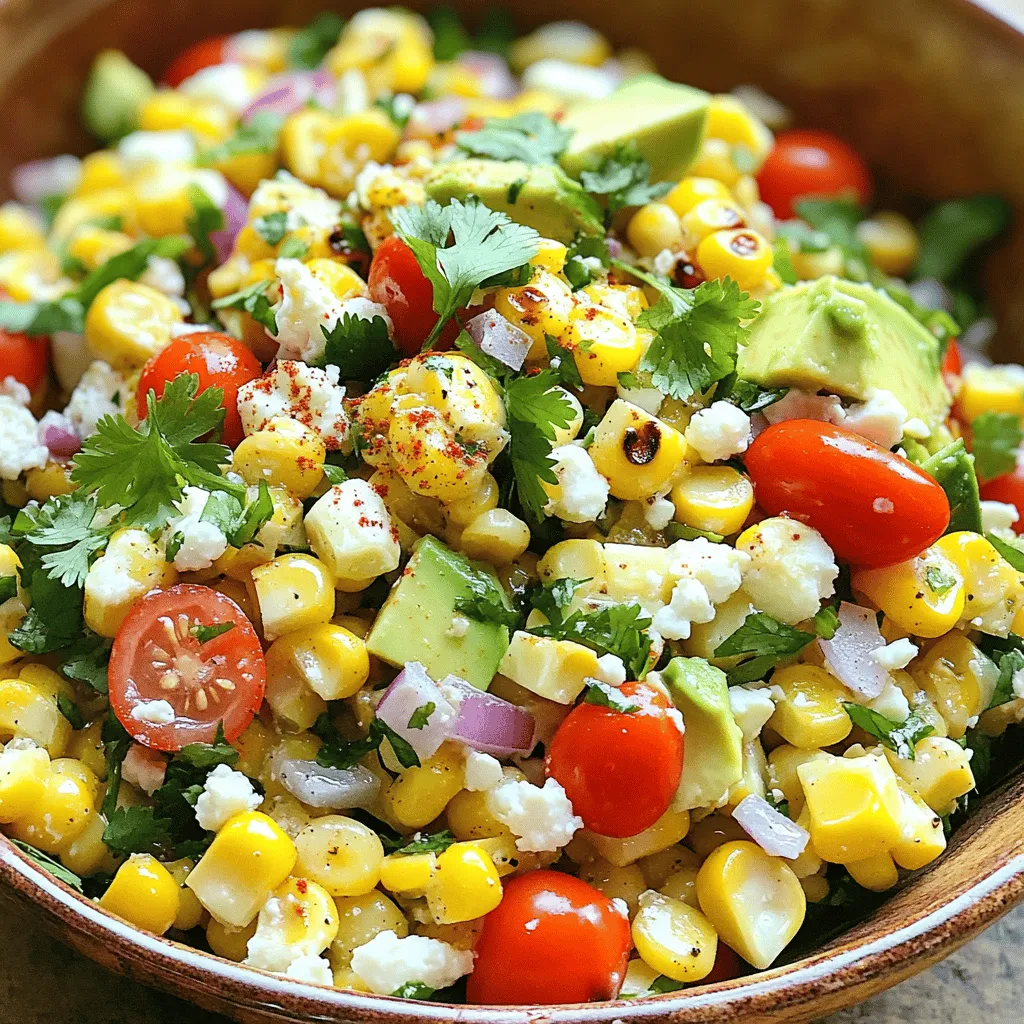
Are you ready to bite into something fresh and flavorful? Mexican Street Corn Salad brings the vibrant taste of the

- 4 cups fresh broccoli florets: Choose bright green florets that feel firm. Avoid any yellowing. - 1 medium onion, diced: Look for onions that are firm and heavy for their size. - 2 cloves garlic, minced: Fresh garlic gives the best flavor. Check for firm bulbs without sprouts. - 3 cups vegetable broth: Use low-sodium broth for more control over saltiness. - 1 cup heavy cream: Buy fresh cream for that rich, velvety texture. - 2 cups shredded cheddar cheese: Opt for block cheese that you shred yourself for better melting. - 1 teaspoon mustard powder: This adds a nice tang to your soup. - Salt and pepper to taste: Freshly ground pepper enhances flavor. - 2 tablespoons olive oil: A high-quality oil adds depth to the soup. - 1/4 cup grated parmesan cheese (for garnish): Use fresh grated cheese for a better taste. - Fresh chives or parsley for garnish: These herbs add color and freshness to your bowl. When selecting fresh broccoli, look for florets that are tight and green. Avoid any wilted or yellowing pieces. For cheese, I recommend sharp cheddar for a robust flavor. The fresher the cheese, the creamier your soup will be! If you want to dive deeper into how to make this soup, check the Full Recipe. Enjoy creating your own creamy delight! To start, gather your ingredients for the Easy Broccoli Cheese Soup. First, heat 2 tablespoons of olive oil in a large pot over medium heat. When the oil is hot, add 1 medium diced onion. Sauté the onion for about 4-5 minutes until it turns soft and clear. This brings out its sweet flavor. Next, add 2 cloves of minced garlic. Cook this for another minute. You want to smell the garlic but not burn it. Now, add 4 cups of fresh broccoli florets along with 3 cups of vegetable broth. Bring this mixture to a boil. Once it boils, lower the heat. Let it simmer for about 10-15 minutes until the broccoli is tender. This step is key for a flavorful soup. After simmering, it's time to blend. If you have an immersion blender, use it right in the pot. Blend until the soup is smooth. If not, carefully pour the soup into a traditional blender in batches. Be careful, as the soup is hot! Once blended, return the soup to the pot if you used a regular blender. Stir in 1 cup of heavy cream and 2 cups of shredded cheddar cheese. Add 1 teaspoon of mustard powder, salt, and pepper to taste. Heat the soup on low until the cheese melts. Stir often to keep it creamy and prevent sticking. Taste your soup and adjust the seasoning. If it needs more salt or pepper, add it now. For a nice finish, serve the soup in bowls. Top with 1/4 cup of grated parmesan cheese and a sprinkle of fresh chives or parsley. This not only makes it look great but adds extra flavor too. If you want a full recipe, check out the link for Cheesy Broccoli Bliss Soup. To make the best Easy Broccoli Cheese Soup, avoid these common mistakes: - Skipping Fresh Ingredients: Always use fresh broccoli and cheese. They bring out the best flavors. - Overcooking the Broccoli: Cook the broccoli until just tender. This keeps the vibrant color and nutrients. - Not Tasting as You Go: Taste your soup at each step. This helps you adjust flavors early. You need a few tools for better results: - Immersion Blender: This tool makes blending easy right in the pot. - Sharp Knife: A good knife helps chop veggies quickly and safely. - Large Pot: Use a pot that holds all the ingredients comfortably. Involve your kids in making this soup! Here are simple tasks for them: - Washing Broccoli: Kids can rinse the broccoli under cold water. - Measuring Ingredients: Let them measure out the broth and cheese. - Stirring the Pot: Give them a spoon to stir while you monitor. Make it a fun family activity by: - Creating a Soup Party: Let each family member pick a favorite topping. - Telling Stories: Share fun stories while cooking. This makes the time enjoyable. - Tasting Together: Sit down as a family and taste your creation. Celebrate your teamwork! {{image_2}} You can switch up the cheese in this soup for new tastes. Cheddar is classic, but you can try Monterey Jack for a milder flavor. Gruyère brings a nutty taste that many love. For a sharper kick, consider blue cheese or gouda. If you need a dairy-free option, use vegan cheese. Look for brands that melt well. Nutritional yeast adds a cheesy flavor, making it great for plant-based diets. Want to boost nutrition? Add more veggies! Carrots and cauliflower work well. Spinach or kale can add color and healthy greens. For protein, toss in cooked chicken, ham, or beans. These additions make your meal heartier. Don't forget spices! A pinch of cayenne brings heat, while thyme or basil adds freshness. A dash of paprika gives depth to the flavor. Herbs like parsley or chives make a lovely garnish too. These variations keep your soup exciting and full of flavor. Feel free to mix and match! For the full recipe, check out the link. To keep your broccoli cheese soup fresh, cool it first. Use an airtight container for storage. This helps keep out air and moisture. Place your container in the refrigerator. The soup stays good for about 3-4 days. If you want to save it longer, freeze it. Pour the cooled soup into freezer-safe bags or containers. Make sure to leave space for expansion. In the freezer, it lasts about 2-3 months. To thaw, place it in the fridge overnight before reheating. To reheat your soup, you have a few good options. The best way is to use a pot on the stove. Pour the soup in and heat it over low to medium heat. Stir it often to avoid burning. This method keeps the flavors bright and the texture creamy. You can also use the microwave. Pour the soup into a microwave-safe bowl. Heat it in short bursts, stirring in between. This way, you warm it evenly. Remember, don’t boil the soup again, or it may separate. Enjoy your creamy delight! Easy Broccoli Cheese Soup lasts about 3 to 4 days in the fridge. To keep it fresh, store it in an airtight container. This helps prevent spoilage and keeps the flavors intact. If you notice any off smells or changes in texture, it’s best to toss it out. Yes, you can make this soup ahead of time. To prepare, follow the recipe steps and let the soup cool down. Then, store it in the fridge for up to 3 days. You can also freeze it for up to 3 months. Just remember to leave some space in the container, as the soup will expand when frozen. This soup pairs well with many dishes. Consider serving it with crusty bread or a light salad for a balanced meal. Grilled cheese sandwiches make a great side too. You can also add some crackers for a nice crunch. Each option enhances the creamy soup and makes it more filling. For a detailed cooking guide, check out the Full Recipe for Cheesy Broccoli Bliss Soup 🥦. In this article, we explored how to make Easy Broccoli Cheese Soup. We covered the ingredients you'll need and provided detailed steps for preparation and cooking. I shared tips for blending the cheese and adding final touches for flavor. Remember, cooking with kids can make it fun. You can also try different cheeses and add extra ingredients to match your taste. This soup is easy to store and reheat, making it perfect for meals ahead. With these tips, you can create a delicious soup that everyone will enjoy!

Easy Broccoli Cheese Soup Creamy Delight in Minutes

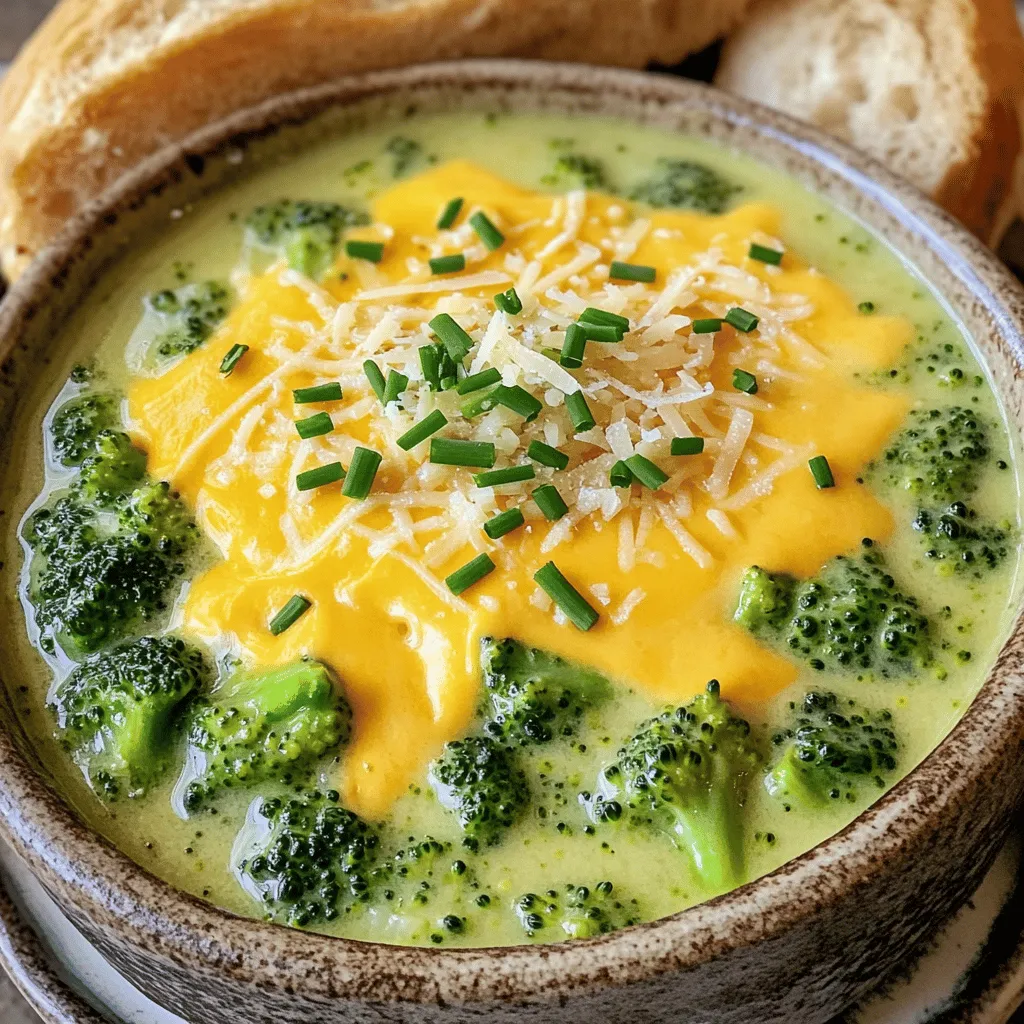
Looking for a quick, creamy delight that warms the soul? My Easy Broccoli Cheese Soup is the answer! This delicious

- 1 cup canned pumpkin puree - 1/2 cup brown sugar - 1/4 cup granulated sugar - 1/3 cup vegetable oil - 2 large eggs - 1 teaspoon vanilla extract - 1 1/2 cups all-purpose flour - 1 teaspoon baking soda - 1/2 teaspoon baking powder - 1 teaspoon ground cinnamon - 1/2 teaspoon ground nutmeg - 1/4 teaspoon ground ginger - 1/4 teaspoon salt - 1 cup semi-sweet chocolate chips - Optional: 1/4 cup chopped walnuts or pecans These ingredients create a warm, sweet muffin. The pumpkin puree gives moisture and flavor. The brown sugar adds depth, while the granulated sugar provides sweetness. Vegetable oil keeps the muffins tender. Eggs are key for binding and rise. Vanilla extract brings warmth. Flour gives structure, while baking soda and powder help them rise. Spices like cinnamon, nutmeg, and ginger add cozy flavors. Chocolate chips bring joy in every bite. You can add nuts for crunch. For the full recipe, check the detailed instructions. - Preheat the oven to 350°F (175°C) and prepare the muffin tin. Use paper liners or grease it with non-stick spray. - In a large bowl, mix the wet ingredients: 1 cup of canned pumpkin puree, 1/2 cup of brown sugar, 1/4 cup of granulated sugar, 1/3 cup of vegetable oil, 2 large eggs, and 1 teaspoon of vanilla extract. Whisk until smooth. - In another bowl, combine the dry ingredients. This includes 1 1/2 cups of all-purpose flour, 1 teaspoon of baking soda, 1/2 teaspoon of baking powder, 1 teaspoon of ground cinnamon, 1/2 teaspoon of ground nutmeg, 1/4 teaspoon of ground ginger, and 1/4 teaspoon of salt. Mix well. - Gradually add the dry ingredients to the wet mixture. Stir gently until just combined. The batter should be thick and smooth. - Now, fold in 1 cup of semi-sweet chocolate chips and, if you like, 1/4 cup of chopped walnuts or pecans for extra texture. - Evenly distribute the batter into the muffin tin. Fill each cup about 3/4 full for the best rise. - Bake in your preheated oven for 18-20 minutes. Check with a toothpick. It should come out clean. - Once done, take the muffins out of the oven. Let them cool in the tin for 5 minutes. Then, transfer them to a wire rack to cool completely. For the full recipe, refer to the earlier sections. - Don't overmix the batter. Overmixing can make muffins tough. Mix gently until just combined. This keeps them fluffy and light. - How to check for doneness. Insert a toothpick into the center of a muffin. If it comes out clean, they are done. If it has wet batter, bake a few more minutes. - Adding spices or extracts. You can boost flavor by adding extra spices, like cloves or allspice. A splash of almond extract can also add a lovely twist. - Using different types of chocolate chips. You can swap semi-sweet chips for dark or milk chocolate. Try adding white chocolate chips for a sweet touch. Each type brings a unique taste to your muffins. Check out the Full Recipe for more details on how to create these delightful treats! {{image_2}} You can easily change ingredients to fit your needs. First, for a gluten-free option, use almond flour or a gluten-free flour blend. These work well and keep the muffins moist. Next, if you want dairy-free muffins, swap out the eggs. Use flax eggs instead. To make a flax egg, mix one tablespoon of ground flaxseed with three tablespoons of water. Let it sit for a few minutes until it thickens. You can also replace vegetable oil with coconut oil or applesauce. Both add moisture and flavor. Feel free to spice it up! Change the pumpkin spice blend for a different taste. You can add more cinnamon, or try cardamom for a unique twist. If you want your muffins to be fruity, consider mixing in cranberries or diced apples. These fruits add a nice tartness and moisture. You can even add nuts or seeds for an extra crunch. The choice is yours, so get creative and make it your own! For the full recipe, check out the detailed steps above. To keep your Pumpkin Chocolate Chip Muffins fresh, store them at room temperature. Place them in an airtight container. This helps to lock in moisture. They will stay good for up to three days. If you want to keep them longer, consider refrigeration. However, refrigeration might dry them out a bit. For best results, use a container that seals tightly. You can use plastic bins or glass jars. Make sure to line the bottom with wax paper. This helps prevent sticking. You can freeze these muffins to enjoy later. To freeze, wrap each muffin tightly in plastic wrap. Then place them in a freezer-safe bag. This helps prevent freezer burn. When you want to eat a muffin, simply take one out. Let it thaw in the fridge overnight or on the counter for a few hours. To warm them up, pop them in the microwave for about 15-20 seconds. This keeps the flavor and texture nice. For best taste, eat frozen muffins within three months. This way, they stay fresh and delicious, just like when you first baked them. Can I use fresh pumpkin instead of canned? Yes, you can use fresh pumpkin. Just cook it first. Cut the pumpkin, remove the seeds, and roast it until soft. Then, mash it well. This gives a nice, fresh taste. How do I ensure my muffins are moist and fluffy? To keep muffins moist, don’t overmix the batter. Mix until it’s just combined. Also, use a good amount of pumpkin puree. Adding a bit of oil helps too. What can I substitute for brown sugar? You can use white sugar and add a bit of molasses. One tablespoon of molasses for each cup of white sugar works well. This gives a similar taste. Can I make this recipe vegan-friendly? Yes, you can! Replace the eggs with flax eggs or applesauce. Use plant-based oil instead of regular oil. This makes the muffins vegan and still tasty. These Pumpkin Chocolate Chip Muffins are simple and fun to make. You learned the key ingredients, step-by-step instructions, and baking tips. I shared delicious flavor variations too. In the end, these muffins are perfect for any season. Experiment and enjoy your baking! You won’t regret trying these tasty treats.

Pumpkin Chocolate Chip Muffins Delightful and Easy Recipe

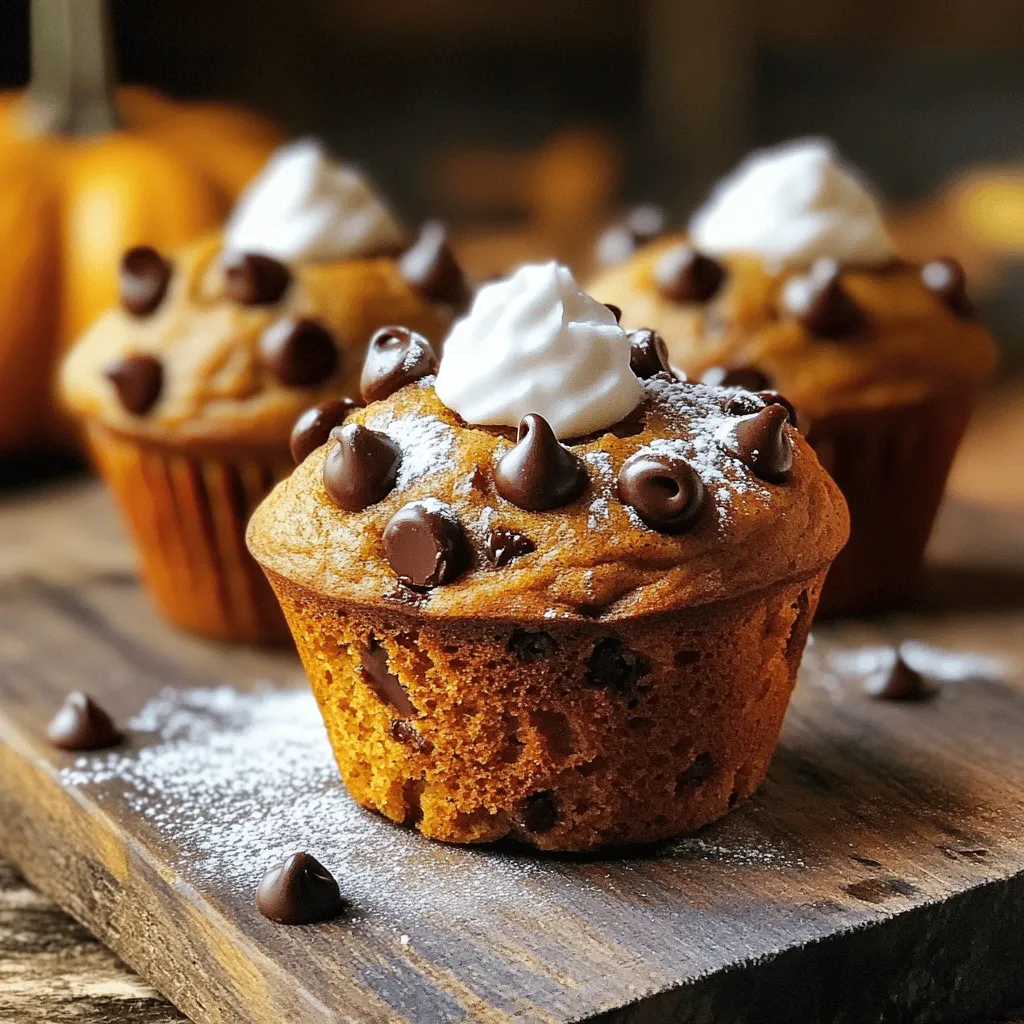
Looking for a new fall favorite? These Pumpkin Chocolate Chip Muffins are both delightful and easy to make. With a

To make these tasty pancakes, you need just a few key items. First, grab some ripe bananas. They add natural sweetness and moisture. Next, you need large eggs. They help bind the mixture and add protein. Finally, rolled oats are a must. They act as a great base and give a nice texture. For the protein boost, use chocolate protein powder. This gives the pancakes a rich chocolate flavor while packing in protein. Also, add cocoa powder. It enhances the chocolate taste and deepens the flavor. You can sweeten the pancakes with honey or maple syrup. This step is optional but adds a nice touch. For a fun twist, sprinkle chocolate chips on top. They melt slightly and create a delightful treat. You might also want milk or almond milk. This can help adjust the batter's thickness. If you want to see all the details, check the Full Recipe for Chocolate Banana Protein Pancakes. - Mashing the banana: Start with a ripe banana. Use a fork to mash it in a bowl. Aim for a smooth texture. The riper the banana, the sweeter your pancakes will be. - Combining wet ingredients: Next, add two large eggs to the mashed banana. Whisk them together until fully mixed. This adds protein and helps bind the batter. - Mixing oats and protein powder: In a blender, combine one cup of rolled oats, one scoop of chocolate protein powder, half a teaspoon of baking powder, and one tablespoon of cocoa powder. Blend until it becomes a fine flour. This step makes the pancakes hearty and nutritious. - Achieving the right consistency: Gradually add the dry mix to the wet ingredients. Mix until combined. If the batter feels too thick, pour in a quarter cup of milk to loosen it. For extra sweetness, stir in one tablespoon of honey or maple syrup. - Heating the skillet: Preheat a non-stick skillet over medium heat. Lightly grease it with cooking spray or a bit of oil to prevent sticking. - Cooking times for pancakes: Pour about a quarter cup of batter onto the skillet for each pancake. Cook for 2-3 minutes until bubbles form on the surface. Flip the pancakes and cook for another 1-2 minutes until golden brown. Repeat with the remaining batter. Enjoy these fluffy delights warm, topped with chocolate chips or sliced bananas if you wish. For the complete recipe, check the Full Recipe. To get the best texture for your pancakes, you need to adjust the batter's thickness. If your batter feels too thick, add a splash of milk. This will make it easier to pour. A thinner batter helps the pancakes cook evenly. To ensure even cooking, use a non-stick skillet. Heat it over medium heat. Watch for bubbles forming on the surface. This means it's time to flip! You can easily boost the flavor of your pancakes. Consider adding a dash of vanilla extract or a sprinkle of cinnamon. Both give a warm, inviting taste. If you want it sweeter, add honey or maple syrup. This small change can make a big difference. Making your pancakes look great is fun! Try stacking them high on a plate. Drizzle with maple syrup for shine. Sprinkle extra chocolate chips on top for a sweet touch. You can also add sliced bananas for a colorful finish. These small details make your meal feel special. For more ideas, check the Full Recipe for creative serving suggestions! {{image_2}} You can easily change the taste of these pancakes. Adding peanut butter or almond butter gives them a creamy, nutty flavor. Just mix in a tablespoon or two when you mash the banana. You can also try different protein flavors. Vanilla or strawberry protein powder can add a fun twist. Experiment with what you like best. If you need gluten-free pancakes, use gluten-free oats. They work just as well in this recipe. For vegan options, swap the eggs with flax eggs. Mix one tablespoon of flaxseed meal with three tablespoons of water. Let it sit for a few minutes to thicken. You can also use plant-based milk in place of regular milk. You can easily scale this recipe. If you're cooking for a crowd, just double or triple the ingredients. This way, you can serve more pancakes at once. For meal prep, you can make a big batch and store them. They heat up well, making them perfect for quick breakfasts throughout the week. Check out the Full Recipe for more details on how to make these delicious pancakes! I often make extra pancakes for busy mornings. To store them, place pancakes in a single layer on a plate. Cover them with plastic wrap or foil. Then, put the plate in the fridge. This keeps them fresh for up to three days. If you want to store pancakes longer, you can freeze them. Stack the pancakes with parchment paper between each. Then, place them in a freezer bag. They can last up to two months in the freezer. When it’s time to eat those delicious pancakes again, reheating is easy. For the microwave, place one pancake on a microwave-safe plate. Heat it for about 20-30 seconds. Check if it’s warm enough. If not, heat in 10-second bursts. For stovetop reheating, use a skillet on low heat. Place the pancake in the skillet for about 1-2 minutes on each side. This keeps the edges nice and crisp. Refrigerated pancakes stay good for about three days. After this, they may not taste fresh. Watch for signs of spoilage. If you see mold or a sour smell, it’s best to throw them away. When frozen, pancakes can last for two months. Make sure to check for freezer burn before eating. Keeping an eye on these signs helps you enjoy your pancakes safely. To make Chocolate Banana Protein Pancakes, follow this simple recipe: - 1 ripe banana, mashed - 2 large eggs - 1 cup rolled oats - 1 scoop chocolate protein powder - 1/2 teaspoon baking powder - 1 tablespoon cocoa powder - 1/4 cup milk (or almond milk) - 1 tablespoon honey or maple syrup (optional) - Pinch of salt - Cooking spray or a small amount of oil for the pan - Chocolate chips (optional, for topping) Start by mashing the banana in a bowl. Then, mix in the eggs until smooth. Next, blend the oats, protein powder, baking powder, cocoa powder, and salt until fine. Combine the dry and wet mixes in a bowl. If the batter seems thick, add milk. Heat a pan over medium heat, spray it lightly, and pour in the batter. Cook until bubbles form, flip, and cook until golden. Enjoy your pancakes warm, topped with chocolate chips or banana slices. Yes, you can easily substitute ingredients. If you have an allergy to eggs, use flaxseed meal instead. Mix 1 tablespoon of flaxseed meal with 3 tablespoons of water and let it sit for a few minutes. Instead of rolled oats, you can use oat flour. If you're lactose intolerant, almond milk works great too. For a sweeter taste, you can swap honey for agave syrup. Just remember, substitutions may change the texture and taste. You can serve Chocolate Banana Protein Pancakes with many tasty items. Here are some great pairings: - Fresh fruit like strawberries or blueberries - A dollop of Greek yogurt for creaminess - A drizzle of maple syrup for sweetness - Nut butter like peanut or almond for added protein - Whipped cream for a fun twist These options can elevate your meal, making it more delicious and enjoyable. These chocolate banana protein pancakes are easy and tasty. You need ripe bananas, eggs, oats, and protein powder. I shared how to mix the batter, cook the pancakes, and achieve the best texture. You can also try fun variations like peanut butter or go gluten-free. Store leftovers well and reheat for quick meals. The options are endless, and the results are delicious. Enjoy making these pancakes your way, and make mornings delightful!

Chocolate Banana Protein Pancakes Nutritious Delight

If you’re looking for a tasty and healthy breakfast, you’ve found it! These Chocolate Banana Protein Pancakes are both delicious

- 2 cups raw almonds - 2 tablespoons olive oil - 1 teaspoon cayenne pepper - 1 teaspoon smoked paprika - 1 teaspoon garlic powder - 1 teaspoon sea salt - 1/2 teaspoon black pepper - 1/2 teaspoon cumin - 1 tablespoon maple syrup or honey To make spicy roasted almonds, you need a few simple ingredients. The main ones are raw almonds, olive oil, cayenne pepper, and smoked paprika. These ingredients give the almonds a tasty kick and a nice flavor. You can also add garlic powder, sea salt, black pepper, and cumin for an extra layer of taste. If you like a hint of sweetness, you can use maple syrup or honey. This sweetness balances the heat from the cayenne pepper. Gather these ingredients before you start. They will make your spicy roasted almonds a crunchy and satisfying snack. For the full recipe, check the section above. - Preheat the oven to 350°F (175°C). - Prepare a baking sheet with parchment paper. This helps the almonds not stick. - In a large bowl, combine the raw almonds with olive oil. Make sure they are well-coated. - Add cayenne pepper, smoked paprika, garlic powder, sea salt, black pepper, and cumin to the bowl. - If you like sweetness, drizzle in maple syrup or honey. Stir everything to mix well. - Spread the seasoned almonds in a single layer on the baking sheet. - Roast for 10-12 minutes. Stir them halfway through for even roasting. - Let the almonds cool completely on the baking sheet. They will get crunchier as they cool. For the full recipe, check the section above. To make your spicy roasted almonds just right, spice levels matter. You can change the cayenne pepper to fit your taste. If you like it hot, add more. If not, cut back. The same goes for the sweetness. If you want a sweeter snack, add more maple syrup or honey. Stirring the almonds while roasting is key. This helps them cook evenly. Set a timer for halfway through roasting. Give them a good stir to ensure every almond gets that golden touch. When it comes to serving, let your almonds shine. Use a rustic bowl or a glass jar to show off their crunch. A sprinkle of extra sea salt on top adds flair. Fresh herbs like rosemary can brighten the look. Pair these almonds with drinks at your next gathering. They go great with beer or cocktails. You can also serve them with other snacks, like cheese or olives. This mix can create a lovely spread for your guests to enjoy. For more ideas, check the Full Recipe for inspiration. {{image_2}} To make spicy roasted almonds even better, try adding different spices. You can mix in chili powder for more heat. Turmeric brings a warm, earthy taste. Experiment with the spice levels to find your perfect blend. Using flavored oils can also change the game. Instead of olive oil, try garlic-infused oil for a rich taste. A hint of sesame oil can add a nutty flavor. These small changes can make a big impact on your snack. If you like a touch of sweetness, you have options. You can use honey or maple syrup. Both add a nice caramel flavor. Maple syrup gives a hint of woodiness, while honey is floral. For a different twist, try coconut sugar. It has a subtle caramel taste that complements the spices. Agave syrup is another choice; it’s sweeter and blends well. Each sweetener gives a unique flavor to your spicy roasted almonds. For the full recipe, check out the instructions above! To keep your spicy roasted almonds fresh, choose the right container. Use an airtight container. Glass jars or plastic containers with secure lids work well. Store your almonds in a cool, dry place. Avoid areas with direct sunlight or moisture. This helps to maintain their crunchiness and flavor. When stored properly, spicy roasted almonds can last up to two weeks. After this time, they may lose their crispness. Check for signs of spoilage, like a stale smell or soft texture. If you notice these, it’s best to toss them out. For longer storage, consider freezing them. This helps preserve their taste and texture for up to three months. To make spicy roasted almonds, follow these steps: 1. Preheat your oven to 350°F (175°C). 2. In a big bowl, mix 2 cups of raw almonds with 2 tablespoons of olive oil. 3. Add spices: 1 teaspoon of cayenne pepper, smoked paprika, garlic powder, sea salt, black pepper, and cumin. 4. If you want a sweet touch, add 1 tablespoon of maple syrup or honey. 5. Stir well so all the almonds get coated. 6. Spread them on a baking sheet lined with parchment paper. 7. Roast for 10-12 minutes, stirring halfway through. 8. Let them cool completely before serving. These steps make a tasty snack that packs a punch. For a full recipe, check out the Full Recipe section. You can find spicy roasted almonds in many stores. Look for brands like Blue Diamond or Trader Joe’s. They often sell them in snack aisles or bulk bins. You can also buy them online at grocery websites. Stores like Amazon and Walmart have good options. Yes, you can use other nuts! Cashews, walnuts, or pecans work well. Just remember to adjust the cooking time based on the nut type. For softer nuts like cashews, roast them for less time, about 8-10 minutes. This way, you can enjoy different flavors and textures! Spicy roasted almonds are easy and fun to make. You need simple ingredients and clear steps. Preheat your oven, mix your spices, and roast! Adjust flavors to suit your taste. You can store them properly for long-lasting crunch. These almonds are great for snacks or parties. Try different spices and sweeteners to keep it fresh. Enjoy your roasted almonds, whether you share or keep them all for yourself!

Spicy Roasted Almonds Tasty and Crunchy Snack

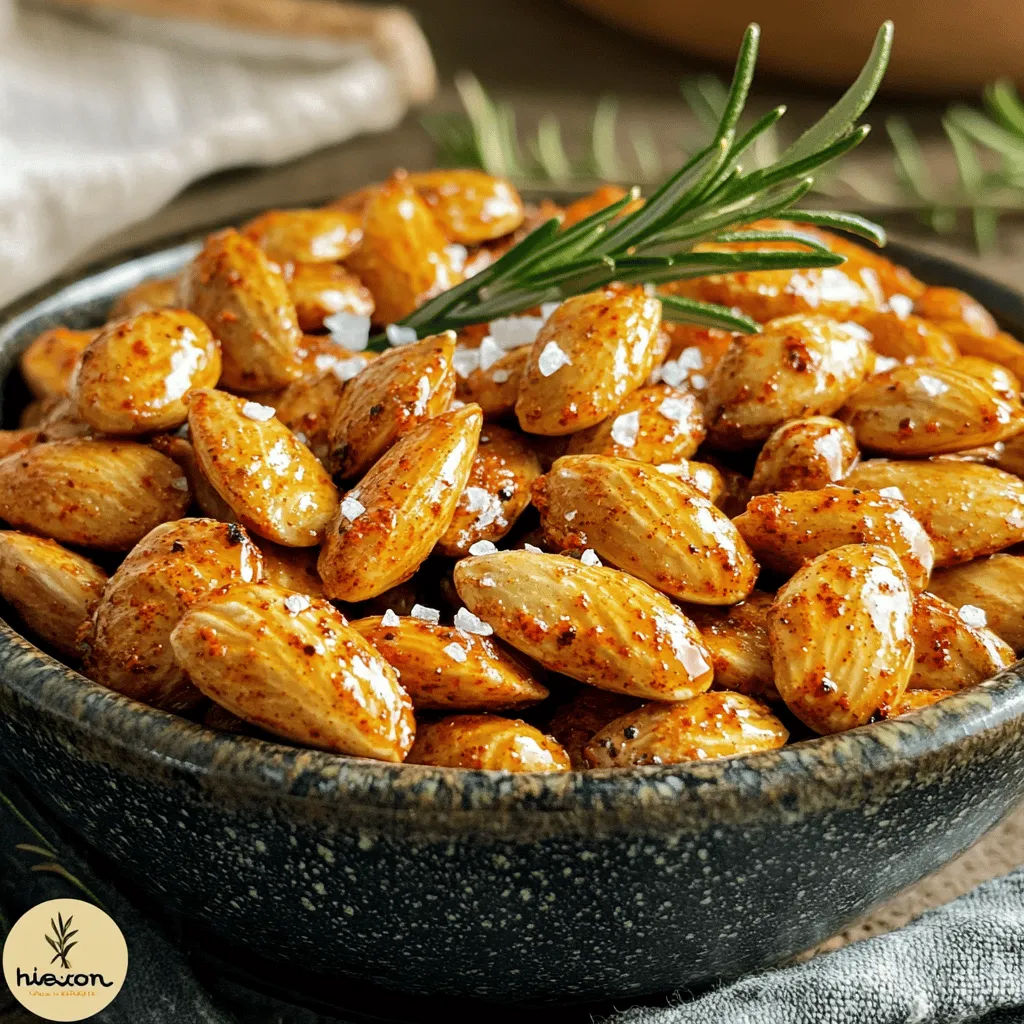
Looking for a crunchy and tasty snack? Try my spicy roasted almonds! They’re easy to make and packed with flavor.

- 2 medium zucchinis, sliced into thin rounds - 1 cup grated Parmesan cheese - 1 cup breadcrumbs - 1 teaspoon garlic powder - 1 teaspoon onion powder - 1 teaspoon paprika - Salt and pepper to taste - Olive oil spray You can switch breadcrumbs for crushed nuts or cornmeal for a gluten-free option. Instead of Parmesan, try using Pecorino Romano for a sharper taste. If you want more flavor, add spices like cayenne pepper, or dried herbs such as oregano or thyme. You can even mix in some lemon zest for a fresh twist. 1. First, preheat your oven to 425°F (220°C). This will help the chips get nice and crispy. 2. Line a baking sheet with parchment paper. This makes cleanup easy. 3. Next, wash the zucchinis under cool water. This removes any dirt or grit. 4. Slice the zucchinis into thin rounds, about 1/4 inch thick. Try to keep them uniform for even cooking. 1. In a shallow bowl, mix the grated Parmesan cheese, breadcrumbs, garlic powder, onion powder, paprika, salt, and pepper. This blend adds great flavor. 2. Take each zucchini slice and spray both sides lightly with olive oil. This helps the coating stick well. 3. Dip each slice into the breadcrumb mixture. Press gently to coat both sides evenly. 1. Arrange the coated zucchini slices in a single layer on the prepared baking sheet. Make sure they do not overlap. 2. Bake in the preheated oven for 20-25 minutes. Flip the chips halfway through for even browning. 3. When they are golden and crispy, remove them from the oven. Let them cool for a few minutes to crisp up more. For the full recipe, check the details above. Enjoy your homemade Baked Parmesan Zucchini Chips! To make great zucchini chips, slice your zucchinis evenly. Thin, uniform slices help them cook at the same rate. If some slices are thick, they may not get crispy. Aim for about 1/4-inch thick rounds for the best results. Also, ensure your oven is set to the right temperature. Preheat it to 425°F (220°C). A hot oven helps the chips crisp up quickly. If your oven runs cool, they may turn out soggy instead of crunchy. You can serve these chips in fun ways. Try placing them in a colorful bowl or on a wooden platter. This makes for a great snack at parties or family gatherings. For dips, I love pairing these chips with a zesty yogurt dip or marinara sauce. The cool dip contrasts nicely with the warm, crispy chips. You can also explore other dips, like ranch or hummus, for a tasty twist. For the full recipe, check out the earlier section. Enjoy your delicious, crunchy snack! {{image_2}} You can play with flavors in your Baked Parmesan Zucchini Chips. One easy way is to add herbs like oregano or thyme. These will give your chips a fresh taste. Just mix a teaspoon of your chosen herb into the breadcrumb mixture. Another fun option is to spice it up with cayenne pepper. If you like heat, add 1/4 teaspoon of cayenne to the mix. This will give your chips a nice kick! If you need gluten-free options, there are great substitutions. Use gluten-free breadcrumbs instead of regular ones. They work just as well and keep the chips crispy. For a vegan option, you can swap out the Parmesan cheese for nutritional yeast. This gives a cheesy flavor without using dairy. Just sprinkle a generous amount into the breadcrumb mix. Whether you choose gluten-free or vegan, your chips will still taste amazing! For the complete recipe details, check out the Full Recipe. To keep your baked Parmesan zucchini chips fresh, use an airtight container. This type of container helps prevent moisture from making them soggy. Line the bottom with paper towels. This absorbs any excess moisture. Place the chips in a single layer if possible. If you have many chips, use multiple layers of paper towels between them. Store them in the fridge for up to three days. To bring back the crispiness of your zucchini chips, use an oven or an air fryer. Preheat your oven to 375°F (190°C). Spread the chips in a single layer on a baking sheet. Heat them for about 5-10 minutes. Check often to make sure they do not burn. If using an air fryer, set it to 350°F (175°C) for 3-5 minutes. Both methods help regain the crispiness you want. Enjoy your chips as if they were just made! For the full recipe, check out the previous section. How long does it take to make Baked Parmesan Zucchini Chips? It takes about 35 minutes to make these chips. You spend 10 minutes on prep and 25 minutes baking. Can I make these chips in an air fryer? Yes, you can use an air fryer! Set it to 400°F (200°C) and cook for about 10 to 15 minutes. Flip them halfway through for even crispiness. Are Baked Parmesan Zucchini Chips healthy? Yes, they are a healthy snack option. Zucchini is low in calories and high in vitamins. Using whole wheat breadcrumbs adds fiber too. Why are my zucchini chips soggy? Soggy chips often come from moisture in the zucchini. Make sure to slice them thinly. You can also pat them dry before coating. How can I make them less greasy? To reduce greasiness, use less olive oil spray. A light coat is enough to help the coating stick. You can also use a baking rack to allow air flow. Baked Parmesan Zucchini Chips offer a tasty snack with simple steps. We covered the ingredients, preparation, and baking methods. You can even try fun variations and substitutions. It's easy to store leftovers and reheat them for that perfect crunch. These tips make the process simple and enjoyable. Experimenting with flavors keeps the dish exciting. I hope you dive in and make your own. Enjoy your healthy snack today!

Baked Parmesan Zucchini Chips Crunchy and Flavorful Snack

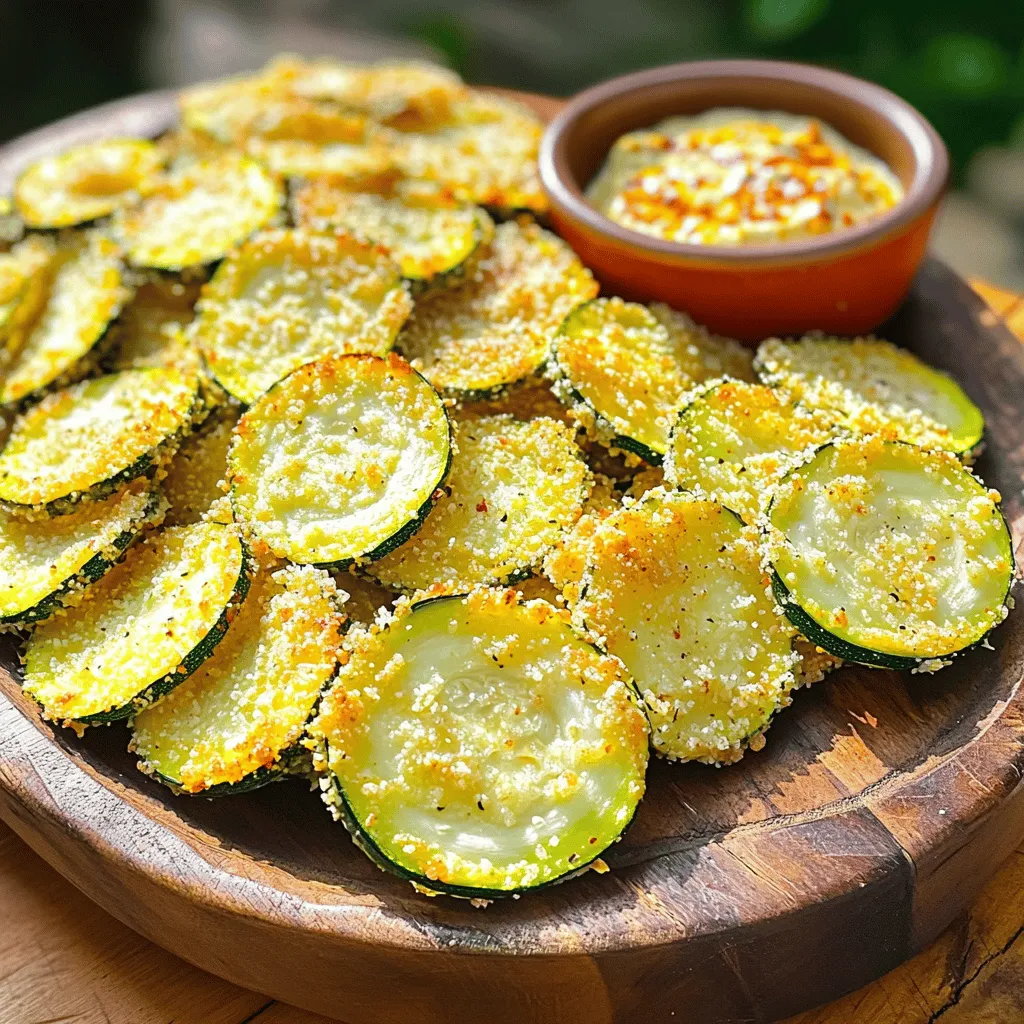
Looking for a crunchy, flavorful snack that’s easy to make? Baked Parmesan Zucchini Chips are just what you need! These

Older posts
Newer posts
← Previous Page1 … Page57 Page58 Page59 … Page82 Next →

dsad

© 2026 Recipes Pursuit • Built with GeneratePress

Our Policies

  • Copyright Policy
  • Cookie Policy
  • GDPR Policy
  • Privacy Policy
  • Disclaimer
  • Terms Of Use

More Information

  • Home
  • About
  • Contact
  • Appetizers
  • Dessert
  • Dinner
  • Drinks
©2026, Recipes Pursuit About Back To Top