. - Step 1: Combine ingredients in a bowl Start by taking a medium-sized mixing bowl. Add 1 cup of rolled oats, 1 cup of almond milk, and 1/2 cup of Greek yogurt. Then, mix in 2 tablespoons of maple syrup, the zest of 1 lemon, 1 tablespoon of lemon juice, 1 teaspoon of vanilla extract, and a pinch of salt. Stir until all the ingredients blend well. - Step 2: Fold in blueberries Gently fold in 1/2 cup of fresh blueberries. Be careful not to smash them. You want to keep those lovely berries whole for a burst of flavor. - Recommended containers for storage Use airtight containers or jars for the best results. These keep your oats fresh and tasty. I prefer using clear jars. They look great and let you see those colorful layers. - Suggested refrigeration duration Refrigerate your oats overnight, or at least for 6 hours. This soaking time helps the oats absorb all those yummy flavors. - Ideas for toppings and pairings In the morning, give your oats a good stir. If they seem too thick, add a splash of almond milk. Try topping with extra blueberries, a sprinkle of lemon zest, or a drizzle of maple syrup. For a fun twist, add nuts or seeds for crunch. Enjoy your energizing breakfast! For the full recipe, check out the [Full Recipe]. To get the right texture, you can adjust the liquid. Some like their oats thicker, while others prefer a creamier mix. If you want a thicker texture, use less almond milk. If you enjoy a creamier bowl, add a splash more. Remember to check the oats after soaking. You can always add a bit more milk to reach your desired creaminess. You can play with flavors for a fun twist. Try adding spices like cinnamon or nutmeg for warmth. You can also mix in other fruits like strawberries or peaches. Zest from different citrus fruits can brighten the dish. Oranges and limes can give a unique taste. Just remember to balance new flavors with the lemon and blueberries. Preparing a larger batch helps save time. You can double or triple the recipe for the week. Store extra servings in jars in the fridge. They will stay fresh for a few days. This way, you can enjoy tasty oats with no morning fuss. Having your breakfast ready makes your day easier. {{image_2}} You can mix up the flavors in your lemon blueberry overnight oats. Try using different fruits. Strawberries or peaches add a sweet twist. They pair well with the tangy lemon. You can also swap the maple syrup for agave or honey. This change adds new taste notes. Each sweetener has its own unique flavor profile. Experiment to see what you like best. If you follow a vegan diet, you can make easy swaps. Use plant-based yogurt instead of Greek yogurt. Almond milk is a great choice for milk. Both options keep the recipe creamy and delicious. If you need gluten-free oats, you can easily find those too. Many brands offer oats that are certified gluten-free. This makes it safe for those with gluten intolerance. Always check the label for safety. You can serve your overnight oats in fun ways. Try making an overnight oats parfait. Layer the oats with fresh fruit and nuts. It looks beautiful and tastes great! Another idea is to turn your oats into a smoothie bowl. Blend the oats with extra almond milk. This creates a thick, creamy smoothie. Pour it into a bowl and top with fresh fruit and seeds. Enjoy your breakfast in a whole new way! You can freeze lemon blueberry overnight oats for a quick breakfast later. Start by placing the oats in a freezer-safe container. Make sure to leave some room for expansion. When you want to enjoy them, take the oats out of the freezer. Let them thaw in the fridge overnight. They will be ready to eat the next morning. In the fridge, lemon blueberry overnight oats last about 3 to 5 days. Store them in airtight containers to keep them fresh. If you see any strange smells or colors, it is best to toss them. Always check for quality before eating. If you prefer warm oats, you can reheat them easily. Pour the desired amount into a bowl. Add a splash of almond milk to help them warm up smoothly. Microwave for 30 seconds, then stir. If they are still too cold, heat for another 15-30 seconds. Be careful not to overheat, as this can change the texture. Enjoy your warm and tasty breakfast! Yes, you can make Lemon Blueberry Overnight Oats in bulk. To prepare a larger batch, simply multiply the ingredients by the number of servings you want. Use a big bowl to mix everything at once. Divide the mixture into jars or containers. This makes breakfast easy for several days. Store them in the fridge for up to five days. You can grab a jar on busy mornings. The oats should sit in the fridge for at least six hours. This soaking time helps the oats absorb the liquid. The oats will soften and the flavors will blend. You can prepare them the night before for a quick breakfast. The longer they sit, the creamier they become. Some people prefer to leave them overnight for the best taste. Yes, you can use other types of milk. Here are some options: - Cow’s milk: Rich and creamy, adds more protein. - Soy milk: Has a similar protein content to cow’s milk. - Oat milk: Tastes sweet and creamy, great for flavor. - Coconut milk: Adds a tropical twist but is richer in fat. Each type of milk will slightly change the flavor, so pick what you like best. For the full recipe, check out the details above. This blog post shared simple steps to make Lemon Blueberry Overnight Oats. You learned about the key ingredients, optional add-ins, and nutrition details. I provided tips to enhance texture and flavor. You also gained ideas for storage and serving. By trying this recipe, you can enjoy a tasty, healthy breakfast. Feel free to customize it to fit your taste. The variety of options lets you explore new flavors. Enjoy your oats fresh or make them in advance and save time.](https://recipespursuit.com/wp-content/uploads/2025/07/65a9a03e-1b15-4f8b-8ce0-7b03416df8da.webp)
Lemon Blueberry Overnight Oats Energizing Breakfast Idea
Looking for a quick and tasty breakfast? My Lemon Blueberry Overnight Oats are the perfect solution! This energizing meal combines
Looking for a quick and tasty breakfast? My Lemon Blueberry Overnight Oats are the perfect solution! This energizing meal combines
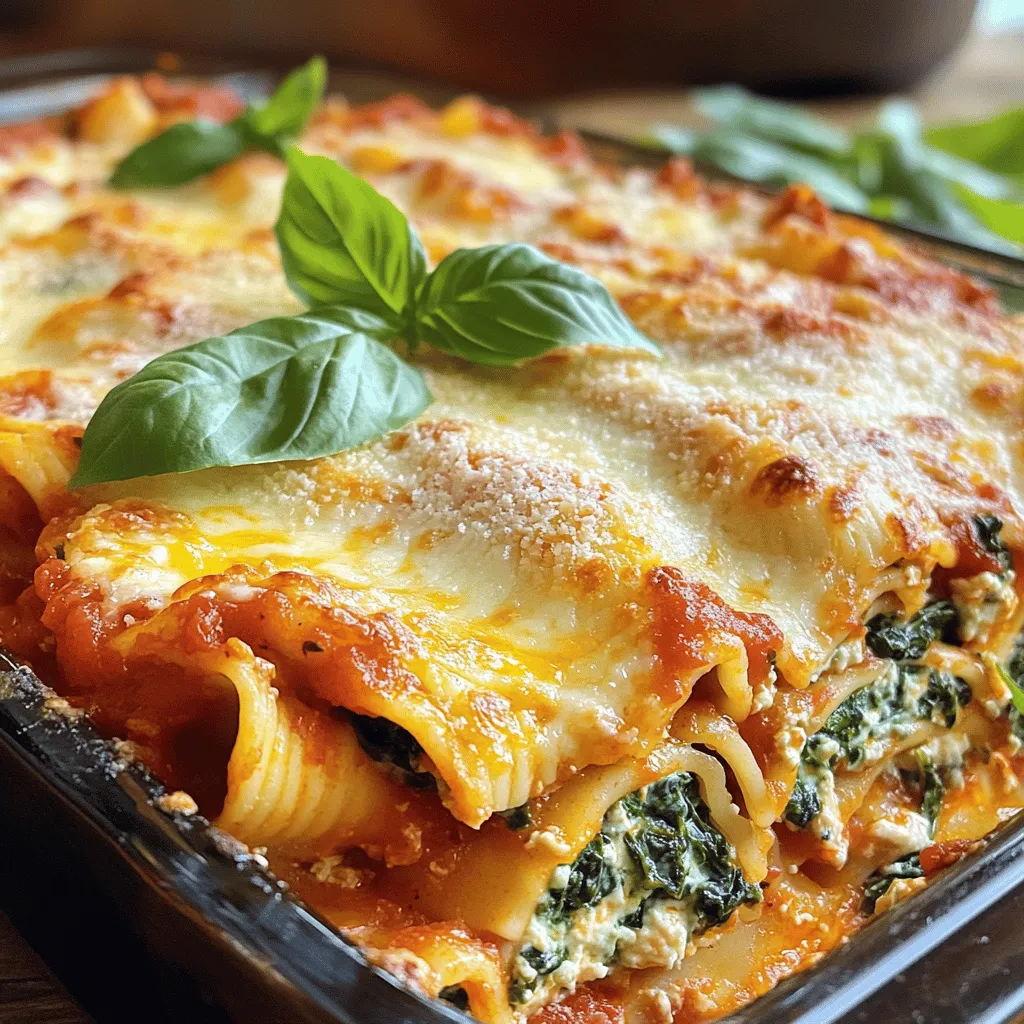
If you’re looking for a cozy dinner that warms the heart, you’ve found it! My Baked Ziti with Spinach and
![- 1 block extra-firm tofu, pressed and drained - 1 cup breadcrumbs (preferably panko) - 1/2 cup buffalo sauce - 1 tablespoon cornstarch - 1 teaspoon garlic powder - 1 teaspoon onion powder - Salt and pepper to taste - 4 large whole wheat tortillas - 1 cup lettuce, shredded - 1/2 cup grated carrots - 1/2 cup cucumber, thinly sliced - 1/4 cup ranch dressing or vegan ranch - Baking sheet - Parchment paper - Mixing bowls - Measuring cups and spoons - Knife and cutting board Gathering the right ingredients is key for your Crispy Buffalo Tofu Wraps. Start with one block of extra-firm tofu. This tofu gives you the best texture. Make sure to press and drain it well. This step removes excess moisture. It helps the tofu crisp up nicely. Next, grab a cup of breadcrumbs. I prefer panko for its extra crunch. You will need half a cup of buffalo sauce. This sauce adds that spicy kick we love. For flavor, you will use cornstarch, garlic powder, and onion powder. A dash of salt and pepper makes it perfect. You will also need four large whole wheat tortillas. These hold everything together. To add freshness, gather one cup of shredded lettuce, half a cup of grated carrots, and half a cup of thinly sliced cucumber. These veggies add crunch and color. Finally, you can choose ranch dressing or vegan ranch to drizzle inside. This adds a creamy contrast to the spicy tofu. Once you have all your ingredients, it’s time to prepare your workspace. You will need a baking sheet lined with parchment paper for easy cleanup. Mixing bowls help you combine your ingredients. Measuring cups and spoons ensure accuracy. A knife and cutting board make chopping easy. With everything ready, you can start making these tasty wraps. Check out the [Full Recipe] for step-by-step instructions! - Preheat the oven to 400°F (200°C). - Cut the pressed tofu into slices or cubes based on your preference. First, you want to start by preparing the tofu. Pressing it removes water and helps it get crispy. When you cut the tofu, think about how you want it in your wrap. Slices work great, but cubes can add a fun texture. - Mix cornstarch, garlic powder, onion powder, salt, and pepper. - Toss the tofu in the mixture until evenly coated. Now, let's make the tofu flavorful! In a bowl, mix cornstarch, garlic powder, onion powder, salt, and pepper. This mix is key for flavor and crunch. Toss the tofu in the mix until every piece is coated. This step makes a big difference in taste. - Dip tofu in buffalo sauce then dredge in breadcrumbs. - Bake for 25-30 minutes, flipping halfway for even crispiness. Next, it's time to bake. Dip each tofu piece in buffalo sauce, then roll it in breadcrumbs. This gives a spicy kick and a crunchy bite. Spread them on a baking sheet lined with parchment paper. Bake for about 25 to 30 minutes. Flip them halfway to get them crispy on both sides. - Spread ranch dressing on each tortilla. - Layer with shredded lettuce, grated carrots, cucumber, and crispy tofu. Once the tofu is crispy, it’s wrap time! Take a tortilla and spread ranch dressing in the center. Then add shredded lettuce, grated carrots, cucumber slices, and 3-4 pieces of that crispy tofu. This mix will make your wrap fresh and tasty. - Fold in the sides and roll up the tortilla to secure fillings. - Repeat for remaining tortillas. Finally, fold in the sides of the tortilla and roll it up tightly from the bottom. This keeps all the yummy fillings inside. Repeat this for the other tortillas. You just made a delicious wrap! For the full recipe, check out the detailed guide. To get crispy tofu, you must press it well. This step removes extra moisture. Without pressing, the tofu stays soggy. I recommend using a tofu press or a heavy object. Wrap the tofu in a clean towel and place something heavy on top. Let it sit for at least 30 minutes. When it comes to cooking, you have two main options: baking or frying. Baking gives you a healthier option. The tofu becomes crispy without extra oil. Frying, however, creates a nice crunch but adds more fat. Choose the method that fits your diet. You can enhance your wraps with fun toppings. Avocado adds creaminess, while bell peppers add crunch. Try adding sliced jalapeños for heat. Fresh herbs like cilantro or parsley add bright flavor too. For dips, ranch dressing is a classic choice. You can also serve with blue cheese or a spicy mayo. These dips elevate the taste and make each bite even better. Think about sides that pair well with these wraps. A fresh salad with lemon vinaigrette adds brightness. Sweet potato fries or a fruit salad make great complements too. For drinks, I suggest pairing these wraps with iced tea or a light beer. Sparkling water with lemon is a refreshing choice as well. These drinks can enhance your meal experience. For the complete cooking steps, check the Full Recipe. {{image_2}} You can make your crispy buffalo tofu wraps even spicier! Try adding sliced jalapeños for a fresh kick. They add a great crunch and heat. You can also drizzle sriracha on top for extra spice. Different hot sauces can change the flavor too. Each sauce has its unique taste. Experiment to find your favorite! If you need gluten-free options, use gluten-free tortillas and breadcrumbs. Many stores sell these now. For a vegan twist, ensure your hot sauce and ranch dressing are vegan-friendly. If low-carb is your goal, try lettuce wraps instead of tortillas. These swaps keep the taste while fitting your diet. Tofu is the star here, but you can switch it up! Tempeh works well too. It has a firmer texture and adds protein. If you prefer meat, chicken is a great choice. Just remember that cooking times will change. Chicken may need longer, while tempeh cooks faster. Adjust your baking time to get the best results. For more detailed instructions, check the Full Recipe. To store leftover wraps, wrap them tightly in foil or plastic wrap. Place them in an airtight container to keep them fresh. You can store them in the fridge for up to three days. The wraps taste best within this time frame, as the ingredients stay crisp and flavorful. To freeze assembled wraps, wrap each one in plastic wrap and then in foil. This helps prevent freezer burn. You can freeze them for up to one month. When ready to eat, thaw them in the fridge overnight. To reheat, place them in the oven at 350°F (175°C) for about 15 minutes. This method keeps the wraps crispy and tasty. For the full recipe, check the earlier sections. To press tofu, you need to remove excess water. This step makes the tofu firmer and helps it absorb flavors. Here’s how you can do it: 1. Drain the tofu: Remove the tofu from its packaging and drain the liquid. 2. Wrap it up: Place the tofu block on a clean kitchen towel or paper towels. Wrap the tofu tightly. 3. Add weight: Put a heavy object on top. A cast-iron skillet or a few cans work well. 4. Wait: Leave it for 15 to 30 minutes. This will squeeze out water. 5. Unwrap and use: Once pressed, your tofu is ready for cooking. You can prep some ingredients ahead of time. This helps save time when you are ready to eat. Here are some tips: - Press the tofu: Do this in advance to save time. - Prepare veggies: Chop lettuce, carrots, and cucumbers early. Store them in an airtight container. - Make the buffalo sauce mix: You can mix the spices with the buffalo sauce a day before. - Assemble just before serving: Wraps taste best when fresh. To make the wraps more filling, you can add extra proteins or grains. Here are some ideas: - Beans: Black beans or chickpeas add protein and fiber. - Grains: Quinoa or brown rice can make the wrap hearty. - Nuts or seeds: Chopped nuts or seeds can add crunch and healthy fats. If you want to try something other than ranch, here are some tasty alternatives: - Greek yogurt: It’s creamy and adds a tangy taste. - Hummus: This adds flavor and is a good source of protein. - Guacamole: For a rich and creamy twist, use guacamole. - Vegan options: Look for vegan ranch or other plant-based dressings. Yes, these wraps are great for meal prep! Here’s how to prepare them with ease: - Store filling separately: Keep the tofu and veggies in separate containers. - Wrap just before eating: This keeps the tortillas fresh and prevents sogginess. - Reheat tofu: If you store the tofu, reheat it in the oven or air fryer to keep it crispy. For the full recipe, check out the Crispy Buffalo Tofu Wraps. These crispy buffalo tofu wraps are easy to make and delicious. You started with fresh ingredients and followed each step closely. Preparing the tofu carefully ensured a crispy texture. The wraps deliver rich flavors and make a great meal or snack. Experiment with toppings or dips to find your favorite combination. Store extras properly or freeze for later use. Enjoy this simple, tasty dish that meets various dietary needs. You'll impress friends and family with your cooking skills!](https://recipespursuit.com/wp-content/uploads/2025/07/9477ea26-6ba3-4772-ab05-bda8d1264f55.webp)
Looking for a tasty and healthy meal? Crispy Buffalo Tofu Wraps deliver bold flavor in every bite! Made with simple
![- 1 lb boneless, skinless chicken breast, cut into 1-inch cubes - 1 cup fresh pineapple, cut into 1-inch cubes - 1 red bell pepper, cut into 1-inch pieces - 1 green bell pepper, cut into 1-inch pieces - 1 small red onion, cut into wedges For this dish, I choose chicken breast for its mild taste and tender texture. Fresh pineapple adds a sweet and tangy flavor. The bell peppers bring color and crunch, making every bite exciting. - 2 tablespoons olive oil - 3 tablespoons soy sauce (or tamari for gluten-free) - 2 tablespoons honey The marinade makes the chicken juicy. Olive oil gives richness, while soy sauce adds depth. Honey balances the saltiness with a touch of sweetness. - 1 teaspoon garlic powder - 1 teaspoon ground ginger - Salt and pepper to taste Garlic powder and ground ginger enhance the flavor of the chicken. Salt and pepper are key to making every ingredient shine. This recipe is simple yet full of flavor. You can check the [Full Recipe] for all the steps to create this dish. Enjoy the vibrant tastes of grilled pineapple chicken skewers! To start, we need to mix the marinade. In a bowl, whisk together: - 2 tablespoons olive oil - 3 tablespoons soy sauce - 2 tablespoons honey - 1 teaspoon garlic powder - 1 teaspoon ground ginger - Salt and pepper to taste This mix brings a sweet and savory flavor to the chicken. Next, add 1 pound of cubed chicken breast to the bowl. Make sure each piece is coated well with the marinade. Cover the bowl and place it in the fridge for at least 30 minutes. For deeper flavor, let it marinate for up to 2 hours. While the chicken marinates, soak your wooden skewers in water for about 30 minutes. This step helps prevent burning on the grill. After soaking, it's time to assemble the skewers. Thread the marinated chicken cubes onto the soaked skewers. Alternate with 1 cup of fresh pineapple cubes, 1 red bell pepper, 1 green bell pepper, and 1 small red onion. You can mix the order and colors to make it pretty! Now, let’s get grilling! Preheat your grill to medium-high heat. This step is important for getting nice grill marks. Once the grill is ready, place the skewers on it. Cook for about 10 to 12 minutes, turning them occasionally. This ensures even cooking. The chicken should be cooked through and have lovely grill marks. When done, remove the skewers from the grill. Let them rest for a few minutes before serving. Enjoy your grilled pineapple chicken skewers! For the full recipe, see the instructions above. Marinating chicken is key for great flavor. I recommend a minimum of 30 minutes. For the best taste, aim for 2 hours. This lets the chicken soak up all the tasty marinade. Use a tight lid or plastic wrap to cover the bowl. Refrigerate it while you wait. The longer you marinate, the more flavor you get. To check your grill heat, hold your hand above the grill grates. If you can keep it there for 2 seconds, it's high heat. For medium-high, you should hold it for 4 seconds. This is perfect for cooking your skewers. Preheat your grill for about 10 minutes. This helps create nice grill marks and keeps the chicken juicy. When serving your skewers, think about color and freshness. Lay them on a bright plate. Add fresh cilantro on top for a pop of green. You can also serve them with lime wedges for a zesty kick. If you want, add a side of rice or a fresh salad. This makes a complete meal that looks and tastes great. For the full recipe, check out the details above. {{image_2}} When you want to mix things up, try different ingredients in your grilled pineapple chicken skewers. You can use shrimp instead of chicken. Shrimp cooks fast and adds a nice twist. Tofu is another great choice for a meatless option. It soaks up flavors well and is perfect for grilling. For veggies, think about using seasonal produce. Zucchini, mushrooms, or cherry tomatoes all work well. These options not only add color but also vary the taste. Changing up your marinade can make a big difference. If you like heat, add red pepper flakes or a dash of hot sauce. This can give your skewers a spicy kick that is very tasty. If you want more sweetness, try adding more honey or even some brown sugar. This balances the savory flavors nicely. Adjusting the marinade can make your skewers feel fresh and new every time. For the full recipe, check out the complete instructions for making these delicious skewers! To store leftover grilled pineapple chicken skewers, let them cool first. Place them in an airtight container. This keeps them fresh and safe. You can keep them in the fridge for up to three days. Make sure they are well sealed to avoid drying out. Reheating skewers can be tricky. You want to keep them juicy. The best way is to use a skillet. Heat a little oil in the pan over medium heat. Add the skewers and cover them. This traps the steam and helps heat them evenly. Cook for about 3-5 minutes on each side. You can also reheat them in the oven at 350°F for 10-15 minutes. If you want to save skewers for later, freezing is a great option. First, let the skewers cool completely. Then, wrap each skewer in plastic wrap. After that, place them in a freezer bag. This keeps air out and prevents freezer burn. You can freeze them for up to two months. To thaw, move them to the fridge a day before you plan to eat them. You should cook chicken on skewers for about 10-12 minutes. This timing works well on medium-high heat. Make sure to turn the skewers often. This helps prevent burning and ensures even cooking. The chicken should reach an internal temperature of 165°F. Use a meat thermometer for accuracy. Yes, you can use many fruits with chicken skewers! Here are some great options: - Mango: Adds sweetness. - Peaches: Offers a juicy burst. - Zucchini: Adds a fresh crunch. - Cherry tomatoes: Bright and tangy. Feel free to mix and match for fun flavors! Grilled chicken skewers pair well with many side dishes. Here are some tasty choices: - Rice: A simple, filling option. - Salad: A light, crisp complement. - Grilled veggies: Enhance the smoky flavor. - Corn on the cob: Sweet and fun to eat. Try these sides to make your meal complete! For the full recipe, check out the main article. Grilled pineapple chicken skewers are easy and fun to make. You learned about essential ingredients like chicken, pineapple, and bell peppers. We walked through mixing marinades and creating the perfect skewers. Tips on grilling and serving add extra flavor and style. Remember, you can mix up ingredients for more fun. Try different proteins or spices! Enjoy these tasty skewers anytime, and don’t forget to share with friends. Happy grilling!](https://recipespursuit.com/wp-content/uploads/2025/07/622611d3-9b02-470d-aac5-5ab019c13e17.webp)
If you’re looking for a tasty dinner idea, you’ve found it! Grilled Pineapple Chicken Skewers combine juicy chicken, sweet pineapple,
![To make this tasty meal, you need simple ingredients that pack a punch. Here’s what you will need: - 1 ripe avocado - 1 cup canned chickpeas, rinsed and drained - 1 tablespoon lemon juice - 1 clove garlic, minced - ¼ teaspoon cumin powder - ½ teaspoon salt - ¼ teaspoon black pepper - 2 slices whole-grain bread These ingredients come together to create a creamy and flavorful spread. The avocado adds healthy fats, while chickpeas give you protein and fiber. To take your toast to the next level, consider these fun garnishes: - 1 tablespoon cherry tomatoes, halved - Fresh cilantro or parsley leaves - Red pepper flakes (optional for spice) These add color and extra flavor. Cherry tomatoes offer a fresh burst, while herbs bring a nice touch. This easy chickpea avocado toast is not only delicious but also healthy. Here’s a quick look at its nutritional benefits: - Calories: Approximately 300 per serving - Protein: 10 grams from chickpeas - Fiber: 8 grams, aiding digestion - Healthy Fats: From the avocado Enjoy this meal as a snack or light lunch. It fuels your body while tasting great. For the full recipe, check the [Full Recipe]. Start by gathering your ingredients. You need: - 1 ripe avocado - 1 cup canned chickpeas, rinsed and drained - 1 tablespoon lemon juice - 1 clove garlic, minced - ¼ teaspoon cumin powder - ½ teaspoon salt - ¼ teaspoon black pepper - 2 slices whole-grain bread - 1 tablespoon cherry tomatoes, halved (for garnish) - Fresh cilantro or parsley leaves (for garnish) - Red pepper flakes (optional, for spice) First, take the avocado and cut it in half. Remove the pit and scoop the green flesh into a bowl. Next, rinse the chickpeas under cold water in a strainer. Let them drain well. This step helps remove extra sodium from canned chickpeas. Now, let's toast the bread. You can use a toaster or a pan. If using a pan, heat it over medium heat. Place the bread slices in the pan. Toast them until they turn golden brown on both sides. This takes about 2-3 minutes per side. Watch closely to avoid burning. Crispy toast will hold the toppings better. With the avocado in the bowl, mash it slightly with a fork. You want it creamy but still a bit chunky. Next, add the chickpeas. Use the fork to mash them together with the avocado. Mix until they are combined but not fully smooth. Now, stir in the lemon juice, minced garlic, cumin powder, salt, and black pepper. Ensure everything is mixed well. This blend gives your toast a fresh and zesty flavor. Finally, it's time to assemble your toast. Spread a generous amount of the chickpea and avocado mix on each slice of toast. Top with halved cherry tomatoes and garnish with fresh herbs. If you like some heat, sprinkle red pepper flakes on top. Enjoy your creation! For the complete recipe, refer to the [Full Recipe]. When picking avocados, look for ripe ones. They should feel slightly soft when pressed. If they are hard, they need more time to ripen. You can place them in a bag with bananas to speed this up. Avoid any avocados with dark spots or bruises. These may taste bad or be overripe. For the best texture, use canned chickpeas. Rinse and drain them well before using. Lightly mash them with the avocado. This keeps some whole for a nice bite. If you mash them too much, it may turn mushy. Aim for a chunky mix to keep it interesting. To keep your toast fresh, store the chickpea and avocado mix in an airtight container. This helps it stay green longer. If you make extra, eat it within a day to enjoy the best flavor. Toast your bread fresh for each meal to keep it crispy. If you have leftover toast, store it in a bag, but it may get soft. {{image_2}} To boost the protein in your chickpea avocado toast, consider adding some extras. You can mix in cooked quinoa or lentils for an extra punch. Another option is to add some hemp seeds for crunch and nutrition. If you eat eggs, a poached or fried egg on top adds creaminess and protein. You can also sprinkle some feta cheese for a salty flavor. Spices and herbs can transform your toast. Try adding smoked paprika or cayenne for a smoky kick. Fresh herbs like basil or chives can brighten the dish. You might also enjoy a dash of garlic powder for extra flavor. Don’t forget about lemon zest to add a fresh zing. Experiment with your favorite spices to find your perfect mix. This recipe is already vegan and can easily be gluten-free. Use gluten-free bread for toasting instead of whole-grain. You can also swap chickpeas for white beans if you want a different taste. Just mash them like chickpeas and follow the same steps. This makes it a great option for anyone with dietary needs. For a nutty flavor, try adding tahini to the mash. For the full recipe, check out the Smashed Chickpea & Avocado Toast 🥑 section. If you have leftover chickpea and avocado mix, store it in an airtight container. Make sure to press plastic wrap directly onto the mix to limit air exposure. This helps keep it fresh and prevents browning. Store it in the fridge for up to 2 days. To reheat your toast, place it in a toaster or toaster oven. This will help regain its crispness. Avoid using a microwave, as it can make the toast soggy. Reheat for about 2-3 minutes until warm and crispy again. The chickpeas can last in the can for 2-3 years if unopened. After opening, store them in the fridge for up to a week. Avocados should be used within 1-2 days after cutting. Whole-grain bread can stay fresh in the pantry for about a week, or longer if frozen. For the full recipe, check out the details above. You can prepare the chickpea and avocado mix ahead of time. Simply mash the avocado and chickpeas as the recipe shows. Store it in an airtight container. Add some lemon juice to keep it fresh. You can prep this mixture a day before. Just toast the bread when you are ready to eat. This way, you save time and enjoy your meal quickly. You can add various healthy toppings to boost flavor and nutrition. Here are some ideas: - Sliced radishes for crunch - Cucumber slices for freshness - Feta cheese for creaminess - Arugula for a peppery kick - Sliced avocado for extra creaminess - Pumpkin seeds for a nutty flavor These toppings not only taste great but also add color to your dish. Yes, you can use dried chickpeas instead of canned ones. However, dried chickpeas need more time. Start by soaking them overnight in water. After soaking, cook them until soft. This usually takes about one to two hours. Make sure to drain and rinse them well before mashing. Using dried chickpeas can enhance the flavor of your toast and is a great way to control the texture. This article covered easy chickpea avocado toast, from essential ingredients to tasty variations. You learned how to prepare and store this dish, ensuring freshness and flavor. The right avocados and chickpeas make a big difference. Don’t forget the optional garnishes and spices to elevate your toast. Experiment with toppings and enjoy this healthy meal any time. Simple, nutritious, and delicious, this toast makes cooking fun and easy. Start creating your own twist today for a tasty treat!](https://recipespursuit.com/wp-content/uploads/2025/07/ffa4b120-b113-4855-9bad-2d81131a7bcd.webp)
If you’re looking for a quick and satisfying meal, Easy Chickpea Avocado Toast is for you. This tasty dish combines
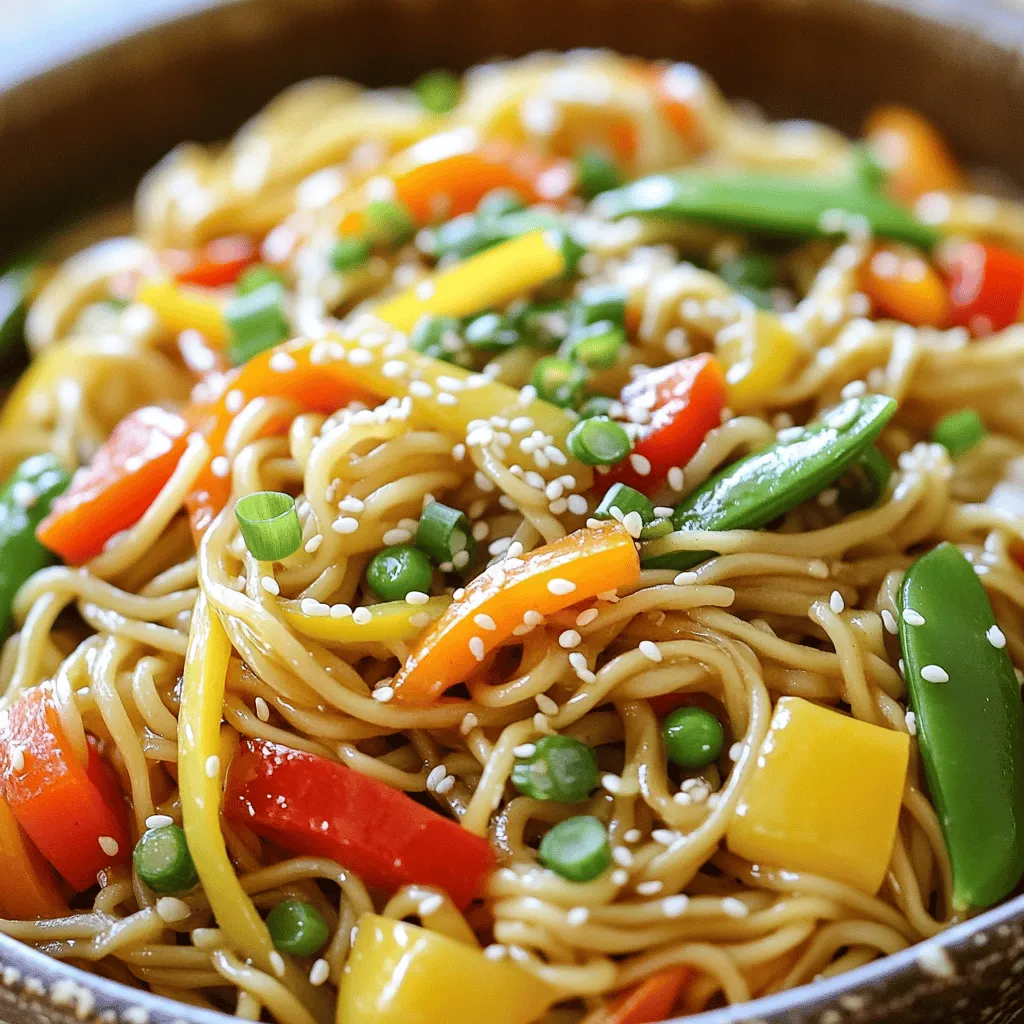
Are you looking for a quick and tasty meal? Ginger Garlic Stir Fry Noodles are the answer! With just a
![To make a tasty Baked Chicken Parmesan, you will need these main ingredients: - 4 boneless, skinless chicken breasts - 1 cup breadcrumbs (preferably Italian seasoned) - 1/2 cup grated Parmesan cheese - 1 cup marinara sauce (homemade or store-bought) - 1 1/2 cups shredded mozzarella cheese - 2 large eggs, beaten - 1 teaspoon garlic powder - 1 teaspoon dried oregano - Salt and pepper to taste - Olive oil spray These ingredients bring a great mix of flavors and textures. The chicken gives a nice base, while the cheeses add creaminess. The marinara sauce adds a burst of tomato goodness that makes this dish shine. You can tweak the recipe with these optional ingredients: - Fresh basil leaves for garnish - Spices like red pepper flakes for a kick - Different cheeses like provolone or fontina - Vegetables like spinach or mushrooms for added nutrition Feel free to get creative! Changing a few ingredients can make the dish your own. Baked Chicken Parmesan is not only delicious but also balanced. A serving (one chicken breast) contains roughly: - Calories: 400 - Protein: 40g - Fat: 18g - Carbohydrates: 20g - Fiber: 1g This dish packs a protein punch, which helps keep you full. It also features carbs from the breadcrumbs. If you want to lighten it up, you can use less cheese or serve it with a salad. For the full recipe, check out the instructions provided earlier. To make Baked Chicken Parmesan, start by gathering your ingredients. You will need: - 4 boneless, skinless chicken breasts - 1 cup breadcrumbs (preferably Italian seasoned) - 1/2 cup grated Parmesan cheese - 1 cup marinara sauce (homemade or store-bought) - 1 1/2 cups shredded mozzarella cheese - 2 large eggs, beaten - 1 teaspoon garlic powder - 1 teaspoon dried oregano - Salt and pepper to taste - Fresh basil leaves for garnish (optional) - Olive oil spray First, preheat your oven to 400°F (200°C). Then, take a baking dish and lightly grease it with olive oil spray. In a shallow bowl, mix the breadcrumbs, grated Parmesan, garlic powder, oregano, salt, and pepper. In another bowl, beat the eggs until smooth. Dip each chicken breast into the eggs, letting the extra drip off. Then coat the chicken with the breadcrumb mix. Press down to make sure it sticks well. After coating, place the chicken breasts in the baking dish. Lightly spray the tops with olive oil spray. Bake the chicken for 20-25 minutes. You want it golden and cooked through. Next, pull the dish from the oven. Spoon marinara sauce over each piece of chicken. Then, sprinkle mozzarella cheese on top. Return the dish to the oven for another 10-15 minutes. The cheese should be melted and bubbly. Once done, let the chicken rest for a few minutes before serving. For a great meal, serve your Baked Chicken Parmesan warm. It pairs well with a side of pasta or a simple salad. You can also add fresh basil leaves on top for a nice touch. For a twist, try serving it with garlic bread or over a bed of sautéed spinach. If you're feeling adventurous, add some crushed red pepper flakes for a spicy kick. Enjoy your delicious creation! For the complete recipe, check out the [Full Recipe]. To get that perfect crispy coating, follow some simple steps. First, make sure to use fresh breadcrumbs for the best texture. You can also mix in some Italian herbs to boost the flavor. Next, press the breadcrumbs firmly onto the chicken. This helps them stick better. A light spray of olive oil on top before baking is key. It helps the coating turn golden and crispy. Avoid these common mistakes for a better dish. Don't skip the egg dip; it’s crucial for the coating. If the chicken is too wet, the crumbs won’t stick. Make sure to dry the chicken with paper towels first. Also, don’t overcrowd the baking dish. Give each piece space to cook evenly. Finally, resist the urge to skip the resting time after baking. Letting the chicken rest keeps it juicy. Baked Chicken Parmesan pairs well with several sides. A simple green salad with a light vinaigrette balances the meal. Garlic bread is a classic choice that everyone loves. You can also serve it over pasta for a hearty dinner. If you want something lighter, steamed veggies are a great option. For a refreshing drink, try iced tea or a light white wine. {{image_2}} You can make Baked Chicken Parmesan lighter. Use skinless chicken thighs instead of breasts. They stay juicy and add flavor. Swap out breadcrumbs for crushed almonds or oats. This keeps the crunch without the carbs. A low-fat cheese can also reduce calories while still tasting great. You can customize this dish with different ingredients. Try using whole wheat breadcrumbs for a healthier twist. If you want a gluten-free option, use almond flour or gluten-free breadcrumbs. Substitute marinara with pesto for a fresh flavor. You can also add spinach or mushrooms to boost nutrition. To elevate the taste, mix fresh herbs into the breadcrumb mix. Basil, parsley, or thyme bring freshness. You can add a dash of red pepper flakes for heat. For extra richness, drizzle balsamic glaze over the chicken before serving. These small changes create a big impact on taste! If you're interested in trying out the full recipe, refer to the Baked Chicken Parmesan Delight section above. After enjoying your Baked Chicken Parmesan, let leftovers cool to room temperature. Place them in an airtight container. This keeps them fresh and helps avoid sogginess. Store the container in the fridge. These leftovers can last for up to three days. To reheat, preheat your oven to 350°F (175°C). Place the chicken on a baking sheet. Cover with foil to keep moisture in. Heat for about 15-20 minutes. If you want the cheese to melt more, remove the foil for the last few minutes. You can also use a microwave, but the oven keeps it crispier. If you want to save some for later, freezing is a great option. Wrap each piece in plastic wrap, then place them in a freezer bag. This helps prevent freezer burn. You can freeze the chicken for up to three months. To thaw, move it to the fridge overnight before reheating. For the best taste, always bake from frozen rather than microwaving. Enjoy your Baked Chicken Parmesan later with great flavor! You can tell when chicken is done by checking its internal temperature. Use a meat thermometer. The chicken should reach 165°F (75°C). When you cut into it, the juices should run clear. If the juices are pink, it needs more time. I usually bake it for about 20-25 minutes. Then, I add the sauce and cheese for another 10-15 minutes. This keeps the chicken juicy and tender. Yes, you can mix it up! While mozzarella is classic, you can try provolone or gouda. For a sharper taste, use aged cheddar or fontina. You can also blend different cheeses for unique flavors. Just remember to keep the cheese melty and gooey. This will enhance the dish's overall taste. Absolutely! You can prepare it a day in advance. Just follow the steps to coat the chicken. Place it in a baking dish, but don’t add sauce or cheese yet. Cover it tightly and store it in the fridge. When ready to bake, add the sauce and cheese before cooking. This makes it easy for busy days. You can have a tasty meal without the rush! For the full recipe, refer to the earlier section. Baked Chicken Parmesan is a delicious meal that you can easily make at home. You learned about the main and optional ingredients, along with how to prepare, bake, and serve this dish. We discussed tips to ensure a crispy coating and common mistakes to avoid. You can even try variations for healthier meals or different flavors. Don’t forget about storing leftovers safely. Now, you have all the knowledge to enjoy this dish and impress your family with your cooking skills. Enjoy your tasty chicken!](https://recipespursuit.com/wp-content/uploads/2025/07/00c11e89-8744-4bf3-b796-df656c1c4469.webp)
Are you ready to dive into a dish that’s both tasty and easy to make? Baked Chicken Parmesan is a
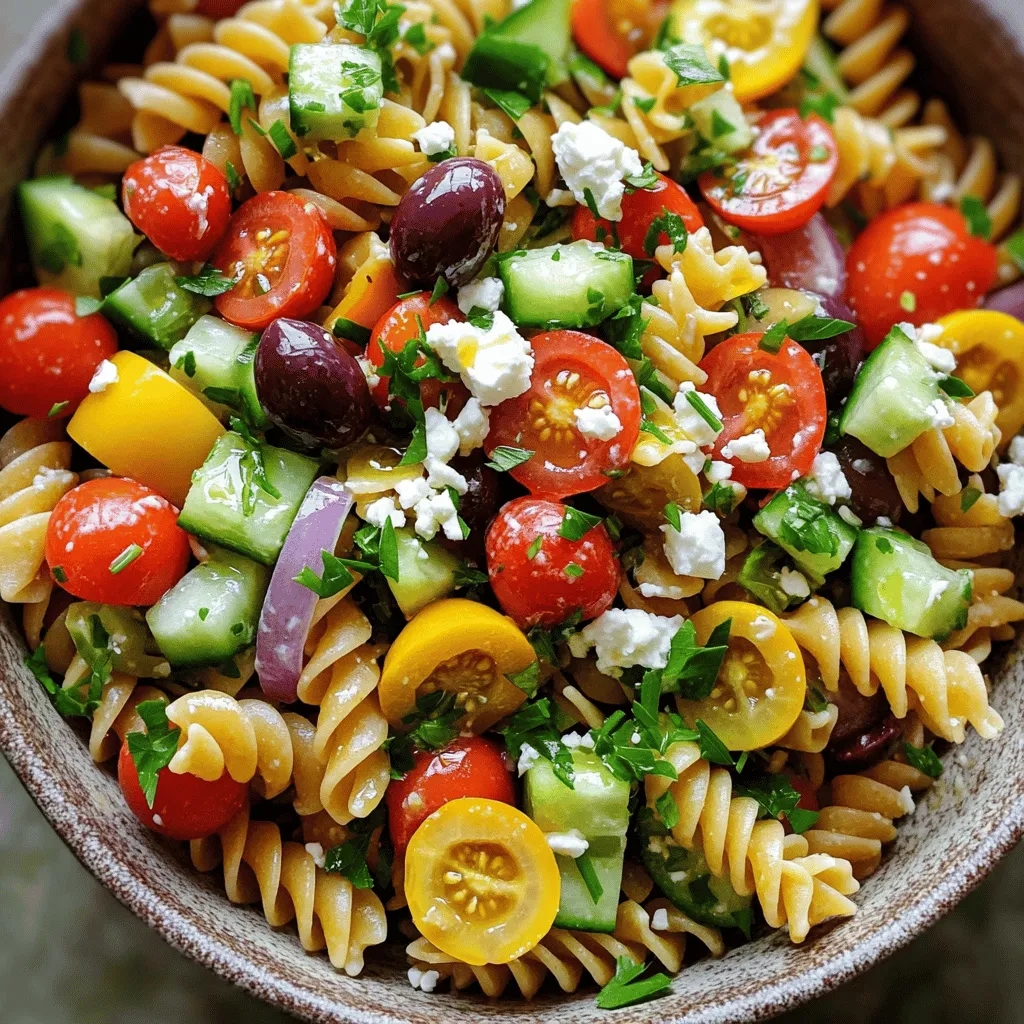
Looking for a fresh and tasty dish that shines at any gathering? Look no further than Classic Greek Pasta Salad!
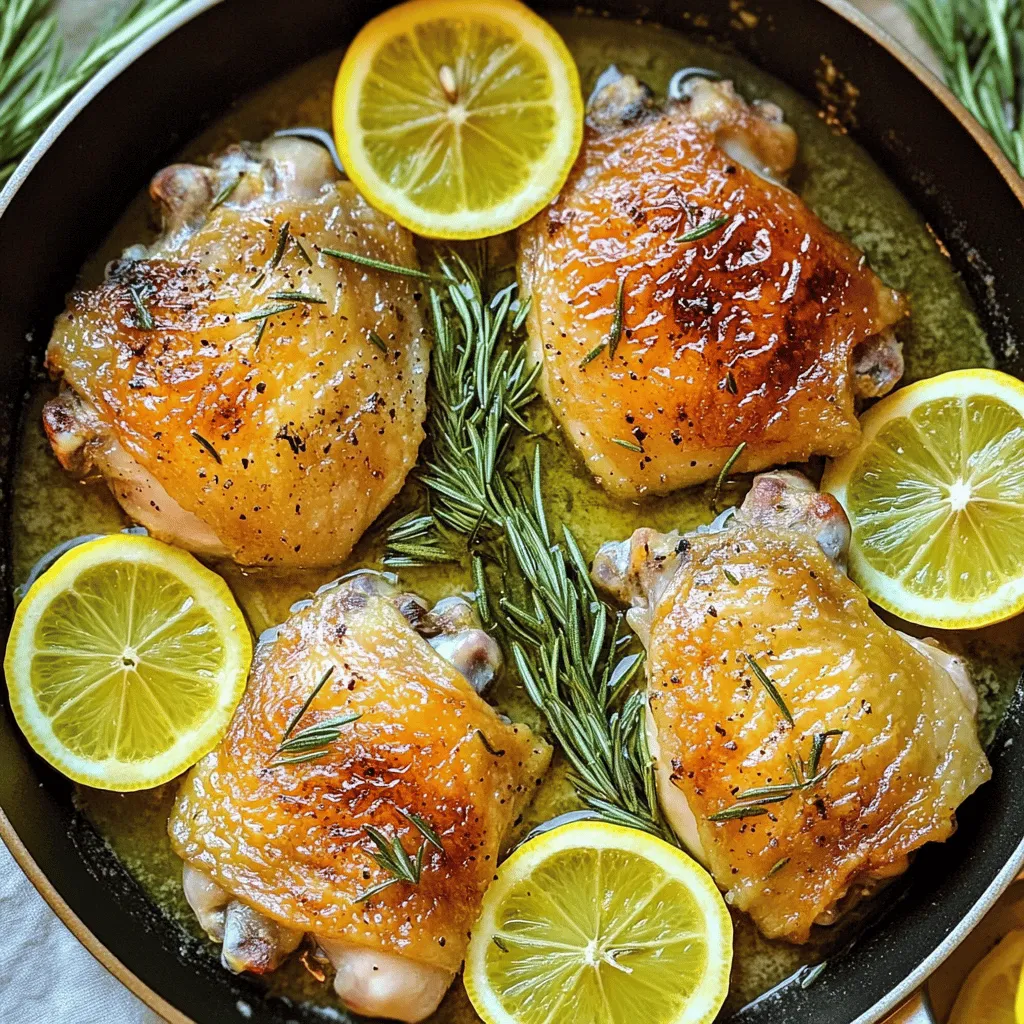
Craving a dish that bursts with flavor? You’ll love my Lemon Rosemary Chicken Thighs! This recipe delivers juicy, tangy chicken
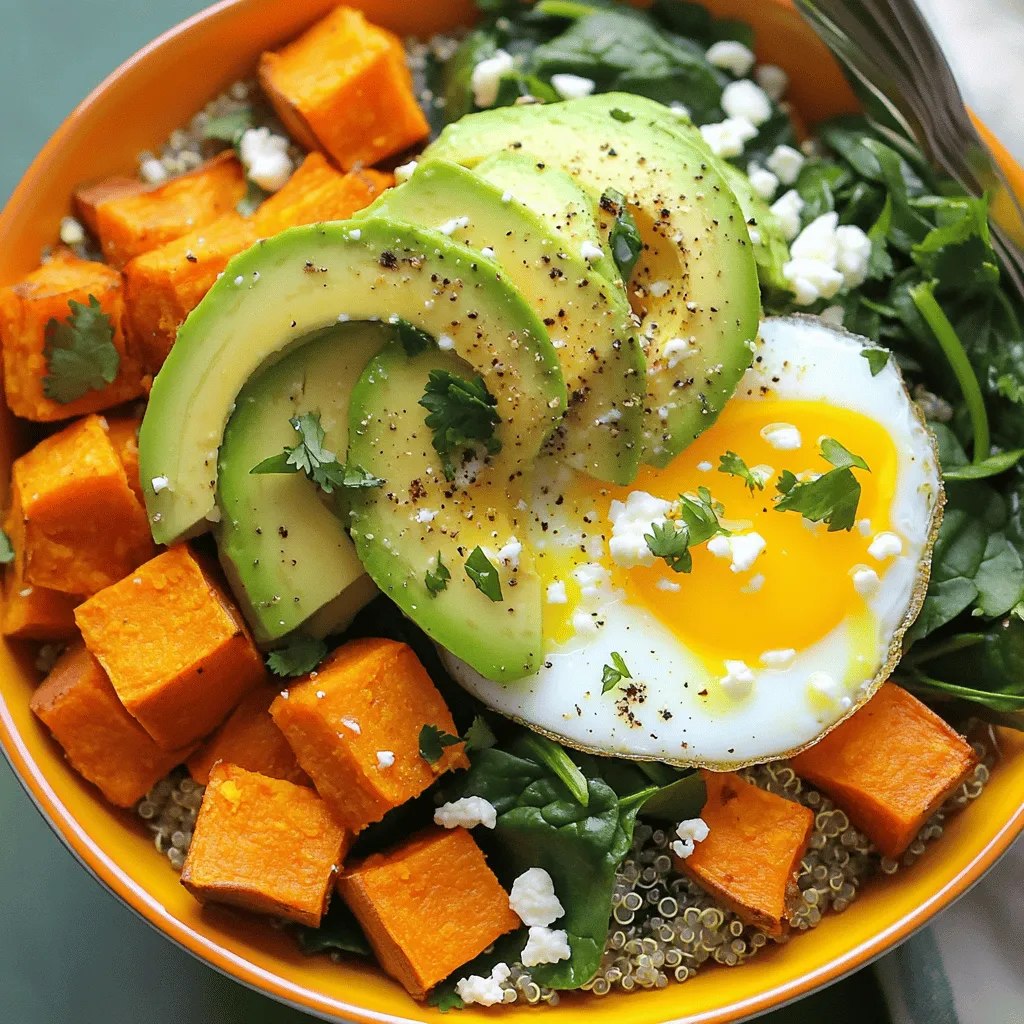
Start your day with a delicious Sweet Potato Breakfast Bowl that’s as nutritious as it is tasty! This bowl is
