Skip to content
DisclaimerTerms Of UseGDPR PolicyCookie Policy

Recipes Pursuit

  • Home
  • Drinks
  • Appetizers
  • Dinner
  • Dessert
  • About
  • Contact
  • Privacy Policy
DisclaimerTerms Of UseGDPR PolicyCookie Policy

NO-ING-IMG

To make this dip, you need a few key items. Here’s the list: - 2 cups frozen corn, thawed - 1 cup cream cheese, softened - 1 cup sour cream - 1 cup shredded cheddar cheese - 1/2 cup diced jalapenos (fresh or pickled) - 1/4 cup chopped green onions - 1 teaspoon garlic powder - 1 teaspoon onion powder - Salt and pepper to taste - Tortilla chips, for serving These ingredients come together to create a creamy and cheesy dip that shines at any gathering. You can change the dip to fit your taste. Here are some ideas: - Add diced tomatoes for freshness. - Mix in black beans for extra protein. - Replace cheddar with Monterey Jack cheese for a different flavor. Feel free to get creative! Each change can give you a new twist. You will need some tools to make this dip. Here’s what I recommend: - A large mixing bowl - A spatula or wooden spoon for mixing - A baking dish for cooking - An oven to bake the dip Having the right tools will help you make this dip easily and quickly. For the full recipe, check out the details provided above. Start by gathering all your ingredients. You will need: - 2 cups frozen corn, thawed - 1 cup cream cheese, softened - 1 cup sour cream - 1 cup shredded cheddar cheese - 1/2 cup diced jalapenos (fresh or pickled) - 1/4 cup chopped green onions - 1 teaspoon garlic powder - 1 teaspoon onion powder - Salt and pepper to taste - Tortilla chips, for serving Once everything is ready, preheat your oven to 350°F (175°C). This helps the dip cook evenly. In a large bowl, mix the softened cream cheese and sour cream. Stir until it becomes smooth and creamy. This step is key to a great texture. Next, add in the thawed corn, shredded cheddar cheese, diced jalapenos, chopped green onions, garlic powder, onion powder, salt, and pepper. Combine all of it well. You want every bite to be packed with flavor. Now, transfer the mixture into a baking dish. Use a spatula to smooth the top. This helps it bake evenly and looks nice when you serve it. Place the dish in the oven. Bake for 25-30 minutes. Look for the dip to be hot and bubbly, with slightly brown edges. This shows it is ready. Once done, carefully remove it from the oven. Let it cool for a few minutes before serving. This helps to avoid burns. Serve the dip hot in the baking dish. For a nice touch, sprinkle some extra chopped green onions on top. It adds color and freshness. Pair the dip with a bowl of colorful tortilla chips. This makes a great snack or appetizer. You can also serve it with fresh veggie sticks for a healthier option. If you want to impress your guests, consider serving it with a side of guacamole or salsa. This offers even more flavors to enjoy. For a full recipe, you can check the details above. To boost the flavor of your Cheesy Jalapeno Corn Dip, use fresh ingredients. Fresh jalapenos bring a bright crunch. You could also add smoked paprika for a warm, smoky taste. For a touch of zest, squeeze in some lime juice. This adds a fresh twist that balances the richness of the cream cheese. Don’t forget to season well with salt and pepper. Taste as you go to find the perfect mix for your palate. One common mistake is not thawing the corn properly. If it’s still frozen, the dip won’t blend well. Be sure to soften the cream cheese fully, too. If it’s too cold, it won’t mix smoothly. Another mistake is baking it for too long. Keep an eye on it so it doesn’t dry out. You want the dip hot and bubbly, not overcooked. Lastly, don’t skip the green onions. They add a fresh flavor and nice color. For a creamy dip, use full-fat cream cheese and sour cream. They provide the best texture. Mix them until smooth before adding other ingredients. If you want an even creamier dip, try adding some shredded mozzarella cheese. It melts beautifully and adds richness. Stir gently to keep the air in the dip. This helps maintain a light texture. Serve hot for the best creamy experience. Enjoy with crispy tortilla chips for the perfect bite! {{image_2}} If you want more heat, try adding more jalapenos. Use fresh jalapenos for a bolder flavor. You can also add a splash of hot sauce or diced serrano peppers. This will kick things up a notch. For those who love heat, consider using pepper jack cheese instead of cheddar. It's creamy and spicy! You can easily make this dip healthier. Swap out the cream cheese for Greek yogurt. It adds creaminess but with less fat. Use low-fat sour cream as well. You can also replace cheddar with a lighter cheese like mozzarella. This keeps the flavor while reducing calories. Seasonal ingredients can make this dip shine. In summer, add fresh corn cut from the cob. It tastes sweeter and fresher. In fall, try adding diced roasted red peppers. They add great flavor and color. You can also mix in herbs like cilantro or parsley for a fresh touch. For the full recipe, check out the [Full Recipe]. To store leftovers of Cheesy Jalapeno Corn Dip, cool it to room temperature first. Then, place the dip in an airtight container. Seal it tightly to keep it fresh. Store it in the fridge for up to three days. This will help maintain its creamy texture and flavors. When you're ready to enjoy the dip again, preheat your oven to 350°F (175°C). Transfer the dip to a baking dish if it's not already in one. Cover it with foil to prevent it from drying out. Heat for about 15-20 minutes or until it's warm. You can also use the microwave. Just heat in short bursts, stirring in between, until hot. If you want to save the dip for later, freezing is a great option. First, let it cool completely. Then, place the dip in a freezer-safe container. Leave some space at the top, as it may expand. Seal it well and freeze for up to three months. When you're ready to eat it, thaw it in the fridge overnight. Then, reheat as mentioned above. This method keeps your dip tasting fresh! For the full recipe, check the previous sections. To make Cheesy Jalapeno Corn Dip spicier, you can add more jalapenos. Use fresh jalapenos for a bold flavor. If you like heat, try adding a splash of hot sauce. You can also mix in some cayenne pepper or crushed red pepper flakes. For an extra kick, consider using pepper jack cheese instead of cheddar. This will give your dip a nice zing. Yes, you can make this dip ahead of time. Prepare the dip and place it in a baking dish. Cover it and store it in the fridge. When you are ready to eat, just pop it in the oven. Bake it at 350°F (175°C) for about 30 minutes, or until it’s hot and bubbly. This makes it easy for parties or gatherings. Cheesy Jalapeno Corn Dip pairs well with many snacks. The best option is tortilla chips. They are crispy and scoop up the dip easily. You can also serve it with fresh veggies like carrots, celery, or bell peppers. Another great choice is soft pita bread or crispy crackers. They all add a nice crunch to the creamy dip. For a fun twist, try serving it with mini tacos or quesadillas! For the full recipe, check out the complete guide. This blog post covered the key points for making Cheesy Jalapeno Corn Dip. You learned the main and optional ingredients, tools for prep, and step-by-step directions. We discussed tips for flavor, texture, and common mistakes. Variations let you spice it up or make it healthier. Lastly, I shared storage tips to keep your dip fresh. In the end, this dip offers a fun way to enjoy gatherings. Enjoy customizing it to fit your taste!

Cheesy Jalapeno Corn Dip Simple and Tasty Recipe

If you’re looking for a bold and creamy treat to wow your guests, this Cheesy Jalapeno Corn Dip is your

- Zucchini preparation and sizing - Use 2 medium zucchinis. - Wash and cut them into fry-sized sticks (about 3-4 inches long and ½ inch thick). - Dry ingredient details - 1 cup of panko breadcrumbs gives a nice crunch. - ½ cup grated Parmesan cheese adds flavor. - 1 teaspoon garlic powder enhances taste. - 1 teaspoon onion powder adds depth. - ½ teaspoon dried oregano brings an herby note. - ½ teaspoon paprika gives a touch of warmth. - Salt and pepper to taste for seasoning. - Liquid ingredient specifics - 2 large eggs are used for binding. - ¼ cup all-purpose flour helps with the coating. - Use cooking spray or drizzle olive oil for crispiness. These simple ingredients work together to create a tasty snack. For the full recipe, check out the Crispy Baked Zucchini Fries section. First, set your oven to 425°F (220°C). This high heat helps make the fries crispy. Next, line a baking sheet with parchment paper. This step makes cleanup easy and helps the fries not stick. To cut the zucchini, wash them first. Trim both ends off each zucchini. Then, slice them into fry-sized sticks. Each stick should be about 3-4 inches long and ½ inch thick. This size ensures even cooking and the best crunch. Now we move on to the fun part: breading! Start with three bowls. In the first bowl, place ¼ cup of all-purpose flour. In the second bowl, whisk together 2 large eggs. In the third bowl, mix 1 cup of panko breadcrumbs with ½ cup of grated Parmesan, 1 teaspoon of garlic powder, 1 teaspoon of onion powder, ½ teaspoon of dried oregano, ½ teaspoon of paprika, and a bit of salt and pepper. Take a zucchini stick. First, coat it in the flour. This helps the egg stick. Next, dip it in the egg mix. Finally, roll it in the panko mixture. Press the breadcrumbs gently to ensure they stick well. Repeat this step for all zucchini sticks. Once coated, lay them out on the baking sheet in a single layer. A light spray of cooking spray or a drizzle of olive oil helps achieve extra crispiness. For the complete method, check the Full Recipe. To get crispy baked zucchini fries, spacing is key. Make sure you place the fries in a single layer on the baking sheet. If they touch, they will steam instead of crisp. This simple step helps air circulate around each fry. The result? Perfectly golden and crunchy fries. Want to kick up the flavor? You can add spices to the panko mix. Consider adding chili powder for heat or Italian seasoning for a herby touch. You might try adding a pinch of cayenne for a spicy kick. Experimenting with flavors makes each batch unique, and you'll find your favorite mix. Baking zucchini fries offers a healthier option than frying. Traditional frying uses a lot of oil, which adds extra calories. With baking, you can use a light spray or drizzle of oil. This method still gives you that crispy texture without the guilt. Plus, it’s easier to clean up! {{image_2}} You can make these zucchini fries gluten-free. Use almond flour or crushed rice cereal instead of panko. Both options give a nice crunch. You can find gluten-free breadcrumbs at many stores, too. This swap ensures everyone can enjoy these tasty fries. Want to switch up the cheese? Use mozzarella or cheddar for a different flavor. If you prefer a vegan option, use nutritional yeast. It adds a cheesy taste without dairy. This ingredient is packed with nutrients and is a great choice for plant-based diets. Don't limit yourself to just one dip! Try ranch dressing, salsa, or spicy mayo. Each sauce brings a new twist to your crispy fries. You can even mix up your own dip using yogurt and herbs for a fresh taste. Get creative and have fun with your dips! For the full recipe, check out the Crispy Baked Zucchini Fries. To keep your zucchini fries fresh, let them cool first. Place them in an airtight container. Store the container in the fridge for up to three days. This way, they will stay tasty and ready to eat. You can freeze zucchini fries for later. If you want to freeze them before cooking, arrange the coated fries on a baking sheet. Freeze them for about an hour until firm. Then, transfer them to a freezer bag. If you cook them first, let them cool. Then, follow the same freezing steps. This will help keep their crunch when you cook them later. To reheat zucchini fries, use the oven. Preheat the oven to 400°F (200°C). Spread the fries on a baking sheet. Bake for about 10-15 minutes until crispy again. Avoid using a microwave, as it can make them soggy. If you want to use an air fryer, set it to 375°F (190°C) and cook for 5-7 minutes for a perfect crunch. For the best results, always aim to keep that crispiness. To make zucchini fries crispy, start with dry zucchini. After cutting, pat them with a paper towel. This helps remove excess moisture. Next, follow the three-step coating method: flour, egg, then panko. The panko adds a light crunch. Space the fries on the baking sheet. This allows hot air to circulate. Bake at a high temperature, around 425°F (220°C). Flip them halfway for even crispiness. Yes, you can use regular breadcrumbs. However, panko provides a lighter and crispier texture. Regular breadcrumbs are denser and can make the fries heavier. The flavor may also differ slightly. Panko absorbs less oil, keeping your fries healthier. If you prefer, you can mix both for a unique texture. Zucchini fries pair well with many dips. Marinara sauce brings a nice tang. Garlic aioli adds creaminess and flavor. You can also try ranch dressing for a classic taste. Spicy sriracha mayo gives a kick. For a healthy option, try tzatziki sauce. These choices will enhance the flavor of your crispy baked zucchini fries. Enjoy experimenting with your favorites! You now have all the tools to make crispy zucchini fries. We explored ingredients, prepping methods, and tips to enhance flavor and texture. You can swap ingredients for your needs and store leftovers properly. The baking process is easy and satisfying. Try these techniques and enjoy your delicious zucchini fries. They are a healthy snack that everyone can love. Happy cooking!

Crispy Baked Zucchini Fries Healthy and Simple Snack

Are you craving a tasty and guilt-free snack? Look no further! Crispy Baked Zucchini Fries are simple to make and

To make this tasty vegan roasted red pepper hummus, you will need: - 1 cup canned chickpeas, drained and rinsed - 1 large roasted red pepper, peeled and chopped (store-bought or homemade) - 3 tablespoons tahini - 2 tablespoons olive oil - 1 garlic clove, minced - 2 tablespoons lemon juice - 1 teaspoon smoked paprika - 1/2 teaspoon ground cumin - Salt and pepper to taste - Water as needed for consistency - Fresh parsley for garnish - Extra olive oil for drizzling This hummus packs a punch in terms of nutrition. Each serving provides: - Calories: About 150 - Protein: 5 grams - Carbohydrates: 12 grams - Fiber: 4 grams - Healthy fats: 8 grams Each ingredient in this hummus brings health benefits: - Chickpeas: They are high in protein and fiber. They help keep you full longer. - Roasted Red Peppers: These add vitamins A and C, boosting your immune system. - Tahini: This sesame paste offers healthy fats and calcium. - Olive Oil: It contains antioxidants and promotes heart health. - Garlic: Garlic is known to support heart health and has anti-inflammatory properties. - Lemon Juice: This adds vitamin C and can aid in digestion. Using these fresh ingredients, you can enjoy a dip that tastes great and is good for you. Try this recipe for a healthy snack or appetizer. For the full recipe, check out the section above. To start, gather your ingredients. If using fresh red peppers, roast them first. You can place them over an open flame or bake them in the oven. Roast until the skin is charred. This gives a smoky flavor. After roasting, let them cool. Then, peel off the skin and remove the seeds. If you prefer, you can also use jarred roasted red peppers. They save time and taste great. Next, it's time to blend! In a food processor, add the drained chickpeas, chopped roasted red pepper, tahini, minced garlic, lemon juice, smoked paprika, and ground cumin. Pulse these ingredients together. While the processor runs, slowly add the olive oil. This helps emulsify the mixture. Keep blending until it becomes smooth and creamy. Now, you need to adjust the hummus. If it’s too thick, add water, one tablespoon at a time. Blend after each addition until you reach your desired consistency. Taste the hummus. Add salt and pepper based on your preference. Blend again to mix the seasoning well. Enjoy the rich flavors of your vegan roasted red pepper hummus! For the full recipe, refer to the recipe section above. Roasting peppers brings out their sweet, smoky flavor. You can roast them in a few easy ways: - Over an Open Flame: Place the pepper directly on the flame of your gas stove. Turn it until the skin chars and blisters. - In the Oven: Preheat your oven to 450°F (232°C). Place the peppers on a baking sheet and roast for about 20-30 minutes, turning halfway. - Under the Broiler: Set your oven to broil. Place the peppers on a baking sheet and broil until the skin is charred. After roasting, let the peppers cool. This makes peeling easier. You want to remove the skin and seeds for the best hummus. The perfect hummus has a creamy, smooth texture. To get this: - Start with drained and rinsed canned chickpeas. This saves time and helps keep the hummus smooth. - Add tahini, olive oil, garlic, and lemon juice to your food processor first. - Blend these ingredients before adding chickpeas. This helps create a silky base. - Gradually add water to adjust the texture. Blend until it’s smooth. If it’s too thick, add more water a little at a time. Taste your hummus. If it needs salt or pepper, blend again to mix it in well. Serving hummus can be fun and tasty! Here are some ideas: - Serve with fresh vegetables like carrots, cucumbers, and bell peppers. They add crunch and color. - Use pita chips or whole-grain crackers for dipping. They complement the flavors well. - Drizzle extra olive oil on top before serving. This adds flavor and makes it look pretty. - Garnish with fresh parsley or a sprinkle of smoked paprika for a touch of color. With these tips, you can make your Vegan Roasted Red Pepper Hummus even better. For the full recipe, check out the details above! {{image_2}} You can kick up the heat with spicy roasted red pepper hummus. Add one to two jalapeños to the blender. This gives a nice kick without overpowering the flavor. You can also mix in some cayenne pepper or chili powder. Adjust the spice level to your taste. Herbs can add fresh notes to the hummus. Try mixing in fresh basil, cilantro, or dill. Just a handful will do. Blend these herbs right in for a burst of flavor. You can also use dried herbs like oregano or thyme for a different twist. This can brighten the dip and make it more vibrant. Want to get creative? You can add roasted garlic for a deeper flavor. Just roast a few cloves until soft, then blend them in. Another great option is to add a splash of balsamic vinegar. This adds a tangy note that pairs well with the sweetness of red peppers. Don't forget to try adding a bit of lemon zest for extra brightness. By exploring these variations, you can make your hummus unique each time. Find what you love best! For the full recipe, click here. To keep your vegan roasted red pepper hummus fresh, store it in an airtight container. Glass containers work best. Make sure to press a piece of plastic wrap directly onto the surface of the hummus. This helps prevent it from drying out. If you make a large batch, divide it into smaller containers. This way, you can enjoy fresh hummus without exposing the whole batch to air. When stored properly, your hummus can last up to one week in the fridge. Always check for any signs of spoilage before eating. If you see any mold or if it smells off, it's best to toss it. I find that it’s often best within the first few days, when the flavors are fresh and vibrant. You don’t need to heat hummus, as it’s best served cold or at room temperature. However, if you prefer it warm, place it in a microwave-safe dish. Heat it gently in short bursts, stirring in between. If you chill it, take it out of the fridge about 15 minutes before serving. This helps the flavors come alive again. For a fun twist, serve it with warm pita or veggies right after chilling. For the full recipe, check out the full recipe link. Enjoy your dip! Yes, this hummus is naturally gluten-free! You can enjoy it with gluten-free crackers or fresh veggies. Just check the labels of any dippers you use, like pita chips or bread. Most ingredients in this recipe are gluten-free, making it a safe choice for those avoiding gluten. Making roasted red peppers at home is easy! Start by washing and drying your peppers. You can roast them in the oven or over an open flame. 1. For oven roasting, preheat your oven to 450°F (232°C). Place the peppers on a baking sheet. 2. Roast for 20-30 minutes until the skin is blackened and blistered. 3. Turn them halfway to roast evenly. 4. Once done, take them out and let them cool in a bowl. Cover it with plastic wrap. 5. After about 15 minutes, the steam helps loosen the skins. 6. Peel off the skins, remove the seeds, and chop them for your hummus. Yes, you can substitute tahini! If you need an alternative, try using peanut butter or sunflower seed butter. Both will add a nice creaminess. You can also use Greek yogurt for a tangy flavor, but it won’t be vegan. Adjust the amount based on your taste. Experiment to find what you like best! For the full recipe, check out the complete instructions above. This blog post covered all you need for making delicious roasted red pepper hummus. You learned about key ingredients, their health benefits, and how to prepare them well. We discussed tips for achieving the best texture and tasty variations. Finally, I shared best practices for storing and reheating your hummus. In conclusion, you now have the tools to create a tasty, healthy snack. Enjoy exploring your own hummus recipes!

Vegan Roasted Red Pepper Hummus Simple and Tasty Dip

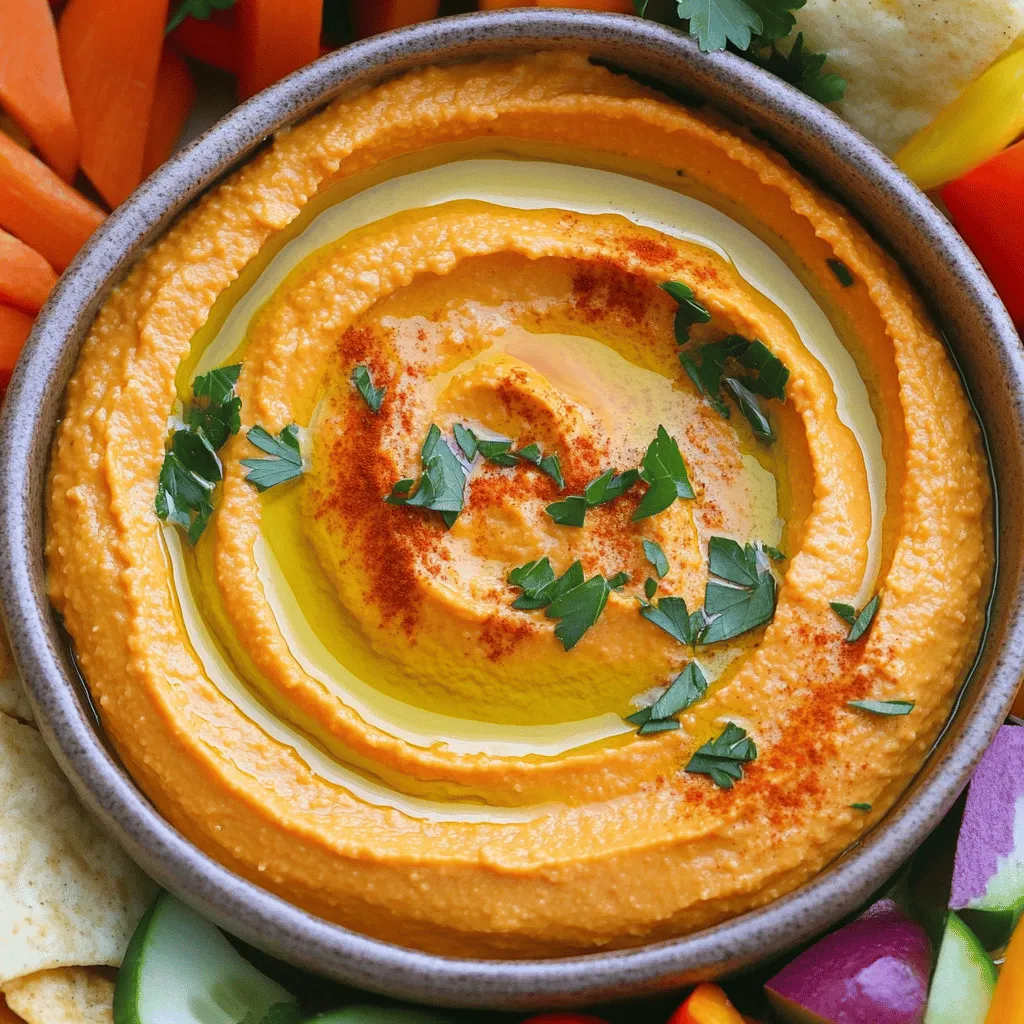
Are you ready to spice up your snacking routine? This Vegan Roasted Red Pepper Hummus is not only simple to

- 2 cups rolled oats - 1 cup milk (dairy or non-dairy) - 1/2 cup maple syrup - 1/2 cup chopped pecans - 2 large eggs - 1/2 teaspoon baking powder - 1/2 teaspoon cinnamon - 1/4 teaspoon salt - 1 teaspoon vanilla extract - 1/2 cup diced apples (optional) - Extra pecans - Maple syrup When making Maple Pecan Baked Oatmeal Cups, you need the right ingredients. First, rolled oats form the base. They give the cups a hearty texture. You can choose milk based on your taste. Dairy or non-dairy options work great. Maple syrup adds sweetness and flavor. Chopped pecans give a nice crunch and nutty taste. Don’t forget the eggs! They hold everything together. For extra flavor, you can add a few enhancers. Baking powder helps the cups rise. Cinnamon brings warmth and spice. Salt balances the sweetness. Vanilla extract adds depth. If you love apples, add diced ones for texture. Finally, top your cups with extra pecans and a drizzle of maple syrup. This makes them look pretty and taste even better. You can find the full recipe to make these delicious oatmeal cups and enjoy a warm, tasty breakfast! - Preheat oven to 350°F (175°C) - Grease muffin tin or use silicone muffin cups I always start by preheating my oven. This step ensures even cooking. Greasing the muffin tin is key. It helps the oatmeal cups pop out easily after baking. Silicone muffin cups are a great option too. They make cleanup a breeze. - Combine rolled oats, baking powder, cinnamon, and salt - Ensure dry ingredients are evenly distributed Next, I mix my dry ingredients. I blend rolled oats, baking powder, cinnamon, and salt in a large bowl. It is important to mix well. This ensures every bite is flavorful and tasty. - Whisk together milk, maple syrup, vanilla extract, and eggs - Combine wet and dry ingredients gently Now, I prepare the wet ingredients. I whisk together milk, maple syrup, vanilla extract, and eggs until smooth. This mixture adds sweetness and richness. I then gently combine the wet and dry ingredients. Careful not to overmix; this step keeps the texture just right. - Spoon mixture into prepared muffin tin - Fill each cup about 3/4 full I take a spoon and fill each muffin cup. Each one should be about three-quarters full. This allows room for the cups to rise. - Sprinkle extra pecans and drizzle maple syrup on top - Bake for 25-30 minutes until golden Before baking, I sprinkle extra pecans on top. A drizzle of maple syrup adds a sweet finish. I bake them for 25-30 minutes. I look for a golden top and a clean toothpick to check for doneness. - Cool in tin for 5 minutes - Transfer to wire rack to cool completely Once baked, I let them cool in the tin for five minutes. Then, I transfer them to a wire rack. This step helps them cool evenly. After they cool, I enjoy them warm, often with more maple syrup drizzled on top. For a balanced breakfast, serve with fresh fruit on the side. This whole process is easy and fun, and I love sharing these treats with friends. For the full recipe, check the earlier section! - Use old-fashioned rolled oats for better texture. They hold moisture well and offer a hearty bite. - Don’t overmix wet and dry ingredients. Stir just until combined to keep cups fluffy. - Check doneness with a toothpick. Insert it in the center; it should come out clean. - Adjust baking time based on your oven. Ovens vary, so keep an eye on them as they bake. - Add spices or fruit for added dimension. Cinnamon or nutmeg can give depth. Fresh or dried fruit adds sweetness. - Experiment with different nuts or sweeteners. Try walnuts or almonds for a twist. Honey or agave can replace maple syrup. For the complete recipe, check out the [Full Recipe]. {{image_2}} If you need a gluten-free option, it's easy to adapt. Just substitute regular oats with gluten-free certified oats. This ensures you get the same great taste without the gluten. Also, use gluten-free baking powder to keep the recipe safe for those with gluten sensitivities. Going vegan? No problem! Replace the eggs with flaxseed meal or chia seeds. Mix 1 tablespoon of either with 2.5 tablespoons of water for each egg. This works great as a binding agent. Use plant-based milk, like almond or oat milk, and stick with the maple syrup for sweetness. Want to mix things up? You can add chocolate chips or dried fruits like raisins or cranberries. Both options give a sweet twist. You can also try different nuts like walnuts or almonds for a unique crunch. This way, you can enjoy a new flavor every time you make them! Store your Maple Pecan Baked Oatmeal Cups in an airtight container in the refrigerator. They taste best when you eat them within 5-7 days. This keeps them fresh and ready for a quick breakfast or snack. You can freeze the oatmeal cups for up to 3 months. Just make sure they're in a freezer-safe container. When you want to enjoy them, reheat in the microwave or the oven until warm. To warm them up quickly, place them in the microwave for 30-60 seconds. For an extra touch, consider adding a drizzle of maple syrup upon reheating. This brings back that delicious flavor and makes each bite even better. Yes, you can prepare these oatmeal cups in advance. Just store them in an airtight container. They stay fresh and tasty for several days. To check for doneness, use a toothpick. Insert it into the center of a cup. If it comes out clean, your oatmeal cups are ready. You can replace pecans with any nut or seed you like. If you prefer, you can also skip the nuts entirely for a nut-free version. You can use instant oats, but it’s not the best choice. Instant oats can change the texture and make the cups mushy. Absolutely! These oatmeal cups are perfect for meal prep. They make quick breakfasts and easy snacks all week long. These oatmeal cups are easy to make and full of flavor. You mix simple ingredients, bake, and enjoy them anytime. You can customize these cups with your favorite mix-ins or toppings. They store well in the fridge or freezer for quick snacks later. Don’t hesitate to try different flavors or adaptations to suit your taste. With these tips, you can create a tasty treat that fits your needs! Enjoy the fun of baking and the satisfaction of homemade oatmeal cups.

Maple Pecan Baked Oatmeal Cups Flavorful and Easy Recipe

Looking for a quick and tasty breakfast? Maple Pecan Baked Oatmeal Cups are your answer! Packed with wholesome ingredients and

To make crispy buffalo chicken taquitos, you need the following key ingredients: - 2 cups cooked chicken, shredded - ½ cup buffalo sauce (choose mild or hot) - 1 cup shredded cheddar cheese - ¼ cup cream cheese, softened - 1 teaspoon garlic powder - 1 teaspoon onion powder - 8 small flour or corn tortillas - Oil for frying (vegetable or canola) - Fresh cilantro, chopped (for garnish) - Ranch or blue cheese dressing (for dipping) These ingredients work together to create a flavorful filling that packs a punch. For added flavor or texture, consider these optional ingredients: - Jalapeños, diced (for some heat) - Green onions, sliced (for freshness) - Extra spices like paprika or cayenne (for depth) - Avocado, sliced (for creaminess) These can elevate your taquitos and impress your guests. Here are the kitchen tools you’ll need to make the recipe: - Large mixing bowl (for combining ingredients) - Non-stick skillet (for softening tortillas) - Frying skillet (for frying taquitos) - Spatula (for turning taquitos) - Paper towels (for draining excess oil) - Toothpicks (to secure taquitos if needed) Having the right tools makes cooking easier and more fun. You can find the full recipe to guide you through each step. First, gather your ingredients. You need cooked chicken, buffalo sauce, cheddar cheese, cream cheese, garlic powder, onion powder, tortillas, and oil. In a large bowl, mix the shredded chicken with buffalo sauce. Add cheddar cheese, cream cheese, garlic powder, and onion powder. Stir until everything blends well. Next, heat a non-stick skillet over medium heat. This helps to soften the tortillas. Place a few tortillas in the skillet for about 10 seconds on each side. Remove them when they feel soft and easy to handle. Now, take each tortilla and put about 2-3 tablespoons of the chicken filling in the center. Roll the tortilla tightly, folding in the sides. If needed, secure the ends with a toothpick. This keeps the filling inside while cooking. In a large skillet, add about half an inch of oil and heat it over medium-high heat. Once the oil is hot, carefully place the taquitos seam-side down in the skillet. Fry them for about 2-3 minutes on each side. You want them to turn golden and crispy. After frying, remove the taquitos and place them on paper towels. This helps drain any extra oil. For a lovely presentation, arrange the taquitos on a serving platter. Garnish with fresh chopped cilantro on top. Serve them warm with ranch or blue cheese dressing on the side. This adds a nice touch for dipping. Enjoy your crispy buffalo chicken taquitos! For the complete recipe, refer to the section above. To get the best crispy taquitos, follow these steps: - Use fresh tortillas: Fresh tortillas roll better and stay intact. - Soften tortillas: Warm them in a skillet for a few seconds to make them pliable. - Don’t overfill: Use only 2-3 tablespoons of filling per tortilla. This helps them roll tightly. - Seal well: Make sure the edges are sealed to keep the filling inside while frying. - Fry at the right temperature: Oil should be hot enough to sizzle but not smoke. This ensures a crunchy texture. - Turn carefully: Use tongs to flip the taquitos slowly. This keeps them from breaking apart. Many people make the same mistakes. Here’s how to avoid them: - Using cold tortillas: Cold tortillas crack and break. Always warm them first. - Overcrowding the pan: Fry in batches. Overcrowding leads to soggy taquitos. - Not draining excess oil: Let taquitos rest on paper towels. This keeps them crispy. - Skipping seasoning: Make sure to season your filling. A well-seasoned filling makes a big difference. Dipping sauces can elevate your taquitos. Here are some great pairings: - Ranch dressing: This classic choice cools the heat of buffalo sauce. - Blue cheese dressing: Perfect for those who love that bold flavor. - Homemade ranch: Mix sour cream, mayo, garlic powder, and herbs for a fresh option. - Creamy avocado dip: Blend ripe avocados with lime juice and salt for a smooth dip. For the full recipe, check out the detailed instructions above. Enjoy your cooking! {{image_2}} You can easily swap ingredients in your taquitos. If you want a vegan option, try using jackfruit or tofu. These can mimic the texture of chicken well. For a spicy kick, switch buffalo sauce for a spicy barbecue sauce. You can also use tempeh for a hearty protein source. If you avoid gluten, use corn tortillas instead of flour. To spice up your taquitos, consider adding more flavors. Chopped jalapeños can bring heat and crunch. Different cheeses like pepper jack or queso fresco add creaminess. You can also sprinkle in some smoked paprika or cumin for depth. Fresh herbs like cilantro or chives add bright notes. Get creative with your favorite toppings! To make a full meal, pair your taquitos with tasty sides. Crunchy salad brings freshness and balance. Tortilla chips with salsa or guacamole offer a fun crunch. You might serve them with a side of coleslaw for a creamy contrast. Don’t forget to have ranch or blue cheese dressing handy for dipping! To keep your taquitos fresh, store them in an airtight container. Place a paper towel inside to absorb moisture. This helps maintain crunchiness. You can refrigerate them for up to three days. If you want to keep them longer, freezing is a great option. Make sure to wrap them in plastic wrap before placing them in a freezer-safe bag. This prevents freezer burn. To reheat taquitos and keep them crispy, use an oven or an air fryer. Preheat the oven to 375°F (190°C). Place the taquitos on a baking sheet and heat for about 10-12 minutes. Flip them halfway through to ensure even crispiness. If using an air fryer, set it to 350°F (175°C) and cook for about 5-7 minutes. Both methods will revive their crunch. In the fridge, prepared taquitos last about three days. In the freezer, they can stay fresh for up to three months. Always check for any signs of spoilage before eating. If they smell off or look strange, it’s best to throw them away. Enjoy your Crispy Buffalo Chicken Taquitos knowing they are easy to store and reheat! For the full recipe, click here. Yes, you can bake these taquitos! Baking is a great way to cut down on oil. To bake, preheat your oven to 400°F. Place the taquitos on a baking sheet lined with parchment paper. Spray them lightly with cooking oil. Bake for 15 to 20 minutes, flipping halfway. They will turn golden and crispy, giving you a healthier option. You can use different types of chicken for these taquitos. Rotisserie chicken works well. It’s easy and tasty. Grilled chicken adds a smoky flavor. You can also use baked chicken for a leaner choice. Just make sure the chicken is cooked and shredded. This makes mixing easy and keeps the filling juicy. To add more heat, use a hotter buffalo sauce. You can also mix in chopped jalapeños or cayenne pepper. If you want extra flavor, try adding crushed red pepper flakes. These tips can help you find the right heat for your taste. Adjust according to your preference for a perfect spicy kick! To make Crispy Buffalo Chicken Taquitos, we reviewed essential ingredients and tools needed. I shared step-by-step instructions for preparation, cooking, and plating. You learned tips to avoid common mistakes and how to customize your taquitos with flavor enhancements. Lastly, I provided storage info and answers to your FAQs. Enjoy your taquitos and remember, cooking is about experimenting. Have fun with your flavors!

Crispy Buffalo Chicken Taquitos Flavor-Packed Recipe

If you’re in the mood for a deliciously spicy snack, Crispy Buffalo Chicken Taquitos are the way to go! This

To make Pumpkin Spice Latte Overnight Oats, you'll need these simple items: - 1 cup rolled oats - 1 cup unsweetened almond milk (or milk of choice) - 1/2 cup pumpkin puree - 1 tablespoon maple syrup (or honey) - 1 teaspoon vanilla extract - 1 teaspoon pumpkin pie spice - 1/2 teaspoon cinnamon - A pinch of salt - Optional toppings: whipped cream, crushed nuts, chocolate chips, or additional pumpkin pie spice This recipe serves two and is packed with good stuff. Each serving has about: - Calories: 300 - Protein: 8g - Carbohydrates: 50g - Fiber: 8g - Sugar: 10g - Fat: 8g These oats are a great way to start your day. They give you energy and keep you full. For the best taste, I suggest these brands: - Rolled oats: Bob's Red Mill or Quaker - Almond milk: Califia Farms or Silk - Pumpkin puree: Libby's or Trader Joe's If you want to make it dairy-free, use almond or coconut milk. You can swap maple syrup for agave or honey if you prefer. This way, you can make it fit your diet! First, gather your ingredients. You will need: - 1 cup rolled oats - 1 cup unsweetened almond milk (or milk of choice) - 1/2 cup pumpkin puree - 1 tablespoon maple syrup (or honey) - 1 teaspoon vanilla extract - 1 teaspoon pumpkin pie spice - 1/2 teaspoon cinnamon - A pinch of salt In a medium bowl, combine the rolled oats and almond milk. Add the pumpkin puree, maple syrup, vanilla extract, pumpkin pie spice, cinnamon, and salt. Mix everything well. You want the oats to soak up all that pumpkin goodness. Once mixed, divide the oat mixture into two jars or containers. Make sure each jar has a tight lid. Seal the jars and place them in the fridge overnight. If you are in a hurry, let them chill for at least 4-6 hours. This step is key. It lets the oats soften and absorb flavors. In the morning, take the jars out of the fridge. Stir the oats well before serving. You can add fun toppings like whipped cream, crushed nuts, or chocolate chips. A sprinkle of extra pumpkin pie spice will give it a nice kick. Serve in clear jars to show off those beautiful layers. Enjoy your Pumpkin Spice Latte Overnight Oats for a warm, cozy breakfast! For the complete recipe, check the section above. To make the best overnight oats, use rolled oats. They soak up liquid well and stay chewy. Quick oats can get mushy, so avoid them. Always mix your oats with a liquid. This helps them absorb flavors and soften overnight. Make sure to seal your jars tightly. This keeps the oats fresh and stops spills. For creamy oats, use almond milk or your favorite milk. My go-to is unsweetened almond milk. It blends nicely with pumpkin. If you like a thicker texture, add more oats. If you want it creamier, add more milk. Stir the mixture well before chilling. This ensures every oat gets soaked evenly. Pumpkin spice latte overnight oats are tasty as is, but you can mix it up! Add chocolate chips for sweetness. Crushed nuts add a nice crunch. You can also try different spices. Nutmeg or ginger can give a warm flavor. For a bit of sweetness, drizzle extra maple syrup on top. Let your taste guide your choices, and enjoy the fun of creating! For the full recipe, check out the details above. {{image_2}} You can easily make this recipe dairy-free. Just swap regular milk for unsweetened almond milk, coconut milk, or oat milk. These options keep it creamy and delicious. They also add a hint of flavor. If you want, use a nut milk with a rich taste, like cashew milk. This change makes it perfect for those avoiding dairy. You can play with flavors in your overnight oats. For chocolate lovers, add a tablespoon of cocoa powder to the mix. This gives it a rich, chocolatey taste. If you like nuts, try adding a few tablespoons of chopped walnuts or pecans. They add crunch and a nice nutty flavor. You can also mix in a tablespoon of nut butter for extra creaminess and protein. As the seasons change, so can your oats. For a holiday twist, add a splash of eggnog in place of almond milk. This will give your oats a warm, festive flavor. You can also mix in dried cranberries or chopped apples for a fall feel. Another idea is to sprinkle some nutmeg or ginger for a spicy touch. These twists keep your breakfast exciting all year round. For the full recipe, check out the details above. Enjoy crafting your own unique version! To store your pumpkin spice latte overnight oats, place them in airtight containers. Make sure to close them tightly. This keeps the oats fresh and tasty. You can store them in the fridge for easy access. Pumpkin spice oats last about 3 to 5 days in the fridge. They stay safe to eat as long as they smell good and look fine. If you see any mold, it's best to toss them out. You can freeze these oats if you want to save them longer. Just put them in freezer-safe containers. They will stay good for up to three months. When you want to eat them, thaw them in the fridge overnight. After thawing, you can heat them in the microwave or eat them cold. If they seem dry, add a splash of almond milk to get the right texture. For the full recipe, check out the details above. Yes, you can use quick oats. Quick oats cook faster and absorb liquid more quickly. This can change the texture of your overnight oats. They may become softer and less chewy. If you prefer a creamier texture, quick oats work well. If you like a heartier bite, stick with rolled oats. Overnight oats can last about 3 to 5 days in the fridge. Store them in sealed containers to keep them fresh. If you use fresh fruit, eat them within 1-2 days for the best taste. If you see any signs of spoilage, throw them away. Overnight oats offer many health benefits. They are high in fiber, which aids digestion. They also provide steady energy thanks to complex carbs. You can customize them to add fruits, nuts, or seeds for extra nutrition. Plus, they help keep you full until lunch. Yes, you can heat them up! Just remove the lid and microwave for about 30 seconds to 1 minute. Stir well, and check the temperature before eating. Heating gives a warm and cozy feel, perfect for chilly mornings. Toppings enhance the flavor and texture of your oats. Here are some great options: - Whipped cream for a sweet touch - Crushed nuts for crunch - Chocolate chips for a treat - Additional pumpkin pie spice for more flavor You can mix and match to find your favorite combination! In this article, I covered how to make Pumpkin Spice Latte Overnight Oats. I shared the key ingredients, their nutrition, and some great brands to use. You learned the steps to prepare, mix, and chill these tasty oats. I also gave tips to get the perfect texture and suggested different flavors. Don’t forget the best storage methods to keep your oats fresh. Enjoy these oats as a healthy breakfast or snack anytime. They are easy to make and full of flavor! Make them your own by trying different add-ins and twists.

Pumpkin Spice Latte Overnight Oats Simple Recipe

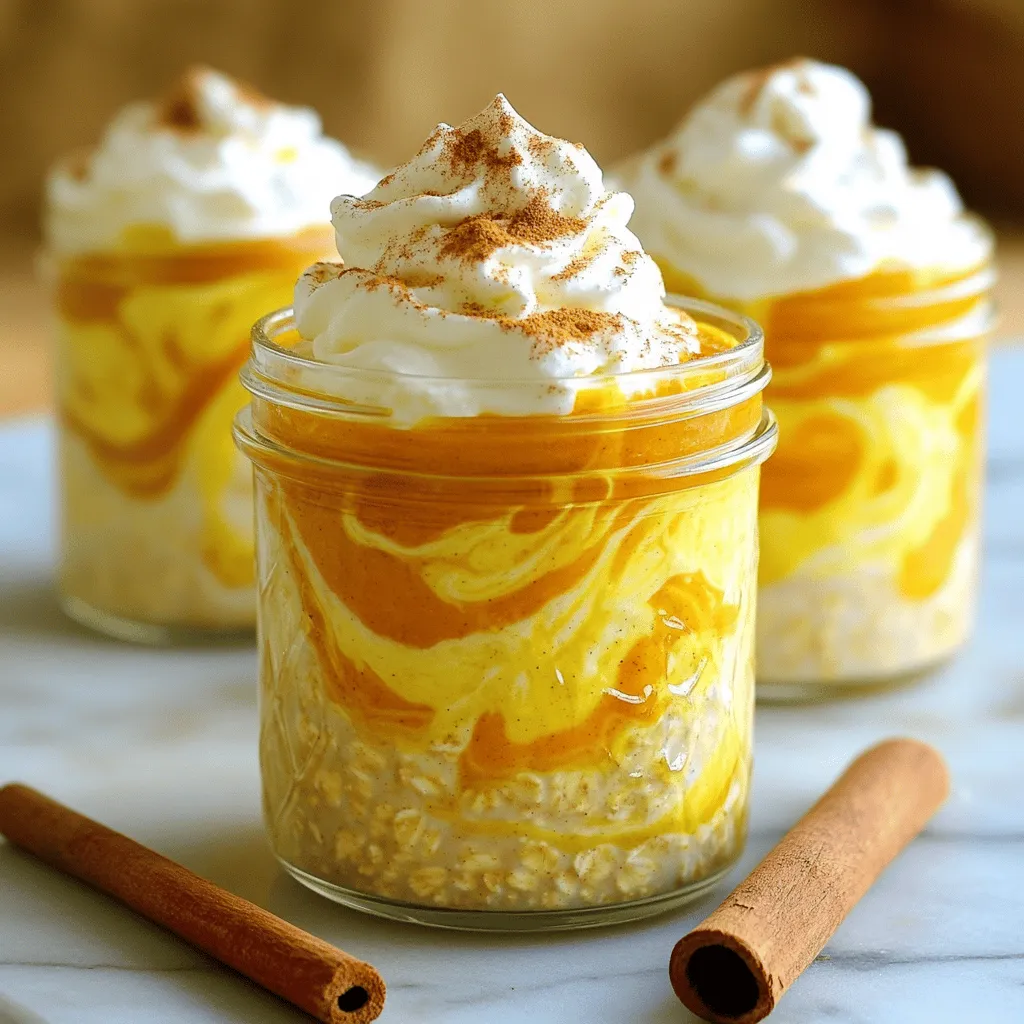
Craving a warm fall flavor? Try my Pumpkin Spice Latte Overnight Oats! This simple recipe combines creamy oats with the

- 8 oz whole grain pasta (penne or fettuccine) - 1 medium cauliflower, chopped into florets - 2 cups vegetable broth - 3 cloves garlic, minced - 1/4 cup nutritional yeast - 2 tablespoons olive oil - 1 tablespoon lemon juice - Salt and pepper to taste - Fresh parsley, chopped (for garnish) - Optional: pinch of nutmeg Cauliflower is the star of this dish. It gives a creamy texture without dairy. You will love how easy it is to blend into a sauce. The garlic brings a great flavor, while nutritional yeast adds a cheesy taste. It’s perfect for anyone who wants a vegan option. Nutritional value of cauliflower Cauliflower is low in calories but high in nutrients. It has a lot of vitamins C, K, and B6. It also provides fiber, which is good for digestion. Low-calorie and high-fiber alternative This veggie is a great choice for those wanting to eat healthy. It fills you up without adding too many calories. You can enjoy it without guilt! Rich in vitamins and antioxidants Cauliflower is packed with antioxidants. These help protect your body from damage. Eating more cauliflower may boost your health in many ways. Now that you know how good cauliflower is for you, let’s dive into the Full Recipe. Bring a large pot of salted water to a boil. The salt adds flavor to the pasta. Add 8 ounces of whole grain pasta like penne or fettuccine. Cook it according to the package instructions until it reaches al dente. You want it firm but not hard. This usually takes about 8 to 12 minutes. After cooking, drain the pasta and set it aside. Make sure to save 1/2 cup of that pasta water for later. Now, let’s make the sauce. Start by steaming 1 medium cauliflower, cut into florets. Place it in a pot over boiling water. Steam it for 8 to 10 minutes, or until the florets are tender. You want them soft enough to blend easily. Next, take your steamed cauliflower and add it to a blender. Add 2 cups of vegetable broth, 3 minced garlic cloves, 1/4 cup of nutritional yeast, 2 tablespoons of olive oil, and 1 tablespoon of lemon juice. Season with salt and pepper to taste. If you like a touch of warmth, add a pinch of nutmeg. Blend everything until it’s smooth and creamy. If it’s too thick, add your reserved pasta water, one tablespoon at a time, until you get the perfect consistency. In a large mixing bowl, toss the drained pasta with the creamy cauliflower Alfredo sauce. Make sure every piece of pasta gets coated. If the pasta cools too much, you can heat it on low for a few minutes. Adjust the seasoning if needed. For serving, plate your creamy pasta in shallow bowls. Drizzle a bit of olive oil on top for a shiny finish. Sprinkle some nutritional yeast for that cheesy effect. You can also add extra cauliflower florets or fresh veggies on the side for a colorful touch. Enjoy your Vegan Cauliflower Alfredo Pasta! To take your vegan cauliflower Alfredo pasta to the next level, consider adding spices and herbs. I love using: - Garlic powder for an extra kick. - Dried oregano or basil for a fresh taste. - A pinch of cayenne for heat. These spices make the sauce pop! You can also adjust the creaminess and consistency. If your sauce is too thick, add a splash of the reserved pasta water. This helps it blend well with the pasta. If you want it creamier, add more cauliflower or a splash of plant milk. One of the biggest mistakes is overcooking the cauliflower. This makes it mushy and hard to blend. Steam it until it's just tender. This usually takes about 8-10 minutes. Another mistake is blending it incorrectly. Make sure your blender is strong enough. Blend it until it's completely smooth. If you see chunks, blend it longer. You want a silky sauce that coats the pasta perfectly. For side dishes, I recommend a crisp salad or steamed vegetables. These add freshness to your meal. If you enjoy wine, a light white wine pairs well with this dish. A Sauvignon Blanc works great. For a fun twist, serve with garlic bread for a complete meal. Don't forget to garnish your dish with fresh parsley. It adds a nice color and a burst of flavor! You can find the full recipe above to guide you through this delicious meal. {{image_2}} If you need a gluten-free meal, you can use gluten-free pasta. Many brands offer great options, like brown rice or quinoa pasta. These alternatives cook well and still taste amazing with the cauliflower Alfredo sauce. Just follow the same cooking steps as with regular pasta. For a different twist, try substituting nuts or coconut milk. Cashews can add a rich flavor when blended into the sauce. If you prefer coconut milk, it brings a sweet taste that pairs well with the dish. You can also add veggies like spinach or peas for extra nutrients. For protein, chickpeas or lentils work well and make the meal heartier. If you want a nut-free version, use sunflower seeds instead of nuts. They blend smoothly and give a creamy texture. For a low-carb option, swap pasta for zoodles made from zucchini. This keeps the meal light and fresh while still tasting great. Each of these variations keeps the spirit of the Vegan Cauliflower Alfredo Pasta alive. You can find the full recipe to guide you through making the base dish. To keep your Vegan Cauliflower Alfredo Pasta fresh, let it cool first. Place it in an airtight container. Store it in the fridge for up to three days. If you want to keep it longer, consider freezing it. Make sure to separate the sauce from the pasta if possible. This helps maintain the texture. You can reheat your pasta in the microwave or on the stovetop. For the microwave, place it in a bowl, cover, and heat for about 2-3 minutes. Stir halfway through to heat evenly. If you use the stovetop, add a splash of water or broth to a pan. Heat it over low, stirring often. This method helps keep the sauce creamy. To freeze, pack the cooled pasta and sauce in separate containers. Use freezer-safe bags or containers. Make sure to remove as much air as possible. When you're ready to eat, thaw it overnight in the fridge. Reheat on the stovetop for the best results. This method keeps the flavors fresh and tasty. If you do not have nutritional yeast, you can use a few other ingredients. Here are some good options: - Grated vegan cheese - Parmesan cheese (if not fully vegan) - Ground sunflower seeds - Cashews (soaked and blended) - A little extra lemon juice for tang These substitutions help keep the creamy flavor while adding a unique twist to your pasta. If you want to tone down the garlic, here are some simple tips: - Use less garlic; try one clove instead of three. - Roast the garlic before adding it to the sauce for a milder taste. - Add a pinch of onion powder to replace some garlic flavor. These methods let you control the garlic taste to your liking. Yes, you can make this recipe ahead of time! Here’s how: - Prepare the cauliflower Alfredo sauce and store it in the fridge for up to three days. - Cook the pasta and toss it with the sauce just before serving. - You can also freeze the sauce in an airtight container for up to a month. When ready to eat, simply reheat the sauce and mix it with freshly cooked pasta. For the full recipe, refer back to our detailed instructions. This recipe for Cauliflower Alfredo combines whole grain pasta and healthy ingredients like cauliflower and garlic. You learned how to cook the pasta and make a creamy sauce. I shared tips to boost flavor and avoid common mistakes. Eating delicious meals can be healthy too. Enjoy this recipe and its benefits. Explore variations to match your taste. With practice, you can impress friends and family with your cooking skills.

Vegan Cauliflower Alfredo Pasta Creamy Flavor Boost

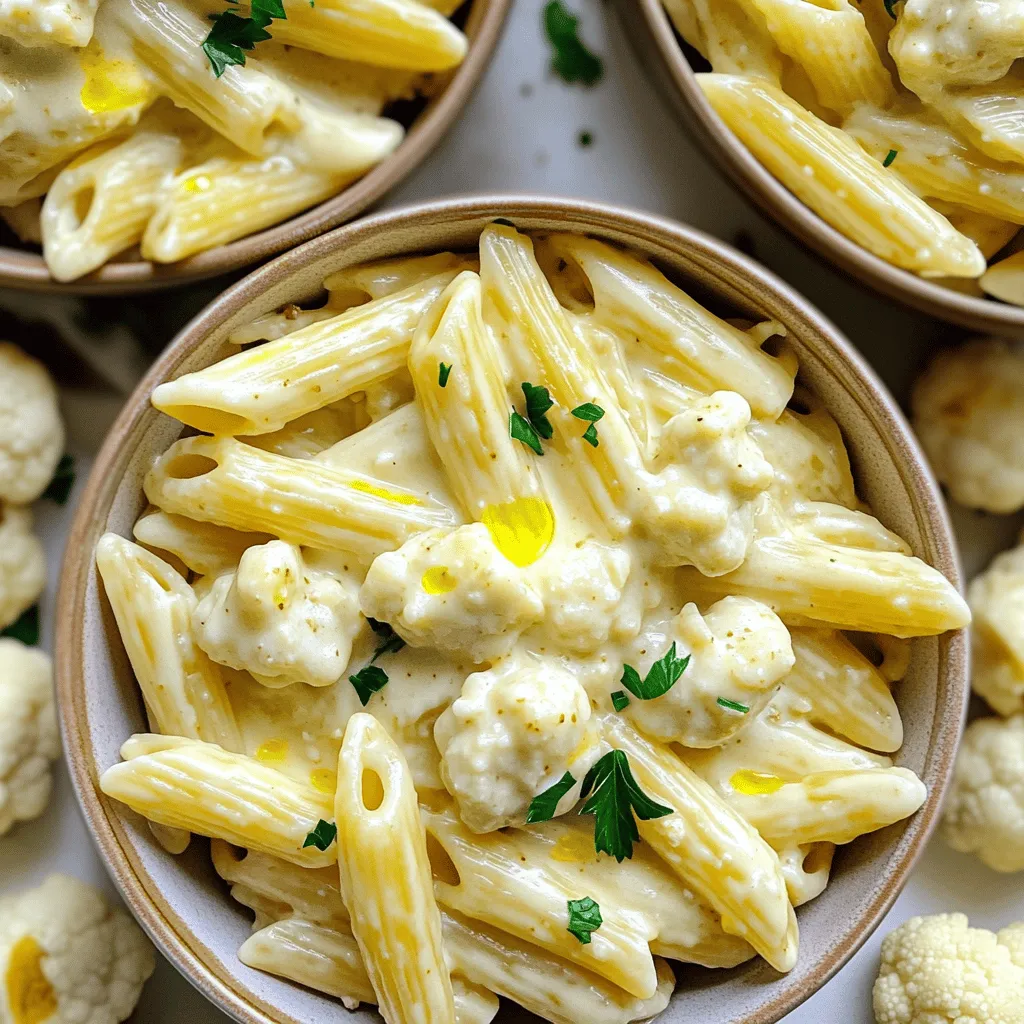
Craving a creamy pasta dish that’s both delicious and healthy? Look no further! My Vegan Cauliflower Alfredo Pasta offers a

- 1 pound baby carrots, peeled - 3 tablespoons pure maple syrup - 2 tablespoons olive oil - 1 teaspoon ground cinnamon - 1/2 teaspoon ground cumin - 1/2 teaspoon smoked paprika - 1/4 teaspoon cayenne pepper (adjust to taste) - Salt and pepper to taste - Fresh parsley, chopped (for garnish) Choosing the best baby carrots is key for this dish. Look for bright orange carrots that are firm and smooth. Avoid any that feel soft or have dark spots. If you need a substitute for maple syrup, try honey or agave syrup for sweetness. You can also adjust the spices as you like. For a milder flavor, skip the cayenne pepper or use less. If you want to add a kick, you can even add more! 1. Preheating the oven: Start by preheating your oven to 425°F (220°C). This high heat helps to caramelize the carrots and enhance their natural sweetness. 2. Preparing the maple spice mixture: In a large mixing bowl, combine 3 tablespoons of pure maple syrup, 2 tablespoons of olive oil, 1 teaspoon of ground cinnamon, 1/2 teaspoon of ground cumin, 1/2 teaspoon of smoked paprika, and 1/4 teaspoon of cayenne pepper. Add salt and pepper to taste. Whisk these together until they blend well. This mixture brings warmth and depth to the dish. 3. Spreading carrots on a baking sheet: Take 1 pound of peeled baby carrots and add them to the bowl with the spice mixture. Toss them until they are evenly coated. Line a baking sheet with parchment paper for easy cleanup. Spread the carrots in a single layer on the sheet. 4. Cooking times and temperature tips: Place the baking sheet in the preheated oven. Roast the carrots for 25 to 30 minutes. Make sure to turn them halfway through cooking. This step ensures they cook evenly and develop a nice caramelized surface. 5. Cooling time before serving: After roasting, remove the carrots from the oven. Let them cool for a few minutes on the baking sheet. This helps the flavors settle and makes them easier to handle. 6. Drizzling leftover glaze and garnishing: Before serving, drizzle any remaining glaze from the baking sheet over the carrots. Garnish with fresh chopped parsley for a bright finish. This adds flavor and a lovely touch to your dish. For the full recipe, check out the Spiced Maple Roasted Carrots recipe. Enjoy this easy and tasty dish! To ensure even roasting, spread the carrots in a single layer. This helps hot air circulate. Turn the carrots halfway through cooking for nice browning. To achieve perfect caramelization, use a high oven temperature, like 425°F (220°C). The sugar in maple syrup will create a rich glaze. Watch them closely to avoid burning. Add nuts or seeds for texture. Chopped walnuts or pumpkin seeds provide a nice crunch. They also add healthy fats and protein. You can adjust spices based on your taste. If you like more heat, add extra cayenne pepper. For a warm flavor, try adding nutmeg or ginger. Serve spiced maple roasted carrots on a rustic wooden platter. This adds a cozy feel to your table. Sprinkle extra chopped parsley on top for a bright pop of color. For special occasions, arrange them in a spiral for a stunning look. You can also drizzle more maple syrup over the top for a sweet touch. For the full recipe, check out the instructions above. {{image_2}} You can mix up the flavor by using other root veggies. Try parsnips, sweet potatoes, or turnips. Each veggie brings its own taste. For sweetness, consider using honey or agave syrup. This change offers a new twist while keeping that sweet flavor. Spices can change the whole dish. Add herbs like thyme or rosemary for an earthy taste. A sprinkle of lemon or orange zest gives a nice brightness. You can also use citrus juice to wake up the flavors. Experiment with these additions to find your favorite combo. This recipe is easy to adapt. For a vegan version, just use maple syrup and olive oil. If you need gluten-free, you’re already set; all the ingredients are gluten-free. Want a low-carb option? Swap carrots for zucchini or cauliflower. These swaps keep it light and tasty. To keep spiced maple roasted carrots fresh, store them in an airtight container. Place them in the fridge. They will last about 3 to 5 days. If you notice any moisture, it’s best to use them quickly. You can reheat these carrots in two ways: the microwave or the oven. For the microwave, place the carrots in a safe dish. Heat them for 1 to 2 minutes, stirring halfway. For the oven, preheat it to 350°F (175°C). Spread the carrots on a baking sheet and heat for about 10-15 minutes. This helps keep their texture and flavor. To freeze the dish, let the carrots cool fully. Place them in a freezer-safe bag or container. Remove as much air as possible before sealing. They can last up to 3 months in the freezer. When ready to eat, thaw them in the fridge overnight. Reheat using the oven or microwave for best results. Enjoy your spiced maple roasted carrots anytime! For the full recipe, check the earlier section. Can I prepare these carrots ahead of time? Yes, you can prepare spiced maple roasted carrots ahead. Toss the carrots in the maple mixture and store them in the fridge for up to 24 hours. When ready to serve, roast them as per the Full Recipe. This saves time and keeps flavors fresh. What should I serve with spiced maple roasted carrots? These sweet and spicy carrots pair well with many dishes. Consider serving them with roasted chicken, grilled fish, or a hearty grain salad. They also work well alongside other roasted veggies or as a side for holiday meals. Why did my roasted carrots burn or dry out? If your roasted carrots burn or dry out, it could be due to high heat or overcooking. Make sure your oven temperature is accurate and check the carrots halfway through cooking. If they look dry, you can drizzle a bit of oil or maple syrup on them during roasting. How can I fix over-seasoned carrots? If your carrots taste too strong, you can balance the flavors. Mix in extra carrots to the batch to absorb the seasoning. You can also add a touch of olive oil or maple syrup to mellow out the spices. How many calories per serving? Spiced maple roasted carrots have about 120 calories per serving. This number can change based on the amount of oil and syrup used. The dish is a healthy option filled with flavor and nutrients. Are there health benefits to eating carrots? Yes, carrots are very healthy! They are rich in vitamins A and K. These vitamins support good vision and healthy skin. Plus, carrots contain fiber, which helps with digestion. Enjoying this dish adds both taste and health to your meals. This recipe for spiced maple roasted carrots is simple and fun. You learned what ingredients to use and how to prepare them. We also discussed helpful tips for cooking, serving, and storing the dish. Remember to adjust the spices and experiment with different flavors. These carrots can fit any meal or celebration. They are tasty and healthy. Enjoy your cooking and share this dish with others!

Spiced Maple Roasted Carrots Flavorful and Simple Dish

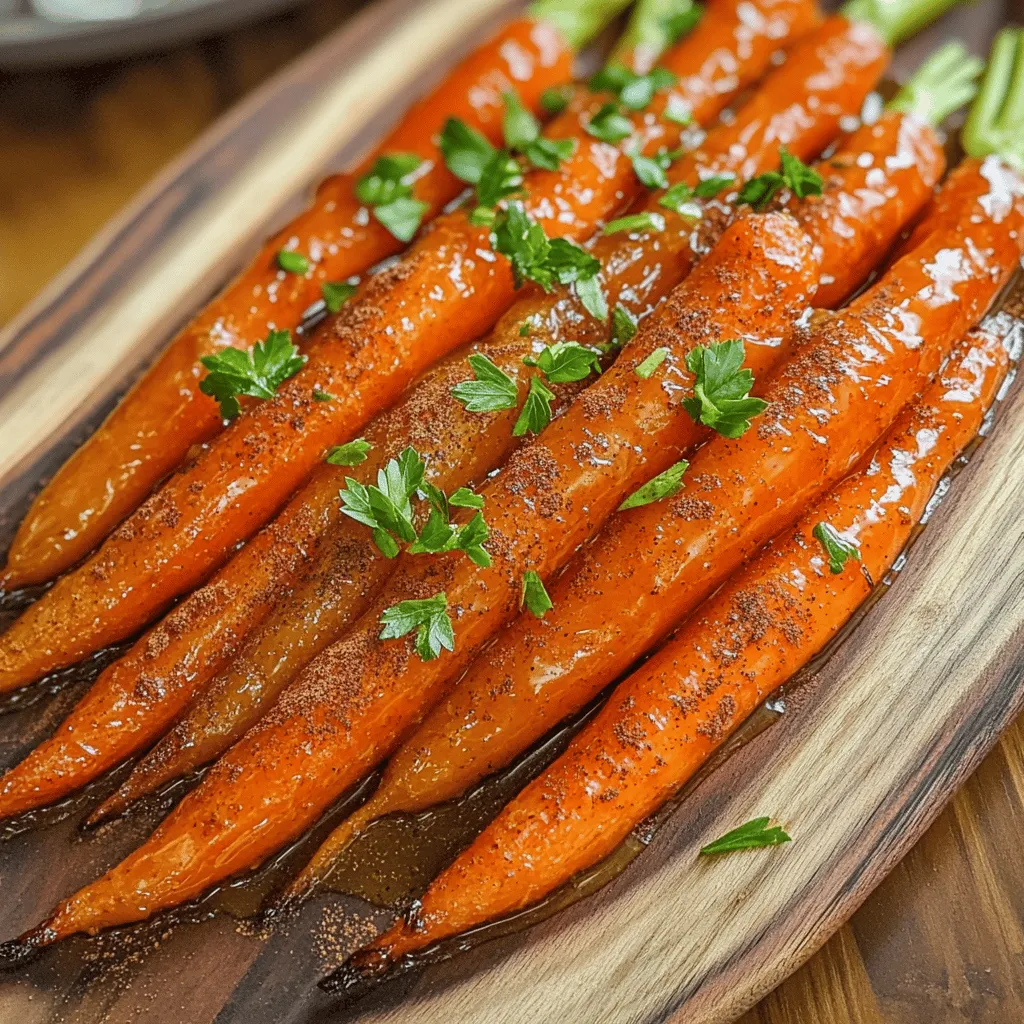
Looking for a simple yet flavorful side dish? Spiced Maple Roasted Carrots are your answer! With just a few fresh

These Loaded Veggie Breakfast Burritos are packed with flavor and nutrients. You can whip them up in no time. They are perfect for busy mornings or lazy weekends. - 4 large flour tortillas - 1 cup black beans, rinsed and drained - 1 cup bell peppers (mixed colors), diced - 1 cup spinach, chopped - 1 medium onion, finely chopped - 2 cloves garlic, minced - 1 avocado, sliced - 4 large eggs (or flax eggs for a vegan option) - 1/2 cup shredded cheese (cheddar or a dairy-free alternative) - 2 tablespoons olive oil - 1 teaspoon cumin - 1 teaspoon paprika - Salt and pepper to taste - Fresh cilantro for garnish (optional) - Salsa for serving Gather these ingredients before you start cooking. This way, you have everything in one spot. The mix of veggies and spices makes these burritos a tasty treat. You can adjust the ingredients based on what you have or your taste. If you want more protein, add chicken or tofu. Enjoy the flavors and colors in each bite! To start, I heat olive oil in a large skillet over medium heat. I add finely chopped onion and minced garlic. I sauté them for about two minutes. The onion should look soft and clear. This step builds a great base for flavor. Next, I stir in the diced bell peppers. I let them cook for three to four minutes. They should be tender but still bright. Then, I add chopped spinach and cook until it wilts. This adds a nice green touch and boosts nutrition. After the veggies are ready, I sprinkle in cumin, paprika, salt, and pepper. I mix everything well to combine. Then, I add the rinsed black beans. I cook it all for another two minutes. This gives the filling a hearty texture and flavor. In a separate bowl, I beat four large eggs. I add a pinch of salt and pepper for taste. Then, I pour the eggs into the pan with the veggies. I scramble them together until fully cooked, which takes about three to four minutes. The eggs add protein and creaminess. I lay out a flour tortilla on a clean surface. I scoop a generous amount of the veggie and egg mix into the center. Next, I add a few slices of avocado and some shredded cheese on top. This makes for a tasty and colorful filling. If I want an extra crunch, I toast the burritos. I place them seam-side down in a clean skillet over medium heat. I let them cook for two to three minutes on each side. This step gives a nice golden brown finish and enhances the flavor. The full recipe includes all these steps, ensuring I get a delicious meal every time. To wrap your burritos well, start with a warm tortilla. A cold tortilla can crack. Lay the tortilla flat and put the filling in the center. Fold the sides over the filling first, then roll it from the bottom up. This keeps the filling secure. Practice makes perfect, so don’t worry if it takes a few tries. Everyone has different tastes. Start with the spices listed in the recipe. You can add more cumin or paprika if you love a kick. If you prefer milder flavors, add less. Taste as you go. This way, you can find the perfect balance that suits you. For fluffy scrambled eggs, beat them well before cooking. Use a non-stick pan to prevent sticking. Cook on low heat, stirring gently. This helps them cook evenly. Remove them from heat when they are still a bit soft. They will continue to cook off the heat. You can make these burritos in advance. Prepare the filling and eggs, then let them cool. Wrap each burrito tightly in foil or plastic wrap. Store them in the fridge for up to three days. You can also freeze them for longer storage. Just reheat in the microwave or oven when you’re ready to eat. For the full recipe, check the detailed instructions provided earlier. {{image_2}} You can boost your breakfast burrito with protein. Chicken works well. Use grilled chicken or shredded rotisserie chicken. Tofu is a great plant-based choice. For tofu, press it first. Then, cube and sauté until golden. Mix it into your veggie filling for added texture and flavor. If you like heat, add jalapeños. Dice them finely and stir them in with the veggies. You can also drizzle in your favorite hot sauce. This will give your burritos a nice kick. Remember to adjust the amount based on your spice level. Cheese adds creaminess to your burrito. Cheddar is a classic option, but feel free to switch it up. Try pepper jack for extra flavor or mozzarella for a milder taste. For dairy-free options, use vegan cheese. It melts well and tastes great in this dish. To make these burritos vegan, swap out the eggs for flax eggs. Mix one tablespoon of flaxseed meal with three tablespoons of water. Let it sit for five minutes until it thickens. You can also use dairy-free cheese and skip the sour cream for a fully vegan meal. For the full recipe, check out the [Full Recipe]. To store leftover burritos, let them cool first. Then wrap each burrito in plastic wrap. Place them in an airtight container or a resealable bag. This keeps them fresh and prevents freezer burn. You can keep them in the fridge for up to three days. Reheat your burritos in the microwave for about 1-2 minutes. Wrap them in a damp paper towel for moisture. If you prefer a crispy exterior, use a skillet. Heat on medium for about 3-4 minutes, turning until warm. This makes them taste fresh again. To freeze burritos, wrap them tightly in foil or plastic wrap. Then place them in a freezer-safe bag. They can last up to three months in the freezer. When you're ready to eat, thaw in the fridge overnight. Reheat using the previous methods. Enjoy your meal anytime! To boost flavor, use spices like cumin and paprika. Fresh herbs, such as cilantro, add brightness too. Sauté your veggies until they are soft and slightly caramelized. This enhances their natural sweetness. You can also add salsa or hot sauce for extra zest. A squeeze of lime juice before serving brightens all the flavors. Yes! Feel free to swap in your favorite veggies. Zucchini, mushrooms, or kale work well. Just remember to chop them into small pieces for even cooking. Roasting or grilling veggies before adding them can also deepen their flavor. Mix and match based on what you have on hand for a fun twist. To reheat, use an oven or skillet for best results. Preheat the oven to 350°F (175°C). Wrap the burrito in foil and heat for about 15-20 minutes. If using a skillet, cook on medium heat for about 5-7 minutes on each side. This keeps the tortilla crispy and warms the filling evenly. Meal prepping is easy with these burritos. Make a big batch and let them cool. Wrap each burrito in foil or parchment paper. Store them in the fridge for up to four days or freeze them for up to three months. When ready to eat, just reheat as mentioned above. Enjoy a quick and tasty breakfast! For the full recipe, check out the details above. This blog post covered a delicious breakfast burrito recipe. We explored the ingredients, discussed preparation steps, and shared tips for making it perfect. You can customize these burritos with your favorite proteins and spices. Storing and reheating is easy, so you'll always have a tasty meal ready. Making your own breakfast burritos lets you enjoy fresh, healthy flavors every day. Embrace your creativity in the kitchen, and enjoy making these burritos as much as eating them.

Loaded Veggie Breakfast Burritos Perfect for Mornings

Start your day right with my Loaded Veggie Breakfast Burritos! These tasty wraps are packed with healthy ingredients like black

To make the Cheesy Jalapeno Corn Dip, you will need the following ingredients: - 2 cups canned sweet corn, drained - 1 cup cream cheese, softened - 1 cup shredded cheddar cheese - 1/2 cup Greek yogurt - 1/2 cup diced jalapenos (fresh or pickled) - 1/4 cup chopped green onions - 1 teaspoon garlic powder - 1 teaspoon onion powder - 1/2 teaspoon smoked paprika - Salt and pepper to taste - Tortilla chips, for serving These ingredients come together to create a rich and creamy dip. The sweet corn adds a nice texture, while the jalapenos bring heat. The cream cheese and cheddar provide that cheesy goodness we all love. Greek yogurt makes the dip creamy without being too heavy. The spices round out the flavor, making it truly irresistible. You can find the full recipe for this delightful dish in the earlier section. - Preheat your oven to 350°F (175°C). - In a large bowl, combine the softened cream cheese, Greek yogurt, garlic powder, onion powder, smoked paprika, salt, and pepper. Mix until it is smooth and creamy. - Now, fold in the sweet corn and diced jalapenos. - Add the shredded cheddar cheese and chopped green onions. Mix until everything is well combined. - Transfer the mixture to a baking dish. Spread it evenly. - Bake for about 20-25 minutes until it is bubbly and the cheese is melted. - Let it cool for a couple of minutes before serving. Enjoy it warm with tortilla chips for dipping. For the full recipe, check the details above. If you want to change things up, there are great alternatives to cream cheese. You can use cottage cheese or even cashew cream for a different taste. For a lower-fat option, Greek yogurt works well. It adds creaminess without all the calories. Mixing is key to a creamy texture. Use a hand mixer for a smooth dip. If you prefer, a fork works too, but it may take longer. For baking, make sure your oven is preheated. This helps the dip cook evenly and bubble nicely. To make your dip look tasty, garnish it with extra diced jalapenos and chopped green onions. This adds a pop of color and freshness. Place the dip in the center of your table. Surround it with colorful tortilla chips for a fun and inviting look. For the full recipe, check the details above. {{image_2}} If you want a kick, add more jalapenos or hot sauce. You can slice fresh jalapenos and mix them in. For an extra spicy dip, use pickled jalapenos. They add a tangy flavor that pairs well with the dip. A dash of hot sauce can also amp up the heat. Just be careful; you can always add more, but you can't take it out! To make the dip burst with flavor, use spices like cumin or cayenne. Cumin gives a warm, earthy taste. Just a pinch can change your dip. Cayenne adds heat and depth. Mixing these spices into the cream cheese base makes the dip even better. You can experiment and find your perfect blend! If you want a lighter dip, try low-fat cheese or yogurt alternatives. Greek yogurt is a great choice. It keeps the creamy texture but cuts calories. You can also add more veggies. Bell peppers or black beans add fiber and nutrients. They make the dip colorful and fun. Use these options to keep it tasty and healthy. For the Full Recipe, check the details above. To store leftovers, place the dip in an airtight container. Make sure it cools down before sealing. This keeps the flavors fresh. In the fridge, it lasts about 3 to 4 days. Freezing is a great option if you want to save some for later. To freeze, put the dip in a freezer-safe container. Leave some space at the top, as it expands while freezing. When you’re ready to eat, thaw it overnight in the fridge. To reheat, warm it in the oven until bubbly. In the fridge, Cheesy Jalapeno Corn Dip lasts around 3 to 4 days. Check for signs of spoilage, like an off smell or mold. If it looks or smells strange, it’s best to toss it. Proper storage helps you enjoy this tasty dip longer. For the full recipe, see above. You can prepare Cheesy Jalapeno Corn Dip in advance. Start by making the dip as usual. Once mixed, place it in a bowl and cover it tightly. Refrigerate the dip for up to 24 hours. When you’re ready to bake, simply take it out and let it sit for 15 minutes. This helps the dip warm up a bit. Then, bake it according to the instructions in the Full Recipe. This way, you save time and still enjoy a hot, cheesy dip. Yes, you can make this dip in a slow cooker. First, mix all the ingredients in a bowl like you usually do. Then, transfer the mixture to your slow cooker. Set it on low and cook for about 2 to 3 hours. Stir it occasionally to make sure it heats evenly. If you want a thicker dip, you can cook it on high for the last 30 minutes. This method keeps it warm for parties, making it easy to serve. The best dippers for this dip are tortilla chips. They add a nice crunch. You can also try fresh veggies like cucumber, carrot sticks, or bell pepper strips for a healthier option. Another great idea is to use warm pita bread or toasted baguette slices. Each option pairs well with the cheesy, spicy dip. Don’t forget to have fun with your presentation! Arrange the dippers around the dip for a colorful display. This blog post outlined a tasty Cheesy Jalapeno Corn Dip recipe. You learned about each ingredient and its role in the dish. I shared easy steps for preparation, cooking, and serving. You also discovered tips for ingredient swaps and healthier variations. In the end, this dip is fun and simple to make. You can tailor it to fit your taste. Enjoy sharing it at your next gathering! Your friends and family will love it.

Cheesy Jalapeno Corn Dip Irresistible Party Treat

If you want to impress your guests, you need this Cheesy Jalapeno Corn Dip! It’s the perfect blend of creamy,

Older posts
Newer posts
← Previous Page1 … Page49 Page50 Page51 … Page82 Next →

dsad

© 2026 Recipes Pursuit • Built with GeneratePress

Our Policies

  • Copyright Policy
  • Cookie Policy
  • GDPR Policy
  • Privacy Policy
  • Disclaimer
  • Terms Of Use

More Information

  • Home
  • About
  • Contact
  • Appetizers
  • Dessert
  • Dinner
  • Drinks
©2026, Recipes Pursuit About Back To Top