Skip to content
DisclaimerTerms Of UseGDPR PolicyCookie Policy

Recipes Pursuit

  • Home
  • Drinks
  • Appetizers
  • Dinner
  • Dessert
  • About
  • Contact
  • Privacy Policy
DisclaimerTerms Of UseGDPR PolicyCookie Policy

NO-ING-IMG

- 2 cups canned corn, drained (or fresh corn kernels) - 1 cup cream cheese, softened - 1 cup sharp cheddar cheese, shredded - 1/2 cup mayonnaise - 1/2 cup sour cream - 2 fresh jalapeños, diced (seeds removed for less heat) - 1 teaspoon garlic powder - 1 teaspoon onion powder - 1/2 teaspoon smoked paprika - Salt and pepper to taste The main ingredients in this dip are key to its creamy and spicy flavor. I love using canned corn because it's quick and easy. Fresh corn works great too if you have it. The cream cheese, mayonnaise, and sour cream create a rich base. Sharp cheddar adds a nice punch. The spices, like garlic powder and smoked paprika, give it that extra kick. - 1/4 cup green onions, chopped (for garnish) - Tortilla chips or sliced baguette (for serving) For garnish, I like to add green onions on top. They add freshness and color. Serving the dip with tortilla chips or baguette makes it fun to eat. You can scoop or spread it easily. This dip is a crowd-pleaser and perfect for sharing! {{ingredient_image_1}} 1. Preheating the oven: Start by setting your oven to 350°F (175°C). This warm-up helps cook the dip evenly. 2. Preparing the base mixture: In a large bowl, mix together the softened cream cheese, mayonnaise, and sour cream. Stir until it is smooth and creamy. This blend creates a rich base for your dip. 1. Combining ingredients: Now, add the shredded cheddar cheese, drained corn, and diced jalapeños to the bowl. Sprinkle in garlic powder, onion powder, smoked paprika, salt, and pepper. Mix all the ingredients well. You want every bite to be full of flavor. 2. Transferring to the baking dish: Grab an 8x8 inch baking dish and spread the mixture evenly in it. Make sure the dip is flat on top for even cooking. 3. Baking process: Place the dish in your preheated oven. Bake for 20-25 minutes. Look for a bubbly and golden-brown top. This shows the dip is ready. 1. Cooling and garnishing: When the dip is done, take it out of the oven and let it cool for a few minutes. This helps prevent burns. Then, sprinkle chopped green onions on top for a fresh touch. 2. Serving recommendations: Serve the dip warm with tortilla chips or sliced baguette. These sides are perfect for scooping up the creamy goodness. Enjoy every bite! To get the best texture for your jalapeño cheddar corn dip, you want it creamy and smooth. Mix your softened cream cheese with mayonnaise and sour cream well. This makes a nice base. Use a hand mixer for a fluffier dip if you like. If you want to change the spice level, start with fewer jalapeños. Taste the dip after mixing in the jalapeños. If you want it spicier, add more. You can also keep the seeds in for extra heat. For sides, tortilla chips are a classic choice. They add a nice crunch. You can also use sliced baguette for a different twist. Both pair well with the dip. Get creative with how you serve the dip. Use small bowls or a large platter. Add colorful veggies around the dip for a fun look. This makes it more inviting and adds flavor. Pro Tips Fresh Corn for a Sweet Touch: If using fresh corn, grill or roast the ears first to enhance the sweetness and add a smoky flavor to your dip. Adjust the Heat Level: If you prefer a milder dip, remove all the seeds and membranes from the jalapeños, or use a milder pepper like poblano. Make-Ahead Magic: Prepare the dip a day in advance and store it in the refrigerator. Just bake it before serving for a quick and easy appetizer. Garnish for Visual Appeal: Enhance the presentation by adding a sprinkle of smoked paprika or a few slices of fresh jalapeño on top before serving. {{image_2}} You can make this dip even better with easy swaps. If you want a lighter dip, try low-fat cream cheese. It keeps the flavor but cuts some calories. You can also use Greek yogurt instead of sour cream for a tangy twist. Cheese lovers can play with different types of cheese. Try pepper jack for extra heat or mozzarella for a milder taste. Mixing cheeses can create fun flavor layers. Add some flair with toppings and mix-ins. Chopped cilantro or diced tomatoes can brighten the dip. For crunch, sprinkle some crushed tortilla chips on top before serving. You can adjust the spice level to fit your taste. If you love heat, leave some jalapeño seeds in. For a milder dip, remove all the seeds. You can also add a pinch of cayenne or hot sauce for a kick. After you enjoy your jalapeño cheddar corn dip, store leftovers in an airtight container. This helps keep the dip fresh. You can also cover the dish tightly with plastic wrap. Always refrigerate the dip within two hours of serving to avoid spoilage. For best quality, eat the dip within three to five days. This ensures the flavors stay vibrant and the texture remains creamy. If you notice any off smells or changes in color, it’s best to toss it. To enjoy the dip again, reheating is key. You can use an oven, microwave, or stovetop. For the oven, preheat it to 350°F (175°C). Place the dip in an oven-safe dish and heat for about 15 minutes. This gives a nice warm texture. If you choose the microwave, use a microwave-safe bowl. Heat in 30-second intervals, stirring in between, until warm. This method is quick and easy. When reheating, avoid overheating. Too much heat can change the dip's texture and flavor. Stir in a little sour cream or cream cheese if it seems dry after reheating. Enjoy your tasty dip just like it was fresh! Can I prepare this dip in advance? Yes, you can prepare the dip a day ahead. Just mix all the ingredients and place them in a baking dish. Cover it and store it in the fridge. When you are ready, bake it for about 25 minutes at 350°F (175°C). This saves time and makes your party stress-free. What are the best dips for parties? Some great party dips include guacamole, spinach artichoke dip, and buffalo chicken dip. Each dip brings its own flavor and style. You can also serve this jalapeño cheddar corn dip for a tasty twist. It’s creamy, cheesy, and has a fun kick! Why is my dip too watery? If your dip is watery, it may have too much liquid from the corn or dairy. To fix this, make sure to drain the canned corn well. You can also add a bit more cream cheese or cheese to thicken it up. Mixing it longer helps, too. How can I make it vegetarian-friendly? This dip is already vegetarian! Just check that your cheese and mayo do not have animal rennet or other animal products. You can also add more veggies like bell peppers or black beans for extra flavor and texture. This blog post walked you through making a tasty dip. You learned about key ingredients, like corn, cream cheese, and spices. We covered preparation, baking, and the best garnishes. I shared tips for perfecting your dip's texture and flavor, plus creative ideas for serving it. Remember, you can customize it to fit your taste preferences. Keeping leftovers fresh is important, and I provided storage tips too. Now, you're ready to create this delicious dip for any occasion! Enjoy every bite with your friends and family.

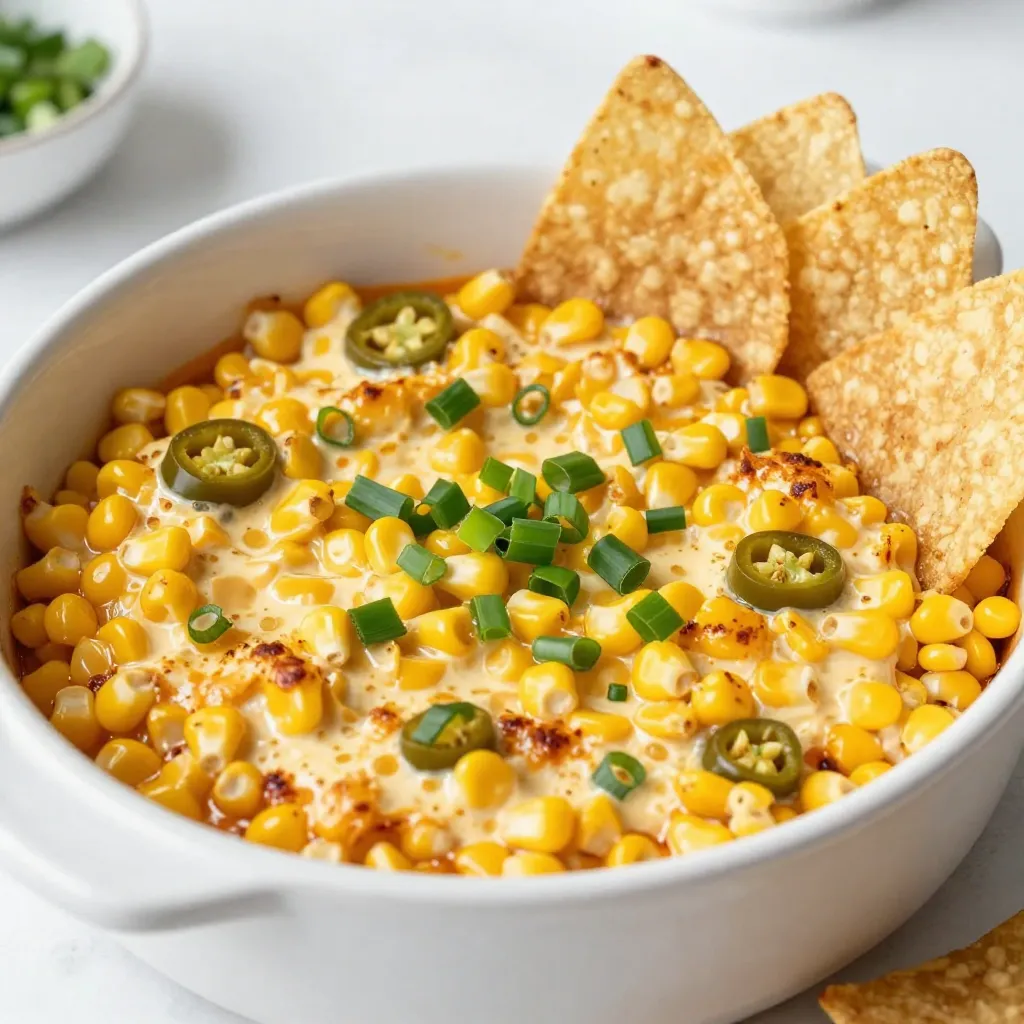
Jalapeño Cheddar Corn Dip Tasty and Simple Recipe

Looking for a dip that’s bursting with flavor yet simple to make? This Jalapeño Cheddar Corn Dip is your answer!

To make pesto chicken stuffed crescent rolls, you will need: - 1 can (8 oz) refrigerated crescent roll dough - 1 cup cooked chicken, shredded - 1/4 cup basil pesto - 1/2 cup cream cheese, softened - 1/2 cup shredded mozzarella cheese - 1/4 cup sun-dried tomatoes, chopped - 1/4 teaspoon garlic powder - 1/4 teaspoon black pepper - 1 egg (for egg wash) - Fresh basil leaves (for garnish) You can swap ingredients if needed. Use rotisserie chicken for quick prep. Instead of cream cheese, try ricotta for a lighter texture. You can also use goat cheese for a tangy flavor. If you don’t have sun-dried tomatoes, try fresh cherry tomatoes. For a dairy-free option, look for vegan cream cheese and cheese alternatives. Each roll contains about 180 calories. You get 8 grams of protein and 10 grams of fat. Each roll has 15 grams of carbs but only 1 gram of fiber. This dish gives a tasty boost to your meal without too many calories. Enjoy these rolls as a fun dinner or snack! 1. Start by preheating your oven to 375°F (190°C). Line a baking sheet with parchment paper. This helps prevent sticking. 2. In a bowl, mix together the shredded chicken, basil pesto, cream cheese, mozzarella, sun-dried tomatoes, garlic powder, and black pepper. Stir well until combined. This creates a creamy, flavorful filling. 3. Open the can of crescent roll dough and unroll it. Cut it into triangles along the perforations. Each triangle will hold the filling. 4. On the wide end of each triangle, place a generous tablespoon of the chicken and pesto mixture. Make sure it is enough for great flavor. 5. Roll each triangle from the wide end to the pointed end. Pinch the seams to seal the filled rolls. This keeps the filling secure inside. 6. Place the rolls on the baking sheet, leaving space between each one. They need room to puff up while baking. 7. In a small bowl, beat the egg with a fork. Brush the egg wash over the tops of the rolls. This step gives them a beautiful golden color. 8. Bake the rolls in the preheated oven for 12-15 minutes. Keep an eye on them until they turn golden brown and puffed up. 9. After baking, remove the rolls from the oven. Let them cool slightly before serving. Garnish with fresh basil leaves for a pop of color and flavor. - Make sure to use the egg wash. This gives the rolls their shiny, golden finish. - Space the rolls evenly on the baking sheet. This ensures even baking and browning. - If your rolls are not browning, you can broil them for the last minute. Watch closely so they don’t burn. - Avoid opening the oven door too often while baking. This helps maintain a consistent temperature for better browning. You can prepare the filling a day before. Mix the chicken, pesto, cream cheese, mozzarella, sun-dried tomatoes, garlic powder, and black pepper. Store it in the fridge. This saves time on busy nights. When ready, unroll the crescent dough and fill it with your cold mixture. You can bake them fresh right before serving. Store leftovers in an airtight container. Place them in the fridge for up to three days. To reheat, use an oven at 350°F (175°C) for about 10 minutes. This helps keep them crispy. Avoid microwaving, as it can make the rolls soggy. Don’t skip the egg wash! It gives a nice golden color. Also, be sure to seal the seams well when rolling. If not sealed, the filling may leak out during baking. Lastly, don’t overcrowd the baking sheet. Give each roll space to puff up and brown evenly. {{image_2}} You can mix up the filling for your pesto chicken stuffed rolls. Try using cooked turkey in place of chicken. You can also add spinach for more veggies. If you enjoy bold flavors, add feta cheese or olives. For a spicy kick, mix in jalapeños or crushed red pepper. You could even use a blend of different cheeses like cheddar or gouda. The options are endless, and each mix brings a new taste! While crescent roll dough works great, you can explore other doughs. Pizza dough gives a chewy texture. You can also use puff pastry for a flaky and airy bite. If you want a low-carb option, try almond flour dough. Each dough choice changes the taste and feel of the rolls. Experiment to find your favorite! Dipping sauces can enhance your meal. A simple marinara sauce pairs well with the rolls. You might also enjoy ranch dressing or garlic aioli for extra flavor. For a zesty twist, try a balsamic glaze. If you like heat, add a spicy sriracha mayo. Each dip offers a fun way to enjoy your rolls. You can make your meal even better by adding side dishes. A fresh salad goes great with these rolls. Try a simple green salad with a light vinaigrette. Roasted vegetables also pair well. Think about carrots, zucchini, or bell peppers. They add color and flavor. You could also serve garlic bread for a nice touch. The crunch of the bread complements the soft rolls. For a heartier option, try a side of pasta. A light pesto pasta can tie everything together nicely. When it comes to drinks, you have many options. A crisp white wine, like Pinot Grigio, matches well. It balances the flavors of the pesto and chicken. If you prefer something non-alcoholic, try sparkling water with lemon. The fizz refreshes your palate. Another fun choice is iced tea with mint. It adds a nice herbal note that pairs well with the dish. Presentation makes your meal look more inviting. Start by placing the rolls on a large platter. You can stack them in a pyramid shape for height. Drizzle some pesto sauce on top for color. Garnish with fresh basil leaves around the edges. This adds a pop of green. You can also serve the rolls with a small bowl of marinara sauce on the side. This gives guests a fun dipping option. Use a colorful plate to make the dish stand out. A great presentation makes your meal feel special. To store leftover rolls, let them cool first. Place them in an airtight container. You can keep them in the fridge for up to three days. To reheat, pop them in the oven at 350°F for about 10 minutes. This keeps them crispy and warm. Yes, you can freeze the stuffed rolls before baking. Simply prepare the rolls and arrange them on a baking sheet. Make sure they do not touch each other. Freeze them for about an hour until firm. Then, transfer the rolls to a freezer bag. They can last for up to three months. When you’re ready to bake, cook them straight from the freezer. Just add a few extra minutes to the baking time. If you need a substitute for cream cheese, try ricotta cheese or Greek yogurt. Both options will keep the rolls creamy. You can also use sour cream for a tangy twist. Each choice adds a unique flavor to the filling. In this article, we explored how to make Pesto Chicken Stuffed Crescent Rolls. We covered the key ingredients, step-by-step instructions, and tips for success. We also discussed variations and serving suggestions to enhance your dish. These rolls are tasty and easy to make. Use the tips shared to avoid mistakes. Enjoy experimenting with different fillings and dips. Happy baking, and enjoy every bite of your delicious rolls!

Pesto Chicken Stuffed Crescent Rolls Easy Dinner Idea

Looking for a quick and tasty dinner idea? Try these Pesto Chicken Stuffed Crescent Rolls! They’re easy to make, packed

- 1 ½ cups graham cracker crumbs - ½ cup unsalted butter, melted - ¼ cup granulated sugar - 16 oz cream cheese, softened - ½ cup granulated sugar - 1 teaspoon vanilla extract - 2 large eggs - 1 teaspoon cinnamon - ¼ cup unsalted butter, melted - ½ cup granulated sugar - 1 teaspoon cinnamon When making churro cheesecake bars, you need specific ingredients. The crust is the base, and it gives flavor. For the crust, use graham cracker crumbs. Combine these with melted butter and sugar. This mix will form a nice, firm base. Next, we prepare the cheesecake layer. Softened cream cheese is key for a smooth texture. Add granulated sugar, vanilla extract, eggs, and cinnamon. Each element adds flavor and creaminess. Mix them well to ensure everything blends. Lastly, the churro topping adds a sweet crunch. Melted butter, sugar, and cinnamon create this delight. It will sit on top, adding a tasty finish. With these ingredients, you can create a sweet treat that everyone will enjoy! - Preheat Oven: 325°F (160°C) - Prepare the Baking Pan: Line an 8x8 inch pan with parchment paper. This helps with easy removal later. - Combine ingredients: In a mixing bowl, mix 1 ½ cups of graham cracker crumbs, ½ cup of melted butter, and ¼ cup of sugar. - Press into the pan: Firmly press this mixture into the bottom of the lined pan. This will form a solid base for your cheesecake. - Mix cream cheese, sugar, and eggs: In a large bowl, beat 16 oz of softened cream cheese with ½ cup of sugar until smooth. - Add vanilla extract and cinnamon: Mix in 1 teaspoon of vanilla extract, 2 large eggs, and 1 teaspoon of cinnamon. Ensure everything is well blended. - Pour cheesecake mixture over crust: Spread the cheesecake layer evenly over the crust in the pan. - Bake for 30-35 minutes: Place in the preheated oven. Bake until the center is set but still slightly jiggly. - Combine churro topping ingredients: In a small bowl, mix ¼ cup melted butter, ½ cup sugar, and 1 teaspoon cinnamon. - Drizzle over the baked cheesecake: Once baked, pour this mixture over the top of the cheesecake. Spread it evenly. - Allow to cool to room temperature: Let the cheesecake bars sit out until they reach room temp. - Refrigerate for at least 2 hours: Chill in the fridge until fully set. - Cut into squares and serve: Use the parchment paper to lift the cheesecake out. Cut into squares and enjoy! To make the best churro cheesecake bars, first ensure your ingredients are at room temperature. This helps them blend smoothly. Next, don’t overmix after adding the eggs. Mix just enough to combine. Overmixing can lead to cracks. Presentation matters! Serve your bars on a decorative plate. You can add toppings like whipped cream or chocolate sauce. Dust the top with cinnamon and sugar before serving. This makes them look even more tempting. If you see cracks in your cheesecake, don’t worry. You can fix them by covering the cracks with topping. For the perfect texture, bake until the center is set but still a bit jiggly. This helps keep your bars creamy and delicious. {{image_2}} You can change the flavors in churro cheesecake bars. Try adding chocolate or caramel layers for a rich twist. This gives each bite a sweet surprise. You can also mix in fruit like berries or bananas for a fresh taste. This makes the cheesecake lighter and adds color. Toppings can change the whole feel of your bars. Use whipped cream on top for a creamy addition. Chopped nuts add a nice crunch that contrasts with the smooth cheesecake. You can also sprinkle chocolate chips for a sweet touch. For more flavor, experiment with spices like nutmeg or ginger. They can add warmth to your treat. How you serve these bars can make them even more fun. Cut them into small mini bars for easy eating at parties. This also makes it easy for guests to grab and enjoy. You can decorate with sauces or drizzles. A chocolate or caramel drizzle can make each bar look fancy and taste even better. Store leftover churro cheesecake bars in an airtight container. This keeps them fresh and delicious. They last about 4 to 5 days in the fridge. If you want to enjoy them later, refrigeration is key. To freeze, wrap each bar tightly in plastic wrap. Place them in a freezer-safe bag or container. You can freeze churro cheesecake bars for up to three months. When you're ready to eat them, let them thaw in the fridge overnight for the best taste. Reheat leftover bars in the oven for about 5 to 10 minutes at 350°F (175°C). This helps keep the texture and flavor just right. You can also use a microwave for 30 seconds. Just be careful not to overheat them, as they can get too soft. Enjoy your delightful treat! Yes, you can change the crust! Here are some tasty options: - Oreo Crust: Use crushed Oreo cookies instead of graham crackers. - Almond Flour Crust: Mix almond flour with butter and a bit of sugar for a nutty flavor. - Gingersnap Crust: Crushed gingersnap cookies add a spicy twist to your bars. Each crust gives a unique taste and texture to the churro cheesecake bars. Chill the cheesecake for at least 2 hours. This helps it set properly. If you want it extra firm, leave it in the fridge longer. The longer it chills, the better the flavors meld together. Yes, you can try other cheeses! Here are some ideas: - Ricotta: This cheese makes a lighter texture. - Mascarpone: Adds a rich and creamy flavor. - Greek Yogurt: Use it for a tangy twist, but expect a different texture. Each option changes the taste and creaminess of your cheesecake bars. Yes, you can make gluten-free churro cheesecake bars! Here are some tips: - Gluten-Free Graham Crackers: Use these instead of regular ones for the crust. - Almond Flour Crust: A great gluten-free option that is easy to make. - Check Labels: Always read labels on your ingredients to ensure they are gluten-free. These steps let everyone enjoy your churro cheesecake bars! This blog post covered how to make delicious churro cheesecake bars. We explored the simple ingredients for the crust, cheesecake filling, and churro topping. You learned step-by-step instructions and helpful tips for perfecting your recipe. Remember, you can mix up flavors and toppings to suit your taste. Now, you’re ready to try this treat. Enjoy making these bars for friends and family. Happy baking!

Churro Cheesecake Bars Delightful and Easy Recipe

If you love desserts that merge flavors, you’ll want to try my Churro Cheesecake Bars. This easy recipe combines the

To make this creamy treat, you need these main ingredients: - 1 cup Arborio rice - 2 cups coconut milk - 1 cup almond milk (or any milk of choice) - 1/2 cup sugar (or sweetener of choice) - 1 ripe mango, diced - 1 teaspoon vanilla extract - 1/4 teaspoon salt - 1/2 teaspoon ground cinnamon These ingredients work together to create a rich and delightful flavor. The Arborio rice gives it a nice creamy texture. The coconut milk adds a tropical twist that pairs perfectly with mango. You can add these optional ingredients to change up the dish: - Fresh mint leaves for garnish - Lime zest for a citrus kick - Cardamom for a warm spice flavor These choices let you personalize your pudding. For example, adding lime zest gives a bright flavor that complements the mango. This pudding is not just tasty; it offers good nutrition too. Here’s a quick breakdown: - Calories: About 300 per serving - Protein: 4 grams - Carbohydrates: 50 grams - Sugars: 20 grams - Fats: 12 grams The coconut milk gives healthy fats. The mango adds vitamins and fiber. Enjoy this dessert knowing it can be part of a balanced meal! Start by gathering all your ingredients. Here’s what you need: - 1 cup Arborio rice - 2 cups coconut milk - 1 cup almond milk (or any milk of choice) - 1/2 cup sugar (or sweetener of choice) - 1 ripe mango, diced - 1 teaspoon vanilla extract - 1/4 teaspoon salt - 1/2 teaspoon ground cinnamon - Fresh mint leaves for garnish (optional) Make sure your mango is ripe and sweet. Dice it into small pieces. Measure out the rice and liquids. This will help you stay organized. In a medium-sized saucepan, combine the Arborio rice, coconut milk, almond milk, sugar, vanilla extract, salt, and cinnamon. Stir all the ingredients together. Next, bring the mixture to a gentle boil over medium heat. Stir occasionally to stop the rice from sticking to the bottom. Once it boils, lower the heat to let it simmer. Let it cook uncovered for about 25-30 minutes. Stir often until the rice is creamy and tender. The pudding should be thick but not dry. Once your pudding reaches the right texture, take it off the heat. Allow it to cool slightly. Then, gently fold in the diced mango. Save a few pieces for later as a garnish. Spoon the rice pudding into serving bowls. Chill them in the fridge for at least one hour. This helps it set. Before serving, add the reserved mango on top. You can also add fresh mint leaves for a pop of color and flavor. Enjoy your delightful and creamy treat! To get the creamiest mango coconut rice pudding, use Arborio rice. This rice has more starch, which makes the pudding rich and smooth. When cooking, stir often to help release the starch. Start with medium heat to bring your mixture to a boil. Then lower the heat and let it simmer. Keep stirring every few minutes until the rice is soft and creamy. Let it cook for about 25-30 minutes. If you want it creamier, add a bit more coconut milk while cooking. One mistake is not stirring enough. If you don’t stir, the rice may stick to the pan and burn. Another mistake is cooking at too high a heat. This can make the rice tough instead of soft. Make sure to simmer it gently. Also, don’t skip the cooling step. Letting the pudding cool helps it set well. Finally, avoid overcooking the rice. If the rice gets mushy, it won't have a nice texture. If you have leftovers, store them in an airtight container. Place the pudding in the fridge, where it can stay fresh for about 3 days. When you want to eat it again, give it a stir. If it seems too thick, add a splash of coconut milk or almond milk. This will help bring back its creamy texture. You can also freeze it for up to a month, but be aware it might change the texture. For best taste, enjoy it fresh! {{image_2}} You can easily make this pudding vegan. Just stick to coconut milk and almond milk. Both options are plant-based. They keep the pudding creamy and rich. You can swap sugar for maple syrup or agave nectar. These sweeteners add a nice touch. You can enjoy a delightful vegan treat! This recipe is gluten-free. Arborio rice is naturally gluten-free. You can use any type of milk. Just ensure it’s gluten-free if you choose a different milk. Avoid additives in your milk. Most coconut and nut milks work well. You can enjoy this dessert without any worries about gluten! Want to spice up your pudding? You can add lime zest for a bright kick. Just a pinch will do. Cardamom adds a warm, sweet flavor. Try adding half a teaspoon during cooking. You can also mix in shredded coconut for extra texture. Feel free to get creative with your flavors! Mango Coconut Rice Pudding pairs well with a variety of flavors. You can serve it with crunchy cookies, like shortbread or biscotti. A dollop of whipped cream adds a nice touch of sweetness. You might also try it alongside fresh tropical fruits, like pineapple or kiwi. This dessert complements a light meal, such as grilled chicken or fish. The bright flavors balance rich dishes perfectly. Garnishing makes your pudding look even more inviting. Fresh mint leaves add a pop of green and a hint of freshness. You can sprinkle some toasted coconut flakes on top for extra crunch. A dash of ground cinnamon or a drizzle of honey adds color and flavor too. Use the reserved mango pieces to create a beautiful, colorful topping. This way, each bowl looks like a work of art. Presentation matters when serving dessert. Consider using clear cups or jars to show off the layers. This creates a lovely visual effect with the creamy pudding and bright mango. You can serve individual portions or a large bowl for sharing. For a fun twist, try layering the pudding with yogurt or fruit. This adds texture and taste while making it even more appealing. Having a beautiful presentation makes the dessert feel special. You can store your Mango Coconut Rice Pudding in the fridge for up to four days. Make sure to keep it in an airtight container. This helps maintain the creamy texture and fresh taste. Before serving, give it a good stir. If it seems thick, add a splash of milk to loosen it up. Yes! You can swap mango for many other fruits. Try using diced pineapple, berries, or bananas. Each fruit adds a unique flavor. Just remember to adjust the sweetness if your fruit is very sweet. This keeps the pudding balanced and delicious. Absolutely! You can make this pudding dairy-free by using almond milk or coconut milk alone. These milks give great flavor and creaminess. Just check your sugar and vanilla for any dairy ingredients. This way, you can enjoy a tasty treat without dairy. Mango coconut rice pudding is a delightful treat, rich in flavor and nutrition. We explored key ingredients, cooking steps, and variations you can try. I shared tips for a creamy texture and mistakes to avoid. This dessert is versatile—you can make it vegan or gluten-free. With the right garnishes and serving ideas, you can impress anyone. Enjoy this sweet dish, and don’t hesitate to experiment with flavors! Each bite is a chance to savor something special.

Mango Coconut Rice Pudding Delightful and Creamy Treat

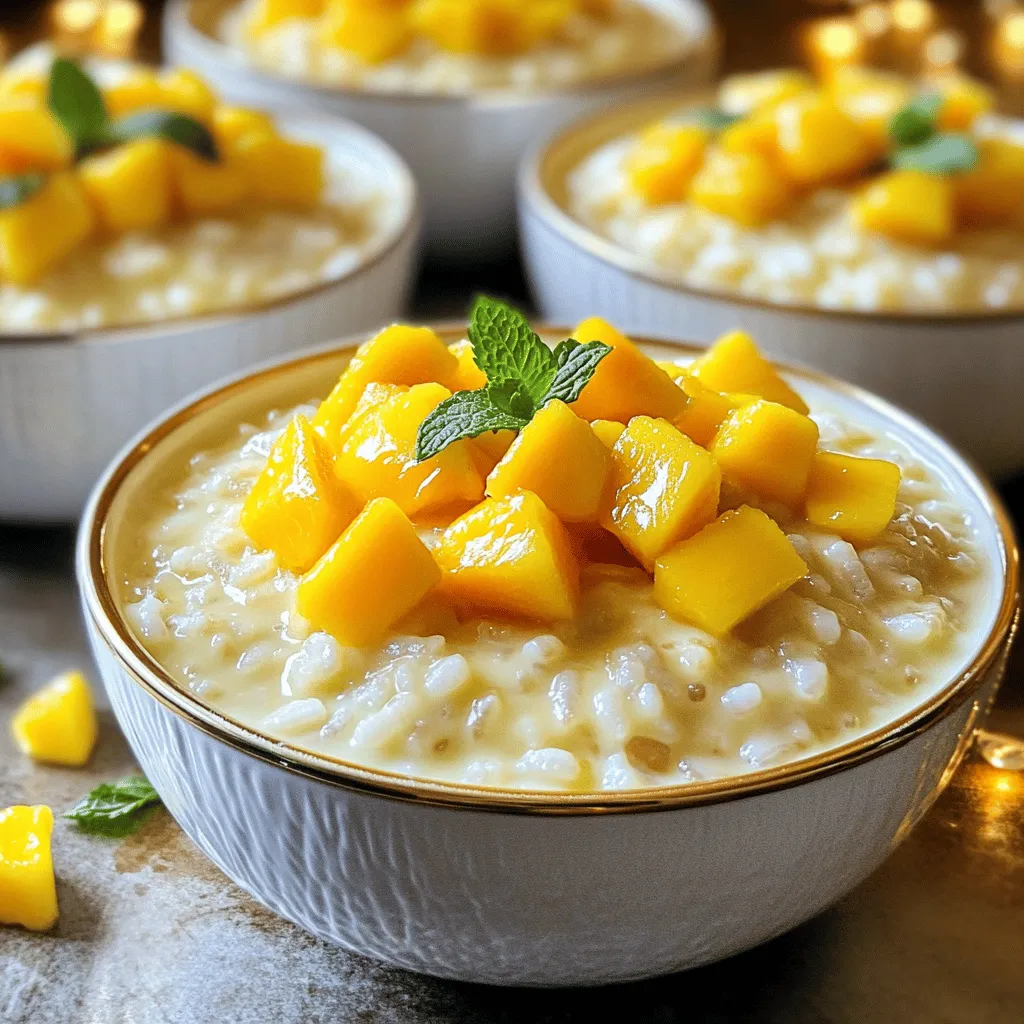
Are you ready to treat yourself to a tropical delight? Mango Coconut Rice Pudding is a creamy dessert that brings

- 4 medium sweet potatoes - 1 can (15 oz) black beans, rinsed and drained - 1 cup corn kernels (fresh, frozen, or canned) - 1 cup diced tomatoes (fresh or canned) - 1 small red onion, diced - 2 cloves garlic, minced - 1 tablespoon chipotle powder - 1 teaspoon cumin - 1 teaspoon smoked paprika - Salt and pepper to taste - 2 tablespoons olive oil - 1 avocado, diced (for topping) - Fresh cilantro, chopped (for garnish) - Lime wedges (for serving) These ingredients blend together to create a tasty dish. The sweet potatoes provide a soft base. Black beans add protein and fiber. Corn gives a sweet crunch. Diced tomatoes bring freshness and moisture. Red onion and garlic offer depth of flavor. The spices—chipotle powder, cumin, and smoked paprika—add warmth and a smoky kick. You can switch things up by adding: - Jalapeños for extra heat - Cheese for creaminess - Greek yogurt as a topping - Any other veggies you enjoy This meal is packed with nutrients. Sweet potatoes are high in vitamins A and C. Black beans provide protein and iron. Corn adds fiber. Avocado brings healthy fats. Each serving is filling and satisfying. You’ll feel good about enjoying this dish! This list ensures you have everything ready to make your Chipotle Black Bean Stuffed Sweet Potatoes. Enjoy cooking! - Preheat your oven to 400°F (200°C). - Wash and pierce each sweet potato with a fork. - Place the sweet potatoes on a baking sheet lined with parchment paper. - Bake for 45-60 minutes until they are tender. - Heat olive oil in a skillet over medium heat. - Add diced red onion and minced garlic; sauté until fragrant. - Mix in black beans, corn, diced tomatoes, chipotle powder, cumin, smoked paprika, salt, and pepper. - Cook for 5-7 minutes, stirring often, until heated through. - Remove the sweet potatoes from the oven and let them cool. - Slice each sweet potato down the middle to create a pocket. - Spoon the chipotle black bean mixture generously into each sweet potato. - Top with diced avocado and garnish with fresh cilantro. - Serve lime wedges on the side for added flavor. How to check for doneness To check if sweet potatoes are done, poke them with a fork. If the fork goes in easily, they are ready. You can also squeeze them gently. They should feel soft. Tips for even baking To bake sweet potatoes evenly, make sure they are similar in size. Pierce them with a fork to let steam escape. This helps them cook well without bursting. Suggested spices and herbs To boost flavor, try adding garlic powder or onion powder. Fresh herbs like thyme or oregano can also add a nice touch. They will brighten the dish. Alternatives to chipotle powder If you want less heat, use smoked paprika instead. You can also try cayenne pepper for a spicy kick. For a milder taste, use regular paprika. Garnishing ideas For a lovely finish, add diced avocado and fresh cilantro. You can also sprinkle feta cheese for creaminess. A drizzle of lime juice adds color and taste. Serving suggestions Serve the stuffed sweet potatoes with lime wedges on the side. This adds a fresh zing. You can also pair them with a simple green salad for a full meal. {{image_2}} You can easily make this dish more plant-based. Consider adding toppings like: - Sliced jalapeños for heat. - Chopped green onions for freshness. - Vegan sour cream or cashew cream for creaminess. For protein, you can swap black beans with: - Lentils for a different flavor. - Chickpeas for a hearty bite. To control the heat, adjust the chipotle powder. Use less if you prefer mild. You can also: - Add a pinch of sugar to balance heat. - Mix in sour cream to tone down spice. If you want milder flavors, try these substitutions: - Use sweet paprika instead of smoked paprika. - Skip the chipotle powder entirely. Feel free to add more veggies to your filling. Some tasty options include: - Diced bell peppers for crunch. - Spinach or kale for extra nutrients. If you're not vegan, cheese can enhance flavor. Consider these choices: - Crumbled feta for a tangy taste. - Shredded cheddar for a classic touch. To keep your stuffed sweet potatoes fresh, let them cool first. Place them in airtight containers. This helps maintain moisture and flavor. Aim to eat leftovers within 3-4 days for the best taste. When you want to enjoy your leftovers, reheat them in the oven. Set it to 350°F (175°C). Heat for about 15-20 minutes. You can also use a microwave. Place on a microwave-safe plate and cover with a damp paper towel to prevent dryness. Avoid sogginess by not reheating for too long. If you want to freeze them, wrap each stuffed sweet potato in foil. Place them in a freezer bag or container. They can last up to 3 months. When you’re ready to eat, thaw them in the fridge overnight. This helps them heat evenly. Yes, you can prepare the filling in advance. Cook the black bean mix and store it in the fridge. Bake the sweet potatoes just before serving. This way, you save time on busy days. If you lack black beans, use chickpeas or pinto beans. Both options add a nice texture. You can also try lentils for a different twist. Yes, this recipe is naturally gluten-free. Sweet potatoes and the filling ingredients do not contain gluten. So, you can enjoy this dish worry-free. Sweet potatoes are done when a fork easily pierces them. They should feel soft inside. If they resist, bake them a bit longer. You can use regular potatoes like russets or Yukon golds. However, they will taste different. Sweet potatoes add a unique flavor that complements the filling. Stuffed sweet potatoes offer a delicious and healthy meal. You need just a few main ingredients and simple steps to make them. Bake sweet potatoes, prepare your tasty filling, and serve. Don't forget to garnish! This dish is easy to tweak for dietary needs and personal taste. Remember to store leftovers properly so you can enjoy them later. Dive into this recipe to create a satisfying meal. You’ll love how simple and flavorful it can be. Enjoy your cooking journey!

Chipotle Black Bean Stuffed Sweet Potatoes Delight

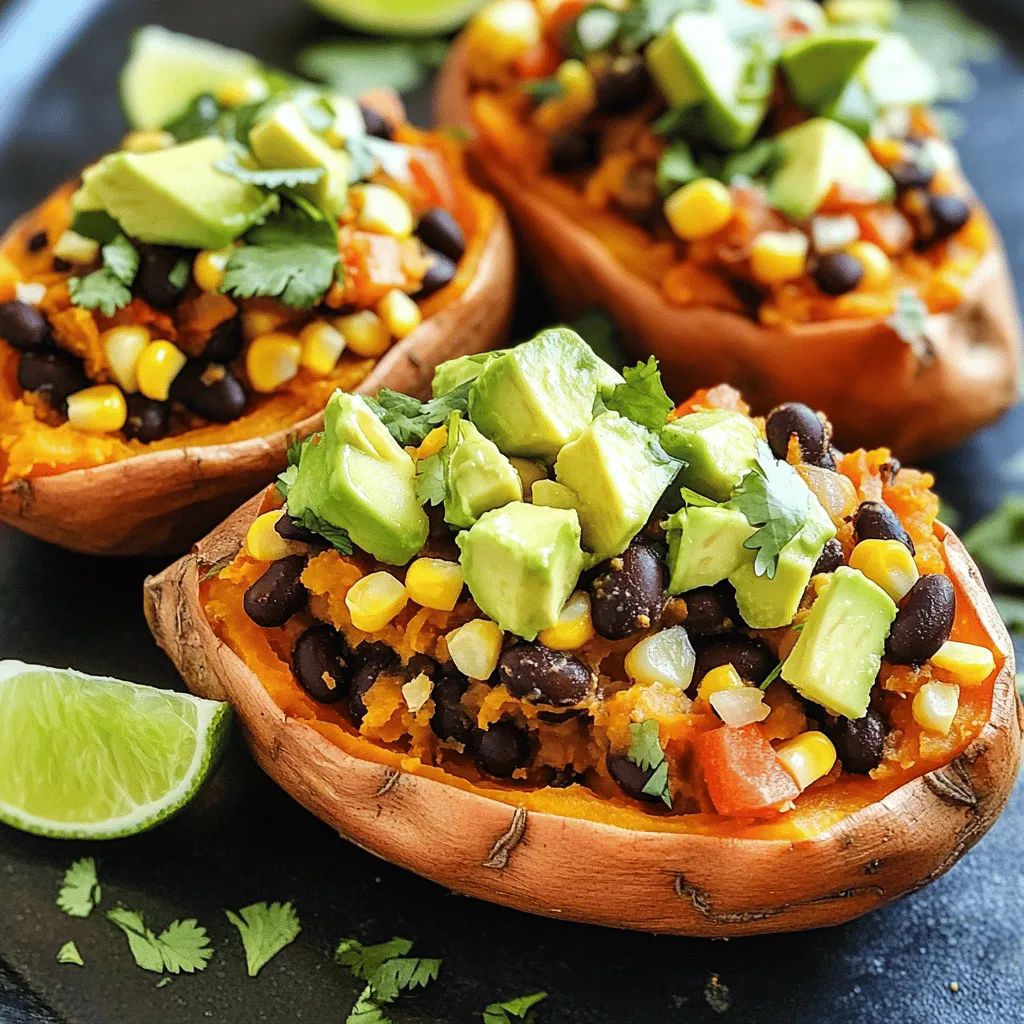
Get ready to enjoy a tasty twist on sweet potatoes with my Chipotle Black Bean Stuffed Sweet Potatoes! This dish

To make Garlic Parmesan Air Fryer Zucchini Chips, gather these items: - 2 medium zucchinis, sliced thinly - 1 tablespoon olive oil - 1 teaspoon garlic powder - 1 teaspoon onion powder - 1/2 teaspoon smoked paprika - 1/2 cup grated Parmesan cheese - Salt and pepper to taste You can swap items for what you have on hand. Use avocado oil instead of olive oil. For cheese, try Pecorino Romano or nutritional yeast for a vegan option. Instead of smoked paprika, regular paprika works well. You can also add red pepper flakes for a spicy kick. When choosing zucchinis, look for firm, smooth skin. They should feel heavy for their size. Avoid any with soft spots or blemishes. Smaller zucchinis tend to be sweeter and more tender. I recommend picking ones that are about 6 to 8 inches long for the best flavor. First, wash your zucchinis well. This step is key to removing any dirt. Next, trim both ends of each zucchini. Slice them thinly, about 1/8 inch thick. Thin slices help them crisp up nicely. You can also slice them lengthwise for longer chips if you prefer. In a large bowl, add your sliced zucchini. Drizzle one tablespoon of olive oil over them. Toss the zucchini so every slice gets an even coat. In a separate small bowl, mix together: - 1 teaspoon garlic powder - 1 teaspoon onion powder - 1/2 teaspoon smoked paprika - A pinch of salt and pepper Sprinkle this seasoning mix over the zucchini. Toss again to make sure every slice is coated well. Now, add in 1/2 cup of grated Parmesan cheese. Gently toss until the cheese sticks to all the slices. Preheat your air fryer to 375°F (190°C). Once it's ready, arrange the zucchini slices in a single layer in the basket. Don’t overcrowd them; you may need to do this in batches. Air fry the zucchini chips for about 10-12 minutes. Keep an eye on them and shake the basket halfway through. This action helps them cook evenly. Once they are golden brown and crispy, transfer them to a cooling rack. This step keeps them crunchy. Allow the chips to cool slightly before serving. You can even add more salt if you like! To make your zucchini chips crispy, slice them very thin. Aim for about 1/8 inch. After slicing, toss them with olive oil. This helps them crisp up nicely in the air fryer. Avoid overcrowding the basket. If you add too many at once, they will steam instead of crisp. Fry in batches if needed. Check them halfway through cooking. Shake the basket to help them cook evenly. One common mistake is not drying the zucchini slices. After washing, pat them dry with a paper towel. This step removes excess moisture. Too much moisture leads to soggy chips. Another mistake is skipping the seasoning mix. The garlic powder, onion powder, and smoked paprika add a lot of flavor. Don’t forget to coat each slice well. You can add more flavor by mixing in different spices. Try adding cayenne for heat or Italian seasoning for a herby taste. For a cheesy twist, use a mix of Parmesan and cheddar. You could also sprinkle some fresh herbs on top after cooking. Try serving with marinara sauce or ranch dressing for dipping. {{image_2}} You can change the taste of your zucchini chips easily. Try adding different spices. For a kick, use cayenne pepper. If you love herbs, mix in dried oregano or basil. A little lemon zest adds freshness. You can also switch up the cheese. Use cheddar or feta for unique flavors. Experiment to find your favorite blend! If you don't have an air fryer, you can bake these zucchini chips. Preheat your oven to 425°F (220°C). Arrange the zucchini on a baking sheet lined with parchment paper. Bake for 15-20 minutes until crispy. Flip them halfway to ensure even cooking. You can also try frying them in oil. Heat oil in a pan and fry until golden brown. This method gives a rich taste. These zucchini chips fit many events. Serve them as a fun snack during movie night. They are perfect for parties or game days. For a healthy appetizer, pair them with marinara sauce or ranch dressing. You can even top them with fresh herbs for a fancy touch. Use them as a crunchy side dish at dinner. They complement sandwiches and salads well. To keep your Garlic Parmesan Air Fryer Zucchini Chips fresh, store them in an airtight container. Place a paper towel inside the container to absorb moisture. This helps maintain their crispiness. Keep them in the fridge, where they last for up to three days. Avoid stacking the chips, as this can cause them to become soggy. When you want to enjoy your leftover chips, reheat them in the air fryer. Set it to 350°F (175°C) for about 3-5 minutes. This will help restore their crunch. You can also use an oven. Place the chips on a baking sheet and heat them at 350°F (175°C) for 5-7 minutes. Check often to avoid burning. Yes, you can freeze zucchini chips, but they may lose some crispiness. To freeze, first allow the chips to cool completely. Then, layer them in a single layer on a baking sheet and freeze for about 1-2 hours. Once frozen, transfer them to a freezer bag. They can last for up to three months. When ready to eat, reheat directly from the freezer in the air fryer. Garlic Parmesan Air Fryer Zucchini Chips stay fresh for about 2-3 days. Store them in an airtight container. The chips may lose some crispiness over time. To help keep them crunchy, avoid stacking them. For the best taste, eat them soon after cooking. Yes, you can use other cheeses! Some great options are cheddar, mozzarella, or feta. Each cheese adds its unique flavor. Try mixing different cheeses for a fun twist. Remember, the cheese should melt well to coat the chips nicely. Zucchini chips are great with many sauces. Marinara sauce adds a nice tang. Ranch dressing gives a creamy touch. You could also try garlic aioli for a garlic kick. Hot sauce is perfect if you want some heat! Choose your favorite or mix and match. This blog post gave you a clear guide to making delicious garlic Parmesan air fryer zucchini chips. We covered the key ingredients and their alternatives, as well as best practices for selecting fresh zucchini. You learned easy steps for preparation, mixing, and air frying. Tips for optimal crispiness and common mistakes showed you how to avoid pitfalls. Variations and storage tips further expanded your cooking options. Keep experimenting with flavors and cooking methods. Enjoy your tasty chips!

Garlic Parmesan Air Fryer Zucchini Chips Delight

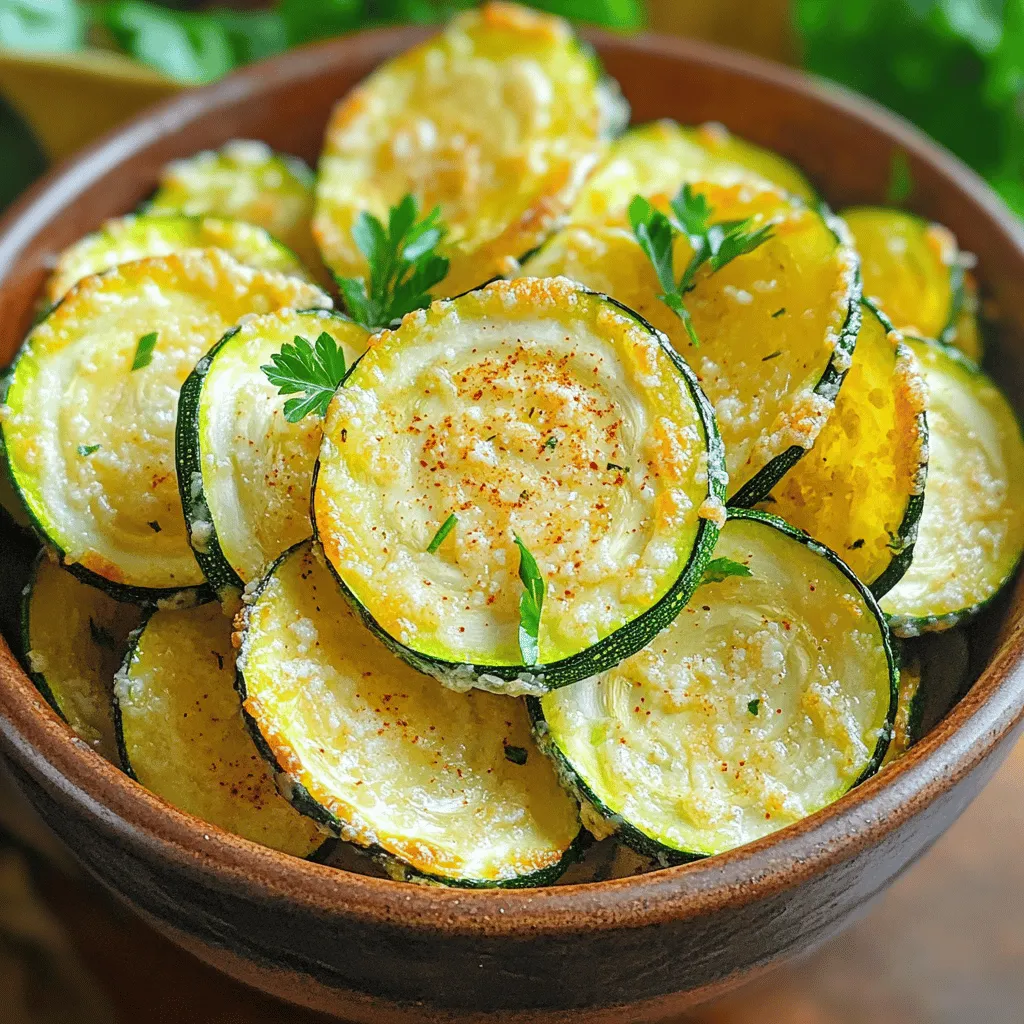
Welcome to a tasty twist on snacking! In this post, I’ll help you create Garlic Parmesan Air Fryer Zucchini Chips

- 2 cups all-purpose flour - 1 cup granulated sugar - 1 tablespoon baking powder - 1/2 teaspoon baking soda - 1/4 teaspoon salt - 1 teaspoon ground cinnamon - 1/2 cup unsalted butter, melted - 1 large egg - 1/2 cup buttermilk - Zest of 1 large orange - 1 cup fresh or dried cranberries - 1 teaspoon vanilla extract - Optional: 1/2 cup chopped pecans or walnuts To create mouthwatering Orange Cranberry Muffin Tops, you need simple yet key ingredients. The flour gives structure, while sugar adds sweetness. Baking powder and soda help them rise, making them fluffy. Salt enhances flavors, and cinnamon brings warmth. Melted butter adds richness, and the egg binds everything together. Buttermilk keeps them moist, while orange zest gives a bright, fresh taste. Cranberries provide a tart contrast, making each bite exciting. If you like, add nuts for crunch. - Calories per serving: Approximately 180 - Protein: 3g - Fat: 8g - Carbohydrates: 27g Knowing the nutritional facts can help you enjoy these treats mindfully. Each muffin top has around 180 calories, making them a tasty snack or breakfast. They have a bit of protein and fat to keep you satisfied. The carbs give you energy, perfect for starting your day. With these ingredients and this nutritional breakdown, you're all set to make delicious Orange Cranberry Muffin Tops! - Preheat oven to 375°F (190°C). - Line a baking sheet with parchment paper. This keeps the muffin tops from sticking. - Combine 2 cups of flour, 1 cup of sugar, 1 tablespoon of baking powder, 1/2 teaspoon of baking soda, 1/4 teaspoon of salt, and 1 teaspoon of cinnamon in a large bowl. Mix well to break up any lumps. - In another bowl, whisk together 1/2 cup of melted butter, 1 large egg, 1/2 cup of buttermilk, the zest of 1 large orange, and 1 teaspoon of vanilla extract. This mix adds flavor and moisture. - Pour the wet mix into the dry mix. Stir gently until just combined. Be careful not to overmix; the batter should be slightly lumpy. - Fold in 1 cup of cranberries and, if you like, 1/2 cup of chopped nuts. The cranberries add a tart flavor, while the nuts give a nice crunch. - Drop heaping tablespoons of the batter onto the prepared baking sheet. Space them about 2 inches apart. Bake for 12-15 minutes. Look for golden tops and clean toothpicks when testing. To make your muffin tops just right, avoid overmixing the batter. When you mix too much, the muffin tops can turn out tough. Mix until you see no dry flour. Then, gently fold in the cranberries. For doneness, insert a toothpick into the center. If it comes out clean, they’re ready. If not, bake a few more minutes. Once your muffin tops cool, add a light dusting of powdered sugar. This makes them look fancy and inviting. You can also garnish them with extra cranberries and orange slices. This adds color and makes your dish pop. Make sure you measure your ingredients carefully. Too much or too little can change the texture. Always check your oven's temperature with an oven thermometer. If your oven runs hot or cold, it can affect how your muffin tops bake. {{image_2}} You can play with flavors in your Orange Cranberry Muffin Tops. Adding spices like nutmeg or ginger gives a warm twist. Nutmeg adds a sweet, nutty taste, while ginger brings a bit of spice. You can also swap cranberries for other fruits like blueberries. Blueberries add a burst of juiciness that pairs well with orange. Experimenting with flavors makes each batch special. If you need a gluten-free option, use a gluten-free flour blend instead of all-purpose flour. It works just as well. For those who follow a vegan diet, replace the egg with a flax egg. Simply mix one tablespoon of ground flaxseed with three tablespoons of water and let it sit for five minutes. You can also use almond milk instead of buttermilk. These changes keep the muffins tasty while meeting dietary needs. Seasonal changes can spice up your muffin tops. For holidays, add festive touches like dried spices or small chocolate chips. You can also include citrus zest, like lemon or lime, for a fresh burst of flavor. These small additions bring joy and excitement to your baking. To keep your orange cranberry muffin tops fresh, store them in an airtight container. This helps lock in moisture and flavor. You can keep them at room temperature for up to three days. If you want them to last longer, consider refrigerating them. They can stay good in the fridge for about one week. Freezing muffin tops is easy! First, allow them to cool completely. Then, wrap each muffin top in plastic wrap. Place the wrapped muffin tops in a freezer-safe bag or container. They can freeze well for up to three months. When you’re ready to enjoy one, just take it out of the freezer. Let it thaw in the fridge overnight for the best results. To reheat muffin tops, you have a few good options. You can use a microwave, oven, or toaster oven. For the microwave, heat for about 10-15 seconds. In the oven, set it to 350°F (175°C) and warm for about 5-7 minutes. Aim for a warm center. The best serving temperature is just warm, which enhances the flavors and freshness. Muffin tops are the domed upper part of a muffin. They are thicker and rounder than regular muffins. Muffin tops often have a crunchy texture outside and a soft inside. They lack the bottom part of a muffin, making them a delightful treat. Many people enjoy muffin tops for their rich flavor and unique shape. Yes, you can use frozen cranberries! They work well in recipes. Frozen cranberries may be softer but will still taste great. If you use frozen ones, do not thaw them before adding them to the batter. This helps keep your muffin tops moist and flavorful. You can easily make these muffin tops healthier! Here are some ideas: - Use whole wheat flour instead of all-purpose flour. - Substitute applesauce for half of the butter. - Use honey or maple syrup instead of granulated sugar. - Add more fruit or nuts for extra nutrients. Muffin tops can last for about 3 to 5 days at room temperature. Store them in an airtight container to keep them fresh. If you want them to last longer, you can freeze them. They can stay good for about 3 months in the freezer. Yes, you can make the batter ahead of time! Mix the dry and wet parts separately and store them in the fridge. Combine them when you're ready to bake. This way, you can enjoy fresh muffin tops anytime. Just remember, the batter is best used within 24 hours for the best texture. These muffin tops pair well with many items! Here are some tasty suggestions: - Serve them with butter or cream cheese. - Enjoy them with yogurt and fresh fruit. - Pair them with coffee or tea for a nice breakfast. - Add a side of scrambled eggs for a filling meal. In this post, we covered the simple steps to make orange cranberry muffin tops. You learned about the key ingredients and how to mix them right. I shared tips to ensure your muffin tops turn out perfect every time. Remember, storage and variations can keep things fun, so explore them as you bake. With this recipe, you can enjoy a tasty treat at any time. Happy baking!

Orange Cranberry Muffin Tops Delightfully Simple Bake

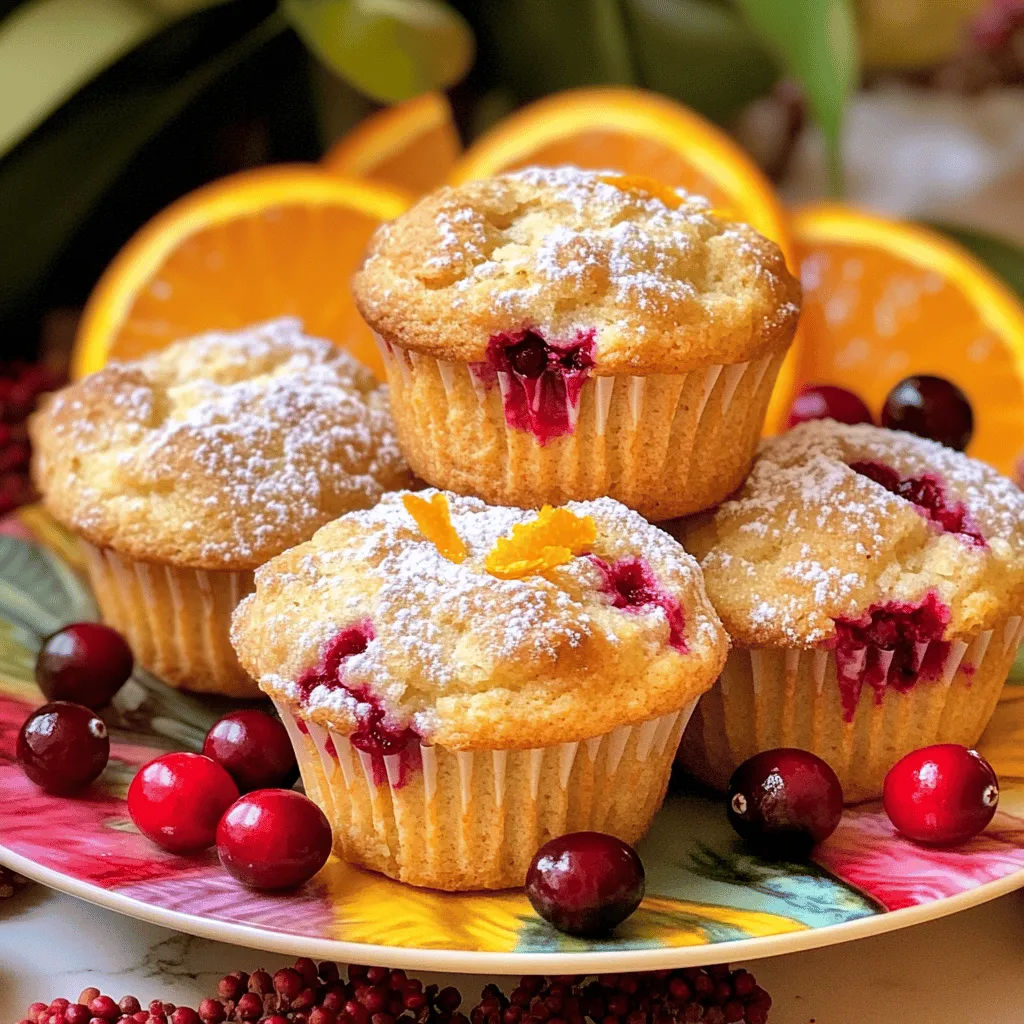
Are you ready to bake something delicious? These Orange Cranberry Muffin Tops are easy and delightful! With bright orange zest

For Greek stuffed eggplant boats, you will need these fresh and tasty ingredients: - 2 medium eggplants - 1 cup cooked quinoa - 1 cup cherry tomatoes, halved - 1/2 cup feta cheese, crumbled - 1/4 cup Kalamata olives, chopped - 1/4 cup red onion, finely chopped - 2 cloves garlic, minced - 1 tablespoon olive oil - 1 teaspoon dried oregano - 1/2 teaspoon smoked paprika - Salt and pepper to taste - Fresh parsley or basil for garnish These ingredients blend together to create a dish that is both vibrant and satisfying. The eggplants serve as perfect boats, holding the rich filling. Each bite combines the nutty quinoa, tangy feta, and savory olives. You can easily find all these items at your local grocery store or farmer's market. Enjoy the process of picking out fresh ingredients; it makes the dish that much better! - Preheat your oven to 400°F (200°C). - Slice the eggplants in half lengthwise. Scoop out the flesh, leaving about 1/2 inch of skin. Set the flesh aside. - Brush the eggplant halves with olive oil. Sprinkle with salt and pepper. Place them cut side down on a baking sheet. Roast for 20 minutes until tender. - While the eggplants roast, chop the reserved eggplant flesh into small pieces. - In a skillet over medium heat, add a splash of olive oil. Sauté the chopped eggplant, garlic, and red onion until softened, about 5-6 minutes. - Stir in the cooked quinoa, halved cherry tomatoes, chopped olives, oregano, smoked paprika, salt, and pepper. Cook for 3-4 more minutes until the tomatoes soften. Remove from heat and stir in the crumbled feta cheese. - After roasting, carefully flip the eggplant halves cut side up. Spoon the quinoa mixture into each eggplant boat, filling them generously. - Return the stuffed eggplants to the oven. Bake for another 10-15 minutes until heated through and slightly golden on top. - Remove from the oven and garnish with fresh parsley or basil before serving warm. When choosing eggplants, look for medium-sized ones. They should feel firm and heavy for their size. The skin should be smooth and shiny. Avoid eggplants with blemishes or soft spots. A ripe eggplant will have a deep, rich color. You want a fruit that feels light for its size. This means it’s full of water and flavor. You can change up the flavors easily. Try adding a pinch of red pepper flakes for heat. Fresh herbs like dill or mint can add a bright taste. If you like citrus, a squeeze of lemon juice works well. For a Mediterranean twist, try adding capers. Experiment with spices like cumin or coriander for warmth. These stuffed eggplants pair great with various sides. A simple Greek salad adds freshness. You can also serve them with tzatziki sauce for creaminess. Consider a side of warm pita bread to balance the meal. A glass of chilled white wine complements the flavors nicely. Enjoy them warm for the best taste! {{image_2}} You can easily make Greek stuffed eggplant boats even more colorful and healthy. - Add more veggies like bell peppers, zucchini, or spinach. - Use chickpeas or lentils to boost the dish's fiber and protein. - Try using corn or black beans for a fun twist. These changes keep the dish fresh and vibrant. If you want more protein, you can add ground meat. - Use ground beef, lamb, or turkey for a heartier meal. - You can also mix in cooked lentils for a meatless option. Meat adds depth and richness to the flavor profile. Making this dish fit your diet is simple. - For a gluten-free option, just ensure your quinoa is certified gluten-free. - If you need it dairy-free, skip the feta cheese or use a plant-based alternative. These swaps keep the spirit of the dish while catering to your needs. After enjoying Greek stuffed eggplant boats, let them cool down. Place the leftovers in an airtight container. This helps keep them fresh. Store the container in the refrigerator. They stay good for about 3 to 5 days. If you plan to eat them later, consider freezing. To freeze stuffed eggplants, first let them cool completely. Wrap each boat in plastic wrap. Then, place them in a freezer-safe bag or container. This method prevents freezer burn. You can freeze them for up to three months. When ready to eat, thaw them in the fridge overnight. To reheat, preheat your oven to 350°F (175°C). Place the eggplant boats on a baking sheet. Cover them with foil to keep moisture in. Bake for about 20 minutes. This method helps maintain texture and flavor. You can also use a microwave, but this may change the texture. Enjoy your delicious meal again! Greek stuffed eggplant boats are a tasty dish. They feature eggplants filled with a savory mix. The main ingredients are: - 2 medium eggplants - 1 cup cooked quinoa - 1 cup cherry tomatoes, halved - 1/2 cup feta cheese, crumbled - 1/4 cup Kalamata olives, chopped - 1/4 cup red onion, finely chopped - 2 cloves garlic, minced - 1 tablespoon olive oil - 1 teaspoon dried oregano - 1/2 teaspoon smoked paprika - Salt and pepper to taste - Fresh parsley or basil for garnish You roast the eggplants and then stuff them with this flavorful mix. The dish is healthy and satisfying. Making Greek stuffed eggplant boats vegetarian is easy. You can replace certain ingredients. For a vegetarian option, use: - More vegetables like zucchini or bell peppers - Lentils instead of quinoa for added protein You can also skip the feta cheese or choose a plant-based version. These swaps keep the dish tasty and filling. Yes, you can prepare Greek stuffed eggplant boats ahead of time. Here’s how: - Cook the filling and store it in the fridge. - Roast the eggplant halves and keep them separate. You can fill the eggplants right before baking. This way, they stay fresh and warm. Greek stuffed eggplant boats pair well with many sides. Try serving with: - A green salad with lemon vinaigrette - Tzatziki sauce for dipping - Grilled pita bread For drinks, consider a light white wine or sparkling water with lemon. These options enhance the meal's flavors. Greek stuffed eggplant boats are nutritious. Each serving contains: - About 300 calories - Good amounts of fiber and protein - Vitamins from the veggies This dish is a balanced choice for a healthy meal. Greek stuffed eggplant boats offer a tasty mix of flavors and textures. We started with the right ingredients, from juicy eggplants to creamy feta. I guided you through simple steps, from preparation to baking, ensuring perfect results. Don’t forget my tips for selecting the best eggplants and adjusting flavors. These boats are highly customizable, whether you want vegetarian or protein-rich versions. With proper storage and reheating tips, your leftovers will shine. Enjoy this dish with sides that elevate it. Dive in and create your delicious eggplant masterpiece today!

Greek Stuffed Eggplant Boats Flavorful and Easy Recipe

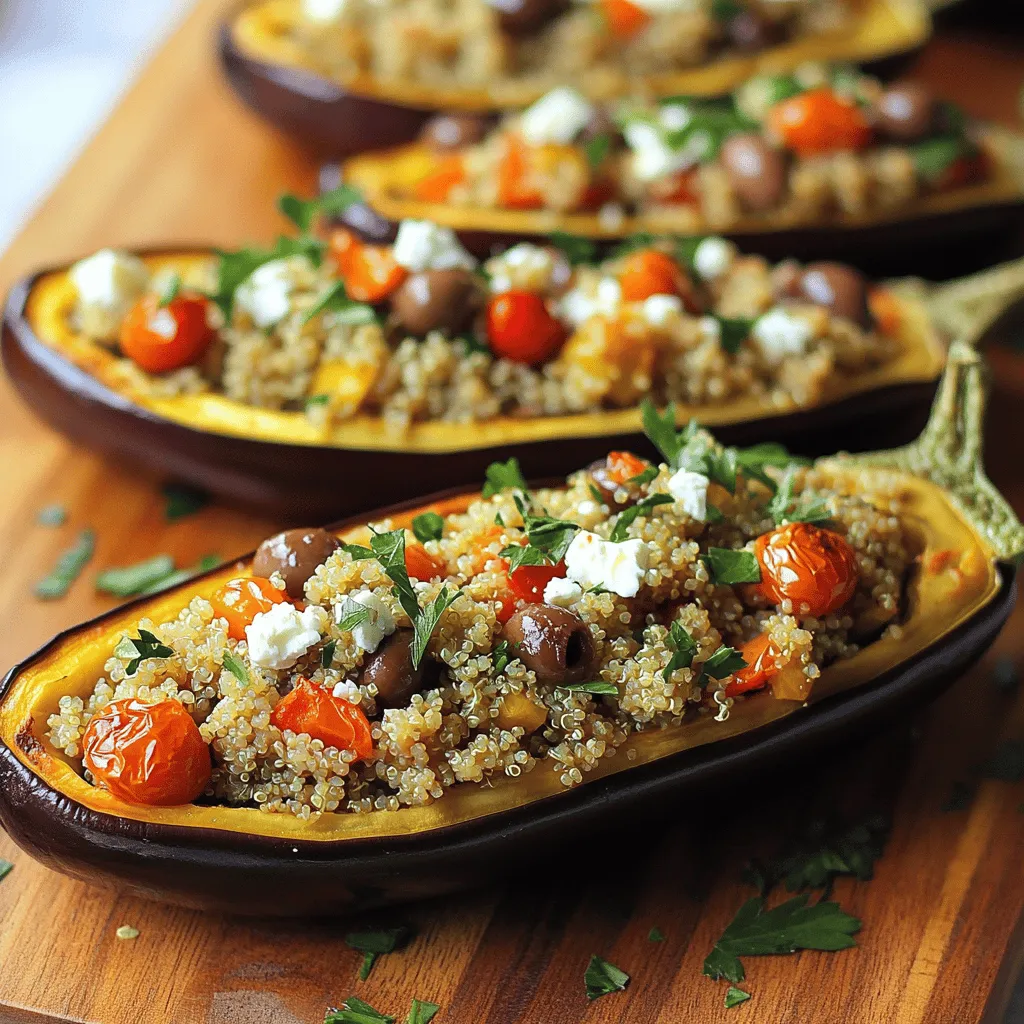
Welcome to my kitchen! Today, I’m excited to share a dish that will delight your taste buds: Greek Stuffed Eggplant

Fresh blueberries are the star of this jam. They bring a sweet, juicy flavor. Look for plump berries with a deep blue color. You can use about 2 cups of fresh blueberries for this recipe. They give the jam its rich taste and vibrant color. You can choose between honey and maple syrup for sweetness. Honey adds a floral note and works well with berries. If you want a vegan option, go with maple syrup. It has a unique flavor that pairs nicely with blueberries. Use 2 tablespoons of your chosen sweetener for the perfect touch of sweetness. You will need a few more key ingredients. Lemon juice adds a hint of acidity that brightens the jam. Just 1 tablespoon of lemon juice works well. Chia seeds help thicken the jam and add nutrition. Use 3 tablespoons of chia seeds for the right texture. A splash of almond extract, about 1/4 teaspoon, gives the jam a lovely aroma. Finally, add a pinch of salt to balance the flavors. To start, gather your ingredients. You will need fresh blueberries, honey or maple syrup, and lemon juice. In a medium saucepan, add the blueberries, sweetener, and lemon juice. Place it over medium heat. Stir gently as it cooks for about 5 to 7 minutes. You want the blueberries to burst and release their juices. This creates a flavorful base for your jam. Once the blueberries are soft, take the saucepan off the heat. Now, grab a fork or a potato masher. Mash the blueberries to your desired texture. If you like it smooth, mash well. For a chunkier jam, leave some berries whole. After mashing, stir in chia seeds, almond extract, and a pinch of salt. Mix everything until well combined. The chia seeds will help thicken the jam. Let the mixture cool for about 10 minutes. As it cools, it will thicken more. Now, transfer your jam to a clean jar or an airtight container. Place it in the refrigerator to store. Your blueberry almond chia jam is ready to enjoy! For the best texture, start with fresh blueberries. Cook them gently until they burst. This will make a nice, juicy base. If you like it smooth, mash the blueberries well. For a chunkier jam, mash less. The chia seeds will help thicken the jam as it cools. When sweetening, you have options. You can use honey or maple syrup. Honey gives a nice floral taste, while maple adds a rich flavor. Start with two tablespoons and taste. Add more if you want it sweeter. Just remember, a little goes a long way! This jam is great on toast or crackers. You can also add it to yogurt or oatmeal. For a fun twist, swirl it into pancakes or waffles. Use it as a topping for desserts like ice cream or cheesecake. It’s a tasty way to enjoy healthy ingredients! {{image_2}} You can swap blueberries for other berries. Raspberries, strawberries, or blackberries work great. Each berry gives a unique taste. For example, strawberries add sweetness, while raspberries bring a tangy kick. Use the same method with the same amounts. Just remember to adjust the sweetener if needed. This way, you can enjoy different flavors all year round. If you want a vegan jam, replace honey with maple syrup. Maple syrup offers a sweet, rich taste. You can also use agave nectar for a lighter option. Both will give you a lovely jam without any animal products. This makes the jam friendly for everyone. Always check the labels to ensure your ingredients are fully vegan. Adding spices can elevate your jam. Try a dash of cinnamon for warmth or a little ginger for spice. These flavors mix well with the berries. You can also add a splash of vanilla extract for a sweet aroma. Experiment with the amounts to find what you love most. Don't be afraid to get creative! To store your Blueberry Almond Chia Jam, use a clean jar. Make sure the jar is airtight to keep the jam fresh. After making the jam, let it cool down. Then, transfer it to the jar and seal it tightly. Place the jar in the fridge. This keeps the jam safe and tasty for later. Your jam will last in the fridge for about one week. It’s best to eat it fresh, but you can freeze it too. For freezing, use a freezer-safe jar. Leave some space at the top, as the jam will expand when frozen. It can stay good in the freezer for up to three months. When you want to use it, simply thaw it in the fridge overnight. Check for any changes before eating the jam. If you see mold or a strange smell, it's time to toss it. The jam should smell sweet and fruity. If it tastes sour, it’s best not to eat it. Always trust your senses; they help keep you safe. Yes, you can use frozen blueberries. They work well in the jam. Frozen berries may release more juice than fresh ones. Just add them to the saucepan without thawing. Cook them until they burst, just like fresh ones. Chia seeds are tiny but mighty. They are rich in fiber, which helps digestion. They also provide protein, healthy fats, and many vitamins. Chia seeds can help you feel full longer. They are great for heart health and reducing inflammation. Adding them to your diet can boost your overall health. Chia jam takes about 10 minutes to thicken after mixing. As it cools, the chia seeds absorb liquid and swell. If you want it thicker, let it sit longer in the fridge. You can also add more chia seeds if you like a denser texture. In this post, we explored how to make blueberry almond chia jam. We covered fresh blueberries, sweeteners, and essential ingredients. You learned step-by-step instructions, from preparing the blueberry mixture to cooling the jam. We shared tips for texture, sweetening, and serving ideas. You discovered fun variations using other berries and vegan options. Lastly, we addressed how to store the jam and its shelf life. Making your own jam is simple and fun. Enjoy your tasty creation and share it with others!

Blueberry Almond Chia Jam Simple and Nutritious Recipe

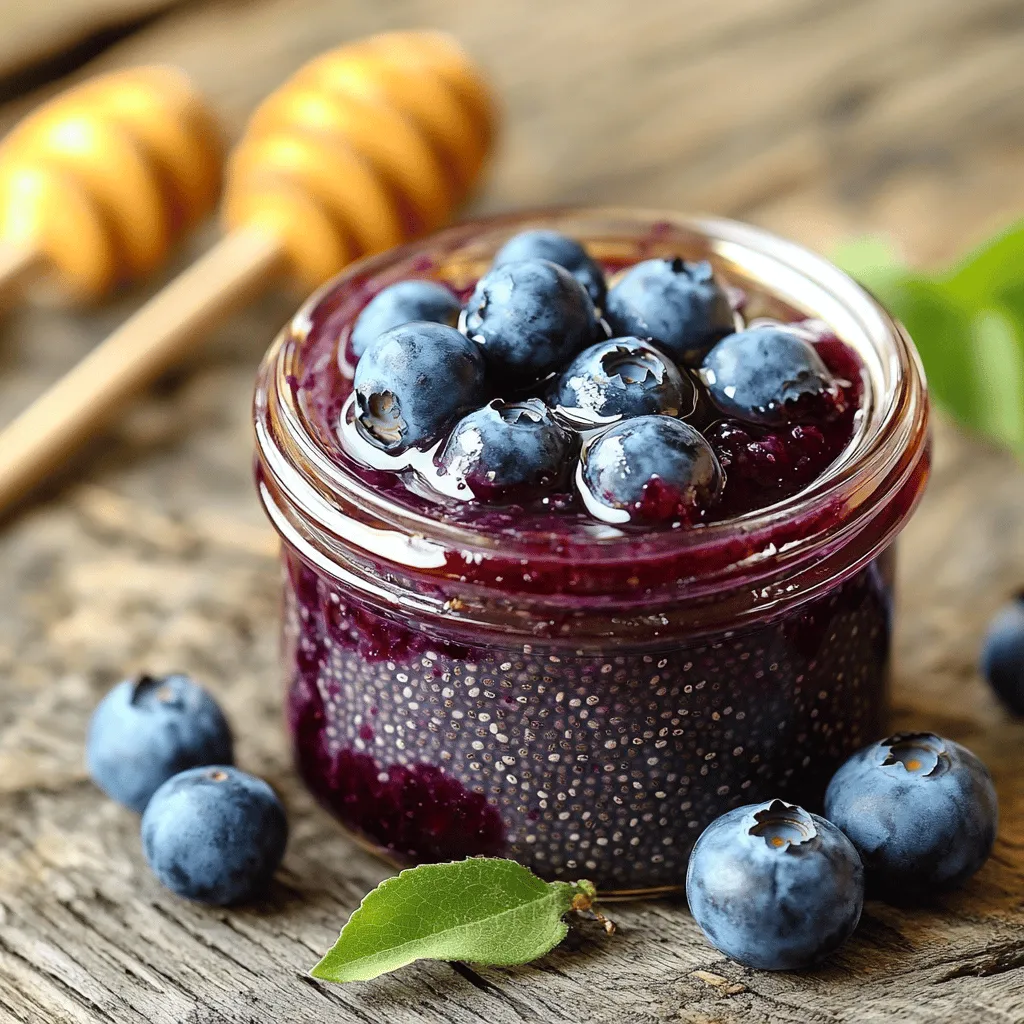
Looking for a simple and nutritious way to enjoy breakfast? You’ll love this Blueberry Almond Chia Jam! Packed with fresh

- 2 medium sweet potatoes, diced - 1 bunch of kale, stems removed and chopped - 1 small onion, diced - 1 red bell pepper, diced - 2 cloves garlic, minced - 4 large eggs - 2 tablespoons olive oil - 1 teaspoon smoked paprika - 1/2 teaspoon salt - 1/4 teaspoon black pepper - Optional toppings: avocado slices, hot sauce, or feta cheese Gathering fresh ingredients is the first step to making a great breakfast hash. Sweet potatoes give this dish a natural sweetness and a bright color. The kale adds a hearty green layer, making it both tasty and healthy. Use fresh, crisp kale for the best flavor. Diced onion and red bell pepper add a nice crunch and a hint of sweetness as they cook down. Don’t forget the garlic! It brings a strong flavor that elevates the whole dish. Eggs are the star here, providing protein and richness. For pantry staples, you will need olive oil for cooking and a few spices to bring out the flavors. Smoked paprika adds depth, while salt and black pepper enhance everything. Feel free to add optional toppings like creamy avocado or a kick of hot sauce. Feta cheese also adds a nice salty bite if you like! These ingredients work together to create a filling and tasty breakfast that will fuel your morning. - Heat 2 tablespoons of olive oil in a large skillet over medium heat. - Add 2 medium diced sweet potatoes, 1/2 teaspoon salt, 1/4 teaspoon black pepper, and 1 teaspoon smoked paprika. - Stir the mix often, cooking for 10-15 minutes. You want them tender and a bit crispy. - Next, add 1 small diced onion and 1 diced red bell pepper to the skillet. - Sauté for 5-7 minutes until the veggies soften nicely. - Stir in 2 cloves of minced garlic and 1 bunch of chopped kale. - Cook for 3-4 minutes until the kale wilts and the garlic smells great. - Use a spoon to create four small wells in the hash mixture. - Crack 4 large eggs into each well gently. - Cover the skillet with a lid and cook for 5-6 minutes until the eggs are set. Adjust the cooking time based on how you like your eggs. To cook sweet potatoes faster, cut them into small pieces. Small cubes cook quicker than larger chunks. Start them in a hot skillet with olive oil. Stir them often to avoid sticking. This keeps them cooking evenly. Remember, stirring helps prevent burning. If you find them browning too fast, lower the heat a bit. To boost flavor, add fresh herbs like thyme or parsley. A sprinkle of cumin can add warmth. You can also try red pepper flakes for spice. The key to seasoning is balance. Taste as you go to find what works for you. If you want a smoky taste, use more smoked paprika. For perfect eggs, cover the skillet with a lid. This traps steam and helps the eggs cook evenly. If you like runny yolks, cook them less. For firmer yolks, let them cook longer. You can also fry eggs separately and place them on top of the hash. This gives you a nice presentation and control over doneness. {{image_2}} For a vegan option, skip the eggs. Replace them with tofu. You can scramble firm tofu to mimic eggs. Add some turmeric for color. For vegetarians, keep the eggs. They add protein and richness. You can also use different greens like spinach or Swiss chard. Both add unique flavor and nutrients. Feel free to mix in other veggies. Try adding diced zucchini or mushrooms for extra texture. Sweet corn gives a sweet crunch too. You can also swap proteins. Use turkey sausage or plant-based sausage for a tasty twist. If you want a vegetarian protein, consider tempeh or chickpeas. These options boost the dish's heartiness. Pair your hash with a side of fresh fruit. Sliced oranges or berries brighten up your plate. For a crunch, serve with whole-grain toast. A dollop of yogurt or sour cream adds creaminess. Garnish with avocado slices for a rich touch. Chopped herbs like cilantro or parsley add a pop of color and flavor. To keep your Sweet Potato Kale Breakfast Hash fresh, use a good container. I recommend glass or BPA-free plastic containers with tight lids. First, let the hash cool to room temperature. Then, transfer it to the container and seal it well. Store it in the fridge for up to four days. If you want to keep it longer, consider freezing it. Use freezer-safe containers and label them with the date. This way, you know what you have and when you made it. When you want to enjoy your leftovers, reheating is key. For the best texture, use the stovetop. Heat a skillet over medium heat, add a splash of oil, and stir the hash until it warms. This method keeps the veggies nice and crisp. If you're in a hurry, the microwave works too. Place a portion in a microwave-safe bowl, cover it, and heat for about 1-2 minutes. Stir halfway through to ensure even heating. Just be careful not to overcook it, or the texture may suffer. Yes, you can make this dish ahead of time. To prep in advance, cook the sweet potatoes and vegetables until tender. Then, cool them quickly and store them in the fridge. You can keep the hash for up to three days. When ready to eat, simply heat it up in a skillet. Add the eggs fresh for the best taste. Many sides pair well with this hash. You can serve it with fresh fruit for a sweet touch. Toast with jam or butter makes a great addition too. Consider yogurt or cottage cheese for extra protein. A side of crispy bacon or sausage can add a savory flavor. To add heat, use a spicy seasoning blend or hot sauce. You can also add diced jalapeños while cooking the onions and peppers. For extra flavor, try adding red pepper flakes to the hash. A sprinkle of cayenne pepper on top before serving also works wonders. Yes, this dish is great for meal prep. Cook a large batch and store it in airtight containers. It lasts well in the fridge for about three days. For longer storage, you can freeze portions for up to a month. Just reheat in the microwave or on the stovetop. In summary, making Sweet Potato Kale Breakfast Hash is simple and rewarding. You need sweet potatoes, kale, and eggs, along with some basic spices. Follow the steps to cook the sweet potatoes, add your veggies, and prepare the eggs perfectly. Remember to explore variations, adapt flavors, and store leftovers well. This dish is not just tasty; it’s also flexible for your diet. Enjoy experimenting with it and make it your own!

Sweet Potato Kale Breakfast Hash Flavorful Morning Fuel

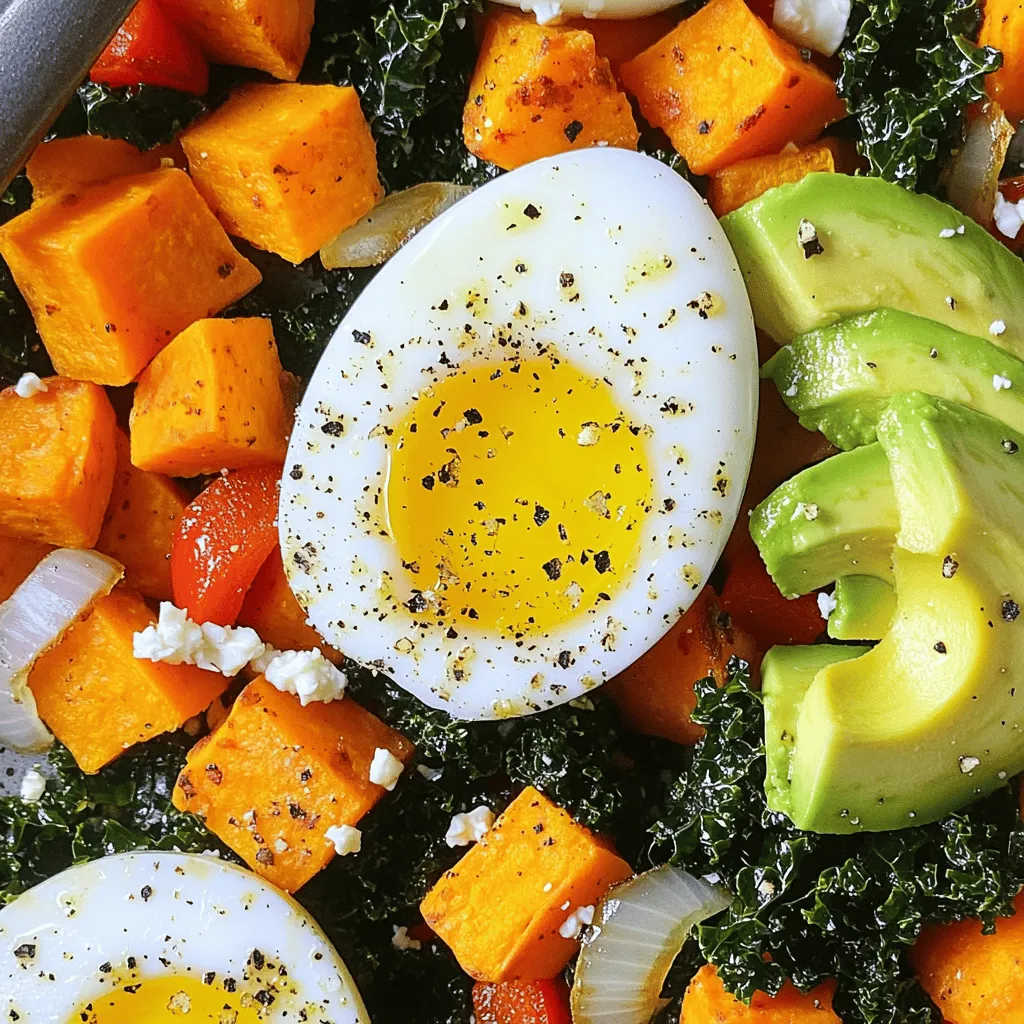
Looking for a healthy and tasty start to your day? I’ve got just the thing: Sweet Potato Kale Breakfast Hash!

Older posts
Newer posts
← Previous Page1 … Page34 Page35 Page36 … Page82 Next →

dsad

© 2026 Recipes Pursuit • Built with GeneratePress

Our Policies

  • Copyright Policy
  • Cookie Policy
  • GDPR Policy
  • Privacy Policy
  • Disclaimer
  • Terms Of Use

More Information

  • Home
  • About
  • Contact
  • Appetizers
  • Dessert
  • Dinner
  • Drinks
©2026, Recipes Pursuit About Back To Top