Skip to content
DisclaimerTerms Of UseGDPR PolicyCookie Policy

Recipes Pursuit

  • Home
  • Drinks
  • Appetizers
  • Dinner
  • Dessert
  • About
  • Contact
  • Privacy Policy
DisclaimerTerms Of UseGDPR PolicyCookie Policy

NO-ING-IMG

To make Raspberry Dark Chocolate Bark, you will need a few simple ingredients. Here’s what you should gather: - 1 cup dark chocolate chips (70% cocoa or higher) - 1 cup fresh raspberries, rinsed and dried - 1 tablespoon coconut oil (optional, for smoother chocolate) - 1/4 cup chopped pistachios (or any nuts of your choice) - Sea salt, for sprinkling These ingredients create a perfect balance of sweet and tart flavors. Dark chocolate brings richness, while fresh raspberries add a burst of freshness. The coconut oil helps the chocolate melt smoothly, but you can skip it if you prefer. Chopped pistachios add a nice crunch and flavor. A sprinkle of sea salt enhances the taste and makes each bite special. When choosing your chocolate chips, aim for high-quality options. The cocoa content impacts flavor. Higher percentages mean richer chocolate. For the raspberries, make sure they are ripe and firm. They will hold up nicely against the chocolate. If you want to switch nuts, almonds or walnuts also work well. Gather these ingredients, and you’re ready to create a delightful treat! 1. Melting the chocolate chips: Start by grabbing a microwave-safe bowl. Add 1 cup of dark chocolate chips. If you want smoother chocolate, add 1 tablespoon of coconut oil. Heat in the microwave for 30 seconds. Take it out and stir. Repeat this until the chocolate is completely melted and smooth. 2. Lining with parchment paper: While your chocolate is melting, get a baking sheet. Line it with parchment paper. This makes it easy to remove the bark later. 3. Spreading melted chocolate: Once your chocolate is melted, pour it onto the lined baking sheet. Use a spatula to spread it evenly. Aim for a thickness of about 1/4 inch. 4. Adding raspberries and nuts: Now, gently drop 1 cup of fresh raspberries over the melted chocolate. Spread them out evenly. Next, sprinkle 1/4 cup of chopped pistachios on top. Press them lightly into the chocolate so they stick well. 5. Finishing with sea salt: For a flavor boost, sprinkle a pinch of sea salt over the chocolate bark. This adds a nice contrast to the sweet chocolate and tart raspberries. 6. Setting time in the refrigerator: Place the baking sheet in the fridge. Let it chill for at least 1 hour. This helps the chocolate set completely. 7. Breaking the bark into pieces: Once the bark is set, take it out of the fridge. Break it into pieces. Store them in an airtight container in the fridge until you're ready to enjoy. To get smooth chocolate, use coconut oil. It helps the chocolate melt well. You can also try a double boiler. Just place a bowl over hot water. This gives you more control and keeps the heat gentle. Add toppings like dried cranberries or shredded coconut. You can also use white chocolate for a sweeter bark. Each chocolate type brings its own taste. Try mixing dark and milk chocolate for a fun twist. Serve your bark on a pretty plate. Add extra raspberries for a pop of color. Mint leaves can give a fresh look too. These small touches make your treat stand out. {{image_2}} If you want a nut-free bark, you can easily switch the pistachios. Try pumpkin seeds or sunflower seeds instead. You can also leave out the nuts completely. The bark will still taste great! Raspberries are amazing, but other berries work too. You can use strawberries, blueberries, or blackberries. Dried fruits like cranberries or apricots also add fun flavors. Just chop them into small pieces. To make this recipe vegan, check the dark chocolate. Make sure it is dairy-free. Use vegan chocolate chips if needed. The coconut oil is already plant-based, so you’re good there! Enjoy this treat without any animal products. To keep your Raspberry Dark Chocolate Bark fresh, use an airtight container. This helps prevent moisture and keeps it safe from smells in the fridge. Choose a container that fits the bark snugly, so it doesn’t break into small pieces. You can also layer parchment paper between the pieces for easy removal. Raspberry Dark Chocolate Bark lasts about two weeks in the fridge. After that, it may lose some flavor and texture. To enjoy it at its best, try to eat it within this time. If you notice any changes in color or smell, it’s best to toss it out. You can freeze Raspberry Dark Chocolate Bark if you want to save some for later. Wrap it tightly in plastic wrap, then place it in an airtight container. This way, it stays fresh and tasty. When you’re ready to eat it, take it out of the freezer. Let it thaw in the fridge for a few hours. Avoid thawing at room temperature to keep it firm and crunchy. Yes, you can use milk chocolate. It will taste sweeter than dark chocolate. If you want a balanced flavor, add a pinch of sea salt. Milk chocolate has less cocoa, so it melts differently. You might need less coconut oil for smoothness. Adjust the amount based on your taste. To make this treat gluten-free, check all ingredient labels. Most chocolate chips are gluten-free, but some may contain gluten. Ensure your nuts are also gluten-free. Avoid any toppings that may have gluten. This way, you can enjoy your bark without worries. If you want to change the raspberries, try other berries. Strawberries, blueberries, or blackberries work well. You can even use dried fruits like cranberries. Each fruit adds a unique taste. Just make sure to adjust the amount based on sweetness. In this post, we explored how to make Raspberry Dark Chocolate Bark. We covered the simple ingredients, detailed instructions, and helpful tips for perfecting it. You can customize your bark with different nuts, fruits, or flavors. Remember, storing it well helps maintain taste and texture. Try to be creative with your presentation to impress your guests. Making this treat can be easy and fun! Enjoy the process, and happy snacking!

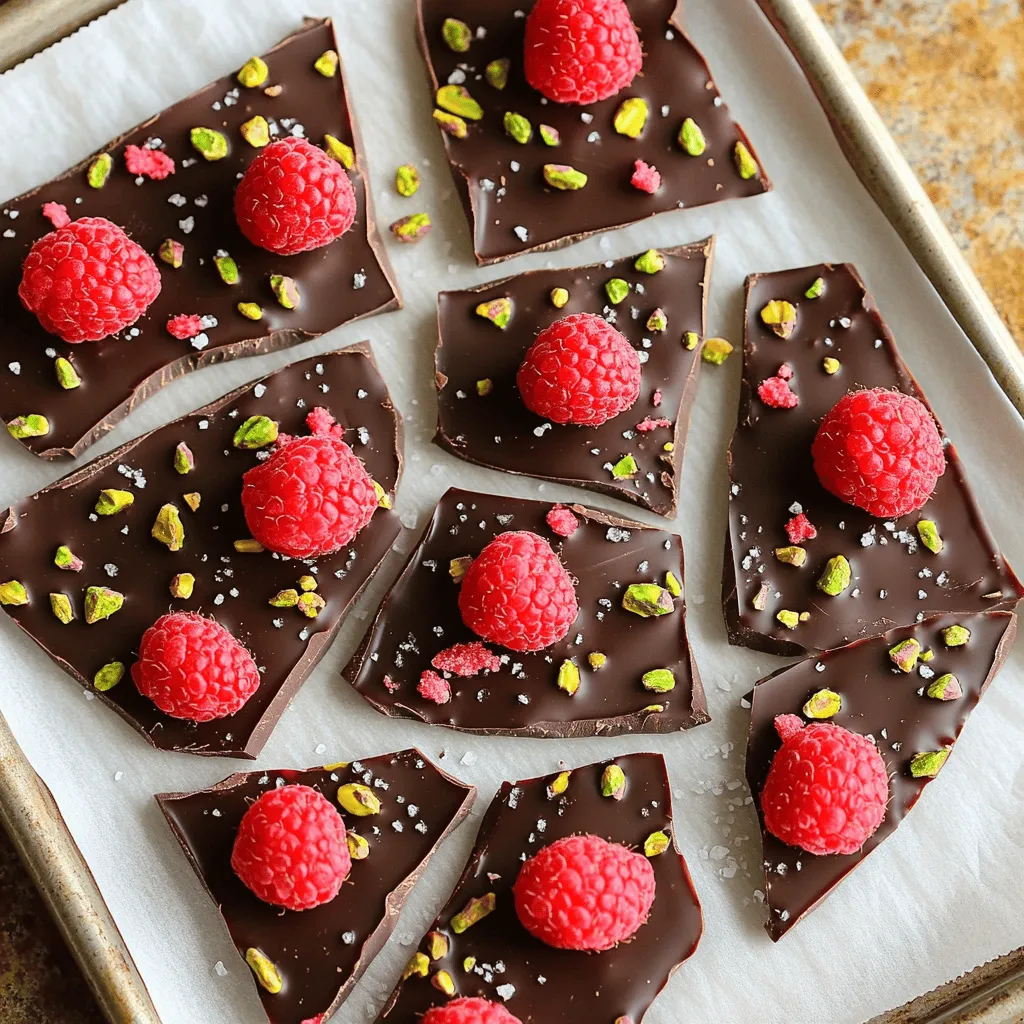
Raspberry Dark Chocolate Bark Irresistible Treat Recipe

Indulge in the perfect blend of sweet and tart with my Raspberry Dark Chocolate Bark! This quick and easy treat

- Apples: I love using Granny Smith and Honeycrisp apples. Granny Smith adds tartness, while Honeycrisp brings sweetness. The mix gives the galette a great balance. You can choose other types too, but these work best. - Essential baking items: You need a pie crust. You can use a store-bought one or make your own. For the salted caramel sauce, you can buy it or make it from scratch. If you make it, keep it simple with sugar, butter, and cream. - Optional serving suggestions: Whipped cream is a classic choice to top the galette. You can also serve it with vanilla ice cream for extra creaminess. Both add a nice touch to the warm galette and make it a special treat. First, you need to prepare the apples. I use two large apples, like Granny Smith and Honeycrisp. These apples have the right mix of tart and sweet. Start by peeling the apples. Then, slice them into thin pieces. This way, they cook evenly. Place the apple slices in a bowl. Next, add one tablespoon of lemon juice. This keeps the apples fresh. Then, sprinkle in 1/4 cup of granulated sugar. This adds sweetness. Add 1/2 teaspoon of cinnamon and 1/4 teaspoon of nutmeg for warm flavors. Finally, stir in one tablespoon of cornstarch. This will help thicken the juices. Let the apple mixture sit for 10 to 15 minutes. This lets the apples release their tasty juices. Now, it’s time to roll out the pie crust. If you use a store-bought crust, take it out of the fridge. Place it on a baking sheet lined with parchment. Roll the crust into a round shape. It should be about 12 inches wide. Once rolled, transfer the apple mixture to the center. Leave a 2-inch border around the edges. Drizzle half of the salted caramel sauce over the apples. Now, fold the edges of the crust over the apples. Pleat the crust as you go. This creates a rustic look that is beautiful and tasty. Brush the exposed edges with a beaten egg. This gives the crust a nice golden finish. Pour the rest of the salted caramel sauce over the apples in the middle. Finish by sprinkling a pinch of coarse sea salt on top. This adds extra flavor. Before baking, preheat your oven to 400°F (200°C). This step is key for getting a nice crust. Place the galette in the oven for 25 to 30 minutes. The crust should turn golden brown, and the apples should become tender. After baking, take the galette out and let it cool for a few minutes. It smells amazing! Slice it up and serve warm. A dollop of whipped cream or a scoop of vanilla ice cream is perfect on top. Enjoy the sweet and salty flavors in every bite! To make your apple mixture shine, balance the sweetness and acidity. I like using Granny Smith and Honeycrisp apples. Granny Smith gives that tart kick, while Honeycrisp adds sweetness. Together, they create a great flavor blend. Cornstarch plays an important role too. It helps thicken the juices from the apples. Without it, your galette might be too runny. Add one tablespoon to your apple mix, and let it sit for 10-15 minutes. This allows the apples to release their juices and soak up the cornstarch. For a beautiful golden crust, use an egg wash. Just beat one egg and brush it on the edges of your galette. This step makes the crust shine and adds color. The right baking environment is key. Preheat your oven to 400°F (200°C) before baking. A hot oven helps the crust puff up and become flaky. Keep an eye on it while it bakes. Look for a golden brown color and tender apples. To enhance flavors, try adding toppings. Whipped cream or vanilla ice cream pair perfectly with the galette. The creaminess balances the sweet and salty notes from the caramel. When it comes to drinks, consider warm cider or a light white wine. These beverages complement the apple and caramel flavors well. Enjoy your sweet treat with these simple pairings for a cozy autumn experience. {{image_2}} You can make your salted caramel apple galette even better with extra flavors. - Adding spices: Try ginger or cloves. They give a warm, cozy taste. - Different fruits: Swap apples for pears or peaches. Each fruit brings its own charm. If you need a gluten-free galette, don't worry! You have choices. - Alternative crusts: Use gluten-free pie crusts or even almond flour for a tasty base. - Adaptations: You can still use the same apple filling. Just make sure your toppings are gluten-free too. The sauce can change your galette’s flavor profile. - Homemade vs. store-bought: Homemade caramel is rich and creamy, but store-bought is quick and easy. - Other options: Try chocolate sauce or fruit reductions. Both can add a fun twist to your dessert. To keep your salted caramel apple galette fresh, store leftovers in the fridge. Place it in an airtight container or cover it tightly with plastic wrap. This way, it will stay tasty and moist. You can keep it in the fridge for up to three days. After that, it may lose some flavor and texture. When you're ready to enjoy your galette again, reheating is key. The best method is to use the oven. Preheat the oven to 350°F (175°C). Place the galette on a baking sheet and warm it for about 10-15 minutes. This helps the crust stay crispy while the apples heat up. Avoid using the microwave, as it can make the crust soggy. By following these steps, you can savor the delightful taste of your salted caramel apple galette once more! A galette is a free-form pie. It has a crust that folds over the filling. This style makes it easy to prepare and bake. The crust is often flaky and golden. You can fill a galette with many fruits. It is perfect for showing off seasonal produce. The rustic look adds charm to any dessert table. Yes, you can make the galette ahead. You can prepare the apple filling and keep it in the fridge. Just store it in an airtight container. You can also roll out the crust and chill it. When ready to bake, assemble the galette. This method saves you time. It is great for gatherings or busy days. Yes, making salted caramel at home is simple. Start with sugar in a pan over medium heat. Stir until it melts and turns amber. Then, add butter and cream carefully. Mix until smooth. Finally, stir in a pinch of sea salt. This caramel enhances your galette. Store it in a jar for later use if needed. Making an apple galette is simple and fun. We covered the key ingredients, from selecting the best apples to choosing pie crusts. I shared step-by-step instructions for prepping, assembling, and baking this dish. With tips on perfecting the mixture and achieving a golden crust, you can elevate your dessert. Remember to explore variations and storage tips for best results. An apple galette is versatile and delicious, making it a great addition to any meal. Enjoy your baking adventure!

Salted Caramel Apple Galette Simple Autumn Delight

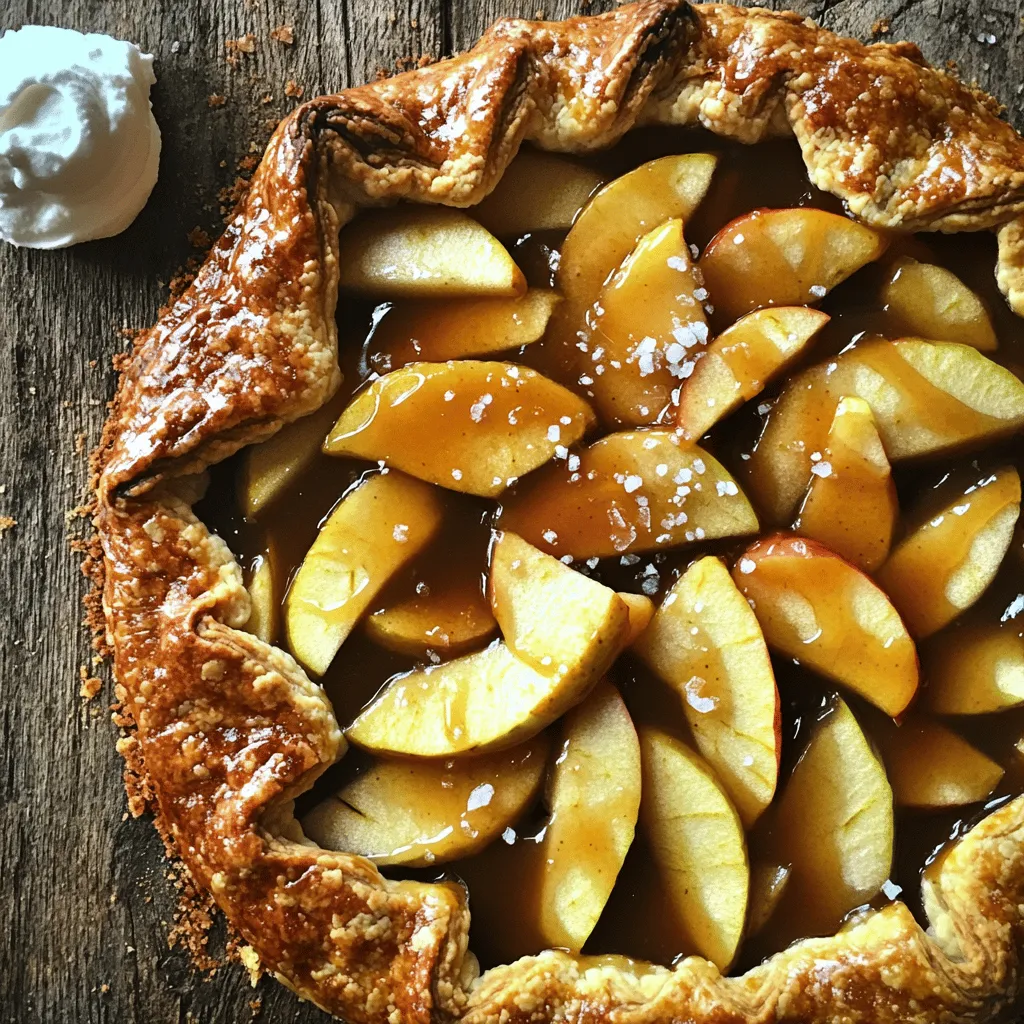
Looking for a warm, sweet treat this autumn? Try my Salted Caramel Apple Galette! This easy recipe combines juicy apples

- 1 store-bought flatbread or pizza dough - 1 cup fresh spinach leaves, washed and dried - 1 cup strawberries, hulled and sliced - 4 oz goat cheese, crumbled - 1 tablespoon balsamic glaze - 1 tablespoon olive oil - Salt and pepper to taste - 1/4 cup sliced almonds, toasted To measure ingredients accurately, use dry measuring cups for solids. Make sure to level off the top for precise amounts. For liquids, use a clear measuring cup. Fill it to the line, ensuring you’re on a flat surface. This gives you the best results in your cooking. 1. Preheat your oven to 400°F (200°C). This step is key for crispy flatbread. 2. If you use pizza dough, roll it out on a floured surface. Aim for a flat rectangle or circle. If you choose store-bought flatbread, place it directly on a baking sheet. 1. Lightly brush the flatbread or dough with olive oil. This adds flavor and helps it crisp up. 2. Place the flatbread in the oven and bake for 6-8 minutes. Look for a golden brown color and a slight crisp. 3. While the flatbread bakes, prepare your toppings. In a bowl, mix the fresh spinach and sliced strawberries. Add a pinch of salt and pepper, then toss gently. 1. When the flatbread is ready, remove it from the oven. Top it with the spinach and strawberry mix. 2. Crumble the goat cheese over the top, spreading it evenly. 3. Drizzle balsamic glaze over the flatbread for extra flavor. 4. If you like, sprinkle toasted sliced almonds on top. 5. Return the flatbread to the oven for 5 more minutes. This helps the cheese soften and meld the flavors. 6. Once done, take it out, slice it, and serve warm. Enjoy your delicious creation! To get the best crispy flatbread, start by preheating your oven to 400°F. Brush the flatbread lightly with olive oil. This helps create a nice crust. Bake for 6-8 minutes until it turns golden brown. Keep an eye on it so it doesn’t burn. Layering your ingredients is key. First, spread your spinach and strawberries evenly. This ensures each bite is full of flavor. Sprinkle the goat cheese on top for a creamy finish. Finally, drizzle balsamic glaze for a sweet touch. You can switch up the cheese if you want. Feta or ricotta work well with this flatbread too. They add their own unique taste. Feel free to add toppings. Consider sliced cucumbers, avocados, or even grilled chicken. These additions can make your flatbread more filling. You can also substitute some spinach for arugula for a peppery kick. When serving, use a wooden board or a large platter. This adds a rustic touch. Garnish with fresh strawberries and a drizzle of balsamic glaze. It will look appealing and taste even better. Cut the flatbread into small pieces for easy sharing. This makes it perfect for gatherings. Serve it warm to enjoy the best flavors. {{image_2}} You can easily switch greens in this recipe. Try arugula for a peppery kick. Kale adds a hearty texture. You can also use mixed greens for variety. For fruits, change strawberries to peaches in summer. In fall, use apples for a crisp bite. Each fruit brings a unique taste. If you need a gluten-free option, use gluten-free flatbreads. Look for ones made from almond or rice flour. You can also make your own with gluten-free dough. Just roll it out as you would regular dough. This way, everyone can enjoy the flavors. Want to boost the protein? Add cooked chicken for a savory touch. Grilled shrimp also pairs well with the sweetness of strawberries. For a plant-based option, try chickpeas or black beans. They add protein and a nice texture. You can even use tempeh or tofu for a hearty bite. To keep your flatbread fresh, store leftovers in the fridge. Place it in an airtight container. This helps prevent it from drying out. You can also wrap it in plastic wrap or foil. Consume within two days for the best taste. To enjoy your flatbread again, preheat your oven to 350°F (175°C). Place the flatbread on a baking sheet. Heat it for about 10 minutes. This method keeps the crust crispy and the toppings warm. You can also use a skillet on low heat for 5 minutes. Cover it to help melt the cheese. You can freeze flatbread, but it’s best to freeze it before baking. Wrap it tightly in plastic wrap and then in foil. This helps avoid freezer burn. When you are ready to eat, thaw it in the fridge overnight. Then bake as usual. If it’s already baked, freeze in slices. Just remember to reheat from frozen, adding a few extra minutes to the baking time. To make this flatbread, you need a few simple steps. First, preheat your oven to 400°F (200°C). If you choose pizza dough, roll it into a flat shape. If you use store-bought flatbread, just place it on a baking sheet. Next, brush a little olive oil on the flatbread or dough. This will help it get crispy. Bake it in your preheated oven for about 6-8 minutes. You want it to be golden brown and slightly crisp. While it bakes, mix fresh spinach and sliced strawberries in a bowl. Add a pinch of salt and pepper, then toss them together. When the flatbread is done, take it out of the oven. Top it with your spinach and strawberry mix. Sprinkle crumbled goat cheese on top, then drizzle balsamic glaze over everything. If you like, add toasted sliced almonds for crunch. Bake again for 5 more minutes. This helps the cheese melt and the flavors mix. When ready, slice it up and serve warm. This flatbread tastes great with many sides. Here are some ideas: - A fresh green salad adds crunch. - Serve with a bowl of soup for warmth. - Pair with a fruit salad for sweetness. - Enjoy with a glass of sparkling water or iced tea. These sides balance the flavors of the flatbread well. Yes, you can easily change this recipe to fit your needs. Here are some options: - For a vegan version, swap goat cheese with a plant-based cheese. - Use different greens if you don’t have spinach, like arugula or kale. - Add more fruits, like blueberries or peaches, for a twist. - If you need gluten-free options, look for gluten-free flatbreads or dough. These changes let you make the flatbread just how you like it! This article explored a delicious Strawberry Spinach Goat Cheese flatbread recipe. We covered key ingredients, preparation steps, and baking tips. Remember, you can customize the flatbread for your taste. Use seasonal fruits or gluten-free options as needed. Properly storing leftovers will keep your flatbread fresh for later. With this guide, you can create a tasty dish for any occasion. Enjoy making and sharing this easy and tasty recipe!

Savory Strawberry Spinach Goat Cheese Flatbread Recipe

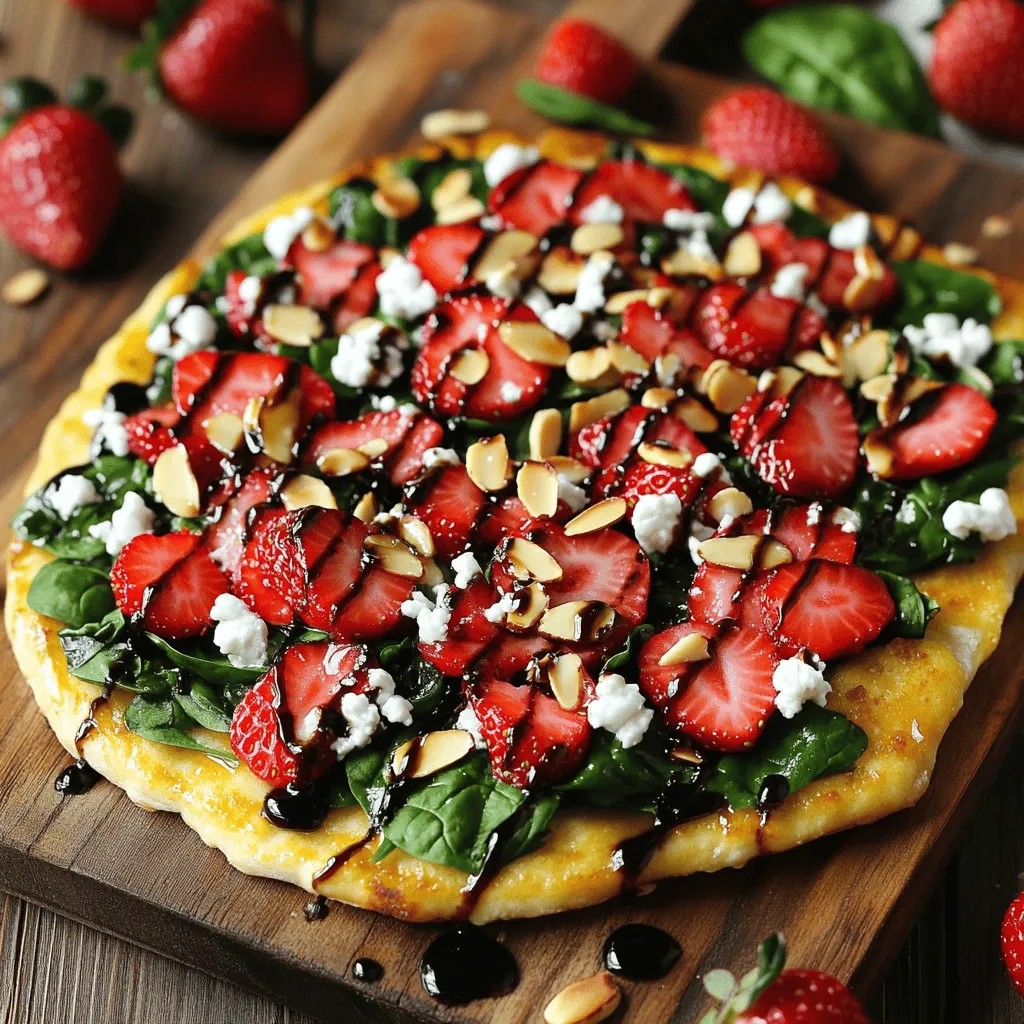
Get ready to impress your taste buds! This Savory Strawberry Spinach Goat Cheese Flatbread Recipe mixes fresh flavors in a

To make garlic butter mushroom orzo, you’ll need the following items: - 1 cup orzo pasta - 2 tablespoons unsalted butter - 1 tablespoon olive oil - 3 cloves garlic, minced - 8 ounces cremini mushrooms, sliced - 1 small shallot, finely chopped - 1 cup vegetable broth - 1/2 cup heavy cream - 1/2 cup grated Parmesan cheese - Salt and pepper to taste - Fresh parsley, chopped (for garnish) If you don’t have a few ingredients on hand, don’t worry. Here are some swaps: - Use any pasta shape if you can’t find orzo. - Substitute margarine for unsalted butter. - Use any oil, like avocado or canola, instead of olive oil. - White button mushrooms can replace cremini mushrooms. - Swap shallots with a small onion if needed. - You can use chicken broth instead of vegetable broth for more flavor. - Substitute half-and-half for heavy cream if you want a lighter dish. - Nutritional yeast can replace Parmesan for a dairy-free option. Measuring correctly helps the dish turn out great. Here are some tips: - For dry ingredients, use dry measuring cups and level them off. - Use a liquid measuring cup for liquids like broth and cream. - Use a kitchen scale for precise measurements, especially for cheese. - When measuring sticky ingredients, like butter, you can line the cup with plastic wrap for easy removal. - Always taste as you go! Adjust salt and pepper based on your preference. To cook the orzo, start with a medium saucepan. Fill it with water and add salt. Bring the water to a boil. Add 1 cup of orzo pasta to the boiling water. Cook the orzo for about 8-10 minutes. Check for doneness; it should be al dente. Once done, drain the orzo and set it aside. In a large skillet, heat 2 tablespoons of unsalted butter and 1 tablespoon of olive oil. Use medium-high heat for this step. When the butter melts, add 3 cloves of minced garlic. Sauté the garlic for about 30 seconds. Be careful not to burn it. Next, add 1 small finely chopped shallot and 8 ounces of sliced cremini mushrooms. Cook this mixture for 5-7 minutes. Stir occasionally until the mushrooms are tender and golden brown. Now it’s time to bring everything together. Pour in 1 cup of vegetable broth and let it simmer for 3-4 minutes. This helps the flavors to meld. Next, add 1/2 cup of heavy cream to the skillet. Stir well and allow it to cook for 2-3 minutes until it thickens slightly. After that, stir in the drained orzo and 1/2 cup of grated Parmesan cheese. Mix everything well until the orzo is coated. Season with salt and pepper to taste. Remove the skillet from heat and let it sit for a minute. This helps the dish thicken further. Serve warm and garnish with freshly chopped parsley. To get that great garlic taste, use fresh cloves. Fresh garlic gives a lively flavor. Mince the garlic finely to release its oils. Sauté it briefly in butter and oil. Cook it just until fragrant, about 30 seconds. Be careful not to burn it. Burnt garlic tastes bitter and ruins the dish. For the best creamy texture, use heavy cream. It thickens beautifully and adds richness. Stir in the cream slowly after adding the broth. Let it simmer gently for a few minutes. This helps the flavors blend well. Adding grated Parmesan also adds creaminess. Mix it in thoroughly to coat the orzo. Serve the garlic butter mushroom orzo in a shallow bowl. Top it with extra Parmesan for a nice touch. A sprinkle of chopped parsley adds color and freshness. Pair this dish with a crisp green salad. A light salad balances the richness of the orzo. You can also serve it with crusty bread for dipping. {{image_2}} You can make Garlic Butter Mushroom Orzo even heartier by adding protein. Cooked chicken works well. Just slice it and mix it in with the orzo. You can use grilled, rotisserie, or even leftover chicken. Bacon is another great option. Cook the bacon in the skillet first. Remove it, then cook the mushrooms in the bacon fat for extra flavor. Crumbled sausage also adds a nice kick. Just brown it in the pan before adding any other ingredients. If you want a vegetarian version, skip the meat and stick to the mushrooms. You can also add more veggies like spinach or peas. For a vegan version, replace the butter with olive oil. Use a plant-based cream instead of heavy cream. Nutritional yeast can replace Parmesan cheese. It gives a cheesy flavor without dairy. This way, everyone can enjoy this dish without worries. Mushrooms add a lot to this dish. While cremini mushrooms are tasty, you can try others. Button mushrooms are mild and easy to find. Shiitake mushrooms add a rich, umami flavor. If you like a bit of a kick, use oyster mushrooms. They have a unique taste and texture. Mix different types of mushrooms for more depth. Each variety brings its own flavor, making your orzo even more exciting! To keep your garlic butter mushroom orzo fresh, place it in an airtight container. Make sure it cools down before sealing. Store it in the fridge for up to three days. This keeps the flavors intact and the texture nice. When you’re ready to enjoy leftovers, heat them gently. You can use a skillet over low heat. Add a splash of vegetable broth or cream to keep it moist. Stir often to prevent sticking. You can also use the microwave, but cover it with a microwave-safe lid. Heat in short intervals, stirring in between. If you want to save some for later, freeze it! Use a freezer-safe container or bag. Make sure to remove as much air as possible. This helps prevent freezer burn. It will stay good for up to three months. When you’re ready to eat, thaw it overnight in the fridge before reheating. Yes, you can use whole wheat orzo. Whole wheat orzo has a nutty flavor and adds fiber. It cooks similarly to regular orzo, so follow the same cooking instructions. Just keep an eye on the cooking time, as it may vary slightly. Whole wheat orzo can make the dish a bit heartier and more filling. Garlic butter mushroom orzo pairs well with many dishes. You can serve it with grilled chicken or steak for a full meal. A simple green salad with lemon vinaigrette works great too. If you want a lighter option, roasted vegetables add color and flavor. For a cozy night in, enjoy it with garlic bread and a glass of wine. To make this recipe gluten-free, use gluten-free orzo. Many brands offer gluten-free pasta made from rice or quinoa. Ensure that your vegetable broth is gluten-free as well. When you follow these swaps, you keep all the creamy, rich flavors while making it perfect for gluten-free diets. This blog post covered the key parts of making Garlic Butter Mushroom Orzo. We talked about the ingredients you need, how to cook the orzo, and ways to add flavor. I shared tips for creamy texture and fun serving ideas. You learned how to store leftovers and find substitutes. Remember, experimenting with different mushrooms or proteins can add a nice twist. Enjoy cooking and have fun with this dish!

Garlic Butter Mushroom Orzo Comforting Pasta Dish

If you’re looking for a delicious and comforting meal, Garlic Butter Mushroom Orzo is it! This dish combines tender orzo

- 1 cup grated zucchini (about 1 medium zucchini) - 1 cup all-purpose flour - 1/2 cup whole wheat flour - 1/2 teaspoon baking soda - 1/2 teaspoon baking powder - 1/4 teaspoon salt - 1 teaspoon ground cinnamon - 1/2 cup granulated sugar - 1/2 cup brown sugar, packed - 1/2 cup vegetable oil - 2 large eggs - 1 teaspoon vanilla extract - 1/2 cup semi-sweet chocolate chips - 1/4 cup chopped walnuts - 1 cup = 240 ml - 1/2 cup = 120 ml - 1/4 teaspoon = 1.25 ml - 1 teaspoon = 5 ml Using the right ingredients matters. Fresh, grated zucchini gives the best taste and texture. You can adjust sugar based on your sweet tooth. If you want a nutty bite, add walnuts. Always measure carefully for the best results. First, turn on your oven. Set it to 350°F (175°C). While the oven heats, get a 9x5 inch loaf pan. You can grease it or use parchment paper. Parchment helps the bread slide out easily later. Next, grab a medium bowl. Combine the all-purpose flour, whole wheat flour, baking soda, baking powder, salt, and ground cinnamon. Mix them well, then set the bowl aside. This dry mix is key for your bread's texture. Now, take a large mixing bowl. Whisk together the granulated sugar, brown sugar, and vegetable oil. Add the eggs and vanilla extract, then mix until it’s smooth and creamy. This step helps create a rich flavor for your bread. Time to add the star ingredients! Stir in the grated zucchini into the wet mix. Make sure it’s mixed well. Slowly add the dry ingredients to this bowl. Use a spatula to fold gently until just combined. Don’t overmix; it will make the bread tough. Lastly, fold in the semi-sweet chocolate chips and walnuts if you want them. Pour the batter into your prepared loaf pan. Smooth the top with a spatula. Place the pan in your preheated oven and bake for 50 to 60 minutes. Check for doneness by inserting a toothpick. If it comes out clean, your bread is ready! Let it cool in the pan for 10 minutes. Then, transfer it to a wire rack to cool completely. Enjoy the lovely smell filling your kitchen! To make your bread moist, start with fresh zucchini. Wash it well and peel if desired. Grate the zucchini using a box grater or food processor. Squeeze out excess water in a clean cloth. This helps keep your bread from being too watery. Aim for about 1 cup of grated zucchini. This gives great flavor and texture. Baking can be tricky, but a few tips help. First, always measure your ingredients carefully. Too much flour or sugar can ruin the bread. Mix the dry and wet ingredients separately first. Then, combine them gently. Overmixing can lead to tough bread. Also, check your oven temperature with an oven thermometer. Ovens can be off by quite a bit. You can easily boost flavors in your zucchini bread. Consider adding spices like nutmeg or ginger for warmth. You can also mix in nuts, like walnuts or pecans, for crunch. If you want a richer taste, try using dark chocolate chips. For a fruity twist, add dried fruits like raisins or cranberries. Don’t be afraid to experiment! {{image_2}} You can make a gluten-free version of this bread. Use gluten-free flour blends instead of all-purpose and whole wheat flour. These blends often have starches that mimic the texture of regular flour. This swap keeps your bread light and moist. Many brands work well, but check the ingredients for best results. To make this bread vegan, swap the eggs for flax eggs. Mix 1 tablespoon of ground flaxseed with 2.5 tablespoons of water to replace one egg. Use plant-based oil, like coconut or canola, instead of vegetable oil. You can also choose dairy-free chocolate chips. These simple swaps keep the taste delicious while being plant-based. You can enhance your zucchini bread with various flavors and spices. Consider adding nutmeg for warmth or ginger for a hint of spice. You can also mix in dried fruits like cranberries or raisins for a chewy texture. For a nutty flavor, try using almond or hazelnut flour in part of the recipe. You can even add a touch of orange zest for a citrus kick. Experiment with your favorite flavors for a fun twist! To keep your chocolate chip zucchini bread fresh, wrap it well. Use plastic wrap or aluminum foil. You can also place it in an airtight container. This helps lock in moisture and flavor. Store it at room temperature if you plan to eat it soon. If you want it to last longer, move to the fridge. Freezing is a great way to keep extra bread. First, let the loaf cool completely. Slice the bread for easier thawing later. Wrap each slice in plastic wrap, then place slices in a freezer bag. Be sure to squeeze out as much air as possible. It can last up to three months in the freezer. When you want a slice, thaw it in the fridge overnight. When stored properly, your zucchini bread stays fresh for about three to four days at room temperature. If you refrigerate it, it can last about a week. Always check for signs of spoilage. If you see mold or smell something off, it’s best to toss it. Enjoy your delicious chocolate chip zucchini bread while it’s fresh! Yes, you can use frozen zucchini. Thaw it first and drain excess water. This helps keep the bread from getting soggy. Frozen zucchini works well, but fresh zucchini offers better taste. To check if the bread is done, insert a toothpick into the center. If it comes out clean, the bread is ready. You can also look for a golden-brown color on the top. The edges should pull away from the pan slightly. Here are some good substitutions: - Use honey or maple syrup instead of granulated sugar. - Swap whole wheat flour for almond flour for a nutty flavor. - Replace vegetable oil with melted coconut oil for a different taste. - You can also use applesauce instead of eggs for a vegan option. To reduce the sweetness, cut down the sugar. Use 1/3 cup of each sugar instead of 1/2 cup. You can also add more spices, like cinnamon or nutmeg, for flavor without extra sugar. This blog post covered everything you need to make delicious chocolate chip zucchini bread. We discussed required and optional ingredients, along with how to convert measurements. I provided step-by-step instructions, helpful tips, and creative variations. You can easily store leftovers and freeze bread for later. Remember, baking is fun. With these tips, you'll create a tasty treat. Enjoy the process and share your zucchini bread with friends!

Chocolate Chip Zucchini Bread Tasty and Easy Recipe

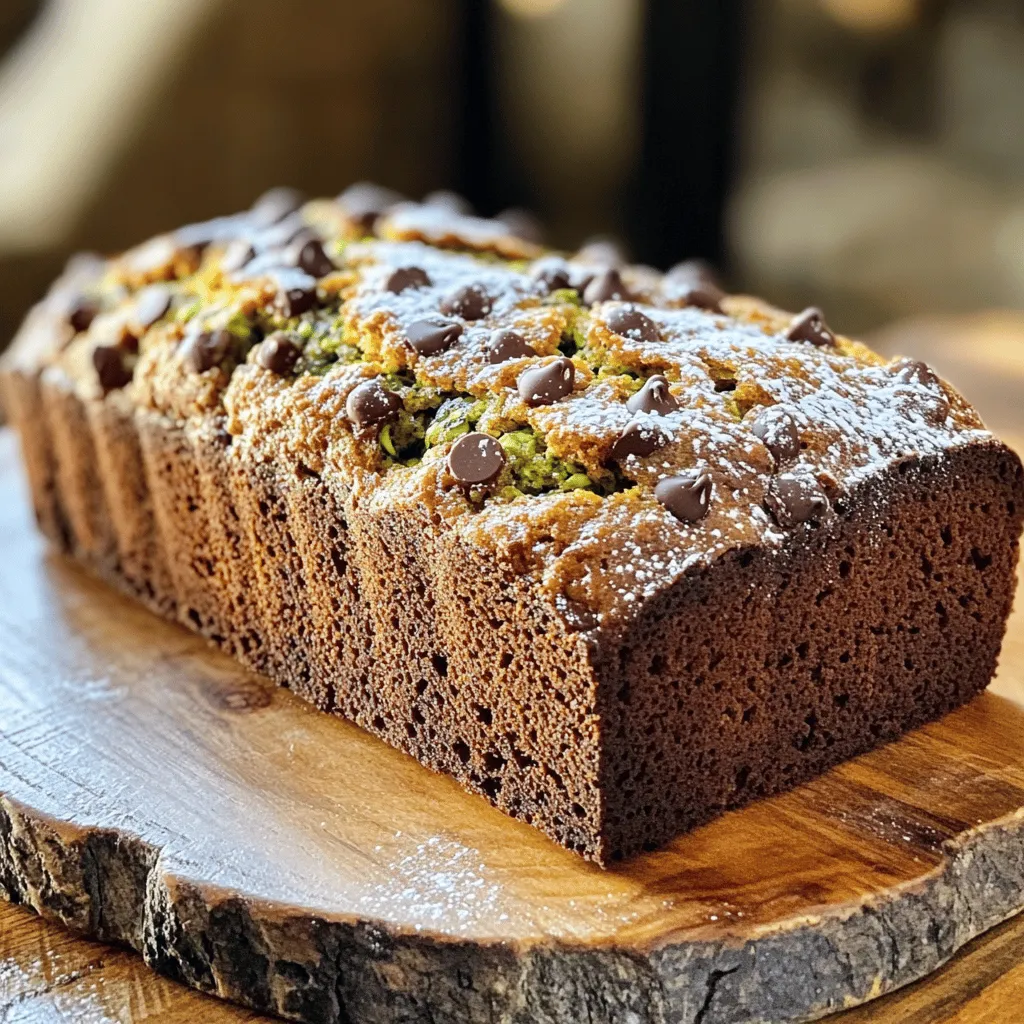
If you love baking but want to sneak in some veggies, this Chocolate Chip Zucchini Bread is perfect for you!

- 2 chicken breasts, diced - 2 cups corn kernels (fresh or frozen) - 8 small corn tortillas - 1 tablespoon chili powder - 1 teaspoon garlic powder - 1 teaspoon cumin - 1 tablespoon olive oil - Juice of 2 limes - Salt and pepper to taste - 1/2 cup mayonnaise - 1/4 cup cotija cheese, crumbled - 2 tablespoons chopped cilantro - Slices of lime, for serving Start by marinating the chicken. In a bowl, mix the diced chicken with chili powder, garlic powder, cumin, olive oil, lime juice, salt, and pepper. Make sure every piece is coated well. Let it sit for about 10 minutes. This lets the flavors soak in. Next, heat a skillet over medium heat. Add the marinated chicken to the skillet. Cook for about 6-8 minutes. Stir occasionally to ensure even cooking. The chicken should turn golden brown and be fully cooked. Once done, remove it from the heat and set it aside. Now, let’s char the corn. In another skillet, add the corn kernels. Cook them over medium heat for about 5 minutes. You want them to get slightly charred, which adds great flavor. In a small bowl, mix the charred corn with mayonnaise, cotija cheese, and chopped cilantro. Stir well until everything is combined. This adds a creamy and tasty touch to your tacos. To warm the corn tortillas, place them in a dry skillet. Heat them for about 15-30 seconds on each side. This makes them soft and easy to fold. Now, it’s time to assemble your tacos! Take a warm tortilla and add a spoonful of the chili lime chicken. Then, top it with a generous scoop of the corn mixture. The flavors all come together here for a delicious bite. Serve the tacos with slices of lime on the side. This adds extra zest when you squeeze them on top. Enjoy your tasty creation! To ensure the chicken is cooked through, use a meat thermometer. Chicken should reach 165°F (75°C). This keeps it juicy and safe to eat. Cook the chicken evenly by cutting it into small, even pieces. Stir it often while it cooks. For perfect char on the corn, use fresh corn when possible. If using frozen corn, thaw it first. Heat a skillet over medium heat and let the corn sit without stirring for a minute. This helps to get a nice char. Stir and let it sit again. Repeat until you see those lovely golden spots. For vibrant taco plating, use a colorful platter. Arrange tacos in a line and sprinkle extra cilantro on top. Add lime wedges around the tacos. This adds color and makes the dish more fun. When it comes to pairing drinks, try a light lager or a zesty margarita. Fresh lime juice in your drink will match the tacos' flavors. For sides, consider a simple green salad or tortilla chips with salsa. These make great companions and balance the meal. To adjust spice levels, use less chili powder and cumin. You can also skip the garlic powder. These small changes make a big difference for sensitive taste buds. If you have picky eaters, swap the chicken for shredded rotisserie chicken. It’s simple and tasty. You can also use plain corn without the mayo mix. Serve the corn on the side. This way, kids can choose what they want in their tacos. {{image_2}} You can switch up the protein in these tacos. If you like shrimp, use that instead of chicken. Just marinate the shrimp the same way. Cook it until it’s pink and opaque. Beef is another good choice. Use diced steak or seasoned ground beef. For a veggie twist, try grilled vegetables. Bell peppers and zucchini work well. You can also use tofu for a tasty meatless option. Just press and marinate it, then grill or sauté until golden. Want to amp up the flavor? Add heat with jalapeños or chipotle peppers. A smoky touch can come from smoked paprika. You can also mix in different sauces. Try a spicy mayo or tangy salsa for extra zest. Experiment with toppings, like avocado or radishes. Fresh mango salsa adds sweetness too. Get creative with what you have at home! If you need gluten-free options, look for corn tortillas made without gluten. Many brands offer this choice. You can also make low-calorie adjustments. Use Greek yogurt instead of mayonnaise for a lighter mix. Reducing the cheese or using less oil can help cut calories too. Adjust the recipe to fit your needs while keeping the flavor! To store leftover tacos, keep them in the fridge. Use airtight containers to keep the flavors fresh. Place the chicken and corn mixture separately from the tortillas. This prevents sogginess. Make sure to eat them within three days for best taste. To reheat the chicken and corn mixture, use a skillet over low heat. Stir frequently to keep it moist. Add a splash of lime juice for extra flavor and juiciness. For the tortillas, warm them in a dry skillet for 15-30 seconds. This keeps them soft and tasty. You can freeze leftover chicken or corn mixture. Let it cool completely before packing it in freezer bags. Remove as much air as possible to prevent freezer burn. When ready to eat, thaw in the fridge overnight. Reheat it in a skillet, adding some lime juice to refresh the flavor. To spice up your chili lime chicken tacos, you can add more heat easily. Here are some ideas: - Extra chili powder: Just sprinkle in more when marinating the chicken. - Cayenne pepper: A pinch goes a long way. Start small. - Hot sauce: Mix some into the mayonnaise for added kick. - Fresh jalapeños: Dice them up and add to your corn mixture. These options let you control the spice level. Enjoy the heat! Yes, you can prepare some parts ahead. Here’s how: - Marinate chicken: Do this the night before. It will soak up the flavors. - Cook corn: You can char the corn a few hours in advance. Just store it in the fridge. - Warm tortillas: Do this right before serving for the best taste. By prepping ahead, you save time on taco night! If you don’t have cotija cheese, here are some great swaps: - Feta cheese: Crumbled feta works well. It adds a nice salty taste. - Parmesan cheese: Shredded Parmesan can also be a good choice. - Homemade version: Mix cream cheese with a bit of lime juice and salt for a quick substitute. These alternatives keep your tacos tasty and fun! This blog post covered easy chicken tacos made from simple ingredients. We explored marinating chicken, charring corn, and layering flavors. I shared tips for cooking, serving, and adjusting the recipe for kids. Variations included different proteins and dietary adjustments. Remember, these tacos can please anyone at the table. Enjoy making them your own, and have fun with flavors and toppings! Your taco night will never be the same.

Chili Lime Chicken Street Corn Tacos Delightful Treat

Are you ready to take taco night to a whole new level? My Chili Lime Chicken Street Corn Tacos pack

- 1 cup frozen spinach, thawed and drained - 1 cup canned artichoke hearts, drained and chopped - 1 cup cream cheese, softened - 1/2 cup sour cream - 1/2 cup mayonnaise - 1 cup shredded mozzarella cheese - 1/2 cup grated Parmesan cheese - 3 cloves garlic, minced - 1 teaspoon onion powder - Salt and pepper to taste - Red pepper flakes (optional, for some heat) To make a tasty creamy spinach artichoke dip, you need quality ingredients. Each one adds its own flavor and texture. - Large mixing bowl - Baking dish - Spatula - Oven Having the right tools helps you mix and bake the dip well. A large mixing bowl lets you stir all the ingredients easily. A baking dish is needed to hold the dip while it bakes. You can swap some ingredients if needed. For a lighter dip, use Greek yogurt instead of sour cream or mayonnaise. If you prefer fresh spinach, use 2 cups of cooked fresh spinach instead of frozen. You can also replace mozzarella cheese with cheddar for a different flavor. These swaps can make the dip fit your taste or dietary needs. Enjoy experimenting! {{ingredient_image_1}} Start by setting your oven to 350°F (175°C). This step is key for a great bake. While the oven heats, grab a baking dish. A 9-inch round or square dish works well. This dip needs a nice home! In a large bowl, combine the softened cream cheese, sour cream, and mayonnaise. Use a spatula or mixer to blend until it is smooth. Next, add the drained spinach and chopped artichokes. Don’t forget the minced garlic, onion powder, mozzarella, and half of the Parmesan. Stir until everything mixes well. Season with salt, pepper, and red pepper flakes if you want some heat. Spread the dip mixture evenly into your baking dish. Sprinkle the rest of the Parmesan on top. Place it in the oven and bake for 25-30 minutes. Look for a bubbly, golden finish. Let it cool for a few minutes before you serve it. Enjoy it warm with crispy tortilla chips, pita bread, or veggie sticks. A garnish of parsley or red pepper flakes adds a nice touch! To get the best texture for your dip, be sure to drain the spinach well. If you leave too much water in, the dip will be watery. I prefer to squeeze the spinach in a clean kitchen towel to get rid of extra moisture. Using softened cream cheese helps achieve a smooth blend. Mix it with sour cream and mayo until creamy. This base makes the dip thick and rich. To spice things up, I like to add minced garlic and red pepper flakes. The garlic adds depth, while the red pepper flakes give a nice kick. You can adjust the heat level to your taste. For a more complex flavor, try adding lemon juice or zest. This will brighten up the dip. Don’t forget to taste as you go. A pinch of salt and pepper can make all the difference. Serve your dip warm for the best flavor. I love pairing it with crispy tortilla chips or fresh veggie sticks. Pita bread is another great option. For a pop of color, sprinkle fresh parsley on top before serving. This little touch makes it look fancy. You can also serve it in a bread bowl for a fun twist. Your guests will love it! Pro Tips Thaw Spinach Properly: Ensure your frozen spinach is fully thawed and drained to avoid excess moisture, which can make the dip watery. Cheese Variations: For a richer flavor, consider mixing in a bit of cream cheese with a flavored variety, such as garlic or herb cream cheese. Make Ahead: You can prepare the dip a day in advance. Just cover and refrigerate it until you’re ready to bake it! Serving Suggestions: Serve with a variety of dippers like toasted baguette slices, crackers, or fresh veggie sticks for a colorful presentation. {{image_2}} Want to kick up the heat? Add red pepper flakes or diced jalapeños. These small tweaks turn your creamy spinach artichoke dip into a spicy delight. Mix in a teaspoon of smoked paprika for extra flavor. Bake it just like the original recipe. This twist makes the dip a hit at any gathering. You can make a vegan version too! Swap cream cheese with cashew cream or a plant-based cream cheese. Use vegan mayonnaise and sour cream for a creamy base. Follow the original steps, and you still get a rich and tasty dip. Everyone will enjoy it, even non-vegans. If you want a lighter dip, use Greek yogurt instead of sour cream and mayonnaise. This change cuts calories but keeps the creaminess. You can also use low-fat cream cheese. Add more veggies to the mix, like bell peppers or mushrooms. This way, you get a tasty dip that feels good to eat. After your party, store any leftover dip in an airtight container. Make sure to let it cool before sealing. Keep it in the fridge for up to three days. This dip tastes great the next day! When you want to enjoy the dip again, heat it in the oven. Preheat your oven to 350°F (175°C). Place the dip in a baking dish. Cover it with foil to keep it moist. Bake for about 15-20 minutes. You can also microwave it for 1-2 minutes. Stir it well before serving. If you have more dip than you can eat, freeze it for later. Use a freezer-safe container. Leave some space at the top for expansion. It will last up to three months in the freezer. To thaw, place it in the fridge overnight. Then reheat as mentioned. Enjoy your dip anytime! You can make this dip ahead of time. First, mix all your ingredients in a bowl. After mixing, place the dip in a baking dish. Cover it tightly with plastic wrap. Store it in the fridge for up to 24 hours. When you are ready to bake, just remove the wrap and top with cheese. Then, bake it as usual. Yes, you can use fresh spinach. Start by washing and chopping about 3 cups of fresh spinach. Sauté it in a pan with a little olive oil until it wilts. Make sure to drain any excess water before adding it to the dip mixture. This helps keep the dip creamy and thick. This dip goes well with many sides! Here are some great options: - Tortilla chips - Pita bread - Vegetable sticks like carrots or celery - Crackers - Toasted baguette slices You can also serve it with a sprinkle of parsley on top for a nice touch. You now know how to make a delicious spinach artichoke dip. We discussed the necessary ingredients, equipment, and substitutions. I shared step-by-step instructions, from prepping to baking. I provided tips for perfect texture and flavor. You also learned some fun variations and how to store leftovers. Remember, making this dip is easy and fun. With practice, it becomes a favorite dish for everyone. Enjoy your cooking adventure and share your tasty dip with friends and family!

Creamy Spinach Artichoke Dip Savory Party Favorite

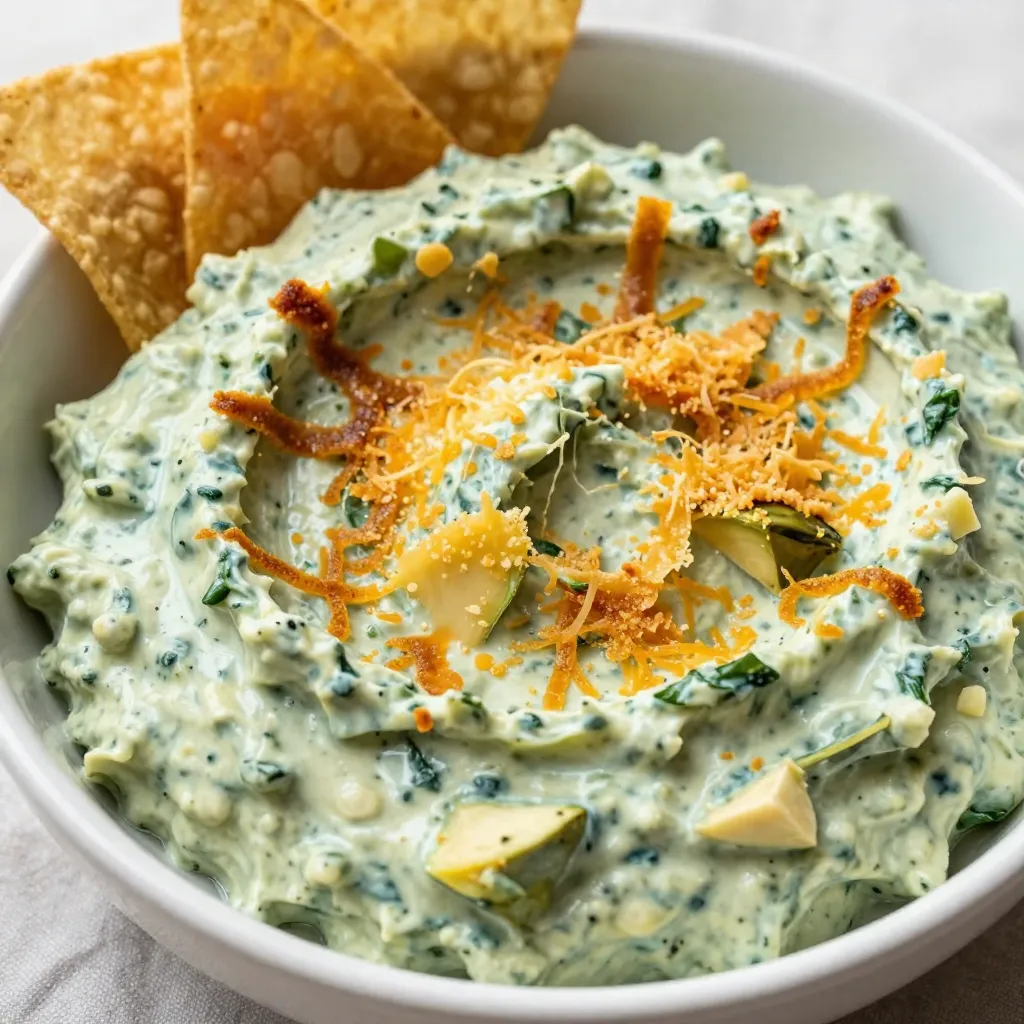
Looking for the perfect dip to impress your guests? Look no further! My Creamy Spinach Artichoke Dip is a savory

To make Chocolate Swirl Banana Ice Cream, you need: - 4 ripe bananas, sliced and frozen - 1 cup coconut milk (or any milk of choice) - 1/4 cup unsweetened cocoa powder - 1/4 cup maple syrup (or honey) - 1 teaspoon vanilla extract - A pinch of sea salt - 1/2 cup dark chocolate chips (optional for added texture) These ingredients combine to create a creamy and smooth ice cream that feels indulgent. You can make swaps based on your needs: - Use almond milk or oat milk instead of coconut milk for a nut-free option. - Swap maple syrup with agave nectar or stevia for lower sugar. - For a vegan option, ensure the chocolate chips are dairy-free. These changes can help you fit this treat into your diet while keeping it delicious. When selecting your ingredients, here are some brands I recommend: - Bananas: Choose organic bananas for the best flavor. - Coconut Milk: Try Thai Kitchen or Aroy-D for creamy textures. - Cocoa Powder: Use Ghirardelli for rich chocolate flavor. - Maple Syrup: Look for grade A pure maple syrup from Crown Maple. - Chocolate Chips: Enjoy Life offers great dairy-free options. These brands can elevate your Chocolate Swirl Banana Ice Cream, making it even more special. First, take your ripe bananas. Slice them into small pieces. Spread the slices on a baking sheet. Make sure the slices do not touch. Freeze them for at least 2 hours or overnight. This step is key for a creamy texture in your ice cream. Next, gather your frozen banana pieces. Place them in a high-speed blender. Add 1 cup of coconut milk. Then, add 1/4 cup of cocoa powder and 1/4 cup of maple syrup. Don't forget 1 teaspoon of vanilla extract and a pinch of sea salt. Blend until the mix is smooth and creamy. You might need to stop and scrape down the sides. Now, it’s time for the fun part! Pour half of the blended mixture into a container. Melt some dark chocolate in the microwave. Drizzle about a tablespoon of this melted chocolate over the ice cream. Then, add the rest of the ice cream mixture. Drizzle more melted chocolate on top. Use a knife or skewer to swirl it all together. This step makes the ice cream look beautiful. Cover the container with a lid or plastic wrap. Freeze it for about 2 to 4 hours. This will help it firm up nicely. When you’re ready to serve, scoop the ice cream into bowls. You can add some cocoa powder or banana slices on top for an extra treat. Enjoy your delicious creation! To get the creamiest ice cream, start with very ripe bananas. Their natural sweetness will shine through. Freeze the banana slices for at least two hours. This time ensures a smooth blend. If your bananas are not frozen enough, the mix will be icy. When you blend, stop often to scrape down the sides. This step helps create a uniform texture. Adding chocolate chips is optional but fun! If you want a crunch, toss in the chips after blending. Pulse the mix a few times to keep some chunks. This way, you add texture without losing the creaminess. If you prefer a smoother treat, skip the chips. The chocolate swirl alone will give you that rich flavor. For a beautiful finish, serve your ice cream in chilled bowls. A sprinkle of cocoa powder adds elegance. Fresh banana slices on top look lovely and taste great. Drizzling melted chocolate over the ice cream enhances the chocolate flavor. You can also add nuts or berries for extra flair. These simple garnishes will impress your family and friends! {{image_2}} You can mix things up with different flavors. Instead of cocoa powder, try adding peanut butter. It gives a rich taste that pairs well with bananas. You can also add vanilla bean or cinnamon for a warm twist. If you want something fruity, blend in some strawberries or mango. Each option brings a new flavor to your ice cream. You might want to adjust how sweet your ice cream is. If you like it sweeter, add more maple syrup or honey. Start with a little and taste as you go. If your bananas are very ripe, you may not need as much sweetener. This way, you can find the perfect balance for your taste. Adding nuts or seeds can make your ice cream extra fun. Try tossing in chopped walnuts or almonds for crunch. You can also use sunflower seeds for a nut-free option. Just fold them in after blending. This gives your ice cream a nice texture and healthy fats, too. To keep your chocolate swirl banana ice cream fresh, store it in an airtight container. This helps prevent ice crystals from forming. Make sure to press a piece of wax paper against the ice cream surface before sealing the lid. This extra layer helps keep the air out and the ice cream creamy. Your ice cream will stay good in the freezer for about 2 to 4 weeks. After that, it might lose some flavor or texture. Always check for any off smells before serving. If you notice any freezer burn, it’s best to toss it and make a new batch. When you want to enjoy your ice cream, take it out of the freezer. Let it sit at room temperature for about 5 to 10 minutes. This time will help soften it for easy scooping. If it’s still too hard, give it a quick stir with a spoon to make it creamier. Enjoy your delicious treat! No, fresh bananas do not work well for this ice cream. Frozen bananas give a creamy texture. They blend smoothly to create a soft-serve feel. If you use fresh bananas, the ice cream will be too runny. So, always freeze your bananas first. If you don’t have coconut milk, try almond milk or oat milk. These options work well in this recipe. Almond milk has a light taste and oat milk adds creaminess. You can also use whole milk for a richer flavor. This recipe is already dairy-free! Use coconut milk or any plant-based milk. Make sure to avoid adding any dairy products, like cream or regular chocolate. This way, you keep the ice cream creamy and tasty without dairy. You can adjust the sweetener to your taste. The bananas add natural sweetness, but the cocoa powder can make it less sweet. If you like it sweeter, add more maple syrup or honey. If you prefer it less sweet, you can skip the sweetener. Yes, you can use a regular blender, but a high-speed blender works best. A regular blender may take longer to mix the frozen bananas. If you have trouble blending, stop and scrape the sides often. This ensures everything mixes evenly for a smooth texture. This post covered how to make tasty ice cream with frozen bananas. We explored ingredients, their substitutes, and some top brands. You learned step-by-step methods, plus neat tips for great texture and flavor. We also discussed fun variations and how to store your ice cream properly. Remember, you can adapt this recipe to suit your taste. Whether you want a dairy-free version or a unique flavor, the choices are yours. Enjoy making your ice cream!

Chocolate Swirl Banana Ice Cream Irresistible Treat

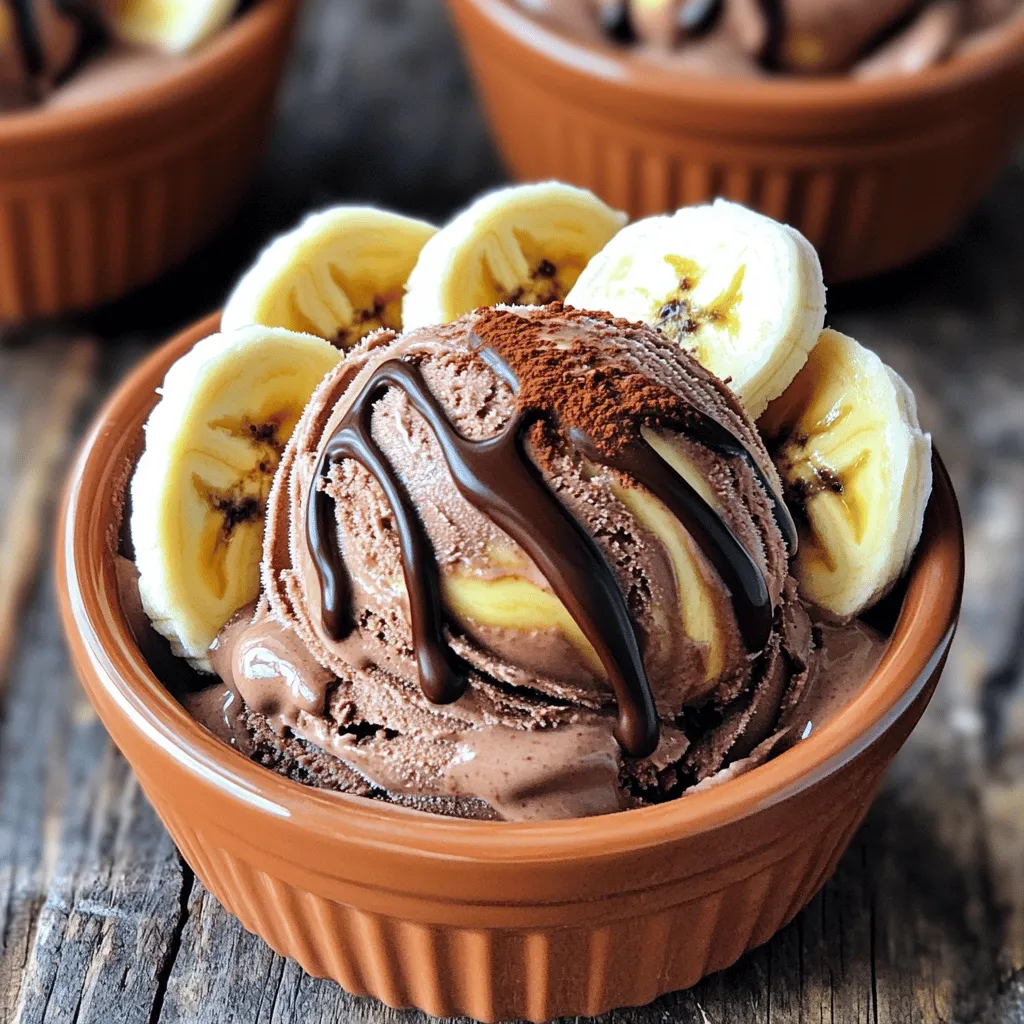
Are you craving a cool, creamy treat that’s easy to make? Chocolate Swirl Banana Ice Cream is the answer! With

- 1 block (14 oz) firm tofu, pressed and drained - 3 tablespoons honey - 2 tablespoons soy sauce - 1 tablespoon sesame oil - 1 tablespoon rice vinegar - 2 cloves garlic, minced - 1 teaspoon fresh ginger, grated - 2 tablespoons sesame seeds - 3 green onions, sliced - Cooked rice or quinoa (for serving) When you make Honey Glazed Sesame Tofu, the main ingredients set the stage for a tasty dish. Firm tofu gives a great base. It holds the flavors well and has a nice texture. Honey adds sweetness, balancing the saltiness of soy sauce. Together, they create a rich and savory taste. Next, sesame oil and rice vinegar join in for extra flavor. Sesame oil offers a nutty note while rice vinegar brings a touch of tanginess. These components make your dish stand out. Don't forget the garlic and ginger! They add depth and warmth to the flavors. Now, let’s talk about garnishes. Sesame seeds give a nice crunch and a pop of flavor. Green onions add freshness and color. Lastly, serve your tofu over cooked rice or quinoa. This helps soak up all that delicious sauce. Enjoy every bite of this savory and flavorful meal! First, press and drain the tofu. This step is key to getting crispy tofu. To press, wrap the tofu in a clean towel and place a heavy object on top. Let it sit for about 15 minutes. After pressing, cut the tofu into cubes. Aim for bite-sized pieces, about 1 inch each. Pat them dry with a paper towel. This helps remove excess moisture. Next, make the marinade by whisking together the following ingredients in a bowl: - 3 tablespoons honey - 2 tablespoons soy sauce - 1 tablespoon sesame oil - 1 tablespoon rice vinegar - 2 cloves garlic, minced - 1 teaspoon fresh ginger, grated For a perfect marinade, mix well until smooth. Taste it! Adjust the seasoning if needed. You can add more honey for sweetness or soy sauce for saltiness. Now, toast sesame seeds in a pan over medium heat. Stir them for about 2-3 minutes, until golden and fragrant. Once done, set them aside. In the same pan, add a drizzle of sesame oil. Arrange the tofu cubes in a single layer. Sear them for 4-5 minutes on each side, until golden brown and crispy. Once the tofu is crispy, pour the marinade over it. Let it cook for another 5-7 minutes. Turn the tofu occasionally. This allows the sauce to thicken and coat the tofu nicely. When the tofu looks well glazed, remove it from heat. Sprinkle the toasted sesame seeds and sliced green onions on top. Serve this tasty honey glazed sesame tofu over cooked rice or quinoa. Enjoy the blend of flavors! To make crispy tofu, start by patting it dry. Use a paper towel to soak up excess moisture. This step is key for great texture. Next, cook the tofu in a hot pan. Use medium heat and avoid crowding the pan. This helps the tofu brown evenly. Flip the cubes only when they release from the pan. Cook for about 4-5 minutes on each side. You can add more spices to boost flavor. Try adding a pinch of chili flakes for heat. A splash of lime juice can add brightness. If you want it sweeter, add more honey. For saltiness, increase soy sauce. Always taste as you go to find the perfect balance. Serving matters! Place the tofu in a shallow bowl. A sprinkle of sesame seeds adds texture. Add sliced green onions for color and freshness. For a pop of color, add a lime wedge on the side. This makes the dish look appealing and adds a fresh burst of flavor. {{image_2}} You can change the sweetener in this dish. Maple syrup or agave nectar works well. These options keep the dish sweet and tasty. They also make the recipe vegan if you need that. Use the same amount as the honey, and enjoy the new flavor. Tofu is great, but you can swap it out. Tempeh is a good choice as it has a nutty taste. If you prefer meat, chicken is also a great option. Cut the chicken into small pieces and cook it until golden brown. Then add the honey glaze as you would with tofu. Each option gives its own twist to the dish. Adding veggies can make this dish even better. You might try bell peppers, broccoli, or snap peas. Just sauté them before adding the tofu. This way, they stay crisp and colorful. Exploring different sauces can also change the taste. Try adding a dash of sriracha for heat or coconut aminos for a sweeter touch. Each sauce brings new flavors, making the dish unique every time. To keep your honey glazed sesame tofu fresh, follow these steps: - Place leftovers in an airtight container. - Refrigerate for up to 3 days. - Ensure the tofu is cooled before sealing the container. If you want to store it longer, freezing is an option: - Wrap the tofu in plastic wrap, then place it in a freezer bag. - It can last up to 2 months in the freezer. - Thaw it in the fridge when ready to eat. To reheat your tofu without losing its texture: - Use a skillet over medium heat. - Add a splash of water or soy sauce to keep it moist. - Heat for about 5 minutes, turning gently. To maintain the flavor: - Avoid microwaving, as it can make the tofu soggy. - Reheating in a pan helps restore the crispy edges. Preparing this dish ahead of time can save you effort: - Cook the tofu and prepare the glaze in advance. - Store them separately until you're ready to eat. - This way, you keep the tofu crispy. For quick meals: - Pack the tofu with rice or quinoa for lunches. - Add some steamed veggies for a complete meal. - Use small containers to keep everything fresh. Yes, you can make this recipe vegan by swapping honey for maple syrup or agave nectar. Both options provide sweetness and work well in the marinade. Use the same amount as honey in the recipe. This keeps the dish flavorful while fitting a vegan diet. You can serve honey glazed sesame tofu with several tasty sides, such as: - Cooked rice - Quinoa - Steamed broccoli - Sautéed spinach - Roasted vegetables These sides add texture and balance the dish. They also soak up the sauce well! To achieve crispy tofu, follow these tips: - Press the tofu well to remove moisture. - Cut tofu into small cubes for more surface area. - Pat the cubes dry with a paper towel before cooking. - Use medium-high heat when cooking the tofu. - Avoid crowding the pan, and cook in batches if needed. These steps help the tofu crisp up nicely and hold onto the glaze. Enjoy your crunchy bites! This blog post covered the ingredients and steps for making honey glazed sesame tofu. We discussed key ingredients, from firm tofu to honey and soy sauce. I shared tips to achieve crispy tofu and enhance flavors. You learned about variations, like sweeteners and protein options, and storage methods for leftovers. In closing, this dish is easy and fun to make. All the flavors come together well, giving you tasty meals. With these tips, you can enjoy your tofu dish anytime you want!

Honey Glazed Sesame Tofu Savory and Flavorful Dish

Get ready to delight your taste buds with my Honey Glazed Sesame Tofu! This dish is sweet, savory, and packed

- 1 lb ground turkey - 1 cup fresh spinach, chopped - 1/2 cup feta cheese, crumbled - 1/4 cup breadcrumbs (preferably whole wheat) - 1 garlic clove, minced - 1/4 teaspoon black pepper - 1/2 teaspoon salt - 1 teaspoon dried oregano - 1 tablespoon olive oil - Whole wheat burger buns - Sliced tomatoes, cucumbers, and lettuce for serving The main ingredients in these burgers create a tasty mix. Ground turkey keeps the burgers lean and healthy. Fresh spinach adds a pop of color and nutrition. Feta cheese gives a creamy, salty flavor. Whole wheat breadcrumbs help bind everything together while adding texture. For seasoning, garlic is a must. It brings strong flavor to the mix. Black pepper and salt boost the taste, while dried oregano adds an earthy note. This blend makes each bite full of flavor. You also need olive oil for cooking. It helps the burgers brown nicely. Whole wheat buns add fiber and keep things wholesome. Fresh veggies like tomatoes, cucumbers, and lettuce bring crunch and freshness to your meal. Each ingredient plays a role in building a delicious and healthy burger. These burgers are not just tasty; they are packed with nutrients. - Mixing the ingredients First, grab a large mixing bowl. Add 1 pound of ground turkey. Then, toss in 1 cup of chopped fresh spinach and 1/2 cup of crumbled feta cheese. Next, include 1/4 cup of whole wheat breadcrumbs. Don't forget to add 1 minced garlic clove, 1/4 teaspoon of black pepper, 1/2 teaspoon of salt, and 1 teaspoon of dried oregano. Lastly, crack in 1 beaten egg. Mix everything gently. Be careful not to overmix. This keeps your burgers tender and juicy. - Shaping the patties Now, divide the mixture into four equal parts. Take each part and shape it into a patty. Aim for about 3/4 inch thick. Make sure your hands are slightly wet to avoid sticking. Place the patties on a plate and set them aside while you prepare to cook. - Heating the skillet Heat 1 tablespoon of olive oil in a large skillet over medium heat. Wait until the oil shimmers. This means it is hot enough for cooking. - Cooking the turkey patties Once hot, carefully place the patties in the skillet. Cook each side for 5-6 minutes. You want them to be golden brown and firm. Check the internal temperature with a meat thermometer. It should reach 165°F. After cooking, remove the patties and let them rest for a minute. - Plating the burgers Take your whole wheat burger buns. Place each turkey patty on the bottom half of a bun. - Garnishing and serving suggestions Top each burger with sliced tomatoes, cucumbers, and lettuce. For an extra touch, serve with sweet potato fries and a wedge of lemon. A dollop of tzatziki sauce adds great flavor too. Enjoy your tasty, healthy meal! - Avoiding overmixing: Mix your ingredients gently. Overmixing makes the burgers tough. Keep it light for a tender bite. - Ensuring proper cooking temperature: Cook the patties until they reach 165°F. This keeps them safe and juicy. Use a meat thermometer for accuracy. - Best sides to pair with: Sweet potato fries make a great side. They add sweetness and crunch. You can also serve a fresh salad for color and balance. - Garnishing ideas for presentation: Add sliced tomatoes, cucumbers, and lettuce on top. A wedge of lemon adds brightness. For extra flavor, a dollop of tzatziki sauce works well. - Nutritional benefits of ingredients: Spinach is full of vitamins. Feta cheese adds calcium and flavor. Turkey is lean and high in protein. Whole wheat buns offer fiber. - Substitute suggestions for dietary needs: Use ground chicken or veggie patties for different diets. Gluten-free buns can replace whole wheat. {{image_2}} You can easily boost the flavor of these burgers. Try adding spices like cumin or paprika. These spices add warmth and depth. You can also mix in other vegetables. Chopped bell peppers or onions work well. They add color and extra nutrients. If you want a low-carb version, skip the bun. Serve the burger on a salad instead. You can also make vegan adaptations. Use plant-based ground meat and skip the egg. Crumbled tofu can replace feta cheese. Experimenting with these options keeps meals fresh and fun. Consider a burger bowl instead of using a bun. Place the patty on a bed of greens. Top it with your favorite veggies. You can also use lettuce wraps. They make a great, low-carb alternative. Whole grain wraps are another option. They add fiber and flavor to your meal. After cooking, let the burgers cool down. Store them in an airtight container. Place a piece of parchment paper between each burger to avoid sticking. You can keep leftovers in the fridge for up to three days. To freeze the burgers, wrap each one tightly in plastic wrap. Then, put them in a freezer-safe bag. This helps prevent freezer burn. The burgers can stay fresh for up to three months. When ready to eat, thaw them overnight in the fridge. You can reheat the burgers in the oven or the microwave. For the oven, preheat to 350°F. Place the burgers on a baking sheet for about 10-12 minutes. This keeps them crispy. In the microwave, heat for about 1-2 minutes on medium power. Be careful not to overheat, or they may become dry. To keep turkey burgers juicy, focus on fat content. Ground turkey can be lean, which can lead to dryness. Look for ground turkey with a bit of fat, around 85/15 or 90/10. This fat helps keep the burgers moist as they cook. Adding ingredients like feta and spinach also adds moisture and flavor. Yes, you can make these burgers ahead of time. Shape the patties and store them in the fridge for up to one day before cooking. You can also freeze the patties for longer storage. Just wrap them tightly in plastic wrap or use a freezer bag. They can last up to three months in the freezer. You can cook turkey burgers in a skillet or on a grill. Both methods work well. If you use a skillet, heat olive oil over medium heat. Cook the patties for about 5-6 minutes on each side. If you prefer grilling, preheat the grill to medium-high. Cook the patties for the same time, ensuring they reach an internal temperature of 165°F. This article explored making tasty turkey burgers with ground turkey, spinach, and feta cheese. You learned steps for mixing, shaping, and cooking the patties. We covered tips to keep them juicy and ways to customize for different diets. In closing, enjoy experimenting with flavors and ideas. These burgers are healthy and fun to make. Try new toppings and sides to make your meal special. Happy cooking!

Spinach Feta Turkey Burgers Healthy and Flavorful Meal

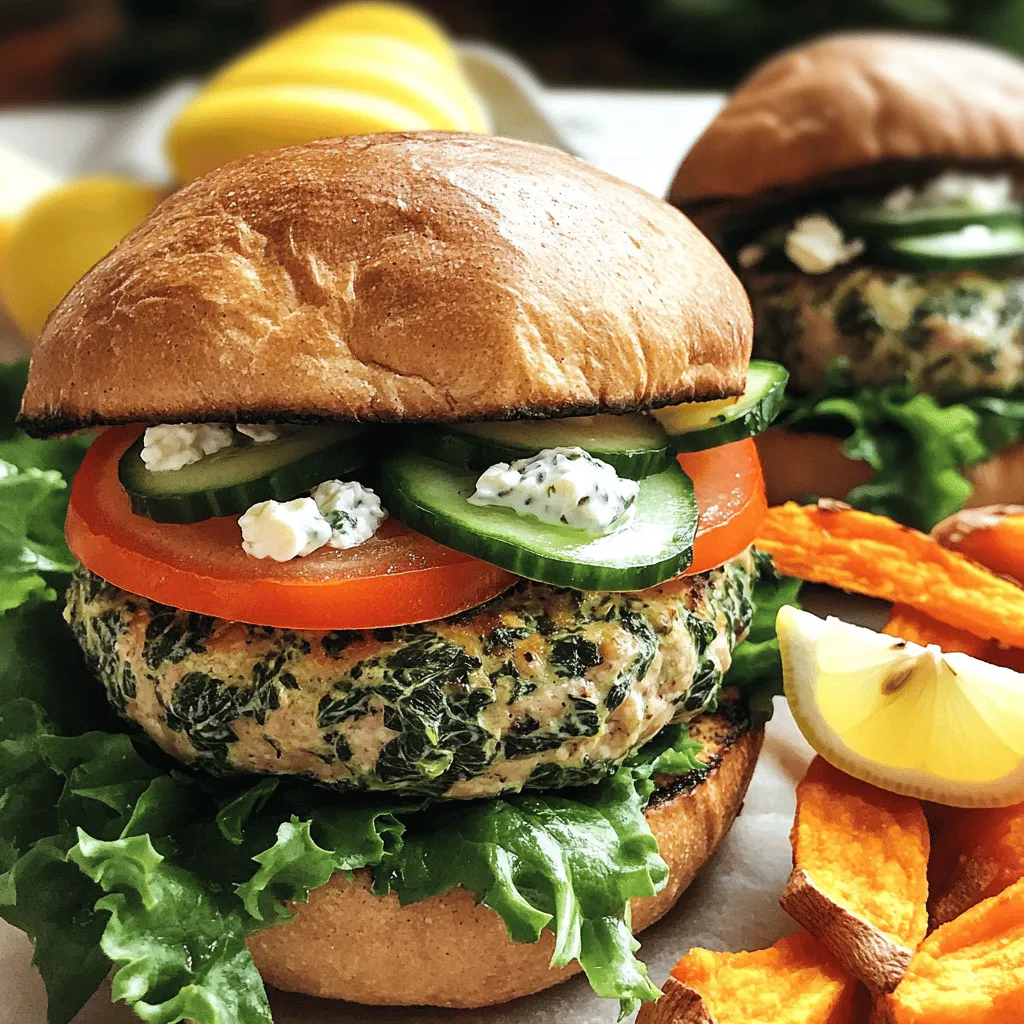
Looking for a lean meal packed with flavor? Check out these Spinach Feta Turkey Burgers! They blend savory turkey with

Older posts
Newer posts
← Previous Page1 … Page33 Page34 Page35 … Page82 Next →

dsad

© 2026 Recipes Pursuit • Built with GeneratePress

Our Policies

  • Copyright Policy
  • Cookie Policy
  • GDPR Policy
  • Privacy Policy
  • Disclaimer
  • Terms Of Use

More Information

  • Home
  • About
  • Contact
  • Appetizers
  • Dessert
  • Dinner
  • Drinks
©2026, Recipes Pursuit About Back To Top