Skip to content
DisclaimerTerms Of UseGDPR PolicyCookie Policy

Recipes Pursuit

  • Home
  • Drinks
  • Appetizers
  • Dinner
  • Dessert
  • About
  • Contact
  • Privacy Policy
DisclaimerTerms Of UseGDPR PolicyCookie Policy

NO-ING-IMG

To make no-bake chocolate oat cookies, you need simple ingredients. Each one plays a crucial role in the final taste and texture. Here’s what you will need: - 1 cup quick oats - 1/2 cup almond butter (or peanut butter) - 1/4 cup honey or maple syrup - 1/3 cup cocoa powder - 1/4 cup chocolate chips (dark or semi-sweet) - 1 teaspoon vanilla extract - Pinch of salt - Optional toppings: shredded coconut, chopped nuts, or sea salt Each ingredient adds flavor and texture. Quick oats give the cookies a chewy bite. Almond butter or peanut butter adds creaminess and healthy fats. Honey or maple syrup serves as a sweetener and binds everything together. Cocoa powder provides that rich chocolate flavor we all love. Chocolate chips add extra sweetness and a melty texture. Vanilla extract enhances the overall taste, while salt balances the sweetness. For toppings, you can get creative! Shredded coconut adds a fun texture. Chopped nuts bring a nice crunch. A sprinkle of sea salt can enhance the chocolate flavor. Use what you have on hand or what you enjoy most! Gather these ingredients, and you’re ready to create a delicious treat. Start by taking a medium mixing bowl. Combine the almond butter and honey (or maple syrup). Stir them well until you have a smooth blend. Next, add the cocoa powder, vanilla extract, and a pinch of salt. Mix these ingredients until they form a creamy consistency. This step is key. A smooth mixture makes the cookies taste better. Now, it's time to add the oats. Gradually fold in the quick oats. Make sure each oat gets coated in the chocolate mixture. The dough should feel thick and slightly sticky. After that, fold in the chocolate chips. This will give your cookies a rich flavor and nice texture. Using your hands or a cookie scoop, form small balls. Aim for about one tablespoon for each cookie. Once you have the balls, flatten them slightly. This gives them the classic cookie shape. Next, place the cookies on a baking sheet lined with parchment paper. If you want, sprinkle your favorite toppings on top. Shredded coconut, chopped nuts, or a pinch of sea salt all work well. Finally, refrigerate the cookies for at least 30 minutes. This helps them set and become firm. After that, they are ready for you to enjoy! You can swap almond butter for peanut butter. Both work well in this recipe. If you want a different sweetener, try agave syrup instead of honey or maple syrup. For cocoa powder, use raw cacao for a richer taste. You can also skip it and use carob powder for a unique twist. For toppings, shredded coconut adds texture. Chopped nuts give a nice crunch. Sea salt enhances the flavor and balances the sweetness. The dough should feel thick and slightly sticky. If it’s too dry, add a bit more almond butter. If it’s too wet, mix in more oats. To handle sticky dough, wet your hands slightly. This helps form the cookies without the dough sticking to your fingers. Make sure to mix well so every oat is coated in that rich chocolate goodness. These no-bake cookies are best right from the fridge. They taste amazing chilled. Try pairing them with a glass of cold milk for a classic combo. You can also enjoy them with coffee or tea. For a fun twist, serve them with a scoop of vanilla ice cream. The flavors mix well and create a delicious dessert experience. {{image_2}} You can change the taste of your no-bake cookies in fun ways. Adding spices like cinnamon or nutmeg gives them a warm flavor. Just a pinch can make a big difference. You can also switch nut butters. Almond butter is great, but peanut butter works well too. Each choice adds its own twist to the cookies. If you want a lighter treat, you can cut the sugar. Try using less honey or maple syrup. This change still keeps the cookies sweet. You can also add superfoods like chia seeds or flaxseed. These seeds boost the health benefits without changing the taste much. Plus, they add extra fiber and nutrients. You can make these cookies any size you like! For mini cookies, use less dough per cookie. A teaspoon works well for tiny bites. For larger cookies, use a tablespoon or more. Just remember to flatten them a bit. Adjust the time in the fridge too. Smaller cookies may set faster, while larger ones need a bit more time. Enjoy making them your way! To keep your no-bake chocolate oat cookies fresh, use air-tight containers. This prevents moisture from getting in and making them soggy. Store the cookies in the fridge for the best taste and texture. A cool environment helps maintain their firmness and flavor. These cookies stay fresh in the fridge for about one week. If you want to keep them longer, freezing is a good option. Wrap each cookie tightly in plastic wrap or place them in a freezer-safe bag. They can stay frozen for up to three months. Just thaw them at room temperature before eating. Enjoy your treats anytime! Yes, you can use old-fashioned oats. They will change the texture a bit. The cookies may be chewier and less smooth. If you prefer a softer bite, quick oats work best. To make these cookies vegan, use maple syrup instead of honey. Choose almond butter or peanut butter with no added ingredients. This way, you keep it plant-based and delicious. If the dough feels too dry, add a little more almond butter or sweetener. A splash of plant milk can also help. Mix until the dough is sticky and holds together well. Yes, this recipe can be gluten-free. Just ensure your oats are labeled gluten-free. Most brands offer gluten-free oats that work well in this recipe. You can make easy no-bake cookies with quick oats and almond butter. First, mix your nut butter with sweetener and cocoa. Then, add oats and chocolate chips. Shape your cookie balls, flatten them, and chill. These cookies can be customized to fit your taste or dietary needs. Store them in an airtight container for longer freshness. Whether you enjoy them as a snack or dessert, these cookies are fun and tasty. Enjoy creating your perfect treat!

No-Bake Chocolate Oat Cookies Easy and Delicious Treat

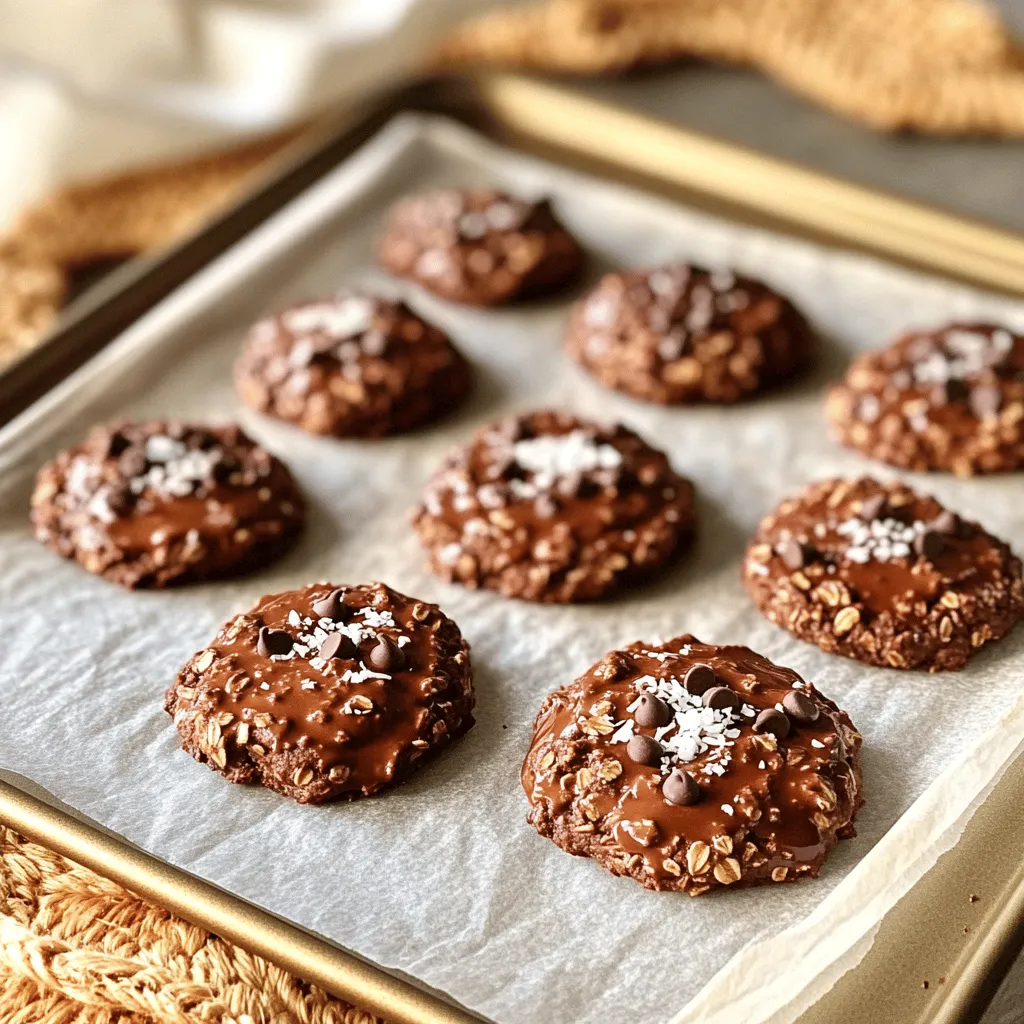
Looking for a quick and tasty treat? No-Bake Chocolate Oat Cookies are the answer! You can whip these up in

To make Blueberry Lemon Scone Bread, you need fresh and simple ingredients. Here’s what you will need: - 2 cups all-purpose flour - 1/2 cup granulated sugar - 1 tablespoon baking powder - 1/2 teaspoon salt - 1/4 cup cold unsalted butter, cubed - 1/2 cup sour cream - 1 large egg - 2 tablespoons lemon zest - 1 tablespoon lemon juice - 1 cup fresh blueberries (or frozen, thawed) - 1/2 teaspoon vanilla extract - 1/4 cup powdered sugar (for glaze, optional) - 1-2 tablespoons lemon juice (for glaze, optional) These ingredients come together to create a bright and flavorful loaf. The lemon adds a zesty kick, while the blueberries provide bursts of sweetness. Each bite is a delightful mix of flavors and textures. First, preheat your oven to 375°F (190°C). While it heats, grease a 9x5-inch loaf pan with butter or cooking spray. This step helps the bread slide out easily later. In a large bowl, whisk together 2 cups of all-purpose flour, 1/2 cup of granulated sugar, 1 tablespoon of baking powder, and 1/2 teaspoon of salt. Make sure these dry ingredients blend well. This mix is the base of your bread. In another bowl, mix 1/2 cup of sour cream, 1 large egg, 2 tablespoons of lemon zest, 1 tablespoon of lemon juice, and 1/2 teaspoon of vanilla extract. Stir until everything is well combined. This mixture brings moisture and flavor to the bread. Now, pour the wet mixture into the dry ingredients. Stir gently until just combined. It’s very important not to overmix. Some lumps are okay. This keeps your bread light and fluffy. Next, carefully fold in 1 cup of fresh blueberries. Be gentle to avoid crushing them. These berries add a burst of flavor and color to your bread. Transfer the batter to your greased loaf pan. Smooth the top for an even bake. Bake for 45-50 minutes. Check for doneness by inserting a toothpick into the center. It should come out clean when the bread is ready. Enjoy the lovely aroma while it bakes! When you mix your batter, you must be gentle. Overmixing can lead to tough bread. It’s best to mix just until you see no dry flour. This keeps your scone bread light and fluffy. Blueberries add great flavor and color. Handle them with care. When you fold them into the batter, do it slowly. If you mix too hard, the blueberries will burst. You want them whole to make every bite special. To check if your bread is ready, use a toothpick. Insert it into the center of the loaf. If it comes out clean, your bread is done. If not, bake it a bit longer. This helps ensure a perfectly baked scone bread every time! {{image_2}} You can switch up the fruit in this recipe. Instead of blueberries, try raspberries or cranberries. Each fruit brings a unique flavor. Raspberries add a tart kick, while cranberries give a nice sweetness. You could also use chopped strawberries or blackberries. Get creative and find your favorite. Spices can add warmth and depth. Try adding cinnamon or nutmeg to the batter. Just a pinch can change the whole flavor. Cinnamon offers a sweet, warm touch, while nutmeg gives a cozy feel. Experiment with different spices to find the perfect combination. For those who need a gluten-free version, you can substitute all-purpose flour with gluten-free flour blends. These blends work well in scone bread recipes. Look for one that contains xanthan gum for better texture. You might need to adjust the liquid slightly for the best results. Enjoy a delicious scone bread, no matter your dietary needs! To keep your blueberry lemon scone bread fresh, wrap it tightly. Use plastic wrap or foil. Store it at room temperature for up to three days. If you want to keep it longer, put it in the fridge. The cold helps it last about a week. Always check for mold or off smells before eating. To freeze your scone bread, let it cool completely first. Slice it into pieces for easy use. Wrap each slice in plastic wrap. Then, place them in a freezer bag. This keeps them fresh for up to three months. When ready to eat, thaw at room temperature or pop in the microwave for a few seconds. At room temperature, your scone bread lasts about three days. In the fridge, it can stay fresh for a week. If you freeze it, the bread can last for three months. Just remember to wrap it well to avoid freezer burn. Keeping an eye on your bread will make sure it stays tasty. Yes, you can use frozen blueberries. Just make sure to thaw them first. This prevents extra moisture from making the dough wet. Pat them dry with a towel to remove excess water. Using frozen blueberries is a great option if fresh ones are not available. To check if your scone bread is done, use a toothpick. Insert it into the center of the bread. If it comes out clean, your bread is ready. The top should be golden brown, and the bread should feel firm to the touch. Blueberry Lemon Scone Bread is tasty on its own, but you can enhance it. Serve it with butter, cream cheese, or lemon curd for added flavor. A side of fresh fruit or a cup of tea makes it even better. Yes, you can make it vegan! Substitute the egg with a flax egg or applesauce. Use plant-based yogurt instead of sour cream. For butter, try coconut oil or vegan butter. These swaps keep the bread moist and delicious. Store leftover scone bread in an airtight container. This keeps it fresh for up to three days at room temperature. For longer storage, wrap it tightly and freeze it. Thaw it overnight in the fridge before enjoying it again. This blog post shared how to make delicious Blueberry Lemon Scone Bread. We covered the ingredients needed, like flour and fresh blueberries. I provided step-by-step instructions, tips for success, and suggested variations. You can create this treat in many ways and store it properly. Remember to enjoy the rich flavors and share it with friends. Baking is fun and rewarding, especially with a sweet treat like this! Happy baking!

Blueberry Lemon Scone Bread Fresh and Flavorful Recipe

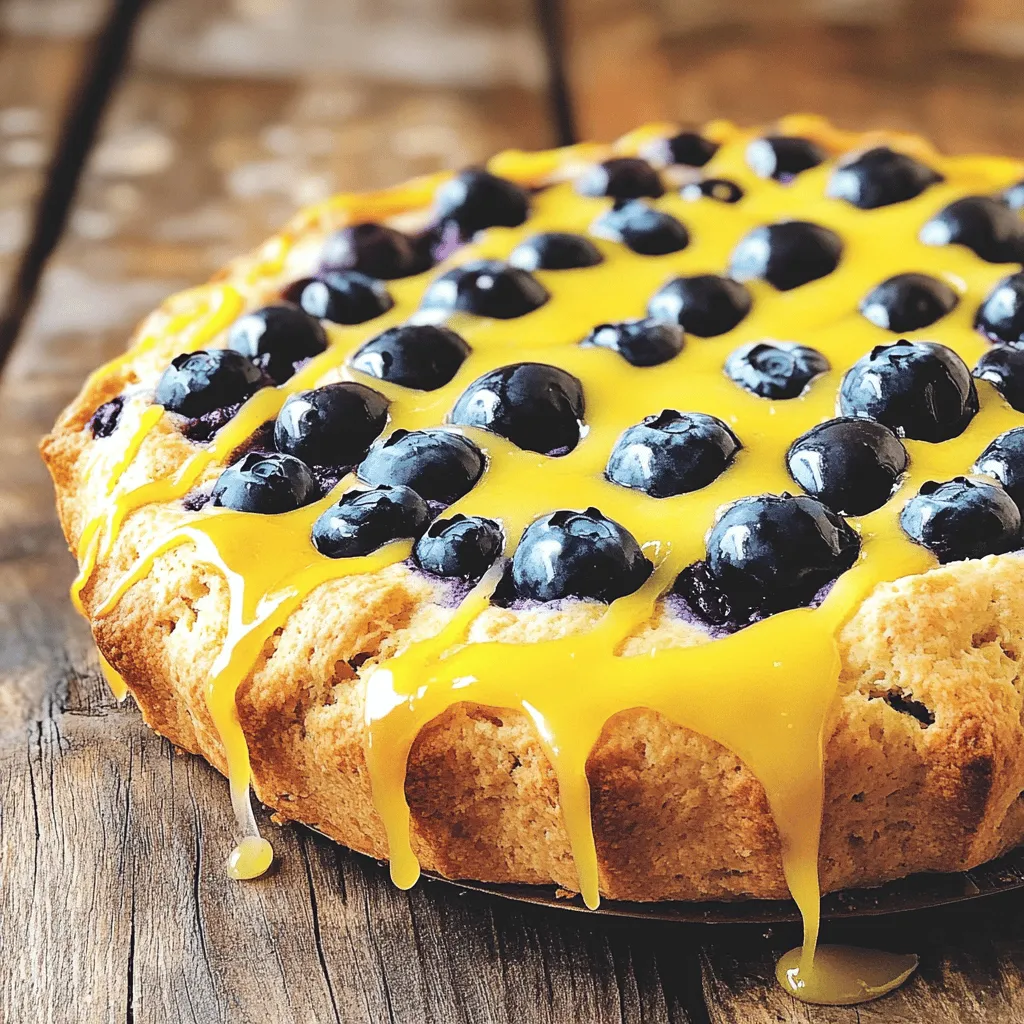
Are you ready to make a delicious Blueberry Lemon Scone Bread? This easy recipe packs vibrant flavors into a soft,

To make Creamy Tomato Basil Tortellini, you need these fresh and flavorful ingredients: - Cheese Tortellini (12 oz, fresh or frozen) - Olive Oil (1 tablespoon) - Garlic (3 cloves, minced) - Crushed Tomatoes (1 can, 14 oz) - Heavy Cream (1 cup) - Fresh Basil (1 cup, chopped) - Italian Seasoning (1 teaspoon) - Salt and Pepper (to taste) - Parmesan Cheese (½ cup, grated) - Optional: Fresh basil leaves for garnish These ingredients come together to create a rich and satisfying dish. The cheese tortellini serves as a perfect base, while garlic adds a warm aroma. Crushed tomatoes bring a sweet tang that pairs well with heavy cream, making the sauce creamy and dreamy. Fresh basil adds a bright touch, and Parmesan cheese gives it a savory kick. Using fresh ingredients shines through in every bite. You can customize it based on what you have. This dish is easy to prepare and full of flavor, making it a go-to for any weeknight meal. First, fill a large pot with water. Add a good amount of salt to the water. This makes the tortellini taste better. Bring the water to a boil. Once boiling, add 12 ounces of cheese tortellini. Cook the tortellini according to the package instructions. Usually, this takes about 3 to 5 minutes. You want them to be al dente, which means firm but not hard. After cooking, drain the tortellini and set them aside. Next, it's time to make the sauce. In the same pot, heat up 1 tablespoon of olive oil over medium heat. Add 3 cloves of minced garlic. Sauté the garlic for about 1 minute. You want it to smell nice but not burn. After that, pour in one 14-ounce can of crushed tomatoes. Stir well and cook for 3 to 4 minutes. This warms up the tomatoes. Lower the heat, then add 1 cup of heavy cream. Stir until the sauce is smooth and creamy. Now, we add flavor. Toss in 1 cup of chopped fresh basil, 1 teaspoon of Italian seasoning, and salt and pepper to taste. Stir everything together and let it simmer for about 5 minutes. This helps the flavors mix well. Finally, gently add the cooked tortellini to the sauce. Toss them so they are fully coated. Stir in ½ cup of grated Parmesan cheese until it melts. If you need, adjust the seasoning. Serve the creamy tortellini hot, garnished with extra basil leaves if you like. To get the best tortellini, don’t overcook it. Follow the package instructions closely. Cook until it is al dente. This means it should be firm but not hard. If you use fresh tortellini, it cooks faster than frozen. Fresh tortellini takes about 3 to 5 minutes, while frozen can take 5 to 7 minutes. Always taste a piece to check doneness before draining. Fresh herbs bring a bright taste to your dish. I love using fresh basil in this recipe. It adds a nice aroma and flavor. Chop the basil right before you add it to the sauce. This keeps it fresh. Don’t forget to taste as you cook. Adding salt and pepper to your liking makes a big difference. If you want a stronger flavor, add a bit more Italian seasoning. Creamy Tomato Basil Tortellini pairs well with a simple side salad. A green salad with a light vinaigrette works great. You can also serve it with garlic bread for a comforting meal. For plate presentation, use a big spoon to twirl the tortellini. Top with extra basil and Parmesan cheese. This makes your dish look beautiful and inviting. {{image_2}} For a vegetarian option, use vegetable broth instead of chicken broth. You can also replace heavy cream with cashew cream or coconut milk for a dairy-free twist. These swaps still give you a rich flavor without any animal products. You can serve this dish as a cold pasta salad. Cook the tortellini, let it cool, and mix it with the creamy sauce. Chill it in the fridge for a refreshing summer meal. Another idea is to bake it as a casserole. Place the tortellini and sauce in a dish, top with cheese, and bake until bubbly. Want to add protein? Try mixing in cooked chicken or shrimp. This will make the dish more filling. If you like heat, sprinkle chili flakes on top. This small change adds a nice kick to your meal. To store your creamy tomato basil tortellini, use an airtight container. Make sure to let it cool down to room temperature first. This helps keep the flavors fresh. You can refrigerate it for up to three days. For longer storage, freeze the tortellini. Place it in a freezer-safe bag. Remove as much air as you can before sealing. It can last in the freezer for up to three months. When it comes to reheating, the best method is using the stovetop. Place the tortellini in a pan over low heat. Add a splash of water or extra cream to help rehydrate it. Stir gently, and heat until warm. Avoid using the microwave if possible. Microwaving can make the tortellini mushy. If you must use a microwave, heat in short bursts. Stir in between to ensure even warming. In the fridge, your creamy tomato basil tortellini can stay fresh for three days. After that, check for signs of spoilage. Look for changes in color or strange smells. If the tortellini becomes slimy or has an off flavor, it's best to toss it. Always trust your senses. Keeping your food safe is important! It takes about 25 minutes in total. The prep time is about 10 minutes. Cooking the tortellini and making the sauce takes around 15 minutes. You can have a warm, tasty dish ready in no time! Yes, you can prepare this dish ahead of time. Cook the tortellini and make the sauce separately. Store them in the fridge until you are ready to serve. Just heat the sauce and toss in the tortellini before serving. This helps the flavors blend well. If you want a lighter version, use half-and-half or whole milk. You can also try coconut cream for a dairy-free option. These substitutes will change the taste slightly but still create a creamy texture. This blog post highlights how to make a delicious creamy tomato basil tortellini dish. We covered every step, from cooking the tortellini to preparing a rich sauce. You learned tips for perfecting the texture and flavor. We also explored fun variations and how to store leftovers effectively. Try this dish for a quick weeknight meal or a special occasion. You won't be disappointed with the rich flavors and ease of preparation. Enjoy your cooking adventure!

Creamy Tomato Basil Tortellini Flavorful Comfort Dish

Craving a warm and tasty dish? Creamy Tomato Basil Tortellini is your answer. This meal combines soft cheese tortellini with

- 4 boneless, skinless chicken breasts - 1 cup heavy cream - ½ cup basil pesto - 1 cup cherry tomatoes, halved - 1 cup mozzarella cheese, shredded - ½ cup grated Parmesan cheese - 2 tablespoons olive oil - Salt and pepper to taste - Fresh basil leaves for garnish (optional) To make creamy pesto chicken bake, gather these simple ingredients. You need chicken breasts for the main protein. Heavy cream and basil pesto create the rich sauce. Cherry tomatoes add a burst of flavor and color. Mozzarella and Parmesan cheeses give it that cheesy goodness. Olive oil helps with cooking, and salt and pepper enhance the taste. Fresh basil leaves are optional but add a nice touch. This list keeps it easy, fun, and tasty! - Preheat the oven to 375°F (190°C). - In a medium bowl, whisk together 1 cup of heavy cream and ½ cup of basil pesto until smooth. - Season 4 boneless, skinless chicken breasts with salt and pepper. - Heat 2 tablespoons of olive oil in a large skillet over medium heat. - Add the chicken and cook for about 3-4 minutes on each side until lightly golden. - The chicken does not need to be fully cooked now. - Arrange the chicken in a single layer in a 9x13 inch baking dish. - Pour the creamy pesto mixture evenly over the chicken. Make sure each piece is well coated. - Scatter 1 cup of halved cherry tomatoes over the top. - Add 1 cup of shredded mozzarella cheese and ½ cup of grated Parmesan cheese on top. - Cover the baking dish with aluminum foil. - Bake in the preheated oven for 20 minutes. - After 20 minutes, remove the foil. - Bake for an additional 10-15 minutes. - Check that the chicken reaches an internal temperature of 165°F (75°C) and the cheese is bubbly and golden. - Remove the dish from the oven and let it rest for a few minutes. - Garnish with fresh basil leaves before serving. To make sure your chicken is perfect, check the internal temperature. Cook the chicken until it reaches 165°F (75°C). This keeps it safe and juicy. For a golden cheese crust, remove the foil near the end of baking. This helps the cheese melt and brown nicely. You can use store-bought pesto for ease, but homemade tastes best. To make your own, blend fresh basil, garlic, nuts, olive oil, and Parmesan. You can also change the flavor. Add extra herbs like oregano or thyme for a unique touch. For side dishes, serve with rice or garlic bread. A fresh salad also pairs well. If you enjoy wine, a crisp white like Sauvignon Blanc complements the dish well. This adds a nice balance to the creamy flavors. {{image_2}} You can switch proteins to fit your taste. Turkey works great as a lean option. If you want a plant-based choice, try tofu. Just make sure to press it to remove extra water. For a dairy-free version, use coconut cream instead of heavy cream. You can substitute nutritional yeast for cheese to keep that cheesy flavor. This way, you still get a creamy dish without dairy. Want to spice things up? Add garlic powder, crushed red pepper, or Italian seasoning to the creamy pesto mix. Fresh herbs like thyme or oregano can add a nice twist too. These enhancements boost the flavor and make it your own. Don’t forget about veggies! You can toss in spinach, bell peppers, or zucchini. Layer them with the chicken for added color and nutrition. This makes the dish even more delicious and healthy. If you want to use a slow cooker, this dish adapts well. Sear the chicken first, then place it in the slow cooker. Pour the creamy pesto sauce over it and cook on low for 4-6 hours. This method keeps the chicken tender and juicy. For a quick option, use an Instant Pot. Sear the chicken using the sauté function. Then add the creamy pesto mix and cook on high pressure for about 8-10 minutes. You’ll have a tasty meal ready in no time! To store leftovers, wait for the dish to cool. Place it in an airtight container. This helps keep the flavors fresh. Store it in the fridge. Your leftovers will stay good for up to three days. If you want to keep it longer, freezing is a good option. When reheating, keep the chicken moist. The best way is to use the oven. Preheat it to 350°F (175°C). Place the dish in a baking pan. Add a splash of cream to help keep it juicy. Cover it with foil to trap steam. Bake for about 15-20 minutes. To keep the cheese melty, remove the foil for the last few minutes. To freeze, let the dish cool completely. Cut it into portions for easy thawing. Wrap each piece in plastic wrap, then place it in a freezer bag. This helps prevent freezer burn. It can last up to three months. When ready to eat, thaw it overnight in the fridge. Reheat it in the oven, just like before, until it's hot throughout. To check if the chicken is done, use a meat thermometer. The internal temperature should reach 165°F (75°C). The chicken should look white throughout with no pink. If you cut into it, the juices should run clear. This ensures your chicken is safe to eat. Yes, you can prep this dish in advance! Simply follow these steps: - Cook the chicken in the skillet until lightly golden. - Arrange it in the baking dish. - Pour the creamy pesto sauce over the chicken. - Cover it with foil and refrigerate. When ready to bake, just add 10 minutes to the cooking time to make sure it’s hot all the way through. This dish pairs well with many sides. Here are a few ideas: - Steamed broccoli or green beans for a healthy crunch. - Garlic bread to soak up the creamy sauce. - A fresh salad with greens, cucumbers, and a light vinaigrette. These sides will balance the rich flavors of the chicken bake perfectly. In this blog post, I covered every step to make a Creamy Pesto Chicken Bake. You learned about the key ingredients and how to prep your oven. I shared tips for perfect chicken and ideas for serving. You can even switch up flavors or try different cooking methods. Try this dish with friends and family. It's easy and delicious. You’ll impress everyone and enjoy every bite. Remember, cooking is fun, and experimenting is key!

Creamy Pesto Chicken Bake Tasty and Easy Recipe

Looking for a simple yet flavorful dinner? You’ll love this Creamy Pesto Chicken Bake! Packed with juicy chicken, rich pesto,

To make these brown sugar glazed carrots, gather the following: - 1 pound baby carrots (or peeled and sliced regular carrots) - 3 tablespoons unsalted butter - 1/4 cup brown sugar, packed - 1/2 teaspoon salt - 1/2 teaspoon black pepper - 1/2 teaspoon ground cinnamon - 1 tablespoon apple cider vinegar - Fresh parsley, chopped (for garnish) You can switch some ingredients based on what you have. If you don’t have baby carrots, use regular carrots. Just peel and slice them to be about 1/4-inch thick. For the butter, you can use olive oil if you want a lighter taste. If you want a different sweetener, try honey or maple syrup instead of brown sugar. This can change the flavor a bit, but it will still taste good. Fresh ingredients make a big difference. Fresh carrots have a sweeter taste and a nice crunch. Using fresh herbs like parsley adds brightness to the dish. When you use fresh ingredients, your food will always taste better. Plus, it helps keep the meal healthy. Always aim for the freshest produce you can find. This will ensure your brown sugar glazed carrots shine on the plate and in your mouth! You can use baby carrots or regular carrots for this dish. If you pick regular carrots, start by peeling them. Then, slice them into pieces that are about 1/4-inch thick. This size helps them cook evenly. If you choose baby carrots, you can leave them whole. Rinse them under cold water to remove any dirt. This step is key for fresh taste. Next, heat a large skillet over medium heat. Add 3 tablespoons of unsalted butter to the skillet. Let it melt completely. Once the butter is melted, add 1/4 cup of brown sugar, 1/2 teaspoon of salt, 1/2 teaspoon of black pepper, and 1/2 teaspoon of ground cinnamon. Stir this mixture until the brown sugar has fully dissolved. This creates a sweet sauce. Now, add the prepared carrots to the skillet. Toss them well to coat each piece in the sauce. Then, pour in 1 tablespoon of apple cider vinegar. This adds a nice tang to balance the sweetness. Cover the skillet and cook the carrots for about 8-10 minutes. Stir them occasionally, so they cook evenly and become tender. After about 10 minutes, remove the lid. Increase the heat slightly to let the glaze bubble. This will take about 2-3 minutes. The glaze should thicken nicely during this time. To get the best glaze, keep a close eye on the cooking time. Overcooking can make the carrots mushy. You want them tender but still firm. If the glaze is too thick, you can add a splash of water to loosen it. Always taste the carrots before serving. Adjust the seasoning by adding more salt or sugar if needed. Finally, sprinkle some freshly chopped parsley on top for a pop of color and flavor. To keep your carrots crunchy, watch the cooking time closely. Cook them for about 8-10 minutes. Stir them gently every few minutes. This helps them cook evenly. You want them tender but not mushy. If you use baby carrots, they may need a little less time. You can make these carrots even tastier by adding more flavors. Try adding a pinch of ginger for warmth. A sprinkle of nutmeg can add depth. If you like heat, a dash of cayenne pepper works well. Want a savory twist? Add some minced garlic while cooking. Fresh herbs like thyme can also bring brightness to the dish. The right tools can help you make this dish easier. Use a large skillet for even cooking. A good spatula helps you stir without breaking the carrots. A lid is essential for steaming the carrots. You might also want a sharp knife for slicing regular carrots. Having measuring spoons handy ensures you get the right amounts of spices. {{image_2}} You can use many types of carrots for this dish. Baby carrots are quick and easy. They cook evenly and look cute on the plate. Regular carrots offer a stronger flavor. Just peel and slice them into 1/4-inch pieces. Consider using rainbow carrots for color. These come in purple, yellow, and orange. They add fun and taste to your meal. You can mix in other veggies for more flavor. Try adding sliced bell peppers. They bring a nice crunch and sweetness. Green beans also work well. Just cut them into small pieces and add them to the skillet with the carrots. You could even add small broccoli florets. They pair well with the glaze and add nutrition. If you want a twist, try different sweeteners. Maple syrup can replace brown sugar. It gives a unique taste and works well with the other flavors. Honey is another option; it adds a floral note. For a low-calorie choice, consider using a sugar substitute. Just follow the package directions for the right amount. Each sweetener will change the flavor slightly, so feel free to experiment! To store leftover glazed carrots, first let them cool. Place the carrots in an airtight container. Make sure to seal it well to keep out air. You can keep them in the fridge for up to five days. This way, you can enjoy them later without losing flavor. When you're ready to eat your leftovers, reheat them simply. You can use a skillet on medium heat. Add a splash of water or a little butter to keep them moist. Stir often until they are warmed through. You can also use a microwave for quick reheating. Just cover them and heat in short bursts, stirring in between. If you want to save glazed carrots for a longer time, freezing works well. Spread the cooled carrots on a baking tray. Make sure they are in a single layer. Freeze them for about two hours until solid. Then, transfer them to a freezer-safe bag or container. Label it with the date and use within three months for best taste. When ready to eat, thaw in the fridge overnight before reheating. Yes, you can make Brown Sugar Glazed Carrots ahead of time. Just cook them as directed, then cool them down. Place the carrots in an airtight container and store them in the fridge. They will stay fresh for up to three days. When ready to serve, just reheat them in a skillet over medium heat. Add a splash of water to keep them moist. Brown Sugar Glazed Carrots pair well with many dishes. They go great with roasted chicken or grilled pork. You can also serve them alongside beef or fish. For a vegetarian meal, try them with quinoa or a fresh salad. Their sweet and savory flavor adds a nice touch to any plate. To adjust sweetness, you can change the amount of brown sugar. If you want less sweetness, use two tablespoons instead of four. For more sweetness, add an extra tablespoon. You can also mix in a little honey or maple syrup. Taste the glaze as you go to find your perfect balance. In this blog post, we explored how to create delicious glazed carrots. We covered key ingredients and smart substitutions. Fresh ingredients make a big difference in flavor. Next, we detailed step-by-step cooking tips for the perfect glaze. With different variations, you can customize your dish using various carrots and sweeteners. Lastly, we shared storage tips to keep your leftovers tasty. Enjoy trying this simple yet flavorful recipe. Your dinner will shine with these glazed carrots by your side.

Brown Sugar Glazed Carrots Simple and Tasty Delight

Looking for a quick and tasty side dish? Brown sugar glazed carrots are your answer! These sweet, tender veggies can

- Cherry tomatoes - Fresh mozzarella balls (bocconcini) - Fresh basil leaves - Balsamic glaze - Extra virgin olive oil - Salt and pepper - Skewers (wooden or metal) - Serving platter To create these tasty tomato basil mozzarella skewers, you need fresh ingredients. Start with cherry tomatoes. They should be bright and firm. Next, use fresh mozzarella balls, also called bocconcini. These small cheese balls melt in your mouth. Lastly, add fresh basil leaves for a burst of flavor. For condiments, you will need balsamic glaze and extra virgin olive oil. These add richness to the skewers. Don’t forget salt and pepper for seasoning. They bring out the best in the tomatoes and cheese. You also need some basic equipment. Skewers are essential, either wooden or metal. If you choose wooden skewers, soak them in water first. This will keep them from burning. Finally, have a serving platter ready to display your beautiful skewers. Using these ingredients and tools, you can make delicious skewers that impress everyone. 1. Rinsing and drying cherry tomatoes: First, take your pint of cherry tomatoes. Rinse them under cold water in a bowl. This removes dirt and makes them fresh. After rinsing, use a paper towel to pat them dry. This helps avoid excess water on the skewers. 2. Draining and drying mozzarella balls: Next, grab your fresh mozzarella balls. Drain them from their liquid. After draining, gently pat them dry with a paper towel. This keeps the skewers from getting soggy. 3. Soaking wooden skewers (if applicable): If you use wooden skewers, soak them in water for about 30 minutes. This step is key. Soaking prevents the skewers from burning during cooking or serving. 1. Step-by-step skewer assembly process: Start by taking a skewer. Thread one cherry tomato onto the skewer first. Then, add a fresh basil leaf. After that, add a mozzarella ball. Repeat this pattern until you fill the skewer. Aim for 3 to 4 sets of tomato, basil, and mozzarella on each skewer. This creates a nice balance of flavors. 2. Recommended number of ingredient sets per skewer: Each skewer should have 3 to 4 sets. This keeps each bite full of taste. Too few sets might not give the full flavor experience. 1. Drizzling olive oil and balsamic glaze: Once all skewers are ready, place them on a serving platter. Drizzle extra virgin olive oil over the skewers. Then, add balsamic glaze. This adds a rich, tangy flavor. 2. Seasoning with salt and pepper: Next, season the skewers with salt and pepper to taste. This simple step enhances the flavors of the fresh ingredients. 3. Optional garnish ideas: For an extra touch, you can sprinkle some chopped basil on top. This not only adds color but also boosts the fresh aroma. Choosing the best tomatoes and mozzarella makes a big difference. I love using cherry tomatoes for their sweetness. Look for bright, shiny tomatoes with no blemishes. They should feel firm when you gently squeeze them. For mozzarella, I prefer fresh mozzarella balls, also known as bocconcini. They should be soft and creamy. Check for a milky smell, which means they are fresh. Using fresh basil is vital too. Find vibrant green leaves without brown spots. Fresh basil adds a wonderful aroma and flavor to the skewers. Threading the ingredients onto skewers can be fun! Start by holding the skewer at one end. Push the pointed end into a cherry tomato first. Then, add a basil leaf. Fold it in half if it’s large to fit better. Next, add a mozzarella ball. To prevent slipping, push each ingredient snugly against the other. This keeps them in place and looks nice. Aim for about three or four sets of tomato, basil, and mozzarella on each skewer. This creates a colorful and tasty bite. Creative ways to serve the skewers can impress your guests. You can stand them upright in a jar for a fun display. This makes them easy to grab. Another option is to lay them flat on a plate. To enhance their visual appeal, drizzle with balsamic glaze and olive oil. A sprinkle of chopped basil on top adds color. You can also place extra basil leaves around the skewers. This gives a fresh look and aroma to your dish. {{image_2}} You can switch up the cheese in this recipe. Feta adds a salty tang. Goat cheese brings a creamy texture. These options work well with tomatoes and basil. You can also add more veggies to the skewers. Bell peppers give a sweet crunch. Cucumbers add a refreshing taste. Try mixing different colors for a vibrant look! To change the flavor, think about dressings or marinades. A drizzle of pesto can add depth. You could also use Italian dressing for an extra kick. Spices and herbs can enhance the taste too. A sprinkle of oregano or thyme adds warmth. Red pepper flakes can bring some heat if you like spice! If you're looking for vegan options, you can use nut-based cheese. Almond or cashew cheese works well. They mimic the creamy texture of mozzarella without dairy. For gluten-free skewers, stick to veggies and cheese. Most cheese is gluten-free, and fresh veggies are safe. Just check labels to be sure! To keep your assembled skewers fresh, place them in an airtight container. This protects them from drying out. Store the skewers in the fridge. The ideal temperature is between 32°F and 40°F (0°C to 4°C). They stay good for about 1 to 2 days. If you want to enjoy warm skewers, use a microwave on low heat. Heat them for about 10 to 15 seconds. Check if they are warm enough. Be careful not to overheat; this can make the cheese rubbery. Always check the temperature to keep food safe, especially with cheese. You can prepare these skewers up to 4 hours ahead. Keep the ingredients separate until you are ready to serve. This keeps the basil fresh and vibrant. If you make them early, store them in the fridge. Avoid adding oil or glaze until just before serving to prevent sogginess. You can serve these skewers with many tasty dishes. Here are some great pairings: - A fresh garden salad - Crispy bruschetta - Grilled chicken or shrimp - Pasta salad with pesto - A cheese platter with crackers These options add variety and make your meal more fun! Yes, you can make these skewers ahead! Here’s how: - Assemble the skewers in advance. - Cover them with plastic wrap and store in the fridge. - Use them within a day for the best taste. This saves time for your event and keeps the flavors fresh! If you don’t have skewers, no problem! Here are some alternatives: - Use toothpicks for smaller bites. - Serve the ingredients on a platter, like a salad. - Create a tomato, basil, and mozzarella stack on a plate. These ideas let you enjoy the flavors without skewers. Yes, these skewers are gluten-free! The main ingredients are safe for a gluten-free diet. - Just ensure any added sauces or dressings are gluten-free. - Always check labels for hidden gluten. This makes them a great option for everyone! This article covered making delicious Tomato Basil Mozzarella Skewers. We explored fresh ingredients, important tools, and easy steps for assembly. You learned tips for selecting the best items and creative ways to present your skewers. We discussed variations to suit different diets and storage tips to keep leftovers fresh. These skewers are not just tasty but also fun to make! Enjoy the process and share this dish with others. Your culinary creativity can shine through with every bite.

Tasty Tomato Basil Mozzarella Skewers Recipe Guide

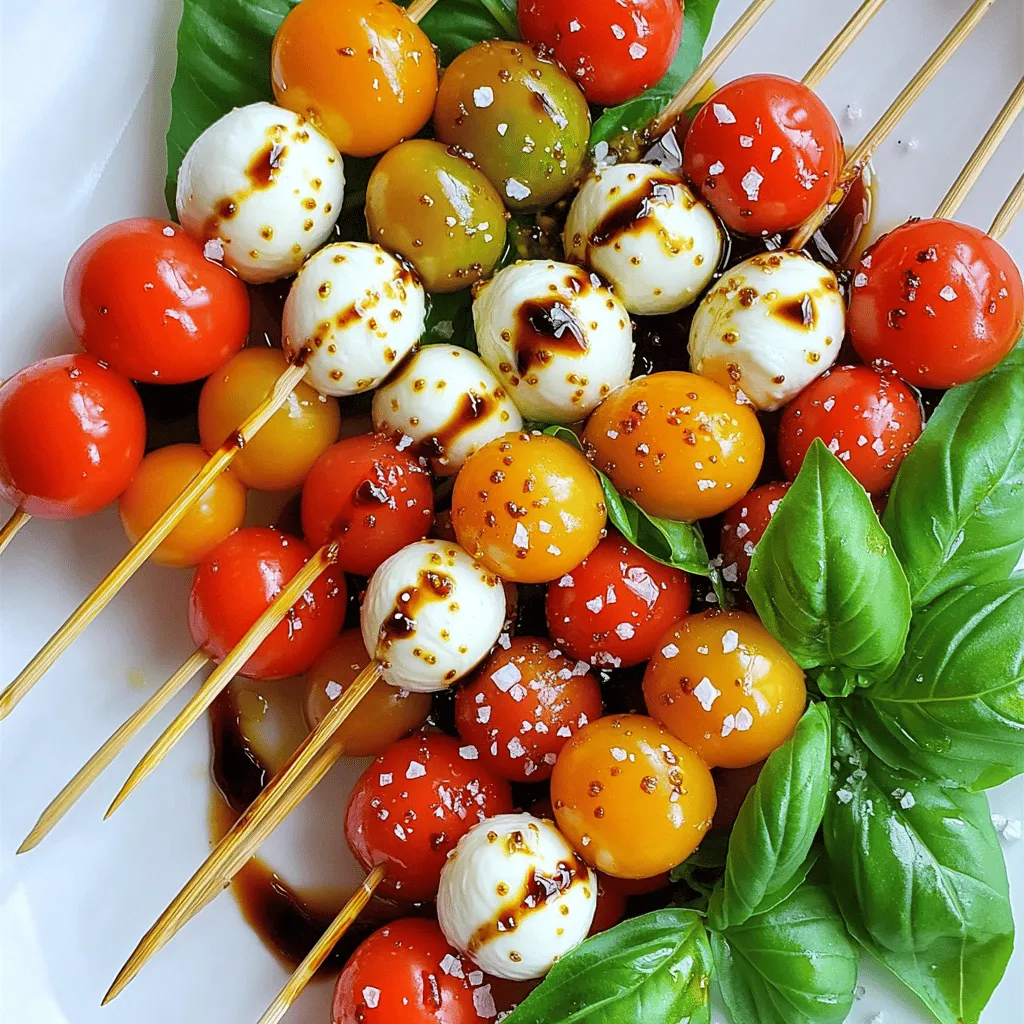
Craving a fresh and easy appetizer? You’re in the right place! In this guide, I’ll show you how to make

To create the Mocha Chip Icebox Pie, you will need the following ingredients: - 1 ½ cups chocolate wafer cookies, crushed - ½ cup unsalted butter, melted - 2 cups heavy whipping cream - 1 cup sweetened condensed milk - ½ cup brewed espresso, cooled - ¼ cup powdered sugar - 1 teaspoon vanilla extract - ½ cup semi-sweet chocolate chips - Optional: Cocoa powder for dusting Each ingredient plays a key role in making this pie velvety and rich. The chocolate wafer cookies form a sweet and crunchy crust. Butter binds the crumbs together. Heavy cream gives the filling its light and fluffy texture. Sweetened condensed milk adds sweetness and creaminess. Brewed espresso gives a deep coffee flavor. Powdered sugar sweetens the filling just right. Vanilla extract enhances the flavors, while semi-sweet chocolate chips add delightful bursts of chocolate. If you like, you can dust the top with cocoa powder for an extra touch. Gather these ingredients, and let’s get started on this delightful no-bake dessert! First, gather your ingredients. You need 1 ½ cups of crushed chocolate wafer cookies and ½ cup of melted unsalted butter. In a mixing bowl, combine the cookie crumbs and melted butter. Stir them well until the mixture looks like wet sand. This step is key for a great crust! Next, you will form the crust. Take a 9-inch pie pan and press the cookie mixture into the bottom and up the sides. Use the back of a measuring cup to make it even. This helps create a strong base. Chill the crust in the fridge for at least 30 minutes. This will help it set properly. Now, let’s make the filling. In a large mixing bowl, take 2 cups of heavy whipping cream. Add in 1 cup of sweetened condensed milk, ½ cup of cooled brewed espresso, ¼ cup of powdered sugar, and 1 teaspoon of vanilla extract. Whisk these ingredients together until they are creamy and well mixed. This part adds a rich flavor! After that, it’s time to fold in the chocolate chips. Gently add ½ cup of semi-sweet chocolate chips into the creamy mixture. Be careful not to break the chips as you mix. This adds little bursts of chocolate in every bite. Now, let’s assemble the pie. Remove the crust from the fridge. Pour the mocha filling into the crust. Use a spatula to smooth the top so it looks nice. Next, cover the pie with plastic wrap. Place it in the freezer for at least 4 hours. This helps the filling become firm and easy to slice. When it’s set, you can enjoy your Mocha Chip Icebox Pie. If you want, dust it with cocoa powder before serving. This adds a nice touch! For a stunning presentation, serve each slice on a chilled plate. Top with a dollop of whipped cream. Add chocolate shavings for a nice touch. You can also sprinkle cocoa powder on top for extra flavor and style. This will make your pie look as good as it tastes. To ensure the crust is set, chill it for at least 30 minutes. This helps it hold its shape when you slice the pie. If your filling is too soft, freeze the pie longer. Aim for at least 4 hours to let it firm up. Adjust the freezing time if your freezer runs warm. This will give you the best results when serving. {{image_2}} If you want to change things up, consider these options. For chocolate wafer cookies, you can use graham crackers or digestive biscuits. They give a different taste but still work well for the crust. If you need a non-dairy choice for heavy cream, try coconut cream or a cashew cream. Both options whip nicely and add a unique flavor. You can easily add new flavors to your mocha chip icebox pie. For a fun twist, include spices like cinnamon or nutmeg. Just a pinch can brighten up the filling. You can also try adding a splash of almond or hazelnut extract for more depth. If chocolate is your focus, switch up the types of chocolate. Use dark chocolate or even white chocolate chips for a sweeter touch. Each choice will change the pie's taste. Experiment and find what makes your taste buds sing! After you enjoy this pie, store leftovers in the fridge. Use a tight lid or plastic wrap. This keeps the pie fresh and tasty. The pie stays good in the fridge for up to four days. If you want to keep it longer, freezing is a better choice. You can freeze Mocha Chip Icebox Pie too! Wrap it well in plastic wrap and foil. This helps prevent freezer burn. The pie lasts in the freezer for up to three months. When you're ready to eat it, let it thaw in the fridge overnight. This keeps the texture nice and creamy. Mocha Chip Icebox Pie is a creamy, no-bake dessert. It features a rich filling made from heavy cream, sweetened condensed milk, and espresso. The chocolate wafer crust adds a crunchy texture. This pie is perfect for coffee lovers. You can enjoy its sweet and bitter flavors in every bite. The addition of chocolate chips makes it even better. It’s a dessert that looks great and tastes fantastic. Yes, you can make this pie a day in advance. This dessert actually tastes better after chilling. Prepare the crust and filling, then freeze it overnight. Cover the pie well with plastic wrap to keep it fresh. Just remember to take it out about 10 minutes before serving. This helps with slicing. Making it ahead saves you time for other tasks. To reduce the sweetness, try a few simple changes. You can cut back on the powdered sugar in the filling. Use unsweetened whipped cream instead of sweetened. Another option is to use dark chocolate chips. They are less sweet and add a nice flavor. You could also add a pinch of salt. This will balance the flavors and enhance the coffee taste. In this post, we explored how to make a Mocha Chip Icebox Pie. We covered the ingredients needed, from chocolate wafer cookies to semi-sweet chocolate chips. You learned to prepare the crust and make the filling step-by-step. I shared tips for serving, storing, and variations for personal touches. This pie is easy to make and delicious. Try it out to impress friends and family. It is a fun dessert that adds joy to any occasion. Enjoy making your own unique version!

Mocha Chip Icebox Pie Delightful No-Bake Dessert

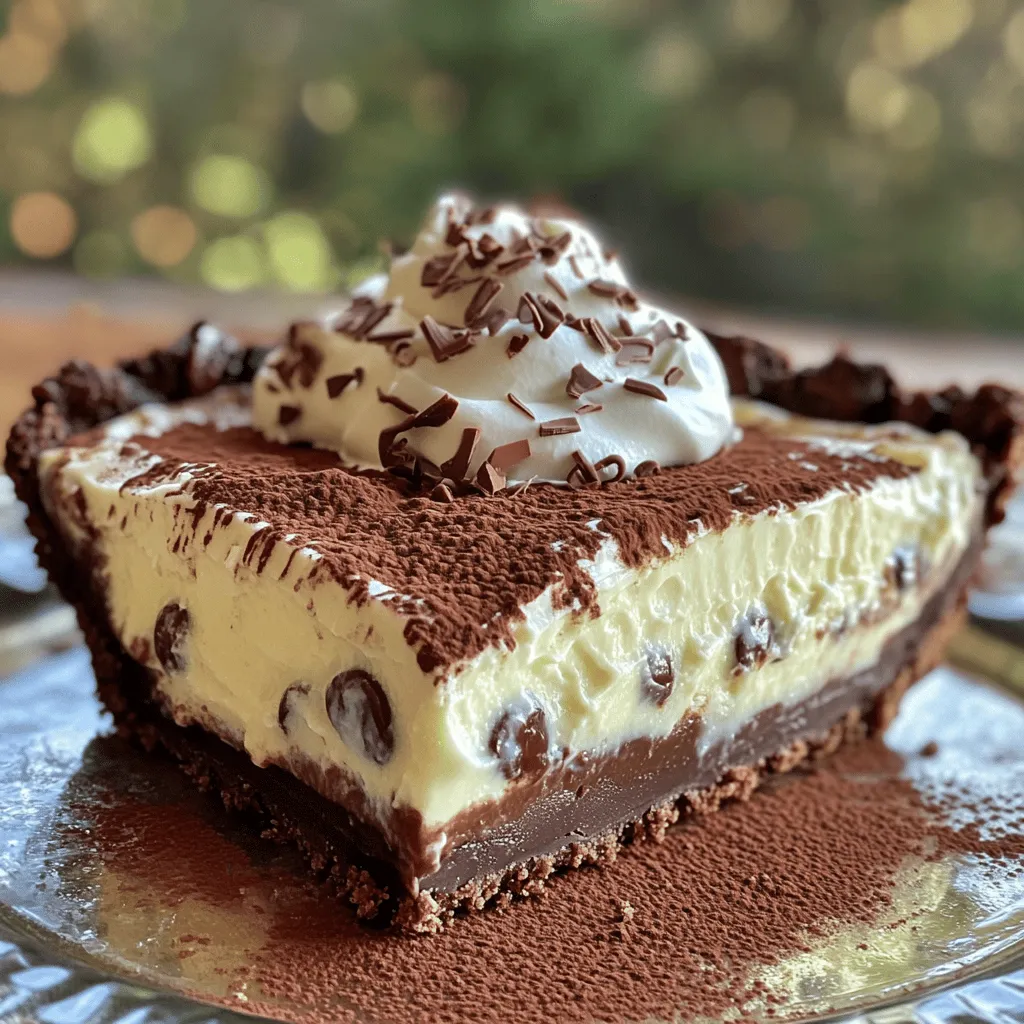
Craving a dessert that’s easy and delicious? Meet the Mocha Chip Icebox Pie! This delightful no-bake treat combines rich chocolate

- 1 block (14 oz) firm tofu, drained and pressed - ½ cup teriyaki sauce - 2 tablespoons soy sauce - 1 tablespoon sesame oil - 1 tablespoon maple syrup - 1 teaspoon grated ginger - 1 teaspoon minced garlic - 1 tablespoon cornstarch - 2 tablespoons sesame seeds - 1 green onion, chopped (for garnish) - Steamed veggies (broccoli, carrots, bell peppers) for serving When I create Baked Teriyaki Tofu, I focus on fresh, simple ingredients. Firm tofu is my go-to. It holds its shape well and absorbs flavors nicely. The teriyaki sauce brings a sweet and savory taste. I love using a mix of soy sauce, sesame oil, and maple syrup for depth. Grated ginger and minced garlic add warmth and a fragrant touch. Cornstarch is key for a crunchy texture. It helps the tofu crisp up nicely in the oven. Sesame seeds give a nice finish and extra flavor. For garnish, I use chopped green onion. It adds a fresh bite. Don't forget your choice of steamed veggies! Broccoli, carrots, and bell peppers work great. They bring color and nutrition to the dish. - Baking sheet - Parchment paper - Mixing bowls - Whisk In my kitchen, I always have a baking sheet handy. Lining it with parchment paper makes cleanup easy. Mixing bowls are essential for marinating the tofu. A whisk helps to blend the marinade smoothly. These tools make the cooking process fun and straightforward. You’ll enjoy making this dish with just a few basic kitchen items. - Preheat the oven to 400°F (200°C). - Line a baking sheet with parchment paper. Start by getting your oven ready. Preheating it helps the tofu cook evenly. The parchment paper stops the tofu from sticking. - Slice the pressed tofu into ½-inch thick rectangles. - Combine marinade ingredients and pour over tofu. - Allow marination time. Cut the tofu into rectangles. This size helps it soak up the flavor. Next, mix the teriyaki sauce, soy sauce, sesame oil, maple syrup, ginger, and garlic in a bowl. Pour this over the tofu slices. Let them sit for at least 20 minutes. This step is key for great flavor. - Coat tofu with cornstarch. - Arrange on the baking sheet and bake. - Add sesame seeds during the last 5 minutes. After marinating, sprinkle cornstarch on both sides of the tofu. This gives it a nice crunch when baked. Place the tofu on your baking sheet in a single layer. Bake for 25-30 minutes. Flip them halfway through for even cooking. In the last five minutes, sprinkle sesame seeds on top. This adds flavor and a lovely look. For the best taste, marinate the tofu for at least 20 minutes. If you have more time, 1 hour is even better. This lets the tofu soak up all the yummy flavors. You can also adjust the seasoning to your liking. If you want it sweeter, add more maple syrup. For a saltier kick, add a splash more soy sauce. To get crispy tofu, coat each slice with cornstarch before baking. This step helps create that perfect crunch. Make sure you spread out the tofu on the baking sheet. If they touch, they won’t get crispy. If you have leftovers, store the baked tofu in an airtight container. It stays good in the fridge for up to 3 days. Garnish your tofu with chopped green onion. This adds a nice touch of color and flavor. Serve it hot with steamed veggies like broccoli, carrots, and bell peppers. You can also drizzle any leftover marinade on top for extra taste. This simple addition makes your meal look and taste great! {{image_2}} You can switch up the flavor with different marinades. One option is a spicy teriyaki with chili sauce. This adds a nice kick to the tofu. Just mix chili sauce into your teriyaki blend. It makes the dish lively and fun! Another option is a citrus-infused teriyaki. Use fresh orange or lime juice for a bright twist. The citrus adds a refreshing taste that pairs well with the soy sauce. You can also add zest for extra flavor. Both of these options keep your meals exciting and diverse. Serving baked teriyaki tofu is easy and versatile. You can serve it over rice or quinoa. This makes a hearty meal that fills you up. Both grains soak up the tasty sauce well. Another idea is to incorporate the tofu into wraps or salads. Slice the tofu and add it to your favorite greens. You can also add colorful veggies for texture. This way, you create a fresh, crunchy meal that’s perfect for lunch or dinner. If you need gluten-free options, use gluten-free soy sauce. It works just as well as regular soy sauce. You can still enjoy the same great taste without gluten. For those who follow a vegan diet, this recipe is already vegan-friendly. All the ingredients are plant-based. You can enjoy this dish without worrying about animal products. It’s a delicious choice for everyone! To keep your baked teriyaki tofu fresh, place it in an airtight container. Store it in the fridge for up to four days. This keeps the tofu tasty and safe to eat. When you want to enjoy it again, simply reheat the tofu. You can use a microwave or an oven. For the microwave, heat for about one minute. If using an oven, preheat it to 350°F (175°C) and warm the tofu for 10 minutes. If you want to save your baked tofu for later, freezing is a great option. First, let the tofu cool completely. Then, wrap it tightly in plastic wrap or place it in a freezer bag. This keeps out air and prevents freezer burn. You can freeze baked tofu for up to three months. When you’re ready to eat the frozen tofu, you will need to thaw it. The best way is to leave it in the fridge overnight. If you’re in a hurry, you can also use the microwave on the defrost setting. After thawing, reheat it in the oven or microwave for a quick meal. Enjoy your crunchy delight! To press tofu, start with firm or extra-firm tofu. Remove the tofu from the package and drain the liquid. Wrap the tofu in a clean kitchen towel. Place a heavy object, like a cast-iron pan, on top. Let it sit for 15-30 minutes. This method removes excess water and helps the tofu absorb flavors better. Yes, you can use soft or silken tofu, but the texture will be different. Firm tofu provides a nice crunch. Soft tofu may break apart more easily. If you prefer a lighter dish, use silken tofu without baking. Adjust cooking times to avoid overcooking. Most teriyaki sauces contain soy sauce, which has gluten. Look for gluten-free soy sauce or tamari. Some brands make gluten-free teriyaki sauce. Always check the label to be sure. This makes it easy to enjoy teriyaki dishes without gluten. Baking tofu takes about 25-30 minutes at 400°F (200°C). Flip the tofu halfway through for even cooking. You want it golden brown and a bit crispy. It’s a simple way to enhance flavor and texture. Steamed veggies like broccoli, carrots, and bell peppers work well. They add color and nutrients. You can also use snap peas or bok choy for more crunch. Mix and match your favorites for a colorful plate. You’ve learned how to make tasty baked teriyaki tofu with simple steps. We covered the key ingredients needed, the right kitchen tools, and how to marinate and bake tofu for great flavor. Plus, I shared tips for crispiness and cool serving ideas. Remember, you can modify the marinades to suit your taste or diet. Enjoy leftovers or freeze them for later. This dish is not just easy; it’s versatile and satisfying. Happy cooking!

Baked Teriyaki Tofu Flavorful and Crunchy Delight

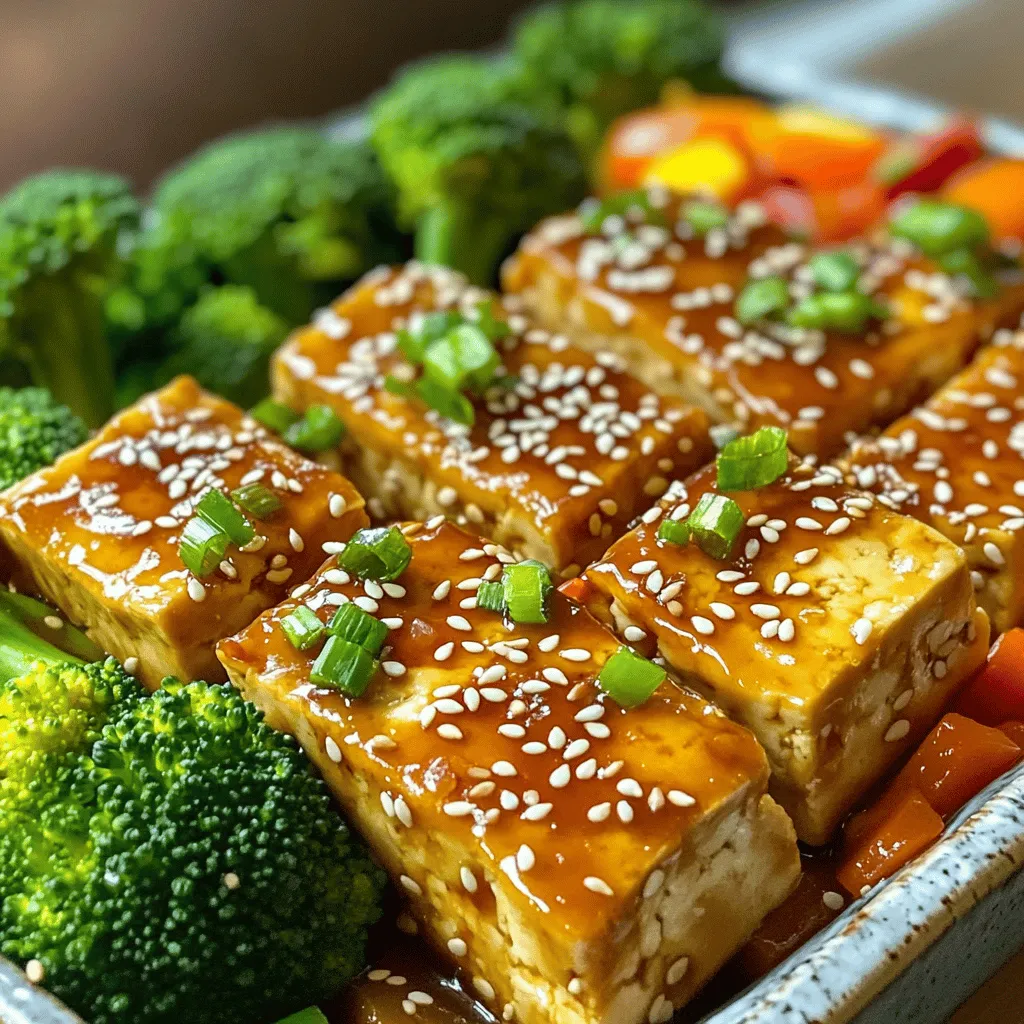
Are you ready to transform your tofu game? Baked Teriyaki Tofu is a flavorful and crunchy delight that will impress

- 1 can (15 oz) black beans, drained and rinsed - 1/2 cup cooked quinoa - 1/2 cup breadcrumbs (or gluten-free alternative) These main ingredients form the heart of your burger. Black beans give it protein and fiber. Quinoa adds a nice texture and boosts the nutrients. Breadcrumbs help bind the mixture, so it holds together well. - 1-2 chipotle peppers in adobo sauce, minced (adjust for spice level) - 1 small onion, finely chopped - 2 cloves garlic, minced - 1 teaspoon cumin - 1 teaspoon smoked paprika Flavor is key to a great black bean burger. Chipotle peppers bring heat and a smoky taste. Onion and garlic add depth, while cumin and smoked paprika give a warm, earthy flavor. These spices make your burger unforgettable. - Burger buns - Lettuce, tomato, and avocado Once your patties are ready, it’s time to serve. Choose your favorite burger buns. Fresh lettuce, ripe tomato, and creamy avocado add crunch and creaminess. These toppings elevate your burger and make it a meal to remember. Start by mashing the black beans in a large bowl. I use a fork or potato masher. Leave some chunks for a nice texture. This step adds heartiness to our burgers. Next, add cooked quinoa and breadcrumbs. These ingredients help bind the mixture. Then, toss in the chopped onion and minced garlic. Both add great flavor. Now, it’s time for the chipotle peppers. Use 1-2, depending on how spicy you want your burgers. Add cumin, smoked paprika, lime juice, salt, and black pepper. Mix everything until it combines well. If the mixture feels too wet, add more breadcrumbs until it holds together. To bind it all, incorporate an egg or a flax egg for a vegan option. This step is key to keeping your patties together. Divide the mixture into four equal parts. Shape each part into a patty. Aim for a nice, even thickness. This helps them cook evenly. Heat a skillet over medium heat and add olive oil. Once the oil is hot, place the patties in the skillet. Cook for about 5-7 minutes on each side. You want them crispy and golden brown. A good tip is to not overcrowd the pan. This way, each burger gets a perfect sear. While the patties cook, you can toast your burger buns if you like. Toasting adds a nice crunch. Now, let’s assemble! Place each spicy black bean patty on a bun. Top with fresh lettuce, slices of tomato, and creamy avocado. These toppings enhance the flavor and texture. Enjoy your delicious Spicy Chipotle Black Bean Burgers! To make these burgers amazing, spice level is key. Chipotle peppers bring heat and flavor. Start with one pepper for mild heat. Add another if you want more kick. Remember, you can always add more spice later, but you can't take it out. Texture matters too. Breadcrumbs help bind the burger. If your mixture feels too wet, add more breadcrumbs gradually. You want a mix that holds together but isn’t dry. You can cook your burgers in two main ways: pan-frying or baking. Pan-frying gives a crispy outside. Use olive oil for frying. Heat the oil over medium heat. Cook each side for about 5-7 minutes. If you prefer baking, preheat your oven to 400°F. Place the patties on a baking sheet. Bake for 20-25 minutes, flipping halfway through. This method is easier and less messy. Serve your burgers with fun sides. Sweet potato fries or a light salad work great. For sauces, try a spicy mayo or avocado crema. Get creative with toppings. Add fresh avocado slices, pickled onions, or even jalapeños. These add crunch and flavor. Don’t be afraid to mix and match! {{image_2}} You can make a vegan version easily. Just swap the egg for a flax egg. To make a flax egg, mix one tablespoon of ground flaxseed with three tablespoons of water. Let it sit for a few minutes until it thickens. This will bind the ingredients just like an egg does. Your burgers will still hold together well, and they will taste great! If you need a gluten-free option, use gluten-free breadcrumbs and buns. Check labels carefully to ensure they are truly gluten-free. This swap keeps the burgers safe for those with gluten issues while still being tasty. Your friends won’t even notice the difference! Feel free to get creative with flavors! You can add different spices or vegetables to the mix. Try adding bell peppers, corn, or zucchini for extra texture and taste. If you want a cheesy touch, mix in some shredded cheese or top your burger with a slice. You can also add cooked proteins like ground turkey or beef if you want a heartier burger. The options are endless, and you can make each burger unique! After cooking your burgers, let them cool down. Place them in an airtight container. You can refrigerate them for up to three days. If you want to keep them longer, consider freezing. To freeze your patties, first, allow them to cool completely. Then, wrap each patty in plastic wrap. Place the wrapped patties in a freezer bag. This way, they stay fresh. When ready to eat, thaw them in the fridge overnight. Reheat them in a skillet or oven until warm. In the fridge, these burgers last about three days. In the freezer, they can last up to three months. Make sure to label your bags with the date. This helps you keep track of how long they have been stored. Enjoy your spicy chipotle black bean burgers whenever the craving hits! Yes, you can prepare the patties in advance. Shape them and store them in the fridge. Keep them in an airtight container for up to a day. You can also freeze them for longer storage. Just make sure to separate each patty with parchment paper. When ready to cook, thaw them overnight in the fridge. This saves you time and makes meal prep easy. Look for a few signs of perfectly cooked black bean burgers. The patties should be golden brown and crispy on the outside. They should hold their shape well and feel firm to the touch. If you see a nice crust, that's a good sign! You can also use a food thermometer to check. The inside should be hot and not cold. If you want variety, you can try different beans. Some great substitutes include pinto beans or kidney beans. Lentils can also work well and add a nice texture. Chickpeas can be another option, giving a unique flavor. Just make sure to mash them well, just like you would with black beans. These spicy chipotle black bean burgers combine bold flavors with healthy ingredients. You learned how to prepare a tasty bean mixture, shape the patties, and assemble your burgers with fresh toppings. With tips on cooking methods and storage, you can enjoy these burgers anytime. Remember, you can also customize them to fit your dietary needs. Experiment with flavors and enjoy a delicious meal. These burgers are a fun, healthy option everyone will love.

Spicy Chipotle Black Bean Burgers Packed with Flavor

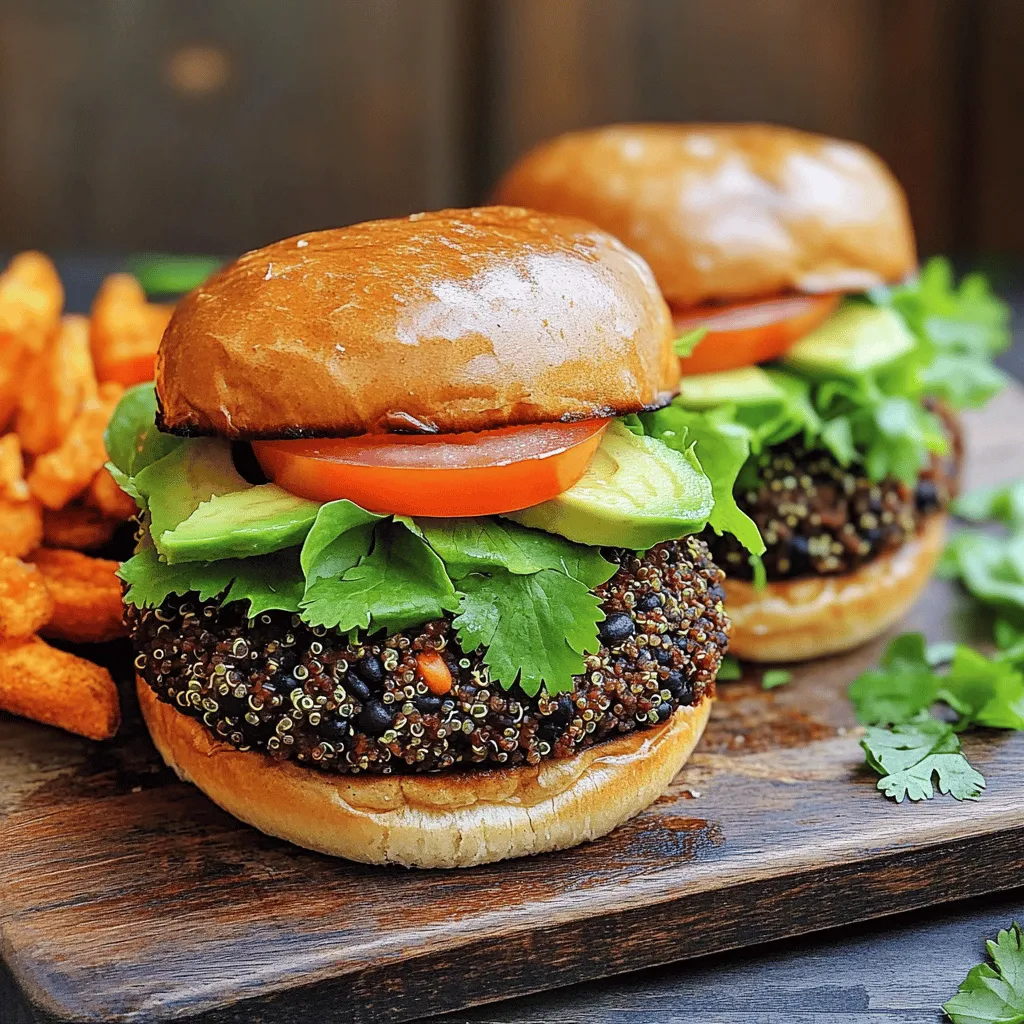
If you crave a burger with a kick, this Spicy Chipotle Black Bean Burger recipe is for you! Packed with

- 4 large Portobello mushrooms, stems removed - 1 cup cherry tomatoes, halved - 1 cup fresh mozzarella balls, halved - 1/4 cup fresh basil leaves, torn - 2 tablespoons balsamic glaze - 2 tablespoons olive oil - 1 teaspoon garlic powder - Salt and pepper to taste - 1/4 teaspoon red pepper flakes (optional) Caprese stuffed Portobello mushrooms shine with fresh flavors. You will find all the ingredients easy to find. The Portobello mushrooms serve as a hearty base. Their deep, earthy flavor pairs well with the bright toppings. Cherry tomatoes add a sweet burst of flavor. Halving them helps release their juices during cooking. Fresh mozzarella balls melt beautifully, giving a creamy texture. I love using torn basil leaves for a fresh, herbal note. Balsamic glaze adds a tangy sweetness. Olive oil helps bring all the flavors together. Garlic powder adds a warm depth, while salt and pepper enhance the dish. For a little kick, red pepper flakes can be added. Gathering these ingredients is simple. You can find them at most grocery stores or farmers' markets. Using fresh ingredients makes a noticeable difference in taste. Enjoy the process of preparing this flavorful delight! First, preheat your oven to 375°F (190°C). This step gets the oven ready for our delicious mushrooms. Next, clean the Portobello mushrooms. Use a damp paper towel to wipe them gently. Remove the stems and place them on a baking sheet, gill-side up. Now, it's time to season the mushroom caps. Drizzle olive oil over each mushroom. Then, sprinkle garlic powder, salt, and pepper on top. If you like a bit of heat, add red pepper flakes. Rub the seasoning into the mushrooms to ensure they are well-coated. For the stuffing, grab a mixing bowl. Combine the halved cherry tomatoes and fresh mozzarella balls. Add the torn basil leaves to the bowl. Finally, drizzle in the balsamic glaze. Toss everything gently to mix. This step makes the stuffing vibrant and full of flavor. Now, spoon the tomato and mozzarella mixture into each mushroom cap. Fill them generously, so each bite is packed with goodness. Place the baking sheet in the preheated oven. Bake the stuffed mushrooms for 20 to 25 minutes. Check for doneness when the mushrooms are tender and the cheese is melted and golden. After baking, let the mushrooms cool for a few minutes. This cooling step helps the flavors settle. Enjoy your beautiful Caprese stuffed Portobello mushrooms! To cook Portobello mushrooms evenly, choose large ones. They should feel firm and not too soft. When cleaning the mushrooms, use a damp paper towel. Avoid soaking them in water. This keeps them from getting soggy. Choose fresh ingredients for the best taste. Look for bright cherry tomatoes and creamy mozzarella balls. Fresh basil should smell strong and sweet. If you can, buy these items at a local market. This ensures better quality and flavor. For extra flavor, try adding Italian seasoning or fresh garlic. You can also mix in some sun-dried tomatoes for a rich taste. A pinch of oregano can make the dish even better. For presentation, drizzle more balsamic glaze over each stuffed mushroom. This adds a beautiful shine and enhances flavor. Serve them on a rustic platter. Adding fresh basil leaves around the mushrooms makes the dish pop. You can also drizzle olive oil on the side for dipping. {{image_2}} You can switch up the cheese in this dish. Instead of fresh mozzarella, try goat cheese or feta. These cheeses add a tangy flavor that pairs well. You can also use shredded mozzarella for a different texture. If you're out of Portobello mushrooms, try using large cremini or shiitake mushrooms. These options still hold the stuffing well. They also have great flavor and texture. To make this dish vegan or dairy-free, replace mozzarella with vegan cheese. You can find many options at stores today. Nutritional yeast can also add a cheesy flavor without dairy. For gluten-free needs, make sure to check your balsamic glaze. Some brands add gluten. Otherwise, the recipe is gluten-free with the ingredients listed. Enjoy this dish without worry! To keep your Caprese stuffed Portobello mushrooms fresh, store them in the fridge. Use an airtight container to prevent moisture loss. Place a paper towel in the container to absorb any extra moisture. This helps keep the mushrooms from becoming soggy. Leftovers can last up to three days in the refrigerator. After that, they may lose their taste and texture. When you want to enjoy your leftovers, reheat them carefully. The best way is in the oven. Preheat your oven to 350°F (175°C). Place the mushrooms on a baking sheet and cover them with foil. Heat for about 10-15 minutes, until warm. This method helps keep the cheese melty and the mushrooms tender. You can also use a microwave if you're in a hurry. Heat for 1-2 minutes, but be aware that the texture may change. You can pair these mushrooms with many sides. Here are some great options: - Garlic Bread: Crunchy and warm, it’s a classic. - Mixed Green Salad: Fresh greens add a nice crunch. - Quinoa: This nutty grain is filling and healthy. - Pasta: A light pasta dish can balance the meal. - Roasted Vegetables: Colorful and tasty, they add variety. These sides enhance the meal and bring out the flavors of the mushrooms. Yes, you can prep these mushrooms before serving. Here’s how: - Prep the Mushrooms: Clean and season them in advance. - Make the Filling: Mix tomatoes, mozzarella, and basil ahead of time. - Store Separately: Keep the mushrooms and filling in the fridge. When you're ready to cook, just fill the mushrooms and bake. This saves time and lets you enjoy your meal. To tell when your mushrooms are ready, watch for these signs: - Tender Texture: The mushrooms should feel soft to the touch. - Melted Cheese: The mozzarella should be bubbly and slightly golden. - Juices: You may see juices from the mushrooms and filling. Baking time is about 20-25 minutes. Keep an eye on them for the best results. Caprese stuffed Portobello mushrooms are a tasty dish made with fresh ingredients. We covered how to prepare, stuff, and bake them for perfect flavor. Using fresh produce like basil and tomatoes boosts taste and health. Remember, you can alter ingredients to suit your diet. Store leftovers properly to enjoy later. Whether for dinner or a party, these mushrooms will impress everyone. Cook them your way and share with friends to spread the joy!

Caprese Stuffed Portobello Mushrooms Flavorful Delight

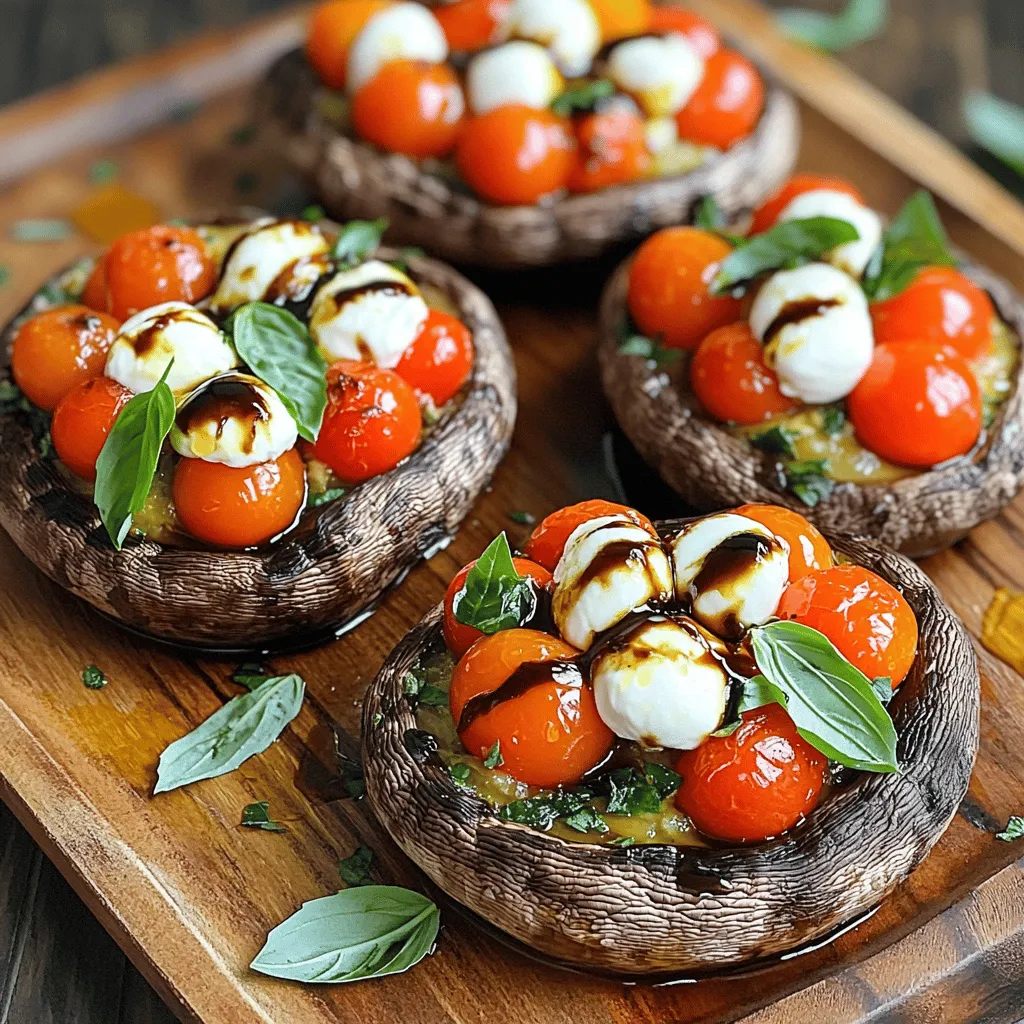
Are you ready to impress your taste buds? Caprese Stuffed Portobello Mushrooms are a delicious way to enjoy fresh flavors.

Older posts
Newer posts
← Previous Page1 … Page32 Page33 Page34 … Page82 Next →

dsad

© 2026 Recipes Pursuit • Built with GeneratePress

Our Policies

  • Copyright Policy
  • Cookie Policy
  • GDPR Policy
  • Privacy Policy
  • Disclaimer
  • Terms Of Use

More Information

  • Home
  • About
  • Contact
  • Appetizers
  • Dessert
  • Dinner
  • Drinks
©2026, Recipes Pursuit About Back To Top