Skip to content
DisclaimerTerms Of UseGDPR PolicyCookie Policy

Recipes Pursuit

  • Home
  • Drinks
  • Appetizers
  • Dinner
  • Dessert
  • About
  • Contact
  • Privacy Policy
DisclaimerTerms Of UseGDPR PolicyCookie Policy

NO-ING-IMG

- 2 ripe mangoes, peeled and diced - 1 cup coconut milk - 1/2 cup Greek yogurt - 2 tablespoons honey or maple syrup (optional, adjust for sweetness) - 1 teaspoon vanilla extract - A pinch of salt - Whipped coconut cream (for garnish, optional) For creamy coconut mango popsicles, you need fresh and ripe mangoes. The ripe mangoes give a sweet and rich flavor. Next, use coconut milk for a creamy texture. It adds a tropical taste that complements the mangoes. Greek yogurt brings in a nice creaminess and adds protein. You can sweeten the mix with honey or maple syrup. This step is optional, but it helps if your mangoes are not very sweet. A touch of vanilla extract adds warmth and depth. Lastly, a pinch of salt balances all the flavors. If you want to make your popsicles even more special, add whipped coconut cream on top. It makes for a lovely garnish and enhances the tropical feel. Keep these ingredients in mind as you prepare your refreshing treat. First, peel and dice the ripe mangoes. Take about two mangoes. Place the diced mangoes in a blender. Add one cup of coconut milk. Blend this mix until it is smooth and creamy. Next, add half a cup of Greek yogurt. If you like it sweeter, add two tablespoons of honey or maple syrup. Pour in one teaspoon of vanilla extract and a pinch of salt. Blend again until everything combines well. Now, taste your mixture. If it needs more sweetness, just add a little more honey or syrup. Blend again until you reach your desired taste. Once your mixture is ready, pour it into popsicle molds. Leave a small gap at the top of each mold. This gap helps when the popsicles freeze and expand. After filling the molds, insert the sticks. Make sure they are secure. This way, they won’t fall out when freezing. Now, place the molds in the freezer. Let them freeze for at least four to six hours. This time ensures they become fully frozen. To check if they are ready, gently touch the mold. If it feels solid, your popsicles are set. If they are still soft, leave them in longer. To release the popsicles, run warm water over the molds for a few seconds. This helps them come out easily. Then, gently pull the popsicles out and enjoy your creamy coconut mango popsicles! To make the best creamy coconut mango popsicles, start with ripe mangoes. Look for mangoes that are slightly soft when you press them. They should have a sweet aroma. This means they are ready to use. The sweetness of ripe mangoes boosts the flavor of your popsicles. When it comes to coconut milk, choose full-fat coconut milk for a rich taste. It gives your popsicles a smooth and creamy texture. You can find coconut milk in cans or cartons. Make sure it is unsweetened to control the sweetness of your popsicles. Getting popsicles out of the molds can be tricky. To make it easy, run warm water over the outside of the molds for a few seconds. This helps loosen the popsicles without melting them. Gently pull the popsicles out once they are warm enough. If you have leftover popsicle mixture, store it in a sealed container in the fridge. It will stay fresh for a few days. You can refill the molds later or use it for smoothies. Make your popsicles look even better with some simple garnishes. You can top them with whipped coconut cream for a fluffy touch. If you want more color, serve them with fresh mango slices or shredded coconut. This adds a tropical vibe to your dessert. Use a nice plate to display your popsicles and impress your guests. {{image_2}} You can make your popsicles even more fun! Try adding other tropical fruits like pineapple or banana. Pineapple brings a sweet-tart taste, while banana adds creaminess. You can mix them in with the mango for a new twist. If you want something different, try mixing in berries. Blueberries, strawberries, or raspberries add color and a fresh flavor. Each fruit adds a unique taste and makes your popsicles special. If you want a dairy-free treat, you can swap Greek yogurt with plant-based yogurt. Almond, coconut, or soy yogurt work great. They keep the creamy texture without dairy. You can also change the sweeteners. Instead of honey, try agave syrup or maple syrup. Both add sweetness and keep it plant-based. These changes make the popsicles suitable for everyone. Want to kick up the flavor? Add a splash of lime or lemon juice to the mix. This adds a zesty brightness that balances the sweetness of mango. You can also add a dash of spices, like cinnamon or nutmeg. They bring warmth and depth to your popsicles. Just a pinch is enough to make a big difference. These simple tweaks can turn your creamy coconut mango popsicles into a gourmet treat! Store your creamy coconut mango popsicles in airtight containers or freezer bags. This helps keep them fresh and tasty. Label the containers with the date. These popsicles can last up to three months in the freezer. For the best flavor and texture, eat them within one month. You can reuse popsicles after they melt, but only if they stay cold. If they sit out for too long, it’s best to toss them. To re-freeze, pour the melted mixture back into molds quickly. Make sure the molds are clean. Freeze them again for at least four hours. Look for signs of freezer burn, like ice crystals on the surface. This can change the taste and texture. If the popsicle feels hard and has a dry surface, it’s likely spoiled. You may also notice changes in flavor. If it tastes off, throw it away. Creamy coconut mango popsicles can last up to two months in the freezer. To keep them fresh, store them in an airtight container or a freezer bag. Make sure to label the container with the date. This helps you track how long they have been stored. Yes, you can use frozen mangoes! Frozen mangoes are often picked at their peak ripeness and can be just as sweet. When using frozen mangoes, you may need to reduce the coconut milk slightly. This helps keep the mixture from becoming too watery. Blend the frozen mangoes straight from the freezer for smooth results. If you need a substitute for coconut milk, consider these options: - Almond milk - Soy milk - Oat milk - Cashew milk These alternatives can change the flavor slightly, but they work well. If you want a creamier texture, use full-fat versions of these non-dairy milks. In this guide, we covered how to make creamy coconut mango popsicles. You learned about the key ingredients, including ripe mangoes and coconut milk. Our step-by-step instructions made it easy to blend, pour, and freeze your popsicles. I also shared tips for enhancing flavor and ensuring easy removal from molds. These popsicles are a treat for any day. Play with different fruits and flavors to make them your own. Enjoy your homemade popsicles and stay cool!

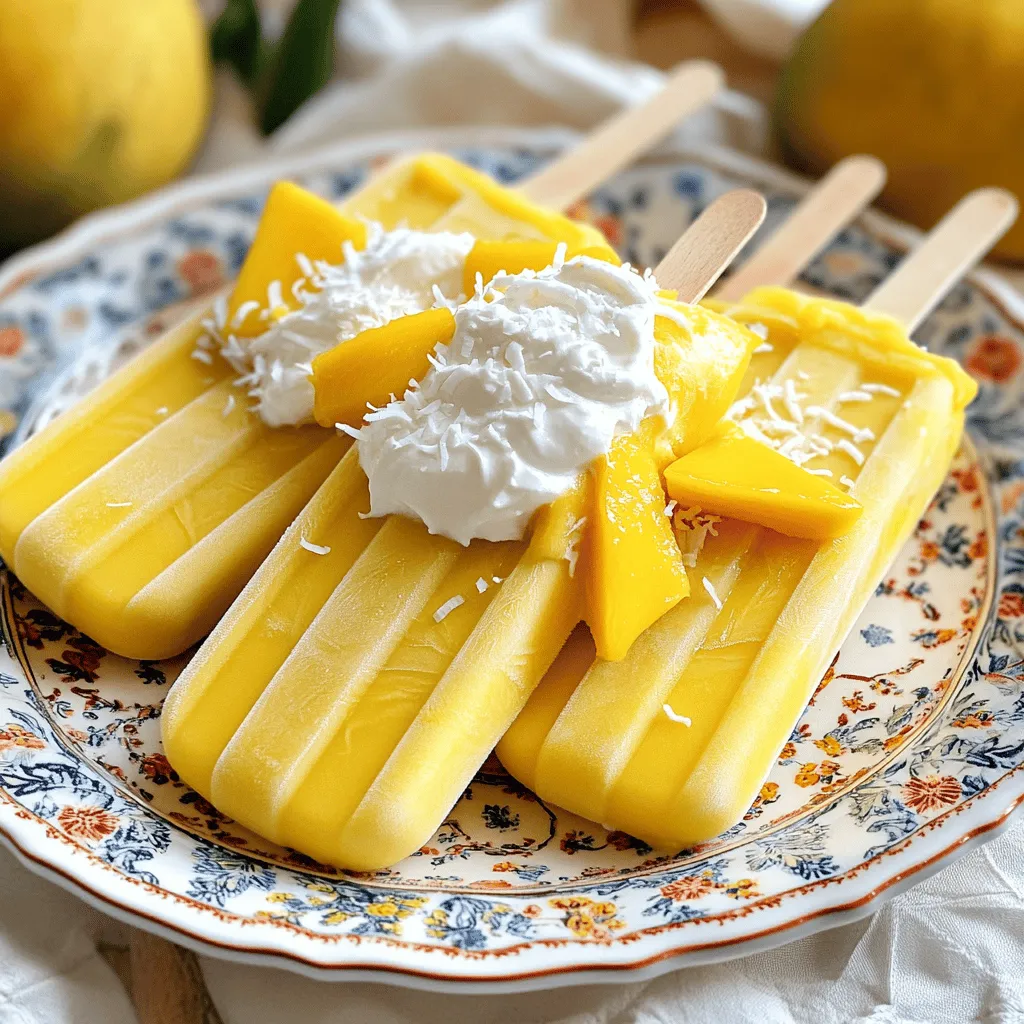
Creamy Coconut Mango Popsicles Easy and Refreshing Delight

Looking for a cool treat that’s easy to make and packed with flavor? Let me introduce you to creamy coconut

To make Funfetti Birthday Cake Cookies, gather these simple ingredients: - 1 cup unsalted butter, softened - 1 cup granulated sugar - 1/2 cup brown sugar, packed - 2 large eggs - 1 teaspoon vanilla extract - 2 3/4 cups all-purpose flour - 1 teaspoon baking powder - 1/2 teaspoon baking soda - 1/2 teaspoon salt - 1 cup colorful sprinkles - 1/2 cup white chocolate chips (optional) These ingredients blend to create soft, chewy cookies that burst with flavor. You can easily swap some ingredients for different flavors or dietary needs. Try these: - Use coconut oil instead of butter for a dairy-free option. - Swap granulated sugar with coconut sugar for a richer taste. - Add chopped nuts for extra crunch. - Change sprinkles to match your theme or event. These swaps let you personalize your cookies while keeping them fun! To make these cookies, you will need a few basic tools: - Mixing bowls for combining ingredients - A cookie scoop or tablespoon for portioning dough - Parchment paper to line your baking sheet - An electric mixer for easy creaming of butter and sugars - A wire rack for cooling the cookies Having these tools ready makes the baking process smooth and enjoyable! First, gather all your ingredients. You need butter, sugars, eggs, and flour. Make sure your butter is soft. It should be easy to mix. Measure out 1 cup of unsalted butter. Then, measure 1 cup of granulated sugar and 1/2 cup of brown sugar. Crack 2 large eggs into a bowl. Don't forget 1 teaspoon of vanilla extract. For dry ingredients, get 2 3/4 cups of flour, 1 teaspoon of baking powder, 1/2 teaspoon of baking soda, and 1/2 teaspoon of salt. Finally, grab 1 cup of colorful sprinkles and 1/2 cup of white chocolate chips, if you like. Now, it's time to mix! In a large bowl, cream the softened butter, granulated sugar, and brown sugar together. You want this to be light and fluffy. This should take about 3 to 5 minutes. Next, add the eggs one at a time. Mix well after each egg. Then stir in the vanilla extract. In another bowl, whisk together the flour, baking powder, baking soda, and salt. Slowly add these dry ingredients to the wet mixture. Mix until just combined. Finally, fold in the colorful sprinkles and white chocolate chips until they are evenly mixed. Preheat your oven to 350°F (175°C). Line a baking sheet with parchment paper. Use a cookie scoop or a tablespoon to drop balls of dough onto the baking sheet. Space them about 2 inches apart. Bake your cookies for 10 to 12 minutes. The edges should be lightly golden. The centers may look soft but will firm up as they cool. Let the cookies cool on the baking sheet for 5 minutes. After that, move them to a wire rack to cool completely. Enjoy your sweet treats! To get the best texture for your Funfetti cookies, use softened butter. Cream the butter and sugars until light and fluffy. This step adds air and makes the cookies soft. Be careful not to overmix your dough. Mix until just combined to keep them chewy. Let the cookies cool on the baking sheet for a bit before moving them. This helps them set and stay soft. One common mistake is not measuring flour correctly. Use a spoon to fluff the flour, then scoop it into your measuring cup. Avoid packing it down. Another mistake is baking cookies too long. Keep an eye on them; the edges should be golden, while the centers stay soft. Lastly, don’t skip the colorful sprinkles! They add flavor and fun. For a festive touch, serve your cookies on a bright platter. Add extra sprinkles on top for color. You can also drizzle melted chocolate over them for a chocolatey finish. If you want to gift the cookies, package them in a cute box. Tie it with a ribbon for a sweet surprise. These simple ideas keep your Funfetti cookies fun and exciting! {{image_2}} You can make gluten-free Funfetti cookies easily. Just swap the all-purpose flour for a gluten-free blend. Look for a mix that includes xanthan gum. This helps the cookies hold their shape. The taste will still be great, and everyone can enjoy them! Want to change the flavor? You can! Add cocoa powder for a chocolate twist. Use 1/2 cup of cocoa and reduce the flour by the same amount. For a fresh taste, try lemon. Add lemon zest and a bit of lemon juice. This will give your cookies a bright flavor perfect for spring. Sprinkles add joy to these cookies. While colorful sprinkles are classic, try others too! Use chocolate sprinkles for a rich look. You can also use themed sprinkles for holidays or parties. Rainbow sprinkles look fun for birthdays. Get creative and mix different kinds for a fun surprise in every bite! To keep your Funfetti Birthday Cake Cookies fresh, place them in an airtight container. This helps lock in moisture and flavor. If you stack them, use parchment paper between layers to prevent sticking. Store them at room temperature for up to five days. If you want to keep them longer, consider freezing. You can freeze these cookies for up to three months. First, let them cool completely. Then, place them in a single layer on a baking sheet. Freeze until solid. Once frozen, transfer them to a freezer bag or container. Make sure to remove as much air as possible. Label the bag with the date for easy tracking. To reheat your cookies, preheat your oven to 350°F (175°C). Place the cookies on a baking sheet. Heat for about 5 to 7 minutes. This warms them up and makes them soft again. You can also use a microwave. Heat for 10 to 15 seconds. Just be careful not to overheat, or they can become tough. Enjoy your delicious cookies warm! To make your Funfetti cookies softer, you can add a little more butter. Use an extra two tablespoons of softened butter. This will keep the cookies moist. Also, do not overbake them. Remove the cookies from the oven when the edges are light golden. They will continue to cook as they cool. Yes, you can use margarine instead of butter. Just make sure it is softened. Margarine can give a similar taste and texture. However, butter often adds a richer flavor. If you want a buttery taste, stick with butter when you can. If you don’t want to use white chocolate chips, try using dark chocolate chips or milk chocolate chips. You can also add nuts like chopped walnuts or pecans for a nice crunch. Dried fruit, like cranberries or raisins, can add sweetness too. Feel free to get creative with your mix-ins! You now have all the tools to make amazing Funfetti cookies. You learned about the best ingredients, essential tools, and how to prepare the dough. We covered baking tips for perfect texture and fun decoration ideas. Variations offer options for different diets and flavors. Plus, proper storage keeps your cookies fresh. Remember, practice makes perfect. Enjoy your cookie journey and share these tips with friends for sweet success!

Funfetti Birthday Cake Cookies Sweet and Tasty Treat

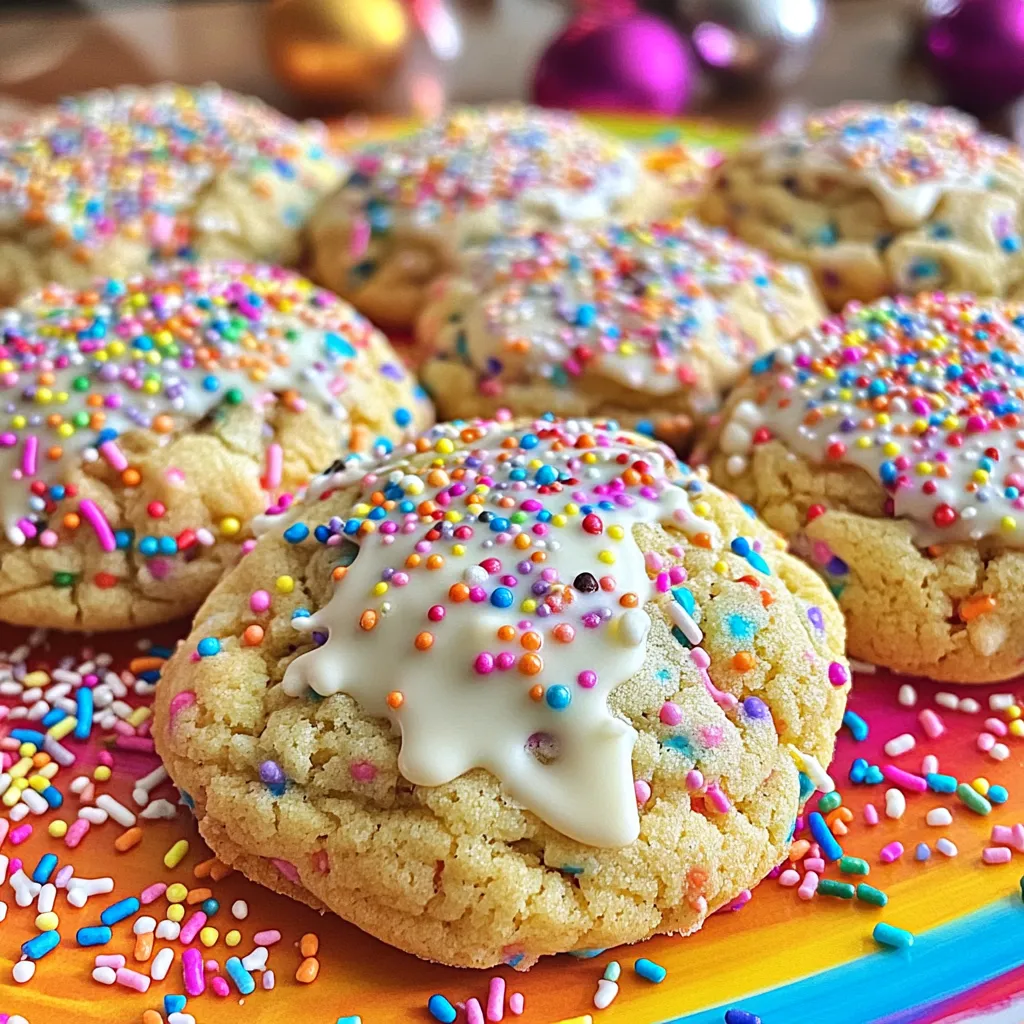
Are you ready to bake something fun and special? Funfetti Birthday Cake Cookies are a sweet treat that will impress

To make Garlic Butter Lemon Cod, you need a few simple ingredients. Each one adds to the flavor and charm of this dish. Here’s what you will need: - 4 cod fillets (about 6 ounces each) - 4 tablespoons unsalted butter - 4 cloves garlic, minced - 1 lemon (zested and juiced) - Salt and pepper to taste - 1 teaspoon dried parsley (or 2 tablespoons fresh parsley, chopped) - Lemon slices for garnish - Fresh parsley for garnish These ingredients come together to create a bright and rich flavor. Cod is a mild fish that takes on flavors well. The unsalted butter adds creaminess. Garlic gives a punch of taste, while lemon brings brightness. Salt and pepper are key for enhancing all the flavors. Parsley adds a fresh note, making the dish look beautiful. You can find all these ingredients at your local store. Using fresh lemon and parsley makes a big difference. They add a vibrant touch to your cod. This simple list allows you to create a dish that impresses without stress. Enjoy cooking! 1. Preheat the oven. Set your oven to 375°F (190°C). This ensures even cooking. 2. Melt butter and sauté garlic. In a small saucepan, melt four tablespoons of unsalted butter over medium heat. Add four minced garlic cloves. Sauté for one to two minutes until the garlic smells great. Be careful not to burn it. 3. Combine lemon juice and zest. Take one lemon. Zest it first, then juice it. Mix the lemon juice and zest into the butter and garlic. Add salt, pepper, and one teaspoon of dried parsley. This mix will add flavor to the cod. 1. Season and place cod in baking dish. Take four cod fillets, about six ounces each. Season both sides with salt and pepper. Place them in a baking dish. 2. Pour garlic butter mixture over cod. Drizzle the garlic butter lemon mix over the cod fillets. Make sure each piece is covered well. This adds taste and moisture. 3. Bake and optionally broil for finishing. Bake the cod in the preheated oven for 15 to 20 minutes. The fish should flake easily with a fork. For a golden top, broil for the last two to three minutes. Keep a close watch to avoid burning. Enjoy your delicious Garlic Butter Lemon Cod! To make sure your cod is flaky and tender, follow these steps: - Start with fresh cod fillets. Fresh fish gives the best taste and texture. - Do not overcook the cod. Bake it until it flakes easily with a fork. - Use a meat thermometer. The fish should reach 145°F (63°C) for safety. The right baking temperature is key. Preheat your oven to 375°F (190°C) for even cooking. This temperature allows the fish to cook through without burning. To add more flavor, try these spices and herbs: - A pinch of paprika adds a nice kick. - Fresh dill pairs well with lemon and fish. - A dash of red pepper flakes can give it a bit of heat. For side dishes, I recommend these options: - Steamed broccoli brings color and nutrition. - A simple green salad with lemon vinaigrette is refreshing. - Rice or quinoa absorbs the tasty garlic butter sauce well. {{image_2}} You can try different methods to make garlic butter lemon cod. Each method gives a unique taste and texture. - Pan-seared garlic butter lemon cod: Start by heating a skillet over medium heat. Add butter and let it melt. Place the seasoned cod fillets in the skillet. Cook for about 4-5 minutes on each side until golden brown and flaky. This method adds a nice crust to the fish. - Grilled cod with garlic butter: Preheat your grill to medium heat. Brush the cod with garlic butter and season well. Place the fillets on the grill. Cook for about 5-6 minutes per side. This adds a smoky flavor that pairs well with lemon. You can switch up some ingredients based on what you have at home. - Alternative fish options: If you can't find cod, use tilapia or haddock. These fish cook similarly and absorb flavors well. - Dairy-free butter alternatives: For a dairy-free option, use coconut oil or vegan butter. They work well in this recipe and maintain a rich flavor. To store leftover garlic butter lemon cod, place it in an airtight container. Make sure to seal it well to keep out air. You can keep it in the fridge for up to three days. If you want it to last longer, consider freezing it. Wrap the cod tightly in plastic wrap, then place it in a freezer bag. Frozen cod can last about three months. When reheating cod, you want to keep it moist. The best way to do this is in the oven. Preheat your oven to 300°F (150°C). Place the cod in a baking dish and cover it with foil. This keeps the moisture in. Heat it for about 10-15 minutes, or until warmed through. You can also use a microwave, but be careful. Heat it in short bursts, checking often to avoid drying it out. Bake cod for 15 to 20 minutes at 375°F. The fish is done when it flakes easily. You want to check it at 15 minutes. If it looks opaque and flakes with a fork, it is ready. Yes, you can use frozen cod fillets. Just thaw them before cooking. If you cook them from frozen, add a few extra minutes to the baking time. Always check for doneness to ensure they are fully cooked. Serve garlic butter lemon cod with steamed veggies or a fresh salad. Rice or couscous also pairs well. For a heartier meal, add some crusty bread to soak up the sauce. You can also try roasted potatoes for a comforting side. You now know how to make tasty garlic butter lemon cod. Remember the key steps: preheat, sauté, season, and bake. Use fresh ingredients for the best flavor. Try different cooking methods or substitute fish for variety. Store your leftovers properly to keep them fresh and delicious. Cooking can be fun and satisfying. Enjoy sharing this dish with friends or family!

Garlic Butter Lemon Cod Simple and Flavorful Dish

If you’re looking for a quick, tasty meal, Garlic Butter Lemon Cod is your answer. This dish bursts with flavor,

To make a tasty Cajun Chicken Rice Skillet, you need some key items. Gather these ingredients: - 1 lb chicken breast, diced - 1 cup long-grain rice - 1 medium onion, chopped - 1 bell pepper (red or green), diced - 3 cloves garlic, minced - 1 can (14 oz) diced tomatoes (with juices) - 2 cups chicken broth These items form the heart of the dish. The chicken gives protein, while the rice makes it filling. The onion, bell pepper, and garlic add flavor and color. The right spices make your dish shine. You will need: - 2 tablespoons Cajun seasoning - 1 teaspoon dried thyme - 1 teaspoon paprika - 1/2 teaspoon cayenne pepper (adjust to taste) - Salt and pepper to taste Cajun seasoning brings a warm, spicy kick. Thyme and paprika add depth, while cayenne boosts heat. Adjust the cayenne to match your taste. Finishing touches bring the dish to life. Consider these garnishes: - 2 green onions, chopped - Fresh parsley, chopped These fresh herbs add color and a pop of flavor. Plus, they make your skillet look even more inviting. Enjoy your meal! To make a Cajun chicken rice skillet, you will cook the chicken, sauté vegetables, add rice, and simmer everything together. This dish is quick and full of flavor. You can enjoy it on a busy weeknight or for a cozy family dinner. First, heat the olive oil in a large skillet over medium-high heat. Add 1 pound of diced chicken breast. Season it with salt, pepper, and half of the Cajun seasoning. Cook the chicken for about 5 to 7 minutes. Make sure it gets browned and cooked through. Then, remove the chicken from the skillet and set it aside. This step gives the chicken a nice flavor. In the same skillet, add 1 chopped medium onion, 1 diced bell pepper, and 3 cloves of minced garlic. Sauté these for 3 to 4 minutes. You want the vegetables to soften and release their flavors. This mix adds great taste to your dish. Next, stir in 1 cup of long-grain rice, the remaining Cajun seasoning, 1 teaspoon of dried thyme, 1 teaspoon of paprika, and 1/2 teaspoon of cayenne pepper. Toast the rice for 2 minutes while stirring. This helps the rice absorb all the flavors. After that, add 1 can of diced tomatoes with their juices and 2 cups of chicken broth. Bring this to a boil. Then, return the cooked chicken to the skillet and stir everything together. Now, reduce the heat to low and cover the skillet. Let it simmer for about 20 minutes. Check it now and then to prevent sticking. The rice will absorb most of the liquid and become tender. Once done, remove it from the heat. Let it sit covered for another 5 minutes. Fluff the rice with a fork, and taste for seasoning. Adjust if needed. Finally, serve it hot, garnished with chopped green onions and parsley. Enjoy your meal! To boost the taste of your Cajun Chicken Rice Skillet, use fresh herbs. Fresh thyme and parsley add bright notes. You can also squeeze some lemon juice before serving. This adds a nice tang. Don't skip the Cajun seasoning; it brings that classic kick. For an extra layer, try smoked paprika instead of regular. For fluffy rice, rinse it under cold water before cooking. This removes excess starch. Use a 2:1 ratio of broth to rice for the best texture. Let the rice simmer gently. Do not lift the lid too often, as it releases steam. After cooking, let it sit covered for five minutes. This helps the rice finish cooking and absorb flavors. Garnish your dish with chopped green onions and parsley for color. You can also add sliced jalapeños for heat. A dollop of sour cream can cool down the spice. For a fun twist, try crumbled feta or goat cheese. These add creaminess and a unique flavor. {{image_2}} You can make a tasty vegetarian version by swapping out chicken. Use hearty veggies like zucchini, mushrooms, and carrots. I suggest adding more beans for protein. Black beans or kidney beans work well. Just cook the veggies until soft and mix in the rice as usual. You can still use the same Cajun spices to keep the bold flavor. For a seafood twist, try shrimp or scallops. Cook them until they turn pink and firm. Add them in the last few minutes of cooking so they don’t overcook. If you prefer sausage, andouille sausage is a great choice. Slice it and cook it with the chicken for added flavor. Either option gives a new spin to your skillet meal. If you want to switch up the grain, consider using quinoa or farro. Both add a nice texture and flavor. Quinoa cooks faster, so adjust the liquid and cooking time. Farro takes longer, so you may want to cook it separately first. Either way, these grains bring a healthy twist to your Cajun dish. Store your leftover Cajun chicken rice skillet in an airtight container. Let it cool first. Place it in the fridge within two hours of cooking. Properly stored, it lasts about 3-4 days. Always label your container with the date for easy tracking. To reheat, use the microwave or a skillet. If using a microwave, put a portion in a bowl and cover it. Heat for 1-2 minutes, stirring halfway. If using a skillet, add a splash of broth or water. Heat over medium heat, stirring until hot. You can freeze Cajun chicken rice skillet for later use. First, let it cool completely. Then, transfer it to a freezer-safe container. It keeps well for up to three months. To thaw, move it to the fridge overnight. Reheat as directed above. Yes, you can use brown rice. It takes longer to cook, about 45 minutes. You will need to add more broth. Use 2.5 cups of broth for brown rice. To reduce spice, cut back on cayenne pepper. You can also add sour cream or yogurt. These will help cool down the heat and add creaminess. Leftovers can last up to 3-4 days in the fridge. Store them in an airtight container. Make sure they cool down before sealing. Yes, this dish is great for meal prep. It reheats well and keeps its flavor. Portion it out in individual containers for easy meals. You can make it in advance. Cook it and let it cool. Store it in the fridge for up to 3 days or freeze it for longer storage. Just reheat before serving. This blog shared key ingredients, cooking steps, and storage tips for Cajun Chicken Rice Skillet. You learned how to enhance flavors and explore variations, like vegetarian options or adding seafood. Remember to store leftovers correctly and reheat them safely. Making this dish easy to prepare allows you to enjoy great meals. Embrace your kitchen skills, and try these ideas today!

Cajun Chicken Rice Skillet Easy and Flavorful Meal

Looking for an easy and tasty dinner idea? This Cajun Chicken Rice Skillet hits the spot! Packed with flavor, it

To make a Chocolate Peanut Butter Mug Cake, gather these simple ingredients: - 4 tablespoons all-purpose flour - 2 tablespoons unsweetened cocoa powder - 3 tablespoons granulated sugar - 1/4 teaspoon baking powder - A pinch of salt - 3 tablespoons milk (dairy or non-dairy) - 2 tablespoons creamy peanut butter - 1 tablespoon vegetable oil - 1/2 teaspoon vanilla extract - Optional: chocolate chips for topping These ingredients blend together to create a rich, tasty dessert in just a few minutes. The flour gives structure, while cocoa adds deep chocolate flavor. Sugar brings sweetness, and baking powder makes the cake rise. A pinch of salt balances the taste. You can use any type of milk you like, whether it’s dairy or a plant-based option. Creamy peanut butter adds a nutty richness that pairs perfectly with chocolate. The vegetable oil keeps the cake moist, and vanilla extract enhances the overall flavor. Optional chocolate chips can make this treat even more indulgent. You can customize the recipe to fit your taste. Have fun mixing and matching! First, grab a large microwave-safe mug. Add 4 tablespoons of all-purpose flour, 2 tablespoons of unsweetened cocoa powder, 3 tablespoons of granulated sugar, 1/4 teaspoon of baking powder, and a pinch of salt. Use a fork to mix these dry ingredients well. Make sure there are no lumps. This step helps the mug cake rise evenly. Next, add the wet ingredients. Pour in 3 tablespoons of milk, 2 tablespoons of creamy peanut butter, and 1 tablespoon of vegetable oil. Also, add 1/2 teaspoon of vanilla extract for flavor. Stir the mixture until it is smooth. You want everything combined well. This ensures a rich, tasty cake. Place the mug in the microwave. Cook on high for 30 to 40 seconds. Keep a close eye on it. The cooking time may change based on your microwave's wattage. The cake should puff up and look set when it's done. Let it cool for a minute or two before you dig in. The mug will be hot, so be careful! To make the best chocolate peanut butter mug cake, mix your dry ingredients first. Combine the flour, cocoa powder, sugar, baking powder, and salt in a large mug. Use a fork to break up any lumps. This step is key for a smooth cake. Next, add the wet ingredients. Pour in the milk, creamy peanut butter, vegetable oil, and vanilla extract. Stir until the batter is smooth and well mixed. Avoid over-mixing, as that can make the cake tough. Cooking time can change based on your microwave's wattage. Most microwaves cook at 700-1200 watts. Start with 30 seconds, then check. If the cake isn’t set, add 10-second bursts until it's done. The cake should puff up and look firm. Get creative with toppings! A scoop of ice cream or a dollop of whipped cream works great. You can also add fresh fruit like bananas or strawberries. For a crunchy texture, sprinkle some chopped nuts on top. I recommend serving your mug cake warm. It tastes best right after cooking. If you let it cool, the texture may change. Just be careful; it will be hot right out of the microwave! Want to change things up? You can add 1 tablespoon of your favorite nut butter for a twist. Almond butter or cashew butter can add a unique taste. If you like it sweeter, increase the sugar by a tablespoon. You can also add a dash of cinnamon for extra warmth. Just remember, small changes can make a big difference in flavor! {{image_2}} You can change the flavor of your mug cake easily. Try using different nut butters. Almond butter or cashew butter adds a nice twist. You can also add spices like cinnamon for warmth. Just a pinch can change the whole taste. If you want a gluten-free version, swap all-purpose flour for almond or coconut flour. These flours work well and keep your cake light. For a vegan-friendly option, use plant-based milk and skip the egg. You can even use flaxseed meal mixed with water as an egg substitute. Get creative with add-ins and toppings. Use dark or white chocolate instead of regular chocolate chips. They give a rich flavor. You can also add fruits like sliced bananas or fresh berries. These fruits add sweetness and moisture. Mix and match to find your favorite combination! To store leftover mug cake, let it cool first. Cover it tightly with plastic wrap or transfer it to an airtight container. This keeps it fresh for up to two days in the fridge. When you're ready to enjoy it again, just pop it in the microwave for 10 to 15 seconds. Check if it's warm enough. If not, heat for a few more seconds. Yes, you can freeze mug cake! To freeze it, let the cake cool completely. Wrap it tightly in plastic wrap. Then, place it in a freezer bag or container. It will stay good for up to a month. When you're ready to eat, take it out and let it thaw in the fridge overnight. Then, warm it in the microwave for 20 to 30 seconds to enjoy. For dry ingredients like flour and cocoa powder, keep them in a cool, dry place. Use airtight containers to avoid moisture. This keeps them fresh for a long time. For peanut butter and other wet ingredients, store them in the fridge after opening. This helps maintain their flavor and texture. Always check the label for specific storage tips. Yes, you can make this mug cake vegan. To replace the milk, use any non-dairy milk like almond or soy milk. For the creamy peanut butter, you can keep it as is since it’s already vegan. You don’t need to use eggs in this recipe, so it is naturally egg-free. If you don’t have a microwave, you can still enjoy this mug cake. You can bake it in an oven. Preheat your oven to 350°F (175°C). Pour the batter into a small oven-safe dish instead of a mug. Bake for about 15 to 20 minutes. Check it often to avoid overcooking. To check if your mug cake is done, look for a few signs. The cake should puff up and look set on top. You can also insert a toothpick in the center. If it comes out clean or with a few moist crumbs, your cake is ready. Let it cool for a minute before tasting. This blog post covered how to make a quick and easy mug cake. We looked at all the ingredients, step-by-step instructions, and tips for perfecting your cake. You can also explore fun variations and storage options. Now, you can enjoy a delicious treat in minutes. With just a few simple steps, you can impress your friends or enjoy a cozy night in. It's easy and fun to customize, so get creative!

Chocolate Peanut Butter Mug Cake Easy Dessert Recipe

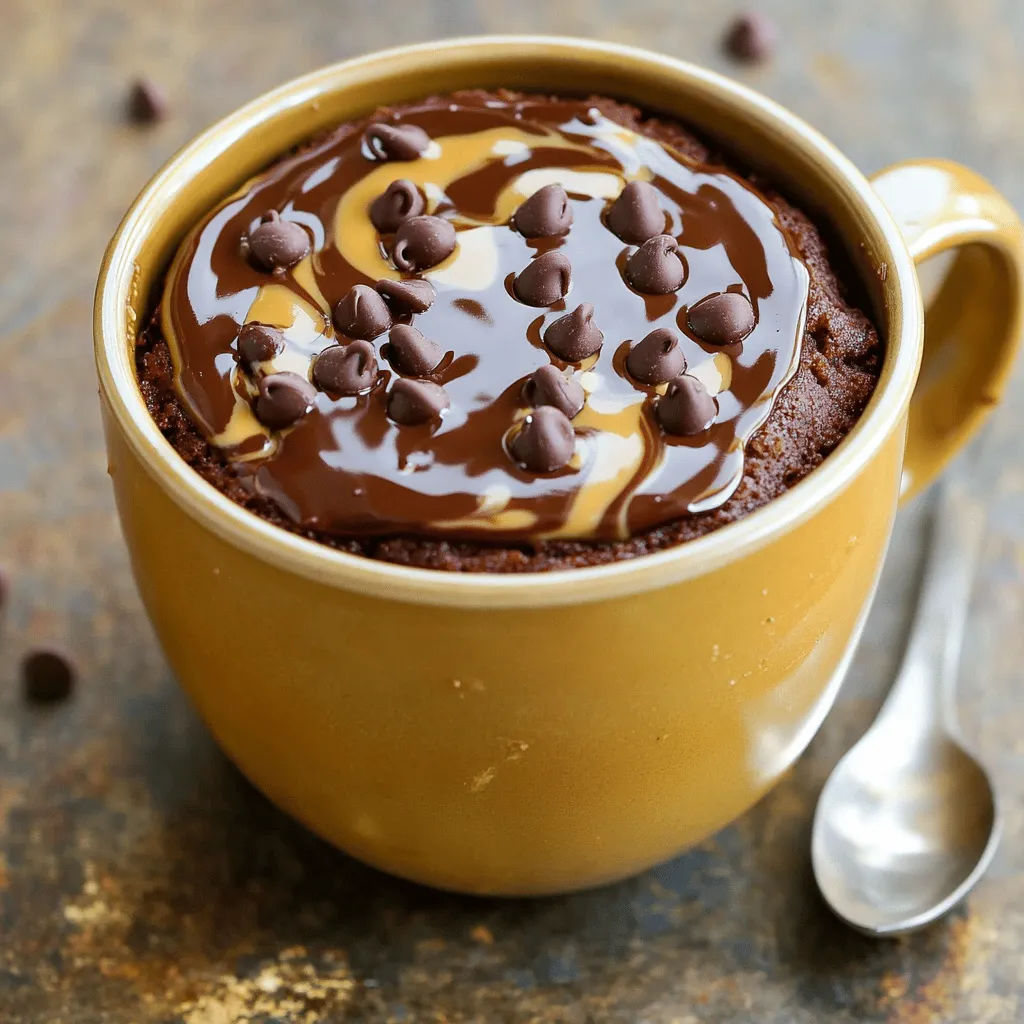
Craving something sweet? You’re in luck! This Chocolate Peanut Butter Mug Cake is super easy and quick to make. With

- 1 cup orzo pasta - 2 cups vegetable broth - 1 cup heavy cream (or coconut cream) - 1/2 cup basil pesto - 1 cup cherry tomatoes, halved - 1/2 cup frozen peas - 1/4 cup grated Parmesan cheese (or nutritional yeast) - 2 tablespoons olive oil - Salt and pepper to taste - Fresh basil leaves for garnish The main ingredients in this recipe create a creamy and tasty dish. The orzo pasta serves as a perfect base, soaking up flavors from the broth and cream. Vegetable broth adds a rich taste without meat. Heavy cream makes the dish extra rich and smooth. You can use coconut cream for a dairy-free choice. Basil pesto gives a burst of fresh flavor and aroma, making this dish shine. The additional ingredients bring color and nutrition. Cherry tomatoes add a sweet burst and a pop of color. Frozen peas add a bright green touch and a bit of sweetness. Parmesan cheese or nutritional yeast adds a savory finish. Olive oil helps toast the orzo and adds healthy fats. Seasoning is key. Salt and pepper bring out all the flavors. Fresh basil leaves add a lovely touch when you serve the dish. They make it look pretty and taste fresh. Enjoy creating this simple yet delightful meal! - Heat 2 tablespoons of olive oil in a large pot over medium heat. - Add 1 cup of orzo pasta and toast for about 2-3 minutes until slightly golden. - Pour in 2 cups of vegetable broth and bring it to a boil. - Reduce the heat to a simmer and cook the orzo for 8-10 minutes. Stir occasionally until the orzo is al dente. - Once the orzo is cooked, stir in 1 cup of heavy cream and 1/2 cup of basil pesto. Mix until creamy and smooth. - Add 1 cup of halved cherry tomatoes and 1/2 cup of frozen peas. Cook for an additional 2-3 minutes until the vegetables are heated. - Stir in 1/4 cup of grated Parmesan cheese (or nutritional yeast) and season with salt and pepper to taste. - Remove the pot from heat and let it sit for a couple of minutes to thicken. - Garnish with fresh basil leaves before serving. To make your orzo perfectly al dente, watch the cooking time. Boil the orzo in vegetable broth for about 8-10 minutes. Stir it often to prevent sticking. Taste it a minute before the time is up. It should be firm but not hard. For creaminess, you can choose different types of cream. Heavy cream gives a rich taste. If you prefer a lighter dish, coconut cream works great too. It adds a subtle sweetness. Pair your creamy pesto orzo with a fresh salad. A simple green salad with lemon dressing complements the dish well. You can also serve it with crusty bread. This adds a nice crunch and is perfect for dipping. For toppings, consider adding sliced olives or toasted pine nuts. They add a delightful texture and extra flavor. Fresh herbs like parsley or chives can also brighten the dish. Want to add more depth? Try adding minced garlic or chopped onion when you toast the orzo. This step gives a wonderful aromatic base. It makes your dish even more inviting. Using homemade pesto is a fantastic choice if you have time. It allows you to control the flavor. Store-bought pesto is still great if you’re short on time. Just make sure to taste and adjust as needed. {{image_2}} If you want a dairy-free dish, use coconut cream instead of heavy cream. Nutritional yeast works great instead of Parmesan cheese. If you need gluten-free options, there are different types of orzo made from rice or corn. These alternatives keep the dish tasty while meeting your diet needs. You can customize this dish with seasonal vegetables. Try adding zucchini, bell peppers, or spinach to boost flavor and nutrition. You can swap the pesto too. Sun-dried tomato pesto adds a rich, tangy twist. This allows you to create new tastes while keeping the dish simple. If you have more guests, you can easily scale up the recipe. Just double the ingredients for a larger crowd. For leftovers, store them in an airtight container in the fridge. They will stay fresh for about three days. You can also freeze portions for future meals, making dinner planning easier. To keep your One-Pot Creamy Pesto Orzo fresh, refrigerate it within two hours. Use an airtight container to prevent air from drying it out. Glass or BPA-free plastic containers work well. Label the container with the date for easy tracking. You can store leftovers for up to three days. When reheating, add a splash of broth or cream. This helps maintain creaminess. Heat it gently on the stove over low heat. Stir often to avoid sticking. If using a microwave, heat in short bursts. Stir between intervals to ensure even heating. Overcooking can make orzo mushy, so watch closely. Yes, you can freeze this dish! To freeze, let it cool completely. Then, transfer it to a freezer-safe container. Leave some space at the top for expansion. It can last for up to three months in the freezer. To thaw, place it in the fridge overnight. Reheat it on the stove, adding a bit of liquid for creaminess. Can I make this dish vegan? Yes, you can make this dish vegan. Use coconut cream instead of heavy cream. Swap grated Parmesan for nutritional yeast. Both choices keep the creamy texture while adding flavor. What can I substitute for orzo? If you can't find orzo, use any small pasta. Options include ditalini, orzo-shaped couscous, or even quinoa. Each will give a unique twist to the dish. How long does one-pot creamy pesto orzo last in the fridge? One-pot creamy pesto orzo lasts about 3 to 5 days in the fridge. Make sure to store it in an airtight container. This keeps it fresh and tasty. Can I add protein to this dish? Absolutely! You can add cooked chicken, shrimp, or chickpeas for protein. Just toss them in when you add the cherry tomatoes and peas. How can I enhance the flavor beyond pesto? To boost flavor, add garlic or sautéed onions. A squeeze of lemon juice can brighten the dish too. Try mixing in herbs like parsley or thyme for extra depth. What are some creative serving options? Serve this dish in bowls or on plates. Garnish with fresh basil leaves for color. You can also add a sprinkle of nuts for crunch. Pair with a side salad for balance. This blog post covered how to make a creamy pesto orzo dish. We explored main ingredients, cooking steps, and storage tips. I shared methods for variations, including dietary needs and serving recommendations. Remember, this recipe is flexible. You can make it your own with different veggies or flavors. Enjoy cooking and sharing this dish with others!

One-Pot Creamy Pesto Orzo Delightful and Simple Dish

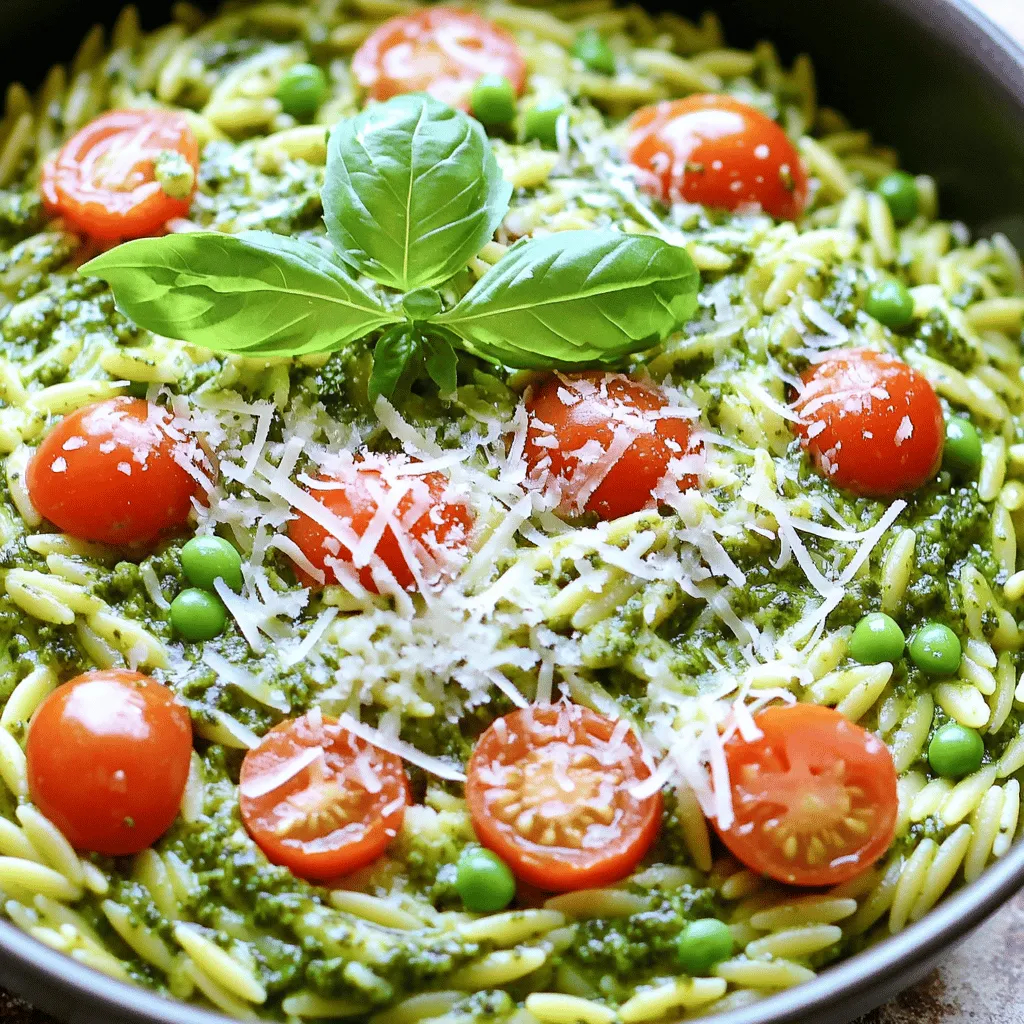
Looking for a quick and tasty dinner? This One-Pot Creamy Pesto Orzo is your answer! In just a few simple

To make Chipotle Honey Chicken Thighs, you need a few key ingredients: - 4 bone-in, skin-on chicken thighs - 2 tablespoons chipotle peppers in adobo sauce, minced - 3 tablespoons honey - 2 tablespoons olive oil - 4 cloves garlic, minced - 1 teaspoon smoked paprika - 1 teaspoon cumin - Salt and pepper to taste These items come together to create a rich flavor. The chicken thighs stay juicy while cooking. You can add some optional ingredients for extra taste: - A squeeze of fresh lime juice - Fresh herbs like oregano or thyme - A dash of cayenne pepper for heat These additions can boost the overall flavor. Experimenting can lead to your perfect mix. When serving, I love to garnish my dish with: - Fresh cilantro, chopped - Lime wedges These garnishes not only add color but also enhance the taste. They give a refreshing touch to each bite. {{ingredient_image_1}} To start, grab a large bowl. In this bowl, mix 2 tablespoons of minced chipotle peppers with 3 tablespoons of honey. Add 2 tablespoons of olive oil and 4 minced garlic cloves. Then, sprinkle in 1 teaspoon of smoked paprika and 1 teaspoon of cumin. Season with salt and pepper to taste. Stir this mix well. This marinade gives the chicken a sweet and spicy flavor. Next, take your 4 bone-in, skin-on chicken thighs. Add them to the bowl with the marinade. Make sure every piece is well-coated. Cover the bowl with plastic wrap. Place it in the fridge for at least 30 minutes. If you have more time, let it marinate for up to 2 hours. This step is key. It fills the chicken with flavor. You can cook the chicken in two ways: grilling or baking. If you choose grilling, preheat your grill to medium heat. Remove the chicken from the marinade and shake off the extra sauce. Place the thighs skin-side down on the grill. Cook them for about 6-8 minutes per side. Use a meat thermometer to check the inside. It should reach 165°F. If you prefer baking, preheat your oven to 375°F (190°C). Place the chicken thighs skin-side up in a baking dish. Bake for 35-40 minutes. The skin should be crispy and the chicken fully cooked. Let the chicken rest for 5 minutes once done. This helps keep it juicy. To get the best flavor, use fresh ingredients. Fresh garlic and cilantro make a big difference. The chipotle peppers add heat and depth. Honey balances the spiciness with sweetness. Marinade the chicken for at least 30 minutes. For more flavor, marinate for up to 2 hours. This lets the spices soak into the meat. For crispy skin, start with bone-in, skin-on thighs. These have more fat, which helps crisp up while cooking. When you grill, place the chicken skin-side down first. This helps render the fat out. If baking, use a high heat of 375°F (190°C). Don't cover the chicken while it cooks. This keeps the skin dry and lets it crisp up. Resting the chicken thighs is key to juicy meat. After cooking, let them rest for 5 minutes. This allows the juices to redistribute. Cutting into them too soon can release the juices. You want every bite to be moist and flavorful. Use this time to prepare the garnish and lime wedges. Enjoy your perfectly cooked chicken! Pro Tips Marination Time: For the best flavor, marinate the chicken thighs for at least 2 hours, or even overnight if you have the time. Grill Temperature: Make sure your grill is preheated to medium heat to ensure even cooking and crispy skin. Internal Temperature: Always check the internal temperature with a meat thermometer; chicken should reach 165°F (75°C) for safe consumption. Resting Period: Let the chicken rest for at least 5 minutes after cooking to allow the juices to redistribute for maximum tenderness. {{image_2}} To kick up the heat, add more chipotle peppers. You can double the amount to really feel the spice. If you want extra flavor, mix in a teaspoon of cayenne pepper. This will give you a delightful kick. Adjust the honey based on your heat level. More honey will soften the spice for a nice balance. You can cook the chicken thighs in different ways. If you prefer not to grill, bake them in the oven. Set your oven to 375°F (190°C). Place the thighs in a dish skin-side up. Bake for 35-40 minutes until they are crispy. You can also use an air fryer. Cook at 380°F (193°C) for about 25 minutes. Each method gives you juicy chicken with great flavor. Serve your chicken thighs with lime wedges for a fresh taste. You can also add a sprinkle of chopped cilantro for color. Pair it with grilled veggies or a light salad for a complete meal. If you want something heartier, serve it with rice or warm tortillas. This dish works well for casual dinners or special occasions. To store leftover chicken thighs, let them cool first. Place the chicken in an airtight container. You can also wrap them tightly in plastic wrap. Keep the chicken in the fridge for up to four days. This keeps it fresh and safe to eat. When reheating, use the oven or stovetop for the best taste. If using the oven, preheat it to 350°F (175°C). Place the chicken on a baking sheet. Heat for about 15 minutes or until warm. You can also reheat in a skillet over medium heat. Add a splash of water to keep it moist. You can freeze the chicken for longer storage. Wrap each piece well in plastic wrap. Then, place them in a freezer bag. This keeps out air and prevents freezer burn. Chicken can last in the freezer for up to three months. When ready to use, thaw it in the fridge overnight. You can use smoked paprika as a milder option. It gives a nice smoky flavor. You can also try jalapeño peppers for heat without the smoke. For a sweet touch, add some cayenne pepper. Each choice changes the taste, so pick what you like best. Yes, boneless chicken thighs work great too. They cook faster, so check them often. Boneless thighs stay juicy and tender, just like bone-in. Adjust cooking time to about 20-25 minutes if baking. If grilling, cook them for 5-6 minutes per side. Use a meat thermometer to check the chicken. The internal temperature should reach 165°F (75°C). If you don’t have a thermometer, cut into the thickest part. The juices should run clear, not pink. This helps ensure your chicken is safe to eat. Many sides go well with this dish. Grilled vegetables add a fresh touch. A simple salad with lime dressing is also nice. You could serve rice or quinoa for a filling meal. Corn on the cob is a fun side too. Choose what you love! In this post, we covered the ingredients and steps for making Chipotle Honey Chicken Thighs. You learned about key flavors, cooking methods, and tips for crispy skin. I also shared variations and storage tips for leftovers. Cooking these chicken thighs can be fun and tasty. Remember to use quality ingredients and follow the steps closely. Enjoy your delicious meal with great sides and company! Happy cooking!

Chipotle Honey Chicken Thighs Savory and Easy Recipe

Are you ready to spice up your dinner table? This Chipotle Honey Chicken Thighs recipe combines sweet and smoky flavors

- 3 cups rolled oats - 1 cup nuts (almonds, walnuts, or pecans), chopped - 1 cup shredded coconut (unsweetened) The main ingredients form the heart of your granola. Rolled oats provide a sturdy base. They add fiber and a nice chewy texture. Nuts bring crunch and healthy fats. You can choose almonds for a sweet flavor, walnuts for a rich taste, or pecans for a buttery touch. Unsweetened shredded coconut enhances the tropical vibe and adds a subtle sweetness. - 1/2 cup maple syrup - 1/4 cup coconut oil, melted - 1 teaspoon vanilla extract The wet ingredients bind everything together. Maple syrup is the star here, giving a sweet and rich flavor. Coconut oil adds healthy fats and a hint of coconut taste. Vanilla extract rounds out the flavor profile. It makes your granola smell amazing while baking. - 1/2 teaspoon salt - 1/2 teaspoon ground cinnamon - 1/2 cup dried fruit (raisins, cranberries, or apricots) Spices bring warmth to your granola. Salt balances out the sweetness. Ground cinnamon adds a cozy flavor that pairs well with the oats. Dried fruit adds a pop of color and chewiness. Raisins, cranberries, or apricots offer different flavors and nutrients. You can mix and match to find your favorite combo. With these ingredients, you create a delicious and crunchy granola that is perfect for breakfast or snacking. Each bite delivers flavors and textures that make you want more! 1. Preheat your oven to 350°F (175°C). This helps the granola bake evenly. 2. Line a baking sheet with parchment paper. This makes cleanup easy. 3. In a large bowl, mix the rolled oats, chopped nuts, shredded coconut, salt, and ground cinnamon. Stir until well combined. 1. In another bowl, whisk together the maple syrup, melted coconut oil, and vanilla extract. Mix until it is smooth. 2. Pour the wet mix over the dry ingredients. Stir well to coat all the oats and nuts. 1. Spread the granola mixture on the lined baking sheet. Press it down lightly for an even layer. 2. Bake for about 20-25 minutes. Halfway through, stir the mix to help it brown evenly. Watch closely to avoid burning. It should turn golden and smell amazing. 3. After baking, take it out and let it cool completely on the sheet. This cooling step is key; it makes the granola crunchy. 4. Once cooled, mix in your favorite dried fruit. Store the granola in an airtight container for later. To keep your granola crunchy, the cooling process is key. After baking, let it cool completely on the baking sheet. This step allows the granola to harden. If you want extra crunch, bake it a bit longer. Just watch it closely. You don’t want to burn it. If you prefer different nuts, feel free to swap them out. Almonds, walnuts, and pecans work great. You can also use sunflower seeds or pumpkin seeds if you need nut-free options. For coconut, shredded and unsweetened offers a nice texture. If you don’t have shredded coconut, try using coconut flakes or even omit it altogether. Granola is super versatile. You can top it with fresh fruits like berries or bananas. It pairs well with yogurt, making a tasty breakfast or snack. You can also sprinkle it over desserts like ice cream or smoothie bowls for added crunch and sweetness. {{image_2}} You can play with the flavors in your granola. Try adding chocolate chips for a sweet twist. Dark chocolate pairs nicely with the maple flavor. You can also add spices like nutmeg or ginger for warmth. For a seasonal touch, mix in dried pumpkin or apple pieces in the fall. These fruits bring a festive flair. If you need gluten-free granola, use certified gluten-free oats. This way, everyone can enjoy it. For a vegan version, replace honey with maple syrup. This keeps the sweetness and stays plant-based. You can also skip the nuts to avoid allergies. Just add more seeds or oats to keep it crunchy. Adjust the maple syrup to your taste. If you like it less sweet, use half the amount. You can also try other sweeteners. Honey or agave syrup works well too. For a low-calorie option, consider using stevia or monk fruit sweetener. These keep the sweetness without the calories. To keep your homemade granola fresh, use an airtight container. Glass jars or plastic bins work well. Store the granola in a cool, dry place. This keeps moisture out and maintains its crunch. Your granola can last for about two weeks at room temperature. If you want it to last longer, consider freezing it. To keep granola crunchy, avoid exposing it to air. After opening, seal it tightly. If granola starts to soften, you can re-crisp it. Just spread it on a baking sheet and bake at 300°F (150°C) for about 10 minutes. Let it cool before storing again. You can also freeze granola for up to three months. Just place it in a freezer-safe bag or container. When ready to eat, let it thaw in the fridge. Enjoy your crunchy treat any time! To make granola clump together, use enough wet ingredients. The maple syrup and coconut oil help bind the oats. Press the mixture firmly on the baking sheet before baking. This step makes clumps form better. Stir gently halfway through baking to keep clumps intact. Let it cool completely before breaking it apart. Yes, you can use different nuts! Here are some great options: - Almonds - Walnuts - Pecans - Cashews - Hazelnuts Feel free to mix and match your favorite nuts. Each nut adds its unique flavor and crunch. If you don't have maple syrup, here are some alternatives: - Honey - Agave nectar - Brown rice syrup - Coconut nectar These options will give you a sweet flavor. Choose what you like best or have on hand. This blog post covered how to make vanilla maple granola from start to finish. We explored key ingredients, mixing methods, and baking tips. You learned how to customize flavors and switch ingredients to suit your taste. Remember, the right ratios and cooling time give you that perfect crunch. Homemade granola is fun, healthy, and easy to store. Enjoy your tasty treats, and get creative with flavors! You now have the power to make your own delicious granola at home.

Vanilla Maple Granola Crunchy and Tasty Recipe

Are you ready to crunch your way to breakfast bliss? My Vanilla Maple Granola recipe is simple, tasty, and oh-so-satisfying.

- 2 chicken breasts, cooked and shredded - 1 cup shredded cheese (cheddar or Monterey Jack) - 1/4 cup chipotle peppers in adobo sauce, chopped - 1 small red onion, thinly sliced - 1 bell pepper (any color), sliced - 2 cloves garlic, minced - 4 large flour tortillas - 2 tablespoons olive oil - Salt and pepper to taste - Fresh cilantro, chopped (for garnish) - Serving Suggestions (sour cream and salsa) The ingredients for these quesadillas are simple yet full of flavor. You start with chicken. Cook two chicken breasts and shred them. This adds protein and heartiness. Next, grab some cheese. I love using cheddar or Monterey Jack for that gooey melt. Chipotle peppers are key here. They bring that spicy kick. Chop a quarter cup of these peppers in adobo sauce. The smoky flavor will wow your taste buds. Don't forget the vegetables. Slice a small red onion and a bell pepper. They add crunch and color. Garlic gives depth to the dish. Use two cloves, minced. For the tortillas, get four large flour ones. They wrap everything together nicely. Finally, you need olive oil for cooking and salt and pepper to taste. For garnish, fresh cilantro makes a lovely touch. Serve your quesadillas with sour cream and salsa on the side. This will make your meal even better! To start, heat 1 tablespoon of olive oil in a skillet over medium heat. Once the oil is hot, add the sliced red onion and bell pepper. Sauté these for about 5 to 7 minutes, until they soften. The smell will be amazing! Next, stir in the minced garlic. Cook for 1 to 2 more minutes until it is fragrant. After that, remove the mixture from the skillet and set it aside. In the same skillet, add the shredded chicken. Then, toss in the chopped chipotle peppers. Season this with salt and pepper. Cook on medium heat for 3 to 4 minutes. You want it heated through and coated with that spicy chipotle sauce. Remove it from heat when done. Now it’s time to build your quesadillas! Place one tortilla in the skillet over medium heat. On one half, sprinkle a layer of shredded cheese. On top of that, add some of the chicken mixture and the sautéed veggies. Then, sprinkle another layer of cheese on top of the fillings. Next, fold the tortilla in half. Cook for about 3 to 4 minutes or until the bottom is golden brown. The cheese should start melting. Carefully flip the quesadilla and cook the other side for another 3 to 4 minutes until it is golden brown too. Repeat this process with the rest of the tortillas and filling. When they are all cooked, remove them from the skillet. Let them cool for a minute, then cut them into wedges. Garnish with fresh cilantro for a pop of color! To get crispy quesadilla shells, heat your skillet first. Use medium heat and add a little olive oil. Place the quesadilla in the skillet. Cook until golden brown, then flip. Repeat for the other side. You want both sides crispy. For great cheese melting, use shredded cheese. Cheddar or Monterey Jack works well. Sprinkle cheese on the tortilla, then add the filling. Top with more cheese before folding. This helps the cheese melt perfectly and hold everything together. To boost flavor, try adding spices like cumin or smoked paprika. Fresh herbs like cilantro can also make a big difference. These extra touches add depth to your quesadilla. If you want more heat, add more chipotle peppers. Start with a little and taste as you go. You can always add more if you like it spicy! Serve your quesadillas on a nice platter. Cut them into wedges for easy sharing. Arrange them in a circle or stack them for a fun look. For garnishing, sprinkle fresh cilantro on top. You can also add a dollop of sour cream and a bowl of salsa on the side. This makes your dish pop and look even more appealing! {{image_2}} You can switch chicken for other proteins. Beef or shrimp works well in quesadillas. Just cook them until tender and add them to your mix. For a vegetarian option, try black beans or sautéed vegetables. Bell peppers, zucchini, or spinach add great flavor. These choices keep the dish tasty and satisfying. Cheese plays a key role in quesadillas. Cheddar offers a sharp taste, while Monterey Jack is creamy and mild. You can mix cheeses for a richer flavor. Try pepper jack for a spicy kick. Each cheese melts differently, so experiment to find your favorite blend. A well-melted cheese makes every bite delightful. You can add more to your quesadillas. Chopped tomatoes, corn, or mushrooms work well. Fresh herbs like cilantro add a burst of freshness. To dip, serve with guacamole or a zesty salsa. These extras make your meal more fun and delicious. Don't be afraid to get creative with your fillings! To keep your spicy chipotle chicken quesadillas fresh, store them in the fridge. First, let them cool down. Then, wrap each quesadilla tightly in plastic wrap or foil. You can also use an airtight container for storage. This helps keep moisture out and flavor in. For best results, eat leftovers within three days. After that, the taste and texture may fade. If you want to keep them longer, consider freezing them. Just remember to wrap them well. You can reheat quesadillas in many ways. The best method is using a skillet. Heat the skillet on medium. Place the quesadilla in it and cook for about 2-3 minutes on each side. This keeps them crispy and delicious. You can also use the oven. Preheat it to 350°F (175°C). Place the quesadillas on a baking sheet. Heat for about 10-15 minutes until warm. This method works well for multiple quesadillas at once. If you use a microwave, be careful. Place the quesadilla on a microwave-safe plate. Heat for 30 seconds, then check. Repeat until warm, but this method may make them soft. For crispy results, always use a skillet or oven. Enjoy your tasty leftovers! You can prepare the chicken mixture in advance. Cook and shred the chicken, then mix it with the chipotle peppers, salt, and pepper. Store this mixture in an airtight container in the fridge. When you're ready to eat, just assemble and cook the quesadillas. This saves time and makes a quick meal. Yes, you can freeze quesadillas. Wrap each one tightly in plastic wrap. Place the wrapped quesadillas in a freezer bag. They can stay frozen for up to three months. To reheat, cook from frozen on a skillet until heated through, flipping carefully. Quesadillas pair well with: - Fresh guacamole - Salsa or pico de gallo - A simple green salad - Refried beans These sides add flavor and balance to your meal. To add more heat, increase the amount of chipotle peppers. You can also add: - Jalapeños - Hot sauce - Red pepper flakes These options let you control the spice level to your taste. Yes, corn tortillas work well for quesadillas. They add a nice flavor and texture. Just keep in mind that they may be a bit more fragile. Use two corn tortillas for each quesadilla to prevent breakage. You’ve learned how to make tasty chipotle chicken quesadillas step by step. We began with key ingredients and moved on to cooking and assembling them. I shared tips to enhance flavor and the best ways to serve your quesadillas. You can even customize them with different proteins or cheeses. As you enjoy your creation, remember to experiment with flavors and ingredients. Happy cooking!

Spicy Chipotle Chicken Quesadillas Easy and Tasty Meal

Are you ready to spice up your dinner routine? These Spicy Chipotle Chicken Quesadillas are easy to make and packed

To make this dish, you need: - 2 heads of broccoli, cut into florets - 4 cloves of garlic, minced - 3 tablespoons olive oil - ½ teaspoon red pepper flakes (optional for spice) - ½ cup grated Parmesan cheese - Salt and pepper to taste - Zest of 1 lemon - 1 tablespoon fresh lemon juice - 2 tablespoons chopped fresh parsley (for garnish) These ingredients create a tasty and healthy side dish. The broccoli offers crunch and nutrients. Garlic adds a rich flavor. Olive oil helps the veggies roast nicely. You can enhance this dish with a few extras: - Red pepper flakes for heat - A squeeze of lemon juice for brightness - Fresh herbs like thyme or basil These optional ingredients can take your dish to the next level. They add layers of taste that make each bite exciting. If you lack any main ingredients, here are some swaps: - Use frozen broccoli instead of fresh. - Replace olive oil with avocado oil. - Swap Parmesan with nutritional yeast for a vegan version. These substitutions work well and keep your dish delicious. Don’t hesitate to get creative with what you have on hand! Start by washing the broccoli. Cut the heads into small florets. This helps them cook evenly. Then, take the garlic cloves and mince them finely. In a large bowl, mix the broccoli florets with the minced garlic. Add three tablespoons of olive oil. If you like some heat, toss in half a teaspoon of red pepper flakes. Season with salt and pepper to taste. Mix everything well until the broccoli is coated. Next, preheat your oven to 425°F (220°C). Line a baking sheet with parchment paper. Spread the broccoli mixture in a single layer on the sheet. This ensures even cooking. Roast the broccoli for 15 to 20 minutes. You want it tender with crisp edges. Keep an eye on it so it doesn’t burn. Once the broccoli is done, take it out of the oven. While it’s still hot, sprinkle half a cup of grated Parmesan cheese on top. This will melt beautifully. Return it to the oven for another 3 to 5 minutes. Take it out when the cheese is melted and bubbly. Drizzle with fresh lemon juice and sprinkle lemon zest and chopped parsley on top. These fresh flavors will brighten the dish. Serve it right away for a tasty side or snack. To get that perfect crispy broccoli, start by drying the florets well. Water on the broccoli causes steaming, not roasting. Toss your broccoli in olive oil, salt, and pepper. Spread them in a single layer on the baking sheet. This way, each piece has space to brown evenly. Keep an eye on them while roasting. Those crispy edges can turn quickly. Seasoning is key to great flavor. Use salt and pepper to taste, but don’t stop there! Add minced garlic for a rich taste. If you enjoy spice, toss in red pepper flakes. Make sure to mix everything well. This helps the flavors blend and coat each floret. After roasting, sprinkle with lemon juice and zest. This will brighten up the dish! You can make this dish even better with extra ingredients. Try adding some lemon zest for a fresh kick. Fresh herbs like parsley add color and taste. If you want a cheesy twist, mix in a bit of cheddar with the Parmesan. You can even add nuts like almonds or walnuts for crunch. These are simple ways to make your broccoli stand out. {{image_2}} To add heat, try spicy roasted garlic Parmesan broccoli. Just mix in ½ teaspoon of red pepper flakes to the broccoli and garlic before roasting. This kick makes the dish lively and fun. You can also sprinkle extra red pepper after cooking for more heat. Adjust the spice to fit your taste. If you want a vegan version, there are great options! Nutritional yeast is a perfect substitute for Parmesan. It adds a cheesy flavor without any dairy. You can also use vegan cheese shreds. Just sprinkle it on right before the last roast. This keeps the dish creamy and tasty. Feel free to mix in other veggies for added color and nutrition! Carrots, bell peppers, or cauliflower work well. Cut them into similar sizes to the broccoli. Toss them in the olive oil and garlic mix too. This way, all the veggies roast together and get that yummy flavor. After enjoying your Roasted Garlic Parmesan Broccoli, let any leftovers cool down. Place them in an airtight container. This helps keep the broccoli fresh. Store it in the fridge. It can last about 3 to 4 days. If you want to keep it longer, freezing is a great option. To reheat, I recommend using the oven or a skillet. This helps keep the broccoli crisp. Preheat your oven to 350°F (175°C). Spread the broccoli on a baking sheet. Heat for about 10 minutes. If using a skillet, add a splash of olive oil. Heat over medium heat for 5-7 minutes, stirring often. Avoid the microwave, as it can make the broccoli soggy. If you want to freeze your broccoli, follow these steps. First, let it cool completely. Then, spread it out on a baking sheet. Freeze for about 1 hour. This prevents clumping. Once frozen, transfer the broccoli to a freezer bag. Remove as much air as possible. It can stay frozen for up to 3 months. When ready to enjoy again, thaw it in the fridge overnight. Reheat as mentioned above for the best taste. Yes, you can use frozen broccoli if needed. Just remember that frozen broccoli may cook faster. You should check it often to avoid mushiness. If you use frozen, skip thawing. Instead, toss it directly with garlic and oil. This way, it stays crispier. Roasted Garlic Parmesan Broccoli pairs well with many dishes. You can serve it with grilled chicken, steak, or fish. It also goes great with pasta or rice. Add it to a quinoa bowl for a healthy lunch. Feel free to get creative with your meals! To make this dish low-carb, focus on the broccoli. Keep the Parmesan cheese, as it has low carbs. Avoid adding too much olive oil. You can also skip the red pepper flakes if you prefer less spice. Enjoy a tasty, low-carb side dish with ease! Roasted Garlic Parmesan Broccoli is easy and tasty. We covered the main and optional ingredients, plus substitutions. You learned step-by-step how to prepare and roast broccoli to get it just right. I shared tips for crispiness and flavor boosts, plus some fun variations. In the end, this dish is versatile and simple. Try different ingredients or ways to serve it. Enjoy this healthy dish that anyone can make!

Roasted Garlic Parmesan Broccoli Simple and Tasty Dish

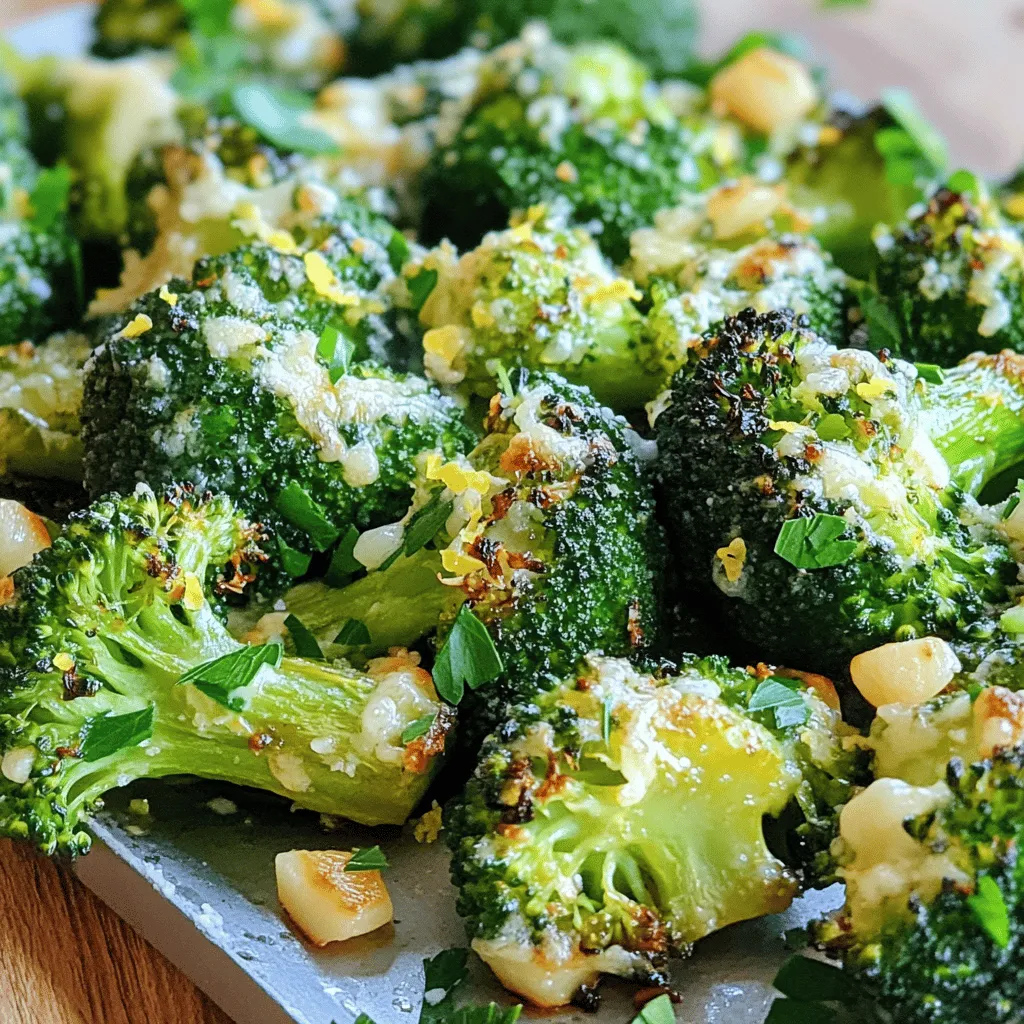
Are you ready to elevate your vegetable game? Roasted Garlic Parmesan Broccoli is a simple yet flavorful dish that adds

Older posts
Newer posts
← Previous Page1 … Page31 Page32 Page33 … Page82 Next →

dsad

© 2026 Recipes Pursuit • Built with GeneratePress

Our Policies

  • Copyright Policy
  • Cookie Policy
  • GDPR Policy
  • Privacy Policy
  • Disclaimer
  • Terms Of Use

More Information

  • Home
  • About
  • Contact
  • Appetizers
  • Dessert
  • Dinner
  • Drinks
©2026, Recipes Pursuit About Back To Top