Skip to content
DisclaimerTerms Of UseGDPR PolicyCookie Policy

Recipes Pursuit

  • Home
  • Drinks
  • Appetizers
  • Dinner
  • Dessert
  • About
  • Contact
  • Privacy Policy
DisclaimerTerms Of UseGDPR PolicyCookie Policy

NO-ING-IMG

Fresh corn brings a sweet crunch to the chowder. I love using 4 ears of corn, which gives the best flavor. If fresh corn is not available, use 2 cups of frozen corn. Both options work well, but fresh corn has a special taste. The key vegetables make this chowder hearty. Start with 1 medium onion, chopped finely. This adds a sweet base. Next, use 2 cloves of garlic, minced. Garlic gives a strong aroma and flavor. Don’t forget the potatoes! Use 2 medium potatoes, peeled and diced. They add creaminess and help thicken the chowder. Finally, we need 1-2 fresh jalapeños. Seed and chop them finely. Adjust the amount based on how spicy you like it. Creamy goodness comes from 1 cup of heavy cream. This makes the chowder rich and smooth. We also need 1 cup of sharp cheddar cheese, grated. It adds a lovely cheesy flavor. For seasoning, use salt and pepper to taste. A sprinkle of fresh cilantro or chives at the end makes a great garnish. This adds color and freshness to each bowl. Start by heating the olive oil in a large pot over medium heat. Add the chopped onion and cook for about 5-7 minutes. You want them to be soft and clear. Next, toss in the minced garlic and jalapeños. Cook for another 2-3 minutes. This step makes your kitchen smell amazing! Now, add the diced potatoes to the pot. Pour in the vegetable broth, and bring this mix to a boil. Once it boils, lower the heat and let it simmer for about 15 minutes. This helps the potatoes become tender. After that, stir in the corn kernels and heavy cream. Let the chowder cook for an extra 5 minutes. Take the pot off the heat. Gradually stir in the grated cheddar cheese. Keep mixing until it melts and makes the chowder creamy. Season with salt and pepper to your taste. If you like a smooth texture, use an immersion blender to puree half of the chowder. This gives you a nice balance of creaminess and texture. Warm it through on low heat before serving. To control the heat in your chowder, start with one jalapeño. Seed and chop it finely. Taste as you go. If you want more heat, add a second jalapeño. For a milder taste, remove all seeds. You can also add a pinch of cayenne for extra warmth without using more peppers. For deeper flavor, use fresh corn. Shuck it just before cooking. Also, sauté onions until golden brown to bring out their sweetness. You can add herbs like thyme or smoked paprika to change the taste. A splash of lime juice at the end brightens the chowder. Serve the chowder in deep bowls. Top with chopped cilantro or chives for color. A sprinkle of cheese on top adds a nice touch. For a rustic feel, place a slice of crusty bread beside the bowl. This makes the dish feel warm and inviting. {{image_2}} If you want a vegetarian twist, skip the heavy cream. You can use coconut milk instead. It gives a nice creaminess with a hint of sweetness. For the broth, use a rich vegetable broth to keep the flavors bold. This version still tastes great and is perfect for plant lovers. Looking to add some protein? Consider using cooked chicken or shrimp. Both cook quickly and blend well with the chowder. Just add them when you stir in the corn. For a meatless option, try adding beans like black beans or chickpeas. They add texture and protein without changing the flavor too much. Cheese makes this chowder creamy and rich. While sharp cheddar is a classic choice, feel free to mix it up. You can try pepper jack for a spicy kick. Or go with a smoked gouda for a deeper flavor. Each cheese will change the taste slightly, so have fun experimenting! After making your Jalapeño Cheddar Corn Chowder, let it cool down. Pour it into an airtight container. This chowder lasts in the fridge for about 3 to 5 days. When ready to eat, check for any signs of spoilage. If it smells or looks off, toss it. You can freeze the chowder for later. Use freezer-safe containers or bags. Leave some space for expansion. This chowder can stay fresh in the freezer for up to 3 months. When you’re ready to enjoy it again, just thaw it in the fridge overnight before reheating. To reheat, pour your chowder into a pot over low heat. Stir it often to avoid burning. If the chowder seems too thick, add a splash of broth or cream. This keeps it creamy and delicious. You can also use a microwave. Heat it in a microwave-safe bowl. Stir halfway through to ensure even heating. Enjoy your chowder warm! You can use half-and-half or whole milk. For a lighter option, try coconut milk. These substitutes will change the taste slightly, but they still work well. If you want it creamy, use 2 tablespoons of cornstarch mixed with milk. This will help thicken the chowder without heavy cream. To boost the heat, add more jalapeños. You can also use diced serrano peppers. If you enjoy smoky flavors, a pinch of cayenne pepper adds nice warmth. For an even spicier kick, try adding hot sauce. Start with a little, then taste before adding more. Yes, canned corn is a great option! It saves time and is still tasty. Use about 2 cups of canned corn, drained. Just combine it with the other ingredients as you would with fresh corn. The chowder will still be creamy and delicious. This blog post covered how to make a tasty chowder with fresh corn, key veggies, and creamy cheese. We shared step-by-step instructions to prepare the base, cook the chowder, and add flavor. You learned tips to adjust spice levels, enhance taste, and present the dish beautifully. Explore variations for vegetarian options and different proteins. Lastly, we provided easy storage and reheating tips. Now, it's time for you to take these ideas and create your own delicious chowder. Enjoy every bite!

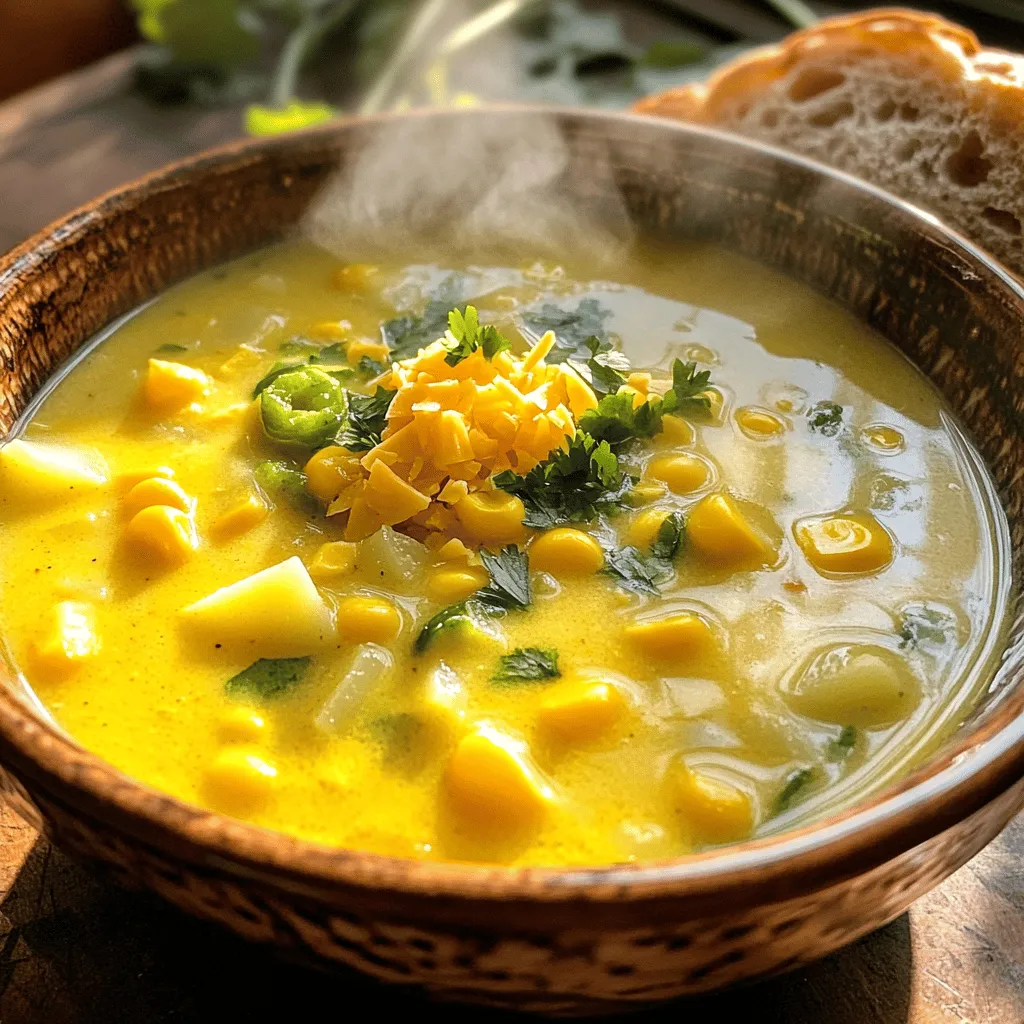
Jalapeño Cheddar Corn Chowder Creamy Flavor Delight

Get ready to enjoy a warm bowl of Jalapeño Cheddar Corn Chowder! This creamy delight bursts with fresh corn, key

- 1 cup glutinous (sticky) rice - 2 cups coconut milk - 1/2 cup sugar - 1/4 teaspoon salt - 1 ripe mango, peeled and sliced - 2 tablespoons sesame seeds or toasted coconut flakes (for garnish) - Fresh mint leaves (optional, for garnish) To make this dessert, you need a few key ingredients. Glutinous rice is a must for that perfect, sticky texture. You will also need rich coconut milk to give it a creamy flavor. Sugar adds sweetness, while salt enhances the taste. A ripe mango brings freshness and color to the dish. You can use sesame seeds or toasted coconut flakes to add a nice crunch. Fresh mint leaves can brighten the plate and add a pop of color. These ingredients come together to create a delightful dessert that is both simple and satisfying. Trust me, using fresh and quality items makes all the difference in the world! 1. Rinse the glutinous rice under cold water. Keep rinsing until the water runs clear. This step removes extra starch. 2. Soak the rice in water. Ensure it is fully covered. Let it soak for at least 4 hours or overnight for best results. 3. After soaking, drain the rice. Place it in a steamer. Use cheesecloth or a clean kitchen towel to line the steamer. 4. Steam the rice for about 25 to 30 minutes. Check that it is tender and sticky when done. 1. While the rice steams, grab a small saucepan. 2. Over medium heat, combine the coconut milk, sugar, and salt. 3. Stir the mix until the sugar fully dissolves. This creates a sweet, creamy sauce. 1. Once the rice is ready, transfer it to a large bowl. 2. Pour about 1 cup of the coconut sauce over the warm rice. 3. Stir gently to mix the rice and sauce. Let it sit for 15 to 20 minutes. This allows the rice to soak up all the flavors. 4. To serve, shape the rice into a mound or scoop it onto a plate. 5. Arrange sliced mango beside the rice. 6. Drizzle the remaining coconut sauce over the rice and mango. 7. For added texture, sprinkle sesame seeds or toasted coconut flakes on top. 8. Optional: Garnish with fresh mint leaves for a nice touch. Choosing ripe mango To get the best mango, look for one that smells sweet. The skin should have some give when you press it gently. A ripe mango will be slightly soft, not mushy. Yellow or orange skin usually means it's ripe. Avoid green mango; it's often too hard and sour. Finding high-quality coconut milk Choose coconut milk that is thick and creamy. Look for brands without additives. Check the can for a high coconut content, at least 60%. If you see a layer of cream on the top, that's a good sign. Fresh coconut milk is great if you can find it. Overcooking or undercooking the rice Cook the rice just until it's tender and sticky. Overcooked rice becomes mushy. Under-cooked rice stays hard and unpleasant. Steaming is key for perfect texture. Trust your senses; the rice should stick together but not be gooey. Not letting the rice absorb the sauce properly After mixing the rice with the coconut sauce, let it sit. This step is important as it allows the rice to soak up the flavors. If you serve it right away, the rice will taste bland. Give it 15-20 minutes to absorb all that goodness. Suggestions for additional toppings Add sesame seeds or toasted coconut flakes for crunch. You can also try fresh fruit like berries or banana slices. A drizzle of honey or a sprinkle of nuts adds more flavors. Even a dash of lime zest can make it pop. Serving temperature recommendations Serve the sticky rice warm, but not hot. The perfect temperature lets the flavors shine. Cold rice can lose its appeal. If you have leftovers, warm them up slightly before serving. It makes a big difference in taste! {{image_2}} You can swap sugar for honey or maple syrup. Both options add a unique flavor. Honey gives a floral note, while maple syrup adds warmth. Just use the same amount as sugar. Adjust the liquid in the sauce if needed. This can make your dessert even more special. While mango is a classic choice, many other fruits work well. Try ripe bananas, juicy pineapples, or fresh strawberries. Each fruit pairs nicely with the sticky rice. You can even mix different fruits for a colorful display. This adds fun and flavor to your dessert. If you want a vegan version, the recipe is easy to adapt. Use plant-based sugar instead of regular sugar. Check that your coconut milk is dairy-free. You can also use agave syrup for sweetness. These swaps keep the dish fully vegan while tasting great. To keep sticky rice fresh, store it in an airtight container. Make sure the rice cools down before sealing. This helps prevent moisture build-up. The coconut sauce can also go in a separate container. Store it in the fridge for up to three days. If you have leftover mango, place it in a sealed bag in the fridge. Use the mango within a day or two for the best taste. Reheating sticky rice can be tricky. The goal is to keep it soft and sticky. You can use a steamer for the best results. Simply place the rice in the steamer and warm it for about 5-10 minutes. If you don’t have a steamer, use the microwave. Place the rice in a bowl, sprinkle a little water on top, and cover it with a damp paper towel. Heat it for 30-second bursts until warm. Yes, you can freeze coconut mango sticky rice! First, let it cool completely. Then, place the sticky rice in a freezer-safe bag. Lay it flat to save space. You can freeze the coconut sauce in another bag. It lasts for about one month in the freezer. When ready to eat, thaw it in the fridge overnight. Reheat it gently before serving. Glutinous rice, also known as sticky rice, is a special type of rice. It has high starch content, which makes it sticky when cooked. This rice is often used in Asian desserts and savory dishes. It is perfect for making Coconut Mango Sticky Rice because it holds together well. Its chewy texture pairs nicely with creamy coconut and fresh mango. Yes, you can prepare this dish ahead of time. Cook the sticky rice and let it cool completely. Store it in an airtight container in the fridge for up to two days. You can also make the coconut sauce ahead. Simply reheat it before serving. This way, you can save time and still enjoy a delicious dessert. To tell if the sticky rice is done, check its texture. The rice should be tender and sticky, not dry. It should also look glossy. If you taste it, it should have a slight chewiness. Steaming for 25-30 minutes usually yields perfect results. Remember to let it sit after cooking so it can absorb flavors. This blog post covered all you need to make coconut mango sticky rice. You learned about the key ingredients, step-by-step instructions, and useful tips. We discussed common mistakes to avoid and offered delicious variations. Storing and reheating tips help you keep this treat fresh. Remember, the best results come from quality ingredients and careful preparation. Enjoy your cooking and share this delightful dish with friends and family!

Coconut Mango Sticky Rice Perfectly Delicious Dessert

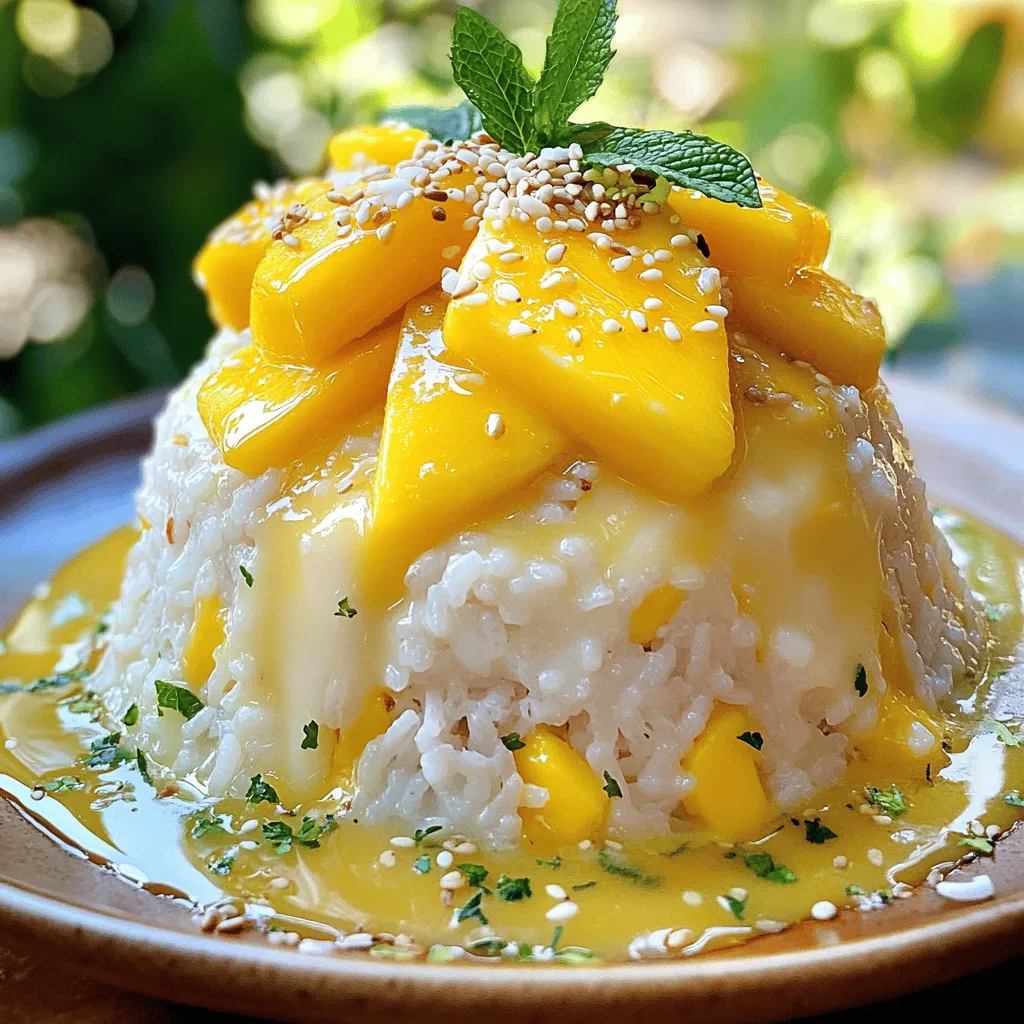
If you’re craving a dessert that’s both creamy and fruity, then Coconut Mango Sticky Rice is your answer. This wonderful

To make Chicken Alfredo Zucchini Boats, gather these key ingredients: - 4 medium zucchinis - 2 cups cooked chicken, shredded - 1 cup heavy cream - 1 cup grated Parmesan cheese - 2 tablespoons butter - 3 cloves garlic, minced - 1 teaspoon Italian seasoning - Salt and pepper to taste - 1 cup shredded mozzarella cheese - Fresh parsley, for garnish These ingredients blend together to create a creamy and rich dish. The zucchinis serve as perfect boats, holding the delicious filling. You can enhance your Chicken Alfredo Zucchini Boats with these optional ingredients: - Red pepper flakes for heat - Chopped spinach for extra greens - Sun-dried tomatoes for sweetness - Bacon bits for crunch These additional items add depth and variety to your meal. Feel free to mix and match to suit your taste. To prepare this dish, you will need these basic tools: - Baking sheet - Parchment paper - Skillet - Spoon for scooping - Mixing bowl - Knife and cutting board Having these tools ready makes the process smooth. This way, you can focus on creating a tasty meal. First, you will need four medium zucchinis. Cut each zucchini in half lengthwise. Use a spoon to scoop out the center. This creates a nice boat shape. Place these boats on a baking sheet lined with parchment paper. This helps with easy cleanup later. In a skillet, melt two tablespoons of butter over medium heat. Add three cloves of minced garlic and cook for about one minute. Stir until you smell the garlic's nice aroma. Next, pour in one cup of heavy cream. Stir it as you add one cup of grated Parmesan cheese. Mix until it is melted and smooth. Now, add two cups of shredded chicken and one teaspoon of Italian seasoning. Stir everything together. Season with salt and pepper to your taste. Now, take your zucchini boats and fill them with the Alfredo mixture. Be generous when you spoon it in. Each boat should be full. After that, sprinkle one cup of shredded mozzarella cheese on top of each filled zucchini. This will make your boats cheesy and delicious. Preheat your oven to 375°F (190°C). Place the baking sheet in the oven. Bake for 25 to 30 minutes. Watch for the zucchini to turn tender and the cheese to get bubbly and golden brown. Once done, take them out and let them cool for a bit. You can garnish with fresh parsley before serving for extra flavor. Enjoy your tasty chicken Alfredo zucchini boats! When picking zucchinis, look for firm ones. They should feel heavy for their size. Choose zucchinis that are dark green and shiny. Avoid ones with soft spots or blemishes. Smaller zucchinis are often sweeter and more tender. Aim for medium-sized zucchinis for this recipe. They hold the filling well and bake perfectly. To make the best Alfredo sauce, start with fresh ingredients. Use real butter and heavy cream for creaminess. Melt the butter in a skillet over medium heat. Add minced garlic for a strong flavor. Stir in the heavy cream slowly. Mix in grated Parmesan cheese until smooth. This step is key to a rich sauce. Don’t forget to season it with salt and pepper. Taste as you go to find the right balance. These zucchini boats are a complete meal on their own. You can serve them with a side salad. A simple green salad pairs well. You can also add garlic bread for extra crunch. For a fresh touch, sprinkle more parsley on top. If you want to mix things up, serve with marinara sauce on the side. Enjoy your meal family-style for a fun dining experience! {{image_2}} You can swap the chicken for other proteins. Try cooked shrimp or diced turkey. If you want a meatless option, use cooked lentils or chickpeas. These choices add unique flavors and textures. Each protein option pairs well with the creamy sauce. Want more veggies? You can add spinach, bell peppers, or mushrooms. Sauté these in the skillet with garlic. This step enhances the flavor and nutrition. You can also top the zucchini boats with fresh tomatoes or olives. These add color and taste, making your meal more vibrant. To make this dish low-carb, skip the heavy cream and use cream cheese instead. You can also replace the zucchini with eggplant or bell peppers. These options have fewer carbs and still taste great. Use a low-carb cheese for a delicious topping. This keeps your meal satisfying without the extra carbs. After enjoying your chicken Alfredo zucchini boats, store leftovers in an airtight container. Keep them in the fridge. They stay fresh for up to three days. Make sure to let them cool first. This helps maintain their texture and flavor. If you want to save your zucchini boats for later, freezing is a great option. Wrap each boat tightly in plastic wrap. Then, place them in a freezer-safe bag or container. They can last up to three months. When you’re ready to eat, thaw them in the fridge overnight before reheating. To reheat your zucchini boats, preheat the oven to 350°F (175°C). Place the boats in a baking dish. Cover with foil to keep them moist. Heat for about 20 minutes or until warm. You can also use the microwave, but the oven keeps them crispy. Enjoy your tasty meal! To make chicken Alfredo zucchini boats gluten-free, choose gluten-free ingredients. For the Alfredo sauce, use gluten-free flour if making it from scratch. You can also check store-bought sauces for gluten-free labels. Always verify that your chicken and seasonings are gluten-free too. This way, everyone can enjoy this tasty meal without worry. Yes, you can use store-bought Alfredo sauce. It saves time and cuts down on prep work. Just heat it up before mixing with the chicken. If you want, you can add a bit of garlic or Italian seasoning to boost the flavor. This option makes the recipe even easier for busy cooks. Chicken Alfredo zucchini boats last about 3 to 4 days in the fridge. Store them in an airtight container to keep them fresh. When you're ready to eat, just reheat them in the oven or microwave. They will still taste great and make for a quick meal option. We covered a lot about chicken Alfredo zucchini boats today. You learned the key ingredients and tools needed. I shared steps for making this dish, along with helpful tips and tricks. We also discussed fun variations to try. Lastly, I gave you storage info and answered common questions. These boats are tasty and versatile. I hope you feel excited to make them! Enjoy your cooking adventure!

Chicken Alfredo Zucchini Boats Flavorful and Easy Meal

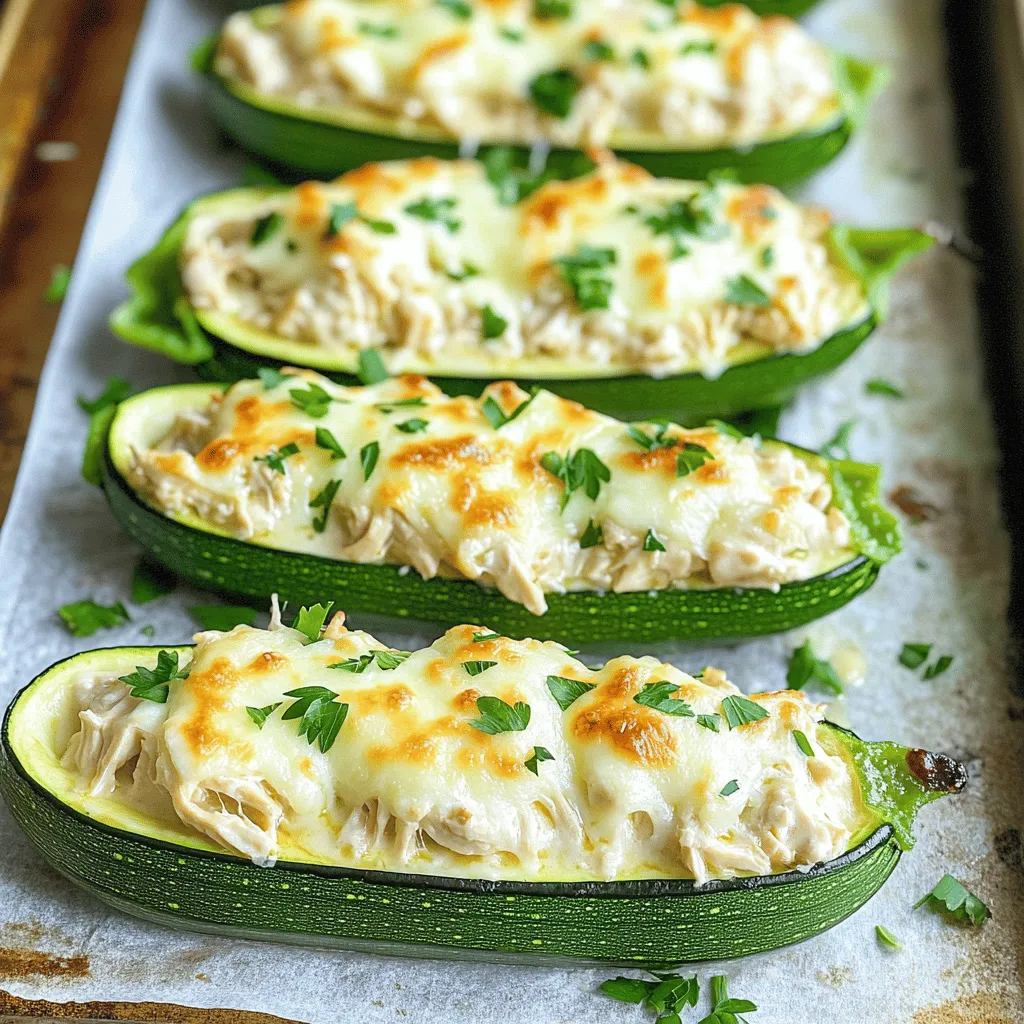
If you love creamy Alfredo and fresh veggies, you’ll adore these Chicken Alfredo Zucchini Boats. This dish combines tender zucchini

- 1 pound Brussels sprouts, trimmed and halved - 4 cloves garlic, minced - 2 tablespoons olive oil - 1/2 teaspoon salt - 1/4 teaspoon black pepper - 1/2 teaspoon red pepper flakes (optional) - 1/3 cup grated Parmesan cheese - 2 tablespoons balsamic vinegar - Fresh parsley, chopped (for garnish) To make Roasted Garlic Parmesan Brussels Sprouts, you need fresh Brussels sprouts. They should be trimmed and cut in half. Garlic gives great flavor, so use four cloves. Olive oil helps everything roast nicely. Salt and black pepper add seasoning, while red pepper flakes give a nice kick if you like heat. Parmesan cheese adds a rich, savory taste. Balsamic vinegar adds a sweet tang, and parsley makes the dish colorful and fresh. - Baking sheet - Parchment paper - Large mixing bowl - Knife - Cutting board For this recipe, you need a few kitchen tools. A baking sheet is key for roasting the sprouts. Lining it with parchment paper makes cleanup easy. A large mixing bowl helps you mix the ingredients well. A good knife and cutting board are essential for trimming and chopping. Having these tools ready will make cooking fun and simple. 1. Start with fresh Brussels sprouts. Trim off the stem ends and discard any yellow leaves. 2. Cut each sprout in half. This helps them cook evenly and absorb flavors. 3. In a bowl, combine the halved sprouts with minced garlic, olive oil, salt, black pepper, and red pepper flakes. Toss everything to coat the sprouts well. 1. Preheat your oven to 400°F (200°C). This temperature helps achieve a nice crisp. 2. Line a baking sheet with parchment paper. This makes cleanup a breeze. 3. Spread the coated Brussels sprouts in a single layer on the baking sheet. 4. Roast for about 20-25 minutes. Stir them halfway through to ensure even cooking. Look for a golden brown color and crispy edges. 1. When the Brussels sprouts are done, sprinkle grated Parmesan cheese over them. The heat will melt the cheese slightly. 2. Return the baking sheet to the oven for 3-5 minutes. Just until the cheese melts but does not turn too brown. 3. Drizzle balsamic vinegar over the hot sprouts. Toss gently to mix the flavors. 4. Finally, garnish with fresh parsley. This adds a pop of color and freshness to your dish. To get your Brussels sprouts crispy, spread them out on the baking sheet. If they crowd together, they will steam instead of roast. Stir them halfway through cooking. This helps them brown evenly. To avoid sogginess, ensure they are dry after washing. Excess water leads to steam, which makes them soft. Use a clean towel to pat them dry before mixing with olive oil. You can add spices to boost the flavor. Try garlic powder or onion powder for more depth. Lemon zest adds a fresh twist. Fresh herbs, like thyme or rosemary, also work well. Using fresh ingredients is key. Fresh Brussels sprouts taste better than frozen ones. Fresh garlic gives a stronger flavor than jarred. Always choose high-quality Parmesan for the best results. {{image_2}} To make a dairy-free version, you can swap out Parmesan cheese. Nutritional yeast works well. It adds a cheesy flavor without dairy. You can also try vegan Parmesan. It melts nicely and tastes great. To make it vegan, skip the cheese entirely. Use more garlic and herbs for extra flavor. Brussels sprouts shine, but other veggies can join the party. Cauliflower, broccoli, or carrots roast well too. Just cut them to similar sizes as Brussels sprouts. Adjust cooking time as needed. For softer veggies like zucchini, roast for less time. Aim for 15-20 minutes instead. Enjoy the fun mix of flavors! To keep your roasted garlic Parmesan Brussels sprouts fresh, store them in an airtight container. This container helps keep moisture out and flavors in. Place the sprouts in the fridge within two hours of cooking. They will stay good for about 3 to 4 days. If you want to keep them longer, consider freezing them. Freezing works well, but the texture may change. When it’s time to enjoy your leftovers, reheating is key. The best methods are using an oven or a skillet. For the oven, preheat it to 350°F (175°C). Spread the Brussels sprouts on a baking sheet and heat for about 10-15 minutes. This method keeps them crispy. If you use a skillet, add a little olive oil and heat on medium. Stir them often until warm. Avoid microwaving, as this can make them soggy. To maintain crispiness, always reheat at a lower temperature and check often. Can I make Roasted Garlic Parmesan Brussels Sprouts ahead of time? Yes, you can prepare them ahead of time. You can trim and halve the Brussels sprouts. Then, mix them with garlic, olive oil, and spices. Store them in the fridge until you’re ready to roast. When it’s time to cook, just follow the roasting steps. The sprouts will taste fresh and delicious. Can I use frozen Brussels sprouts for this recipe? Yes, frozen Brussels sprouts can work. However, fresh ones give the best texture. If using frozen, thaw them first. Pat them dry to remove excess moisture. This will help them roast better. Adjust the cooking time if needed, as frozen sprouts may take longer to crisp up. Caloric content and health benefits Roasted Garlic Parmesan Brussels Sprouts are tasty and good for you. One serving has about 150 calories. They are low in calories but high in fiber. Brussels sprouts are packed with vitamins C and K. The Parmesan cheese adds flavor and protein, making this dish a great side. Possible allergens in the recipe This recipe contains dairy from the Parmesan cheese. If you have a dairy allergy, you can use a dairy-free cheese instead. The dish also contains olive oil, which is safe for most diets. Always check your ingredients to avoid any allergens. The blog post shared recipes and tips for making Roasted Garlic Parmesan Brussels Sprouts. It covered key ingredients, tools, and step-by-step roasting instructions. I also shared storage advice and common questions you might have. Remember, using fresh ingredients makes a big difference. Feel free to experiment with flavors or different vegetables. Enjoy creating this dish with your own twist and savor every bite!

Roasted Garlic Parmesan Brussels Sprouts Recipe Delish

Looking for a tasty way to enjoy Brussels sprouts? Try my Roasted Garlic Parmesan Brussels Sprouts! This recipe turns a

To make these tasty bars, you need: - 2 cups rolled oats - 1 cup whole wheat flour - 1 cup brown sugar, packed - 1 teaspoon baking powder - 1/2 teaspoon salt - 1 teaspoon cinnamon - 1/2 cup unsalted butter, melted - 1 cup fresh blueberries (or frozen, thawed) - 2 tablespoons lemon juice - 2 tablespoons honey or maple syrup These ingredients create a great mix of flavors and textures. The oats give a hearty feel, while the blueberries add a burst of sweetness. You can play with flavors by adding: - Chopped nuts, like walnuts or almonds - A splash of vanilla extract - Zest from a lemon or orange These extras can lift your bars to a new level. Nuts add crunch, while citrus gives brightness. If you have allergies, try these swaps: - Use gluten-free oats for a gluten-free option. - Replace whole wheat flour with almond flour for a nutty taste. - Swap butter with coconut oil for a dairy-free version. These substitutions make the recipe more inclusive. You can still enjoy delicious bars no matter your dietary needs. First, set your oven to 350°F (175°C). This ensures the bars bake evenly. Next, take a 9x9-inch baking dish. Grease it lightly or line it with parchment paper. This step helps with easy removal later. In a large bowl, add the following dry ingredients: - 2 cups rolled oats - 1 cup whole wheat flour - 1 cup brown sugar - 1 teaspoon baking powder - 1/2 teaspoon salt - 1 teaspoon cinnamon Mix these well. You want everything evenly combined. This helps in making the bars tasty. In another bowl, combine: - 1 cup fresh blueberries (or thawed frozen) - 2 tablespoons lemon juice - 2 tablespoons honey or maple syrup Gently stir these together. The lemon juice brightens the blueberries. It adds a nice zing to the filling. Take half of the oat mixture. Press it firmly into the bottom of the baking dish. This forms a solid base. Then, spread the blueberry filling evenly over this layer. Finally, crumble the reserved oat mixture on top. Bake the dish in the oven for 30-35 minutes. Look for a golden topping and bubbling blueberries. This means your bars are ready. Once baked, take the dish out and let it cool for at least 15 minutes. This cooling time helps the bars set. After cooling, slice them into squares. Enjoy your delicious blueberry oatmeal crumb bars! To get the best crumb texture, use rolled oats. They give a chewy base. Make sure to mix the dry ingredients well before adding the butter. When you add the melted butter, stir until it looks like coarse crumbs. This helps keep the texture light and airy. Always save some oat mixture for the topping. This creates a nice crunch on top. To keep your bars fresh, store them in an airtight container. This keeps moisture out and flavor in. If you have leftovers, let them cool completely first. Then, wrap them tightly with plastic wrap. You can keep them at room temperature for up to three days. If you want to keep them longer, consider freezing. You can freeze these bars for up to three months. Cut them into squares before freezing. Place the bars in a single layer on a baking sheet. Once frozen, transfer them to a freezer bag. To reheat, take out the number you need. Let them thaw at room temperature for a few hours. Then, warm them in the oven at 350°F (175°C) for about 10 minutes. Enjoy them warm for the best taste! {{image_2}} You can easily switch out blueberries for other fruits. Try raspberries, strawberries, or peaches for a tasty change. Each fruit adds its own flavor and sweetness. For a tropical twist, use diced mango or pineapple. Mix and match to find your favorite! If you need gluten-free bars, use certified gluten-free oats. Swap whole wheat flour for almond flour or coconut flour. This change keeps the texture nice and crumbly. Always check labels to ensure no gluten sneaks in! To make these bars vegan, replace the butter with coconut oil or a nut butter. Use maple syrup instead of honey for sweetness. You can also try unsweetened applesauce to add moisture. These swaps keep the bars delicious and plant-based! To keep your Blueberry Oatmeal Crumb Bars fresh, place them in an airtight container. This helps prevent them from drying out. You can store them in the fridge for up to one week. If you want to enjoy them cold, simply slice and serve. Look for signs of spoilage like mold or a strange smell. If the bars become too dry, they may lose their tasty texture. To extend freshness, ensure they stay sealed tightly. You can also wrap each bar in plastic wrap before placing them in the container. When meal prepping, consider making a double batch of these bars. They freeze well too! After baking, let them cool completely. Then, cut them into bars and wrap them individually. Place them in a freezer-safe bag or container. They can last in the freezer for up to three months. To eat, just thaw overnight in the fridge and enjoy! Yes, you can use frozen blueberries. Just thaw them first. Frozen blueberries work well. They still taste great and keep the bars moist. Drain any excess liquid before mixing. This helps prevent a soggy texture in your bars. Blueberry Oatmeal Crumb Bars can last up to five days. Store them in an airtight container. Keep them in the fridge for best freshness. You can also freeze them for up to three months. Just wrap each bar tightly in plastic wrap. These bars pair nicely with yogurt or ice cream. A dollop of Greek yogurt adds creaminess. You can also serve them with a sprinkle of powdered sugar. Fresh fruit on the side enhances the flavors, too. Yes, you can adjust the sweetness easily. Use less brown sugar if you want them less sweet. You can also add more honey or maple syrup. Taste the blueberry mix before baking to find your perfect balance. The blog post covered how to make delicious blueberry oatmeal crumb bars. We explored essential ingredients, helpful substitutes, and creative variations. You learned step-by-step instructions for mixing and baking the bars. I shared tips for perfect texture and storing leftovers. With this knowledge, you can create tasty treats that suit your diet. Enjoy making these easy bars and share them with friends and family. Happy baking!

Blueberry Oatmeal Crumb Bars Tasty and Simple Recipe

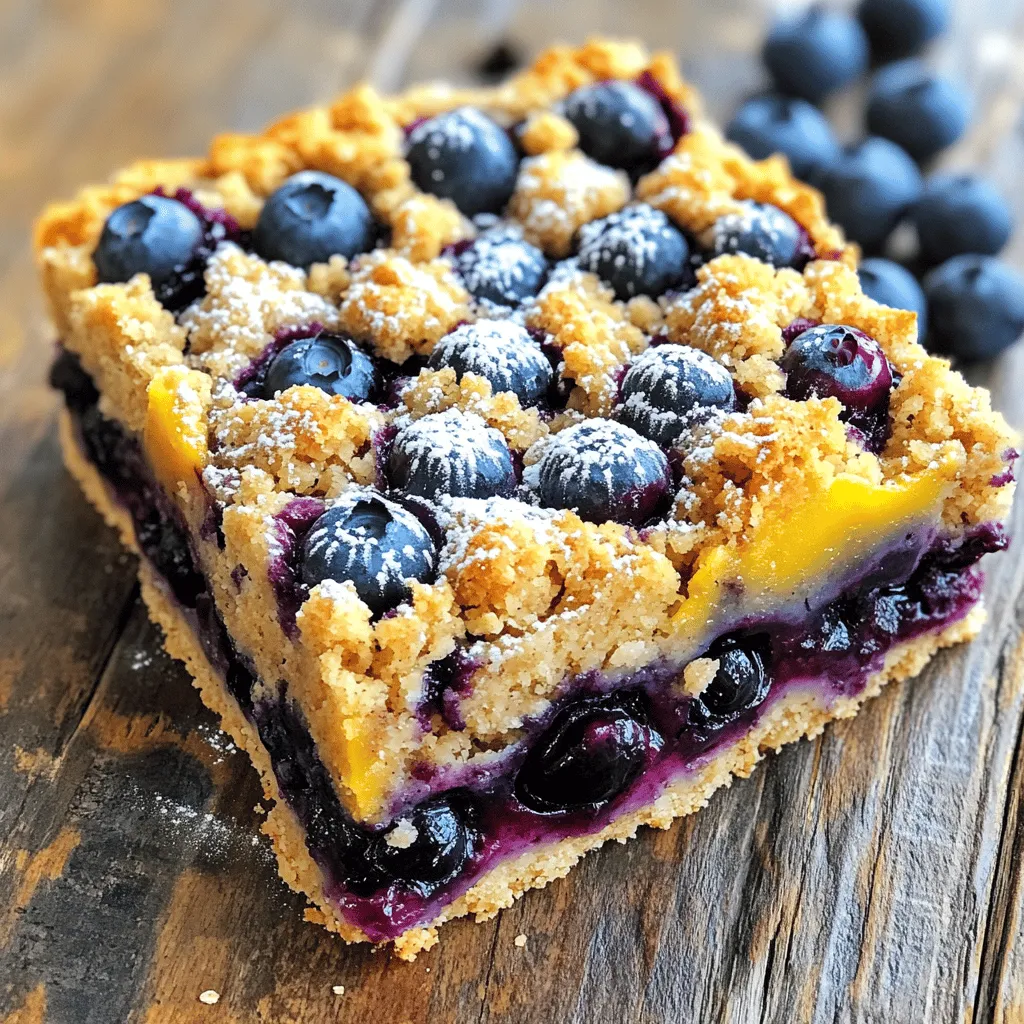
Do you crave a sweet treat that’s easy to make? Look no further! My Blueberry Oatmeal Crumb Bars are a

- 12 oz pasta (like penne or fusilli) - 1 lb ground turkey (or beef/vegetarian substitute) - 1 small onion, diced - 2 cloves garlic, minced - 1 packet taco seasoning - 1 can (14 oz) diced tomatoes with green chilies - 4 cups chicken or vegetable broth - 1 cup cream cheese, softened - 1 cup shredded cheddar cheese - 1 cup corn, frozen or fresh - Salt and pepper to taste - Fresh cilantro, for garnish - Lime wedges, for serving Gathering the right ingredients is key to making One-Pot Creamy Taco Pasta. You can choose between penne or fusilli pasta. Both types work well and hold the sauce nicely. For protein, ground turkey is a great choice, but you can also use ground beef or a vegetarian option. Don't forget the dairy! Cream cheese adds creaminess, while shredded cheddar gives flavor. The taco seasoning is what makes this dish special. It adds that bold, zesty kick. You’ll need some fresh veggies too. Diced onion and minced garlic boost the taste. Diced tomatoes with green chilies give it a nice touch of heat and flavor. Corn adds sweetness and texture. Finally, you’ll need broth. Chicken or vegetable broth works well to cook the pasta and bring everything together. With these ingredients, you create a dish that is not only easy but also bursting with flavor. Start by heating a large pot over medium heat. Add 1 pound of ground turkey. Brown it for about 5 to 7 minutes. Use a spatula to break it up. If there’s extra fat, drain it. Next, add 1 small diced onion and 2 minced garlic cloves to the pot. Stir them in for about 3 minutes, until the onion turns soft and clear. Now sprinkle in 1 packet of taco seasoning. Stir well for about a minute. This helps to bring out the flavors. Next, pour in 1 can of diced tomatoes with green chilies, juice and all. Add 4 cups of chicken or vegetable broth, then stir everything together. Bring this mixture to a gentle simmer. Once it simmers, add 12 ounces of pasta and 1 cup of corn. Make sure the pasta is well-covered by the liquid. Turn down the heat to medium-low and cover the pot. Cook for about 10 to 12 minutes. Stir it occasionally to prevent sticking. You want the pasta to be al dente and soak up most of the broth. Lower the heat and add 1 cup of softened cream cheese and 1 cup of shredded cheddar cheese. Stir until the cheeses melt and blend in. If the pasta looks too thick, add a bit of broth or water to get the right creaminess. Finally, season with salt and pepper to your taste. Stir everything again to mix well before serving. To cook pasta just right, aim for al dente. This means the pasta should be firm but not hard. Check the doneness by tasting it a minute or two before the package time ends. You want it to have a slight bite. If it feels too soft, it may be overcooked. To boost the taste, consider adding extra spices. A pinch of cayenne pepper can add heat. Fresh cilantro makes a great garnish. You can also use fresh lime juice for a zesty kick. Fresh ingredients really elevate this dish. They bring out rich flavors and make your meal shine. You need a large pot or deep skillet for this recipe. A pot with a lid helps keep moisture in. Essential utensils include a spatula for stirring and a measuring cup for the broth. Having the right tools makes cooking easy and fun. {{image_2}} You can swap out ground turkey for other meats. Ground beef and chicken work well. For a plant-based option, try lentils or crumbled tofu. If you choose a different meat, adjust the cooking time. Make sure all proteins are cooked through before adding more ingredients. To make this dish vegetarian, use plant-based meat or skip it entirely. You can add more beans or vegetables. If you need it gluten-free, choose gluten-free pasta. Always check labels for hidden gluten. You can also use vegetable broth instead of chicken broth. Want to spice things up? Add chopped jalapeños or more chili powder. This will give your pasta a nice kick. For cheese lovers, try different cheese types. Pepper jack adds heat, while Monterey Jack gives a mild flavor. Mixing cheeses can create a rich taste. To keep your One-Pot Creamy Taco Pasta fresh, use these tips: - Refrigerate: Place leftovers in an airtight container. Store them in the fridge. - Freeze: For longer storage, freeze in a freezer-safe container. - Duration: Leftovers can last up to 3-4 days in the fridge. In the freezer, they can stay fresh for about 2-3 months. Always check for off smells before eating. When it's time to enjoy your leftovers, follow these steps: - Microwave: Place your pasta in a microwave-safe bowl. Cover with a damp paper towel. Heat for 1-2 minutes, stirring halfway. - Stovetop: In a pot over low heat, add a splash of broth or water. Stir frequently until heated through. - Keep it Creamy: To maintain creaminess, add a little broth or cream while reheating. This helps prevent it from drying out. Yes, you can use other pasta types. Penne and fusilli work well. You can also try elbow macaroni or rotini. Just keep an eye on the cooking time, as it may vary. To add heat, mix in some chopped jalapeños or cayenne pepper. You can also use spicy taco seasoning instead of the regular kind. If you love heat, add hot sauce when serving for extra kick. This dish pairs well with a side salad or some garlic bread. You can also serve it with tortilla chips and salsa for a fun crunch. Lime wedges add a fresh touch to the meal. Yes, you can make it ahead of time. Just cook the dish and let it cool. Store it in the fridge for up to three days. When ready to eat, reheat it on the stove or in the microwave. You can make it dairy-free by swapping out the cream cheese and cheddar. Use dairy-free cream cheese and a dairy-free cheese blend instead. This way, you still get the creamy texture without dairy. To check if the pasta is done, taste a piece. It should be tender but still firm, which is called al dente. If it is too hard, let it cook a bit longer, stirring often. This blog post covered the key steps to making One-Pot Creamy Taco Pasta. We discussed the ingredients, cooking methods, and tips for perfect pasta. You learned how to create a creamy sauce and customize the dish with various proteins and spices. In the end, this recipe is fun and easy to make. It offers delightful flavors and can fit any diet. Enjoy your cooking adventure and have fun experimenting with your favorite ingredients!

One-Pot Creamy Taco Pasta Easy and Flavorful Dish

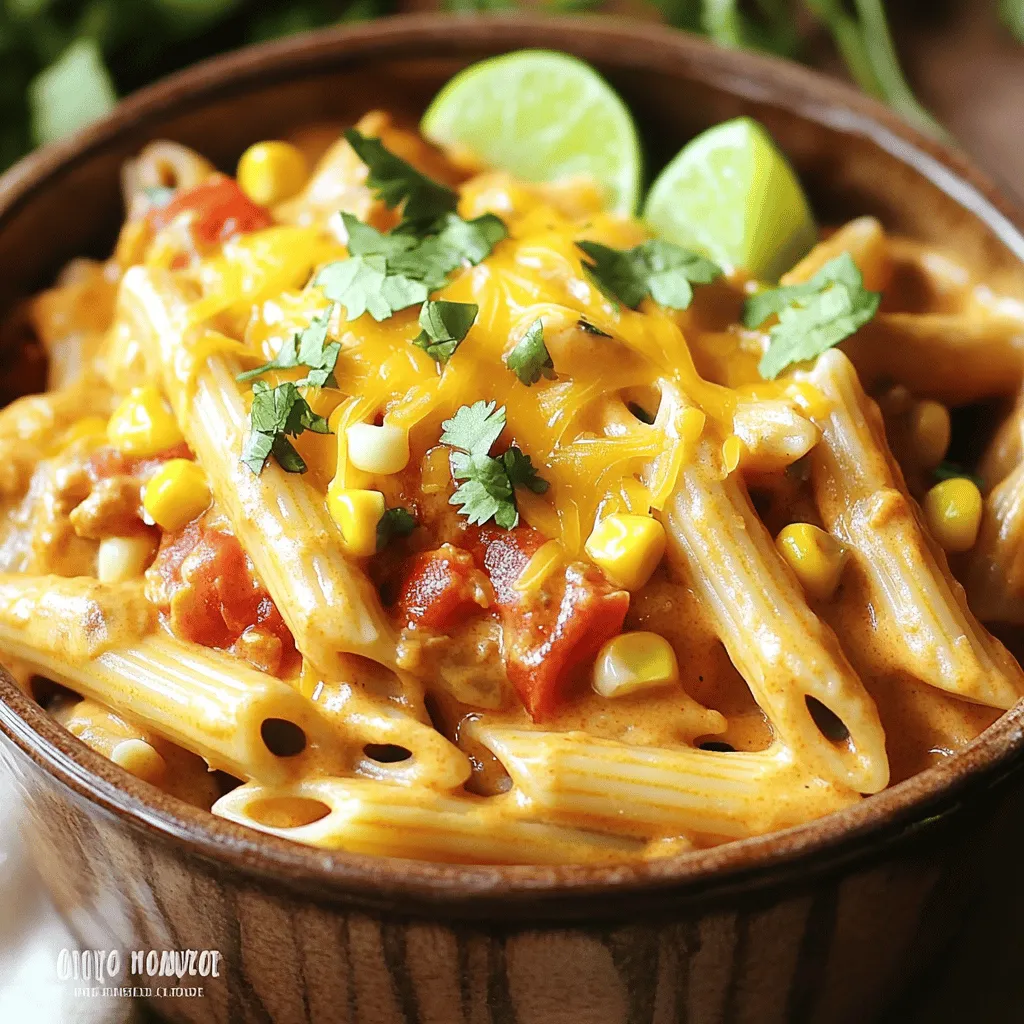
Are you ready to spice up your weeknight dinners? This One-Pot Creamy Taco Pasta is your answer! With a savory

To make these tasty Chocolate Chip S’mores Bars, you need the following items: - 1 cup graham cracker crumbs - 1/2 cup all-purpose flour - 1/2 teaspoon baking powder - 1/4 teaspoon salt - 1/2 cup unsalted butter, melted - 1/2 cup brown sugar, packed - 1/4 cup granulated sugar - 1 teaspoon vanilla extract - 1 large egg - 1 cup semi-sweet chocolate chips - 1 cup mini marshmallows - 1/2 cup crushed graham crackers for topping You can make your bars even more special with these fun options: - Add a pinch of cinnamon for warmth. - Use dark chocolate chips for a richer taste. - Mix in nuts, like walnuts or pecans, for crunch. - Swap mini marshmallows for larger ones if you like gooey bites. When picking chocolate, quality matters. I recommend using: - Semi-sweet chocolate chips for classic flavor. - Dark chocolate chips for a bolder taste. - Milk chocolate chips for a sweeter treat. Choose the type you love best, and feel free to mix them for fun flavors! First, you need to preheat your oven to 350°F (175°C). This step is key to getting the bars just right. Next, prepare a 9x9-inch baking pan. You can grease it lightly or line it with parchment paper. Lining the pan makes it easy to lift the bars out later. In a clean mixing bowl, combine these dry ingredients: - 1 cup graham cracker crumbs - 1/2 cup all-purpose flour - 1/2 teaspoon baking powder - 1/4 teaspoon salt Mix these well. This blend helps create a great base for your bars. Set it aside for later use. In another large bowl, whisk together: - 1/2 cup unsalted butter, melted - 1/2 cup brown sugar, packed - 1/4 cup granulated sugar - 1 teaspoon vanilla extract Make sure the mixture is smooth. Next, beat in 1 large egg until it blends fully. This mix gives the bars their rich flavor. Now, take your dry mix and slowly add it to the wet mix. Stir gently until just combined. Make sure not to overmix. Then, fold in: - 1 cup semi-sweet chocolate chips - 1 cup mini marshmallows Ensure the chips and marshmallows are evenly spread through the batter. This step adds delightful bites of chocolate and gooey marshmallow. Pour the prepared batter into your baking pan. Spread it out evenly. Don’t forget to sprinkle 1/2 cup of crushed graham crackers on top for a crunchy finish. Bake your bars in the oven for 25-30 minutes. You know they’re ready when the edges turn golden brown. A toothpick inserted in the center should come out clean, though it might have melted chocolate on it. After baking, let the bars cool in the pan for about 10-15 minutes before cutting them into squares. Enjoy! Mixing is key to great Chocolate Chip S’mores Bars. Start with dry ingredients. In a bowl, blend graham cracker crumbs, flour, baking powder, and salt. Stir well to combine. This helps evenly distribute the baking powder and salt. For wet ingredients, whisk melted butter with brown and granulated sugars. Add vanilla extract, then beat in an egg. Mix until smooth. Slowly add the dry mix to the wet mix. Stir gently. Avoid overmixing; this keeps the bars soft and chewy. To get the right texture, watch your baking time. Bake the bars for 25-30 minutes at 350°F. Check for golden edges. If a toothpick comes out clean, they’re ready. Remember, some melted chocolate on the toothpick is okay! Let the bars cool in the pan. This helps them set. Cutting too soon can make them fall apart. After 10-15 minutes, slice them into squares. This way, they hold their shape and stay delicious. Serve these bars warm for the best taste. Drizzle melted chocolate on top for a sweet touch. Add a sprinkle of mini marshmallows to make them even better. Pair them with a cold glass of milk. It balances the sweetness and makes each bite better. You can also enjoy these bars with a scoop of vanilla ice cream. The creamy ice cream complements the chewy bars perfectly. {{image_2}} You can easily make this dessert gluten-free. Swap the all-purpose flour for a gluten-free blend. Look for a blend that works well for baking. This choice keeps the bars soft and tasty. You still get that chewy texture and sweet flavor. You can mix things up with flavors. Try adding peanut butter for a nutty twist. Just fold in 1/2 cup of creamy peanut butter when you add the wet ingredients. If you love mint, add a few drops of mint extract. Mint pairs well with chocolate, making it a fun combo. Feel free to get creative with add-ons. Chopped nuts like walnuts or pecans can add crunch. You can also switch chocolate types. Use dark chocolate chips or even white chocolate. These choices bring new flavors and textures to your bars. To keep your Chocolate Chip S’mores Bars fresh, store them in an airtight container. Make sure the bars cool completely before you seal them. If you want to keep them for a longer time, you can wrap them in plastic wrap first. This step prevents them from drying out. You can also place parchment paper between layers to avoid sticking. When stored properly, these bars last about five days at room temperature. If you refrigerate them, they can last up to a week. The cold helps maintain their texture and flavor. Just remember, the bars may become a bit firmer when chilled. If you love them soft, let them sit at room temperature for a bit before eating. If you want to enjoy your bars warm, you can reheat them. Place a bar on a microwave-safe plate and heat it for about 15 to 20 seconds. This will melt the chocolate chips and soften the marshmallows again. For a crispier top, you can place them in the oven at 350°F (175°C) for about 5 minutes. Enjoy the gooey goodness! Yes, you can! You can swap semi-sweet chocolate chips for dark or milk chocolate. White chocolate also works well if you enjoy its creaminess. Mixing different chocolates gives a fun twist to the bars. To make these bars vegan, replace the egg with a flax egg. Use 1 tablespoon of ground flaxseed mixed with 2.5 tablespoons of water. Let it sit for five minutes until it thickens. For butter, use coconut oil or a vegan butter alternative. Ensure that your chocolate chips are dairy-free too. You can use crushed cookies like Digestive biscuits or vanilla wafers. For a gluten-free option, try almond flour or gluten-free graham crackers. You can also grind oats into a fine powder for a different texture. Yes, you can freeze these bars! First, let them cool completely. Then, wrap them tightly in plastic wrap or aluminum foil. Place them in an airtight container or freezer bag. They can last for up to three months in the freezer. In this post, we explored the ingredients and steps for making Chocolate Chip S’mores Bars. We covered required and optional ingredients, the best chocolate choices, and the baking process. You learned tips for great texture and serving ideas. We also shared variations, storage tips, and answers to common questions. With this guide, you can easily make, enjoy, and customize these delicious treats. Happy baking!

Chocolate Chip S’mores Bars Irresistible Dessert Treat

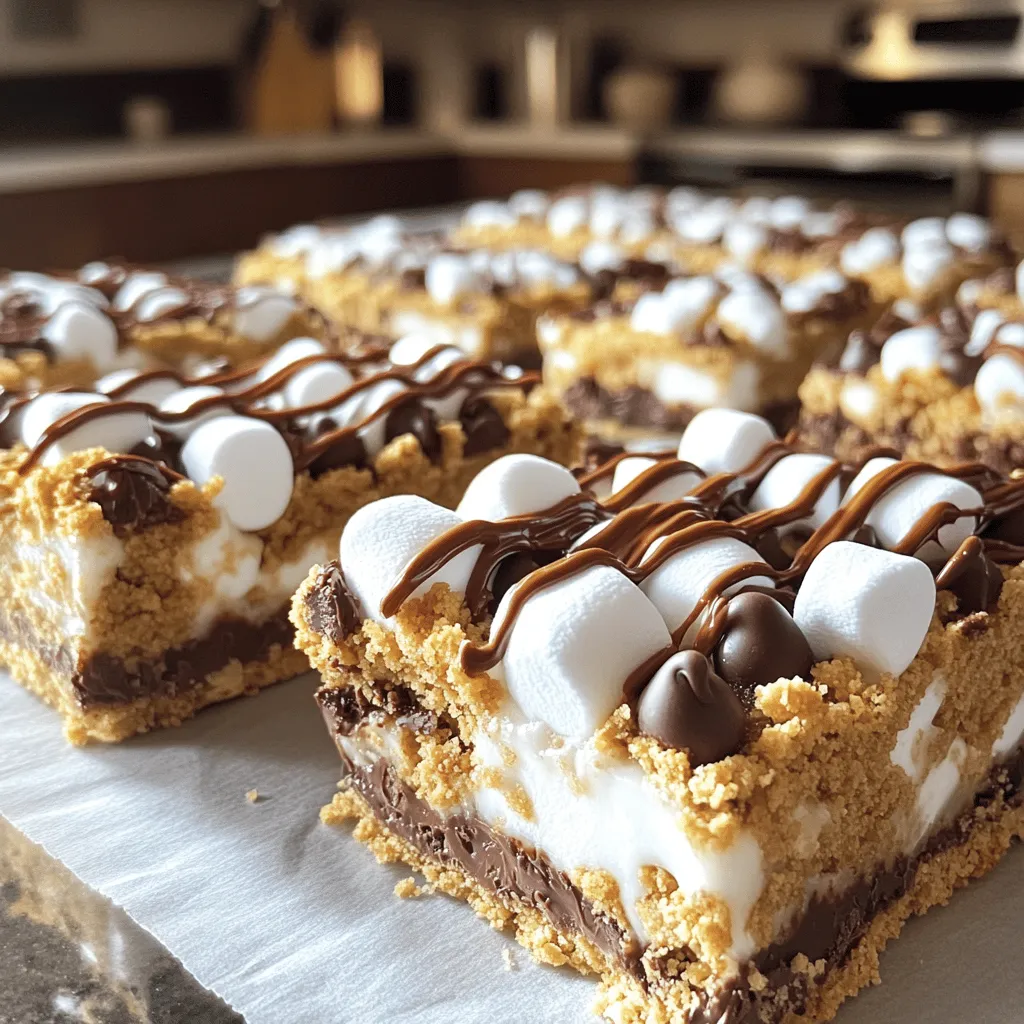
Do you have a sweet tooth? If you love gooey s’mores and rich chocolate, you’ll adore my Chocolate Chip S’mores

Here’s what you need to make this tasty lemon cheesecake mousse: - 8 oz (227g) cream cheese, softened - 1 cup powdered sugar - 1 tablespoon lemon zest - 1/4 cup fresh lemon juice - 1 teaspoon vanilla extract - 1 cup heavy whipping cream - 1/2 cup graham cracker crumbs - 2 tablespoons unsalted butter, melted - Fresh mint leaves for garnish Each ingredient brings its own flavor and texture to the dish. The cream cheese adds a smooth base. Powdered sugar gives sweetness, while lemon zest and juice add that bright, tangy taste. Vanilla extract rounds out the flavors nicely. Heavy whipping cream makes the mousse light and fluffy. Graham cracker crumbs and melted butter create a tasty crust. Finally, fresh mint leaves not only look great but also add a fresh aroma. This mix of flavors makes every bite delightful. You’ll love how simple it is to gather these ingredients, and the results? Simply delicious! Start by taking your softened cream cheese. Place it in a medium bowl. Beat it with an electric mixer until it is smooth and creamy. This step is key for a nice texture. Next, add the powdered sugar, lemon zest, fresh lemon juice, and vanilla extract. Mix everything until it is fully combined. You want it to be creamy and well-blended. This mixture brings that lovely lemon flavor into the mousse. In a separate bowl, pour in your heavy whipping cream. Use an electric mixer to whip it until you see stiff peaks. This usually takes about 3 to 5 minutes. Be patient and keep an eye on it. The whipped cream adds lightness to the mousse. Once you see those stiff peaks, stop mixing. We don’t want it to turn into butter. Now it’s time to build the layers! Take a small bowl and mix graham cracker crumbs with melted butter. Stir it until the crumbs are moistened. Spoon a layer of this mixture into your serving glasses. Next, add a layer of your lemon cheesecake mousse on top of the crumbs. Repeat these layers until your glasses are filled. Finish with the mousse on top for a beautiful look. Chill the mousse in the fridge for at least 2 hours. This lets the flavors meld together. Before serving, add fresh mint leaves on top for a pop of color and flavor. Enjoy your delightful creation! To get the right texture for your lemon cheesecake mousse, start with soft cream cheese. This makes it easy to mix. Beat it until smooth before adding other ingredients. When you whip the heavy cream, aim for stiff peaks. This keeps the mousse light and fluffy. Gently fold the whipped cream into the cream cheese mix. Use a spatula to keep the air in. If you mix too hard, the mousse will be dense. You can add extra flavor to your mousse. Try a bit more lemon zest for a stronger lemon taste. A splash of limoncello can add depth and richness. For a twist, mix in some fresh berries. Blueberries or raspberries pair well with lemon. You can also swap vanilla extract for almond extract if you want a different flavor. How you serve your mousse can make it special. Use clear glasses to show off the layers. Start with the graham cracker crust, then add the mousse. Finish with a dollop of whipped cream on top. Add fresh mint leaves for color and a fresh taste. For a fun touch, sprinkle a few graham cracker crumbs on top. This adds texture and looks nice. {{image_2}} You can swap out lemon for other citrus fruits. Try using lime or orange for a fun twist. Lime gives a zesty kick, while orange adds a sweet touch. Each fruit brings its unique flavor profile to the mousse. You can use the same amount of zest and juice as the recipe states for lemon. The classic graham cracker crust is easy and tasty. But you can change it up! Try using crushed cookies like Oreos or digestive biscuits. For a nutty flavor, use crushed almonds or pecans mixed with butter. This adds more depth to your dessert. Just remember to adjust the butter based on your crust type. You can make this mousse dairy-free with a few changes. Use vegan cream cheese instead of regular cream cheese. For the heavy cream, use coconut cream or a plant-based whipped cream alternative. This keeps the mousse creamy and delicious. Don't forget to check the labels to ensure everything is vegan-friendly. To store leftover lemon cheesecake mousse, place it in an airtight container. Make sure to cover the container tightly. This will help keep the mousse fresh and tasty. Store it in the fridge. It can last up to three days. If you want to enjoy it later, don't mix it with the crust until serving. You can freeze lemon cheesecake mousse if you want to keep it longer. First, spoon the mousse into a freezer-safe container. Leave some space at the top for expansion. Seal it tightly. This mousse can last up to two months in the freezer. When you are ready to eat it, thaw it in the fridge overnight. Avoid using the microwave, as it can change the texture. The best way to enjoy your lemon cheesecake mousse is fresh. It tastes best within the first three days. After that, the texture may change. If you store it properly, it can last longer than three days in the fridge. For the best taste and texture, eat it within that time frame. Always check for any off smells or changes in color before serving leftovers. You can use mascarpone cheese as a substitute for cream cheese. It has a rich taste and smooth texture. You may also try Greek yogurt for a lighter option. If you want a non-dairy choice, use silken tofu blended until smooth. Each option will change the flavor slightly, but they work well in this recipe. Yes, you can make this mousse ahead of time! I recommend preparing it the day before you plan to serve it. This allows the flavors to mix and become even more delicious. Just remember to store it in the fridge until you are ready to serve. The mousse will be set after chilling for at least 2 hours. When you gently touch the top, it should feel firm but still soft. If it jiggles too much, it needs more time in the fridge. Once it is set, it will hold its shape when you scoop it out. You learned how to make a tasty lemon cheesecake mousse. We discussed the key ingredients, like cream cheese and heavy cream, and how to prepare them step by step. I shared tips for the best texture and ideas for presentation. You also discovered ways to adjust the recipe for your taste and how to store leftovers. Enjoying this dessert can be simple and fun. Try new flavors and make it your own. Happy mousse-making!

Lemon Cheesecake Mousse Delightful and Simple Dessert

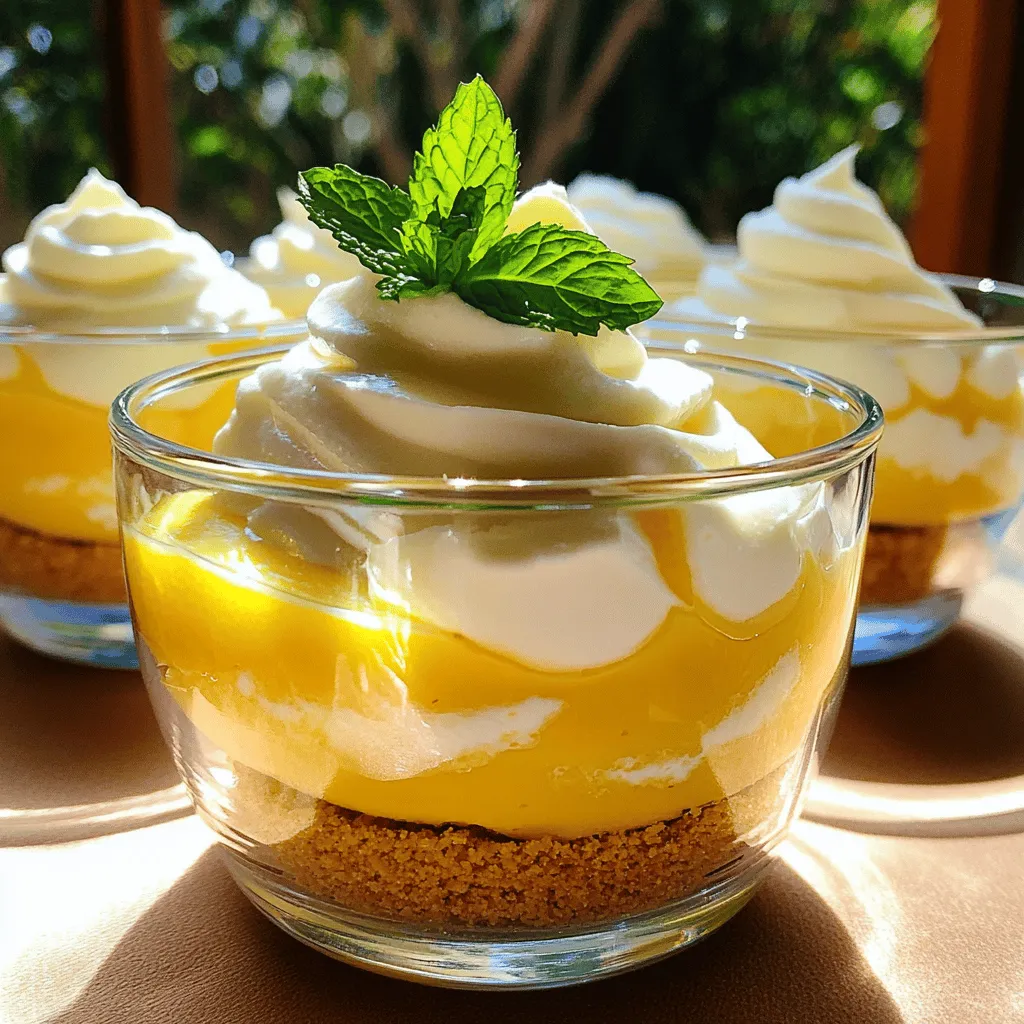
If you love dessert, you’re in for a treat! This Lemon Cheesecake Mousse is both delightful and easy to make.

- 1 cup rolled oats - 1/2 cup almond butter (or peanut butter) - 1/3 cup honey or maple syrup These main ingredients form the base of your no-bake chocolate oat bars. The rolled oats give a chewy texture. Almond butter adds a nutty flavor, while honey or maple syrup adds sweetness. - 1/4 cup cocoa powder - 1/4 teaspoon salt - 1/2 teaspoon vanilla extract The cocoa powder will turn your bars into a chocolatey treat. Salt balances the sweetness. Vanilla extract adds a nice aroma and depth to the flavor. - 1/2 cup dark chocolate chips - 1/4 cup chopped nuts (like walnuts or almonds) - 1/4 cup shredded coconut These optional ingredients let you customize your bars. Dark chocolate chips boost the chocolate flavor. Chopped nuts add crunch, and shredded coconut brings a tropical touch. Use any combo you like! Start by mixing rolled oats, cocoa powder, and salt. Use a large bowl for this. Stir until everything blends well. This step is key. It makes sure each oat gets coated in chocolate flavor later. Next, take a separate bowl. Warm almond butter and honey in the microwave for about 20 to 30 seconds. This makes them easier to mix. After warming, add vanilla extract. Stir until smooth. The warm mix helps blend better with the dry mix. Now, it’s time to combine! Pour the wet mix into the dry mix. Stir thoroughly until all oats are covered. You want a nice, even coating. Then, fold in dark chocolate chips and any extra additions like nuts or coconut. Mix gently until everything is well spread out. This step adds texture and flavor. To make sure all oats get a good coat, mix well. First, combine the dry ingredients in a bowl. This includes oats, cocoa powder, and salt. Make sure everything is blended evenly. Then, pour the melted almond butter and honey mixture into the dry mix. Stir with a sturdy spoon. Keep stirring until every oat is covered in chocolate goodness. This step is key to getting a tasty bar. To keep your bars fresh, store them in an airtight container. You can use a glass or plastic container with a lid. Place parchment paper between layers to avoid sticking. If you want to keep them longer, the fridge is a great spot. You can also freeze them for up to three months. Just wrap each bar tightly in plastic wrap before freezing. When it's time to serve, you can get creative! Cut the bars into fun shapes, like squares or rectangles. For a special touch, drizzle some melted chocolate on top. Pair these bars with fresh fruit or a scoop of yogurt. You can even pack them in lunchboxes for a sweet treat. Enjoy these bars with a hot cup of tea or coffee for a cozy snack. {{image_2}} You can play with flavors in these bars. Swap almond butter for peanut butter. Each nut butter brings its own taste. You can also use sun butter if you need a nut-free option. For sweeteners, try agave syrup or brown rice syrup. Each choice changes the flavor a bit. You can mix things up to find what you love most. If you want dairy-free options, use dairy-free chocolate chips. They melt and taste great in the bars. You can also swap regular sugar with coconut sugar or stevia. These choices keep the bars sweet without using traditional sugar. They make the bars a bit healthier too. Want a crunch? Add seeds like chia or flaxseeds. They give the bars extra fiber and a nice bite. You can also toss in dried fruits like raisins or cranberries. These fruits add sweetness and chewiness. Both options make your bars fun and interesting to eat. To keep your no-bake chocolate oat bars fresh, use an airtight container. Glass or plastic containers work well. Make sure the bars are fully cooled before placing them inside. You can also wrap them in parchment paper for extra protection. No-bake bars last about one week in the pantry. If you store them in the fridge, they can last up to two weeks. The cold helps keep the bars firm and fresh. Always check for any signs of spoilage before eating. To freeze your bars, cut them into squares first. Place them in a single layer on a baking sheet. Freeze for about an hour. Once firm, transfer the bars into a freezer-safe bag or container. To thaw, leave them in the fridge overnight or at room temperature for about 30 minutes. Enjoy your treat any time! You can use quick oats, but the texture will change. Quick oats are finer and soak up more moisture. This can make your bars softer and chewier. If you want a thicker bar, stick with rolled oats. They provide better structure and a heartier feel. The choice is yours, depending on what you prefer. These bars need to chill for about 1 to 2 hours. Chilling helps the bars set up nicely. If you want them to be firmer, let them chill longer. Check them after an hour. If they feel firm to the touch, they are ready. If not, give them some extra time. Yes, these bars can fit a vegan diet. Use maple syrup instead of honey for sweetness. Almond butter or peanut butter works well as a base. Also, choose dairy-free chocolate chips for a fully vegan treat. This way, you can enjoy a tasty snack that meets vegan needs. In this blog post, we explored how to create delicious no-bake chocolate oat bars. We covered the main ingredients, like oats and almond butter, and discussed how to mix them properly. I shared tips for storage and serving, plus ideas for variations to keep things fun. No-bake bars are easy to make and can fit many diets. Try making them your own with different flavors and add-ins. Enjoy your tasty treats and share them with friends!

No-Bake Chocolate Oat Bars Easy and Delicious Treat

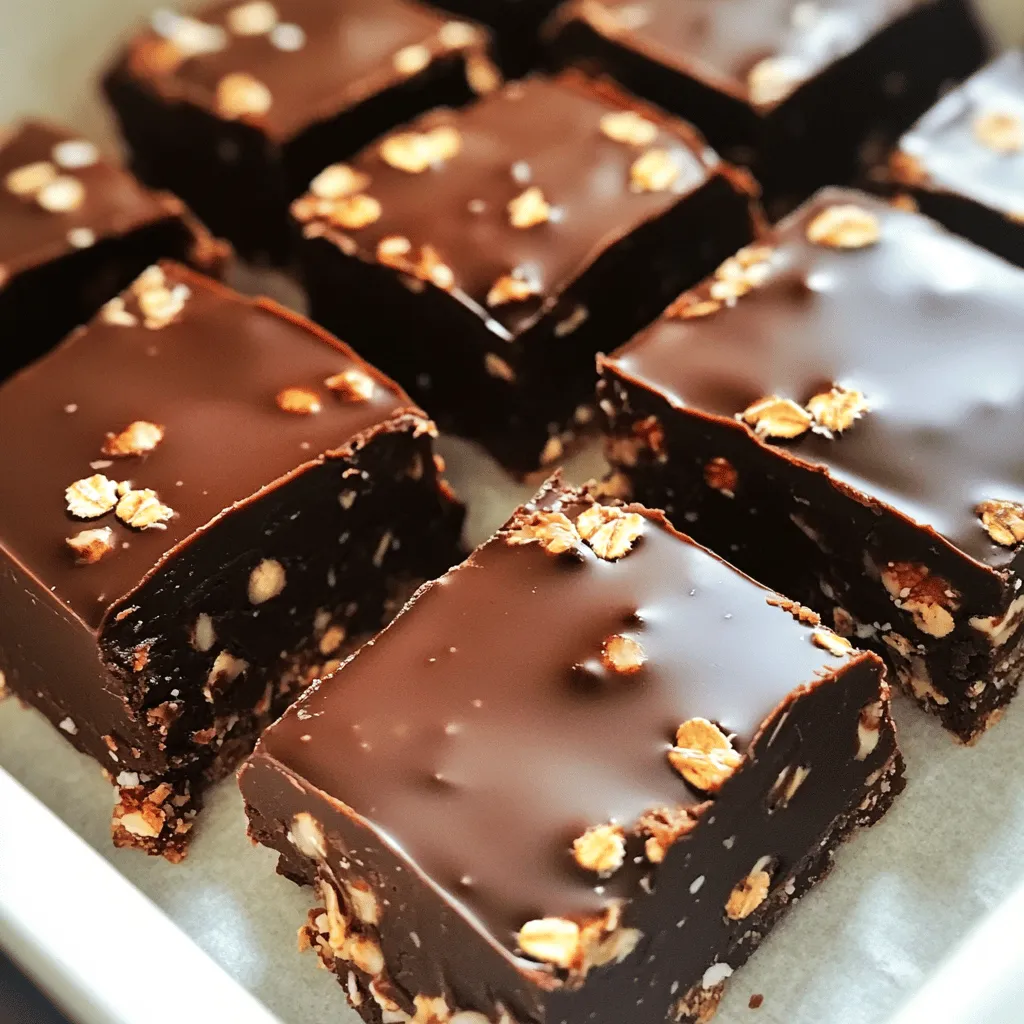
Are you looking for a sweet treat that’s quick, easy, and requires no baking? You’re in luck! No-bake chocolate oat

- Ripe avocado: A ripe avocado is creamy and rich. It adds a smooth texture to the dressing. Avocados are high in healthy fats and vitamins. They help keep your heart healthy and make the dressing filling. - Fresh cilantro leaves: Choose bright green cilantro with no brown spots. Fresh cilantro brings a fresh taste. It also adds color and brightness to your dressing. Wash it well to remove any dirt before using. - Lime juice: Always use fresh lime juice. It has a bright, zesty flavor that lifts the dressing. Bottled lime juice can taste flat. Fresh juice also has more nutrients. - Garlic: One clove of minced garlic gives a nice kick. Garlic adds depth and flavor. It also has health benefits, like boosting your immune system. - Olive oil: Use extra virgin olive oil for the best flavor. It is smooth and rich. Olive oil helps emulsify the dressing, making it creamy without dairy. - Honey or agave syrup: These sweeteners add a touch of sweetness. You can use honey for a floral note or agave for a milder taste. Both help balance the acidity of the lime juice. - Salt and pepper: These are key for seasoning. Add salt and pepper to enhance all the flavors. Start with a pinch and adjust to your taste. - Water: Water helps adjust the thickness of the dressing. Add a little at a time until you reach your desired consistency. This way, the dressing stays pourable and easy to use. To make this zesty avocado cilantro lime dressing, follow these easy steps. - Combining ingredients in the blender: Start by placing one ripe avocado, one cup of fresh cilantro leaves, two tablespoons of freshly squeezed lime juice, and one clove of minced garlic into your blender. This mix gives the dressing its vibrant flavor. - Achieving the right creaminess: Blend the mixture until it is completely smooth. Don’t forget to scrape down the sides of the blender to ensure all ingredients mix well. A creamy texture is key to a great dressing. - Emulsification technique with olive oil: With the blender running, slowly drizzle in 1/4 cup of olive oil. This method helps create a smooth and creamy dressing, binding all the flavors together. - Adjusting flavor balance with honey/agave: Next, add one teaspoon of honey or agave syrup. Blend again to mix it in well. This step balances the acidity from the lime and adds a touch of sweetness. - Final seasoning and consistency tweaks: Finally, season your dressing with salt and pepper to taste. If it feels too thick, add two tablespoons of water bit by bit until you reach your desired consistency. Always taste your dressing and adjust the lime juice or honey if needed. Now your fresh and flavorful dressing is ready to serve! Enjoy this dressing over salads or as a dip for veggies. To make a perfect dressing, blending matters. First, avoid common mistakes. Do not overload your blender. This can lead to uneven mixing. Instead, work in batches if needed. Next, ensure a smooth texture. Start with the avocado, cilantro, lime juice, and garlic. Blend these until you see no chunks. Scrape down the sides to mix well. While blending, slowly add the olive oil. This step creates a creamy emulsion. If it's too thick, add water a little at a time. Taste your dressing as you go. Adjust flavors by adding more lime juice or honey. This way, you get the right balance of flavors. This dressing shines in many ways. Use it on salads for a fresh kick. It pairs well with greens, tomatoes, and cucumbers. You can also drizzle it over tacos or grilled chicken. It adds great flavor and moisture. For a tasty dip, serve it with fresh veggies. Carrots, bell peppers, or celery work great. Garnish your dish with extra cilantro for a pop of color. It makes your meal look more inviting and fresh. {{image_2}} You can mix up your avocado cilantro lime dressing by changing a few ingredients. If you want a different taste, try using other herbs. Parsley and basil are great options. They add a fresh taste that pairs well with lime. You can also spice things up. A pinch of chili powder or a dash of cayenne can give your dressing a nice kick. This works well if you like heat in your food. Just start with a little and add more if you want. For a vegan option, swap honey with agave syrup. This keeps the sweetness without using any animal products. You can also use maple syrup for a unique flavor. Each option adds its own twist to the dressing. This dressing is versatile, making it perfect for many dishes. Use it as a dipping sauce for fresh veggies or chips. It adds a burst of flavor that makes snacks more fun. You can also use it as a marinade for proteins like chicken or tofu. Just coat your choice of protein and let it sit for a while. This adds flavor and keeps the meat juicy. It’s a simple way to elevate your meals. To keep your avocado cilantro lime dressing fresh, use a glass jar with a tight lid. Glass helps maintain flavor and prevents odors from seeping in. Always store it in the fridge. This dressing can last up to a week when stored correctly. To prolong shelf life, make sure to press plastic wrap against the surface before sealing the jar. This limits air exposure, which can cause browning. You could also add a bit more lime juice. The acidity helps slow down oxidation. You may not need to reheat this dressing, as it is best served cold. However, if it thickens after storage, add a splash of water to loosen it up. Blend it again for a smooth texture. To maintain the flavor, taste the dressing before using it again. You might want to adjust the seasoning. If it loses its fresh taste, a little extra lime juice or honey can help. This keeps the dressing vibrant and tasty. You can use this dressing on many dishes. It enhances salads with fresh greens. Try it on a simple cucumber and tomato salad for a zesty upgrade. This dressing pairs well with grilled vegetables too. You can drizzle it over roasted corn for a tasty side. Wraps and tacos are another great option. Spread it inside a tortilla with your favorite fillings. It adds flavor to chicken, beans, or even grilled shrimp. The creamy texture complements these ingredients well. You’ll love how it brightens every bite! Yes, you can make this dressing ahead of time. It stays fresh in the fridge for up to one week. Just place it in an airtight container. Before using, give it a good stir. If it thickens, add a little water to adjust. Freezing is not recommended for this dressing. The avocado might change texture when thawed. It’s best to enjoy it fresh for the best taste and texture. Absolutely! This dressing is vegan and gluten-free. It contains no animal products, making it perfect for plant-based diets. The olive oil and avocado provide healthy fats, while cilantro adds freshness. Nutritionally, this dressing offers good fats and vitamins. The avocado is rich in potassium and fiber. Lime juice adds vitamin C. Overall, it's a delicious way to boost your meal with health benefits! This blog post covered how to make a delicious avocado cilantro lime dressing. We explored all the key ingredients, like ripe avocados and fresh lime juice, and shared step-by-step instructions to achieve the perfect texture. I gave tips for blending and serving ideas, as well as variations for different tastes. Remember, using fresh ingredients makes a big difference. Make this dressing your own with the tips provided, and enjoy it on your favorite dishes. Keep experimenting, and you'll find new ways to savor this dressing.

Avocado Cilantro Lime Dressing Flavorful and Fresh Mix

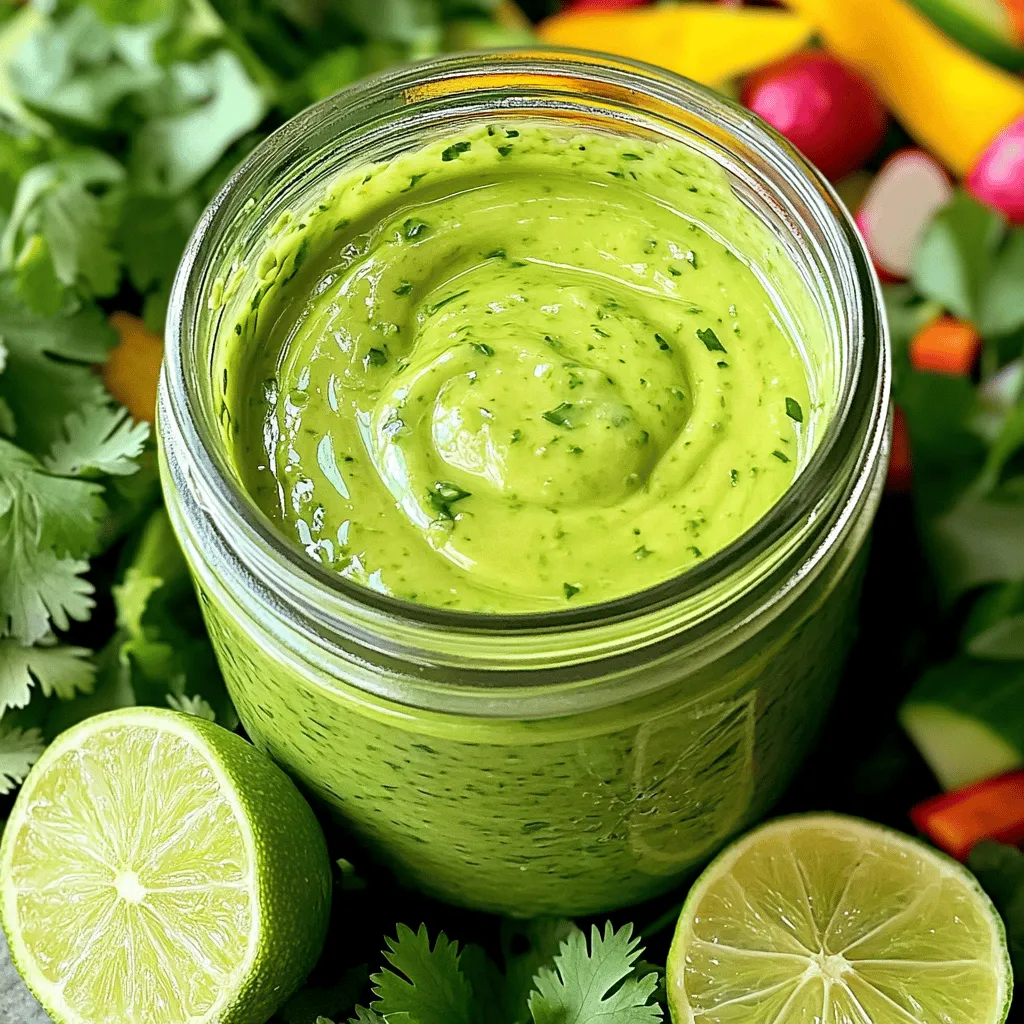
Ready to elevate your meals? This Avocado Cilantro Lime Dressing is your answer! With ripe avocados, fresh cilantro, zesty lime,

Older posts
Newer posts
← Previous Page1 … Page30 Page31 Page32 … Page82 Next →

dsad

© 2026 Recipes Pursuit • Built with GeneratePress

Our Policies

  • Copyright Policy
  • Cookie Policy
  • GDPR Policy
  • Privacy Policy
  • Disclaimer
  • Terms Of Use

More Information

  • Home
  • About
  • Contact
  • Appetizers
  • Dessert
  • Dinner
  • Drinks
©2026, Recipes Pursuit About Back To Top