Skip to content
DisclaimerTerms Of UseGDPR PolicyCookie Policy

Recipes Pursuit

  • Home
  • Drinks
  • Appetizers
  • Dinner
  • Dessert
  • About
  • Contact
  • Privacy Policy
DisclaimerTerms Of UseGDPR PolicyCookie Policy

NO-ING-IMG

To make delightful overnight mocha oatmeal jars, you need a few key items. Here’s the list: - 1 cup rolled oats - 2 cups almond milk (or any milk of choice) - 2 tablespoons cocoa powder - 2 tablespoons instant coffee granules - 2 tablespoons maple syrup (or honey) - 1 teaspoon vanilla extract - 1/4 teaspoon salt These ingredients blend well to create a rich, chocolatey flavor. Rolled oats soak up the milk and flavors overnight, making them soft. Almond milk adds a nutty taste. Cocoa powder brings in that chocolate kick, while coffee granules give a nice boost. Maple syrup or honey sweetens the mix, and vanilla adds depth. Salt enhances all these flavors. You can add more to your jars to make them unique. Here are some optional ingredients: - 1/2 cup Greek yogurt (for creaminess) Adding Greek yogurt makes the oatmeal richer and creamier. It also packs in protein, which keeps you full longer. If you want to switch things up, you can try other yogurt types, too. Just keep in mind that it will change the taste and texture. Toppings bring your mocha oatmeal to life! Here are some tasty options: - Chocolate chips - Sliced bananas - Chopped nuts - Shredded coconut These toppings not only add flavor but also texture. Chocolate chips give a sweet crunch. Sliced bananas add creaminess and sweetness. Chopped nuts offer a nice crunch, and shredded coconut gives a tropical feel. Feel free to mix and match your favorites for a fun and tasty breakfast! Start by gathering your large mixing bowl. Add the rolled oats to the bowl. Pour in the almond milk. Add the cocoa powder and instant coffee granules. These ingredients give the oatmeal its rich mocha flavor. Next, add the maple syrup to sweeten things up. Then, include the vanilla extract for a nice aroma. Finally, sprinkle in the salt. This helps to balance the sweetness. Stir everything together well. Make sure the cocoa powder and coffee granules dissolve fully. You want a smooth, chocolatey mix. If you want a creamier texture, now is the time to add Greek yogurt. Scoop the yogurt into your oatmeal mix. Stir it in until everything is smooth and well combined. The Greek yogurt adds a lovely richness. It also boosts the protein content, making this breakfast even better. Grab your jars or airtight containers. Divide the oatmeal mixture evenly among them. Leave a little space at the top. This space lets the oats expand as they soak up the liquid. Once filled, seal the jars tightly. Place them in the fridge overnight. If you’re short on time, let them chill for at least four hours. This helps the flavors blend beautifully. In the morning, give your oatmeal a good stir. If it seems too thick, add a splash of milk. Now, you’re ready to add your favorite toppings! To get the best texture for your overnight mocha oatmeal, start with rolled oats. They soak up the liquid well and hold their shape. Mix your oats with almond milk and other ingredients right away. This gives the oats time to soften overnight. If you prefer a creamier mix, add Greek yogurt. It makes the oatmeal rich and smooth. In the morning, check the thickness. If it feels too thick, stir in a bit more milk until it’s just right. To boost the flavor of your mocha oatmeal, focus on the cocoa and coffee. Use good quality cocoa powder and instant coffee granules. They enhance the chocolate and coffee taste. Maple syrup adds sweetness too. You can adjust the amount of syrup or honey based on your taste. Mixing in vanilla extract also helps round out the flavors, making the dish bright and tasty. These oatmeal jars are great for meal prep. Make a batch on Sunday for quick breakfasts all week. You can store them in the fridge for up to five days. For serving, layer toppings like chocolate chips, sliced bananas, or chopped nuts for a fun look. Use clear jars to show off the pretty layers. This makes them even more inviting. If you plan to take them on the go, seal the jars tightly to avoid spills. {{image_2}} If you want a dairy-free version, use almond milk or oat milk. Both options work well. You can also try coconut milk for a creamier taste. Just make sure to check the labels for added sugars. This way, you keep your breakfast healthy and tasty. To boost flavors, add a pinch of cinnamon or nutmeg. These spices pair well with chocolate and coffee. You can also mix in a scoop of peanut butter or almond butter for extra richness. If you like a fruity touch, add some berries or diced apples into the mix. If you want to change your sweetener, maple syrup works great. Honey is another good choice. You can also try agave syrup or stevia if you need a low-calorie option. Just remember, each sweetener has a different taste, so adjust to your liking. To keep your overnight mocha oatmeal fresh, use airtight jars. Glass jars work well, but any container with a tight seal will do. Fill the jars with the oatmeal mixture, but leave some space at the top. This space allows for the oats to expand as they soak. Seal the jars and place them in the fridge. Prepared overnight oatmeal can last up to five days in the fridge. This makes it a great option for meal prep. After a few days, the oats may lose some texture. If they seem too thick, add a little milk before eating. Always check for any off smells or changes in color before eating. You can freeze overnight oatmeal jars for longer storage. Just make sure to use freezer-safe containers. Store them for up to three months. When you’re ready to eat, thaw the jars in the fridge overnight. For a warm breakfast, microwave the oatmeal in a microwave-safe bowl. Heat it in short bursts, stirring in between, until warm. Add fresh toppings just before serving for the best taste and texture. Yes, you can use regular oats. They will work but may lead to a mushier texture. Rolled oats hold up better when mixed with liquid. So, if you want some chewiness, stick with rolled oats. Overnight oats last up to five days in the fridge. Just keep them in airtight jars. This makes them great for meal prep. You can enjoy different flavors all week long. You can use any milk you like. Options include oat milk, soy milk, or cow's milk. Each choice will give a slightly different taste. Choose what suits your diet and taste buds best. Yes, they can be vegan! Just use plant-based milk and maple syrup. If you decide to skip the Greek yogurt, your jars remain vegan-friendly. Enjoy a delicious breakfast that fits your needs! Overnight mocha oatmeal jars are easy to make and fun to customize. You can mix simple ingredients, add yogurt, and prepare jars for a quick breakfast. Remember to use tips for great texture and flavor. Variations like dairy-free options and sweetener swaps let you adjust to your taste. Store them well to keep them fresh. With these ideas, your mornings will be exciting and delicious. Enjoy a tasty start to your day!

Overnight Mocha Oatmeal Jars Easy Breakfast Delight

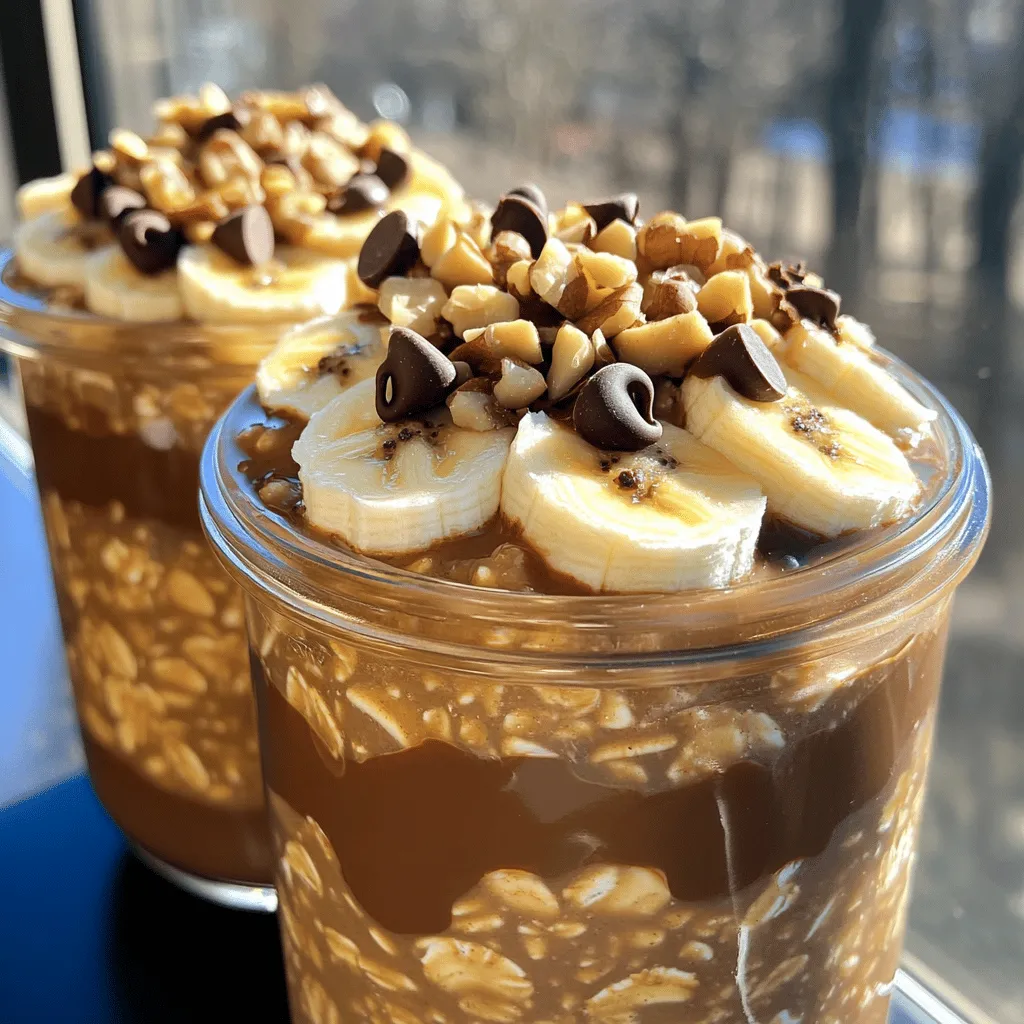
Start your day right with Overnight Mocha Oatmeal Jars! This easy breakfast delight offers the perfect mix of rich coffee

- 4 large bell peppers (any color, tops cut off and seeds removed) - 1 cup cooked quinoa - 1 can (15 oz) black beans, rinsed and drained These main ingredients create a great base for our stuffed peppers. The bell peppers provide a sweet and slightly crunchy shell. Cooked quinoa adds a nutty flavor and a filling texture. Black beans give extra protein and fiber, making these peppers satisfying. - 1 teaspoon cumin - 1 teaspoon smoked paprika - Salt and pepper to taste - 1 cup shredded cheese (cheddar or a blend) - Fresh cilantro for garnish Seasoning is key to making these stuffed peppers pop with flavor. Cumin brings warmth, while smoked paprika adds depth. Salt and pepper round out the taste. Topping with cheese adds a creamy layer, and cilantro gives a fresh burst at the end. - Additional vegetables (like diced onions or corn) - Different types of cheese (like mozzarella or pepper jack) - Spices and herbs for variation (like chili powder or oregano) Feel free to get creative with your stuffed peppers! You can add extra veggies for more nutrition or swap cheeses for a different taste. Choosing spices like chili powder can kick up the heat if you like it spicy. Prepping the bell peppers Start with four large bell peppers. You can pick any color you like. Cut off the tops and remove the seeds. Rinse them under cold water to clean. This helps get rid of any dirt. Set the peppers aside for now. Preparing the quinoa mixture In a big bowl, combine one cup of cooked quinoa. Add in a small onion, finely chopped, and two cloves of minced garlic. Next, mix in one can of black beans, rinsed and drained, and one cup of corn. You can use fresh or frozen corn based on what you have. Sprinkle in one teaspoon each of cumin and smoked paprika, along with salt and pepper to taste. Finally, add one cup of diced tomatoes. Stir everything together well. Make sure all the ingredients mix evenly. Setting the air fryer Preheat your air fryer to 375°F (190°C). Let it warm up for about five minutes. This step helps cook the peppers evenly. Cooking times and techniques Now, it’s time to stuff the peppers. Fill each pepper with the quinoa mixture. Press down lightly to pack it in. Place the stuffed peppers in the air fryer basket, making sure they stand upright. They should not touch each other. This ensures they cook evenly. Air fry them for 15 to 20 minutes. You want them to be tender and slightly charred on top. Adding cheese during cooking With five minutes left, take one cup of shredded cheese and sprinkle it on top of each pepper. This will melt beautifully and add extra flavor. Cooling and garnishing Once the cooking time is up, carefully remove the peppers from the air fryer. Let them cool for a few minutes. Before serving, garnish with fresh cilantro. This adds a nice touch and enhances the flavor. Enjoy your delicious air fryer stuffed peppers! - Best temperature settings: Set your air fryer to 375°F (190°C). This temperature cooks the peppers evenly and helps them become tender. - How to avoid soggy peppers: To keep your peppers firm, do not overstuff them. Leave a little space at the top. Also, ensure they are upright in the air fryer for good air circulation. - How to cook quinoa perfectly: Rinse the quinoa before cooking. Use a ratio of 2 cups of water to 1 cup of quinoa. Bring it to a boil, then reduce the heat to low and cover. Cook for about 15 minutes until all water is absorbed. - Alternative cooking methods for quinoa: You can also cook quinoa in a rice cooker or Instant Pot. Both methods give you fluffy quinoa with little effort. - Serving suggestions: Serve the stuffed peppers on a large platter. Drizzle with olive oil and add a sprinkle of fresh cilantro for a pop of color. - Plating ideas for a beautiful meal: Cut the peppers in half for a colorful display. Use a bed of greens or quinoa to elevate the peppers and create height on your plate. {{image_2}} You can change the protein in stuffed peppers. Ground turkey or chicken works well. These options add a hearty touch. For a plant-based twist, try black beans or lentils. They pack protein and fiber too. You can even use tempeh for a nutty flavor. Spices can change the game for stuffed peppers. Try adding chili powder for some heat. If you love smokiness, add more smoked paprika. Cheese also adds richness. Cheddar is great, but mozzarella or pepper jack can add fun flavors. Think about what to serve with your stuffed peppers. A fresh salad pairs well for a light meal. You can also serve rice or quinoa on the side. For gatherings, cut the peppers into smaller pieces. This way, guests can easily enjoy them. Presentation matters, so arrange them on a colorful platter. Add a sprinkle of fresh cilantro for a pop of color. To store cooked stuffed peppers, let them cool first. Then, place them in an airtight container. This keeps them fresh in the fridge for up to four days. If you want to keep them longer, consider freezing. Make sure to wrap each pepper in plastic wrap before placing them in a freezer-safe bag. This extra layer helps prevent freezer burn. Label the bags with the date to track freshness. You can freeze stuffed peppers either before or after cooking them. If you freeze them raw, prepare and stuff them, then freeze. Place them in a single layer on a tray until firm. Once frozen, transfer them to freezer bags. If you freeze cooked peppers, let them cool completely first. To reheat, thaw overnight in the fridge. Then, air fry at 375°F for about 10 minutes. This warms them through and restores some crispness. Stuffed peppers can last in the fridge for up to four days. Signs of spoilage include a sour smell or mushy texture. If you see mold or any unusual color, it's best to toss them. When properly frozen, they can last up to three months. Always check for signs of spoilage before eating. Can I make these stuffed peppers ahead of time? Yes, you can make stuffed peppers ahead. Prepare them up to the cooking step and store them in the fridge. They stay good for 1-2 days. When you are ready, just pop them in the air fryer. This makes meal prep easy and saves time. What is the best air fryer for stuffed peppers? The best air fryer for stuffed peppers has a good size and even heating. Look for one that fits 4 large peppers comfortably. Brands like Ninja and Instant Pot are great choices. They cook evenly and have easy controls. How healthy are quinoa-stuffed peppers? Quinoa-stuffed peppers are very healthy. They are low in calories and high in fiber. They also provide protein and essential vitamins. This dish is a great choice for a balanced meal. What are the nutritional benefits of quinoa? Quinoa is a super grain. It is packed with protein and fiber. It also has vitamins and minerals like magnesium and iron. Quinoa helps keep you full and is gluten-free. This makes it perfect for a healthy diet. What can I use instead of quinoa? You can use rice, couscous, or farro instead of quinoa. Each will change the flavor and texture a bit. Choose what you like best or what you have on hand. Can I use frozen peppers for this recipe? Yes, you can use frozen peppers. Just thaw them first and drain any extra water. This helps avoid soggy peppers when cooking. They can still taste great and be a quick option! You now have all the tools needed to make delicious quinoa-stuffed peppers. We covered the key ingredients like bell peppers, cooked quinoa, and black beans, along with great seasoning tips. I shared step-by-step instructions for prep and cooking. I also offered helpful tips, variations, and storage info to make your cooking experience easier. Enjoy experimenting with flavors and designs. These stuffed peppers are tasty, healthy, and fun to prepare. Get cooking and share your creations!

Air Fryer Stuffed Peppers with Quinoa Flavor Boost

Are you ready to transform your mealtime? These Air Fryer Stuffed Peppers with Quinoa pack a flavor punch while being

- 1 pound large shrimp, peeled and deveined - 1 red bell pepper, sliced - 1 yellow bell pepper, sliced - 1 red onion, sliced - 3 tablespoons olive oil - 4 cloves garlic, minced - 1 teaspoon smoked paprika - 1 teaspoon cumin - 1 teaspoon dried oregano - 1 teaspoon chili powder - Juice of 1 lime - Salt and pepper to taste - Fresh cilantro for garnish - Tortillas for serving Gather these ingredients to make your Sheet Pan Garlic Herb Shrimp Fajitas. The shrimp provide a tender protein, while the peppers and onions add crunch and color. The seasoning mix brings bold flavor that dances on your taste buds. Fresh cilantro adds a bright finish, and warm tortillas hold everything together. With these ingredients, you can create a meal that is both easy and delicious. 1. First, preheat your oven to 400°F (200°C). This step is key for cooking the shrimp and veggies evenly. 2. Line a large baking sheet with parchment paper. This makes cleanup a breeze. 3. In a bowl, mix 3 tablespoons of olive oil, 4 minced garlic cloves, 1 teaspoon each of smoked paprika, cumin, dried oregano, and chili powder. Add lime juice, salt, and pepper. Whisk until blended. This mixture is your flavor base. 1. Now, add 1 pound of peeled and deveined shrimp, along with sliced red and yellow bell peppers and red onion. Toss everything together to coat in the seasoning. 2. Spread the shrimp and veggies in a single layer on the baking sheet. This helps them cook evenly. 1. Bake in the preheated oven for 12-15 minutes. Check that the shrimp turns pink and the veggies get tender. 2. Once done, take them out and let cool for a few minutes. 3. Serve the fajitas in warm tortillas, garnished with fresh cilantro. Enjoy your meal! - Best practices for selecting shrimp: Look for large shrimp that are firm and shiny. They should smell fresh, like the ocean. Avoid any shrimp with a strong fishy scent. When possible, buy shrimp that are wild-caught for better taste and quality. - Ensuring shrimp doesn't overcook: To prevent overcooking, keep a close eye on the shrimp while baking. They cook fast and should only take 12-15 minutes. When they turn pink and opaque, they are done. Remove them from the oven right away to keep them juicy. - Adding extra spices for a kick: If you like heat, consider adding cayenne pepper or red pepper flakes. A little goes a long way, so start small and adjust to your taste. You can also use fresh herbs like cilantro or parsley for a fresh boost. - Alternative oils for different flavor profiles: While olive oil is great, you can try avocado oil for a lighter taste. Grapeseed oil also works well and has a high smoke point. Each oil adds a unique flavor to your dish. - Pairing with sides or dips: Serve your fajitas with sides like black beans, rice, or a fresh salad. Guacamole or salsa makes great dips. These add more flavor and color to your meal. - Creative tortilla alternatives: If you want to mix it up, try lettuce wraps instead of tortillas. You can also use corn tortillas for a gluten-free option. For a fun twist, consider using pita bread or even quinoa bowls as a base. {{image_2}} You can swap shrimp for chicken or beef. Cut the meat into strips and follow the same steps. The cook time will be similar. If you want a vegetarian option, try using mushrooms or tofu. Slice the mushrooms or cube the tofu and treat them just like the shrimp. This way, everyone can enjoy fajitas. You can change the flavor by using a Southwestern spice mix. This mix often includes chili powder, garlic powder, and cayenne. For a fresh twist, add chopped herbs like cilantro or parsley. These herbs boost the flavor and make the dish more vibrant. Experiment with what you like best. Feel free to include other veggies, like zucchini or corn. Just slice them up and toss them with the shrimp and spices. They add more texture and flavor. Adding cheese or creamy avocado can make the dish richer. Top your fajitas with these add-ins for a delicious finish. To store your leftover fajitas, let them cool first. Place the shrimp and veggies in an airtight container. Make sure to keep the tortillas separate to avoid sogginess. If stored correctly, they will last in the fridge for up to three days. This way, you can enjoy them again without losing flavor. If you want to keep your fajitas for longer, freezing is a great option. Pack the shrimp and veggies in a freezer-safe container or bag. Remove as much air as possible before sealing. They can last in the freezer for up to three months. When you are ready to eat, thaw them in the fridge overnight. Reheat them in a pan over medium heat until warm. Get creative with your leftovers! You can easily use the shrimp and veggies in salads. Toss them with greens, avocado, and a light dressing for a fresh meal. You can also add them to grain bowls. Mix them with rice or quinoa, and top with a squeeze of lime for extra flavor. Using leftovers this way makes meals fun and easy. The best way to cook shrimp is quick and hot. Shrimp cooks fast. You want them pink and firm. Here are some techniques for perfect shrimp every time: - Preheat Your Oven: Always start with a hot oven at 400°F (200°C). This helps the shrimp cook evenly. - Single Layer: Spread the shrimp and veggies in a single layer. This allows for even cooking and browning. - Timing: Bake for 12-15 minutes. Keep an eye on them. Overcooked shrimp can become rubbery. - Check Doneness: Look for that lovely pink color. They should be opaque, not transparent. Yes, you can use frozen shrimp for this recipe. Here are some guidelines for thawing and using frozen shrimp: - Thawing: Place frozen shrimp in a bowl of cold water for about 15 minutes. Change the water if needed. - Pat Dry: Once thawed, make sure to pat the shrimp dry. This helps the seasoning stick better. - Cooking: You will follow the same cooking instructions. Just ensure they are fully thawed before baking. To make fajitas spicier, you can add more heat without overpowering the dish. Here are some tips: - Use Extra Chili Powder: Increase the chili powder in the seasoning mix. Start small and taste as you go. - Fresh Peppers: Add sliced jalapeños or serrano peppers for fresh heat. - Hot Sauce: Drizzle some hot sauce on top before serving. This gives a nice kick. - Spicy Seasoning Blends: Look for spicy taco seasoning blends to mix in with your spices. You learned how to make delicious shrimp fajitas. We covered key ingredients, step-by-step prep, and cooking tips. You can customize this dish with different proteins and spices. Remember to store leftovers properly and get creative with reuse ideas. Fajitas are fun and easy to make, so enjoy your cooking!

Sheet Pan Garlic Herb Shrimp Fajitas Easy Dinner Idea

Looking for a quick and tasty dinner? These Sheet Pan Garlic Herb Shrimp Fajitas are just what you need! In

- 2 cups pretzel sticks - 1 cup semi-sweet chocolate chips - 1 cup white chocolate chips - 1/2 cup crushed nuts (almonds or peanuts) - 1/4 cup colorful sprinkles - Sea salt to taste - Other nut types (e.g., walnuts, pecans) - Different types of chocolate (dark chocolate, milk chocolate) - Flavoring options (e.g., peppermint extract) For this chocolate covered pretzel bark, the ingredients are key. The pretzel sticks give a nice crunch, while the chocolate adds sweetness. You can use semi-sweet chocolate chips for a rich flavor. The white chocolate chips provide a nice contrast. Adding nuts, like almonds or peanuts, gives extra texture. Colorful sprinkles make it fun and appealing. You can customize your bark too. Swap in other nuts like walnuts or pecans. Try different chocolates, such as dark or milk chocolate. You can even add flavor, like a hint of peppermint. This allows you to make a treat that suits your taste. Keep these ingredients handy for a fun and easy treat. You will love how simple and delicious this recipe is! First, preheat your oven to 350°F (175°C). This step is key for crisping the pretzels. Next, spread 2 cups of pretzel sticks evenly on a lined baking sheet. Bake them for about 5 to 7 minutes. You want them warm and just starting to crisp. After baking, take them out and let them cool down. Now it's time to melt the chocolate. In a microwave-safe bowl, add 1 cup of semi-sweet chocolate chips. Microwave them in 30-second intervals. Stir them in between until they are smooth and melted. This usually takes about 1 to 2 minutes. In another microwave-safe bowl, add 1 cup of white chocolate chips. Repeat the same melting process. Make sure they are smooth as well. Pour the melted semi-sweet chocolate over the cooled pretzel sticks on the baking sheet. Spread it evenly using a spatula. Next, drizzle the white chocolate over the top, creating a zigzag pattern. Use a toothpick to swirl the two chocolates together for a nice marbled effect. While the chocolate is still soft, sprinkle on 1/2 cup of crushed nuts and 1/4 cup of colorful sprinkles. Finish with a light sprinkle of sea salt for balance. Place the baking sheet in the refrigerator for about 30 minutes. Let the chocolate fully harden. Once set, break the bark into pieces and store it in an airtight container. Enjoy your treat! To get smooth melted chocolate, use a microwave-safe bowl. Place your chocolate chips in the bowl. Heat them in short bursts of 30 seconds. Stir the chocolate well after each interval. This method helps the chocolate melt evenly. If you notice lumps, don’t panic! Stirring will help break them down. If you heat too long, the chocolate may seize. Seized chocolate becomes grainy and thick. To avoid this, never add water. Keep the bowl dry. For added fun, think about toppings! You can use crushed nuts, like almonds or peanuts. They add a nice crunch. Want more color? Try colorful sprinkles. They make the bark look festive. Balance is key with flavors. The saltiness of pretzels pairs well with sweetness. A sprinkle of sea salt on top can enhance the taste. It adds a nice contrast to the sweet chocolate. You can also try adding a hint of sea salt to your melted chocolate. It gives a lovely touch! {{image_2}} One fun way to change your chocolate covered pretzel bark is by adding flavors. You can try two tasty options: - Peanut Butter Pretzel Bark: Mix in some creamy peanut butter. After you melt the semi-sweet chocolate, swirl in the peanut butter before spreading it over the pretzels. This gives a rich, nutty taste. - Mint Chocolate Pretzel Bark: Add a few drops of peppermint extract to the melted chocolate. This gives a fresh and cool flavor that pairs well with the saltiness of the pretzels. You can also use green or white sprinkles to enhance the mint theme. You can also make your bark fit the seasons with easy changes: - Holiday-Themed Bark: For Halloween, use orange and black sprinkles. For Christmas, add red and green sprinkles or even mini candy canes. This makes your bark festive and fun for any holiday party. - Summer Fruit-Infused Bark: In the summer, you can try adding dried fruits. Chopped dried strawberries, blueberries, or even mango pieces give a fruity twist. These flavors make the bark light and refreshing, perfect for hot days. To keep your chocolate-covered pretzel bark fresh, store it in an airtight container. This helps prevent moisture from ruining the texture. Make sure to place a layer of parchment paper between the layers if you stack them. The shelf life of the bark is about two weeks at room temperature. If you want to keep it longer, consider freezing it. If you have extra bark, freezing is a good option. First, let the bark cool and harden completely. Then, wrap it tightly in plastic wrap. After that, place the wrapped bark in a freezer-safe bag or container. To thaw the bark, take it out of the freezer and leave it at room temperature. This usually takes about 30 minutes. For the best results, do not rush the process by using heat. Enjoy your tasty treat! Yes, you can swap chocolates! Here are some tasty options: - Dark chocolate for a rich flavor. - Milk chocolate for a sweeter taste. - White chocolate will add creaminess. - Add flavored chocolates like mint or orange. You’ll know the chocolate is ready when: - It looks smooth and glossy. - No lumps remain. - It stirs easily without clumps. Check after each 30-second melt in the microwave. To break the bark neatly, follow these tips: - Chill the bark until hard. - Use a sharp knife for clean cuts. - For rustic pieces, tap it gently with a rolling pin. This keeps your pieces from crumbling too much. Making chocolate-covered pretzel bark is fun and easy. We covered the ingredients, steps, tips, and variations to personalize your treat. You learned how to melt chocolate perfectly and create tasty combinations. Remember, use different chocolates or toppings to make it your own. Store your bark well, and enjoy it for weeks. With just a few items and steps, you can impress friends and family. Dive in and make your own yummy bark today!

Chocolate Covered Pretzel Bark Easy and Fun Treat

Are you ready to whip up a fun and tasty treat? Chocolate Covered Pretzel Bark is the perfect mix of

- 1 large sweet potato, peeled and cubed - 1 can (15 oz) chickpeas, rinsed and drained - 2 cups cooked quinoa Sweet potatoes add a sweet and creamy base to your bowl. Chickpeas offer protein and fiber, making the dish hearty. Quinoa is a great grain choice that is gluten-free and full of nutrients. - 1 tablespoon olive oil - 1 teaspoon smoked paprika - 1 teaspoon ground cumin - ¼ cup tahini Olive oil helps roast the sweet potatoes and chickpeas. Smoked paprika gives a nice smoky flavor. Cumin adds warmth and depth. Tahini works as a rich, creamy dressing. - 2 cups baby spinach - ½ cup cherry tomatoes, halved - ¼ cup red onion, thinly sliced - Fresh cilantro (optional) Baby spinach gives a fresh and vibrant touch. Cherry tomatoes add juiciness and brightness. Red onion offers a crunchy bite. Fresh cilantro can enhance the dish with its unique flavor. First, you need to preheat your oven to 400°F (200°C). This step is key for roasting. A hot oven helps the sweet potatoes get crispy and golden. Next, take your large sweet potato. Peel and cube it into small pieces. In a big bowl, toss the cubed sweet potatoes with olive oil, smoked paprika, ground cumin, salt, and pepper. Spread the sweet potatoes out on a baking sheet in one layer. Roast them for 25-30 minutes. Flip them halfway through to cook evenly. They should be tender and golden when done. While the sweet potatoes roast, grab a can of chickpeas. Rinse and drain them well. In a bowl, mix the chickpeas with a splash of olive oil, cumin, smoked paprika, salt, and pepper. Spread the seasoned chickpeas on a different baking sheet. Roast them for about 15-20 minutes. You want them crispy, so keep an eye on them. Now, let’s make the tahini dressing. In a small bowl, whisk together tahini, lemon juice, maple syrup, and a bit of water. Keep mixing until it's smooth. Adjust the water until the dressing is the thickness you like. It’s time to put everything together! In a serving bowl, start with a layer of cooked quinoa at the bottom. Add a handful of fresh baby spinach on top. Next, layer the roasted sweet potatoes, crispy chickpeas, halved cherry tomatoes, and thinly sliced red onion. Finally, drizzle the tahini dressing generously over each bowl. You can add fresh cilantro on top if you want. This adds a nice touch and flavor. Serve your Buddha bowls right away for the best taste! To get the best sweet potatoes, cut them into even cubes. This helps them cook evenly. Aim for about 1-inch pieces. Toss the cubes with olive oil, smoked paprika, cumin, salt, and pepper. This blend gives great flavor. Spread them on a baking sheet in one layer. This way, they roast well without steaming. For crispy chickpeas, start with drained and rinsed ones. Dry them well with a towel. Toss them in a bowl with a splash of olive oil and seasonings. Use cumin, paprika, salt, and pepper for extra taste. Spread them on a baking sheet in a single layer. Roast them for 15-20 minutes. Keep an eye on them to get the perfect crunch. Making tahini dressing is easy. Mix tahini, lemon juice, and maple syrup in a bowl. Start with a little water and whisk until smooth. If it’s too thick, add more water slowly. For a thinner dressing, keep adding a bit until you get the right thickness. This dressing will bring all the flavors together. {{image_2}} To make your Sweet Potato Chickpea Buddha Bowls even heartier, add extra protein. Here are some great options: - Grilled chicken or tofu for a protein boost - Hard-boiled eggs for creaminess - Sliced avocado for healthy fats - Edamame for a fun texture These proteins blend well with the sweet potato and chickpeas. They add flavor and nutrition. You can mix and match to find your favorite combination. Seasonal veggies can bring new life to your bowls. Here are some swaps you can try: - Use roasted zucchini or bell peppers in summer - Add butternut squash in fall for sweetness - Try kale or Swiss chard for winter greens - Incorporate fresh asparagus in spring These veggies not only taste great but also add color. Each season offers new flavors to explore. Changing up spices or dressings can take your bowls to the next level. Here are some ideas: - Use curry powder instead of smoked paprika for warmth - Try a spicy harissa dressing for a kick - Add fresh herbs like basil or mint for brightness - Squeeze lime juice instead of lemon for a zesty twist Experimenting with flavors keeps your meals exciting. Don’t be afraid to get creative! Store any leftovers in a sealed container. Place them in the fridge. They stay fresh for up to four days. Make sure to keep the tahini dressing separate to avoid sogginess. This keeps the salad crisp and tasty. To reheat, use a microwave or oven. If using a microwave, heat on medium power for one to two minutes. Stir halfway to warm evenly. For the oven, preheat to 350°F (175°C) and heat for about 10 minutes. This helps keep the sweet potatoes soft and the chickpeas crispy. You can freeze the sweet potatoes and chickpeas separately. Use airtight containers or freezer bags. They can last up to three months in the freezer. When ready to eat, thaw them in the fridge overnight. Reheat as described above for best results. If you need a chickpea substitute, you have options. You can use black beans or lentils. Both add great protein and flavor. White beans also work well in this bowl. They have a creamy texture and blend nicely with other ingredients. You might also try edamame for a fresh twist. Each option brings its own taste, so feel free to experiment! Yes, this recipe is already vegan! All the ingredients are plant-based. The sweet potatoes, chickpeas, quinoa, and veggies fit perfectly in a vegan diet. The tahini dressing is made with lemon juice and maple syrup, which are also vegan. It’s a guilt-free meal that everyone can enjoy. You can switch up the grains in your Buddha bowl. Quinoa is great, but you can try brown rice for a heartier feel. Farro or barley also add a nice texture. If you want something lighter, try cauliflower rice. Each grain will change the flavor and feel of the dish, so choose what you like best! To keep this bowl gluten-free, stick with quinoa or rice. Both are naturally gluten-free. When choosing your tahini, check the label to ensure it is gluten-free. Most brands are safe, but it’s good to verify. Enjoy your meal without worries about gluten! This blog post explored how to create delicious Buddha bowls. We covered the key ingredients, like sweet potatoes, chickpeas, and quinoa. I shared step-by-step instructions for roasting and assembling your bowl. You learned tips for perfect textures, fun variations, and smart storage options. In the end, these bowls are not just tasty; they’re easy and adaptable. Enjoy creating your own unique flavors and combinations!

Sweet Potato Chickpea Buddha Bowls Nutritious Delight

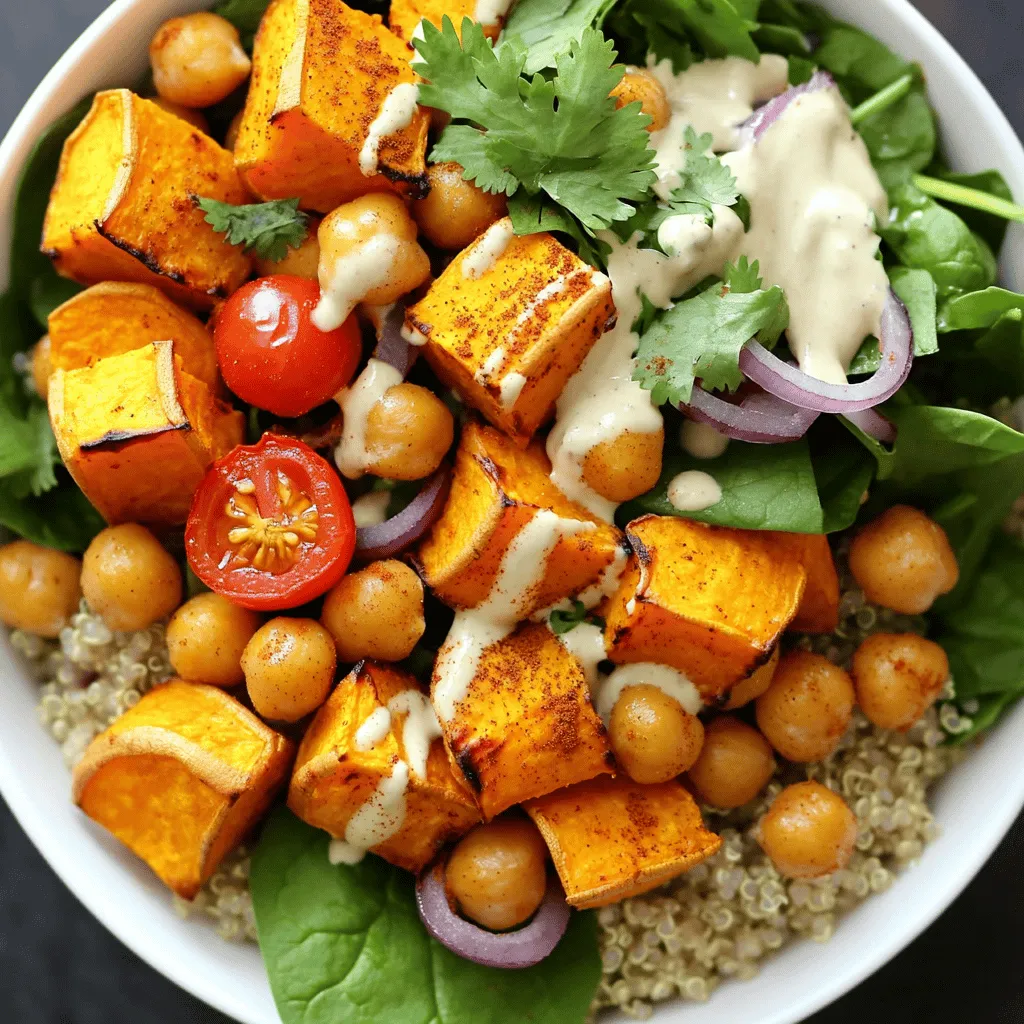
Looking for a tasty, wholesome meal? Sweet Potato Chickpea Buddha Bowls are your answer! Bursting with flavor, these bowls are

- 1 lb ground turkey - 1/4 cup teriyaki sauce - 1 tablespoon grated ginger - 1 clove garlic, minced - 1 tablespoon sesame oil - Salt and pepper to taste - 4 large leaves of iceberg or romaine lettuce - 1/2 cup shredded carrots - 1/2 cucumber, thinly sliced - 1/4 cup chopped green onions (scallions) - Sesame seeds for garnish These ingredients come together to create a tasty meal. Ground turkey gives a lean protein base. Teriyaki sauce adds a sweet and savory flavor. Grated ginger and minced garlic bring warmth and depth. Sesame oil adds a nice nutty taste. Salt and pepper enhance all the flavors. For the wraps, choose iceberg or romaine lettuce. These lettuce types are crisp and sturdy. They hold the filling well, making them perfect for wraps. Shredded carrots add crunch and color. Cucumber slices provide freshness. Chopped green onions give a mild onion flavor. Finally, sesame seeds make a delightful garnish. They add texture and a touch of elegance. With these ingredients, you create a balanced, fun meal that looks great and tastes even better. To start, grab a mixing bowl. Add the ground turkey, teriyaki sauce, grated ginger, minced garlic, sesame oil, salt, and pepper. Mix all the ingredients well. You want a nice blend with no clumps. If you use your hands, it helps to get everything mixed better. Make sure your hands are clean before you start! Now, shape the turkey mixture into patties. You can make about four medium-sized patties. Press gently to form a nice round shape. To cook, heat a non-stick skillet or grill over medium heat. Cook each patty for about 5-6 minutes on each side. Check that they turn golden brown. The internal temperature should reach 165°F or 75°C. This ensures they are fully cooked and safe to eat. While the burgers cook, prepare your lettuce leaves. Wash them well and pat them dry with a towel. Choose large leaves for easy wrapping. Once the patties are done, take a lettuce leaf and lay it flat. Place a turkey burger on it. Top with shredded carrots, cucumber slices, and chopped green onions. Finish with a sprinkle of sesame seeds for crunch. Now, fold the lettuce around the filling like a taco. Enjoy your meal right away! To cook the turkey burgers well, use a non-stick skillet or a grill. Heat it over medium heat for even cooking. Make sure to check the internal temperature. It should reach 165°F or 75°C. Cooking for about 5-6 minutes on each side gives a nice golden color. This keeps the burgers juicy and flavorful. Adding toppings makes these burgers even better. Try adding sliced avocado for creaminess. You can also use sriracha for a spicy kick. Fresh herbs like cilantro or mint add a bright flavor. A drizzle of extra teriyaki sauce brings out the sweetness. To avoid dry turkey burgers, do not overcook them. Ground turkey can dry out easily. Always use a meat thermometer to check doneness. Mix your ingredients just until combined; over-mixing can make them tough. Adding some grated onion or a bit of olive oil can help keep them moist, too. {{image_2}} You can switch the ground turkey for other proteins. Chicken works well and stays juicy. Beef also creates a great flavor. For a plant-based option, try black beans or lentils. These choices let you enjoy the same taste in different ways. You can change the flavors of your burgers easily. Try adding different sauces like barbecue or sriracha. If you want spice, add red pepper flakes or cayenne. For a sweet touch, mix in hoisin sauce or honey. Experimenting with spices can really change the dish! Pair your lettuce wraps with tasty sides. Crunchy vegetable sticks, like carrots and celery, work well. You can also serve them with rice or quinoa for a complete meal. Adding a simple side salad can boost freshness too. Enjoy your meal with a refreshing drink like iced tea! To keep your teriyaki turkey burgers fresh, store them in airtight containers. If you have extra lettuce, keep it separate. Place the turkey burgers in the fridge within two hours after cooking. If you want to freeze them, wrap each patty in plastic wrap before placing it in a freezer bag. This helps prevent freezer burn. When you're ready to eat your leftovers, use the stove or microwave. For the stove, heat a skillet over medium heat. Add a little oil, then cook the patties for about 3-4 minutes on each side. This will keep them juicy. If you use the microwave, place the burger on a plate. Heat it for 30 seconds, then check if it's warm. Repeat in 15-second bursts if needed. In the fridge, your teriyaki turkey burgers will last about 3-4 days. If frozen, they can last up to 3 months. Just remember to label your containers with the date. This way, you can enjoy them later without any guesswork. You can use soy sauce mixed with honey. This mix gives a sweet and salty taste. Another option is to use hoisin sauce. It has a similar flavor and works well. You might also try making a quick blend of soy sauce, brown sugar, and rice vinegar. This blend can mimic teriyaki sauce nicely. Yes, you can grill these turkey burgers! Preheat your grill to medium heat. Make sure to oil the grill grates to prevent sticking. Cook each patty for about 5-6 minutes on each side. Check that the internal temperature reaches 165°F (75°C) for safety. Grilling gives the burgers a nice smoky flavor and crispy edges. Yes, there are great low-carb options! You can use cabbage leaves instead of lettuce. They are sturdy and tasty. Another choice is to use zucchini slices or bell pepper strips. Both add crunch and flavor without the carbs. You can also use low-carb tortillas if you prefer a wrap. You now have a complete guide to making tasty turkey lettuce wraps. We covered key ingredients, step-by-step cooking, and tips for flavor. Remember, using fresh toppings enhances your wraps. Avoid common mistakes to keep your burgers juicy. Feel free to try different proteins and flavors to suit your taste. Prepare and store leftovers wisely for future meals. Enjoy making these healthy wraps, and impress your family or friends!

Teriyaki Turkey Burger Lettuce Wraps Flavorful Meal

Looking for a tasty and healthy meal? Try my Teriyaki Turkey Burger Lettuce Wraps! These wraps pack a big flavor

- 1 ½ cups graham cracker crumbs - ½ cup unsweetened shredded coconut - ½ cup unsalted butter, melted - 1 (8 oz) package cream cheese, softened - 1 cup sweetened condensed milk To create the perfect base for these cheesecake bars, I start with graham cracker crumbs. They add a nice crunch. I mix them with unsweetened shredded coconut. This gives a tropical feel to the crust. Then, I add melted unsalted butter to bind everything together. Next comes the creamy filling. I use softened cream cheese for a smooth texture. Sweetened condensed milk makes the filling rich and sweet. This combination forms the heart of the cheesecake bars. - 1/3 cup fresh lime juice - Zest of 2 limes - 1 teaspoon vanilla extract Now, let's talk about flavor. Fresh lime juice adds a zesty kick. I also include lime zest for a deeper flavor. Vanilla extract rounds out the taste, making it well-balanced and delightful. - Extra shredded coconut For a fun touch, I sometimes sprinkle extra shredded coconut on top. It adds a nice visual and texture contrast. This simple garnish makes the bars look even more inviting. - Preheat your oven to 350°F (175°C). - In a medium bowl, combine 1 ½ cups graham cracker crumbs, ½ cup unsweetened shredded coconut, and ½ cup melted unsalted butter. Mix well. - Press this mixture firmly into the bottom of a greased 9x9 inch baking dish. Bake for 10 minutes, then take it out and let it cool slightly. - In a large mixing bowl, beat 1 (8 oz) package of softened cream cheese until smooth. - Gradually add in 1 cup of sweetened condensed milk. Mix until it is well combined and fluffy. - Next, add 1/3 cup of fresh lime juice, the zest of 2 limes, and 1 teaspoon of vanilla extract. Blend until everything is incorporated. - Beat in 2 large eggs, one at a time. Be careful not to overmix. - Pour the cheesecake filling over the crust in the baking dish. - Bake for 25-30 minutes. Check for doneness; the center should be set but still slightly jiggly. - Once done, remove it from the oven. Let it cool completely at room temperature. Then chill it in the refrigerator for at least 4 hours, or overnight for the best results. - Once set, cut into bars. If you like, garnish with extra shredded coconut before serving. To make a great crust, press the mixture firmly into the pan. This helps it hold together well. A good crust needs a sturdy base. I use a 9x9 inch baking dish for the best results. It gives the bars nice thickness and even cooking. Cracks can ruin your cheesecake's look. To avoid them, do not overmix the filling. Mix until just smooth. This keeps air from getting in. Also, cool the cheesecake slowly. After baking, let it sit at room temperature first. Then, chill it in the fridge for at least four hours. This helps it set without cracks. You can switch out some ingredients if needed. For sweeteners, try using honey or maple syrup instead of regular sugar. If you want a dairy-free option, look for dairy-free cream cheese. Many brands offer great taste and texture. These swaps still keep the bars creamy and delicious. {{image_2}} You can add other citrus flavors to these bars. Lemon or orange juice can brighten the taste. Just replace some lime juice with your chosen citrus. This change gives a fresh twist to the classic recipe. You might also mix in chocolate or fruit layers. Swirling in melted chocolate or fruit puree creates beautiful designs. It adds a new layer of flavor that surprises your taste buds. If you need a gluten-free option, use gluten-free graham crackers. Look for brands that offer a similar taste and texture. For vegan adjustments, replace cream cheese with a vegan cream cheese alternative. Use coconut cream for a rich texture. You can also swap eggs for flaxseed meal mixed with water. This creates a binding effect, keeping the bars together while being plant-based. Pair these cheesecake bars with sauces for extra flavor. Drizzle chocolate or caramel sauce on top for a sweet touch. You can also serve them with fresh fruit for a fun twist. For a creative presentation, cut the bars into fun shapes or use cookie cutters. Arrange them on a colorful platter, and garnish with mint leaves. This adds a pop of color and freshness to your dessert table. To keep your creamy coconut lime cheesecake bars fresh, use airtight containers. This helps to prevent air from drying them out. Place the bars in a single layer. You may also use parchment paper between layers to avoid sticking. Store them in the fridge for the best taste. You can freeze cheesecake bars to enjoy later. First, cut the bars into squares. Wrap each piece in plastic wrap. Then, place them in a freezer-safe bag or container. Label the bag with the date. To thaw, take them out of the freezer and place them in the fridge overnight. You can also thaw them at room temperature for about an hour. These delicious bars last about five days in the fridge. Be sure to check for any signs of spoilage. If you see any mold or if they smell off, it's best to throw them away. Enjoy your bars while they are fresh for the best flavor and texture! You should chill the bars for at least four hours. This helps the cheesecake set properly. If you have time, chilling overnight is even better. It enhances the flavors and makes cutting easier. Yes, you can use various crust types. If you want a gluten-free option, try almond flour or gluten-free cookies. For a twist, use chocolate cookies for a richer flavor. You can even try a nut crust for added crunch. Just ensure the crust is firm enough to support the filling. There are many fun garnishes for your cheesecake bars. You can sprinkle extra shredded coconut on top. Fresh lime slices add a nice touch, too. For a special treat, drizzle with chocolate or caramel sauce. Whipped cream also pairs well, giving it a creamy finish. This blog post outlined the key ingredients and steps for making creamy coconut lime cheesecake bars. You learned about the main ingredients, including graham cracker crumbs and cream cheese, plus flavor enhancers like fresh lime juice and zest. I shared tips for a perfect crust, variations for unique flavors, and storage guidelines. These cheesecake bars are delicious and easy to customize. Try different flavors and toppings to make them your own. Enjoy the process, and happy baking!

Creamy Coconut Lime Cheesecake Bars Delightful Treat

If you’re craving a sweet treat that combines creamy goodness and zesty lime, look no further! These Creamy Coconut Lime

- 1 medium head of cauliflower, cut into florets - 2 cups cooked chicken, shredded - 1/2 cup buffalo sauce (mild or hot, depending on your preference) - 1 cup cream cheese, softened - 1 cup shredded cheddar cheese - 1/2 cup blue cheese, crumbled - 1/2 cup green onions, chopped - 1 teaspoon garlic powder - 1 teaspoon onion powder - Salt and pepper to taste - 1/2 cup breadcrumbs - 2 tablespoons olive oil In this recipe, the ingredients come together to create a cheesy delight. First, cauliflower florets serve as the base. They provide a great texture and absorb the flavors well. You can use fresh cauliflower or frozen, but fresh gives the best bite. Next, cooked chicken adds protein. You can use any cooked chicken. Shredded rotisserie chicken works great. Then we add buffalo sauce. It gives a spicy kick. You can choose mild for less heat or hot for more spice. Cream cheese makes everything creamy. It binds the dish together. Shredded cheddar cheese adds a rich flavor and helps create a gooey top layer. For a twist, add blue cheese. It gives a tangy taste that pairs well with buffalo sauce. Green onions add a fresh crunch and color. Don't forget the seasoning! Garlic powder and onion powder boost the flavor. Salt and pepper enhance everything. Finally, the topping of breadcrumbs mixed with olive oil adds a crispy finish. It makes every bite exciting. This mix of ingredients is what makes this Cheesy Buffalo Chicken Cauliflower Bake so special. 1. Preheat oven and cook cauliflower Set your oven to 400°F (200°C). In a large pot, boil salted water. Add the cauliflower florets and cook for about 5 minutes until they are slightly tender. Drain the cauliflower and set it aside. 2. Prepare chicken mixture In a mixing bowl, combine the shredded chicken, buffalo sauce, and softened cream cheese. Add half of the cheddar cheese along with garlic powder, onion powder, salt, and pepper. Mix everything well until you have a smooth, creamy mixture. 1. Combine chicken and cauliflower Gently fold the cooked cauliflower into the chicken mixture. Make sure each piece of cauliflower is well coated with the sauce. 2. Transfer to baking dish Grease a 9x13-inch baking dish with a little oil. Spread the chicken and cauliflower mixture evenly in the dish. 1. Adding cheese and breadcrumb topping Sprinkle the remaining cheddar cheese over the top. If you like blue cheese, add that too. In a small bowl, mix breadcrumbs with olive oil until coated. Then, sprinkle this mixture over the cheese layer. 2. Baking time and temperature Place the dish in the oven and bake for 20-25 minutes. Look for bubbly cheese and a golden brown top. After baking, let it cool for a few minutes. Garnish with chopped green onions before serving. To avoid soggy cauliflower, make sure to cook it just right. Boil it for only 5 minutes. Drain it well to remove excess water. Adding the cauliflower to the dish while it's still wet can make it mushy. To achieve a golden top, use breadcrumbs mixed with olive oil. This adds crunch and color. Bake at 400°F (200°C) for 20-25 minutes. Keep an eye on it. You want the cheese to bubble and the topping to turn golden. Using leftover chicken works great for this dish. Just shred it and mix it in. This saves time and adds flavor. If you don’t have chicken, try cooked turkey or even canned chicken. They both blend well with the other flavors. For cheese substitutions, you can use gouda or mozzarella. They melt nicely and taste great. If you want a different flavor, consider pepper jack for a kick. Adjusting spice levels is easy. If you like it mild, use less buffalo sauce. You can also mix in some ranch dressing for a creamier taste. Just remember to balance the flavors to keep it delicious. {{image_2}} You can make this dish lighter. Try using low-fat cream cheese. This swaps in less fat and keeps the creaminess. Gluten-free breadcrumbs work great too. They add crunch without gluten. Both options keep the dish tasty and enjoyable for everyone. Want to change the flavor? Add colorful bell peppers. They bring sweetness and crunch. You can also switch up the sauces. Try ranch or teriyaki for a new kick. These small changes make the dish fun and fresh each time you make it. Pair this bake with a fresh salad. A crisp green salad complements the cheesy dish well. Roasted veggies also make a great side. They add more nutrients and balance the meal. Enjoy these sides for a full, satisfying dinner. To keep your Cheesy Buffalo Chicken Cauliflower Bake fresh, store it properly. First, let the dish cool down. Then, place leftovers in an airtight container. This helps keep moisture in and prevents odors. You can store it in the fridge for up to three days. For best results, use glass containers. They are sturdy and help with even heating. When you're ready to enjoy leftovers, you have two options: the oven or the microwave. The oven gives the best results. Preheat it to 350°F (175°C). Place the bake in a baking dish and cover with foil. Heat for about 20 minutes, or until warm. This helps keep the texture nice and creamy. If you use the microwave, heat in 30-second intervals. Stir in between to help warm it evenly. If you want to save some for later, freezing is a great choice. First, let the dish cool completely. Then, cut it into portions. Wrap each piece tightly in plastic wrap. Place them in a freezer-safe bag or container. Label it with the date. You can freeze it for up to three months. When you're ready to eat, thaw it in the fridge overnight. Reheat it in the oven as mentioned above for the best texture. Yes, you can use frozen cauliflower. It saves time and is easy to find. However, frozen cauliflower has more water than fresh. This can make it a bit mushy. To fix this, cook it for less time. You can skip boiling and just add it to the dish. This will keep the texture better. If you want a milder sauce, try these options: - Barbecue sauce for a sweet twist. - Ranch dressing for a cool flavor. - Hot sauce mixed with butter for a softer kick. These options will change the taste but still keep it tasty. This dish lasts about 3 to 4 days in the fridge. Store it in an airtight container. Make sure it cools before putting it away. Always check for any signs of spoilage before eating leftovers. If it smells off or looks strange, it’s better to throw it away. You now have a delicious buffalo chicken bake recipe at your fingertips. We covered the main ingredients, tips for baking, and ways to vary the dish. Remember, you can adjust ingredients like cheese and chicken to fit your taste. Store leftovers properly or freeze them for later. This meal is fun to make and share. Enjoy experimenting in the kitchen and delighting your taste buds!

Cheesy Buffalo Chicken Cauliflower Bake Delight

Are you craving a dish that packs a punch while keeping it healthy? Look no further! My Cheesy Buffalo Chicken

- 2 pounds baby potatoes, halved - 3 tablespoons olive oil - 4 cloves garlic, minced - 1 tablespoon fresh rosemary, chopped - 1 tablespoon fresh thyme, chopped The main ingredients make this dish shine. Baby potatoes are small and tender. They cook fast and taste great. Olive oil adds richness and helps with browning. Garlic gives a strong, tasty kick. Fresh rosemary and thyme bring a lovely aroma. These herbs make the dish feel special. - 1 teaspoon paprika - Salt and black pepper to taste Seasoning is key to great flavor. Paprika adds warmth and a bit of color. Salt enhances all the other tastes. Black pepper gives a nice, spicy edge. Adjust these seasonings to suit your taste. - Fresh parsley, chopped (for garnish) Garnishing adds a fresh touch. Fresh parsley brightens the dish. It adds color and a hint of flavor. Always sprinkle it on just before serving. This small step makes your meal look and taste better. - Halve the baby potatoes: Start by cutting the baby potatoes in half. This helps them cook evenly. - Mince garlic and chop herbs: Next, mince the garlic and chop fresh rosemary and thyme. Fresh herbs give the best taste. - Heat olive oil in the skillet: Pour 3 tablespoons of olive oil into a large skillet. Heat it on medium. - Add potatoes and season: Add the halved potatoes, cut side down. Season with salt, black pepper, and paprika to enhance flavor. - Add garlic and herbs: Once the potatoes are crispy, add minced garlic, chopped rosemary, and thyme to the skillet. Stir gently to mix. - Cover and cook for tenderness: Lower the heat and cover the skillet. Cook for 10-15 minutes until the potatoes are tender. Stir occasionally for even cooking. - Adjust seasoning and garnish: After cooking, taste the potatoes. Adjust the seasoning as needed. Lastly, garnish with fresh parsley before serving. To make the best skillet potatoes, focus on crispiness. Start with dry baby potatoes. If they are wet, they won’t crisp up. Cut them in half and place them cut side down in the skillet. Use medium heat to cook them. This helps create a nice golden crust. Fresh herbs are key for flavor. I love using rosemary and thyme. They add a fresh taste that makes the dish pop. Chop them finely before adding them to the skillet. This way, the flavor spreads evenly through the potatoes. For cooking skillet potatoes, use a heavy skillet. A cast iron skillet works best. It holds heat well and gives a nice sear. Non-stick skillets are also good, but remember to use less oil. They can help prevent sticking while ensuring an even cook. Cooking time depends on the size of your potatoes. If you use larger potatoes, cut them into smaller pieces. This will help them cook more evenly. For baby potatoes, about 8-10 minutes on the first side is perfect. After flipping, reduce heat and cover for 10-15 minutes. Always check for tenderness by poking with a fork. If they are soft, they are ready to eat! {{image_2}} You can play with flavors in your garlic herb skillet potatoes. Adding other herbs can boost taste. Try basil for a fresh twist. Oregano gives a nice earthy touch. You can also sprinkle cheese over the top. Feta or Parmesan melts well and adds richness. Just add it during the last few minutes of cooking for the best results. If you want this dish to be vegan, swap the butter for more olive oil. You can also use vegetable broth instead of oil for a lighter option. For a gluten-free meal, this recipe is already safe! Just make sure your ingredients are gluten-free. This way, everyone can enjoy it without worry. Garlic herb skillet potatoes pair well with many dishes. Try them with grilled chicken or steak for a hearty meal. They also work great with roasted vegetables for a vegetarian option. A light salad on the side can add freshness. These potatoes are a versatile side that complements many main dishes beautifully. To store garlic herb skillet potatoes, let them cool first. Use a clean, airtight container. Place the potatoes in the container and seal it well. Store them in the fridge. They will keep fresh for up to three days. When reheating skillet potatoes, I suggest using a skillet again. Heat a little olive oil over medium heat. Add the leftover potatoes and stir gently. Cook until they are warm and crispy again. This keeps the texture nice. You can also use a microwave, but they may not stay crispy. If you want to freeze the potatoes, make sure they are fully cooled. Spread them out on a baking sheet in a single layer. Freeze them for one to two hours. Once frozen, transfer the potatoes to a freezer bag. Remove as much air as possible. When you want to eat them, thaw in the fridge overnight before reheating. You should use baby potatoes for this recipe. Their small size cooks evenly and quickly. They have a creamy texture that makes each bite delightful. You can also use Yukon Gold or red potatoes. Both types are great options. Just remember to halve them for even cooking. Yes, you can use dried herbs. However, fresh herbs taste better and add more flavor. If using dried herbs, use about one-third of the amount. For example, one tablespoon of fresh rosemary is about one teaspoon of dried. Add them earlier in the cooking process. This helps release their flavors. You can prep the potatoes and herbs in advance. Halve the potatoes and chop the herbs. Store them in the fridge until you are ready to cook. You can also cook the potatoes ahead of time. Just reheat them in a skillet before serving. This keeps them warm and crispy. You learned about making tasty skillet potatoes. We discussed key ingredients like baby potatoes, olive oil, and fresh herbs. I shared my step-by-step guide to help you cook them just right. Tips on achieving crispy potatoes and storage methods ensure your dish stays great. Lastly, I covered variations to suit different diets and tastes. Enjoy creating this simple dish that adds flavor to any meal!

Garlic Herb Skillet Potatoes Delightful and Easy Recipe

Looking for a quick and tasty side dish? Garlic Herb Skillet Potatoes are here to save the day! This easy

- 4 salmon fillets (6 oz each) - 2 cups fresh spinach, chopped - 1 cup feta cheese, crumbled - 2 cloves garlic, minced - 1 tablespoon olive oil - 1 tablespoon lemon juice - 1 teaspoon dried oregano - Salt and pepper to taste - Lemon slices for garnish - Fresh herbs for presentation For this dish, I love using fresh ingredients. The salmon brings a rich flavor. The spinach adds color and nutrition. Feta cheese gives a creamy and tangy taste. Garlic brings out the best in all these flavors. The olive oil keeps everything moist and tasty. Lemon juice brightens the dish and adds a fresh zing. Dried oregano gives a nice, earthy aroma. Always use salt and pepper to bring all the flavors together. When I prepare this dish, I like to think about the presentation too. Adding lemon slices on the plate makes it look fresh and inviting. A sprinkle of fresh herbs adds a touch of elegance. This not only enhances taste but also makes the meal feel special. Feel free to mix in your favorite herbs or spices. This dish is easy to customize, so let your creativity shine! - Step 1: Preheat the oven and prepare the baking sheet First, set your oven to 375°F (190°C). While it heats, line a baking sheet with parchment paper. This helps the salmon not stick and makes cleanup easy. - Step 2: Sauté garlic and spinach In a medium skillet, add one tablespoon of olive oil. Heat it over medium heat. Once hot, add two minced cloves of garlic. Sauté for 1-2 minutes until you smell the garlic. Then, add 2 cups of chopped spinach. Cook this for about 3-4 minutes until the spinach wilts. Remove the skillet from the heat. - Step 3: Combine spinach with feta and seasonings Take your cooked spinach and garlic mixture and place it in a mixing bowl. Add one cup of crumbled feta cheese, one tablespoon of lemon juice, and one teaspoon of dried oregano. Season with salt and pepper to taste. Mix everything well until combined. - Step 4: Prepare salmon fillets for stuffing Take 4 salmon fillets and place them skin-side down on the prepared baking sheet. Using a sharp knife, carefully cut a pocket along the side of each fillet. Be gentle to avoid cutting all the way through. - Step 5: Stuff the salmon and bake Take your spinach-feta mixture and stuff it into the pockets of the salmon fillets. Press it down gently so it stays inside. Once done, place the baking sheet in the oven. Bake for about 15-20 minutes, or until the salmon is cooked through and flakes easily with a fork. - Step 6: Resting and serving the salmon After baking, remove the salmon from the oven. Let it rest for 5 minutes. This helps the flavors settle. You can serve the stuffed salmon on a plate with lemon slices for garnish. Enjoy it with roasted vegetables or a light salad. - To keep your salmon moist, don’t overcook it. Bake for just 15-20 minutes. - Use a sharp knife to cut a pocket in each fillet. This makes stuffing easy. - Stuff the salmon pockets firmly, but don’t overstuff. You want it to stay intact. - Add fresh dill or parsley for extra flavor. These herbs pair well with salmon. - Serve with a lemon butter sauce or a yogurt dill sauce for a creamy touch. - Roasted veggies or a simple salad go great on the side. They add color and crunch. - Use a sturdy baking sheet lined with parchment paper. This makes cleanup simple. - A small spoon or spatula works well for stuffing the fillets. - Keep a sharp knife handy for cutting the pockets in the salmon. This keeps the fillets neat. {{image_2}} You can make this dish your own by swapping out some ingredients. If you want to replace feta cheese, try goat cheese or ricotta. Both will add a creamy texture and unique taste to your salmon. For greens, while spinach is great, you can also use kale or Swiss chard. These options will give a different flavor and color to your filling. They are also packed with nutrients. When it comes to cooking methods, you have options. Grilling salmon adds a nice smoky flavor. Just be careful not to overcook it. Baking is simple and keeps the salmon moist. You can bake it exactly as the recipe states. Air frying is another fun method. It cooks the salmon quickly and gives it a crispy outer layer. Just set your air fryer to 400°F and cook for about 10-15 minutes. You can easily adapt this dish for different diets. To make it gluten-free, check your feta label. Most brands are safe, but it's always good to read. For low-carb diets like keto, skip the bread crumbs if you use any. Focus on the salmon and spinach filling. You can add more cheese for flavor and richness. This keeps it delicious and fitting for keto plans. To store leftover spinach feta stuffed salmon, first let it cool. Place it in the fridge after it reaches room temperature. Use an airtight container to keep it fresh. This method helps prevent the salmon from drying out. When reheating, avoid drying out the salmon. The best method is to use the oven. Preheat your oven to 350°F (175°C). Place the salmon in a baking dish, cover with foil, and heat for 10-15 minutes. This keeps the fish moist and flavorful. You can also use a microwave. Heat for 1-2 minutes, but check often to avoid overcooking. To freeze stuffed salmon, wrap each piece tightly in plastic wrap. Then place them in a freezer-safe bag. This prevents freezer burn and keeps the taste intact. When you want to eat it, move the salmon to the fridge for 24 hours to defrost. For quicker thawing, submerge it in cold water for about an hour. Can I use frozen salmon fillets for this recipe? Yes, you can use frozen salmon. Just make sure to thaw them completely first. This helps the salmon cook evenly. To thaw, place the fillets in the fridge overnight or run them under cold water for faster results. How do I know when salmon is fully cooked? The salmon is done when it flakes easily with a fork. You can also check the internal temperature. It should be at least 145°F (63°C). This ensures it is safe to eat and still juicy. Can I prepare the spinach-feta mixture ahead of time? Absolutely! You can make the spinach-feta mix a day in advance. Just store it in the fridge. This saves time when you are ready to cook. What sides go well with stuffed salmon? Stuffed salmon pairs well with roasted vegetables. Try serving it with a light salad or some rice. These sides complement the flavors nicely and add freshness. Is this recipe suitable for gluten-free diets? Yes, this recipe is naturally gluten-free. There are no gluten-containing ingredients in the salmon or filling. Always check labels to ensure any added items are gluten-free. Can I substitute dairy-free alternatives for feta? Yes, you can use dairy-free feta cheese. Look for brands made from nuts or tofu. These alternatives work well and keep the dish tasty for those avoiding dairy. This blog post covered how to make spinach and feta stuffed salmon. You learned about the main ingredients, step-by-step instructions, helpful tips, and variations. Cooking salmon this way can be easy and fun. Remember to try different ingredients and cooking methods to find your favorite. Enjoy your meals and impress your friends with this tasty dish! Whether you’re cooking for yourself or others, this recipe is a hit every time. Happy cooking!

Spinach Feta Stuffed Salmon Tasty and Easy Recipe

Looking for a mouthwatering meal that’s quick and easy? This Spinach Feta Stuffed Salmon recipe checks all the boxes! With

Older posts
Newer posts
← Previous Page1 … Page29 Page30 Page31 … Page82 Next →

dsad

© 2026 Recipes Pursuit • Built with GeneratePress

Our Policies

  • Copyright Policy
  • Cookie Policy
  • GDPR Policy
  • Privacy Policy
  • Disclaimer
  • Terms Of Use

More Information

  • Home
  • About
  • Contact
  • Appetizers
  • Dessert
  • Dinner
  • Drinks
©2026, Recipes Pursuit About Back To Top