Skip to content
DisclaimerTerms Of UseGDPR PolicyCookie Policy

Recipes Pursuit

  • Home
  • Drinks
  • Appetizers
  • Dinner
  • Dessert
  • About
  • Contact
  • Privacy Policy
DisclaimerTerms Of UseGDPR PolicyCookie Policy

NO-ING-IMG

- 8 oz linguine pasta - 1 lb scallops, cleaned and patted dry - 4 tablespoons unsalted butter - 4 cloves garlic, minced - 1 teaspoon red pepper flakes (adjust for spice level) - 1 lemon (juice and zest) - 1/4 cup freshly chopped parsley - Salt and black pepper to taste - Optional: Grated Parmesan cheese for serving Gather all your ingredients before you start cooking. This makes the process easy and fun. First, you need 8 ounces of linguine pasta. This pasta is perfect for holding onto the sauce. Next, grab 1 pound of scallops. Make sure they are cleaned and patted dry for a nice sear. Now, let's talk about the star of the dish: garlic. Use 4 cloves of minced garlic. This will add a rich flavor. Next, you need 4 tablespoons of unsalted butter. The butter will create a creamy sauce when it melts. For a kick, add 1 teaspoon of red pepper flakes. You can adjust this based on how spicy you like your food. Then, squeeze in the juice and add the zest of 1 lemon. This adds brightness to the dish. You'll also need 1/4 cup of freshly chopped parsley. This adds color and freshness. Don't forget salt and black pepper to taste. Lastly, if you want to make it even more special, you can sprinkle some grated Parmesan cheese on top. It adds a nice touch. With these ingredients, you are ready to create a delicious garlic butter scallop linguine! Boiling Water and Salting Start by filling a large pot with water. Add a generous amount of salt to the water. This step is key for flavor. Bring the water to a rolling boil. Cooking Time and Texture Once boiling, add the linguine. Cook according to the package instructions. Aim for al dente, which means it should be firm but not hard. This usually takes about 8 to 10 minutes. Reserve 1/2 cup of the pasta water before draining the linguine. Preparation of Scallops Take the scallops and pat them dry using a paper towel. This helps them sear better. Season both sides with salt and black pepper for flavor. Searing Technique and Timing In a large skillet, melt 2 tablespoons of butter over medium-high heat. Once hot, add the scallops in a single layer. Do not overcrowd them! Sear for 2 to 3 minutes on each side until golden brown. Flip them carefully for the best crust. Once done, set the scallops aside. Melting Butter and Adding Garlic In the same skillet, lower the heat to medium. Add the remaining 2 tablespoons of butter. Let it melt, then add the minced garlic. Stir to combine. Adjusting Heat and Adding Spices Add red pepper flakes for a dash of heat. Sauté for 1 to 2 minutes until the garlic is fragrant and slightly golden. Watch closely so it doesn’t burn! Mixing Linguine and Sauce Now, add the drained linguine to the skillet. Toss it in the garlic butter sauce, making sure it’s well coated. Adding Scallops and Flavor Enhancers Pour in the reserved pasta water gradually. This helps create a smooth sauce. Return the scallops to the skillet. Squeeze in fresh lemon juice and add the zest for brightness. Toss gently to combine all flavors. Incorporating Fresh Ingredients Stir in freshly chopped parsley. This adds color and freshness. Adjusting Seasoning to Taste Taste the dish. If needed, adjust the seasoning with salt and black pepper. This final step ensures your dish is just right. - Avoiding Overcrowding the Skillet When you cook scallops, space is key. If you crowd them, they will steam instead of sear. This will ruin their nice crust. Cook them in batches if needed. Each scallop should have its own space for even cooking. - Tips for Achieving a Golden Crust For a great crust, start with dry scallops. Pat them with a paper towel before cooking. Use high heat to sear them quickly. Let them cook for about 2-3 minutes without moving them. Flip only when they are golden. This way, they will be crispy and delicious. - Suggested Seasonings and Variations Garlic and butter make a great base. You can add red pepper flakes for heat. Try using fresh herbs like basil or thyme for a twist. A splash of white wine can also enhance the flavor. Experiment to find what you like best. - Recommended Cheese Toppings Grated Parmesan cheese adds a nice touch. It melts slightly and gives a rich flavor. You can also try Pecorino Romano or even feta for a different taste. Sprinkle cheese right before serving for the best results. - Serving Suggestions Plate the linguine and scallops in shallow bowls. This makes the dish look fancy. You can add lemon wedges on the side for extra zest. The bright colors will make it more appealing. - Garnish for Visual Appeal Fresh parsley adds a pop of color. Chop it finely and sprinkle it on top. You can also add some extra red pepper flakes for a hint of color. A little sprinkle of cheese on top can also make it look gourmet. {{image_2}} If you want to switch things up, try using shrimp or fish. Both options add a nice twist to your dish. Shrimp cooks quickly and has a sweet flavor that pairs well with garlic butter. Just make sure to use large shrimp so they don’t overcook. For fish, I suggest using flaky white fish like cod or halibut. Cook it using the same method as the scallops for a delicious result. For a gluten-free version, swap the linguine with gluten-free pasta. There are many great options available today made from rice or chickpeas. These will give you a similar texture without the gluten. If you want a dairy-free dish, you can replace the butter with olive oil or a dairy-free butter substitute. This will keep your dish creamy and rich without the dairy. Add seasonal vegetables to your linguine for extra flavor and nutrition. Asparagus, zucchini, or cherry tomatoes work well. Just sauté them in the garlic butter before adding the pasta. Using fresh herbs can elevate your dish. If you have basil or oregano, sprinkle them in with the parsley. This adds a fresh taste that brightens the whole meal. To store leftover Garlic Butter Scallop Linguine, place it in an airtight container. Make sure the dish cools to room temperature first. This will help keep the pasta and scallops fresh. If you follow this method, the dish should last for about 2-3 days in the fridge. To reheat your delicious dish, use the stovetop method. Place the linguine and scallops in a skillet over low heat. You can add a splash of water or broth to keep it moist. Stir gently to avoid overcooking the scallops. It’s important to watch the heat. Scallops cook quickly. If they heat too long, they can become tough. Keep stirring until everything is warm. Enjoy your meal again without losing flavor! You can tell scallops are cooked by their color and texture. Properly cooked scallops are opaque and have a nice golden crust. They should feel firm but not rubbery. If they are translucent, they need more time. Searing them for about 2-3 minutes on each side usually does the trick. Keep an eye on them to avoid overcooking. Yes, you can prepare some parts ahead of time. Cook the linguine and scallops separately. Store them in airtight containers in the fridge. When you're ready to eat, just reheat and mix them with the garlic butter sauce. This way, you keep flavors fresh and avoid mushy pasta or scallops. If you don’t have linguine, you have many options. Spaghetti, fettuccine, or even penne work well. You can also use gluten-free pasta if you need. Explore whole grain or vegetable-based pasta for a twist. Each type will give a different texture and flavor, so choose what you like best! You now have a solid guide for creating Garlic Butter Scallop Linguine. We covered the key ingredients, step-by-step cooking methods, and helpful tips to perfect the dish. You learned how to elevate flavors, explore variations, and ensure proper storage. Remember, cooking is all about experimenting and enjoying the process. Use what you learned to create a delightful meal that impresses. Enjoy every bite!

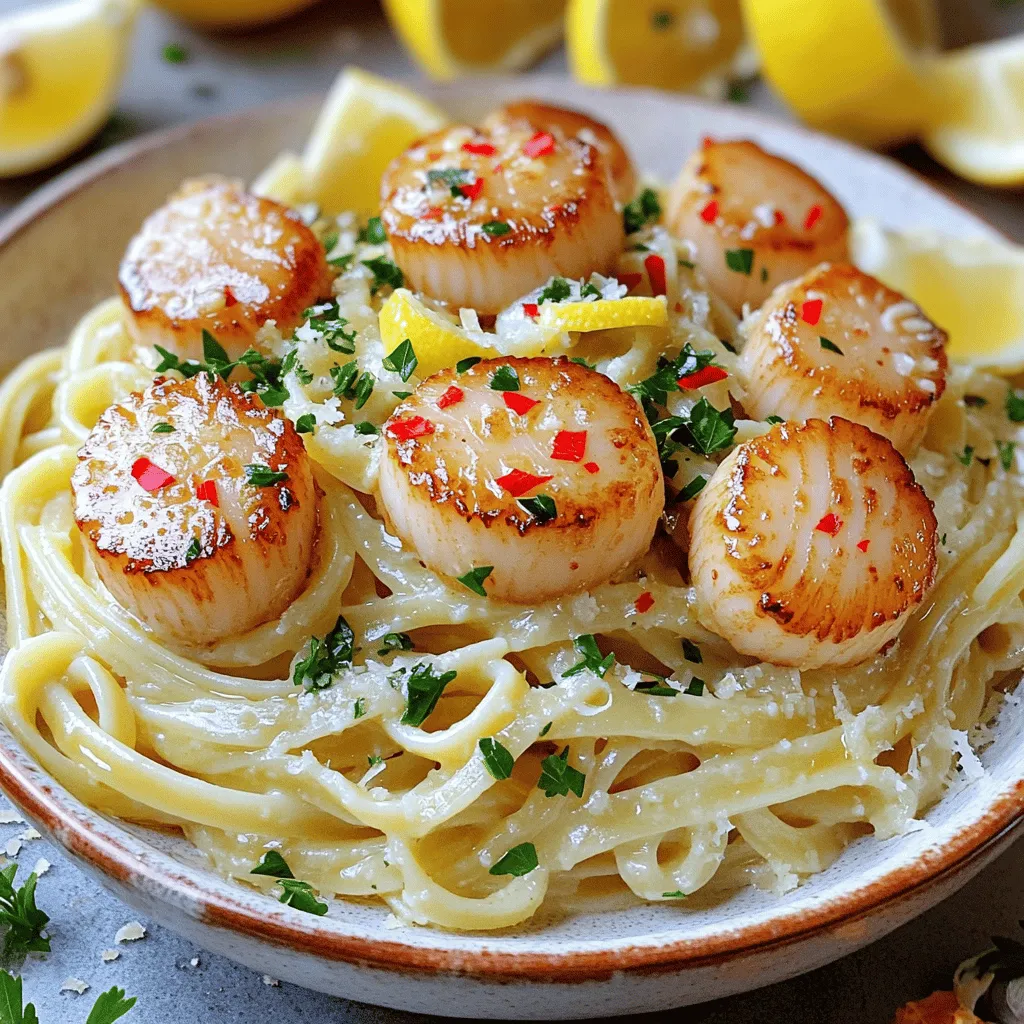
Garlic Butter Scallop Linguine Simple and Savory Dish

Do you want a quick yet elegant meal that impresses? Garlic Butter Scallop Linguine is your answer! This simple dish

- 4 medium zucchinis - 1 cup cooked quinoa - 1 cup cherry tomatoes, halved - 1 bell pepper, finely chopped - 1 cup black beans, rinsed and drained - 1/2 cup corn kernels (fresh or frozen) - 1 teaspoon cumin - 1 teaspoon smoked paprika - 1/2 teaspoon garlic powder - 1 cup shredded cheese (mozzarella or cheddar) - 2 tablespoons olive oil - Salt and pepper to taste - Fresh cilantro for garnish When making air fryer stuffed zucchini boats, the right ingredients matter. You start with medium zucchinis. These serve as the base. The cooked quinoa gives the filling a nice texture. Cherry tomatoes add sweetness and color. Next, you want a bell pepper. It brings crunch and flavor to the mix. Black beans add protein and fiber, making the dish hearty. Corn kernels add a pop of sweetness, which makes it fun to eat. For seasoning, cumin and smoked paprika give a warm, smoky taste. Garlic powder enhances the flavor even more. Shredded cheese is a must. It melts and creates a wonderful topping. Olive oil helps keep the zucchini moist and adds richness. Don't forget salt and pepper to taste. Lastly, fresh cilantro brightens the dish and adds a fresh note. With these ingredients, you can create a meal that is colorful, tasty, and full of good nutrition. First, take your medium zucchinis and cut them in half lengthwise. Use a spoon to scoop out the seeds and some flesh. This creates your zucchini boats. You want to leave a good amount of the sides intact. Save the scooped-out flesh for later. This will add flavor to your filling. In a large mixing bowl, combine one cup of cooked quinoa, halved cherry tomatoes, finely chopped bell pepper, and rinsed black beans. Add half a cup of corn and the reserved zucchini flesh, chopped into small pieces. Sprinkle in a teaspoon of cumin, a teaspoon of smoked paprika, and half a teaspoon of garlic powder. Don’t forget to season with salt and pepper. Mix everything well until blended. The colors and textures will be beautiful. Drizzle the hollowed zucchini boats with two tablespoons of olive oil. Sprinkle a pinch of salt inside each boat to enhance the flavor. Now, stuff each zucchini boat generously with your filling mixture. Top them off with one cup of shredded cheese. Preheat your air fryer to 350°F (175°C). Place the stuffed zucchini boats in the air fryer basket in a single layer. Cook for 12 to 15 minutes. Your zucchini should be tender, and the cheese should be melted and bubbly. To make your filling shine, adjust the flavors as you like. For more heat, add chili powder or diced jalapeños. If you want a milder taste, skip the spices. You can also swap out ingredients for dietary needs. Use brown rice instead of quinoa or add ground turkey for protein. If you're vegan, leave out the cheese or use a plant-based option. For even cooking, preheat your air fryer before adding the zucchini boats. Arrange them in a single layer, not touching. This helps all sides cook well. To prevent soggy zucchini boats, don't overstuff them. Leave a little space at the top. Also, if possible, pat the zucchini dry before adding the filling to remove excess moisture. Serve your stuffed zucchini boats with a fresh side salad or some crusty bread. A dollop of yogurt or guacamole makes a nice dip. For presentation, place the boats on a colorful plate and sprinkle with fresh cilantro. You can also drizzle with olive oil for a glossy finish. {{image_2}} You can change the filling to suit your taste. Want to add protein? Try cooked chicken or turkey. These meats add a nice texture and flavor. If you prefer a vegetarian or vegan meal, skip the meat. Use more beans or lentils for protein. You can also add nuts for crunch and flavor. Not just any zucchini will do! You can use other squash, like yellow squash or pattypan squash. Each type adds its own flavor. Feel free to mix in seasonal veggies too. Bell peppers, corn, and spinach work well. They will brighten up your dish and add nutrients. Cheese lovers rejoice! You can stick with mozzarella or cheddar. But what if you want dairy-free options? Try cashew cheese or vegan cheese blends. These can melt nicely and still taste great. For a twist, consider flavored cheeses like pepper jack or feta. These add a fun kick to your zucchini boats. To store your leftover stuffed zucchini boats, place them in a sealed container. This keeps them fresh. They will last about 3 to 5 days in the fridge. Make sure they cool to room temperature before sealing. This helps avoid excess moisture. If you want to freeze your zucchini boats, wrap them tightly in plastic wrap or aluminum foil. Then, place them in a freezer bag or container. They can last up to 3 months in the freezer. For the best results, freeze them before cooking. When you are ready to eat, thaw them overnight in the fridge. You can use the air fryer to reheat your zucchini boats. Set it to 350°F (175°C) and air fry for about 5 to 8 minutes. This makes them warm and crispy again. You can also use a microwave, but this may make them soft. If using the oven, heat it to 350°F (175°C) and bake for about 10 minutes. You can tell when zucchini boats are done by checking for a few signs. First, look for a tender texture. The zucchini should be soft but not mushy. The cheese on top should be melted and bubbly. If the cheese starts to brown, that’s a great sign too. Use a fork to poke the zucchini. If it goes in easily, they are ready. Yes, you can make these boats ahead of time! Prepare the filling and stuff the zucchini. Store them in the fridge for up to two days. Keep them in an airtight container to keep them fresh. This way, you will save time on busy days. Just pop them in the air fryer when you are ready to eat. To boost the flavor, you can add many tasty ingredients. Consider cooked ground meat like chicken or turkey for protein. You can also mix in chopped mushrooms or spinach for more veggies. If you like spice, add jalapeños or red pepper flakes. For herbs, try fresh basil, oregano, or parsley. These will take your filling to a new level! You learned how to make tasty air fryer stuffed zucchini boats. We covered key ingredients like zucchini, quinoa, and spices. I shared tips on preparing, cooking, and serving these boats. You can even customize them with different fillings or cheese options. Remember, storage is easy, whether in the fridge or freezer. Enjoy experimenting and sharing this dish. With the right techniques, you can create amazing meals that everyone will love. Happy cooking!

Air Fryer Stuffed Zucchini Boats Flavorful and Easy Meal

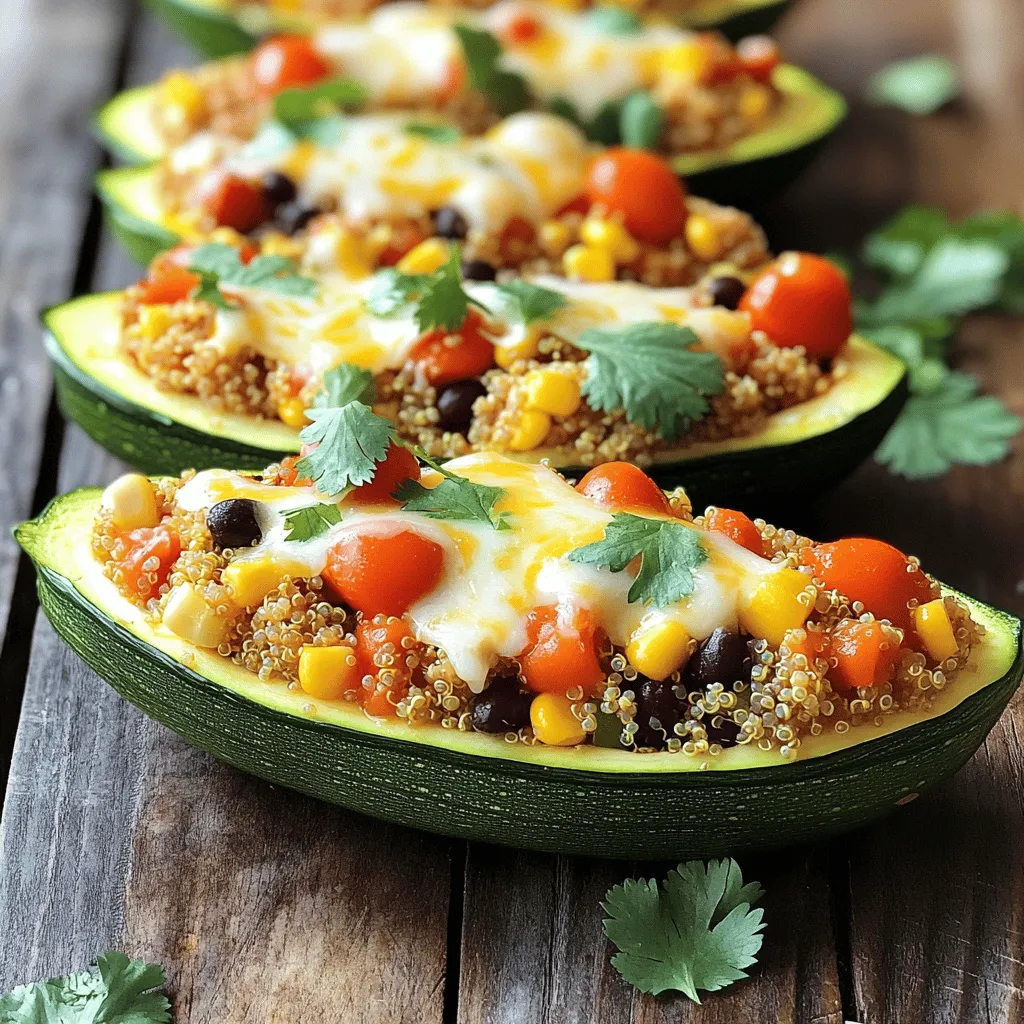
If you’re looking for a quick and tasty meal, you’ve found it! Air Fryer Stuffed Zucchini Boats are easy to

- 200g fresh salmon fillet, skin removed - 1/4 cup teriyaki sauce - 8 rice paper wrappers - 1 cup cooked jasmine rice, cooled - 1 medium cucumber, julienned - 1 large carrot, julienned - 1 avocado, sliced - Fresh cilantro or mint leaves - Sesame seeds for garnish To make Teriyaki Salmon Rice Paper Rolls, you need fresh salmon. This will give you the best taste and texture. Teriyaki sauce adds a sweet and savory flavor that pairs well with the salmon. Rice paper wrappers hold everything together and are fun to eat. Next, you need some additional ingredients. Cooked jasmine rice acts as a filling base. Cucumber and carrot add crunch and freshness. Sliced avocado brings creaminess to each bite. Fresh herbs like cilantro or mint add a burst of flavor. Finally, sesame seeds sprinkle on top for a nice touch. When you gather these ingredients, you set the stage for a great meal. Each component plays a role in the taste and look of the rolls. Plus, they are colorful and healthy! You can serve these rolls as a main dish or an appetizer. To start, take your fresh salmon fillet and place it in a shallow dish. Pour 1/4 cup of teriyaki sauce over the salmon. Ensure the fish is fully coated. Let it marinate for at least 15 minutes. This time lets the salmon soak up the flavor. Next, preheat your grill pan over medium-high heat. Remove the salmon from the marinade but save the marinade for later. Grill the salmon for about 4-5 minutes on each side. You want it to flake easily with a fork. Once it’s cooked, set it aside to cool slightly. Then, flake it into bite-sized pieces. In a bowl, combine 1 cup of cooked jasmine rice, the julienned cucumber, and carrot. Add the sliced avocado. Gently mix everything together. Be careful not to mash the avocado; you want nice pieces for the rolls. For a fresh touch, toss in some cilantro or mint leaves. Fill a large shallow dish with warm water. Dip one rice paper wrapper into the water for about 10-15 seconds. You want it softened but not too mushy. Carefully take it out and lay it flat on a clean surface. This is key for easy rolling. Now, it’s time to assemble! Place a small handful of your rice and veggie mixture in the center of the softened rice paper. Add a few pieces of the grilled salmon on top. Drizzle a little of the reserved teriyaki marinade for extra flavor. Fold the bottom of the rice paper over the filling. Next, fold in the sides. Then, roll tightly from the bottom to the top. Make sure everything is snug inside. Repeat this step until you have used all the rice paper wrappers and filling. Arrange the completed rice paper rolls on a serving platter. Drizzle some extra teriyaki sauce on top. To finish, sprinkle sesame seeds for garnish. These rolls are not just tasty, but they also look amazing on the plate! To make the best Teriyaki Salmon Rice Paper Rolls, avoid common mistakes. One mistake is over-soaking the rice paper. This makes it too soft and hard to handle. Soak for only 10-15 seconds. Another mistake is adding too much filling. Too much filling makes rolling difficult. Aim for a small handful of ingredients. For a tighter roll, start by placing the filling in the center. Fold the bottom up over the filling first. Then, tuck in the sides neatly. Finally, roll from the bottom to the top. Keep it tight as you roll. You can boost flavor with tasty extras. Try adding sliced bell peppers or sprouts for crunch. You can also add a dash of lime juice for tang. Consider these spices and sauces for extra flavor: - Sriracha for heat - Garlic powder for depth - Sesame oil for richness These additions can make your rolls even more delicious. Serve your rice paper rolls with tasty sides. A light salad with a sesame dressing pairs well. You can also serve edamame for a fun touch. For drinks, consider green tea or a light sparkling water. These drinks complement the flavors without overpowering them. Enjoy your meal! {{image_2}} You can change the protein in your rice paper rolls. Try chicken or tofu instead of salmon. Both options work well with teriyaki sauce. They offer different flavors and textures. If you want a different sauce, try hoisin or peanut sauce. Both add a unique taste to the rolls. If you need a gluten-free option, check your teriyaki sauce. Some brands contain gluten. Use a gluten-free soy sauce for a safe choice. For a vegan version, swap the salmon for marinated tofu. You can also use a vegan teriyaki sauce. This way, you keep all the great taste without animal products. To make your rolls more exciting, add fresh herbs. Basil or dill can work well with the other flavors. You can also try adding more veggies. Thinly sliced bell peppers or shredded red cabbage add crunch and color. These simple changes can elevate your dish and make it even more delicious. To store leftovers, place your rice paper rolls in a single layer. Use an airtight container to keep them fresh. Avoid stacking the rolls, as they may stick together. You can wrap each roll in plastic wrap for extra protection. You can freeze rice paper rolls, but they may lose some texture. To freeze, wrap each roll in plastic wrap and place them in a freezer bag. Remove as much air as possible. For reheating, let them thaw in the fridge overnight. Then, reheat in a warm pan for a few minutes. In the fridge, expect your Teriyaki Salmon Rice Paper Rolls to last about 2-3 days. Look for signs of spoilage like a sour smell, slimy texture, or discoloration. If you see any of these signs, it’s best to discard the rolls. Enjoy your tasty creation while it’s fresh! To prevent rice paper from sticking, follow these tips: - Use warm water to soften the rice paper. - Soak each wrapper for only 10-15 seconds. - Lay them flat on a clean surface. - Keep them separated with parchment paper if stacking. If you notice sticking, try using a little oil on your hands or the surface. This can help. Yes, you can prepare these rolls ahead of time. Here are the best practices: - Store uncut rolls in an airtight container. - Use parchment paper between each roll to avoid sticking. - Keep them in the fridge for up to 24 hours. If you want to prep the filling, you can do that a day in advance too. Just keep it in the fridge. Some great dipping sauces include: - Soy sauce with a splash of lime. - Spicy mayo with sriracha and mayo. - Peanut sauce for a rich, nutty flavor. You could also drizzle extra teriyaki sauce over the rolls for added flavor. Yes, you can use cooked salmon. If you do, make these adjustments: - Flake the cooked salmon into small pieces. - Skip the marinating step since it’s already cooked. - You might want to add a bit more sauce for flavor. Cooked salmon works well, but fresh will give a better texture. To check if salmon is cooked right, look for these signs: - The salmon should be opaque and not translucent. - It should flake easily with a fork. - The internal temperature should reach 145°F (63°C). If you follow these signs, you'll have perfectly cooked salmon for your rolls. In this article, I guided you through making Teriyaki Salmon Rice Paper Rolls. We covered key ingredients like fresh salmon, rice paper, and vibrant veggies. I shared step-by-step instructions, tips, and storage advice to help you succeed. Enjoy creating various flavors or adjusting ingredients to meet your tastes. These rolls are fresh, healthy, and fun to make. Try them for your next meal or gathering!

Teriyaki Salmon Rice Paper Rolls Tasty and Simple Recipe

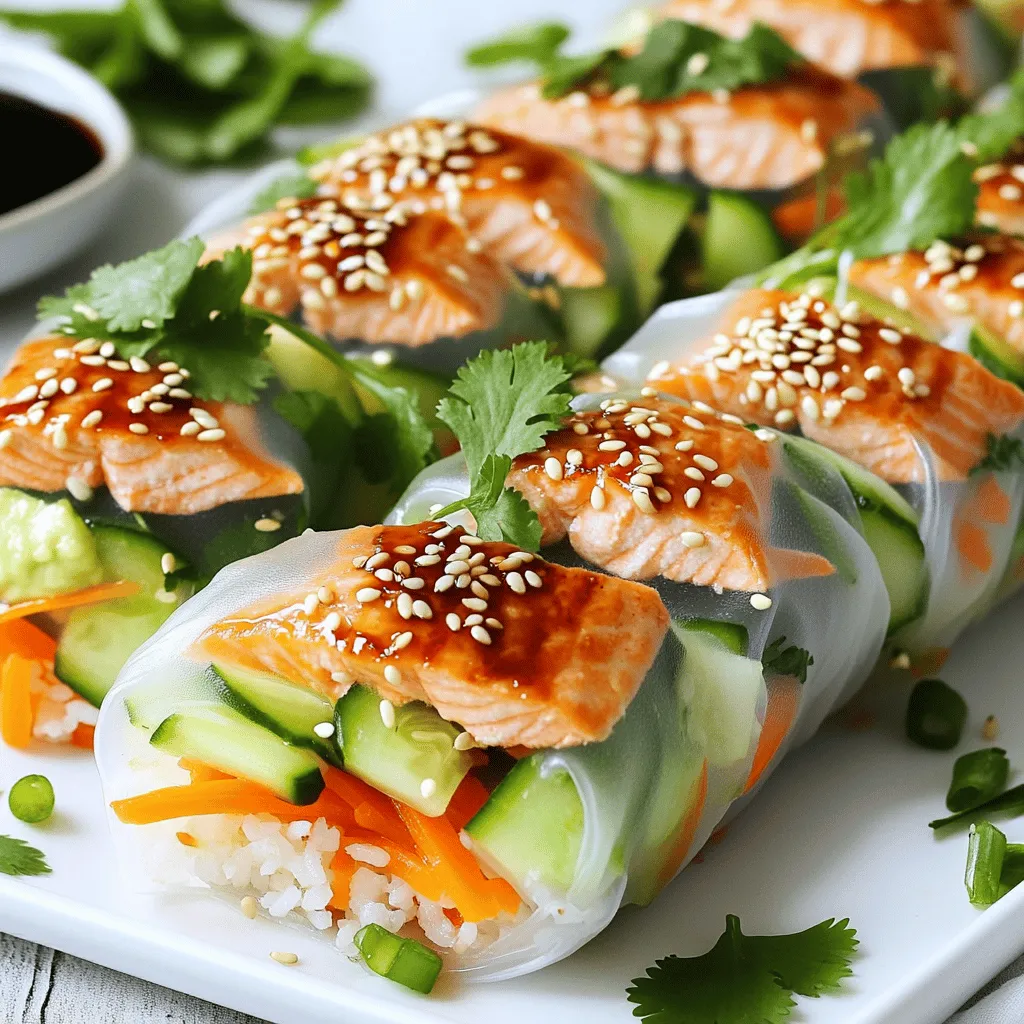
If you’re craving a fresh, tasty dish, try Teriyaki Salmon Rice Paper Rolls. This recipe is simple and packed with

To make tasty cinnamon roll overnight oats, you will need: - 1 cup rolled oats - 1 cup milk (dairy or plant-based) - 1/2 cup Greek yogurt (or dairy-free alternative) - 2 tablespoons maple syrup - 1 teaspoon vanilla extract - 1 teaspoon ground cinnamon - 1/4 teaspoon nutmeg - 1/2 cup diced apples or raisins - A pinch of sea salt These ingredients work together to create a creamy, sweet treat. The rolled oats soak up the milk and yogurt, giving them a soft texture. The maple syrup and vanilla add sweetness, while cinnamon and nutmeg bring warmth. For extra flavor, you might want to add: - 1 tablespoon chopped pecans (optional) Chopped pecans add a nice crunch and a rich nutty taste. You can also try different fruits like bananas or berries for new flavors. If you have specific dietary needs, there are easy swaps. Use: - Almond milk or oat milk instead of regular milk for a dairy-free option. - Coconut yogurt or cashew yogurt instead of Greek yogurt for a vegan choice. These substitutions keep the recipe delicious while fitting your diet. You can enjoy cinnamon roll overnight oats no matter your preference! Start by gathering your ingredients. In a bowl or a mason jar, mix together: - 1 cup rolled oats - 1 cup milk (dairy or plant-based) - 1/2 cup Greek yogurt (or dairy-free alternative) - 2 tablespoons maple syrup Stir these ingredients well. You want them to blend smoothly. Next, add: - 1 teaspoon vanilla extract - 1 teaspoon ground cinnamon - 1/4 teaspoon nutmeg - A pinch of sea salt Mix everything until it looks even. This blend gives the oats a rich flavor. Now it's time to bring in some fun flavors! Fold in: - 1/2 cup diced apples or raisins - 1 tablespoon chopped pecans (optional) Gently stir these into your oat mixture. This step adds sweetness and crunch. You can choose apples for a fresh taste or raisins for a chewy surprise! Once your mixture is ready, divide it into jars or containers. Seal them tightly to keep the goodness in. Now, place them in the fridge. Let the oats soak overnight. If you're in a hurry, give them at least 4 hours. This soaking time makes the oats soft and creamy. In the morning, stir the oats again. If they seem too thick, add a splash of milk. You can enjoy them cold or warm them in the microwave. Add a sprinkle of cinnamon or a drizzle of maple syrup for a special touch! To get the best texture for your oats, use rolled oats. They soak well and stay chewy. Mix in Greek yogurt to add creaminess. Adjust the liquid by adding more milk if it feels too thick. This way, your oats stay smooth and easy to eat. To boost flavor, use fresh spices. A dash of nutmeg adds warmth. You can also add vanilla extract for a sweet note. Diced apples or raisins bring natural sweetness. If you love crunch, mix in chopped pecans. They add a nice texture and flavor. For a pretty presentation, layer your oats in a clear jar. This shows off the colors. Top with a slice of apple or a sprinkle of cinnamon. A drizzle of maple syrup makes it look fancy. These small touches make breakfast feel special and inviting. {{image_2}} You can easily change the flavor of your cinnamon roll overnight oats. Try adding pumpkin spice for a fall treat. Simply swap in 1 teaspoon of pumpkin pie spice. For a chocolate twist, mix in 2 tablespoons of cocoa powder. You can also add chocolate chips for sweetness. Each option gives a fun twist to the base recipe. Toppings can take your oats to the next level. Consider adding a dollop of whipped cream for a dessert feel. You can also sprinkle crushed graham crackers on top for crunch. Drizzle with extra maple syrup or honey for added sweetness. A sprinkle of chopped nuts adds texture and flavor, too. Feel free to change ingredients based on what you like. If you prefer, use almond milk or oat milk instead of dairy milk. You can swap Greek yogurt for a plant-based yogurt if needed. For fruit, use bananas or berries instead of apples or raisins. Each swap keeps the oats tasty and fun! To keep your cinnamon roll overnight oats fresh, store them in airtight containers. You can use mason jars or small bowls with lids. Make sure each jar is sealed tightly to avoid any spills or drying out. This method keeps your oats creamy and tasty. These oats can last in the fridge for up to five days. This makes them a great meal prep option. For best taste and texture, eat them within three days. The flavors blend well, but the apples or raisins may get mushy after that. If you prefer warm oats, you can reheat them easily. Just take the jar from the fridge. Remove the lid and microwave for about 30 seconds to 1 minute. Stir well and check the temperature. Add a splash of milk to keep them creamy if needed. Enjoy your warm, cozy breakfast! Yes, you can make Cinnamon Roll Overnight Oats a day before you eat them. Just mix all the ingredients and store them in jars. They stay fresh in the fridge for up to five days. This makes breakfast easy and quick! Overnight oats are healthy and filling. They are high in fiber, which helps digestion. The oats provide energy and keep you full longer. Greek yogurt adds protein, while fruits give you vitamins. Using maple syrup adds natural sweetness without refined sugar. Yes, rolled oats work great for this recipe. They soak up the liquid well and give a good texture. Quick oats can become mushy, but rolled oats stay nice and chewy. You can enjoy a better bite with rolled oats. To make more servings, just double or triple the ingredients. Keep the same ratios for best results. If you want four servings, use two cups of oats, two cups of milk, and so on. Mix well and store in separate containers. Cinnamon Roll Overnight Oats are easy and fun to make. We covered main and optional ingredients, plus tips for the best taste. You learned how to prepare and store your oats for fresh, tasty meals. Don't be afraid to try different flavors and toppings. Enjoy these oats at any time. They are healthy, quick, and versatile. You can adapt them to fit your taste and needs. Make your breakfast exciting and satisfying with these simple ideas. Enjoy your delicious creations!

Cinnamon Roll Overnight Oats Easy and Tasty Recipe

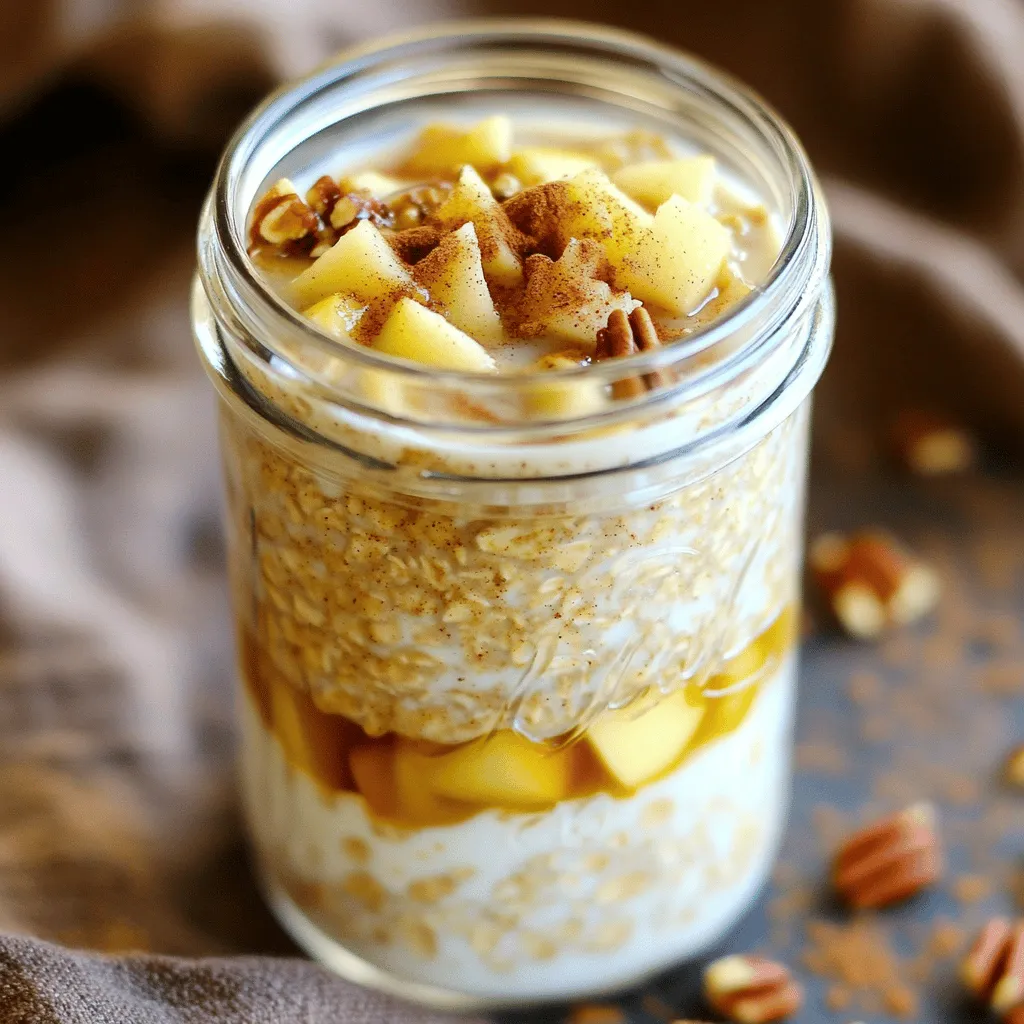
Are you ready to start your mornings with a flavor-packed treat? Cinnamon Roll Overnight Oats combine the warmth of cinnamon

To make this creamy chicken enchilada pasta, gather these main ingredients: - 1 lb boneless, skinless chicken breasts - 1 tablespoon olive oil - 1 small onion, diced - 2 cloves garlic, minced - 1 can (10 oz) red enchilada sauce - 2 cups chicken broth - 8 oz pasta (penne or rotini works well) - 1 cup corn (frozen or canned) - 1 cup heavy cream - 1 teaspoon cumin - 1 teaspoon chili powder - Salt and pepper to taste - 1 cup shredded cheddar cheese - Fresh cilantro for garnish These ingredients blend together to create a rich and flavorful dish. The chicken adds protein, while the pasta makes it filling. The enchilada sauce gives it a lovely kick, making it a family favorite. You can enhance the dish with these optional add-ins: - Black beans for added protein and fiber - Jalapeños for a spicy kick - Bell peppers for extra color and crunch - Lime juice for brightness These add-ins can make your pasta even more exciting. Feel free to mix and match based on your taste. To serve your creamy chicken enchilada pasta, consider these garnishes: - Extra shredded cheddar cheese - Fresh cilantro for a pop of color - Sliced avocado for creaminess - A squeeze of lime juice for zest Serve the pasta in bowls, topped with your chosen garnishes. This not only looks appealing but also adds layers of flavor. Enjoy your meal with a side salad or some crusty bread for a complete dinner experience. First, you need to get your Instant Pot ready. Set it to the sauté function. Pour in one tablespoon of olive oil. Let the oil heat up for a moment. Add one small diced onion. Stir it for about 2-3 minutes. You want it to look clear, not brown. Next, add two minced garlic cloves. Stir this mix for about 30 seconds. The aroma will be amazing! Now, let’s add the chicken. Take one pound of boneless, skinless chicken breasts. Season them with salt, pepper, one teaspoon of cumin, and one teaspoon of chili powder. Place the chicken in the pot. Sear it for about 2 minutes on each side. This step locks in the flavor. After that, pour in one can of red enchilada sauce and two cups of chicken broth. Add eight ounces of pasta, like penne or rotini, and one cup of corn. Make sure to stir gently. You want the pasta to be covered by the liquid. Close the lid of your Instant Pot. Set the valve to sealing. Now, cook on high pressure for six minutes. When the time is up, be careful. Perform a quick release of the pressure. Open the lid when it is safe to do so. Take out the chicken breasts and shred them with two forks. Return the shredded chicken to the pot. Stir in one cup of heavy cream and half of the shredded cheddar cheese. Mix it well until it’s creamy. Check the taste and add more salt or pepper if you want. Let it rest for a few minutes to thicken. Now, serve your pasta in bowls. Top with the rest of the cheese and some fresh cilantro. Enjoy your meal! To shred chicken well, use two forks. Hold one fork steady and pull with the other. Start with chicken that is warm. It shreds easier when it's hot. I like to shred right after cooking. This keeps all the juices in the chicken. You can also use a hand mixer for quick shredding. Just be careful not to overmix it. If you want more heat, add more chili powder. For less spice, cut back on it. You can also add some diced jalapeños for extra flavor. If you want to tone down the spice, add more heavy cream. This helps balance the heat. Always taste your dish before serving to find the right level for you. To get a creamy sauce, add heavy cream at the end. Stir it in slowly after you shred the chicken. This keeps the cream from curdling. If you want it thicker, let it sit for a few minutes. The pasta will absorb some of the sauce. You can also add a bit of pasta water for a silkier finish. {{image_2}} You can make a vegetarian version of creamy enchilada pasta. Instead of chicken, use 1 can of black beans or chickpeas. These beans add protein and a nice texture. You can also add more corn for sweetness. Replace the chicken broth with vegetable broth to keep it flavorful. This way, you keep the dish rich and hearty, while making it meat-free. Pasta shapes can change how your dish feels. Penne or rotini work well, but you can try others too. Fusilli gives a nice twist and holds sauce well. Farfalle looks pretty and adds fun to your meal. Use your favorite shape, or whatever you have at home. Each type brings its own fun texture to the dish. Adding vegetables boosts nutrition and flavor. Bell peppers, zucchini, or spinach work great. Chop them up and add them when you sauté the onions. They will cook nicely and blend with the sauce. This not only makes the dish healthier, but it also makes it colorful and inviting. You can mix and match vegetables based on what you like. After enjoying your Instant Pot creamy chicken enchilada pasta, let it cool down. Store leftovers in airtight containers. This keeps flavors fresh. You can keep it in the fridge for up to three days. If you want to enjoy it later, freezing is a great option. To reheat, use either a microwave or a stovetop. If using the microwave, place a portion in a bowl. Cover with a damp paper towel to keep moisture. Heat for about 2-3 minutes, stirring halfway. On the stovetop, add a splash of chicken broth. Heat in a pan over low heat until warm. Stir to combine and enhance taste. If you choose to freeze it, do so right after cooking. Pour the pasta into freezer-safe bags or containers. Remove as much air as possible to avoid freezer burn. It can last up to three months in the freezer. When ready to eat, thaw it overnight in the fridge before reheating. Enjoy the creamy goodness again! Yes, you can use frozen chicken breasts. The Instant Pot cooks them well. Just add a few extra minutes to the cooking time. Instead of 6 minutes, cook for 10 minutes on high pressure. This way, the chicken will be safe and tender. If you want a lighter option, use half-and-half or whole milk. Coconut milk works too for a dairy-free version. For a thicker sauce, blend silken tofu and use it as a cream substitute. These options still keep it creamy and tasty. To make this pasta gluten-free, choose gluten-free pasta. Many brands offer great options that cook well. Check the enchilada sauce and chicken broth too. Ensure they are gluten-free to keep the dish safe. Enjoy your gluten-free creamy chicken enchilada pasta! This blog post covers how to make delicious creamy chicken enchilada pasta in an Instant Pot. You learned about the main ingredients, useful tips, and variations for the dish. Proper storage and reheating also help keep it fresh. In summary, this recipe is easy to follow and perfect for busy days. Try it out and enjoy the creamy flavor and spice. With a few tweaks, you can make it your own. Happy cooking!

Instant Pot Creamy Chicken Enchilada Pasta Delight

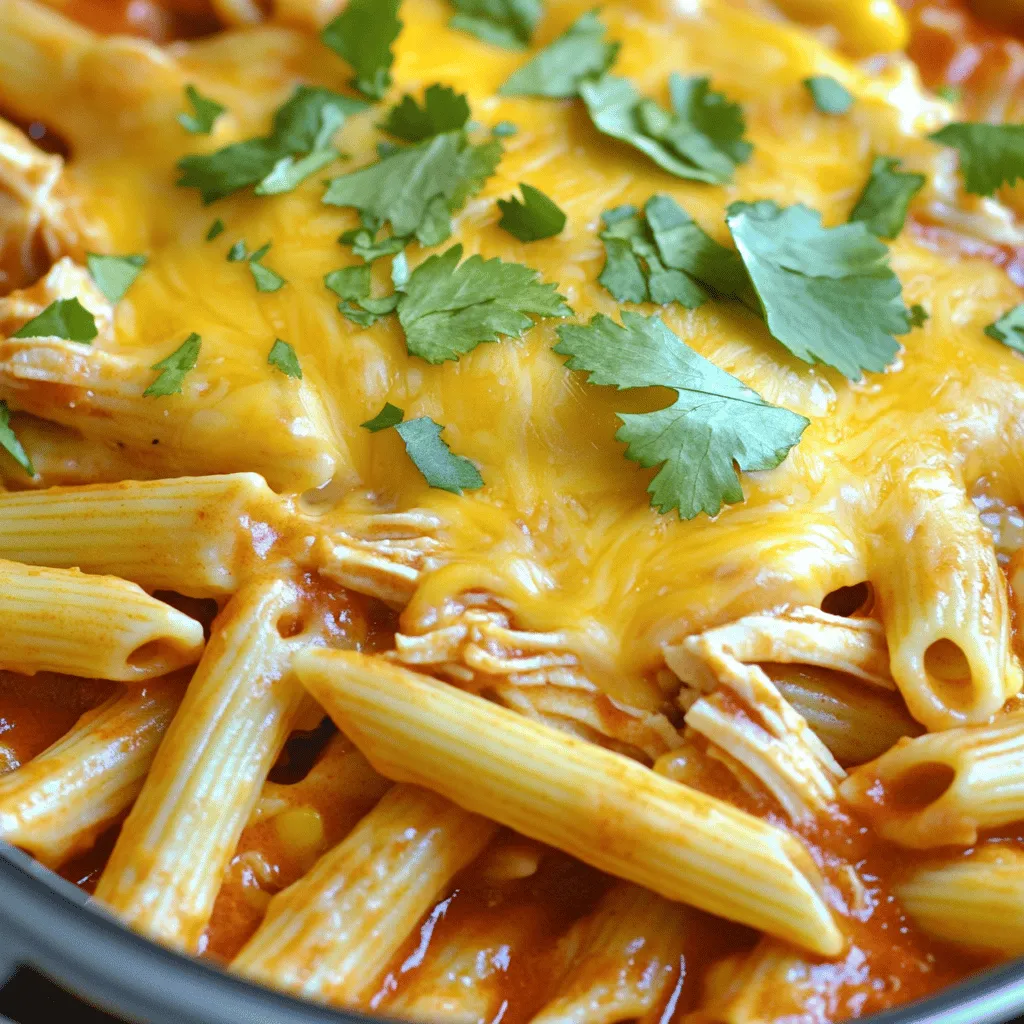
Looking for a quick dinner idea that’s rich in flavor? Try my Instant Pot Creamy Chicken Enchilada Pasta Delight! This

- 1 medium head of cauliflower, cut into small florets - 2 tablespoons olive oil - 1 teaspoon smoked paprika - 1 teaspoon garlic powder - 1 teaspoon onion powder - Salt and pepper to taste - 1 cup BBQ sauce (store-bought or homemade) - 1 cup black beans, drained and rinsed - 1 cup corn kernels (fresh, frozen, or canned) - 1 cup shredded cheese (cheddar or mozzarella) - 1 jalapeño, sliced (optional) - Fresh cilantro, chopped for garnish - 1 avocado, diced, for serving - Sour cream or Greek yogurt, for serving This mix of ingredients gives a fun twist to nachos. Cauliflower replaces chips, making them lighter. The spices add a warm flavor that sings with each bite. Black beans and corn bring texture and color. Cheese melts beautifully, while jalapeño adds heat. Fresh cilantro and avocado finish the dish, adding freshness. You can switch up the BBQ sauce to suit your taste. Use homemade for a personal touch. Enjoy this blend of flavors in every bite! 1. Preheat your oven to 425°F (220°C). This step ensures even cooking. 2. Line a large baking sheet with parchment paper. This helps with easy cleanup. 3. In a big bowl, toss the cauliflower florets with olive oil. 4. Add smoked paprika, garlic powder, onion powder, salt, and pepper. Mix well until all florets are coated. 5. Spread the seasoned cauliflower in a single layer on the baking sheet. 6. Roast for 20-25 minutes. Look for a tender and slightly crispy texture. 7. Remove the baking sheet. Drizzle BBQ sauce over the roasted cauliflower. Toss gently to coat. 8. Spread black beans and corn over the sauced cauliflower. 9. Sprinkle cheese on top. If you like heat, add sliced jalapeños. 10. Return the baking sheet to the oven. Bake for another 10 minutes. The cheese should melt and bubble. 11. Once out of the oven, let the nachos cool for a couple of minutes. 12. Garnish with chopped cilantro and diced avocado. 13. Serve with a dollop of sour cream or Greek yogurt. Enjoy your nachos fresh from the oven! To get crispy cauliflower, follow these steps: - Cut the cauliflower into small, even florets. - Toss them well with olive oil and spices. - Spread them out in a single layer on the baking sheet. - Roast at 425°F for 20-25 minutes until golden brown. For BBQ sauce, you have options: - Store-bought sauces are quick and easy. Look for ones with natural ingredients. - Homemade BBQ sauce lets you control the flavors. Mix ketchup, vinegar, and spices for a simple sauce. For a casual vibe, serve the nachos straight from the baking sheet. - This allows everyone to dig in. For a more formal setting, transfer nachos to a large platter. - Add lime wedges for a fresh touch. Pair these nachos with: - A crisp salad for a light side. - Cold drinks like iced tea or lemonade. If you want a dairy-free option, try these cheese substitutes: - Use plant-based cheese or nutritional yeast for flavor. - Cashew cheese is another great choice. To adjust the spice level, add jalapeños. - If you like it milder, remove the seeds. - For extra heat, leave the seeds in or add more jalapeños. {{image_2}} You can make these nachos fit your diet easily. If you want vegan nachos, use plant-based cheese instead of dairy cheese. There are many great brands now available. For gluten-free options, ensure your BBQ sauce is gluten-free. You can serve with corn chips made from corn instead of wheat. Enjoy tasty nachos without worry! Don't be afraid to switch up the flavors! Try different sauces like Buffalo sauce or ranch dressing. These add a new twist to your nachos. For toppings, think outside the box. Add sliced olives or diced bell peppers for extra crunch and flavor. Each bite can taste different, keeping things fun! Take advantage of seasonal produce for your nachos. In summer, add fresh tomatoes or zucchini. In fall, use roasted pumpkin or squash for a cozy touch. You can also adjust for holidays. For a festive vibe, top with cranberries during Thanksgiving or fresh herbs during spring. Your nachos can change with the seasons! To keep your nachos fresh, store them in an airtight container. Place a layer of parchment paper between the nachos and the lid. This helps absorb moisture and keeps them from getting soggy. You can refrigerate them for up to three days. When you're ready to eat them again, reheat them in the oven for best results. Set your oven to 350°F (175°C) and place the nachos on a baking sheet. Heat for about 10 minutes. This will help crisp up the cauliflower and melt the cheese again. You can freeze nachos, but it's best to freeze the components separately. This way, the texture stays nice. Freeze the roasted cauliflower, beans, and corn in airtight bags. Keep the cheese and toppings separate. To thaw, move the frozen items to the fridge overnight. When ready to eat, reheat the cauliflower in the oven until warm. Add the cheese on top and melt it for about 10 minutes at 350°F (175°C). Enjoy your tasty nachos! Can I use frozen cauliflower instead of fresh? Yes, you can use frozen cauliflower. Just thaw and drain it first. This helps avoid extra moisture. Frozen cauliflower may cook faster, so watch it closely in the oven. How can I make this dish spicier? To boost the heat, add more jalapeños. You can also use a spicier BBQ sauce. If you like it very hot, try adding crushed red pepper or hot sauce. What can I substitute for BBQ sauce? If you don’t have BBQ sauce, try using salsa or a spicy sauce. You could also make a simple mix of ketchup and hot sauce for a quick swap. Alternatives for black beans and corn? For black beans, you can use pinto beans or kidney beans. If you want to skip corn, try adding bell peppers or diced tomatoes instead. These will add flavor and texture. How many servings does this recipe yield? This recipe serves about four people. It makes a great shareable dish for game night or a fun dinner. Can I halve or double the recipe easily? Yes, you can halve or double the recipe without trouble. Just adjust the cooking time slightly if you change the amount. Keep an eye on the cauliflower for the best results. This blog post shows how to make tasty cauliflower nachos. We covered the key ingredients like cauliflower, BBQ sauce, and toppings. You learned step-by-step instructions for preparation, roasting, and final baking. We shared tips for getting crispy nachos and suggested ways to customize your dish. Plus, we explored variations to suit special diets and seasonal tastes. With proper storage, you can enjoy leftovers later. Try these nachos at your next gathering and impress everyone with your cooking skills. Enjoy the crunchy bites and flavors!

Sheet-Pan BBQ Cauliflower Nachos Quick and Easy Recipe

If you crave a fun and tasty snack, I have the perfect recipe for you: Sheet-Pan BBQ Cauliflower Nachos. They’re

- 2 cups white chocolate chips - 1 can (15 oz) pumpkin puree - 1 cup sweetened condensed milk - 1 teaspoon vanilla extract - 1 teaspoon pumpkin pie spice - ½ teaspoon ground cinnamon - ¼ teaspoon salt - ½ cup chopped walnuts (optional) - Chopped pecans - Mini marshmallows - Drizzled caramel For the white chocolate chips, you can use high-quality brands found at most grocery stores. Look for chips that melt well. If you cannot find pumpkin puree, you can make your own by roasting and pureeing fresh pumpkin. Sweetened condensed milk is available in cans at any supermarket. You can skip the walnuts if you have nut allergies or prefer a smoother fudge. If you want to add more spice, try using nutmeg or ginger for a different flavor twist. Start by lining an 8x8-inch baking pan with parchment paper. Leave some paper hanging over the sides. This helps you lift the fudge out later. Next, gather your ingredients. You will need white chocolate chips, pumpkin puree, sweetened condensed milk, and spices. Have everything ready before you begin. In a medium saucepan, add the sweetened condensed milk and white chocolate chips. Set the heat to low. Stir the mix continuously. Keep stirring until the chocolate melts completely. The mixture should be smooth and creamy. Once melted, take the saucepan off the heat. Now, stir in the pumpkin puree, vanilla extract, pumpkin pie spice, ground cinnamon, and salt. Mix well until everything is combined. If you like walnuts, fold them in now. Pour the fudge mixture into your prepared pan. Use a spatula to spread it evenly. Let it cool at room temperature for a bit. After that, put it in the fridge for at least two hours. This helps it set. Once firm, lift the fudge out using the parchment paper. Cut it into squares, and enjoy! To get the best texture, watch the heat closely when melting chocolate. Keep it on low. Stir the mix all the time. This step helps avoid any lumps. When you blend in the pumpkin, make sure it’s smooth. You want a creamy mix, not a chunky one. If you like, add chopped walnuts. They give a nice crunch. When it's time to serve, cut the fudge into small squares. This makes it easy to share. Arrange them on a colorful platter. A sprinkle of pumpkin pie spice on top adds a nice touch. You can also serve it with whipped cream for dipping. This makes the treat even more fun. One common mistake is not stirring the chocolate enough. This can cause it to burn. Another mistake is using cold pumpkin puree. Always let it sit out to reach room temperature. This helps it mix better. Lastly, don’t rush the cooling time. Let it chill fully to set right. {{image_2}} You can change the flavor of this fudge with ease. Adding spices can give it a fun twist. For example, try mixing in nutmeg or ginger for a warm kick. You can also swap the vanilla extract for almond extract. This will add a lovely nutty flavor. Want a stronger pumpkin taste? Add an extra half cup of pumpkin puree. Each change makes the fudge more unique! If you follow a vegan diet, you can still enjoy this treat. Use dairy-free white chocolate chips and a vegan sweetened condensed milk. This simple swap keeps the fudge creamy and delicious. For gluten-free options, check labels on your ingredients. Most white chocolate chips are gluten-free, but it’s good to double-check. You can have fun with toppings and mix-ins! Chopped nuts, like walnuts, add a nice crunch. If you like a sweeter treat, sprinkle some mini chocolate chips on top. You can also try adding marshmallows or dried fruit for a chewy texture. Drizzling caramel or chocolate on top makes it extra special. The options are endless, so get creative! To keep your pumpkin spice white chocolate fudge fresh, store it in an airtight container. Place a sheet of wax paper between layers of fudge to prevent sticking. This method keeps your fudge soft and tasty for days. Keep it in a cool place, away from sunlight and heat. If you want to save some fudge for later, freezing works great! Wrap each piece tightly in plastic wrap. Then, place them in a freezer bag or container. You can freeze it for up to three months. When you are ready to enjoy it, let it thaw in the fridge overnight. Pumpkin spice white chocolate fudge can last about one week at room temperature. If you store it in the fridge, it can last two weeks. Always check for any signs of spoilage before eating. If it looks dry or hard, it may be time to toss it. For best taste, eat it fresh! Yes, you can swap dark chocolate for white chocolate. Dark chocolate gives a richer taste. It also changes the fudge’s color. Keep in mind that dark chocolate is less sweet. You may want to adjust the sugar or sweetened condensed milk to balance the flavors. You will know the fudge is set when it feels firm to the touch. After chilling for at least 2 hours, check the edges. They should pull away slightly from the pan. If the fudge is still soft in the center, give it more time in the fridge. Use a sharp knife for clean cuts. First, lift the fudge out of the pan using the parchment paper. Place it on a cutting board. Wipe the knife between cuts to keep the edges neat. For smaller squares, cut in half, then cut each half into equal pieces. In this blog post, we explored how to make fudge, from ingredients to storage. We covered the main ingredients, optional choices, and substitutions. You learned step-by-step how to prepare, melt, and set your fudge. We also shared tips to perfect the texture and avoid common mistakes. Lastly, we discussed variations for different flavors and dietary needs. Enjoy your fudge-making adventure, and don’t forget to share your delicious results!

Pumpkin Spice White Chocolate Fudge Irresistible Treat

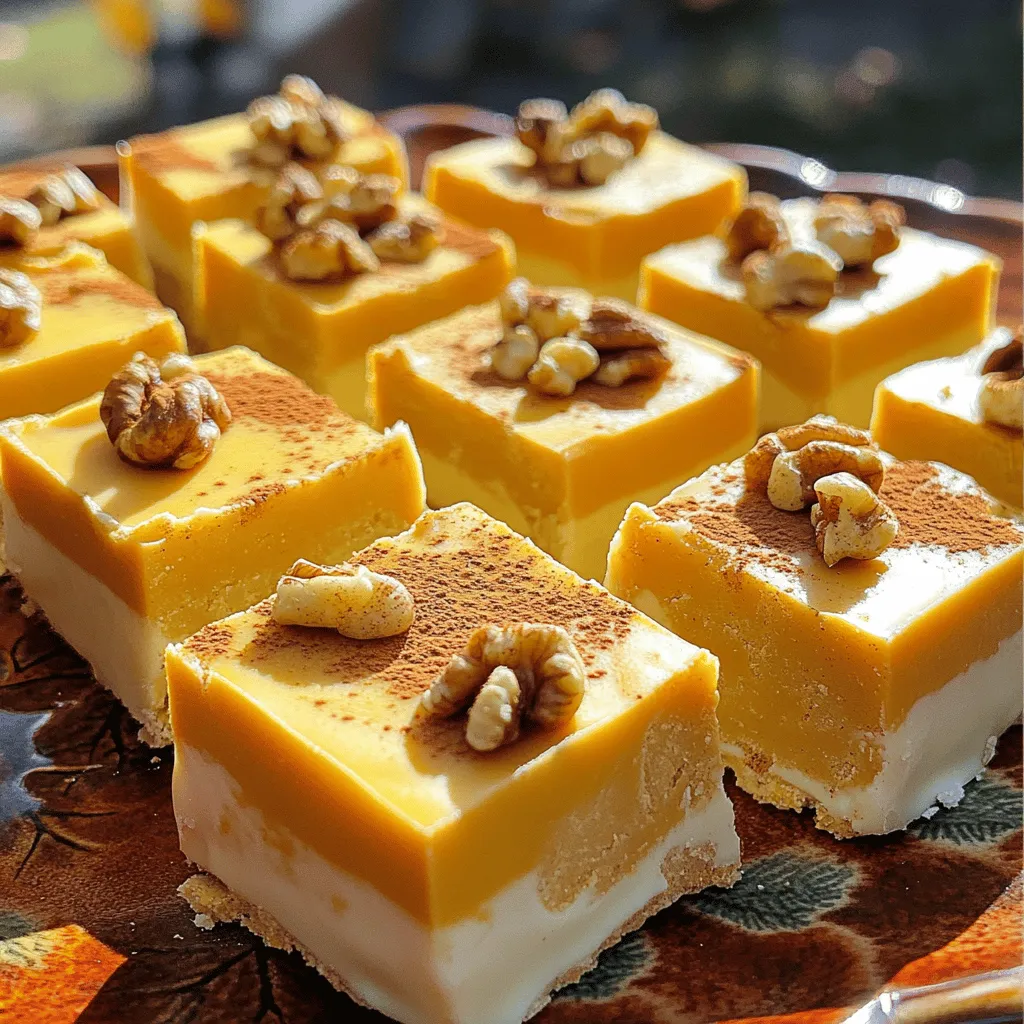
Get ready for a sweet fall treat! This Pumpkin Spice White Chocolate Fudge brings together the warm flavors of autumn

For this dish, you need two key items: penne pasta and chicken. The recipe calls for: - 2 cups penne pasta - 1 lb boneless, skinless chicken breasts, cubed Penne pasta holds sauce well, making each bite tasty. Chicken adds protein and makes the meal hearty. Next, we add flavor with veggies and spices. You will need: - 1 cup sun-dried tomatoes in oil, drained and chopped - 1 medium onion, diced - 3 cloves garlic, minced - 1 teaspoon Italian seasoning - 1 cup spinach, roughly chopped - Salt and pepper to taste Sun-dried tomatoes give a rich flavor. Onion and garlic add depth. Spinach adds color and nutrients. Finally, we need liquids and cheese for a creamy finish. Gather these: - 1 cup chicken broth - 1 cup heavy cream - 1/2 cup grated Parmesan cheese - 2 tablespoons olive oil - Fresh basil leaves for garnish Chicken broth adds moisture and flavor. Heavy cream creates a rich sauce. Parmesan cheese makes it extra creamy. Start by heating 2 tablespoons of olive oil in a large pot over medium heat. Once the oil is hot, add 1 medium diced onion. Sauté the onion for about 3-4 minutes. You want it to turn translucent. Next, add 3 minced garlic cloves and cook for another minute. This will boost the flavor and aroma of the dish. Now, it’s time to add 1 pound of cubed boneless, skinless chicken breasts. Cook the chicken for about 5-6 minutes. Make sure it browns and is no longer pink inside. Season the chicken with salt, pepper, and 1 teaspoon of Italian seasoning. This adds that classic Italian taste. Once the chicken is ready, stir in 1 cup of chopped sun-dried tomatoes. Cook this mixture for another 2 minutes. This allows the flavors to meld nicely. Now, pour in 1 cup of chicken broth and bring it to a boil. After boiling, add 2 cups of penne pasta. Reduce the heat to medium-low and cover the pot. Let it simmer for about 10-12 minutes until the pasta is al dente. After the pasta cooks, stir in 1 cup of heavy cream and 1 cup of roughly chopped spinach. Cook for another 2-3 minutes until the spinach wilts. Finally, remove the pot from heat and add 1/2 cup of grated Parmesan cheese. Stir until it becomes creamy. Adjust the taste with more salt and pepper if needed. Serve hot, garnished with fresh basil leaves and extra Parmesan if you like. Enjoy your meal! To cook pasta well, always check the package for times. Use a large pot and plenty of water. Add salt to the water; this adds flavor. Once the water boils, add the penne pasta. Stir it often for even cooking. Taste the pasta a minute before the time is up. You want it al dente, firm but not hard. Seasonings make your dish pop. Besides salt and pepper, try Italian seasoning. It blends herbs like oregano and basil. You can also add a pinch of red pepper flakes for heat. If you want more depth, use fresh garlic and onion. They bring out the best in chicken and sun-dried tomatoes. To keep your leftovers fresh, let them cool first. Store them in an airtight container. You can keep them in the fridge for up to three days. If you want to save them longer, freeze the dish. Portion it out and label the containers. When reheating, add a splash of broth or cream to keep it moist. {{image_2}} You can easily make this dish vegetarian. Just swap the chicken for firm tofu. Cut the tofu into cubes and sauté it until golden. You can also use chickpeas for added protein. They bring a nice texture. This swap keeps the meal hearty and satisfying without meat. Feel free to add more veggies to boost nutrition. Zucchini, bell peppers, or mushrooms work great. Chop them small for even cooking. Add them when you cook the onion. They will soften and blend well with the other flavors. This keeps the dish fresh and colorful too. If you want a lighter option, use Greek yogurt instead of cream. It adds creaminess with fewer calories. For cheese, nutritional yeast gives a cheesy flavor without dairy. You can also use almond milk with a bit of cornstarch. This keeps the sauce creamy and delicious without heavy cream. To keep your One-Pot Sun-Dried Tomato Chicken Penne fresh, store it in an airtight container. Let it cool to room temperature first. You can keep it in the fridge for up to three days. If you want to keep it longer, freezing is a great option. For freezing, use a freezer-safe container or a resealable bag. Make sure to remove as much air as possible to prevent freezer burn. Label the bag with the date. You can freeze this dish for up to three months. When you are ready to eat, thaw it in the fridge overnight. To reheat, use a microwave or a skillet on low heat. If using the microwave, cover the dish to keep moisture in. Stir occasionally to heat evenly. If using a skillet, add a splash of chicken broth or water to keep it creamy. Heat until warmed through. Enjoy your meal just like it was fresh! Yes, you can use other pasta shapes. Fusilli, farfalle, or rigatoni work well. Just keep an eye on cooking times. Each shape may need slight adjustments in time to cook through. To make this dish gluten-free, use gluten-free penne. Many brands offer good options. Also, check the chicken broth and seasonings to ensure they are gluten-free. You can use shrimp, turkey, or even tofu for a vegetarian option. Each protein brings unique flavors. Adjust the cooking time based on your protein choice to ensure it's cooked right. This blog post covered key ingredients like pasta, chicken, and vegetables. You learned how to prepare your dish, cook chicken, and complete the meal. I shared tips for perfect pasta, flavor boosts, and storing leftovers. You can also explore variations like vegetarian options and substitutes. Remember, this dish is versatile and easy to adapt. Enjoy creating your version with different ingredients, and don’t forget to share it with others!

One-Pot Sun-Dried Tomato Chicken Penne Delightful Meal

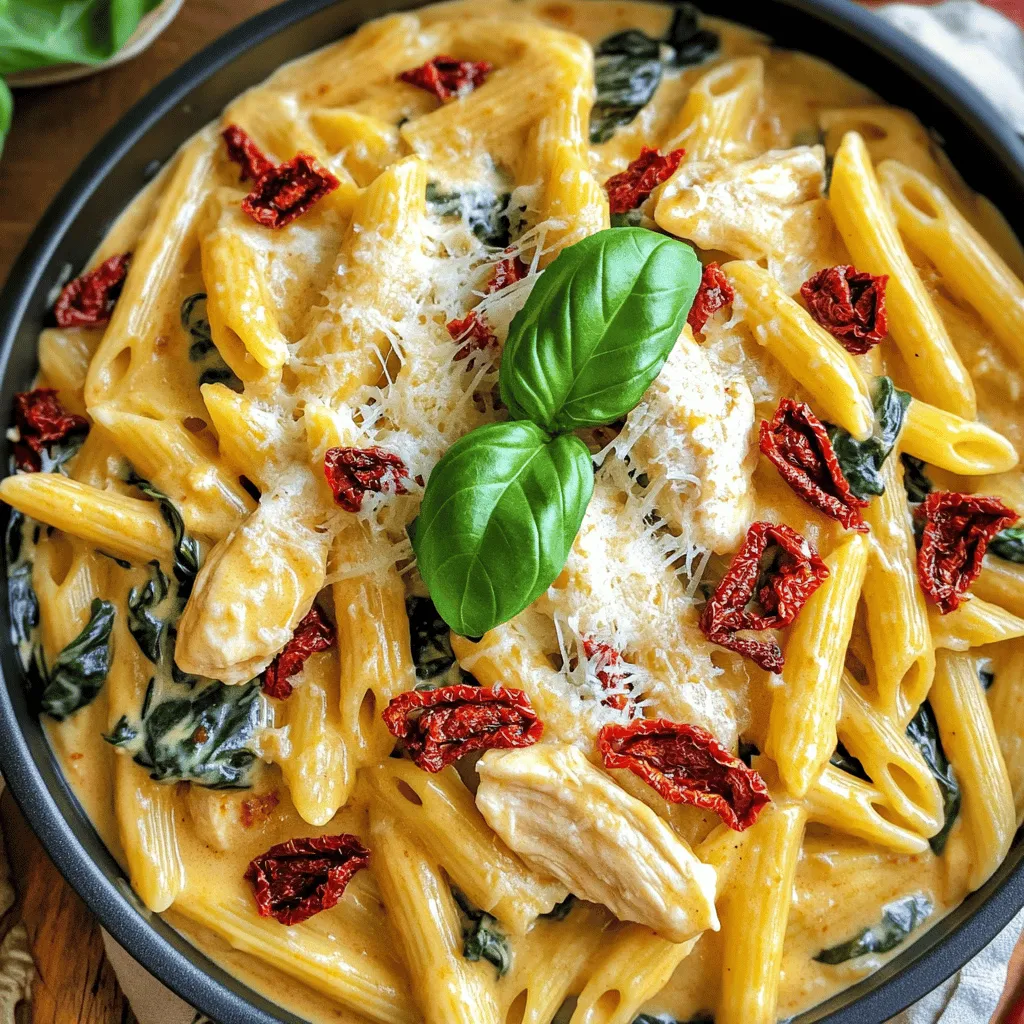
Looking for a quick and tasty meal? You’ve come to the right place! This One-Pot Sun-Dried Tomato Chicken Penne is

To make Air Fryer Garlic Parmesan Green Bean Fries, you need: - 1 pound fresh green beans, trimmed - 2 tablespoons olive oil - 3 cloves garlic, minced The right seasonings make these fries tasty. You will need: - 1/4 cup grated Parmesan cheese - 1 teaspoon garlic powder - 1/2 teaspoon onion powder - 1/2 teaspoon paprika - Salt and black pepper to taste Garnishes add a nice touch. Consider using: - Fresh parsley, chopped (for garnish) These simple ingredients come together to create a delicious dish. The fresh green beans give a nice crunch. The garlic and cheese pack in flavor. Plus, the spices add warmth and depth. You can feel good about eating these fries because they are fresh and tasty! I start by preheating the air fryer to 375°F (190°C). This step is key to getting crispy fries. Preheating helps cook the green beans evenly. It only takes a few minutes, and it makes a big difference! Next, I take one pound of fresh green beans and trim the ends. This makes them easier to eat. I place the trimmed beans in a large mixing bowl. Then, I drizzle two tablespoons of olive oil over them. I toss the beans gently, ensuring they are coated well. Now comes the fun part! I add three minced garlic cloves to the bowl. Then, I sprinkle in a quarter cup of grated Parmesan cheese. I also add one teaspoon of garlic powder, half a teaspoon of onion powder, and half a teaspoon of paprika. Finally, I season with salt and black pepper to taste. I toss everything until the green beans are well-coated. Next, I arrange the green beans in a single layer in the air fryer basket. If my air fryer is small, I may need to cook them in batches. I air fry the green beans for 8-10 minutes. Halfway through, I shake the basket to help them crisp up. I watch them closely to avoid burning. Once golden and crispy, I remove them from the fryer. Sometimes, I sprinkle on a bit more Parmesan for extra flavor. Finally, I garnish with chopped parsley before serving. To get that perfect crispiness, start by drying the green beans well. Excess water can make them soggy. Use a clean kitchen towel to pat them dry. Next, make sure to toss them well in olive oil. This helps them crisp up nicely. Spread the green beans in a single layer in the air fryer. Crowding the basket can lead to uneven cooking. If you want extra crunch, air fry a few minutes longer. Just watch them closely to avoid burning. Seasoning makes all the difference. Feel free to taste the coating before cooking. If you like more garlic, add extra minced garlic or garlic powder. Want a kick? Try adding a pinch of cayenne pepper. Remember, balance is key! You can also mix in some fresh herbs like thyme or rosemary for a twist. Adjust the salt and pepper to your liking. The cheese adds flavor, but you can always add more for a richer taste. If you have many green beans, cook them in batches. The air fryer works best when it’s not overcrowded. Cooking in smaller amounts helps them crisp up evenly. After each batch, you can keep the cooked fries warm in an oven set to low heat. This way, all your green bean fries will be hot and crispy when you serve them. Enjoy your delicious creation with friends and family! {{image_2}} You can switch up the cheese in this recipe. Try using cheddar, feta, or even blue cheese. Each type adds a unique flavor. Cheddar gives a sharp taste, while feta adds a creamy touch. Blue cheese offers a bold flavor. Just keep the amount similar to the Parmesan for balance. Want a kick? Add chili powder or cayenne pepper. Start with a small amount. You can always add more if you like it spicy. For a smoky flavor, try adding smoked paprika. These spices will make your green bean fries extra tasty. You don’t have to stick with green beans. Carrots, zucchini, or asparagus work well too. Just cut them into thin strips. Adjust the cooking time based on the vegetable. Thicker veggies might need a few more minutes. This way, you can enjoy a variety of flavors and textures. After cooking, let the green bean fries cool down. Place them in an airtight container. They will stay fresh in the fridge for up to three days. Make sure to separate layers with parchment paper to keep them crisp. To reheat, use the air fryer for the best results. Set it to 350°F (175°C) and heat for about 5 minutes. This method keeps them crispy. You can also use a microwave, but the fries may turn soft. If you want to freeze them, I recommend doing so before cooking. Place the seasoned green beans on a tray and freeze for 1-2 hours. Once frozen, transfer them to a freezer bag. They can last for up to three months. Thaw in the fridge before cooking for best results. Yes, you can make these green bean fries in a conventional oven. Preheat your oven to 425°F (220°C). Follow the same steps as in the air fryer recipe. Spread the green beans on a baking sheet in a single layer. Bake for about 15-20 minutes, turning halfway. This method gives you crispy green beans, too. Air Fryer Garlic Parmesan Green Bean Fries pair well with many dishes. Serve them as a side with grilled chicken or fish. They also make a great snack with a dipping sauce. Try marinara, garlic aioli, or ranch dressing. You can even serve them alongside burgers for a fun twist. To make this recipe vegan, simply skip the Parmesan cheese. You can use nutritional yeast for a cheesy flavor. It adds a nice depth without any dairy. Also, check your olive oil for any additives. This way, you keep the dish tasty and plant-based. Yes, green bean fries are a healthy snack. They are low in calories and high in fiber. Green beans provide vitamins A, C, and K. When you air fry them, you use less oil than traditional frying. This method keeps them crispy while reducing fat. Enjoy these fries guilt-free! We explored how to make tasty Air Fryer Garlic Parmesan Green Bean Fries. First, we covered essential fresh ingredients, seasonings, and optional garnishes. Then, we guided you through preheating the air fryer and preparing the beans. I shared tips for getting the perfect crispiness and ways to adjust flavors. We also talked about fun variations and proper storage methods. In closing, enjoy experimenting with this fun, easy recipe as a healthier snack or side dish. Get creative and have fun in the kitchen!

Air Fryer Garlic Parmesan Green Bean Fries Delight

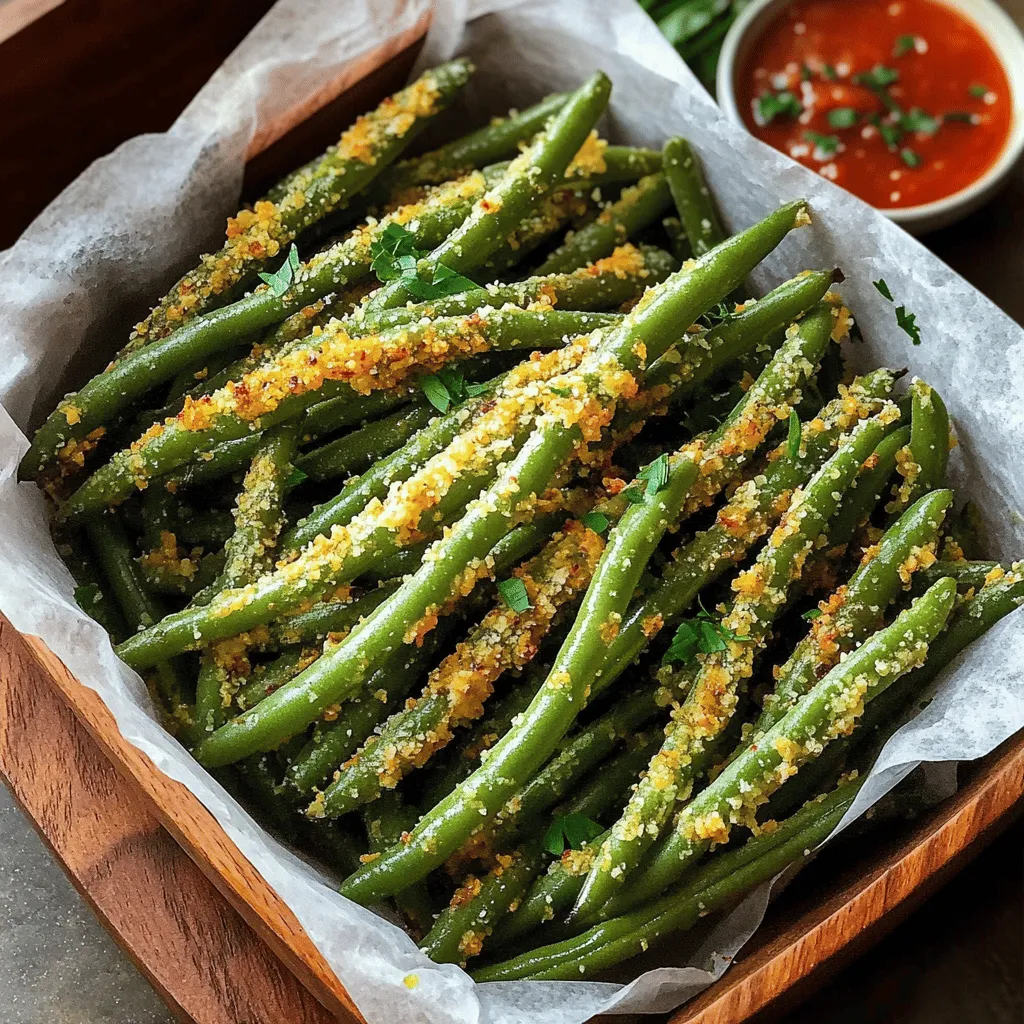
Are you ready to elevate your snack game? My Air Fryer Garlic Parmesan Green Bean Fries offer a crispy, savory

- 1 cup Biscoff cookies, crushed - 8 oz cream cheese, softened - 1/2 cup powdered sugar - 1/2 cup Biscoff spread (cookie butter) - 1 tsp vanilla extract - 1/4 cup chocolate chips (optional, for coating) - Extra crushed Biscoff cookies, for rolling Gathering the right ingredients makes all the difference in your no-bake Biscoff cheesecake truffles. The main star is Biscoff cookies. These cookies bring a rich, spiced flavor that pairs well with cream cheese. Next, you need cream cheese. It adds creaminess and richness to the truffles. Make sure it's softened for easy mixing. You’ll also need powdered sugar for sweetness. This ingredient balances the flavors and adds a nice texture. Biscoff spread is key in this recipe. It's also known as cookie butter. This spread gives the truffles that signature Biscoff taste. Adding vanilla extract enhances the overall flavor and aroma. If you want to coat the truffles, chocolate chips are an option. They add a lovely sweetness. Finally, have extra crushed Biscoff cookies ready for rolling. This adds a crunchy exterior. By preparing these ingredients ahead of time, you set yourself up for success. Each component contributes to the delightful flavor of these truffles. First, I grab a mixing bowl. I add 1 cup of crushed Biscoff cookies and 8 oz of softened cream cheese. I use a hand mixer or spatula to mix them well. The goal is to get a smooth blend. Next, I add 1/2 cup of powdered sugar, 1/2 cup of Biscoff spread, and 1 tsp of vanilla extract. I mix again until the mixture is creamy and has no lumps. This mixture is the heart of our truffles. Now, I need to chill the mixture. I cover the bowl and place it in the fridge for about 30 minutes. Chilling makes the mixture easier to handle. It helps the truffles hold their shape when I form them. This step is key for a great texture. After chilling, I take the bowl out of the fridge. I use a small cookie scoop or my hands to form the mixture into balls. Each ball should be about 1 inch in diameter. Once I have the balls ready, I can roll them in extra crushed Biscoff cookies. For a twist, I can melt 1/4 cup of chocolate chips and dip each truffle in chocolate before rolling them in cookies. This adds a fun layer of flavor. Finally, I place the coated truffles on a parchment-lined baking sheet. I pop them back in the fridge for another 30 minutes to set. Chilling is key for the right texture. After mixing the ingredients, let the mixture chill for at least 30 minutes. This makes it easier to shape the truffles. The cold helps the mixture firm up, allowing you to roll it into perfect balls. The consistency of the mixture is also important. You want it creamy but not too runny. It should hold its shape when you form the balls. If it feels too soft, chill it longer. If it seems too thick, add a bit more Biscoff spread to loosen it up. Get creative when presenting your truffles! You can arrange them in a pretty box or on a cake stand. This makes them look even more inviting. An extra touch is to drizzle some Biscoff spread over the top. It adds flavor and makes your truffles shine. You can even sprinkle some crushed Biscoff cookies on top for added crunch and flair. For mixing, I recommend a hand mixer for smooth blending. A spatula works well too if you prefer. You will also need a small cookie scoop for shaping the truffles. This helps keep them uniform in size. When it comes to storage, use airtight containers to keep your truffles fresh. You can stack them with parchment paper between layers. This prevents them from sticking together. {{image_2}} You can play around with different flavors in your Biscoff cheesecake truffles. Try using Nutella or peanut butter instead of Biscoff spread. Both options add rich flavors and fun twists. You can also mix in flavored extracts. For example, almond or hazelnut extract can give your truffles a special touch. Just remember to adjust the amounts to keep the balance right. Making these truffles fit your diet is easy. For gluten-free options, swap out Biscoff cookies with gluten-free cookies. Many brands offer delicious alternatives that work well. If you want vegan truffles, use plant-based cream cheese and a vegan spread. You can find many tasty cookie butters that are dairy-free. This way, everyone can enjoy these treats! To store your truffles in the fridge, place them in an airtight container. This keeps them fresh and tasty. Layer parchment paper between the truffles to prevent sticking. They will stay good in the fridge for up to one week. Just make sure to keep them cold. For long-term storage, you can freeze the truffles. Place them on a baking sheet first, and freeze them for about two hours. Once frozen, transfer them to a freezer-safe container. They can last for up to three months in the freezer. To enjoy them, thaw the truffles in the fridge overnight. This keeps their texture nice and creamy. The best time to eat these truffles is within one week if kept in the fridge. If you freeze them, enjoy them within three months for the best flavor. After that, they may lose their taste and texture. Always check for any signs of spoilage before eating. You can make these truffles easily without an oven. First, combine crushed Biscoff cookies with softened cream cheese in a bowl. Use a hand mixer or spatula to mix them well. Next, add powdered sugar, Biscoff spread, and vanilla extract. Stir until the mixture is smooth and creamy. Chill the mixture in the fridge for about 30 minutes. This step helps it firm up and makes it easier to handle. Once chilled, scoop out small amounts and roll them into balls. Coat the balls in crushed Biscoff cookies or melted chocolate. Finally, refrigerate the truffles again to set. Yes, you can make these truffles ahead of time. After rolling them into balls, place them in an airtight container. Store them in the fridge for up to a week. You can also freeze them for longer storage. Just make sure to use a freezer-safe container. When you want to enjoy a truffle, take it out and let it thaw in the fridge for a few hours. If you do not have Biscoff cookies, there are good alternatives. You can use graham crackers, digestive biscuits, or any other spiced cookies. Each option will give a different flavor, but they all work well. For a chocolate twist, try using chocolate cookies. Just make sure to crush them finely, just like the Biscoff cookies. In this post, we explored making delicious Biscoff truffles. We covered ingredients like Biscoff cookies and cream cheese, along with easy steps for mixing and chilling. I shared tips for getting the right texture and creative ways to present your truffles. Don't forget the fun variations and storage tips! You can enjoy these treats fresh or frozen. They are simple to make and satisfy every sweet tooth. Try them yourself and share your results!

No-Bake Biscoff Cheesecake Truffles Delightful Treat

Craving a sweet treat that’s easy to make and oh-so-delicious? You’re in the right place! These No-Bake Biscoff Cheesecake Truffles

Older posts
Newer posts
← Previous Page1 … Page23 Page24 Page25 … Page82 Next →

dsad

© 2026 Recipes Pursuit • Built with GeneratePress

Our Policies

  • Copyright Policy
  • Cookie Policy
  • GDPR Policy
  • Privacy Policy
  • Disclaimer
  • Terms Of Use

More Information

  • Home
  • About
  • Contact
  • Appetizers
  • Dessert
  • Dinner
  • Drinks
©2026, Recipes Pursuit About Back To Top