Skip to content
DisclaimerTerms Of UseGDPR PolicyCookie Policy

Recipes Pursuit

  • Home
  • Drinks
  • Appetizers
  • Dinner
  • Dessert
  • About
  • Contact
  • Privacy Policy
DisclaimerTerms Of UseGDPR PolicyCookie Policy

NO-ING-IMG

To make this tasty ice cream, gather these vital ingredients: - 2 ripe bananas, frozen and sliced - 1 cup unsweetened almond milk (or any milk of choice) - 1/2 cup natural peanut butter - 1/4 cup unsweetened cocoa powder - 1 scoop chocolate protein powder - Pinch of salt These ingredients blend to create a rich and creamy base. The frozen bananas give a smooth texture. The almond milk helps mix everything well. Peanut butter adds that delicious nutty flavor. Cocoa powder and chocolate protein powder make it extra chocolaty. To make your ice cream even sweeter, consider these optional ingredients: - 2 tablespoons honey or maple syrup (for added sweetness) - Crushed peanuts (for crunch) - Dark chocolate shavings (for extra flavor) You can add honey or maple syrup to suit your taste. If you like toppings, crushed peanuts give a nice crunch. Dark chocolate shavings add a touch of elegance and more chocolatey goodness. You can use different types of milk to suit your needs: - Almond milk - Coconut milk - Oat milk - Regular cow's milk Almond milk keeps it light and dairy-free. Coconut milk adds a rich creaminess. Oat milk gives a smooth texture, while cow's milk is a classic choice. Choose what you like best! Start by slicing two ripe bananas. Make sure to freeze them first. Frozen bananas give the ice cream its creamy texture. Place the banana slices in a blender or food processor. This forms the base of your ice cream. Next, pour in one cup of almond milk. You can use any milk you like. Then add half a cup of natural peanut butter. Spoon in a quarter cup of unsweetened cocoa powder too. Don’t forget one scoop of chocolate protein powder. If you want it sweeter, drizzle in two tablespoons of honey or maple syrup. Add a pinch of salt to boost the flavor. Blend all the ingredients on high. Stop to scrape down the sides if needed. Blend until the mixture is smooth and creamy. Now, transfer your blended mixture into a freezer-safe container. Smooth the top with a spatula. Cover it with a lid or plastic wrap. Freeze for at least three to four hours until firm. When ready to enjoy, let it sit for five minutes. This helps soften it for easier scooping. Scoop into bowls and top with crushed peanuts and dark chocolate shavings if you like. To get that creamy texture, use ripe bananas. Frozen bananas work best. They add smoothness and sweetness. Blend them well with your almond milk. If the mixture is too thick, add a bit more almond milk. This helps it blend smoothly. Stop to scrape down the sides if needed. Blending well is key to achieving the right texture. Sweetness is a personal choice. If you want more sweetness, add honey or maple syrup. Start with two tablespoons and taste the mix. You can always add more. If you prefer a less sweet treat, skip the added sweeteners. The bananas and peanut butter provide natural sweetness. You can customize this recipe by using different protein powders. Chocolate protein powder is great, but you can try vanilla. Each type of powder changes the flavor a bit. Make sure to choose one that fits your taste. If you have a plant-based powder, it works just as well. {{image_2}} You can add a splash of vanilla extract to your mix. This small addition makes the ice cream taste richer and more complex. Just one teaspoon can elevate the flavors. It pairs well with chocolate and peanut butter. If you love other flavors, try adding a dash of cinnamon or a pinch of espresso powder. Each adds a unique twist to your treat. If you want a dairy-free version, swap out regular milk for almond milk or oat milk. Both options work well and keep the ice cream creamy. You can also use coconut milk for a richer flavor. For the peanut butter, look for brands that have no added sugar. This way, you control the sweetness while keeping it dairy-free. Toppings can add great texture to your ice cream. Crushed peanuts give a nice crunch and pair perfectly with the peanut butter flavor. Dark chocolate shavings add a sweet touch and an extra layer of chocolate. You can even try granola or sliced almonds for more variety. Get creative! Mix and match toppings to find your perfect scoop. To keep your chocolate peanut butter protein ice cream fresh, use a freezer-safe container. Make sure the container is airtight. This will prevent ice crystals from forming. Before sealing, smooth the top of the ice cream with a spatula. Cover the container with a lid or plastic wrap. This extra layer helps keep it creamy. Your ice cream will last about two weeks in the freezer. After that, it may lose its creamy texture. To enjoy it at its best, try to eat it within this time. If you store it longer, just check for freezer burn before serving. When you're ready to scoop, take the ice cream out of the freezer. Let it sit at room temperature for about five minutes. This will soften it just enough to scoop easily. If it is still too hard, you can microwave it for a few seconds. Just be careful not to melt it! Enjoy your treat! Yes, you can skip the bananas. They add creaminess and natural sweetness. If you want a different base, try using avocado. It gives a smooth texture. You can also use silken tofu for creaminess. Adjust the sweetness to your taste since these options are less sweet. Absolutely! This ice cream is perfect for meal prep. You can make it ahead of time and store it in the freezer. It lasts well for up to two weeks. Just remember to let it sit out for a few minutes before scooping. This makes it easier to serve. If you need a substitute for peanut butter, try almond butter or cashew butter. These nut butters work well in this recipe. You can also use sunflower seed butter for a nut-free option. Each choice brings a slight flavor twist, so pick what you enjoy most. You can make a tasty, healthy treat with chocolate peanut butter protein ice cream. We covered essential ingredients, step-by-step instructions, and helpful tips for the perfect texture. Customize it with different flavors and toppings to suit your taste. Make sure to store it right for long-lasting enjoyment. This easy recipe fits into any meal plan. Enjoy making ice cream that is fun, delicious, and good for you. Grab your blender and get creative!

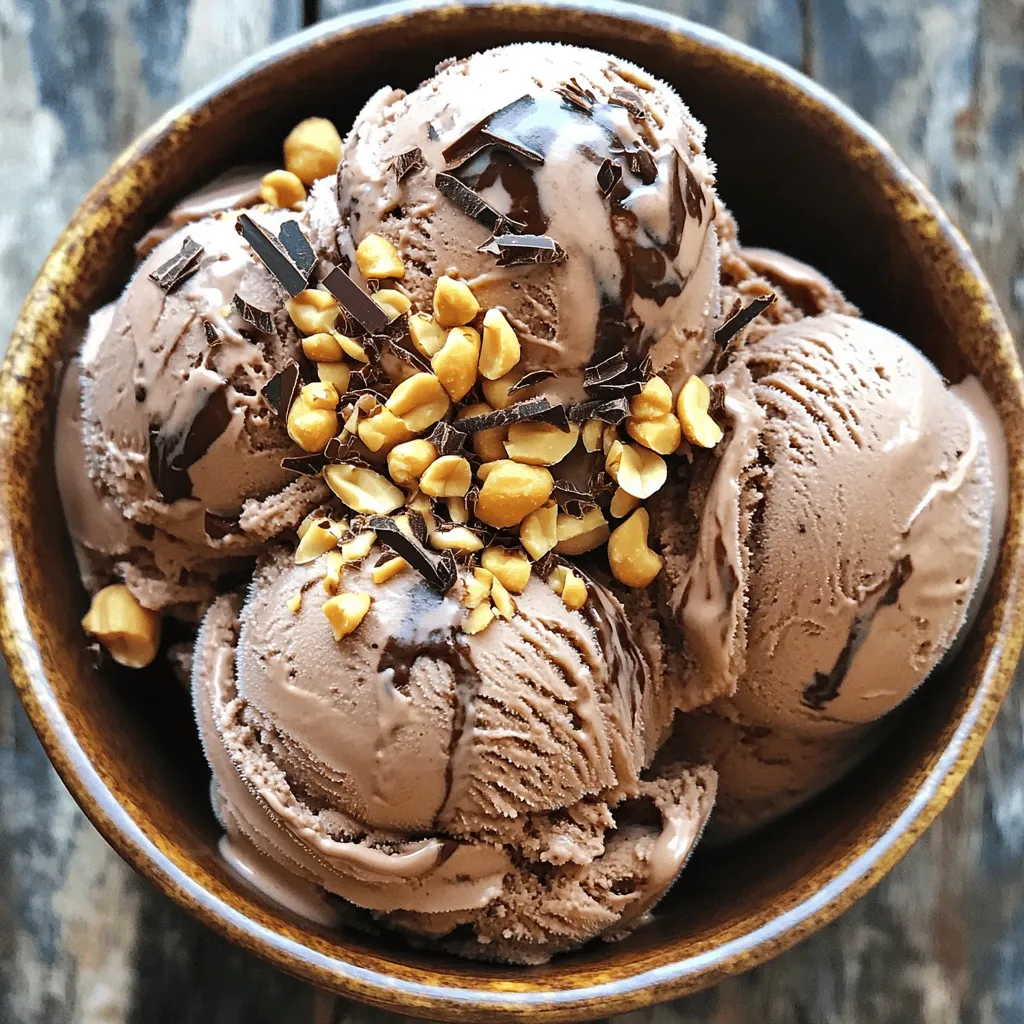
Chocolate Peanut Butter Protein Ice Cream Delight

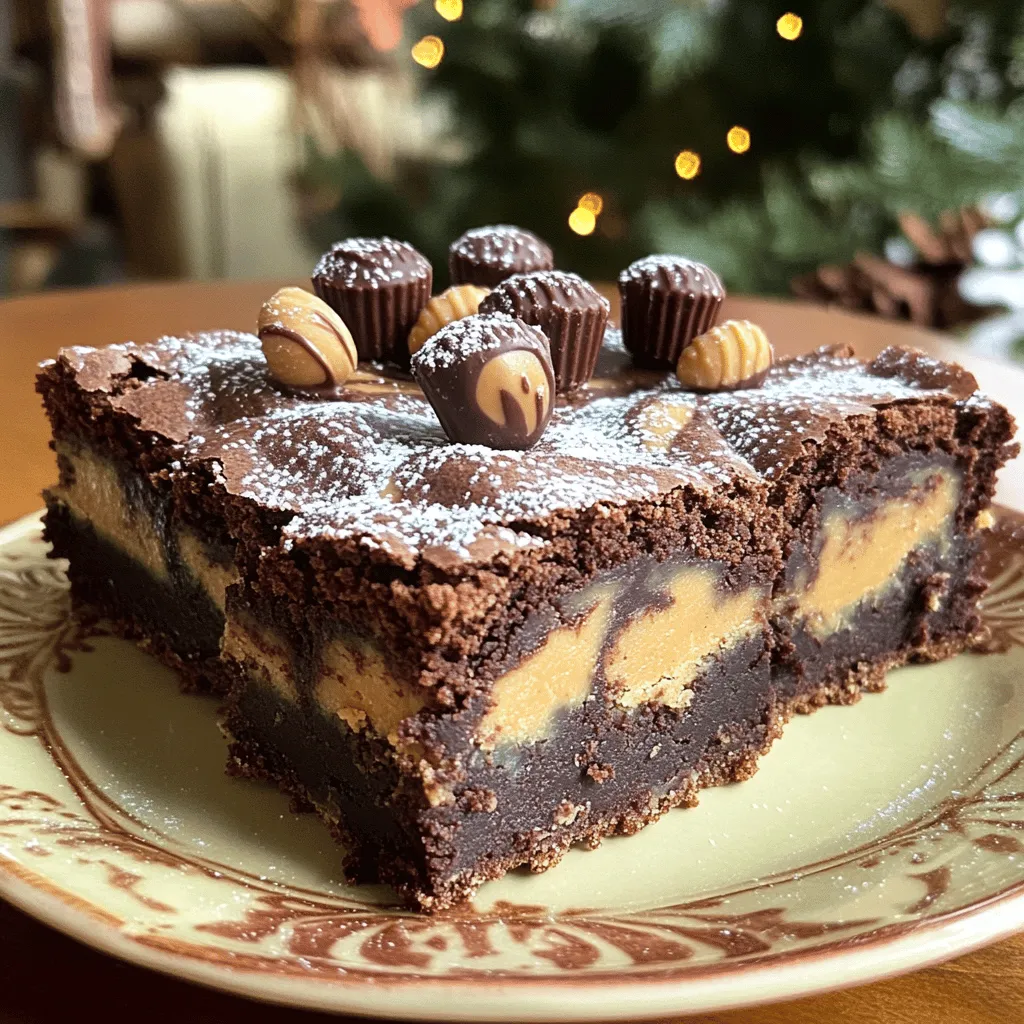
Craving a sweet treat that won’t derail your goals? I’m here to share my favorite Chocolate Peanut Butter Protein Ice

For this tasty dish, you need a few main items. Here’s what I use: - 1 lb flank steak, sliced into thin strips - 2 bell peppers (any color), sliced - 1 medium onion, sliced - 4 cloves garlic, minced - 1/4 cup unsalted butter, melted - 2 tablespoons lime juice - 1 tablespoon chili powder - 1 teaspoon cumin - 1 teaspoon paprika - 1/2 teaspoon salt - 1/2 teaspoon black pepper - 8 small flour tortillas - Fresh cilantro, chopped (for garnish) - Lime wedges (for serving) These ingredients come together to create bold flavors. The garlic and butter add richness, while the lime juice brings brightness. You can change up the dish with some fun extras. Here are a few ideas: - Different colors of bell peppers for a vibrant look - Jalapeños for a spicy kick - Corn or black beans for added texture - Avocado or guacamole for creaminess - Sour cream for a tangy finish Feel free to mix and match. This dish is all about your taste! If you can’t find some ingredients, don’t worry! Here are some easy swaps: - Use sirloin or skirt steak instead of flank steak. - Swap butter for olive oil if you want a lighter option. - Lime juice can be replaced with lemon juice for a similar taste. - Use taco seasoning if you don’t have chili powder, cumin, or paprika. These changes keep the meal delicious while fitting your needs. Enjoy experimenting! Start by preheating your oven to 400°F (200°C). This step ensures your fajitas cook evenly. Next, line a rimmed baking sheet with parchment paper or aluminum foil. This makes cleanup a breeze. Now, grab a large bowl. In it, combine the sliced flank steak, sliced bell peppers, sliced onion, and minced garlic. Mix them well for a good blend of flavors. In a separate bowl, you’ll make a sauce. Whisk together 1/4 cup of melted butter, 2 tablespoons of lime juice, 1 tablespoon of chili powder, 1 teaspoon of cumin, 1 teaspoon of paprika, 1/2 teaspoon of salt, and 1/2 teaspoon of black pepper. Pour this sauce over the steak and veggies. Toss everything until well coated. Spread the seasoned steak and veggies evenly onto your prepared sheet pan. Make sure they are in a single layer. This helps them cook properly. Place the sheet pan in the preheated oven. Bake for 20 to 25 minutes. Keep an eye on them. You want the steak cooked to your liking and the vegetables tender and slightly charred. While your fajitas bake, warm up 8 small flour tortillas. You can do this in a pan or microwave. Warm tortillas make wrapping easier. Once cooked, remove the sheet pan from the oven. Let it rest for a few minutes. This allows the juices to settle. Then, garnish the dish with chopped cilantro. Serve the fajitas with warm tortillas and lime wedges. The lime adds a fresh touch when drizzled over the top. Enjoy your delicious garlic butter steak fajitas family-style! To get your steak just right, use a meat thermometer. Aim for 130°F for medium-rare and 145°F for medium. If you don't have a thermometer, check the texture. Medium-rare feels soft and springy, while medium feels firmer. Let the steak rest for a few minutes after cooking. This helps juices stay inside, making your fajitas juicy. When roasting veggies, cut them into even sizes. This helps them cook evenly. Use parchment paper on your baking sheet for easy cleanup. Toss the veggies in a bit of oil and seasonings before roasting. This adds flavor and helps them brown. Spread them out in a single layer. Overcrowding leads to steaming instead of roasting. For a great look, serve fajitas right from the baking sheet. This makes it fun and easy for everyone. Add colorful lime wedges and fresh cilantro on top. It makes the dish pop! You can also offer a variety of toppings like salsa, guacamole, or sour cream. This way, each person can customize their fajitas. {{image_2}} You can switch up the protein in these fajitas. Chicken breast works great. It cooks fast and stays juicy. You can also use shrimp for a lighter touch. Just adjust the cooking time for shrimp. For more flavor, consider using pork tenderloin. Cut it into thin strips like the steak. Each option gives a unique taste to your dish. If you love heat, add some sliced jalapeños to the mix. They roast well and pack a punch. You can also sprinkle cayenne pepper into your spice mix. For a milder taste, skip the chili powder. You can also use sweet bell peppers instead of spicy ones. Adjusting spices lets you make this dish just right for your taste. You can easily make this a vegetarian meal. Replace the steak with sliced portobello mushrooms. They have a meaty texture that works well. You can also use firm tofu cut into strips. Marinate it in the same garlic butter mix. Add extra vegetables like zucchini or squash for more flavor. This way, you keep the essence of fajitas while going meat-free. To store your leftover fajitas, let them cool first. Then, place them in an airtight container. Keep the container in the fridge. Your fajitas will stay fresh for up to three days. If you have extra tortillas, store them separately to keep them soft. When you want to enjoy your fajitas again, you can reheat them easily. Use a skillet over medium heat. Add a little oil to prevent sticking. Heat the fajitas for about five to seven minutes. Stir them often to warm all sides. You can also use the microwave. Heat them in a safe dish for one to two minutes. Check them to ensure they are hot all the way through. If you want to save your fajitas for later, freezing is a great option. First, let the cooked fajitas cool completely. Then, place them in a freezer-safe bag or container. Squeeze out as much air as possible to prevent freezer burn. Your fajitas can last in the freezer for up to three months. When you're ready to eat, thaw them in the fridge overnight before reheating. Yes, you can use other cuts of steak. Sirloin, ribeye, or skirt steak work well too. Each cut has a different flavor and texture. Just slice the meat thinly for the best results. This keeps it tender and flavorful when cooked. The best toppings for fajitas are fresh and colorful. Here are some great options: - Sliced avocado - Shredded cheese - Sour cream - Fresh salsa - Pickled jalapeños - Chopped tomatoes - Fresh cilantro Feel free to mix and match your favorites. These toppings add flavor and fun to your meal. You can prepare the ingredients ahead of time. Slice the steak and veggies the day before. Store them in the fridge in an airtight container. Mix the garlic butter sauce and keep it separate. When you’re ready to cook, just combine everything and bake. This saves time and makes dinner easy. You learned how to make sheet-pan garlic butter steak fajitas with fresh, tasty ingredients. We covered essential and optional items, plus great substitutions. You now have a clear step-by-step guide, tips for perfect cooking, and variations to suit your taste. Storage guidelines make leftover care easy, and FAQs answered common concerns. Making this dish can be fun and rewarding for all. Enjoy your fajitas, and share them with family and friends!

Sheet-Pan Garlic Butter Steak Fajitas Delightful Dish

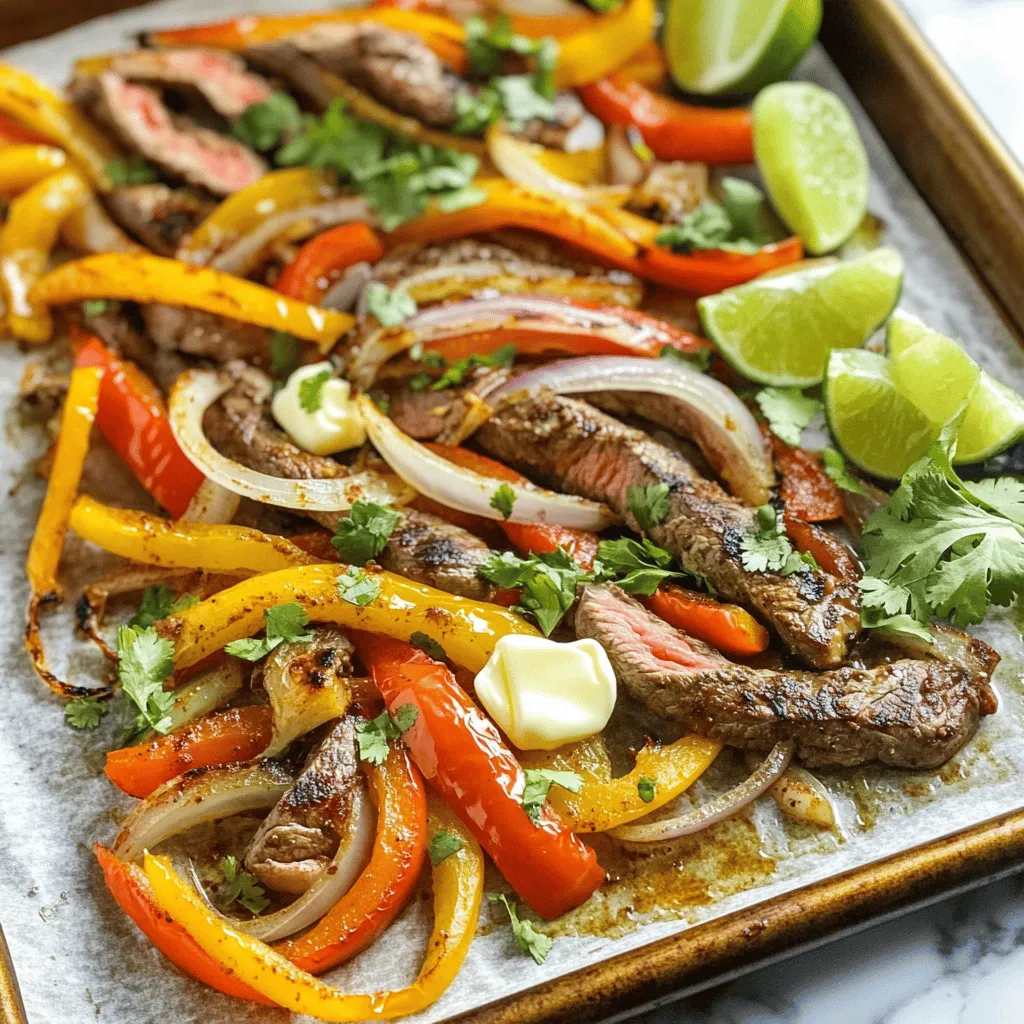
Are you ready to elevate your weeknight dinner? With my Sheet-Pan Garlic Butter Steak Fajitas, you’ll enjoy a feast of

Here’s what you need to make this tasty no-bake lemon blueberry icebox cake: - 1 package (8 oz) cream cheese, softened - 1 cup heavy whipping cream - 1/2 cup powdered sugar - 1 tablespoon lemon zest - 1/4 cup fresh lemon juice - 1 teaspoon vanilla extract - 2 cups fresh blueberries (plus extra for topping) - 1 package (14 oz) graham crackers Each ingredient plays a key role in building layers of flavor and texture. The cream cheese gives the cake a rich, creamy base. Heavy whipping cream adds lightness and helps it hold shape. The powdered sugar sweetens the mix just right. Lemon zest and juice brighten the flavor, making every bite refreshing. Vanilla extract rounds out the taste, while fresh blueberries add natural sweetness and color. Finally, graham crackers provide the perfect crunchy layer that contrasts with the creamy filling. This mix of ingredients creates a delightful treat that is easy to share and enjoy. To start, take your softened cream cheese. Use an electric mixer to beat it until smooth. This step is key for a creamy base. Next, slowly add the heavy whipping cream while mixing. This will help lighten the texture. Once combined, add the powdered sugar, lemon zest, fresh lemon juice, and vanilla extract. Mix until the mixture is thick and creamy. This will be the delightful filling for your cake. Now, grab your 9x13 inch baking dish. Begin by placing a single layer of graham crackers at the bottom. Make sure they cover the entire base. Next, spread a layer of the cream cheese mixture evenly over the crackers. This is where the magic starts! After that, sprinkle fresh blueberries over the cream cheese layer. Spread them out so every bite has some fruit. Repeat these layers: graham crackers, cream cheese mixture, and blueberries. Finish with a final layer of cream cheese on top. Once all layers are complete, cover the dish with plastic wrap. Place it in the refrigerator for at least 4 hours, or overnight if you can wait. This chilling time allows the flavors to meld and the cake to set. When ready to serve, slice the cake into squares. For a pretty touch, garnish with extra blueberries and a sprinkle of lemon zest. Serve on chilled plates for that extra refreshing feel. Enjoy this light and tasty dessert! To get the right consistency for the cream cheese mixture, start with softened cream cheese. Softening it helps you achieve a smooth blend. Mix it well until it is completely creamy. Next, add the heavy whipping cream slowly. This step helps create a light, airy texture. For flavor enhancements, lemon zest is key. It adds a bright, fresh taste. You can also add a bit more lemon juice if you want a tangy kick. Mixing in a teaspoon of vanilla extract brings warmth to the flavor. Ensuring even layers is crucial for the look and taste. Use a flat spatula to spread the cream cheese mixture over the graham crackers. Make sure to cover every cracker fully. This way, each bite has a good mix of flavors. To keep the cake stable, layer carefully. Use the same amount of each ingredient for every layer. This balance helps the cake stay firm when you slice it. The ideal serving temperature for this cake is cold. Refrigerating it for at least four hours helps the flavors blend well. When ready to serve, slice the cake into squares. For garnishing ideas, top it with extra blueberries and a sprinkle of lemon zest. You can also drizzle honey over the slices for added sweetness. A sprig of mint on the plate adds a nice touch. Enjoy this refreshing dessert at your next gathering! {{image_2}} You can switch up the fruits in this cake. Strawberries and raspberries work well. They add a nice color and taste. Simply slice strawberries or use whole raspberries. Mixing different fruits adds fun flavors. Try a mix of blueberries and strawberries for a fruity twist. You can even use peaches or blackberries to make it your own. Want a vegan option? Use vegan cream cheese and coconut cream instead of heavy cream. This keeps the texture creamy. For a low-sugar version, swap the powdered sugar for a sugar substitute. You can also use fresh fruit to sweeten the mix. This way, you can enjoy the cake without all the sugar. For a flavor boost, add different extracts. Almond or coconut extracts can change the taste. Just a teaspoon can create a new flavor. You can also try adding spices like cinnamon or nutmeg. They will give the cake a warm, cozy feel. Experiment with different combinations to find what you love! To keep your No-Bake Lemon Blueberry Icebox Cake fresh, you should follow these steps: - Refrigerating leftovers: Place any leftover cake in an airtight container. This will help keep it cool and fresh. Store it in the fridge for best results. - Freezing options: If you want to save some for later, you can freeze it. Wrap the cake tightly in plastic wrap and then in foil. This protects it from freezer burn. You can keep it in the freezer for up to three months. - How long it lasts in the fridge: The cake stays fresh in the fridge for about 4 to 5 days. After that, the texture and flavor may change. - Signs of spoilage: Look for any changes in color or texture. If the cake smells off or has mold, it’s best to throw it away. Eating spoiled food can make you sick, so always check before you enjoy your dessert! Yes, you can make the No-Bake Lemon Blueberry Icebox Cake a day in advance. This dessert tastes even better when the flavors have time to mix. To prepare, assemble the cake as directed and cover it tightly with plastic wrap. Place it in the fridge for at least four hours. If you make it the night before, it will be ready for your gathering the next day. This saves time and stress! To keep your cake from getting soggy, use fresh graham crackers. When layering, avoid soaking the crackers in liquid. Instead, layer them with the cream cheese mixture gently. Spread just enough cream cheese mix to coat the crackers. This way, they will stay crisp and create a nice texture. Keep the cake chilled until serving to maintain its structure. You can use store-bought whipped cream if you need to save time. However, homemade whipped cream has a richer taste and better texture. To make it, whip heavy cream until it forms soft peaks. Add a bit of powdered sugar for sweetness. This gives your cake a fluffy and creamy feel. If you do use store-bought, look for one with no added stabilizers for the best flavor. This cake is fun to make and tasty to eat. You learned about the great ingredients, like cream cheese and blueberries. I shared easy steps for a perfect cake and tips for layering. You also saw ways to change the flavors and deal with storage. Lastly, I answered common questions to help you succeed. Now go and create this delicious dessert for your friends and family! Enjoy the process and the rewards!

No-Bake Lemon Blueberry Icebox Cake Delightful Treat

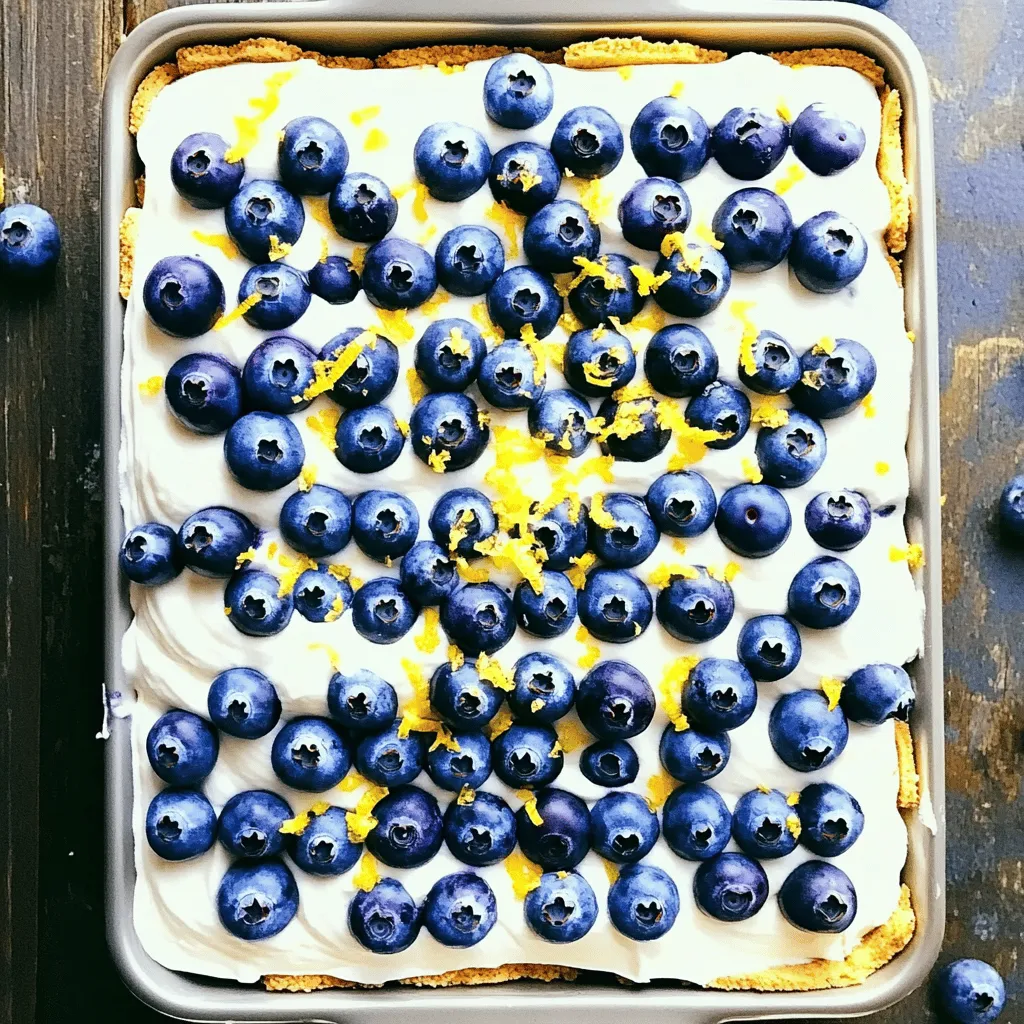
Looking for a quick, refreshing dessert? This No-Bake Lemon Blueberry Icebox Cake is your answer! With rich cream cheese, fresh

- 2 cups cooked chicken, shredded - 1 (8 oz) package cream cheese, softened - 1 cup shredded cheddar cheese - 1/2 cup blue cheese dressing - 1/2 cup hot sauce (such as Frank’s RedHot) - 1/2 cup Greek yogurt - 1 teaspoon garlic powder - 1 teaspoon onion powder - 1/4 teaspoon salt - 1/4 teaspoon black pepper To make the best Slow Cooker Buffalo Chicken Dip, gather all your ingredients first. This mix of creamy and spicy makes a great dip. You need two cups of cooked chicken. Shredded chicken works best. Then, grab a pack of cream cheese. It should be softened for easy mixing. Next, you’ll need a cup of shredded cheddar cheese. This adds a rich flavor. For a tangy kick, use half a cup of blue cheese dressing. Hot sauce is a must! You need half a cup, and I recommend Frank’s RedHot for the best taste. For extra creaminess, add half a cup of Greek yogurt. It balances the heat and thickens the dip. Season with one teaspoon each of garlic powder and onion powder. These spices add depth to the flavor. Lastly, sprinkle in a bit of salt and black pepper to taste. - Fresh celery sticks - Tortilla chips For serving, fresh celery sticks and crispy tortilla chips are perfect. The cool crunch of celery pairs well with the warm, spicy dip. Tortilla chips add a fun, crunchy element. They are great for scooping up all that yummy dip! - Mix softened cream cheese, shredded chicken, and Greek yogurt. - Incorporate the hot sauce and blue cheese dressing. Start by taking your softened cream cheese. If it's not soft, it will not mix well. I like to let it sit out for about 30 minutes before use. Once it’s soft, add in your shredded chicken. You can use rotisserie chicken for speed. Next, add Greek yogurt. This adds creaminess and a bit of tang. Now, pour in your hot sauce. Frank’s RedHot is a popular choice for its bold flavor. Lastly, mix in the blue cheese dressing for that classic finger-licking taste. Stir everything until well combined. - Combine all ingredients in the slow cooker. - Set slow cooker to low heat and cover. Now it’s time to transfer everything into the slow cooker. Make sure to scrape all the mixture in there. Set your slow cooker to low heat. Cover it and let it work its magic. Cooking on low is key to getting that creamy texture. You’ll want to let it cook for about 2-3 hours. - Stir occasionally while cooking. - Serve hot and garnish if desired. As your dip cooks, be sure to stir it occasionally. This helps everything mix evenly and prevents sticking. After 2-3 hours, your dip should be hot and bubbly. When it’s done, give it one last good stir. You can serve it right from the slow cooker. If you want to impress, garnish with extra cheese or some green onions on top. Enjoy your tasty creation with fresh celery sticks and tortilla chips! To make your dip smooth, stir it well while it cooks. I recommend stirring every 30 minutes. This keeps all the flavors blended. Each slow cooker works a bit differently. Keep an eye on your dip. If it cooks too fast, you can lower the heat. For thicker dip, cook a little longer. Want more heat? Add extra hot sauce to kick it up. I love using Frank’s RedHot for this dip. If you want fresh taste, try adding herbs like parsley or chives. They bring a nice pop of flavor. Serve the dip hot right from the slow cooker. This keeps it warm for your guests. For a nice touch, sprinkle some cheese on top. You can also add green onions for color. For dipping, fresh celery sticks work great. Tortilla chips are a crowd favorite, too! {{image_2}} You can change a few ingredients in Buffalo chicken dip. - Use mozzarella cheese instead of cheddar for a milder taste. - Try non-dairy cream cheese if you want a dairy-free option. These swaps give you a dip that fits your needs. You can enjoy the same great flavors without sticking to the original recipe. Want it less spicy? You can make it milder. - Reduce the hot sauce to 1/4 cup or use a milder brand. - Add a touch of honey to balance the heat. If you love spice, kick it up a notch. - Use spicy hot sauces like Sriracha or habanero sauce. - Add sliced jalapeños for extra heat and crunch. These adjustments let you create a dip that suits your taste. You can make this dip fit many diets. - For gluten-free, check that your hot sauce and blue cheese are safe. - Use low-fat cream cheese and Greek yogurt for a lighter dip. These swaps help you enjoy the dip without worry. You can savor every bite while sticking to your health goals. To keep your buffalo chicken dip fresh, store leftovers in an airtight container. Place the dip in the fridge within two hours of serving. It should last for up to three days. To freeze the dip, place it in a freezer-safe container. Make sure to leave some space at the top for expansion. It will stay good for about two months in the freezer. You can reheat your dip in the microwave or the slow cooker. If using the microwave, heat it in short bursts. Stir it often to make sure it warms evenly. For the slow cooker, set it on low and heat until hot. This may take about 30 minutes. Always stir the dip to keep its creamy texture. Enjoy your buffalo chicken dip just as you made it! You can keep Slow Cooker Buffalo Chicken Dip in the fridge for about 3 to 5 days. Store it in an airtight container to keep it fresh. If you want to keep it longer, freeze it for up to 3 months. Yes, you can prepare this dip ahead of time. Mix everything in the slow cooker, cover it, and store it in the fridge. When you're ready to eat, just set the slow cooker to low heat, and cook it for 2-3 hours. Yes, Slow Cooker Buffalo Chicken Dip can be gluten-free! Just make sure to use gluten-free hot sauce and blue cheese dressing. Always check labels to ensure all ingredients are safe. You can serve buffalo chicken dip with: - Fresh celery sticks - Tortilla chips - Crackers - Sliced vegetables These options are great for dipping and add crunch to your meal. No, it's best to use cooked chicken. Raw chicken needs more time to cook through. Plus, cooked chicken keeps the dip creamy and tasty. If you want to use raw chicken, cook it separately before adding it to the dip. We covered the key ingredients, step-by-step instructions, and helpful tips for making Slow Cooker Buffalo Chicken Dip. You learned how to adjust flavors and textures to suit your tastes. Storing leftovers and reheating tips ensure you can enjoy this dish multiple times. In the end, this dip is simple to make and fun to share. You can easily customize it to meet your needs. Enjoying great food together brings people closer, and this dip does just that.

Slow Cooker Buffalo Chicken Dip Tasty and Simple Recipe

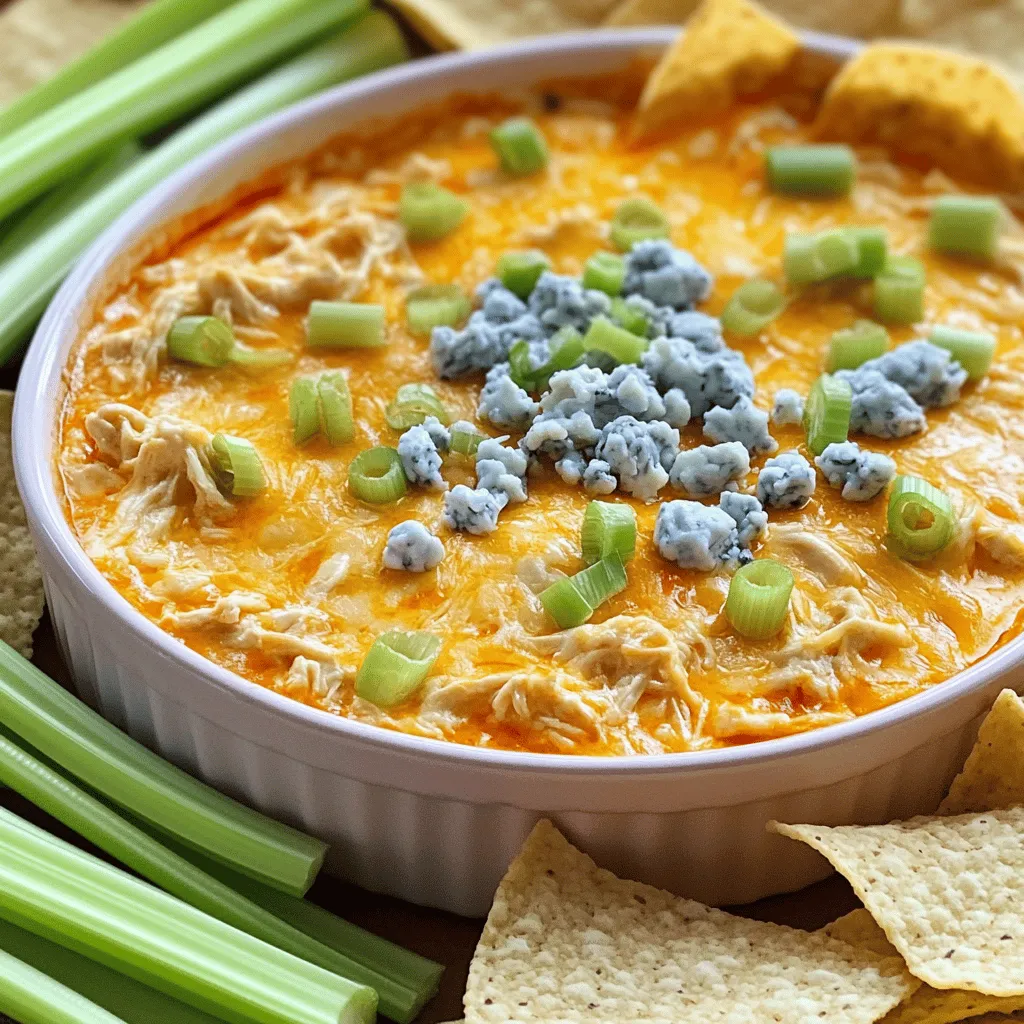
Are you ready to impress your guests with a dish that’s both simple and delicious? This Slow Cooker Buffalo Chicken

To make Minute Caprese Pasta Salad, you need these main items: - 8 ounces of rotini or fusilli pasta - 1 cup cherry tomatoes, halved - 1 cup fresh mozzarella balls (bocconcini), halved - ½ cup fresh basil leaves, torn - 2 tablespoons balsamic glaze - 2 tablespoons extra virgin olive oil - Salt and pepper to taste You can add some optional items for more taste: - 1 tablespoon pine nuts, toasted Each main ingredient brings good things to the dish. - Pasta: Rotini or fusilli holds the sauce well. It fills you up and gives energy. - Cherry Tomatoes: These add a sweet and fresh taste. They are also full of vitamins. - Mozzarella: This cheese is creamy and mild. It gives a nice texture to the salad. - Basil: Fresh basil adds a lovely aroma and flavor. It also has health benefits like antioxidants. - Balsamic Glaze: This adds a sweet and tangy kick. It enhances the overall taste and makes the salad shine. - Olive Oil: Extra virgin olive oil gives healthy fats. It helps the body absorb nutrients from the salad. With these ingredients, you create a dish that is fresh, tasty, and good for you. First, grab a large pot. Fill it with water and add salt. Bring the water to a boil. Then, add 8 ounces of rotini or fusilli pasta. Cook it for about 8 to 10 minutes. You want it al dente, which means firm but cooked. After cooking, drain the pasta in a colander. Rinse it under cold water. This cools it down and stops the cooking. Now, take a big bowl. Add the cooled pasta to the bowl. Next, toss in 1 cup of halved cherry tomatoes. Then, add 1 cup of fresh mozzarella balls, also halved. These ingredients bring color and taste. Finally, add ½ cup of torn fresh basil leaves. The basil adds a fresh aroma that makes the salad pop. It’s time to dress the salad! Drizzle 2 tablespoons of balsamic glaze over the top. Then, add 2 tablespoons of extra virgin olive oil. Sprinkle in salt and pepper to taste. Now, gently mix everything together. This step ensures the dressing coats the pasta and veggies well. If you want a crunchy element, toast 1 tablespoon of pine nuts in a dry skillet. Add them on top for extra flavor and texture. Let the salad sit for about 10 minutes before serving. This waiting time helps the flavors blend nicely. Enjoy your fresh and tasty Minute Caprese Pasta Salad! To cook pasta well, start with a large pot. Fill it with water and add salt. The water should taste like the sea. Bring the water to a boil before adding the pasta. For rotini or fusilli, cook for about 8-10 minutes. Check the pasta a minute early to avoid overcooking. You want it to be al dente, which means firm to the bite. Once done, drain the pasta and rinse it under cold water. This stops the cooking process and cools it down fast. Using fresh ingredients makes a big difference. Choose ripe cherry tomatoes for a sweet taste. Look for mozzarella balls that are soft and creamy. Fresh basil should smell strong and fragrant. If you can, buy these ingredients on the same day you plan to make the salad. This way, they stay at their best. Always wash your vegetables before using them to remove dirt and germs. For the best flavor, serve the salad right after mixing. Letting it sit for about 10 minutes helps the flavors blend. If you want a cold salad, chill it in the fridge for up to an hour. This enhances the taste and makes it refreshing. You can also toast pine nuts for a crunchy topping. They add a nice texture and nutty flavor. Enjoy the salad as a side dish or a light meal. {{image_2}} You can switch up the pasta in this dish. Instead of rotini or fusilli, try penne or farfalle. Both shapes hold sauce well. You could also use whole wheat pasta for added fiber. If you want gluten-free, look for pasta made from rice or corn. These options taste great and keep the dish fresh. To boost nutrition, add some veggies. Consider diced bell peppers or sliced cucumbers. Spinach or arugula can add a nice touch too. If you want protein, try grilled chicken or chickpeas. These add substance and make the salad more filling. Adding pine nuts can give a nice crunch and healthy fats. The dressing can change the whole vibe of the salad. Besides balsamic glaze, you could use lemon juice for a zesty kick. A sprinkle of red wine vinegar adds depth. For creaminess, try a yogurt-based dressing. Mix it up based on your taste. Each option brings a new twist to the classic Caprese flavor. To store leftovers, place the Minute Caprese Pasta Salad in an airtight container. This keeps it fresh. Make sure to cool it to room temperature first. You can store it in the fridge for up to three days. However, the salad tastes best when fresh. You don’t really need to reheat this salad. It is great cold. If you prefer warmth, heat it gently. Use a skillet over low heat. Add a splash of olive oil for moisture. Stir it often to avoid sticking. This helps keep the flavors intact. Freezing this salad is not ideal. The fresh ingredients do not freeze well. The tomatoes and basil can become mushy. If you must freeze it, leave out the tomatoes and basil. You can freeze the pasta only. When ready to use, thaw it in the fridge overnight. Then, mix in fresh ingredients before serving. Yes, you can make this salad ahead of time. I recommend making it no more than a few hours before serving. This keeps the fresh taste. If you chill it in the fridge, it will help the flavors blend. Just remember to add the dressing right before serving. This keeps the pasta from getting soggy. For this Minute Caprese Pasta Salad, I love using rotini or fusilli pasta. These shapes hold the dressing well and catch the bits of cheese and tomato. You can also use other small pasta shapes, like penne or farfalle. Just make sure to cook it until al dente. This keeps the pasta firm and chewy. To make this salad gluten-free, simply choose gluten-free pasta. There are many types available, like rice or corn-based pasta. These options cook the same way as regular pasta. Just follow the package instructions closely. The rest of the recipe remains the same, so you won’t miss out on any flavor! This blog post covered a tasty pasta salad recipe. I shared key ingredients and their benefits. You learned step-by-step instructions for cooking pasta and assembling the salad. Tips helped you perfect your dish with fresh flavors. Variations showed you how to switch things up for more nutrition. Storage info offered ways to keep leftovers fresh. With this knowledge, you can create a delightful pasta salad that suits your taste and needs. Enjoy making your salad your own. Happy cooking!

Minute Caprese Pasta Salad Fresh and Flavorful Dish

Looking for a quick, tasty meal? My Minute Caprese Pasta Salad is just the dish you need! Packed with fresh

- 4 salmon fillets, skin-on - 2 tablespoons olive oil - 2 tablespoons lemon juice (freshly squeezed) - 1 teaspoon lemon zest - 1 tablespoon black pepper (freshly cracked) - 1 teaspoon sea salt - 2 cloves garlic, minced - Fresh parsley, chopped (for garnish) When I prepare Air Fryer Lemon Pepper Salmon, I start with the freshest salmon fillets. The skin-on fillets keep the meat moist and add flavor. I love using olive oil for its rich taste and healthy fats. Fresh lemon juice and zest bring a bright, zesty kick to each bite. Black pepper gives heat, while sea salt enhances all the flavors. Minced garlic adds a savory touch that complements the fish. Lastly, I always garnish with fresh parsley for color and freshness. - Air fryer - Mixing bowl - Cooking brush - Measuring spoons An air fryer is a must for this recipe. It cooks the salmon quickly while keeping it crispy outside and tender inside. I use a mixing bowl to blend the marinade ingredients. A cooking brush helps to coat the fillets evenly. Measuring spoons ensure I add just the right amount of each ingredient for perfect flavor. Having these tools ready makes the cooking process smooth and fun. Preheating is key to great air-fried salmon. It helps cook the fish evenly. Set your air fryer to 400°F (200°C). Let it heat for about 5 minutes. This small step makes a big difference. Mixing the marinade is simple but important. In a bowl, combine olive oil, lemon juice, lemon zest, black pepper, sea salt, and minced garlic. Use a whisk or a fork to blend well. This helps all flavors mix together. For the best taste, use fresh lemon juice. Fresh ingredients work wonders for flavor. Now it's time to marinate. Take your salmon fillets and coat them well with the marinade. Make sure every side gets some. Marinate the fillets for about 15-20 minutes at room temperature. This helps the flavors soak in better. If you have time, longer marinating can add more taste. When marinating is done, it’s time to cook. Place the salmon fillets in the air fryer basket, skin-side down. Do not crowd the basket; space them out. This ensures even cooking. Air fry the salmon at 400°F (200°C) for 10-12 minutes. Check that the salmon flakes easily and reaches 145°F (63°C) inside. This means it’s done and safe to eat. To know when your salmon is done, look for a few signs. The flesh should be opaque and flake easily with a fork. The internal temperature should reach 145°F (63°C). Using a food thermometer can help you check this. Insert it into the thickest part of the fish for an accurate reading. If you want to change the lemon pepper seasoning, consider using garlic herb seasoning. You can also try spices like paprika or dill for a unique twist. Fresh herbs like thyme or rosemary can enhance the taste as well. Experiment to find what you love! For a beautiful plate, serve the salmon on a white platter. Add lemon wedges beside the fish and sprinkle fresh parsley on top. This makes the dish look vibrant and inviting. Pair your salmon with sides like roasted vegetables, rice, or a fresh salad for a complete meal. These sides complement the flavors of the salmon perfectly. {{image_2}} You can change the flavors with different seasonings. Garlic herb seasoning adds warmth and depth. Mix garlic powder, dried herbs, and a bit of salt for a tasty twist. If you like heat, try Cajun seasoning. This spice mix packs bold flavors and a nice kick. A little goes a long way, so start with a small amount and adjust to your taste. You can use other fish instead of salmon. Trout or tilapia work well in this recipe. They cook quickly, just like salmon. For trout, cook for about 8-10 minutes. For tilapia, check it at 8 minutes. Always check the fish for doneness with a fork. It should flake easily when cooked right. This dish is naturally gluten-free, so it’s great for anyone with gluten issues. For sides, serve with steamed veggies, like broccoli or green beans. These add color and nutrition. If you want low-carb options, try a fresh salad with a simple vinaigrette. This keeps your meal light and tasty. You can also pair the salmon with cauliflower rice for a nice low-carb plate. To keep your salmon fresh, use airtight storage containers. Glass or plastic containers work well. Allow the salmon to cool completely before sealing. Store it in the fridge for up to three days. This helps keep the flavor intact. For longer storage, freeze cooked salmon. Wrap each fillet tightly in plastic wrap. Then, place wrapped fillets in a freezer-safe bag. Remove as much air as you can. This keeps the salmon from getting freezer burn. Thaw frozen salmon in the fridge overnight. This method preserves flavor and texture. When reheating, aim to keep the salmon moist. The best method is to use a microwave. Place the salmon on a microwave-safe plate. Cover it with a damp paper towel. Heat on low for about one minute. Check for warmth, then add more time if needed. You can also reheat in the oven. Set it to 275°F (135°C) and heat for about 15 minutes. Both methods help prevent dryness while keeping your salmon delicious. You should marinate salmon for about 15-20 minutes. This time allows the flavors to soak in. If you want a stronger taste, you can marinate it longer. Just be careful not to over-marinate, as it can change the texture. Yes, you can cook salmon without skin in the air fryer. Skin-on salmon helps keep the fish moist. If you prefer skinless, just adjust the cooking time slightly. Skinless fillets may cook faster than skin-on ones. Lemon pepper salmon pairs well with many sides. Here are some ideas: - Steamed broccoli - Roasted asparagus - Quinoa or rice - Fresh salad These sides add color and balance to your meal. Air frying salmon can be healthier than baking. The air fryer uses less oil, which cuts down on fat. It also cooks faster, helping retain the fish's nutrients. You get a crispy texture without the extra calories. Salmon is fully cooked when it reaches an internal temperature of 145°F (63°C). You can check this with a food thermometer. The fish should flake easily with a fork and look opaque. If it’s still pink in the middle, it needs more time. In this blog post, we explored how to prepare delicious lemon pepper salmon using an air fryer. We covered the essential ingredients and equipment needed, along with clear step-by-step instructions for marinating and cooking the salmon. Tips for perfect texture and flavor enhancement were also included, along with variations and storage advice. Remember, cooking salmon is simple and rewarding. With these methods, you'll enjoy tasty meals that impress. Dive into this easy and flavorful recipe!

Air Fryer Lemon Pepper Salmon Flavorful and Simple Dish

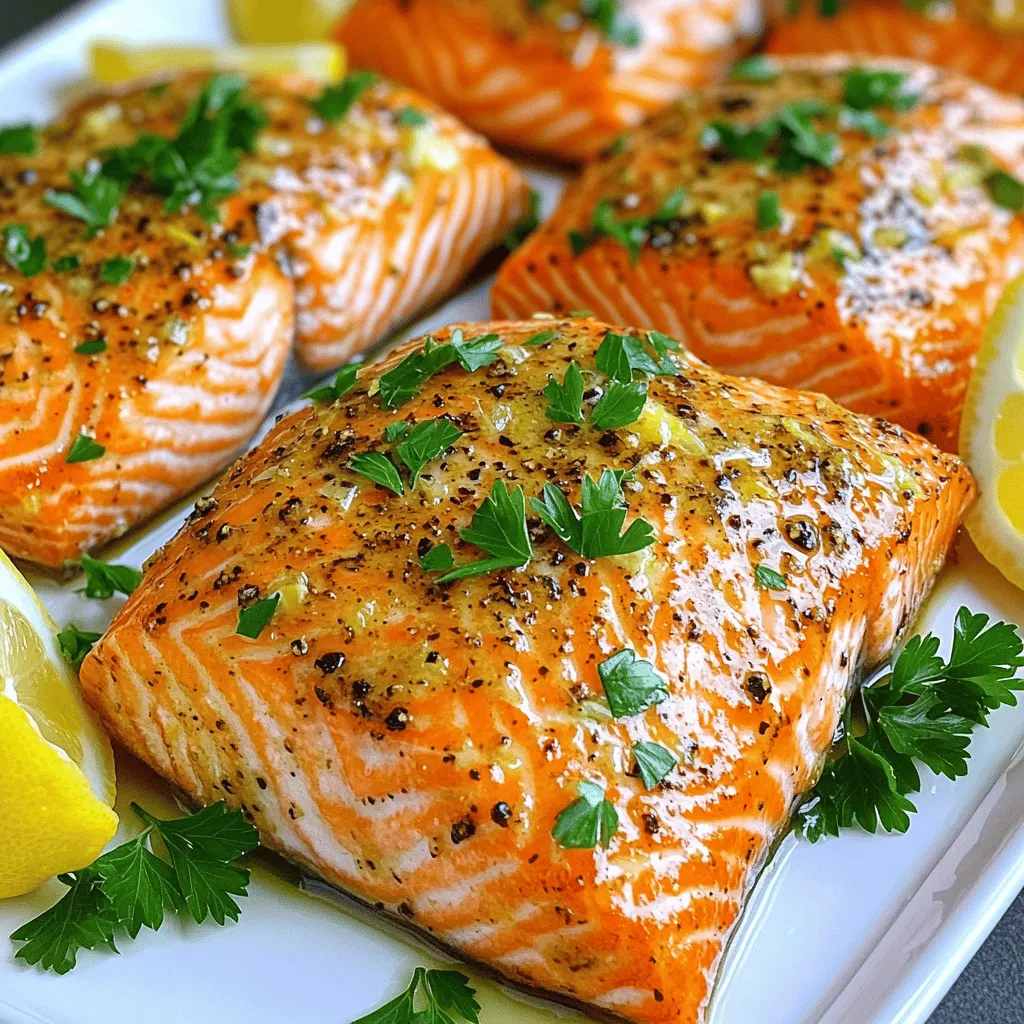
Are you ready to elevate your dinner game with a dish that’s both simple and bursting with flavor? In this

- 8 slices of thick bread (challah or brioche works best) - 1 cup Nutella - 2 large eggs - 1/2 cup milk - 1 teaspoon vanilla extract - 1 teaspoon ground cinnamon For this recipe, choose thick bread like challah or brioche. This bread holds the filling well and gives a nice texture. Use about 1 cup of Nutella. This amount is perfect for four sandwiches. You’ll need two large eggs for the egg mixture. Combine them with 1/2 cup of milk and 1 teaspoon of vanilla extract to enrich the flavor. Adding 1 teaspoon of ground cinnamon gives a warm touch to your French toast. - 1 tablespoon sugar (optional) - Butter for frying - Fresh strawberries or bananas for topping (optional) - Powdered sugar for dusting (optional) You can add 1 tablespoon of sugar to the egg mix if you like it sweeter. Butter is essential for frying. It adds flavor and helps achieve a golden crust. For toppings, fresh strawberries or bananas enhance the taste and look. A dusting of powdered sugar on top makes it feel special. Enjoy these optional ingredients to make your dish even better! {{ingredient_image_1}} Start by getting your thick bread. I like to use challah or brioche. Take four slices and spread about two tablespoons of Nutella on each slice. Make sure to cover the bread well. Next, place another slice on top of each one. This creates four Nutella sandwiches. Press down gently to seal the filling inside. In a mixing bowl, whisk together two large eggs and half a cup of milk. Add one teaspoon of vanilla extract and one teaspoon of ground cinnamon. If you like it sweet, add one tablespoon of sugar. Keep whisking until the mixture is smooth and well combined. Make sure there are no lumps. This mixture will coat your sandwiches. Heat a skillet over medium heat. Add a pat of butter and let it melt. The butter should coat the pan evenly. Dip each Nutella sandwich into the egg mixture. Make sure both sides are coated, but don’t let them soak too long. Place the sandwiches in the skillet once it's hot. Cook each side for about 3 to 4 minutes. You want them golden brown and slightly crispy. After cooking, remove the sandwiches and let them rest on a paper towel. This helps absorb any extra butter. Now they are ready to serve! Dust them with powdered sugar and top with fresh strawberries or bananas if you like. To avoid soggy French toast, coat the bread lightly in the egg mixture. Use a quick dip. This prevents the bread from soaking too much. Aim for a soak of about 5 seconds per side. This gives you a nice balance. For best results, use a non-stick skillet or griddle. These help the toast cook evenly and prevent sticking. I recommend a medium heat to get a good golden color. You’ll also need a spatula for flipping. A whisk is great for mixing the egg mixture evenly. For a stunning plate, stack the French toast high. Drizzle with more Nutella or maple syrup. This adds a sweet touch and looks great. Garnish with fresh berries or banana slices. The colors pop and make the dish more inviting. Dust with powdered sugar for a nice finish. Pro Tips Choose the Right Bread: Using thick bread like challah or brioche will give you a fluffy texture and hold the Nutella better. Don’t Soak Too Long: Make sure to dip the sandwiches quickly in the egg mixture to avoid them becoming too soggy. Adjust the Heat: Keep your skillet at medium heat to ensure a nice golden-brown crust without burning the outside. Experiment with Fillings: Try adding sliced bananas or strawberries inside the Nutella sandwiches for extra flavor and texture. {{image_2}} You can switch out Nutella for other spreads. Try peanut butter, almond butter, or cookie butter. These options bring a new taste. You can also mix flavors. Pair chocolate spreads with fresh fruit like bananas or strawberries. The creamy texture of the spreads blends well with juicy fruits. Each bite becomes a tasty adventure. If you need dairy-free or vegan options, there are great substitutes. Use almond milk or oat milk instead of regular milk. For eggs, try flaxseed meal or a banana. Mix one tablespoon of flaxseed meal with three tablespoons of water. Let it sit for five minutes to thicken. This mixture works well in French toast. You can add seasonal flavors to your French toast. For fall, sprinkle cinnamon or nutmeg into the egg mixture. In winter, try a hint of peppermint extract. Fresh fruit changes with the seasons too. Use strawberries in spring, peaches in summer, and apples in fall. Each season brings a new twist to this classic dish. To keep your leftover Nutella stuffed French toast fresh, follow these steps: - Refrigeration: Place the French toast in an airtight container. Store it in the fridge for up to 3 days. This keeps it moist and tasty. - Freezing: Wrap each piece in plastic wrap or foil. Then, put them in a freezer-safe bag. They can last for up to 2 months. This is great for quick meals later. To enjoy your French toast again, reheating is key. Here are some methods: - Skillet: Heat a bit of butter in a skillet over medium heat. Place the French toast in the skillet for about 2-3 minutes per side. This keeps it crispy. - Oven: Preheat your oven to 350°F (175°C). Place the French toast on a baking sheet. Heat for about 10-15 minutes. This warms it evenly. Knowing how long your leftovers last is important: - In the fridge: Leftover French toast stays good for up to 3 days. - In the freezer: It lasts for about 2 months. After that, the taste may change, and it might lose its texture. If you want to swap Nutella, try these spreads: - Chocolate hazelnut spread - Peanut butter - Almond butter - Cookie butter - Fruit spreads like strawberry or raspberry Each option gives a unique taste. Chocolate hazelnut spread is the closest. Peanut butter adds a nutty flavor. Cookie butter brings a sweet, spiced twist. Fruit spreads add a fruity touch. Yes, you can prepare this dish early! Here’s how: - Make the Nutella sandwiches and store them in the fridge. - Keep them in an airtight container for up to 24 hours. - For cooking, just dip them in the egg mixture and cook as usual. Prepping ahead saves time on busy mornings. Serve fresh and warm for the best taste. Thick bread works best for this recipe. Here are great options: - Challah: It’s soft and slightly sweet. - Brioche: This bread is rich and buttery. Both types soak up the egg mixture well. They also give a nice golden crust when cooked. Avoid thin bread, as it can get soggy. Choose thick bread for the best flavor and texture! You’ve learned how to make tasty Nutella Stuffed French Toast. We covered key ingredients, step-by-step instructions, and helpful tips. You can even explore fun variations to suit your taste. Remember, presentation matters too! With a few easy storage tips, you can enjoy this dish even later. Try it out and impress your friends and family with this delicious treat. Cooking doesn’t have to be hard, and French toast is a great way to start. Enjoy every bite!

Nutella Stuffed French Toast Tasty Morning Delight

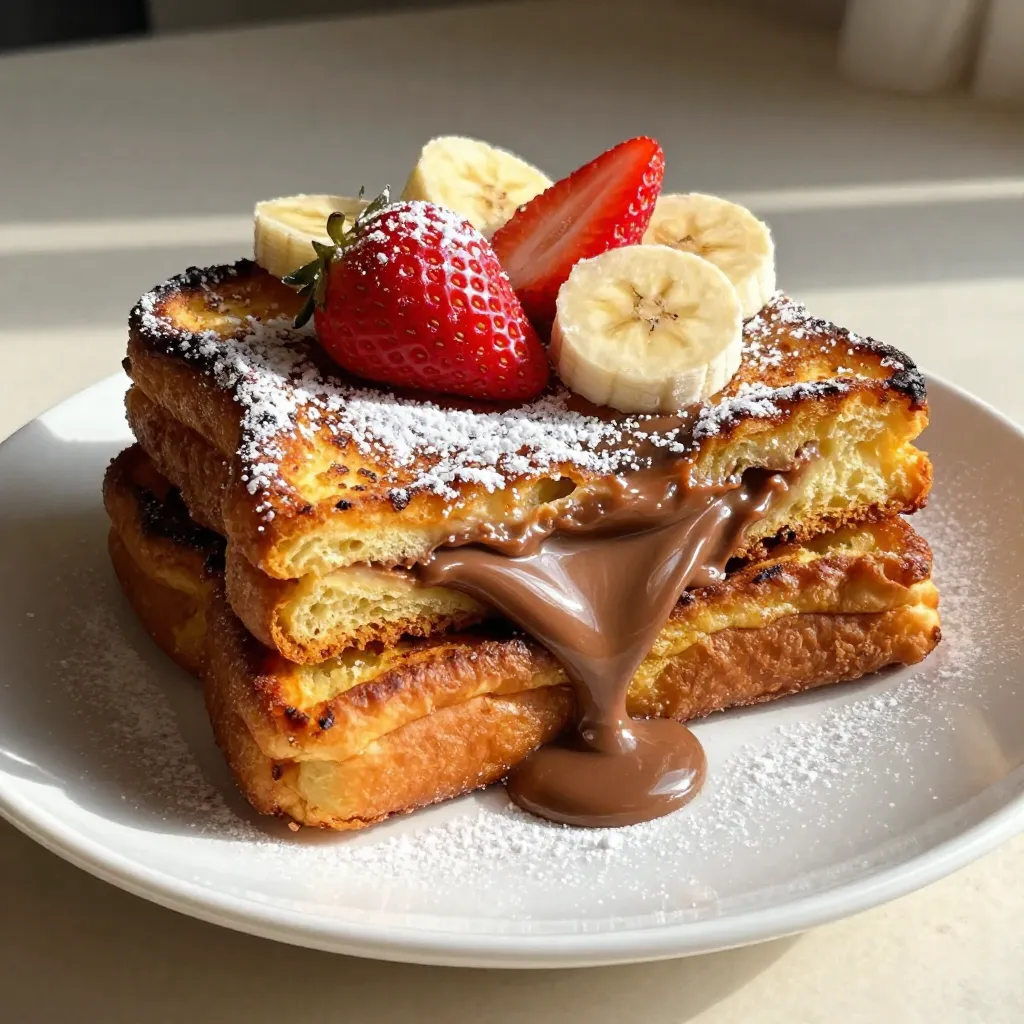
Wake up to a delightful treat with Nutella Stuffed French Toast! This easy, indulgent dish is perfect for brunch or

- 1 package (16 oz) gnocchi (store-bought or homemade) - 2 cups broccoli florets - 1 red bell pepper, sliced - 1 cup cherry tomatoes, halved Gnocchi is the star of this dish. You can use store-bought or make it from scratch. I love the chewy texture of gnocchi. It pairs well with fresh veggies. Broccoli adds crunch, while red bell pepper brings sweetness. Cherry tomatoes offer a burst of flavor. - 4 tablespoons unsalted butter, melted - 4 cloves garlic, minced - 1 teaspoon dried oregano - 1 teaspoon paprika - Salt and pepper to taste Butter is essential here. I use unsalted butter for this recipe. It lets me control the salt level. Garlic adds a strong, savory flavor. Oregano and paprika lift the taste. Salt and pepper finish the mix. - Fresh parsley, chopped Fresh parsley brightens the dish. It adds color and a hint of freshness. Just sprinkle it on after baking. It makes your meal look and taste even better. 1. Preheat the oven and prepare the sheet pan. Start by setting your oven to 425°F (220°C). This heat will help the gnocchi and veggies cook well. Line a large sheet pan with parchment paper. This makes cleanup easy. 2. Whisk together garlic butter mixture. In a small bowl, melt 4 tablespoons of unsalted butter. Add in 4 cloves of minced garlic, 1 teaspoon of dried oregano, 1 teaspoon of paprika, salt, and pepper. Mix well. This garlic butter will add great flavor. 1. Combining gnocchi and vegetables. In a big bowl, add 1 package of gnocchi. Then, toss in 2 cups of broccoli florets, 1 sliced red bell pepper, and 1 cup of halved cherry tomatoes. 2. Coating with garlic butter. Pour the garlic butter mixture over the gnocchi and veggies. Toss everything together until it is evenly coated. This helps each piece soak up that tasty butter. 1. Spreading mixture on the sheet pan. Take the coated gnocchi and veggies. Spread them out in a single layer on the prepared sheet pan. Make sure they are not piled on top of each other. 2. Baking time and temperature. Place the sheet pan in the preheated oven. Bake for 20-25 minutes. Stir halfway through to ensure even cooking. Look for golden gnocchi and tender veggies. This is when they are ready! Timing is key when cooking gnocchi and veggies. Bake for 20-25 minutes. Stir halfway through to ensure even cooking. This step keeps everything from burning and helps the flavors meld. Gnocchi should be golden brown, while veggies should be tender and vibrant. To achieve even browning, spread everything in a single layer. If they are too crowded, they might steam instead of roast. This can lead to soggy gnocchi and limp veggies. Feel free to swap out the vegetables based on what you have. Zucchini, asparagus, or carrots work well too. Just remember they should roast for about the same time. Adjust the garlic and herbs to match your tastes. You can add more oregano or use a spicy seasoning for a kick. For plating, use a large, shallow bowl. This allows the colors to pop. Drizzle some extra garlic butter over the top for shine. Finish with a sprinkle of fresh parsley. This adds a fresh touch and bright color. You can also serve with crusty bread for a complete meal. {{image_2}} You can change up the gnocchi in this dish. Pasta or rice works great instead. You can also use gluten-free pasta if needed. For veggies, think about what’s in season. Try zucchini in summer or squash in fall. Want to switch up the taste? Add herbs like basil or thyme for a fresh twist. Spices like red pepper flakes can add heat. You can also add protein to make it heartier. Chicken or shrimp complements the flavors well. To make this dish vegan, swap the butter with olive oil or vegan butter. Use a vegan gnocchi brand to keep it plant-based. For gluten-free options, choose a gluten-free gnocchi or pasta. This way, everyone can enjoy a tasty meal. After baking your Sheet Pan Garlic Butter Gnocchi and Veggies, let it cool down. Cooling helps keep the texture right. Leave it at room temperature for about 20 minutes. This step keeps the steam from making the dish soggy. For storage, use airtight containers. Glass or plastic containers work well. Make sure they are clean and dry. This helps to keep the flavors fresh longer. You can store the dish in the fridge for about 3 to 4 days. Keep it in the airtight container. If you want to enjoy it longer, consider freezing it. When you are ready to eat leftovers, reheating is key. Preheat your oven to 350°F (175°C). This temperature helps keep the gnocchi soft and the veggies tender. Place the gnocchi and veggies on a baking sheet. Heat for about 10 to 15 minutes. Check that they are warm all the way through. You can also add a little more butter or oil to keep it moist. This will help the dish taste just as good as when it was fresh! Can I use homemade gnocchi for this recipe? Yes, you can use homemade gnocchi. It adds a special touch. Just make sure it is cooked properly. Fresh gnocchi will absorb the garlic butter and flavors well. What vegetables can I add or substitute? You can use many veggies! Try zucchini, asparagus, or carrots. Each adds unique flavor and texture. Just cut them into even pieces for even cooking. How do I know when the dish is done baking? Look for a golden-brown color on the gnocchi. The veggies should be tender but not mushy. You can poke a vegetable with a fork to check. Can I prepare this dish ahead of time? Yes, you can prep the gnocchi and veggies. Mix them with the garlic butter and store in the fridge. Bake it fresh right before serving for the best taste. Is it okay to freeze leftovers? Yes, you can freeze leftovers. Just make sure to cool it first. Store in an airtight container. When ready to eat, thaw in the fridge and reheat in the oven. Can I use garlic powder instead of fresh garlic? You can use garlic powder, but fresh garlic gives a better taste. If you use powder, add about half a teaspoon for each clove. What type of butter is best for this recipe? Unsalted butter is best. It allows you to control the salt level. If you like a stronger taste, you can use flavored butter, like herb butter. This recipe brings together gnocchi, fresh veggies, and garlic butter. You can adjust it to fit your taste. Try swapping ingredients or adding different spices to change the flavor. Store any leftovers properly to enjoy later. With these simple steps, you’ll create a dish that’s tasty and fun. Explore the possibilities and make it your own. Cooking can be exciting, so have fun trying new things!

Sheet Pan Garlic Butter Gnocchi and Veggies Delight

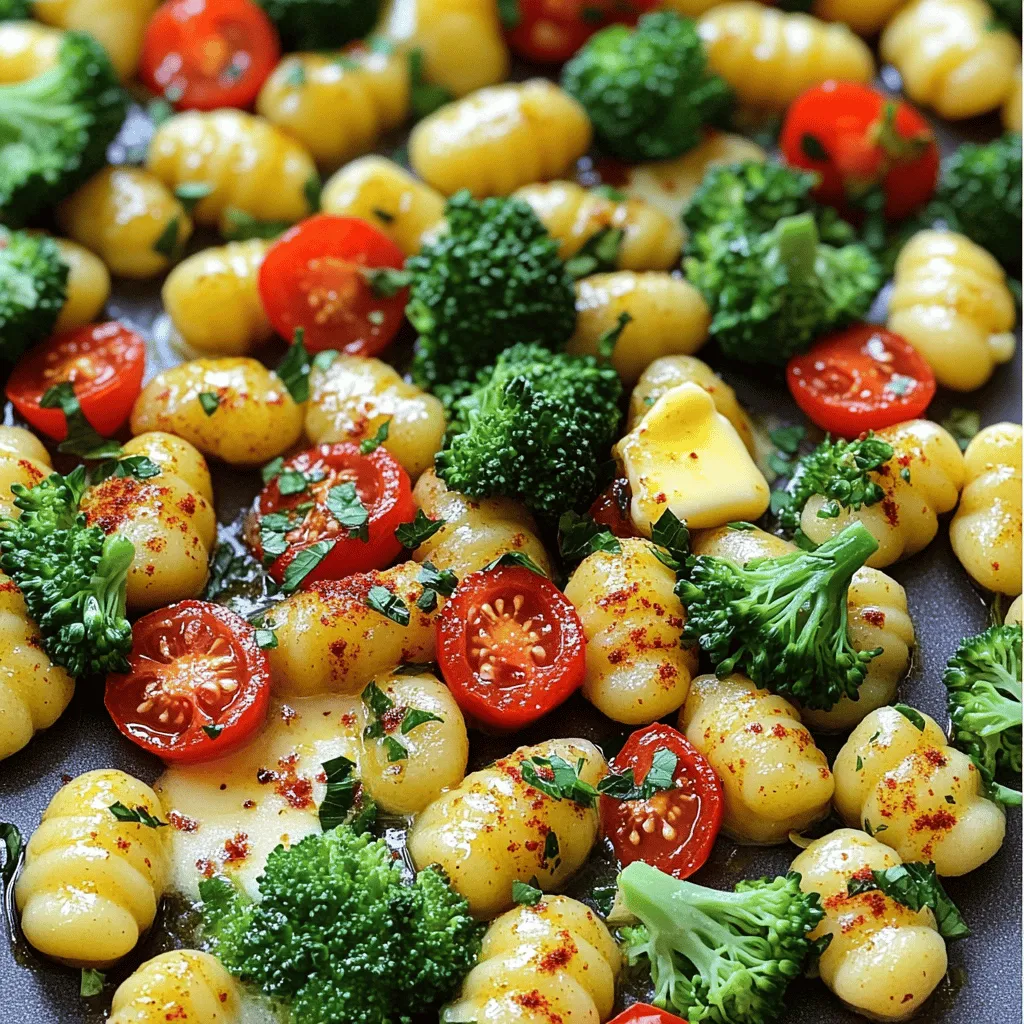
Looking for an easy, mouthwatering meal? Try my Sheet Pan Garlic Butter Gnocchi and Veggies Delight! This dish brings together

- 1 cup raw almonds - 1 cup pitted dates - 1 cup unsweetened shredded coconut - Zest of 1 large lemon - 2 tablespoons fresh lemon juice - 1 tablespoon chia seeds - 1/4 teaspoon sea salt - Optional: 1/4 cup dark chocolate chips Gathering your ingredients is the first step to making Lemon Coconut Energy Bites. I love using raw almonds for their crunch and healthy fats. Pitted dates add natural sweetness and stickiness. Unsweetened shredded coconut brings in that tropical flavor. Lemon zest brightens the bites with a fresh taste. Fresh lemon juice adds even more zing. Chia seeds offer a nice crunch and boost of nutrients. A touch of sea salt balances the flavors perfectly. If you're a chocolate lover, the optional dark chocolate chips can take these bites to the next level. - Calories per serving: About 100 calories - Carbs: 14g - Fats: 5g - Proteins: 2g These energy bites are not just tasty; they are also healthy. Each bite packs a punch of energy without refined sugar. Almonds provide protein and healthy fats. Dates offer fiber and natural sugars for quick energy. Coconut is great for hydration and adds flavor. Chia seeds are full of omega-3s and fiber. Enjoy these bites as a snack or a quick breakfast. They are easy to make and perfect for busy days. Don't forget to share them with friends and family! - Step 1: Grinding the almonds Start by adding 1 cup of raw almonds to your food processor. Pulse them until they are finely ground but not turned to butter. You want a fine texture that still has some crunch. - Step 2: Combining ingredients in the food processor Next, add the pitted dates, shredded coconut, zest of 1 large lemon, fresh lemon juice, chia seeds, and sea salt to the processor. If your dates are dry, soak them in warm water for a few minutes to soften them. - Step 3: Achieving the right consistency Process this mix until all ingredients blend well and stick together. If needed, stop and scrape down the sides. The mixture should be sticky enough to hold together but not too wet. - Step 4: Rolling into balls Take a tablespoon of the mixture and roll it into a ball with your hands. Make sure each bite is about the size of a golf ball. Repeat this until you use all the mixture. - Step 5: Setting in the refrigerator Place the rolled energy bites on a lined tray. Refrigerate them for at least 30 minutes. This helps them firm up nicely. - Presentation ideas Serve the energy bites in a small bowl. Dust them lightly with more shredded coconut to add a nice touch. You can also add a lemon wedge for an extra pop of color. - Serving suggestions These bites are perfect as a quick snack or a healthy dessert. Enjoy them with a cup of tea or coffee for a refreshing treat. - Ensuring the right texture: You want a sticky mix. When you grind the almonds, stop before they turn to butter. It should feel crumbly yet hold together when pressed. If it feels too dry, add a splash more lemon juice. - Adjusting sweetness levels: Dates bring natural sweetness. If you prefer less sugar, use fewer dates. You can also add a bit of honey or maple syrup if needed. Taste your mix before rolling it into bites for the perfect balance. - Over-processing the almonds: This can lead to almond butter instead of a crumbly texture. Pulse just until finely ground. Check often to avoid over-processing. - Not chilling the bites enough: Chilling helps them firm up. If you skip this, they may fall apart. Refrigerate for at least 30 minutes. This step is key to good energy bites. - How to store properly: Keep your energy bites in an airtight container. They stay fresh in the fridge for up to a week. This makes them easy to grab when you need a snack. - Freezing options for longer shelf life: For longer storage, freeze the energy bites. Place them on a tray first, then transfer to a container after they are firm. They can last up to three months in the freezer. Just thaw them in the fridge before enjoying. {{image_2}} You can change the flavor of your Lemon Coconut Energy Bites easily. Try adding zests from other fruits like lime or orange. This small twist can make your bites taste fresh and vibrant. You can also swap out the raw almonds for different nuts. Cashews or walnuts can add unique flavors and textures. Each nut brings its own taste, so feel free to experiment! If you need to avoid nuts, you can still enjoy these energy bites. Use seeds like sunflower or pumpkin instead of nuts. This makes the bites nut-free but still packed with nutrition. For those following a vegan diet, you can skip the chocolate chips or use dairy-free ones. All the other ingredients are already vegan-friendly. These adaptations ensure everyone can enjoy these tasty treats! Lemon Coconut Energy Bites can last up to a week in the fridge. Store them in an airtight container to keep them fresh. If you want to keep them longer, freeze them. They can last for up to three months in the freezer. Yes, you can substitute the almonds. Use walnuts or cashews instead. For dates, try using dried figs or prunes. Just make sure any alternative is soft enough to blend well. Adjust the amounts based on your taste. Absolutely! Lemon Coconut Energy Bites are great for kids. They are healthy and full of flavor. They also provide energy without added sugars. Just be mindful of any nut allergies when sharing with kids. Check for a video that shows how to make Lemon Coconut Energy Bites. Watching someone make them can help you see each step clearly. If you love these bites, try these similar recipes: - Peanut Butter Energy Bites - Chocolate Oat Energy Bites I want to hear from you! Share your thoughts on the recipe. Did you change any ingredients? What did you think of the taste? Your comments help make this a better recipe for everyone. In this post, we covered how to make delicious Lemon Coconut Energy Bites. We listed the simple ingredients and provided step-by-step instructions for preparation. You learned about nutrition and tips for success, along with common mistakes to avoid. Experimenting with flavors adds fun to the recipe. You can easily adapt it to fit your diet. These energy bites are perfect for a quick snack or a healthy treat. Try making them today, and enjoy the benefits!

Lemon Coconut Energy Bites Quick and Easy Recipe

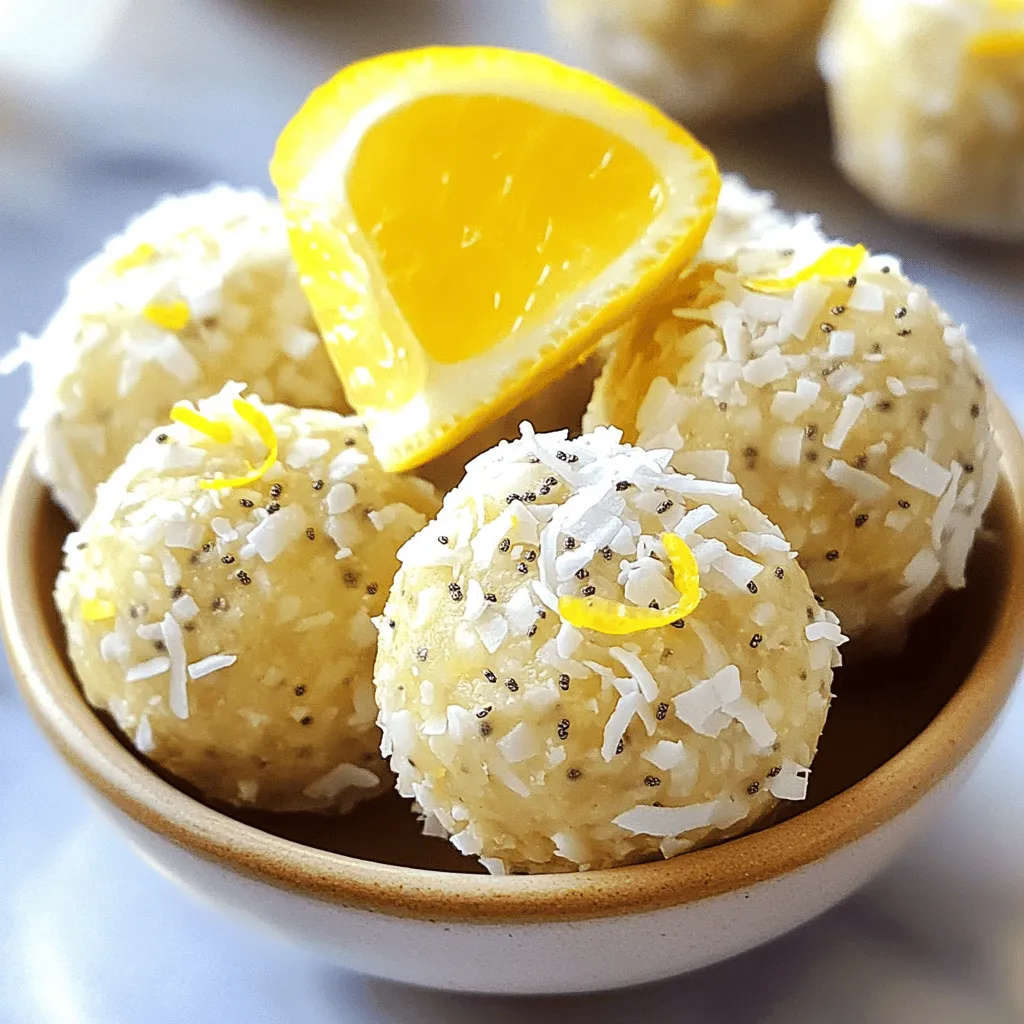
Looking for a quick boost of energy? You’re in the right place. Lemon Coconut Energy Bites are as simple as

- 1 cup unsalted butter, melted - 1 cup granulated sugar - 1/2 cup brown sugar, packed - 4 large eggs - 1 teaspoon vanilla extract - 1 cup all-purpose flour - 1/2 cup cocoa powder - 1/2 teaspoon baking powder - 1/4 teaspoon salt - 1 cup creamy peanut butter - 1/2 cup powdered sugar - 1 cup mini peanut butter cups, chopped - 1/2 cup chocolate chips (optional for topping) These ingredients come together to make a rich and tasty treat. Start with unsalted butter. It gives the best flavor without extra salt. The mix of granulated and brown sugar helps create a sweet, chewy texture. The eggs add moisture and bind the brownie bars. Vanilla extract brings a warm flavor that enhances the chocolate. Flour and cocoa powder form the base of our brownies. Baking powder adds a little lift, while salt balances the sweetness. Don't forget the creamy peanut butter! It creates a swirled topping that pairs perfectly with chocolate. The mini peanut butter cups add delightful pockets of flavor. If you want an extra chocolatey touch, sprinkle chocolate chips on top. With these ingredients, you're set for a delicious baking adventure. Each element plays a role in creating the perfect peanut butter cup brownie bars. 1. Preheating the oven Set your oven to 350°F (175°C). This step helps the brownies bake evenly. 2. Preparing the baking pan Grab a 9x13 inch baking pan. Line it with parchment paper. Leave some paper hanging over the edges. This makes it easy to lift the brownies out later. 1. Mixing wet ingredients In a big bowl, mix the melted butter, granulated sugar, and brown sugar. Whisk until smooth. Add the large eggs, one by one. Whisk well after each egg. Now, stir in the vanilla extract. 2. Incorporating dry ingredients and add-ins In another bowl, whisk together the flour, cocoa powder, baking powder, and salt. Gradually add this dry mix to the wet mix. Stir gently until just combined. Now, fold in the chopped mini peanut butter cups. Make sure they are evenly spread through the batter. 1. Pouring the batter into the pan Pour the brownie batter into the prepared pan. Spread it out evenly with a spatula. 2. Swirling peanut butter topping In a small bowl, mix the creamy peanut butter with powdered sugar until smooth. Drop spoonfuls of this mix over the brownie batter. Use a knife to swirl it gently for a marbled look. 3. Baking and cooling instructions Bake in the preheated oven for 25-30 minutes. Check with a toothpick in the center. If it comes out with a few moist crumbs, they are done. Let the brownies cool completely in the pan. Once cool, use the parchment paper to lift them out. Slice into squares or bars. - Checking doneness: To check if your brownies are done, use a toothpick. Insert it into the center. If it comes out with a few moist crumbs, they are ready. If it comes out clean, they may be overbaked. Aim for that perfect crumb! - Avoiding overmixing: When you mix the wet and dry ingredients, stir gently. Overmixing can make your brownies tough. Just mix until you see no dry flour. This helps keep them soft and delicious. - Presentation tips for serving: Slice the cooled brownie bars into squares. Serve them on a decorative plate for a pretty look. Dust with powdered sugar for a sweet touch. You can also add whole mini peanut butter cups on top to make them pop! - Ideal pairings with beverages: These brownie bars pair well with milk, coffee, or even a scoop of vanilla ice cream. A warm drink with these treats creates a cozy experience. Try it, and you might find your new favorite combo! - Tips if brownies are too dry: If your brownies turn out dry, next time try baking for a shorter time. You can also add a bit more melted butter for moisture. Another trick is to cover them with foil halfway through baking to prevent too much dryness. - Overcoming stickiness in the pan: If your brownies stick, make sure to line the pan with parchment paper. Leave some overhang to lift them out easily. If they still stick, let them cool longer before cutting. A sharp knife helps too! {{image_2}} You can get creative with your Peanut Butter Cup Brownie Bars. Try adding nuts or seeds for crunch. Chopped walnuts or almonds work great. You could also throw in chia seeds or sunflower seeds for a healthy twist. Experimenting with different types of chocolate can change the taste. Use dark chocolate chips for a rich flavor. White chocolate chips add a sweet touch. Mixing chocolate types can give you a fun layered flavor. If you need gluten-free options, swap all-purpose flour for almond flour. This will keep the bars tasty and moist. You can also use gluten-free flour blends that are easy to find. For vegan options, replace the eggs with flax eggs. Mix one tablespoon of flaxseed meal with three tablespoons of water for each egg. Use a plant-based butter and dairy-free chocolate chips. Your bars will still taste great! Layering these brownie bars with other desserts can be fun. Try adding ice cream on top for a sundae twist. You can also layer them with cheesecake for a rich dessert. For holiday-themed adaptations, add festive sprinkles or colors. You could use peppermint extract for a holiday flavor. During Halloween, add orange and black sprinkles for fun! You can store your peanut butter cup brownie bars at room temperature or in the fridge. If you choose room temperature, keep them in a cool, dry place. They will stay fresh for a few days. For longer freshness, put them in the fridge. Make sure to place them in an airtight container. This helps keep moisture out and the brownies soft. If you don't have one, wrap them tightly in plastic wrap. To freeze brownie bars, first cut them into squares. Place them in a single layer on a baking sheet. Freeze them for about an hour. After they are firm, move them to a freezer-safe bag. When you want to eat them, take out the number you need. Let them thaw in the fridge overnight or at room temperature for a couple of hours. This way, they will taste fresh again. These delicious brownie bars can last about a week at room temperature. In the fridge, they can stay fresh for up to two weeks. If you freeze them, they can last for three months. Just remember to check for any signs of freezer burn before eating. Can I use natural peanut butter? Yes, you can use natural peanut butter in this recipe. Natural peanut butter adds a nice flavor. Keep in mind that it may have a different texture. Stir it well before using to mix in the oil. Can I make these in advance? Absolutely! You can make these brownie bars a day ahead. Cool them completely and store them in an airtight container. They taste even better after a day in the fridge! How do I know when the brownies are done? To check if the brownies are done, use a toothpick. Insert it into the center. If it comes out with a few moist crumbs, they're ready. If it comes out wet, bake for a few more minutes. Can I substitute ingredients in the recipe? Yes, you can substitute ingredients! For example, you could use dark brown sugar instead of light brown sugar. You could also swap the mini peanut butter cups for chocolate chips if you prefer. Just keep the main components the same for best results. This recipe for peanut butter brownies covers everything you need. We explored the ingredients, step-by-step instructions, and helpful tips for baking success. You learned about fun variations and how to store your brownies for freshness. These brownies are easy to make and delicious. With practice, you can enjoy tasty treats any time. Experiment with flavors and share with friends. Your baking journey can create sweet memories.

Peanut Butter Cup Brownie Bars Easy and Delicious Treat

Craving a sweet treat that’s quick to make and packed with flavor? You’re in the right place! These Peanut Butter

Older posts
Newer posts
← Previous Page1 … Page21 Page22 Page23 … Page82 Next →

dsad

© 2026 Recipes Pursuit • Built with GeneratePress

Our Policies

  • Copyright Policy
  • Cookie Policy
  • GDPR Policy
  • Privacy Policy
  • Disclaimer
  • Terms Of Use

More Information

  • Home
  • About
  • Contact
  • Appetizers
  • Dessert
  • Dinner
  • Drinks
©2026, Recipes Pursuit About Back To Top