Skip to content
DisclaimerTerms Of UseGDPR PolicyCookie Policy

Recipes Pursuit

  • Home
  • Drinks
  • Appetizers
  • Dinner
  • Dessert
  • About
  • Contact
  • Privacy Policy
DisclaimerTerms Of UseGDPR PolicyCookie Policy

NO-ING-IMG

- 2 cups all-purpose flour - 1 tablespoon baking powder - 1 teaspoon garlic powder - 1 teaspoon salt For the dry ingredients, we start with all-purpose flour. It gives the biscuits their structure. Next, we add baking powder to help them rise. Then, garlic powder adds a nice kick. Finally, salt enhances all the flavors. - 1/2 cup unsalted butter, melted - 1/2 cup buttermilk (or milk with 1/2 tablespoon lemon juice) For the wet ingredients, we need melted unsalted butter for richness. It makes the biscuits soft and tasty. Buttermilk, or milk with lemon juice, adds moisture and tang. This combination helps the dough come together. - 1 cup shredded mozzarella cheese - 1/2 cup shredded sharp cheddar cheese - 1/4 cup fresh parsley, finely chopped - 1/4 teaspoon black pepper Now, let’s talk about the cheeses and herbs. Mozzarella cheese makes the biscuits gooey. Sharp cheddar cheese adds depth and flavor. Fresh parsley gives a burst of brightness, and black pepper adds a bit of heat. All these ingredients come together to create a delicious bite. {{ingredient_image_1}} First, let's prepare. Preheat your oven to 375°F (190°C). This heat helps the biscuits rise well. Next, grease a round baking pan or a cast-iron skillet. This step stops the biscuits from sticking. You want them to come out easily and stay fluffy. Now, we mix the dough. In a large mixing bowl, add 2 cups of all-purpose flour, 1 tablespoon of baking powder, 1 teaspoon of garlic powder, and 1 teaspoon of salt. Whisk these dry ingredients together until they blend well. Next, pour in 1/2 cup of melted unsalted butter and 1/2 cup of buttermilk. If you don't have buttermilk, mix milk with 1/2 tablespoon of lemon juice. Stir these wet ingredients into the dry mix. Be careful not to overmix; a few lumps are fine. Then, fold in 1 cup of shredded mozzarella, 1/2 cup of shredded sharp cheddar, 1/4 cup of finely chopped fresh parsley, and 1/4 teaspoon of black pepper. This step adds great flavor and texture to your biscuits. Now it’s time to shape and layer. Divide the dough into about 12 equal pieces. Roll each piece into a small ball. Place them in your prepared pan, making sure they touch but aren’t too tight. This helps them pull apart easily when baked. Bake the biscuits in your preheated oven for 20 to 25 minutes. Watch for them to turn golden brown on top. When they are done, take them out and brush the tops with melted butter. For a nice touch, sprinkle a bit more parsley on top. Serve warm, and enjoy the cheesy goodness! To get the best texture, avoid overmixing the dough. When you combine the wet and dry ingredients, mix until just combined. If you mix too much, the biscuits may become tough. Aim for a slightly sticky and soft dough. This helps keep your biscuits light and fluffy. Want to boost the flavor? Try adding spices or herbs. You can add a pinch of red pepper flakes for heat or some dried oregano for an Italian twist. Fresh herbs like thyme or chives can add a nice touch too. Experiment with flavors that you enjoy to make these biscuits uniquely yours! Serve these pull-apart biscuits warm for the best taste. You can place them directly in the skillet or on a wooden board. Offer toothpicks for easy eating, or let guests dig in with their hands. Pair them with marinara sauce or a creamy dip. They also make a great side for soups and salads. Enjoy the fun of sharing and tearing apart each delicious bite! Pro Tips Use Fresh Ingredients: Always opt for fresh garlic and parsley to enhance the flavor of your biscuits. Don't Overmix: Mix the dough just until combined to ensure light and fluffy biscuits. Experiment with Cheeses: Feel free to mix different cheeses like gouda or pepper jack for a unique twist. Customize the Herbs: Add herbs like thyme or rosemary for additional flavor that complements the garlic. {{image_2}} You can switch up the cheese in these biscuits. Use different kinds for fun flavors. Here are some great options: - Monterey Jack: This cheese melts well and adds a creamy texture. - Pepper Jack: For a spicy kick, try this cheese. It brings both heat and flavor. - Feta: Crumbled feta gives a tangy taste that pairs well with garlic. Mixing cheeses can create a flavor you love. Don't be afraid to experiment! Herbs can change the taste of your biscuits. You can swap parsley for other herbs. Here are some tasty ideas: - Thyme: Adds a soft, earthy flavor. - Oregano: Gives a hint of Italian taste. - Rosemary: Offers a strong and fragrant scent. Feel free to mix and match herbs to find your favorite blend! You can make these biscuits fit different diets. Here are some easy adjustments: - Gluten-Free: Use a gluten-free flour mix to make this recipe safe for gluten-free diets. - Dairy-Free: Swap butter for a plant-based butter. Use non-dairy milk for buttermilk. These changes keep the flavor while catering to your needs. Enjoy your delicious pull-apart biscuits! Store leftover cheesy garlic pull-apart biscuits at room temperature. Place them in an airtight container. They stay fresh for about two days. If you want to keep them a bit longer, you can wrap them in plastic wrap before putting them in the container. This helps maintain their soft texture. For long-term storage, freezing is the best option. First, let the biscuits cool completely. Then, wrap each biscuit in plastic wrap. Place the wrapped biscuits in a freezer-safe bag or container. They can last up to three months in the freezer. To reheat, take them out and let them thaw in the fridge overnight. Warm them in the oven at 350°F (175°C) for about 10 minutes. This keeps them soft and tasty. To maintain flavor and texture, follow a few simple tips. Always store biscuits in an airtight container to keep moisture out. If you freeze them, avoid stacking them tightly. This prevents them from sticking together. When reheating, use the oven instead of the microwave to keep them crispy. Enjoy your biscuits fresh, warm, and full of cheesy goodness! Yes, you can make these biscuits ahead of time. Prepare the dough and shape it into balls. Place them in the baking pan and cover with plastic wrap. Store in the fridge for up to 24 hours. When you're ready to bake, take them out and let them sit at room temperature for about 20 minutes. This helps them rise better. You can also bake them in advance and reheat later. To make these biscuits healthier, consider a few swaps. Use whole wheat flour instead of all-purpose flour. This adds fiber and nutrients. You can also reduce the amount of butter and use Greek yogurt as a substitute for half of the buttermilk. Use reduced-fat cheese to cut down on calories. Adding veggies like spinach or bell peppers can boost nutrition without adding many calories. These biscuits pair well with a variety of dishes. Serve them with a fresh salad for a light meal. They also go great with soups, especially creamy tomato or chicken soup. For a hearty option, try them with grilled meats or roasted vegetables. You can even use them as a side for pasta dishes. These biscuits are perfect for sharing at parties, too! In this blog post, we explored the ingredients for Cheesy Garlic Pull-Apart Biscuits, including dry and wet ingredients, cheeses, and herbs. We walked through the steps to prepare, mix, and bake these delicious treats. I shared tips for texture and flavor, variations for dietary needs, and storage advice to keep them fresh. These biscuits are a tasty addition to any meal. Try out different cheeses and herbs, and enjoy the delicious results. Happy baking!

Cheesy Garlic Pull-Apart Biscuits Tasty and Easy Recipe

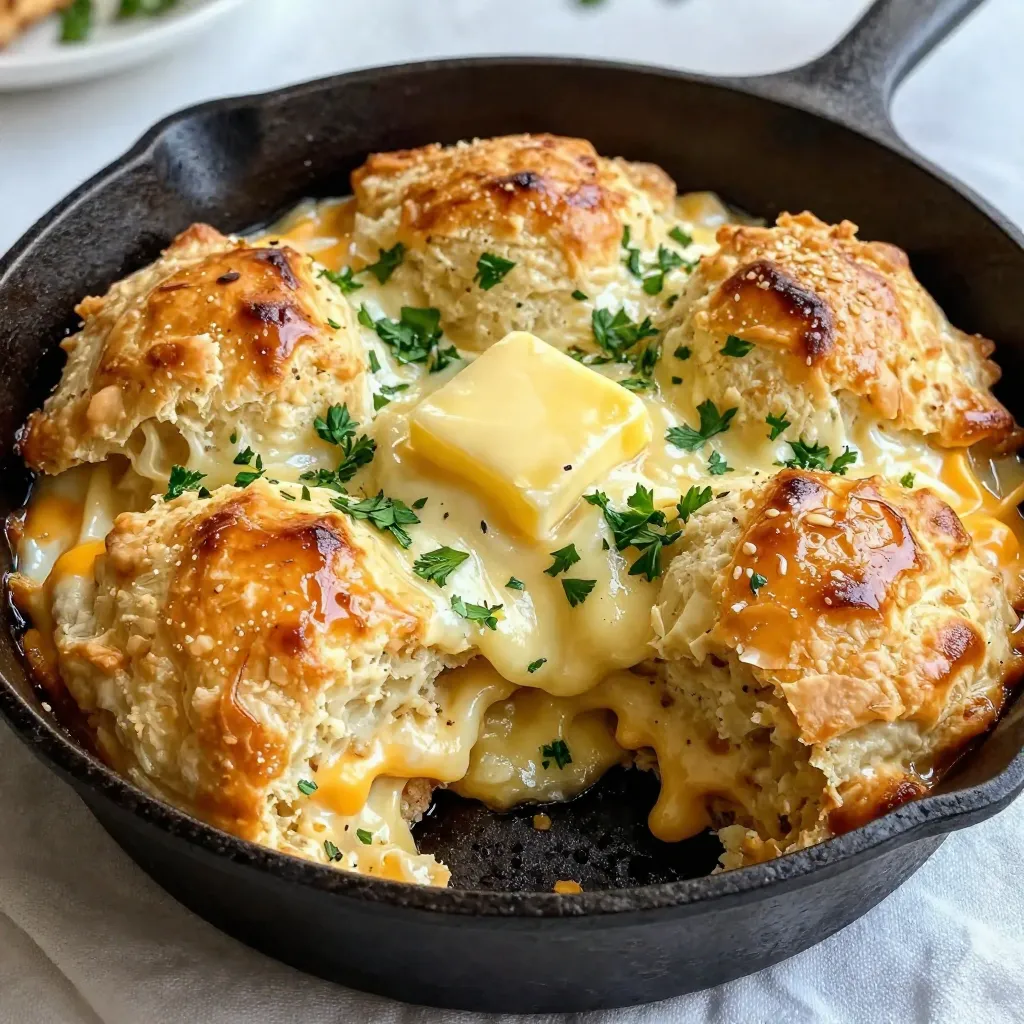
Are you ready to delight your taste buds with Cheesy Garlic Pull-Apart Biscuits? This simple recipe blends gooey cheese, savory

- 1/2 cup unsalted butter - 1 cup granulated sugar - 2 large eggs - 1 teaspoon vanilla extract - 1/3 cup unsweetened cocoa powder - 1/2 cup all-purpose flour - 1/4 teaspoon salt - 1/4 teaspoon baking powder - 1/2 cup creamy peanut butter - 1/4 cup chocolate chips (optional) You can swap unsalted butter with coconut oil or margarine for a dairy-free option. For sugar, try brown sugar or a sugar substitute. If you're gluten-free, use almond flour or oat flour instead of all-purpose flour. For cocoa powder, I recommend Dutch-processed cocoa for a richer taste or natural cocoa for a lighter flavor. Each option offers a unique twist to your brownies! {{ingredient_image_1}} 1. First, preheat your oven to 350°F (175°C). This helps the brownies bake evenly. 2. Next, prepare your 9x9-inch baking pan. You can grease it or line it with parchment paper. This makes it easy to remove the brownies later. 3. In a medium saucepan, melt 1/2 cup of unsalted butter over low heat. Stir it often to prevent burning. 4. Once melted, take it off the heat. Add in 1 cup of granulated sugar and mix until smooth. The sugar should blend well with the butter. 1. Allow the butter and sugar mixture to cool slightly. This will keep the eggs from cooking when you add them. 2. Next, whisk in 2 large eggs one at a time. Make sure each egg is fully mixed in before adding the next. 3. Then, add in 1 teaspoon of vanilla extract. This will give your brownies a nice flavor. 4. In a separate bowl, sift together 1/3 cup of unsweetened cocoa powder, 1/2 cup of all-purpose flour, 1/4 teaspoon of salt, and 1/4 teaspoon of baking powder. 5. Slowly blend the dry mix into the wet mixture. Be careful not to overmix. Just stir until you see no dry flour. 1. Now, pour the brownie batter into the prepared baking pan. Use a spatula to spread it into an even layer. 2. In a small microwave-safe bowl, warm 1/2 cup of creamy peanut butter for about 20 seconds. This makes it easy to swirl. 3. Once it's pourable, dollop spoonfuls of the peanut butter on top of the brownie batter. 4. Grab a knife or a toothpick. Gently swirl the peanut butter into the batter. Move in a figure-eight pattern for a nice marbled effect. Be gentle, so you don’t mix it too much. 1. Place your pan in the preheated oven. Bake for 20-25 minutes. 2. Check for doneness by inserting a toothpick into the center. It should come out with a few moist crumbs, not wet batter. 3. When done, take the brownies out and let them cool completely in the pan. This helps them set. 4. Once cool, cut the brownies into squares and enjoy your delicious treat! To get the best brownies, keep them moist and chewy. Here’s how: - Use butter: Always use unsalted butter. It adds richness. - Don’t skip the eggs: They help bind the batter and add moisture. - Check your oven temperature: Make sure your oven is at 350°F (175°C). An oven thermometer can help. - Watch the baking time: Bake for 20-25 minutes. You want a few moist crumbs on your toothpick, not wet batter. To avoid overbaking, set a timer for the minimum time. Check often. If the edges look set, but the middle is soft, take them out. For a beautiful presentation, dust your brownies with powdered sugar. Serve them on a rustic board. Add a scoop of vanilla ice cream on the side. A drizzle of chocolate sauce elevates the dish. Consider pairing these brownies with: - Chopped nuts: They add crunch and flavor. - Fresh berries: Strawberries or raspberries contrast well with chocolate. - Whipped cream: It adds a light, airy touch. Pro Tips Use Room Temperature Ingredients: Ensure that your eggs and butter are at room temperature for better mixing and a smoother batter. Check for Doneness: Instead of relying solely on baking time, use a toothpick to check for doneness; it should come out with a few moist crumbs. Add a Pinch of Espresso Powder: If you love coffee, a pinch of espresso powder can enhance the chocolate flavor in your brownies. Cool Before Cutting: Let the brownies cool completely in the pan before cutting to ensure clean, even squares. {{image_2}} To make gluten-free brownies, you can use almond flour or oat flour. Both options give a nice texture. Make sure to check that your flour is certified gluten-free. When using these flours, you may need to bake the brownies a bit longer. Start checking for doneness at 25 minutes. For a vegan version, replace the eggs with flax eggs. Mix 1 tablespoon of ground flaxseed with 3 tablespoons of water for each egg. Let it sit for about 5 minutes to thicken. Instead of butter, use coconut oil or vegan butter. You can also use dairy-free chocolate chips for a rich taste without animal products. You can add chopped nuts like walnuts or pecans to the batter for crunch. Mix-ins like chocolate chunks or caramel pieces can also enhance the flavor. For a fun twist, try using almond butter or cashew butter instead of peanut butter. These changes can create unique marble effects that surprise your taste buds. Store your brownies in an airtight container. This keeps them fresh and moist. You can use a glass or plastic container with a tight lid. If you want to stack them, use parchment paper between layers. Store brownies at room temperature for about 3 to 4 days. If you like them cold, put them in the fridge. They can last up to a week in the fridge. You can freeze brownies to keep them longer. Here’s how to do it step-by-step: 1. Cool Completely: Let your brownies cool all the way before freezing. This helps them hold their shape. 2. Cut Into Squares: Cut the brownies into squares. This makes it easy to grab one later. 3. Wrap Each Square: Wrap each square tightly in plastic wrap. Make sure there are no gaps. 4. Place in a Bag: Put the wrapped brownies in a freezer bag or container. Squeeze out as much air as you can. 5. Label and Date: Write the date on the bag or container. This helps you keep track of how long they have been frozen. To thaw, take out the brownies and let them sit at room temperature for about 30 minutes. You can also microwave them for a few seconds to warm them up. Enjoy your delicious treats! To check if your brownies are done, use the toothpick test. Insert a toothpick into the center of the brownies. If it comes out with a few moist crumbs, they are ready. If it comes out wet, they need more time. Keep an eye on them to avoid overbaking. Yes, you can make these brownies ahead of time. After baking, let them cool completely. Then, cover them with plastic wrap. Store them at room temperature for up to three days. You can also refrigerate them to extend their life. Just bring them back to room temperature before serving. If you have allergies or dietary needs, try almond butter or sunflower seed butter. Both options work well in this recipe. You can also use cashew butter for a different flavor. Just make sure the butter you choose has a similar texture to peanut butter. If your brownies turn out dry, don't worry. You can revive them with a few tricks. First, try adding a scoop of ice cream on top. The creaminess helps balance the dryness. You can also drizzle some warm chocolate sauce over them. This adds moisture and flavor. If all else fails, serve them with whipped cream. These chocolate peanut butter swirl brownies are a delight! We covered all the key ingredients, like butter, sugar, and cocoa powder. You learned how to prep, mix, and swirl for a perfect bake. Remember, storing them right keeps them fresh. As you try different variations, let your creativity shine. With these tips, your brownies will impress everyone. Enjoy every bite!

Chocolate Peanut Butter Swirl Brownies Delightful Treat

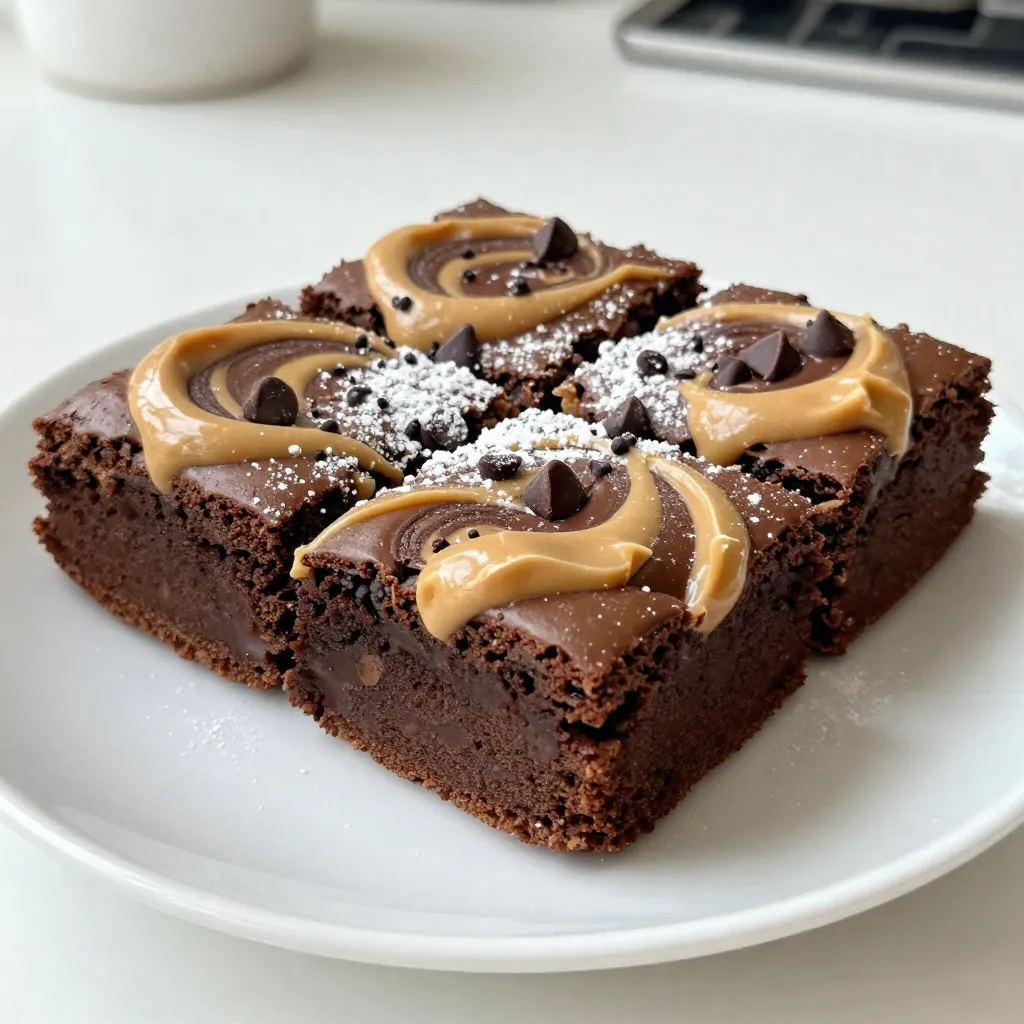
If you love chocolate and peanut butter, get ready for a treat! These Chocolate Peanut Butter Swirl Brownies are rich,

Here’s what you need for Garlic Herb Roasted Turkey Legs: - 4 turkey legs - 4 tablespoons olive oil - 6 cloves garlic, minced - 2 teaspoons dried rosemary - 2 teaspoons dried thyme - 2 teaspoons dried oregano - 1 teaspoon paprika - Salt and pepper to taste - 1 lemon, zested and juiced - Fresh parsley for garnish These ingredients come together to create a flavor-packed dish. The turkey legs provide a juicy base, while the olive oil adds richness. Garlic brings a strong, savory taste that many love. The dried herbs—rosemary, thyme, and oregano—add depth. Paprika gives a slight warmth and beautiful color. Using fresh parsley as a garnish not only adds color but also freshness to each bite. The lemon zest and juice brighten the dish, making it pop with flavor. This mix of ingredients is simple yet effective. You can easily find them at your local store. Each component plays a role in making the turkey legs juicy and flavorful. {{ingredient_image_1}} - Preheat Oven: Set your oven to 375°F (190°C). This makes sure your turkey cooks evenly. - Prepare Herb Marinade: In a bowl, mix together 4 tablespoons of olive oil, 6 minced garlic cloves, 2 teaspoons each of dried rosemary, thyme, oregano, 1 teaspoon of paprika, zest and juice from 1 lemon, and salt and pepper to taste. This mix will bring out great flavors. - Pat Turkey Legs Dry: Use paper towels to dry the turkey legs. This helps the skin get crispy when roasting. - Coating the Turkey Legs: Rub the herb marinade all over the turkey legs. Make sure to cover every inch for the best taste. - Lifting Skin for Extra Flavor: Gently lift the skin on the turkey legs and spread some marinade underneath. This step adds even more flavor to the meat. - Organizing in Roasting Pan: Place the marinated turkey legs in a roasting pan. Make sure they have space around them to cook well. - Cooking Time and Temperature: Roast the legs in your preheated oven for about 1 hour and 15 minutes. Check that the internal temperature hits 165°F (74°C) for safe eating. - Basting for Moisture: Halfway through cooking, use the pan juices to baste the turkey legs. This keeps them moist and tasty. To get that perfect crispy skin on your turkey legs, start by drying them well. Use paper towels to pat the legs until they are dry. This helps the skin crisp up in the oven. Basting is also key. Baste the turkey legs with the pan juices halfway through cooking. This adds flavor and keeps the meat moist. If you want to switch things up, try using fresh herbs instead of dried ones. Fresh rosemary, thyme, and oregano can give your dish a bright taste. Just remember to use about three times more fresh herbs than dried. Adjust the seasoning to your liking. Taste the herb marinade before applying it to the turkey. You can add more salt or pepper if needed. For a beautiful presentation, serve the turkey legs on a large platter. Drizzle the pan juices over them for added flavor. Garnish with lemon wedges and fresh herbs like parsley. This adds color and makes the dish look more inviting. Pro Tips Marinade Time: For deeper flavor, let the turkey legs marinate in the herb mixture in the refrigerator for at least 2 hours, or ideally overnight. Skin Crispiness: Ensure the turkey skin is dry before applying the marinade; this helps achieve a beautifully crispy skin while roasting. Basting Technique: Use a baster or spoon to baste the turkey legs with pan juices halfway through cooking to keep the meat moist and flavorful. Resting Period: Allow the turkey legs to rest for at least 10 minutes after roasting; this helps the juices redistribute, leading to juicier meat. {{image_2}} You can change the dried herbs to fit your taste. For a fresh twist, use fresh herbs instead. Fresh rosemary, thyme, or oregano can boost the flavor. Just use three times the amount of fresh herbs compared to dried. Adding spicy elements can make it fun. Try adding a pinch of cayenne pepper or red pepper flakes. This will give your turkey a little heat. Mix it into the herb marinade for a spicy kick. Using a slow cooker is a great option for tender turkey legs. Just season the legs and place them in the cooker. Cook on low for 6 to 8 hours. This will let the flavors blend and keep the meat juicy. Grilling is another fun choice. Marinate the turkey legs as usual, then grill them over medium heat. Cook for about 30 to 40 minutes. Turn them often to get that smoky flavor and crispy skin. Pair your turkey legs with tasty side dishes. Roasted vegetables, mashed potatoes, or rice work well. A fresh salad can add a nice crunch, too. Sauces can enhance the dish. A tangy barbecue sauce or a rich gravy can be perfect. You can also serve it with a citrus sauce for a fresh taste. Enjoy these combinations to make your meal even better! - Refrigeration Tips: Store leftover turkey legs in an airtight container. Make sure to keep them in the fridge. They will stay fresh for about three to four days. Always let them cool down before sealing the container. - Freezing Instructions: To freeze, wrap the turkey legs tightly in plastic wrap, then place them in a freezer bag. Remove as much air as possible. They can last up to three months in the freezer. Label the bag with the date to keep track. - Best Practices for Reheating: The best way to reheat turkey legs is in the oven. Preheat your oven to 350°F (175°C). Place the turkey legs on a baking sheet and cover them with foil. Heat for about 20 to 30 minutes, or until warmed through. - Avoiding Dryness: To keep the turkey legs moist, add a splash of broth or water to the baking sheet. This will create steam and help maintain moisture. Avoid using a microwave, as it can dry out the meat quickly. You should cook turkey legs for about 1 hour and 15 minutes. This time ensures they become tender and juicy. The key is to roast them at 375°F (190°C). Cooking them too long can dry them out. Always check them around the one-hour mark to avoid any overcooking. The safe internal temperature for cooked turkey legs is 165°F (74°C). Use a meat thermometer to check the thickest part of the leg. This ensures the meat is safe to eat and fully cooked. If the temperature is lower, return the legs to the oven until they reach the right temperature. Yes, you can use fresh herbs instead of dried ones. Fresh herbs can add a brighter flavor to your dish. To use fresh herbs, simply chop them finely. You can use about three times the amount of fresh herbs as dried. For example, if a recipe calls for 2 teaspoons of dried rosemary, use 6 teaspoons of fresh rosemary. Mix them into your marinade just like you would with dried herbs. In this post, we explored how to cook turkey legs perfectly. We discussed the essential ingredients, preparation steps, marinades, and roasting techniques. I shared tips for crispy skin and flavor enhancements, along with ways to serve and store leftovers. Cooking turkey legs can be fun and easy. With these steps, you can impress everyone at your meal. Enjoy making your dish and experimenting with flavors!

Garlic Herb Roasted Turkey Legs Juicy and Flavorful Dish

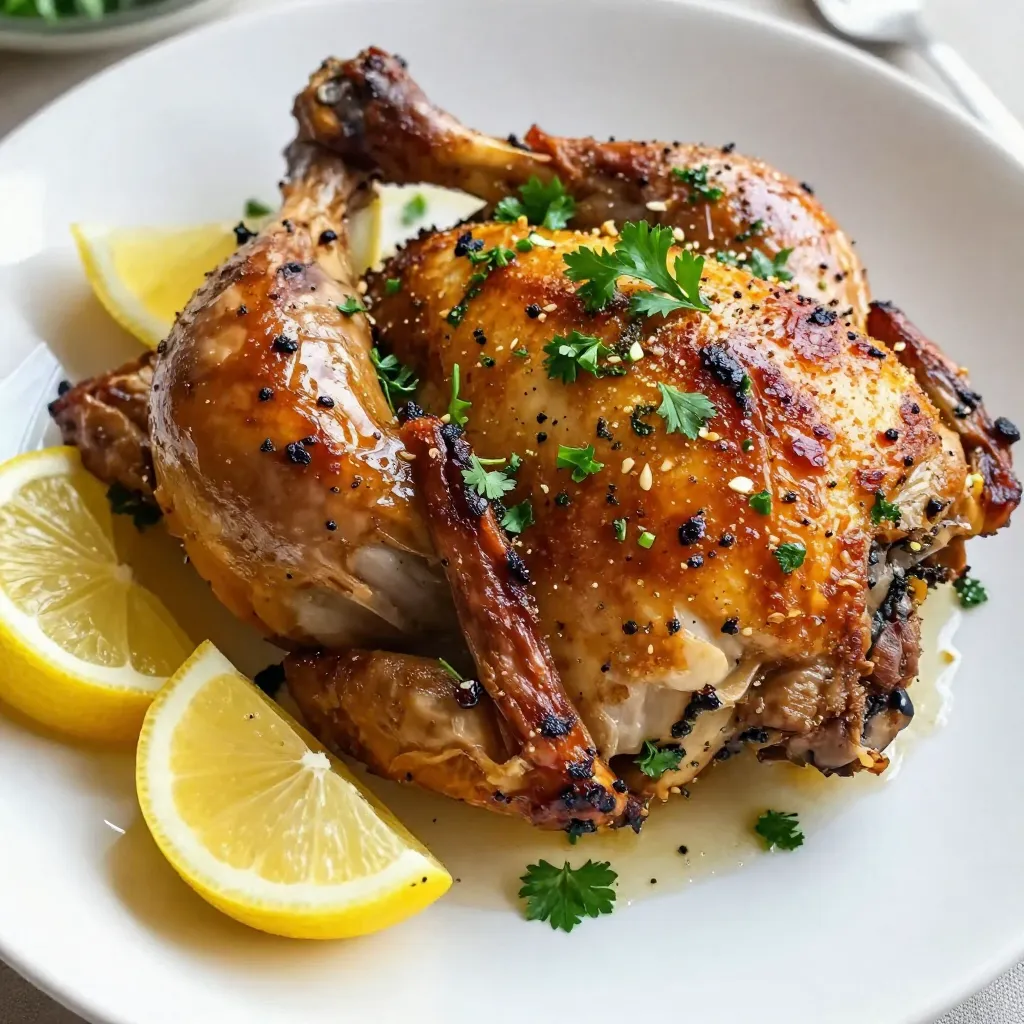
Welcome to a mouth-watering journey of flavors with my Garlic Herb Roasted Turkey Legs recipe! If you crave juicy, tender

- 1 ½ pounds flank steak - 2 tablespoons olive oil - 4 cloves garlic, minced - 1 pound baby potatoes, halved - 1 pound green beans, trimmed - 2 teaspoons dried rosemary - 2 teaspoons dried thyme - 1 teaspoon smoked paprika - Salt and pepper to taste - 1 lemon, sliced - Fresh parsley for garnish Gather these simple ingredients before you start. The flank steak gives a rich flavor. Olive oil adds moisture and helps the herbs stick. Minced garlic brings a strong taste. Baby potatoes are tender and comforting. Green beans add a nice crunch. For the marinade, dried rosemary and thyme bring depth. Smoked paprika adds a warm, smoky touch. Salt and pepper enhance all the flavors. Fresh lemon slices brighten the dish. Finally, fresh parsley adds color and freshness when you serve. Make sure your ingredients are fresh. Quality matters in every bite. You can find these items at your local store. If you want, use fresh herbs instead of dried ones. This can add even more flavor. Enjoy your cooking! {{ingredient_image_1}} To start, grab a small bowl. Add 2 tablespoons of olive oil. Then, mince 4 cloves of garlic and toss them in. Next, add 2 teaspoons of dried rosemary and 2 teaspoons of dried thyme. Sprinkle in 1 teaspoon of smoked paprika, plus salt and pepper to taste. Mix this well to create a tasty marinade. Now, take your 1 ½ pounds of flank steak. Place it in a large zip-top bag or dish. Pour half of your marinade over the steak. Seal the bag or cover the dish tightly. Let it marinate in the fridge for at least 30 minutes. This step adds great flavor to your steak. While the steak marinates, prepare 1 pound of baby potatoes. Cut them in half and place them on a large baking sheet. Drizzle the remaining marinade over the potatoes. Toss them well to coat every piece. This step makes the potatoes full of flavor. Roast the potatoes in your preheated oven at 400°F (200°C) for about 15 minutes. This gets them nice and tender. After 15 minutes, take the baking sheet out. Now, add 1 pound of trimmed green beans and slices of 1 lemon around the potatoes. This adds freshness and color to your meal. Remove the steak from the marinade. Place it on the baking sheet, right on top of the veggies. This helps the steak soak up some of those great flavors. Return the sheet to the oven. Roast for 15 to 20 minutes. Aim for a temperature of 135°F for medium-rare. Adjust the time if you like it more cooked. Once done, take the baking sheet out. Let the steak rest for 5 minutes before slicing it thinly against the grain. This keeps the meat tender. Serve the steak with the roasted potatoes and green beans. Garnish with fresh parsley for a pop of color and flavor. Enjoy your meal! For this dish, marinate the steak for at least 30 minutes. If you can, let it sit for up to 2 hours. This time helps the flavors soak in well. To enhance flavor, try adding a splash of lemon juice or a dash of soy sauce. Both give a nice twist to the taste. To check steak doneness, use a meat thermometer. Aim for 135°F for medium-rare. For medium, cook until it reaches 145°F. After cooking, always let the steak rest for 5 minutes. This helps keep the juices locked in, making it juicier when you slice it. Pair your steak with roasted potatoes and green beans. They complement the rich flavor of the steak. You can also add a tangy sauce like chimichurri or a drizzle of balsamic glaze. For a nice touch, garnish with fresh parsley and lemon slices on the plate. This makes your meal look vibrant and inviting. Pro Tips Marinate Longer: For a more flavorful steak, consider marinating for 2 hours or even overnight if time allows. Vegetable Variations: Feel free to swap in your favorite seasonal vegetables, like bell peppers or carrots, for a different flavor profile. Resting Time: Always allow your steak to rest after cooking to ensure the juices redistribute, making for a more tender bite. Use a Meat Thermometer: To achieve your preferred doneness, use a meat thermometer; aim for 135°F for medium-rare, 145°F for medium. {{image_2}} You can switch flank steak for chicken or pork. Chicken thighs work well. They stay juicy and soak up flavors nicely. Pork tenderloin is also a great choice. Just thinly slice it to ensure even cooking. For a vegetarian meal, try marinated tofu or tempeh. Both absorb marinades and add protein. Use seasonal vegetables to keep your dish fresh. In spring, add asparagus or zucchini. Summer brings bell peppers or cherry tomatoes. In fall, root veggies like carrots or sweet potatoes shine. For winter, try Brussels sprouts or butternut squash. When roasting root vegetables, cut them into similar sizes for even cooking. Toss them in olive oil and seasoning before roasting. You can change up the spices and herbs in the recipe. Try adding cumin or chili powder for heat. Fresh herbs like basil or cilantro can brighten the dish. Experiment with marinades too. A soy sauce and ginger mix gives an Asian twist. For a smoky flavor, add chipotle peppers in adobo. Mix and match to find your favorite flavor! To keep your Garlic Herb Steak fresh, store leftovers in the fridge. Use airtight containers to prevent moisture loss and keep flavors intact. Make sure the steak and veggies are cool before sealing. This helps them stay fresh for up to three days. To reheat without losing flavor, use the oven. Preheat it to 350°F (175°C). Place the steak and veggies on a baking sheet. Heat for about 10-15 minutes or until warm. If you use a microwave, set it on low power. Heat for short bursts to avoid tough steak. Yes, you can freeze Garlic Herb Steak. Wrap it in plastic wrap or foil, then place it in a freezer bag. This keeps it safe for up to three months. When you’re ready to eat, thaw overnight in the fridge. Reheat in the oven for best results. You should marinate flank steak for at least 30 minutes. This allows the flavors to soak in. For best results, marinate it for 2 to 4 hours. If you have time, marinating overnight will enhance the taste even more. The best doneness for flank steak is medium-rare. Aim for an internal temperature of 135°F. This keeps the meat juicy and tender. For medium, cook until it reaches 145°F. Use a meat thermometer to check the temperature for accuracy. Yes, you can make this recipe ahead of time. You can marinate the steak the night before. This helps the flavors develop more fully. You can also prep the vegetables in advance. Store them in the fridge until you are ready to cook. This recipe combines flank steak and fresh veggies for a delicious meal. You learned the key steps to prepare, cook, and store this dish. Plus, I shared tips for marinating and variations for different preferences. Remember, cooking is about experimenting and enjoying the process. Try new flavors and make this meal your own. With simple steps, you can impress anyone at the table. Enjoy your cooking journey!

Garlic Herb Steak Sheet Pan Dinner Delight

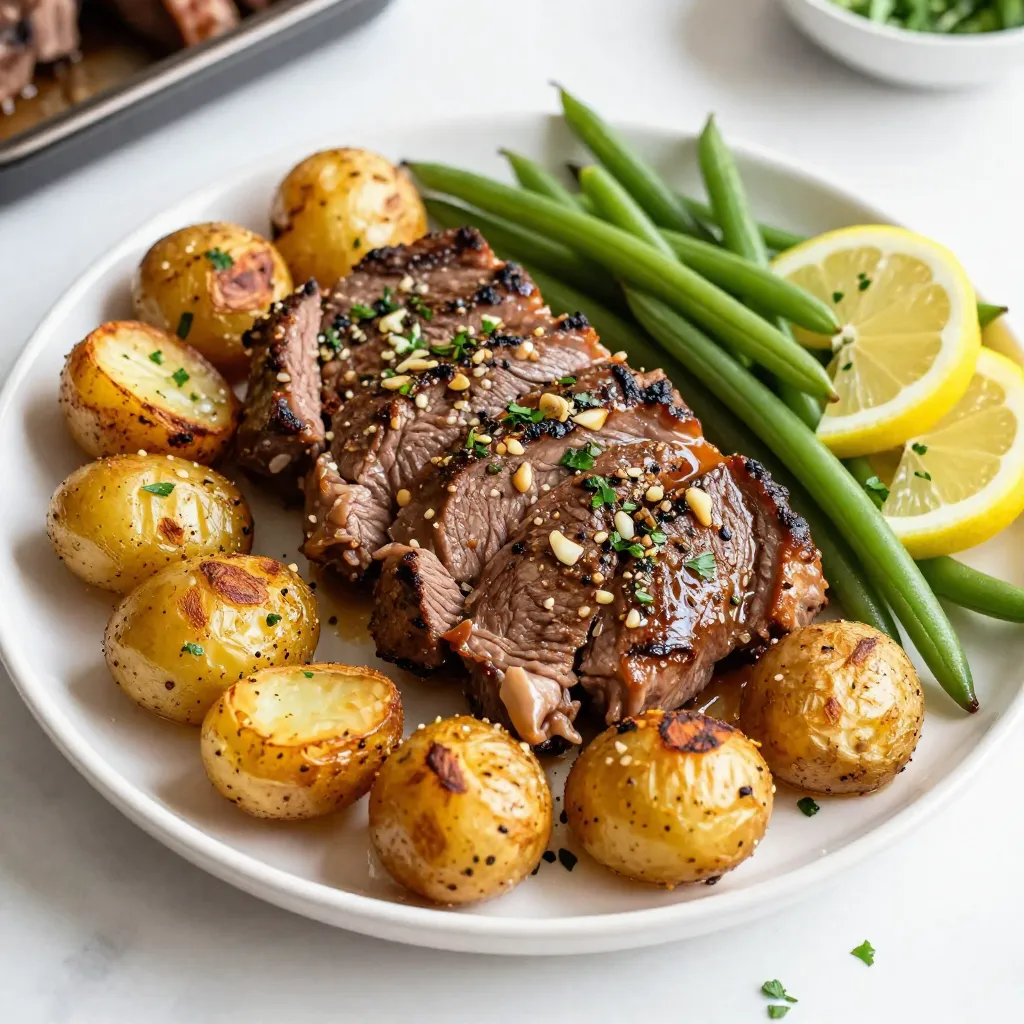
Are you ready for a quick dinner that bursts with flavor? My Garlic Herb Steak Sheet Pan Dinner combines tender

To make Caramelized Banana French Toast, gather these simple ingredients: - 4 slices of thick brioche bread - 2 ripe bananas, sliced - 2 tablespoons unsalted butter - 2 tablespoons brown sugar - 2 large eggs - 1/2 cup milk (or a dairy-free alternative) - 1 teaspoon vanilla extract - 1/2 teaspoon ground cinnamon - Pinch of salt - Maple syrup and powdered sugar for serving These ingredients create a sweet and creamy breakfast treat. The thick brioche bread gives a soft base. Ripe bananas add natural sweetness. Butter and brown sugar create a lovely caramel. The eggs and milk mix for a fluffy texture. Vanilla and cinnamon add warmth and depth. Maple syrup and powdered sugar are perfect toppings. With these items, you can craft a delightful meal. The combination will impress anyone at your table. {{ingredient_image_1}} To caramelize bananas, start with ripe ones. Ripe bananas are sweeter and will caramelize better. 1. Melt 1 tablespoon of unsalted butter in a medium skillet over medium heat. 2. Add the sliced bananas. 3. Sprinkle 2 tablespoons of brown sugar over the bananas. 4. Cook for 2-3 minutes. Stir gently. You want the bananas to turn golden and soft. This step gives them a lovely flavor. Tip: Watch closely to avoid burning. The bananas should look shiny and brown. Now, let's make the egg mixture. It binds the bread and adds flavor. 1. In a bowl, crack 2 large eggs. 2. Pour in 1/2 cup of milk. You can use a dairy-free milk if you prefer. 3. Add 1 teaspoon of vanilla extract, 1/2 teaspoon of ground cinnamon, and a pinch of salt. Technique: Whisk the mixture well with a fork. Make sure the eggs and milk blend completely. This will help create a smooth texture for the French toast. Cooking the French toast is the fun part. You get to see it come to life! 1. Heat a skillet or griddle over medium-low heat. 2. Add the remaining tablespoon of butter and let it melt. 3. Dip a slice of brioche into the egg mixture. Let it soak for a few seconds on each side. 4. Place the soaked brioche into the skillet. Cooking Time: Cook for 3-4 minutes on each side. Look for a golden brown color. Pro Tip: Flip the bread gently. A spatula works well here. This keeps the toast from breaking. After cooking, top the toast with the caramelized bananas. Enjoy your tasty breakfast treat! To get that sweet, golden look, cook the bananas for about 2-3 minutes. Use medium heat and stir gently. Make sure the bananas are ripe. Ripe bananas are sweeter and softer. They will caramelize better and add more flavor. Plating is key for a beautiful dish. Stack the French toast and spoon the caramelized bananas on top. Dust with powdered sugar for a touch of elegance. You can add a sprig of mint for color. Drizzle with maple syrup to enhance the sweetness. If you want, add chopped nuts for extra crunch. Soaking the bread too long can make it soggy. Just dip it quickly in the egg mixture. Also, watch your cooking time. Overcooking makes the French toast dry. Under-cooking leaves it raw inside. Cook for about 3-4 minutes on each side until golden brown. Pro Tips Choose the Right Bread: Opt for thick-cut brioche or challah for a richer flavor and a fluffier texture that holds up well to soaking. Perfect Caramelization: Cook the bananas on medium heat and be patient; allow them to develop a deep golden color for the best flavor. Soak Time Matters: Don’t rush the soaking process; let the brioche absorb the egg mixture for a few seconds on each side for a custardy inside. Garnish for Appeal: A sprinkle of powdered sugar and a sprig of mint not only enhance presentation but also add a refreshing contrast to the sweetness. {{image_2}} You can switch up the bread in your caramelized banana French toast. Here are some tasty choices: - Challah: This bread is soft and sweet. It soaks up the egg mixture well. - Sourdough: This has a nice tang. It gives a unique flavor and texture. - Whole Wheat Bread: This option is healthier and adds fiber. It still tastes great with bananas. - Gluten-Free Bread: If you need a gluten-free option, choose a good quality gluten-free bread. It works well in this recipe. To make your French toast even better, try these flavor boosts: - Nutmeg: Just a pinch adds warmth and depth. It pairs nicely with cinnamon. - Almond Extract: A small splash gives a nutty taste. It complements bananas well. - Cocoa Powder: Mix in a little for a chocolate twist. It makes the dish richer and more fun. - Coconut Flakes: Add some for a tropical vibe. It gives a nice crunch too. You can easily make this dish fit your diet: - Dairy-Free: Use almond milk or coconut milk instead of regular milk. It keeps the flavor good. - Gluten-Free: As mentioned, use gluten-free bread. This allows everyone to enjoy it. - Egg-Free: For a vegan option, try a banana or flaxseed mixture in place of eggs. It binds the bread while adding flavor. With these variations, you can enjoy your caramelized banana French toast in many ways! To keep your Caramelized Banana French Toast fresh, store it well. Place any leftovers in an airtight container. This helps prevent the bread from drying out. You can refrigerate it for up to three days. If you have more than you can eat, freeze it. Wrap each slice in plastic wrap and then place them in a freezer bag. This way, they can last for up to two months. When you're ready to enjoy leftovers, reheating is key. For the best texture, use a skillet. Heat it over medium-low heat and add a little butter. Place the French toast slices in the skillet. Cook each side for about two to three minutes until warm. You can also use a toaster oven. This method keeps the outside crispy while warming the inside. Avoid using a microwave, as it can make the bread soggy. Yes, you can prep some parts in advance. You can slice the bananas and mix the egg mixture the night before. Store the egg mixture in the fridge. This saves time in the morning. You can also cook the French toast and keep it warm in the oven. Set the oven to a low heat, about 200°F. I love serving this dish with fresh berries. Blueberries, strawberries, or raspberries add color and flavor. You can also try crispy bacon or sausage for a savory touch. Yogurt on the side adds creaminess too. A sprinkle of nuts like walnuts or pecans gives a nice crunch. To make this recipe vegan, swap the eggs with flaxseed meal. Mix one tablespoon of flaxseed meal with three tablespoons of water. Let it sit for a few minutes until it thickens. Use a plant-based milk like almond or oat milk instead of regular milk. For butter, use a vegan alternative. This way, everyone can enjoy this tasty treat! Caramelized Banana French Toast is a treat you can create with simple steps. You learned how to caramelize bananas, whip up the egg mixture, and cook the perfect toast. Remember to avoid common mistakes to ensure the best result. With tips on variations and storage, you can enjoy this dish anytime. Final thoughts: this recipe is great for breakfast or brunch. Use the ideas shared to make this dish your own and impress your family and friends. Enjoy your cooking!

Caramelized Banana French Toast Tasty Breakfast Treat

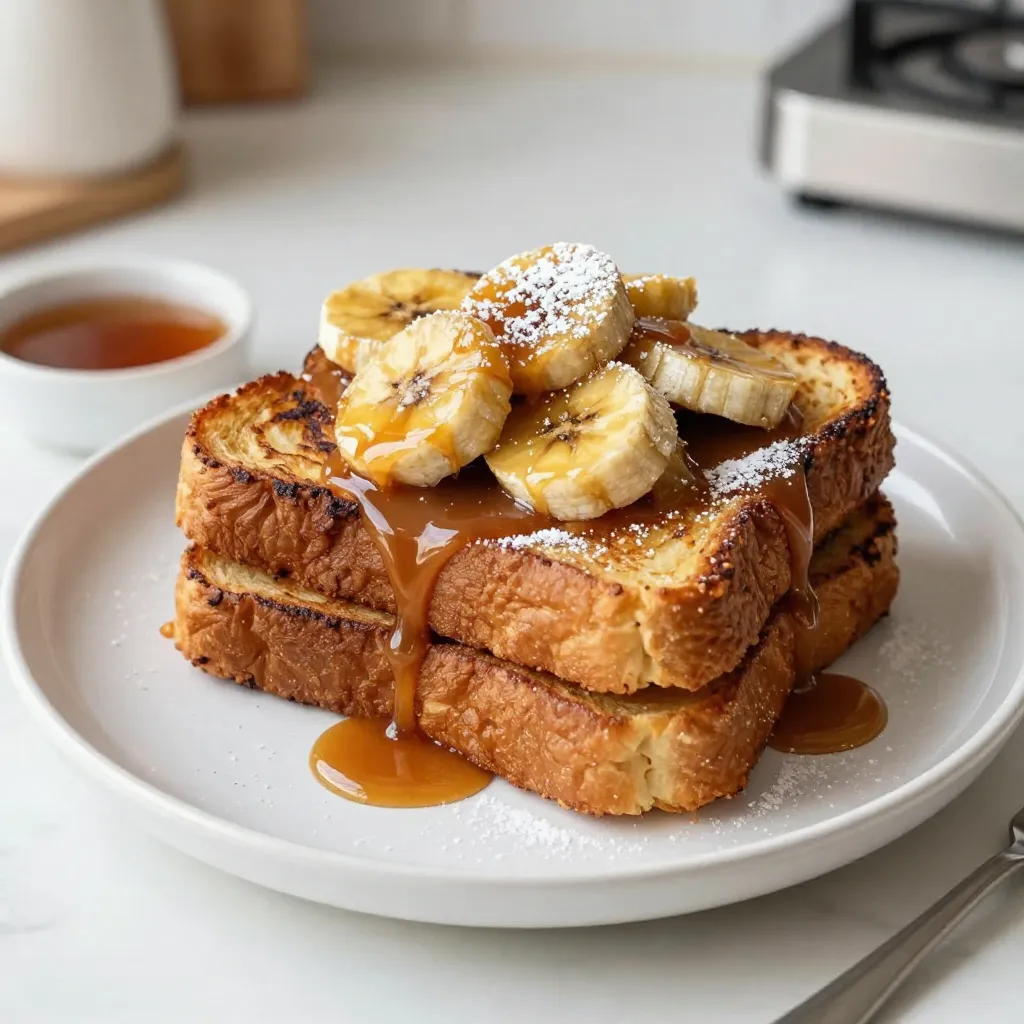
Start your day with a sweet twist! Caramelized Banana French Toast is the perfect treat for breakfast lovers. Imagine thick

- 1 lb chicken breast, cut into 1-inch cubes - Salt and pepper to taste - 1/4 cup honey - 1/4 cup fresh lime juice - 2 tablespoons olive oil - 2 cloves garlic, minced - 1 teaspoon ground cumin - 1/2 teaspoon chili powder - Wooden or metal skewers (if using wooden skewers, soak in water for 30 minutes) - Grill or grill pan - Mixing bowl - Whisk The main ingredients form the base of the skewers. Fresh chicken is key for tenderness. Salt and pepper bring out the best flavors. The marinade adds a burst of taste. Honey gives sweetness, while lime juice adds zing. Olive oil keeps the chicken moist. Garlic brings depth, and spices enhance the flavor. For equipment, skewers hold everything together. Make sure to soak wooden skewers in water. This prevents them from burning on the grill. A grill or grill pan helps cook the chicken evenly. A mixing bowl and whisk make it easy to mix the marinade. {{ingredient_image_1}} To start, gather your ingredients for the marinade. You need: - 1/4 cup honey - 1/4 cup fresh lime juice - 2 tablespoons olive oil - 2 cloves garlic, minced - 1 teaspoon ground cumin - 1/2 teaspoon chili powder - Salt and pepper to taste In a mixing bowl, whisk these together. The honey adds sweetness, while lime brings a zesty kick. Olive oil keeps the chicken moist. Garlic adds a nice taste, and spices give it depth. Next, prepare your chicken. Cut 1 pound of chicken breast into 1-inch cubes. This size helps the chicken cook evenly. Add the chicken to the bowl with the marinade. Mix well to coat each piece. Cover the bowl and refrigerate it for at least 30 minutes. For more flavor, let it sit for up to 2 hours. When ready, preheat your grill to medium-high heat. Thread the marinated chicken pieces onto skewers. If you use wooden skewers, soak them in water for 30 minutes first. This step helps prevent burning. Place the skewers on the grill and cook for 10-12 minutes. Turn them occasionally. You want them golden brown with nice grill marks. Check that the chicken reaches 165°F (75°C) inside. After grilling, let them rest for a few minutes. Garnish with fresh cilantro before serving. Enjoy your tasty skewers! To grill chicken perfectly, start with even-sized pieces. This helps them cook at the same rate. Preheat your grill to medium-high heat for the best results. Use a meat thermometer to check doneness. Aim for an internal temperature of 165°F (75°C). This keeps the chicken juicy and tender. You can customize the marinade to suit your taste. Like it sweet? Add more honey. Prefer a kick? Increase the chili powder. Try adding fresh herbs like thyme or basil for a different flavor. Use lime zest for extra zing. Tasting the marinade before adding the chicken helps, too. For this recipe, you need a few key tools: - Mixing bowl - Whisk - Grill or grill pan - Meat thermometer - Skewers (wooden or metal) If using wooden skewers, soak them for 30 minutes. This prevents them from burning on the grill. A good quality grill brush can help keep the grill clean and ready for cooking. Pro Tips Marinate Longer for More Flavor: If time allows, marinate the chicken for up to 2 hours. This will enhance the flavor and tenderness of the meat. Use Fresh Lime Juice: Always opt for fresh lime juice instead of bottled for a brighter, more vibrant flavor in your marinade. Check for Doneness: Use a meat thermometer to ensure your chicken reaches an internal temperature of 165°F (75°C) for safe consumption. Soak Skewers: If using wooden skewers, soak them in water for at least 30 minutes before grilling to prevent them from burning. {{image_2}} You can add colorful veggies to your skewers for more flavor and nutrition. Bell peppers, red onions, and zucchini work well. Cut these veggies into pieces similar in size to the chicken cubes. Toss them in the same marinade for a tasty mix. Skewering chicken and veggies together makes a fun and healthy meal. The veggies soak up the honey-lime flavor, making every bite delicious. If grilling isn’t an option, you can use your oven or broiler. Preheat your oven to 400°F (200°C). Place the skewers on a baking sheet lined with foil. Cook for about 15-20 minutes, flipping them halfway through. If using a broiler, set the oven to broil and place the skewers close to the heat. Cook for 10-12 minutes, turning often for even cooking. Both methods still give you juicy and tasty chicken. Want to mix up the flavor? Try adding spices or herbs. Cumin and chili powder give a nice kick, but you can add paprika or smoked paprika for extra depth. Fresh herbs like cilantro or parsley can brighten the dish. For a kick, add a pinch of cayenne pepper. The more you experiment, the more unique your honey lime chicken skewers will be! After enjoying your Honey Lime Chicken Skewers, you may have some left. Store them in an airtight container. They will stay fresh in the fridge for up to three days. Make sure they cool down before you seal them up. This helps keep the texture nice. If you want to keep your skewers longer, freezing is a great option. Wrap each skewer tightly in plastic wrap. Then, place them in a freezer bag. Make sure to squeeze out the air. They can last in the freezer for up to three months. When you're ready to eat, just thaw them in the fridge overnight. To reheat your skewers, you have a few options. You can use the oven, grill, or microwave. For the oven, preheat it to 350°F (175°C). Place the skewers on a baking sheet and cover with foil. Heat for about 10-15 minutes, or until they are warm. If using a grill, heat it to medium-low and grill for 5-7 minutes. For the microwave, place them on a plate and heat in short bursts, checking often. Enjoy your tasty skewers! Marinate the chicken for at least 30 minutes. This allows the flavors to soak in. You can also marinate it up to 2 hours for a stronger taste. The longer you marinate, the more flavorful the chicken will be. Just remember not to go too long, or the acid from the lime juice might start to toughen the chicken. Yes, you can use different meats for skewers. Chicken is great, but beef or shrimp works well too. Just adjust the cooking time based on the meat you choose. For example, shrimp cooks faster than chicken. Make sure to cut the meat into even pieces for even cooking. You can serve many sides with these skewers. Some great options are: - Rice or quinoa - Grilled vegetables - A fresh salad - Corn on the cob These sides add color and flavor to your meal. They also balance the sweetness of the honey lime chicken. Check the chicken with a meat thermometer. The internal temperature should be 165°F (75°C). If you don’t have a thermometer, cut a piece open. The meat should be white, and the juices should run clear. Avoid undercooking, as raw chicken can be unsafe to eat. Always ensure your chicken is cooked just right for the best taste. To sum up, making Honey Lime Chicken Skewers is easy and fun. You learned about the main ingredients, how to prepare them, and the grilling process. I shared useful tips for great results and offered fun variations. Store leftovers well or freeze for later use. With these tips, you can serve a tasty dish to impress anyone. Enjoy your cooking and make these skewers a family favorite!

Honey Lime Chicken Skewers Tasty Grilled Delight

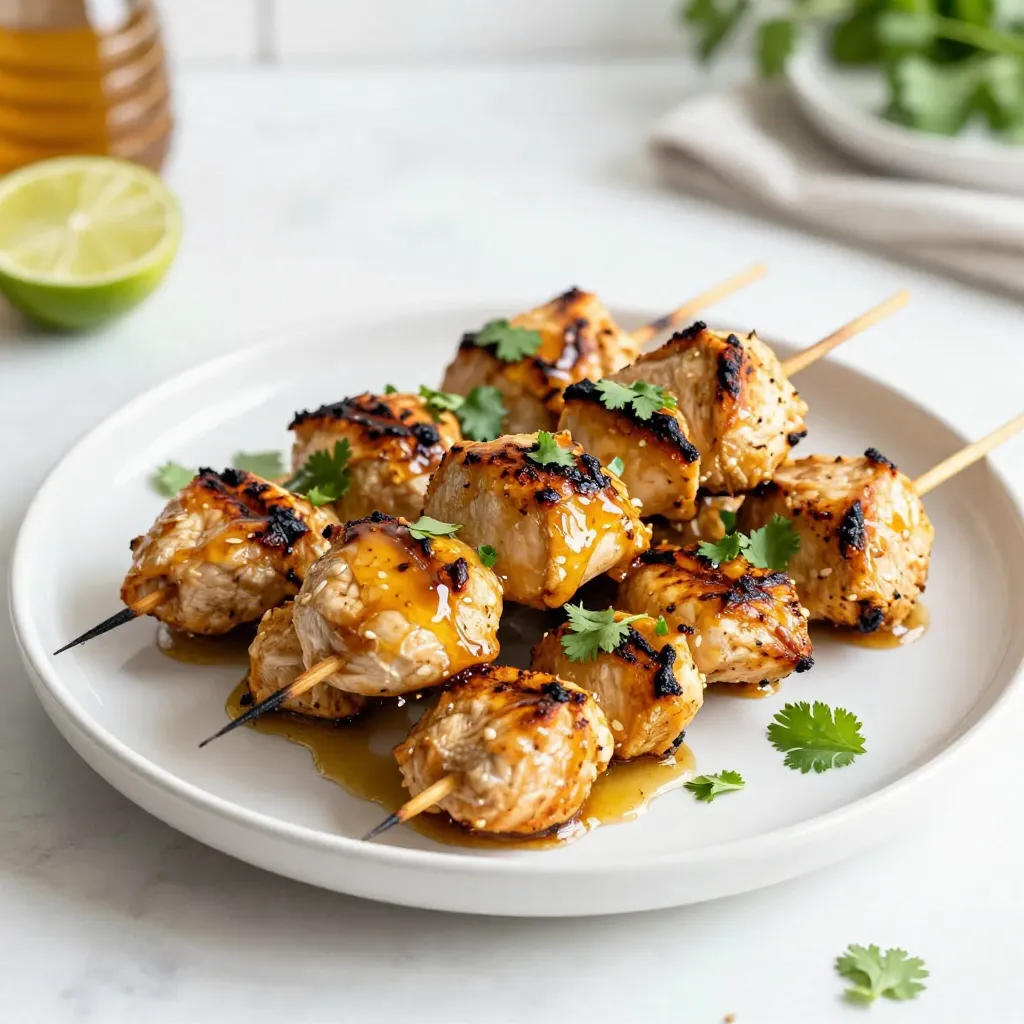
If you’re hungry for a delicious meal that’s easy to make, I have just the recipe for you! Honey Lime

- 4 cups fresh broccoli florets - 1 cup carrots, diced - 1 medium onion, chopped - 3 cloves garlic, minced Fresh ingredients are key to making this soup shine. Broccoli adds color and nutrients, while carrots bring sweetness. Chopped onion gives a nice base flavor, and garlic adds depth. - 4 cups vegetable broth - 1 cup whole milk - 2 cups sharp cheddar cheese, grated - 3 tablespoons unsalted butter - 3 tablespoons all-purpose flour Pantry staples make this dish easy. Vegetable broth forms the soup's base. Whole milk makes it creamy, and sharp cheddar cheese gives a rich taste. Butter and flour help thicken the soup. - 1 teaspoon Dijon mustard - Salt and pepper to taste - Optional: pinch of cayenne pepper for extra heat Seasoning adds layers of flavor. Dijon mustard brightens the taste. Salt and pepper enhance all the flavors. If you like heat, add a pinch of cayenne pepper. This spice can really wake up your soup! 1. Sautéing the onions and garlic Start by melting the butter in a large pot over medium heat. Add the chopped onion. Sauté it for about 4-5 minutes until it becomes soft and clear. Then, stir in the minced garlic. Cook for an extra 1-2 minutes. The garlic should smell nice and fragrant. 2. Creating the roux with butter and flour Next, sprinkle the flour into the pot with the onions and garlic. Use a whisk to mix it all together. This mixture is called a roux. Cook it for about a minute. This step helps to thicken the soup later. 1. Adding broth and vegetables Gradually pour in the vegetable broth while whisking. This helps prevent lumps. Then, add the diced carrots and fresh broccoli florets. Bring the soup to a gentle boil. After that, reduce the heat and let it simmer. Cook for about 15 minutes until the veggies are tender. 2. Blending the soup for desired texture After cooking, remove the pot from the heat. Use an immersion blender to blend the soup. Blend it until smooth. If you like some chunks, blend only half of the soup. This gives you a nice texture. 1. Incorporating milk and cheese Return the pot to low heat. Stir in the whole milk, grated sharp cheddar cheese, and a teaspoon of Dijon mustard. Keep stirring until the cheese melts and the soup looks creamy. 2. Adjusting seasoning to taste Finally, season the soup with salt and pepper. If you want some heat, add a pinch of cayenne pepper. Taste it and adjust the seasoning if needed. Now, your creamy broccoli cheddar soup is ready to enjoy! To get that rich, creamy texture in your soup, you need a roux. A roux is a mix of fat and flour. It helps thicken the soup and gives it a smooth base. Here's how to make it: - Melt the butter in your pot. - Add flour and stir it well. - Cook it for about a minute. For cheese, I suggest using sharp cheddar. It melts well and adds great flavor. You can also mix in some Gruyère for a twist. Both cheeses will bring that creamy goodness you crave. You can easily change the taste of your soup. Try adding different spices. A pinch of smoked paprika can add a nice depth. If you like heat, cayenne pepper works well too. Feel free to swap out the broccoli with other veggies. Cauliflower or spinach can create a fun twist. Just make sure they cook until soft. This soup pairs perfectly with crusty bread. A slice of sourdough or a warm baguette is ideal. You can also sprinkle extra cheese on top before serving for a nice touch. For a pretty presentation, serve the soup in bowls and add fresh herbs. Chopped chives or parsley make it look fresh and inviting. Enjoy your meal with family and friends! {{image_2}} Gluten-free modifications: To make this soup gluten-free, swap out the all-purpose flour. Use cornstarch or arrowroot powder instead. Mix it with a little cold water before adding it to the pot. This helps thicken the soup without any gluten. Vegan alternatives: For a vegan version, replace the whole milk with almond or oat milk. Use nutritional yeast instead of cheddar cheese. This adds a cheesy flavor without dairy. You can also use vegan butter to sauté the onions. Adding spices or herbs for variation: You can spice up your soup by adding a pinch of nutmeg or thyme. These herbs add warmth and depth. If you like heat, cayenne pepper is a great choice. Start with a small pinch, then taste and adjust. Optional ingredients to enhance taste: Consider adding cooked bacon bits for a smoky flavor. You might also stir in some cooked potatoes for extra heartiness. If you want a touch of sweetness, a small amount of honey or maple syrup can balance the flavors. Making a larger batch: If you want more soup, simply double the ingredients. This will give you enough to feed a crowd or have leftovers. Just make sure your pot is big enough to hold everything. Freezing for future meals: Freezing is a great way to save your soup for later. Let the soup cool completely, then pour it into airtight containers. Label them with the date. It will last up to three months in the freezer. When you’re ready to eat, thaw it overnight in the fridge and reheat on the stove. To store leftover soup, let it cool first. Then, pour it into a container. Use a container with a tight lid to keep it fresh. Glass or BPA-free plastic containers work best. Make sure to eat the soup within three to five days for the best taste. For longer storage, you can freeze this soup. Place it in freezer-safe bags or containers. Leave space at the top for expansion. Label the bags with the date. To reheat frozen soup, thaw it overnight in the fridge. Then, warm it on the stove over low heat. Stir often to ensure it heats evenly. If you keep the soup in the fridge, it lasts for about three to five days. In the freezer, it stays good for about two to three months. Signs of spoilage include bad smells, changes in color, or mold. If you notice any of these, throw it away. Always trust your senses! How can I make this soup thicker? You can make this soup thicker by adding more flour. Create a paste with one tablespoon of flour and two tablespoons of water. Stir this mixture into the soup while it cooks. Another option is to blend more of the soup until smooth. Can I substitute the cheddar cheese? Yes, you can substitute the cheddar cheese. Try using Gruyère or mozzarella for a different taste. For a dairy-free option, use a vegan cheese. Make sure it melts well for the best result. How long does the soup last in the fridge? This soup lasts for about three to four days in the fridge. Keep it in an airtight container to help it stay fresh. Always check for any signs of spoilage before eating. Can I freeze creamy broccoli cheddar soup? Yes, you can freeze this soup. Let it cool completely first. Then, pour it into freezer-safe bags or containers. It’s best to use it within three months for the best flavor. Can I use frozen broccoli for this recipe? Absolutely! Frozen broccoli works well in this recipe. Just add it straight to the pot. You may need to cook it a bit longer than fresh broccoli. What is the best way to reheat the soup? The best way to reheat the soup is on the stove. Pour it into a pot and heat it over low heat. Stir often to prevent burning. You can also use the microwave, but stir it every minute for even heating. This blog covered how to make creamy broccoli cheddar soup, from fresh ingredients to storage. You learned essential steps like sautéing, blending, and adding cheese for flavor. I shared tips for creaminess and custom flavor variations. In the end, this soup is delicious and versatile. It’s a great dish to enjoy now or save for later. Try different ingredients to suit your taste. Cooking can be fun and rewarding!

Creamy Broccoli Cheddar Soup Simple and Tasty Recipe

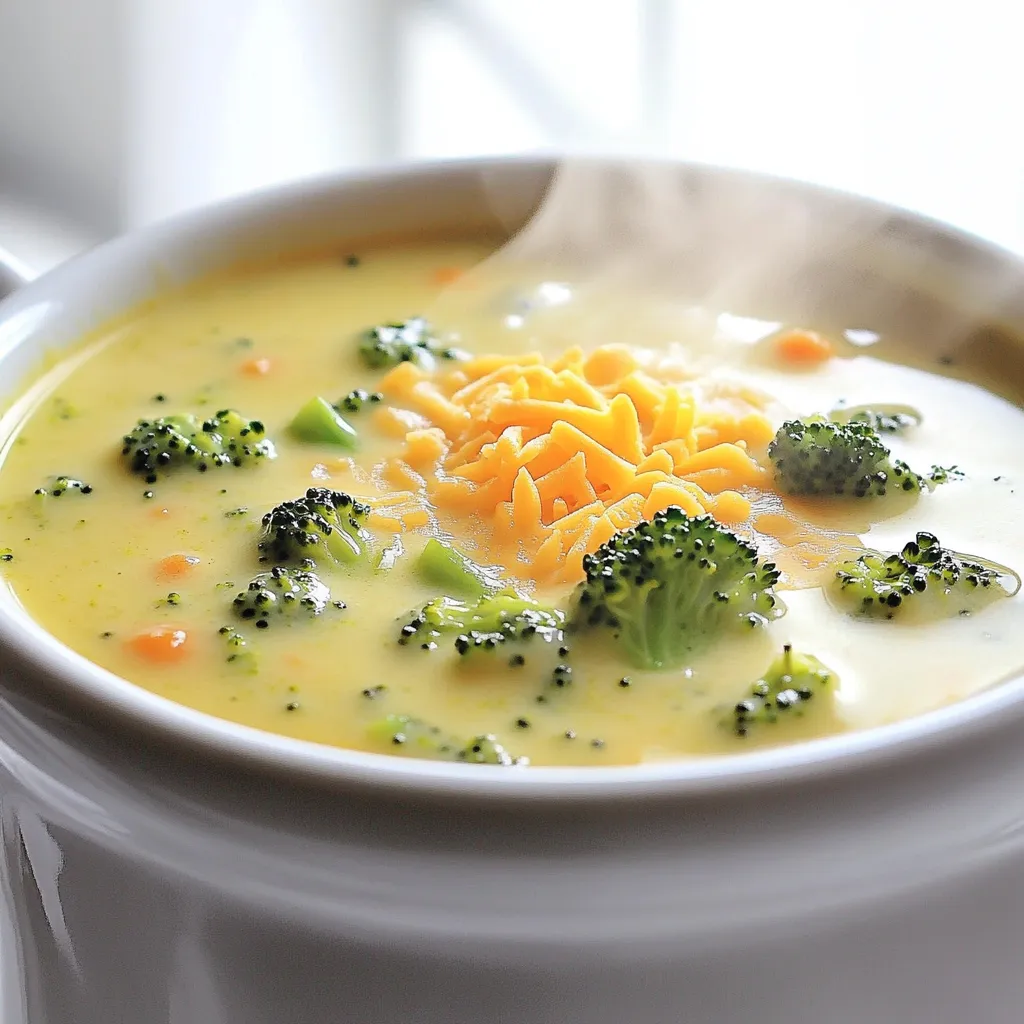
Warm your senses with my Creamy Broccoli Cheddar Soup! This simple recipe makes a delicious meal perfect for any night.

To make Coconut Pineapple Popsicles, gather these ingredients: - 2 cups fresh pineapple, diced - 1 can (13.5 oz) coconut milk - 1/4 cup honey or maple syrup - 1 tablespoon lime juice - 1/4 cup unsweetened shredded coconut - Pinch of salt You can swap ingredients if needed. For a different sweetener, use agave syrup instead of honey. If you want a lighter option, use light coconut milk. You can also use lemon juice if you don’t have lime juice. If you don’t like coconut, try adding yogurt or almond milk. These popsicles are packed with nutrients. Pineapple is rich in vitamin C and helps with digestion. Coconut milk provides healthy fats that keep you full. Honey or maple syrup adds natural sweetness and contains antioxidants. Lime juice adds flavor and vitamin C. The shredded coconut gives fiber and good texture. This treat is tasty and healthy for hot summer days! Start by gathering your ingredients. You will need fresh pineapple, coconut milk, honey or maple syrup, lime juice, shredded coconut, and a pinch of salt. First, dice the fresh pineapple into small pieces. Place the pineapple in a blender. Add the coconut milk, honey or maple syrup, lime juice, and salt. Blend all these together until you have a smooth and creamy mix. Once blended, taste the mixture. If it needs more sweetness, add a little more honey or syrup. Blend again to mix. Now, stir in the shredded coconut. This adds a nice chewy texture to your popsicles. Next, it’s time to pour the mixture into popsicle molds. Use a funnel if you have one; it helps to avoid spills. Fill each mold, leaving a little space at the top. This space allows for the mix to expand when it freezes. After filling the molds, insert the popsicle sticks into each one. Make sure the sticks stand straight. Now, put the molds in the freezer. Freeze them for at least 4 to 6 hours. This time ensures that your popsicles will be fully set and ready to enjoy. To release your popsicles, take the molds out of the freezer. Run warm water over the outside of each mold for a few seconds. This helps loosen the popsicles. Gently pull the popsicles out. If they don’t come out easily, run the water over them for a bit longer. Enjoy your refreshing coconut pineapple popsicles! To adjust sweetness, start by tasting the mix. If it’s not sweet enough, add more honey or maple syrup. Mix well after each addition. Keep in mind that fresh fruit can change the sweetness. Pineapples can vary in sugar content. Always taste as you go. This way, you create a treat that suits your taste. Using fresh ingredients gives the best flavor. Choose ripe pineapples for a sweeter taste. Look for pineapples with a sweet smell and a golden color. When selecting coconut milk, pick the unsweetened kind for more control over your sweetness. Always check the expiration date on your coconut milk. Fresh ingredients also help with health benefits. They add vitamins and minerals to your popsicles. Presentation can make your popsicles pop! Serve them on a colorful platter. Add fresh pineapple slices for a tropical look. Sprinkle some shredded coconut on top for texture. You can even use small mint leaves for color. These small touches make your popsicles look fun and inviting. Enjoy making your popsicles as much as you enjoy eating them! {{image_2}} You can make your coconut pineapple popsicles even better by adding fruits. Try mango, kiwi, or strawberries. These fruits mix well with the pineapple and coconut. Just chop them up and blend with the other ingredients. You can also layer the fruits in the molds for a fun look. The colorful layers will impress anyone who sees them. If you want a dairy-free treat, use coconut milk like in the recipe. Coconut milk is creamy and rich, making it a great choice. You can also try almond or cashew milk. These milks will change the taste a bit but still keep it tasty. Just make sure the milk you choose is unsweetened. This way, you can control the sweetness better. Adding fresh mint or ginger can elevate your popsicles. Mint adds a cool taste, while ginger gives a spicy kick. You can blend a few mint leaves or a small piece of ginger into the mix. Both flavors balance well with coconut and pineapple. This can change the whole vibe of your popsicles. Experiment with different amounts to find your favorite flavor. To freeze your Coconut Pineapple Popsicles, first blend your ingredients until smooth. Then pour the mixture into popsicle molds. Leave a small gap at the top for expansion. Place the molds in the freezer. Freeze them for at least 4 to 6 hours. This ensures they set properly. Once frozen, these popsicles can last up to 2 months in the freezer. After that, they may lose some taste and texture. To enjoy them at their best, aim to eat them within this time frame. To keep your popsicles fresh, store them in airtight containers. You can wrap the molds in plastic wrap for extra protection. Avoid opening the freezer too often, as this can cause temperature changes. Label your containers with the date you made them. This way, you can track their freshness easily. Yes, you can use frozen pineapple. It works just as well. The popsicles may be a bit thicker. If you use frozen fruit, no need to add ice. Blend until smooth, just like fresh pineapple. This can save you time and still give you that great taste. To make these popsicles vegan, swap honey for maple syrup. Honey comes from bees, but maple syrup is plant-based. Use coconut milk, which is already vegan. This way, you keep all the yummy flavors while making it suitable for everyone. Cleaning popsicle molds is easy. Start by rinsing them with warm water. Use a soft sponge to scrub if needed. If there are sticky spots, soak them in warm, soapy water for a few minutes. Rinse well and let them dry completely before storing. In this blog post, we explored how to make tasty and healthy popsicles. We covered the ingredients, their benefits, and substitutions. You learned step-by-step instructions for blending, pouring, and freezing, along with tips for sweetness and fresh use. Variations let you try different flavors and add-ins. We also shared smart storage advice to keep popsicles fresh longer. Try these recipes to cool off and enjoy fun flavors. Happy popsicle making!

Coconut Pineapple Popsicles Refreshing Summer Treat

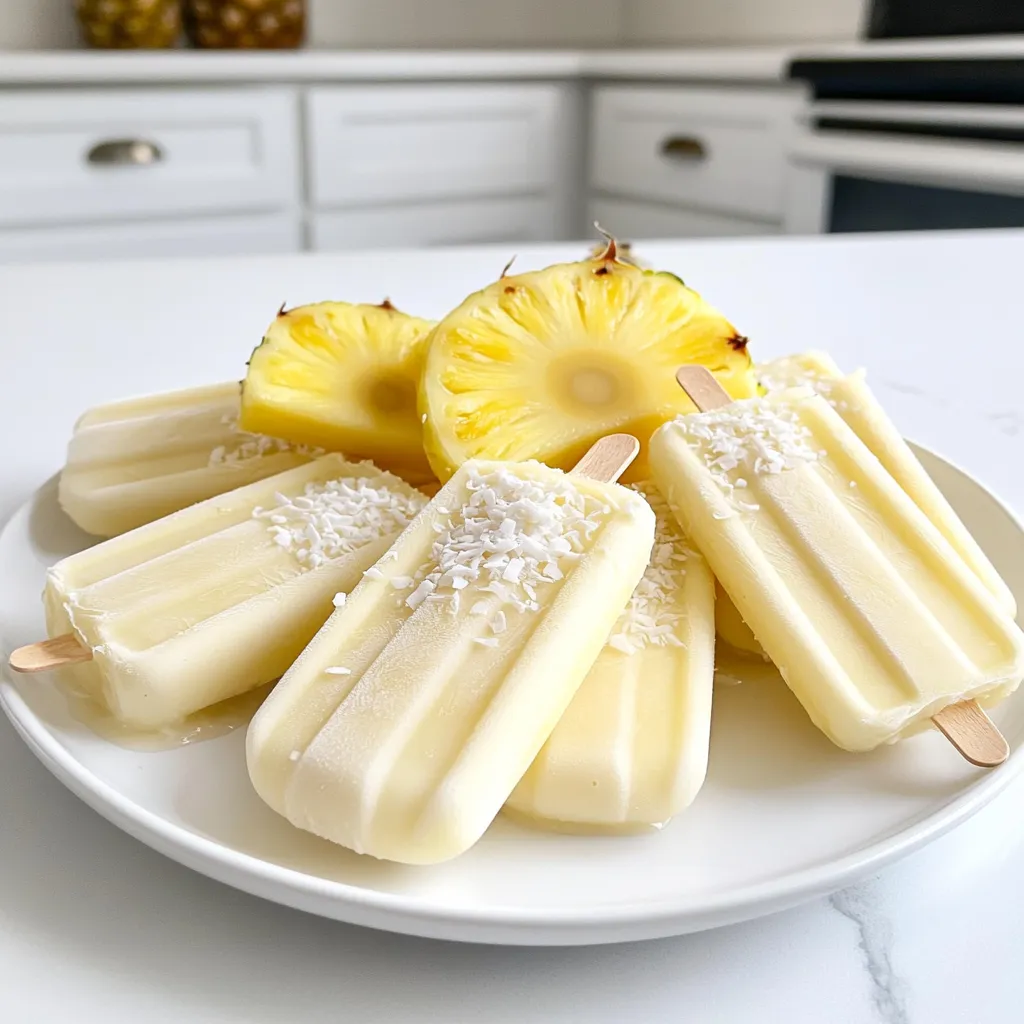
Looking for a cool treat to beat the summer heat? You’ve come to the right place! Coconut Pineapple Popsicles are

To make this tasty dish, gather these key ingredients: - 4 slices of thick bread (brioche or challah is best) - 2 ripe bananas, sliced - 1/2 cup Nutella - 2 medium eggs - 1/2 cup milk - 1 teaspoon vanilla extract - 1 teaspoon ground cinnamon - 1 tablespoon butter (for cooking) - Powdered sugar (for serving) - Maple syrup (for serving) These ingredients create a rich and creamy filling that pairs well with the warm bread. You can dress up your French toast with some fun toppings. Here are a few ideas: - Fresh berries like strawberries or blueberries - A sprinkle of chopped nuts for crunch - A dollop of whipped cream for extra creaminess - A drizzle of honey or chocolate syrup for added sweetness Feel free to mix and match these toppings based on your taste. Choosing the right bread can make a big difference. I recommend using: - Brioche: This bread is soft and sweet, perfect for French toast. - Challah: Its rich flavor and fluffy texture are also ideal. - Texas toast: This thick bread holds up well to the filling. Each option will give you a delightful bite, so pick your favorite! To start, gather your ingredients. Take two slices of thick bread and spread Nutella on one side of each. Make sure to use enough to get a good flavor. Next, slice the two ripe bananas. Place the banana slices on top of the Nutella. Then, place the other two slices of bread on top to create sandwiches. This filling is what makes the French toast special. Now, grab a mixing bowl. Add two medium eggs to the bowl. Pour in half a cup of milk for creaminess. Add one teaspoon of vanilla extract for flavor. Then, sprinkle in one teaspoon of ground cinnamon. Whisk everything together until it’s smooth. This mixture will coat the sandwiches and help them cook perfectly. Heat a non-stick skillet over medium heat. Add one tablespoon of butter and let it melt. Once melted, dip each sandwich into the egg mixture. Make sure both sides get coated but don't soak them too long. Place the sandwiches in the skillet. Cook each side for about 3-4 minutes, until they turn golden brown. If they cook too fast, lower the heat. After cooking, let them cool for a moment. Slice each sandwich in half. Serve warm with powdered sugar and maple syrup on top for extra sweetness. To get the best toast, use thick bread. Brioche or challah works great. Heat your skillet on medium heat. Add butter and let it melt. Dip the stuffed bread lightly in the egg mix. Avoid soaking it too long. This keeps your toast from getting soggy. Cook each side for 3-4 minutes. Look for a golden brown color. If it cooks too fast, lower the heat. You can prepare the filling earlier. Spread Nutella on the bread and add bananas. Cover them with plastic wrap and store in the fridge. This saves time when you want to cook. You can also whisk the egg mix in advance. Store it in the fridge until ready. When you're set to cook, just dip and fry. This method cuts your cooking time in half. For a lovely presentation, slice the French toast in half. Stack them on a plate. Dust with powdered sugar for a sweet touch. Drizzle warm maple syrup over the top. You can add extra banana slices beside the toast. Fresh berries also make a nice pop of color. Get creative with your plating. A beautiful dish makes every bite more enjoyable! {{image_2}} You can swap Nutella for other spreads. Try peanut butter for a nutty taste. Almond butter brings a light flavor too. For a fruity twist, use strawberry or raspberry jam. Each option pairs well with bananas. You can mix and match different toppings to find your favorite. Bananas are great, but you can add more fruits. Sliced strawberries add sweetness and a pop of color. Blueberries provide a nice tartness that complements the chocolate. If you love tropical flavors, add some pineapple. These fruits can be layered inside or served on top. They add freshness to each bite. Want to switch it up? Try a savory stuffed French toast. Use cream cheese and spinach for a rich taste. You could also add cooked bacon for a salty kick. Try using pesto with mozzarella for a unique flavor. These savory options will give a new spin to your breakfast. To keep your Banana Nutella stuffed French toast fresh, store it in an airtight container. Let it cool to room temperature first. Place a piece of wax paper or parchment between layers to prevent sticking. This method keeps the toast soft and tasty for a few days in the fridge. To reheat, use a skillet over low heat. This warms the toast evenly and keeps it crispy. You can also use the oven. Preheat it to 350°F (175°C) and bake for about 10-15 minutes. Both methods help restore the yummy flavors without making it soggy. You can freeze this French toast for up to one month. Wrap each piece tightly in plastic wrap, then place them in a freezer-safe bag. When you’re ready to eat, thaw them in the fridge overnight. Then, reheat using one of the methods mentioned above for a quick treat! Yes, you can use many types of bread. I like brioche or challah for their softness. These breads hold the filling well. You may also use whole grain or sourdough. Each bread adds a unique flavor. Just make sure the slices are thick enough. Thin bread may tear when cooking. If you want a change from Nutella, try almond butter or peanut butter. Both give a nutty taste. You can use chocolate spread too, if you like. For a healthier option, try a fruit spread. These alternatives keep the dish delicious and fun. Choose what fits your taste best. To make this dish gluten-free, use gluten-free bread. Many stores sell great options now. Check the label to ensure it meets your needs. The other ingredients are already gluten-free. Just follow the same steps to cook. Enjoy your tasty treat without worry! Banana Nutella stuffed French toast is a fun and tasty dish. We covered the main ingredients, the steps to prepare it, and tips for perfect results. You can try different breads and toppings for variety. Don’t forget to explore some tasty variations and storage tips. This dish is easy to make and perfect for any meal. With the right ingredients and some creativity, your French toast can wow anyone. Enjoy your cooking and happy eating!

Irresistible Banana Nutella Stuffed French Toast Recipe

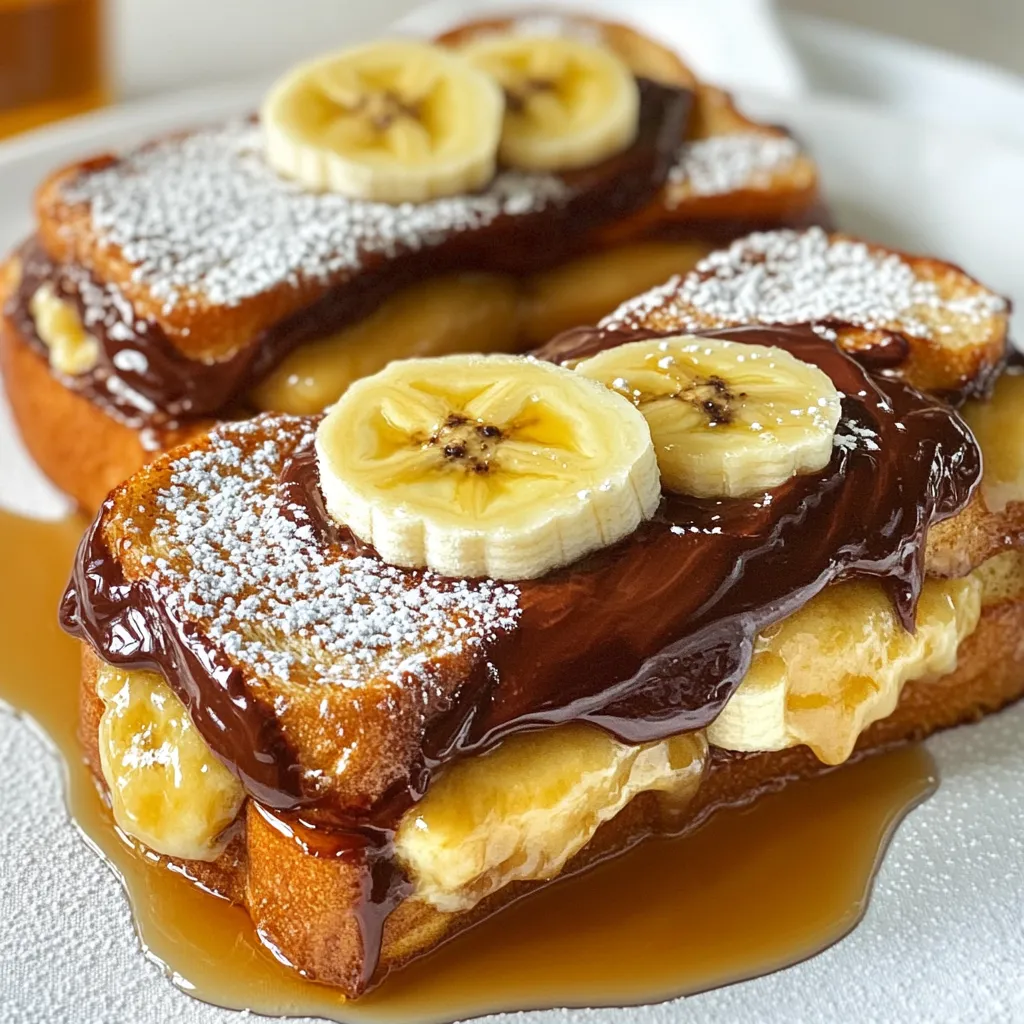
If you crave a delicious twist on breakfast, you need to try Banana Nutella Stuffed French Toast! This easy recipe

- 4 cod fillets (about 6 ounces each) - 4 tablespoons unsalted butter - 3 cloves garlic, minced - Zest of 1 lemon - Juice of 1 lemon - 1 teaspoon dried parsley (or 1 tablespoon fresh parsley, chopped) - Salt and pepper to taste - Lemon slices, for garnish - Fresh parsley, for garnish Gathering these ingredients is the first step to making this tasty dish. Cod fillets are the star here. They have a mild taste and cook quickly. The unsalted butter gives a rich flavor. Minced garlic adds a nice kick, and lemon zest brings brightness to the dish. Fresh lemon juice is key. It balances the butter and enhances the fish. Parsley adds a touch of color and freshness. Don't forget salt and pepper! These basic seasonings make a big difference. Finally, garnishes like lemon slices and fresh parsley make your dish look nice. Each ingredient plays a role in creating a flavorful and delightful meal. Set your oven to 400°F (200°C). Preheating helps cook the fish evenly. If you skip this step, the cod may not cook right. In a small saucepan, melt 4 tablespoons of unsalted butter over medium heat. Once the butter is melted, add 3 cloves of minced garlic. Sauté the garlic for about 1 minute. You want it fragrant, but not browned. This step brings out the garlic's flavor. Next, stir in the zest of 1 lemon and the juice of 1 lemon. Add 1 teaspoon of dried parsley, salt, and pepper to taste. Mix well and then remove it from heat. Set the butter mix aside while you prepare the cod. In a baking dish, arrange 4 cod fillets side by side. Each fillet should be about 6 ounces. Pour the lemon garlic butter mixture over the fish. Make sure each fillet is well coated. Now, bake in the preheated oven for 12-15 minutes. The cod is done when it flakes easily with a fork. If you’re not sure, check a thick part of the fillet. Let the cod rest for a minute after baking. This makes it more tender. To know when your cod is done, look for a few signs. The fish should turn opaque and feel firm. Use a fork to test it. If the cod flakes easily, it is ready to eat. Cook it for 12-15 minutes at 400°F. Thicker fillets may need a bit more time. To boost the flavor, consider adding spices or herbs. Dill or thyme pairs well with cod. You can also try a bit of paprika for a smoky touch. If you want to marinate, let the fish soak in the lemon garlic butter for 30 minutes. This adds more depth to the dish. Garnishing makes your dish look appealing. Use fresh parsley and lemon slices for color. Arrange the cod on a plate and drizzle some of the leftover sauce over it. Serve with a side of rice or steamed veggies for a complete meal. {{image_2}} If you can't find cod, you can use other fish like tilapia or haddock. Both work well with lemon and garlic. They also cook quickly. For a dairy-free option, try using vegan butter or olive oil. These alternatives give you a similar taste without dairy. To change up the flavor, add other citrus fruits like lime or orange. These fruits can make the dish brighter and more fresh. You can also add spices. Try a pinch of red pepper flakes for heat or smoked paprika for a deeper flavor. These simple changes can really enhance your dish. You can cook your cod in different ways. Pan-searing gives a nice crust. Just heat a skillet and cook the fish for about 3-4 minutes per side. Baking is easy and hands-off. It takes about 12-15 minutes in the oven. Grilling is another option. It adds a smoky taste. Just make sure to oil the grill to prevent sticking. Each method offers a unique flavor and texture. After enjoying Lemon Garlic Butter Cod, store any leftovers in the fridge. Place the cod in an airtight container. This keeps it fresh and safe to eat later. You can use glass or plastic containers with tight lids. Make sure to cover the cod well. This helps prevent any strong odors from other foods. You can freeze Lemon Garlic Butter Cod if you have more than you can eat. Let the cod cool down completely. Then, wrap each piece in plastic wrap. Place the wrapped cod in a freezer-safe bag or container. Squeeze out the air to avoid freezer burn. To thaw, move the cod to the fridge overnight. You can reheat it in the oven at 350°F (175°C) for about 10 minutes. Make sure it’s heated all the way through. When stored properly, Lemon Garlic Butter Cod lasts about 3 to 4 days in the fridge. If frozen, it stays good for up to 2 months. Always check for any off smells or changes in color before eating. Keeping track of dates helps ensure you enjoy this dish at its best! You can tell cod is done when it flakes easily with a fork. The fish should look opaque and white. Use a fork to test a fillet gently. If it breaks apart easily, it’s ready. Cod cooks quickly, so check it around the 12-minute mark. Overcooking can make it dry, so watch it closely. Yes, you can use frozen cod. Just make sure to thaw it first. Leave the cod in the fridge overnight or run it under cold water for a quick thaw. Pat the fillets dry with a paper towel before cooking. This step helps the butter mixture stick well. Cooking times might be slightly longer for frozen fillets, so keep an eye on them. Lemon Garlic Butter Cod goes well with many sides. Some great options include: - Steamed broccoli - Roasted asparagus - Garlic mashed potatoes - Quinoa salad - Rice pilaf These sides balance the rich flavor of the cod. They also add color and nutrients to your meal. You can mix and match based on what you enjoy most! This blog post covered making a simple and tasty Lemon Garlic Butter Cod. We discussed key ingredients like fresh cod, garlic, and lemon. I walked through the steps to preheat your oven, prepare the butter, and bake the cod just right. The tips also highlighted flavor boosts and cooking methods to try. Remember, fresh cod can be a hit at meals. Enjoy experimenting with new flavors and techniques. Happy cooking!

Lemon Garlic Butter Cod Flavorful Delight in Minutes

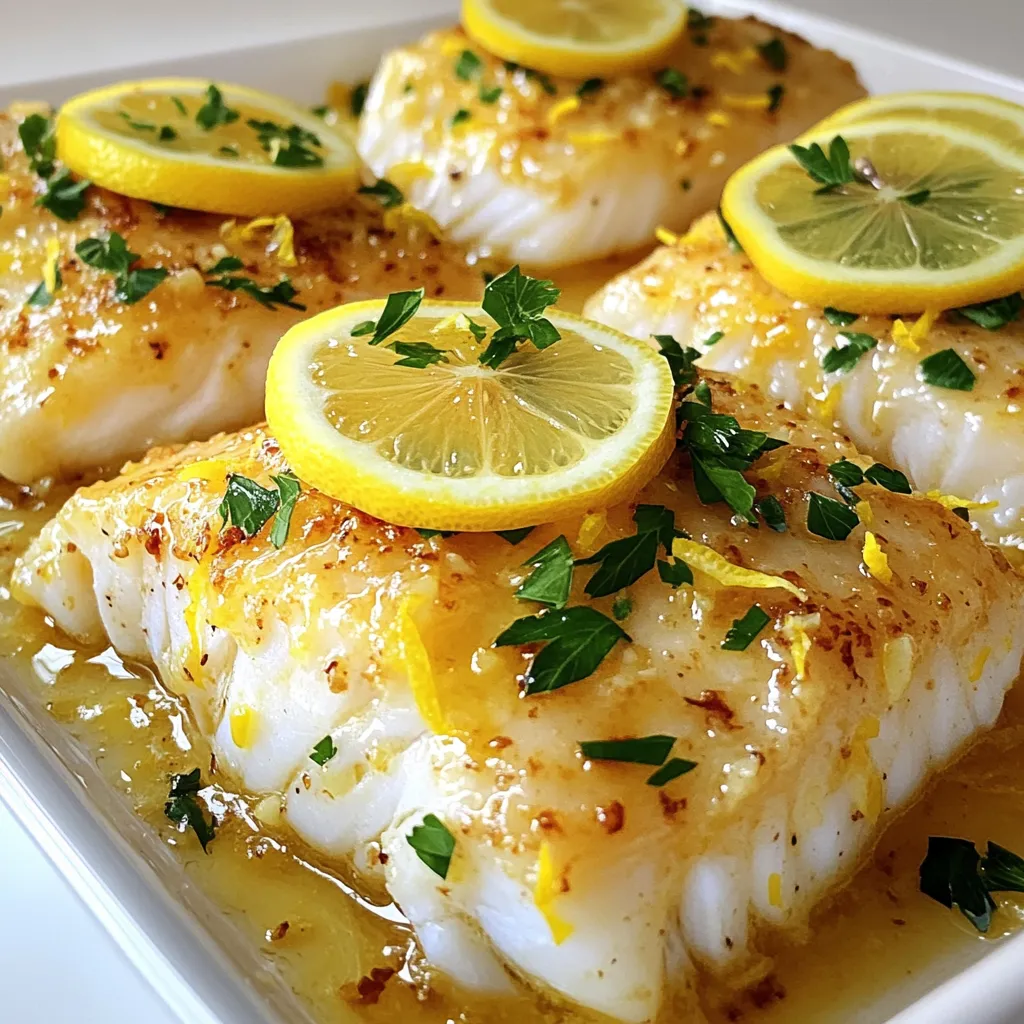
Are you craving a quick and tasty dinner? This Lemon Garlic Butter Cod recipe is your answer. With just a

Older posts
Newer posts
← Previous Page1 Page2 Page3 … Page82 Next →

dsad

© 2026 Recipes Pursuit • Built with GeneratePress

Our Policies

  • Copyright Policy
  • Cookie Policy
  • GDPR Policy
  • Privacy Policy
  • Disclaimer
  • Terms Of Use

More Information

  • Home
  • About
  • Contact
  • Appetizers
  • Dessert
  • Dinner
  • Drinks
©2026, Recipes Pursuit About Back To Top