Skip to content
DisclaimerTerms Of UseGDPR PolicyCookie Policy

Recipes Pursuit

  • Home
  • Drinks
  • Appetizers
  • Dinner
  • Dessert
  • About
  • Contact
  • Privacy Policy
DisclaimerTerms Of UseGDPR PolicyCookie Policy

NO-ING-IMG

To make this dish, we need: - 2 salmon fillets - 8 ounces fettuccine pasta - 2 tablespoons Cajun seasoning - 2 tablespoons olive oil - 1 cup heavy cream - 1 cup grated Parmesan cheese - 2 cloves garlic, minced - 1/2 teaspoon black pepper - 1/4 teaspoon salt - 1 tablespoon fresh parsley, chopped (for garnish) These ingredients blend together to create a rich, creamy dish that tastes amazing. You can use various types of salmon for this recipe. I recommend fresh or frozen wild-caught salmon. It has a great flavor and texture. Farmed salmon is another option, but it can be fattier. Choose what you enjoy most. Always check for bright color and firm texture when buying salmon. Fresh ingredients make a big difference in flavor. Fresh salmon adds richness. Fresh parsley gives a pop of color. Fresh garlic has a stronger taste than dried. When you use quality ingredients, your dish shines. Take time to select the best. It pays off in every bite. First, grab your salmon fillets. Pat them dry with paper towels. This helps them sear nicely. Next, sprinkle Cajun seasoning on both sides. Make sure to coat them well. This will give your salmon a great kick. Boil a large pot of salted water. Once hot, add the fettuccine. Cook according to the package instructions. You want it to be al dente, which means firm but cooked. After cooking, drain the pasta but save a cup of the water. This water will help later with the sauce. Heat olive oil in a large skillet over medium-high heat. When the oil is hot, place the salmon in skin-side down. Cook for about 4 to 5 minutes. This will make the skin crispy. Next, carefully flip the salmon. Cook for another 3 to 4 minutes. It should be cooked through and flaky. Remove the salmon and let it rest on a plate. In the same skillet, reduce the heat to medium. Add minced garlic and sauté it for about 30 seconds. This will make your kitchen smell amazing! Pour in the heavy cream and stir well. Make sure to scrape up any bits from the bottom of the pan. This adds flavor to your sauce. Now it's time to add the cheese. Gradually whisk in the grated Parmesan until it melts smoothly. If the sauce is too thick, add some of that reserved pasta water. Season with black pepper and salt to taste. Then, add your cooked fettuccine to the skillet. Toss gently, coating the pasta with the creamy sauce. Finally, serve the pasta on plates. Top it with crispy salmon and drizzle any sauce from the pan on top. Enjoy! Cajun seasoning adds a punch to your salmon. To get the best flavor, use fresh Cajun seasoning. You can make your own by mixing paprika, garlic powder, onion powder, black pepper, and cayenne. Rub it on both sides of the salmon fillets. Let it sit for a few minutes to soak in. This makes every bite flavorful. Overcooked salmon can be dry. To avoid this, use a timer. Cook the salmon for 4-5 minutes skin-side down first. Flip it and cook for 3-4 more minutes. The salmon should be slightly pink in the middle. If you have a food thermometer, aim for 145°F. It’s perfect when it’s still moist. A creamy Alfredo sauce can make or break your dish. Start by heating the garlic in the skillet gently. Then add heavy cream and stir well. Whisk in the Parmesan cheese slowly. If the sauce gets too thick, add a little pasta water. This keeps it smooth and creamy. Season with salt and pepper to taste. This sauce should coat the pasta nicely, making it rich and indulgent. {{image_2}} You can swap salmon for other proteins. Chicken works well with Cajun flavors. Shrimp is another great choice; it cooks quickly and absorbs spice well. Try scallops for a luxurious touch. Each of these options pairs nicely with creamy Alfredo sauce, giving you a tasty meal. For a vegetarian version, use mushrooms or zucchini. They add texture and flavor while soaking up the sauce. If you want a vegan dish, try using tofu or tempeh. Cook them with Cajun seasoning for a spicy kick. Use coconut milk instead of heavy cream and nutritional yeast for a cheesy flavor. Feel free to play with different spices! Try adding smoked paprika for a deeper flavor. Cayenne pepper can add extra heat. If you want a milder taste, use Italian seasoning or a simple garlic and herb blend. This way, you can customize the dish to fit your taste. To store your leftovers, let the dish cool down first. Place the creamy Cajun salmon Alfredo in an airtight container. Refrigerate it for up to three days. Make sure to cover it well. This keeps the flavors fresh and the sauce from drying out. When you reheat creamy dishes, avoid high heat. This prevents the sauce from separating. Use a microwave or stovetop. If using the microwave, heat in short bursts. Stir in between to ensure even warming. On the stovetop, warm over low heat. Add a splash of water or cream if the sauce thickens. Freezing creamy dishes can be tricky. The texture may change after thawing. If you want to freeze it, I suggest storing just the pasta and sauce separately from the salmon. Use freezer-safe containers. This way, you can enjoy it later with better quality. When ready to eat, thaw in the fridge overnight. Reheat gently as noted above. To make this recipe spicier, add more Cajun seasoning. You can also use hot sauce. Sprinkle some red pepper flakes for an extra kick. Taste your sauce before serving. Adjust the spice level based on your preference. Yes, you can use other pasta shapes. Penne or rigatoni work well. Choose whole wheat or gluten-free pasta if you prefer. Just follow the cooking time on the package. The creamy sauce pairs well with many pasta types. If you want a lighter option, use half-and-half or whole milk. For dairy-free, try coconut milk or cashew cream. Each substitute will change the flavor slightly. Adjust the seasoning to balance the taste. Salmon is ready when it flakes easily with a fork. The color should change from bright pink to a light pink. If you have a food thermometer, it should read 145°F. Avoid overcooking to keep it moist and tender. Yes, you can make this recipe gluten-free by using gluten-free pasta. Many brands offer great options. Just check the pasta's cooking time, as it may differ from regular pasta. The rest of the recipe remains the same. This blog post covered how to make a great Creamy Cajun Salmon Alfredo. We looked at key ingredients, types of salmon, and why fresh items matter. I shared step-by-step instructions for cooking the salmon and pasta, plus tips for the best flavor. You can also explore variations and storage methods. Always remember, this dish is versatile and fun. With these tips, you’ll impress everyone with a creamy meal. Enjoy cooking and experimenting with flavors!

Creamy Cajun Salmon Alfredo Flavorful Dinner Delight

Welcome to a culinary adventure! If you love rich, creamy pasta and bold flavors, then you’re in for a treat.

- 1 cup quinoa - 2 cups vegetable broth - 1 tablespoon olive oil - 1 teaspoon lemon zest - 3 tablespoons fresh lemon juice - 1 teaspoon garlic powder - 1 teaspoon onion powder - 1 teaspoon dried oregano - 1 teaspoon dried thyme - Salt and pepper to taste - Fresh parsley, chopped When making Instant Pot Lemon Herb Quinoa, the right ingredients matter. I always start with high-quality quinoa. Rinsing it helps remove any bitter taste. I use vegetable broth for rich flavor. Olive oil adds a nice touch and keeps the quinoa moist. Next, I enhance the dish with lemon zest and fresh lemon juice. Their bright taste lifts the entire meal. Garlic powder and onion powder bring depth to the flavor. Dried oregano and thyme add earthy notes. Finally, I season with salt and pepper to balance everything. For garnish, I love using fresh parsley. It adds color and a fresh taste. You can also add lemon slices for extra flair. This simple yet vibrant dish is sure to impress! Start by rinsing the quinoa in cold water. This helps remove any bitterness. Use a fine mesh strainer for best results. Once rinsed, set the strainer aside. Next, add the rinsed quinoa into the Instant Pot. Pour in 2 cups of vegetable broth. Then, add 1 tablespoon of olive oil. For bright flavor, include 1 teaspoon of lemon zest and 3 tablespoons of fresh lemon juice. Now, add the spices: 1 teaspoon of garlic powder, 1 teaspoon of onion powder, 1 teaspoon of dried oregano, and 1 teaspoon of dried thyme. Remember to stir everything well to mix all the flavors. Close the lid of the Instant Pot tightly. Make sure the steam release valve is set to sealing. Select the “Manual” setting, and cook on high pressure for just 1 minute. After cooking, let the pressure release naturally for 10 minutes. This step is key to getting fluffy quinoa. Then, carefully turn the steam release valve to venting. This releases any remaining pressure safely. Open the Instant Pot and fluff the quinoa with a fork. This helps separate the grains. Taste the quinoa and add salt and pepper as you like. For a lovely presentation, garnish with chopped parsley. You can serve the quinoa in a large bowl, topped with more parsley and a few lemon slices. This adds a fresh and vibrant look to your dish. To ensure perfect texture of quinoa, rinse it well. This removes bitterness. Use a fine mesh strainer under cold water. For a firmer bite, adjust the water. Use 1.75 cups of broth for 1 cup of quinoa. This gives a nice chew. You can add many herbs and spices. Try basil or rosemary for a twist. For a heartier dish, mix in diced veggies. Bell peppers, tomatoes, or spinach work great. They add color and nutrients. Using an Instant Pot is simple. Always close the lid tightly. Make sure the steam release valve is sealed. If you notice burnt food, check the liquid level. Always add enough broth to avoid this. If the quinoa is too mushy, reduce the liquid next time. {{image_2}} Quinoa is a superfood packed with protein. It has about 8 grams of protein per cup. This makes it a great choice for vegetarians. It also has dietary fiber, which helps with digestion. Each serving gives you about 5 grams of fiber. Quinoa is rich in vitamins and minerals too. It contains magnesium, iron, and B-vitamins. These nutrients support your energy levels and overall health. Eating quinoa can help you feel full and satisfied. You can enjoy Instant Pot Lemon Herb Quinoa in many ways. It pairs well with grilled chicken or fish. You can also serve it alongside roasted vegetables for a complete meal. If you have leftovers, store them in the fridge. They make a great lunch the next day. You can add some fresh veggies to the leftover quinoa. This gives you a quick and healthy meal. For a balanced meal, aim for about 1 cup of quinoa per serving. This amount keeps you full without overdoing it. Each serving has about 220 calories, 8 grams of protein, and 5 grams of fiber. This makes quinoa a nutritious choice. It fits well into many diets. Enjoying the right portion helps you stay on track with your nutrition goals. You can switch herbs to change the taste. If you do not have dill or oregano, try thyme or basil. Fresh herbs work well, too. Rosemary can add a strong flavor, while cilantro gives a fresh twist. Mix and match to find your favorite blend. Customizing herbs lets you create a unique dish every time. Think about what you enjoy most and go for it! Not all broths are the same. You can use chicken broth instead of vegetable broth for richer taste. If you're vegan, consider using mushroom broth. It adds a deep flavor and pairs well with quinoa. Other stocks can also work, just choose what you like. Each broth brings its own flair to the dish. If you want to make more or less quinoa, adjust the cooking time. For larger servings, increase the liquid slightly. If you add veggies, like bell peppers or peas, they might need more time. Keep an eye on the texture of the quinoa. Aim for a fluffy result, not mushy. Cooking with extras can make the dish heartier and more filling. Cooking quinoa in the Instant Pot is quick and easy. The total time is about 20 minutes. Here’s a breakdown: - Preparation: Rinsing quinoa takes about 5 minutes. - Cooking Time: The Instant Pot cooks quinoa on high pressure for just 1 minute. - Pressure Release: Allow 10 minutes for natural pressure release. Yes, you can make this lemon herb quinoa ahead of time. It stores well in the fridge. Here are some tips: - Storage: Keep quinoa in an airtight container. It stays fresh for up to 5 days. - Reheating: Warm it in the microwave or on the stove with a splash of broth. This keeps it moist. Yes, quinoa is gluten-free. It is a great choice for people with gluten allergies. Here are some benefits: - Nutritional Value: Quinoa is high in protein and fiber. - Vitamins: It contains essential vitamins and minerals like magnesium and iron. You can enjoy quinoa as a healthy part of your meals, knowing it fits many diets. In this post, I shared a simple recipe for cooking quinoa in an Instant Pot. We covered essential ingredients and flavor enhancers that boost the taste. I walked you through the preparation, cooking steps, and final touches for a beautiful dish. Using quinoa is a great choice for health. It’s rich in protein and fiber. You can vary flavors and ingredients to suit your taste. Experimenting makes cooking more fun and creative. Enjoy your delicious, wholesome quinoa!

Instant Pot Lemon Herb Quinoa Flavorful and Easy Meal

Looking for a quick, tasty meal? Instant Pot Lemon Herb Quinoa is your answer! This dish combines fluffy quinoa with

- 1 cup natural peanut butter - 1/2 cup honey or maple syrup - 2 cups rolled oats - 1/2 cup protein powder (vanilla flavor recommended) - 1/4 cup mini chocolate chips - 1/4 cup crushed walnuts (optional) - 1 teaspoon vanilla extract - Pinch of sea salt - Peanut butter: Full of protein and healthy fats, it helps keep you full. - Honey or maple syrup: Natural sweeteners that add energy and flavor. - Rolled oats: A great source of fiber for good digestion and lasting energy. - Protein powder: Boosts protein intake, helping with muscle repair and growth. - Mini chocolate chips: Add sweetness and a little joy to each bite. - Crushed walnuts: Offer healthy fats and a bit of crunch, plus omega-3s. - Vanilla extract: Enhances flavor and makes the bites taste like cookie dough. - Sea salt: Balances sweetness and brings out other flavors. - Nut-free option: Use sunflower seed butter instead of peanut butter. - Sweetener swap: Choose agave syrup for a vegan-friendly sweetener. - Gluten-free: Ensure you use certified gluten-free oats. - Dairy-free option: Select plant-based protein powder to avoid dairy. Start with a large mixing bowl. Add 1 cup of natural peanut butter and 1/2 cup of honey or maple syrup. Stir these together until the mixture is smooth. Next, mix in 1 teaspoon of vanilla extract and a pinch of sea salt. This step boosts the flavor. Now, gradually add 2 cups of rolled oats and 1/2 cup of protein powder. Mix well until everything is evenly blended. You want a thick dough. Finally, fold in 1/4 cup of mini chocolate chips and 1/4 cup of crushed walnuts, if you like. The dough should feel thick and slightly sticky. If it’s too dry, add a little more peanut butter. If it’s too wet, mix in more oats or protein powder. Don’t rush this step; a good mix makes for tasty bites. Use your hands to really blend everything together. This helps the flavors combine well. Once the dough is ready, scoop out small amounts with your hands. Aim for about 1 inch in diameter for each bite. Roll them until they are smooth and round. Set the shaped bites on a baking sheet lined with parchment paper. After shaping all the bites, refrigerate them for at least 30 minutes. This helps them firm up nicely. Enjoy your tasty protein bites! To get a smooth texture in your protein bites, start with creamy peanut butter. Natural peanut butter is best, as it has no added sugar or oils. Mix the peanut butter and honey well until they blend smoothly. Adding a pinch of salt and vanilla extract also helps. When adding oats and protein powder, do it slowly. This keeps the mixture even and easy to work with. You can add more flavor to your bites. Try adding a tablespoon of cocoa powder for a chocolate taste. If you want a fruity twist, mix in dried cranberries or raisins. Chia seeds or flaxseeds can boost the nutrition too. For extra crunch, throw in some crushed pretzels. Each of these additions can make your bites unique and tasty. One common mistake is adding too much protein powder. This can make the mixture dry. Always start with less, and add more if needed. Another mistake is not chilling the bites long enough. They need at least 30 minutes in the fridge to firm up. Finally, don’t skip the sea salt. It enhances the flavor and balances the sweetness. Avoiding these mistakes will lead to better bites every time. {{image_2}} You can mix up the flavor of your protein bites easily. Try adding cocoa powder for a chocolate taste. Just use 2 tablespoons of cocoa with the dry mix. For a tropical twist, add shredded coconut. About 1/4 cup works great. Dried fruit, like raisins or cranberries, can bring a chewy texture. About 1/4 cup of dried fruit adds a fun flavor. Experiment and find what you love! You can control how sweet your bites are. If you like it sweeter, add more honey or maple syrup. Just a tablespoon or two will do. If you want less sweetness, cut back on the syrup. You can also replace syrup with mashed banana for a natural sweetness. This will change the texture a bit but offers great taste! If you don't have protein powder, you can use other options. Oat flour can work well in place of protein powder. It keeps the texture right and adds more fiber. You can also use a nut flour like almond flour. Just remember, this might change the taste. For a boost of protein, try ground chia seeds or hemp seeds. Use 1/4 cup for a nice protein punch! To keep your Peanut Butter Cookie Dough Protein Bites fresh, store them in an airtight container. This helps prevent moisture from making them soggy. Place a piece of parchment paper between layers if you stack them. This will help them stay separate and not stick together. You can freeze these protein bites for longer storage. First, let them chill in the fridge until firm. Then, place them in a single layer on a baking sheet. Freeze for about an hour. Once frozen, transfer the bites to a freezer-safe bag or container. They will stay fresh for up to three months. When you want one, just take it out and let it thaw for a few minutes. In the refrigerator, your protein bites will last about one week. After that, they may lose some flavor and texture. To enjoy them at their best, try to eat them within this week. If you notice any changes in smell or appearance, it’s best to toss them. Enjoy your tasty snacks while they are fresh! Yes, you can use other nut butters. Almond butter or cashew butter works well. Just make sure the nut butter is natural. This means it should have no added sugars or oils. The taste will change slightly, but it can still be delicious. Feel free to experiment with any nut butter you love. To make these bites vegan, swap honey for maple syrup. This keeps the sweetness without using animal products. Use a plant-based protein powder too. Check the label to ensure it is vegan. With these changes, you can enjoy tasty bites that fit your diet. If you don’t have protein powder, you can use ground nuts or seeds. Almond meal or ground flaxseed are great options. You can also use unsweetened cocoa powder for a chocolatey taste. Just remember, the bites may not be as high in protein. Adjust the other ingredients to get the right texture. This blog covered key ingredients and their benefits, alongside how to prepare tasty protein bites. You learned about mixing tips, common pitfalls, and tasty variations. You now know how to store them for lasting freshness. Remember, you can customize the bites to fit your diet and taste preferences. Experiment with flavors and substitutions for the best results. Enjoy these healthy snacks, and share them with others. Happy snacking!

Peanut Butter Cookie Dough Protein Bites Easy Recipe

Craving a sweet treat that’s also healthy? Look no further! My Peanut Butter Cookie Dough Protein Bites are easy to

- 1 pound ground chicken or turkey - 1/2 cup breadcrumbs - 1/4 cup green onions, finely chopped - 2 cloves garlic, minced - 1 tablespoon ginger, grated - 1/4 cup soy sauce (low-sodium) - 1/4 cup teriyaki sauce - 1 tablespoon sesame oil - 2 cups broccoli florets - 2 bell peppers (red and yellow), sliced - 2 cups cooked jasmine rice - Sesame seeds - Additional green onions for garnish The stars of this dish are the main ingredients. Ground chicken or turkey brings lean protein to the table. You can use either meat; they both work well. Breadcrumbs help bind the meatballs. They keep them from falling apart while cooking. Green onions add a nice crunch and fresh taste. Garlic and ginger bring depth and warmth to the flavor. The additional ingredients play a big role too. Low-sodium soy sauce gives a savory, umami kick. Teriyaki sauce adds sweetness and richness. Sesame oil adds a nutty flavor that elevates the meatballs. Broccoli florets and bell peppers round out the meal with color and nutrients. Finally, garnishes make the dish shine. Cooked jasmine rice provides a fluffy base. Sesame seeds add a nice crunch. Extra green onions on top give a fresh bite. Each ingredient plays a part in making this meal delicious and fun to eat. First, set your oven to 400°F (200°C). This high heat helps cook the meatballs and veggies fast. Use parchment paper to line the sheet pan. This makes cleanup easy. In a large bowl, mix the following items well: - 1 pound ground chicken or turkey - 1/2 cup breadcrumbs - 1/4 cup finely chopped green onions - 2 cloves minced garlic - 1 tablespoon grated ginger - 1 large egg - 1/4 cup low-sodium soy sauce - 1 tablespoon sesame oil Make sure everything blends nicely. You want a sticky but firm mixture. Now, shape the mixture into small balls, about 1 inch in size. Place them evenly on the sheet pan. Make sure not to crowd them. This helps them cook evenly and get a nice brown color. In another bowl, toss these veggies: - 2 cups broccoli florets - 2 sliced bell peppers (red and yellow) Add a drizzle of olive oil, salt, and pepper. Mix well. Arrange the veggies around the meatballs on the pan. They will roast and soak up the meatball flavors. In a small saucepan, mix 1/4 cup teriyaki sauce with about 2 tablespoons of water. Heat it on medium until warm. This glaze adds a sweet and savory touch to the dish. To serve, put cooked jasmine rice in bowls. Top the rice with the meatballs and vegetables. Drizzle the warm teriyaki glaze over everything. For a fun touch, sprinkle sesame seeds and extra green onions on top. Enjoy your meal! The key to great meatballs is texture and flavor. Start with ground chicken or turkey. They keep the meatballs light and juicy. Combine them with breadcrumbs, green onions, garlic, ginger, and an egg. Mix well but don't overwork the meat. Shape the meatballs to about one inch wide. This size cooks evenly and stays tender. Bake at 400°F for 20-25 minutes. They should be golden brown and cooked through. Choose fresh vegetables for the best taste. I love using broccoli and bell peppers. Chop the broccoli into small florets. Slice the bell peppers into strips. Toss them in olive oil, salt, and pepper. This adds flavor and helps them roast well. Spread them around the meatballs on the pan. This way, they cook together and soak up the meatball juices. You can customize the teriyaki glaze to suit your taste. If you want a sweeter sauce, add more teriyaki sauce or honey. For some heat, mix in a bit of sriracha or red pepper flakes. You can also use low-sodium soy sauce for less salt. If you like a thicker glaze, let it simmer longer in the pan. This adds richness to your dish and makes it even more delicious. {{image_2}} You can switch up the protein in your teriyaki meatball bowls. Here are some great options: - Ground beef: This adds a rich flavor. - Pork: Ground pork gives a juicy texture. - Tofu: Crumbled tofu is perfect for a vegetarian dish. - Lentils: Cooked lentils can make a hearty meatball. Feel free to mix and match these proteins. Each choice brings its own taste and texture. The base of your bowl can also change. Here are some tasty grains to consider: - Brown rice: This adds a nutty flavor and extra fiber. - Quinoa: A protein-rich choice that cooks quickly. - Cauliflower rice: A low-carb alternative that’s light and fluffy. - Sushi rice: For a stickier, sweeter bite. Using different grains not only changes the taste but also the nutrition of your meal. To make your teriyaki meatball bowls even better, try these flavor boosts: - Garlic powder: Adds a punch of flavor. - Red pepper flakes: Perfect for some heat. - Honey or maple syrup: A touch of sweetness balances the saltiness. - Chili sauce: For a spicy kick, drizzle it over the top. Mixing in these extras can elevate your dish and make it even more exciting. To keep your teriyaki meatball bowls fresh, store them in airtight containers. Allow the dish to cool before sealing it. You can refrigerate the leftovers for up to four days. If you want to save them longer, freeze the meatballs and veggies in freezer-safe bags. Squeeze out as much air as possible. This way, your meal stays tasty for up to three months. To reheat, use the microwave or oven. If using a microwave, place the meatballs and veggies in a bowl. Cover them with a damp paper towel. Heat them in short bursts, stirring in between. For the oven, preheat to 350°F (175°C). Place the leftovers on a baking sheet and warm for about 10-15 minutes. This keeps them juicy and flavorful. You can safely eat refrigerated leftovers for about four days. If you freeze the meatballs, check the date. After three months, they may lose taste and texture. Always check for any off smells or changes in color before eating. If in doubt, it's best to throw it out. You can skip the breadcrumbs in your meatballs. Use oats or ground nuts instead. Both options work well. For a gluten-free choice, use crushed rice cereal or almond flour. They help bind the meat without adding gluten. Yes, store-bought teriyaki sauce is a great time-saver. Look for a low-sodium option to cut down on salt. This will keep your dish lighter. Just warm it up before serving. It adds flavor without extra steps. You can use many veggies in this dish. Try snap peas, carrots, or zucchini. They all roast well and add crunch. Just cut them into similar sizes for even cooking. Feel free to mix and match your favorites! To add spice, mix in some red pepper flakes or sriracha. You can also use spicy teriyaki sauce if you like heat. For a fresh kick, add sliced jalapeños on top before serving. Adjust the spice to fit your taste! This blog post details a tasty meatball dish with fresh ingredients, simple steps, and helpful tips. You learned how to prepare the meatball mixture, bake vegetables, and make teriyaki glaze. I shared storage tips for keeping your leftovers tasty and safe. Remember, this dish is flexible. Feel free to try different proteins, grains, and flavors. Enjoy experimenting with your ingredients and customizing your meal. With this guide, you can create a satisfying dish that's easy to make and fun to share.

Teriyaki Meatball Bowls Sheet Pan Easy Family Meal

Looking for an easy dinner that your whole family will love? Try these Teriyaki Meatball Bowls, made on a sheet

- 1 cup dried chickpeas, soaked overnight - 1 small onion, roughly chopped - 2 garlic cloves, minced - 1/4 cup fresh parsley, chopped - 1/4 cup fresh cilantro, chopped - 1 teaspoon ground cumin - 1 teaspoon ground coriander - 1/2 teaspoon baking powder - Salt and pepper to taste - 3 tablespoons olive oil, for brushing - Whole wheat pitas - Toppings: sliced tomatoes, cucumber, lettuce, and tahini sauce Using dried chickpeas makes your falafel flavorful and healthy. Soaking them overnight helps soften them. You will blend these with onion, garlic, and fresh herbs like parsley and cilantro. These herbs add a bright taste to your dish. Seasoning is key too. Ground cumin and coriander provide warmth and depth. Baking powder gives your falafel a nice lift, making them light and crispy. Olive oil is essential for brushing on the falafel. It helps achieve that golden color and crisp texture. Whole wheat pitas are my favorite choice. They are nutritious and hearty. For toppings, I suggest fresh sliced tomatoes, crunchy cucumber, and crisp lettuce. Drizzling tahini sauce adds a creamy element that ties everything together. This combination creates a meal that is tasty, filling, and good for you. You can adjust toppings to fit your taste. Have fun with it! Soaking chickpeas overnight is key. This softens them and helps with blending. If you skip this step, your falafel may end up dry or crumbly. After soaking, drain the chickpeas well using a colander. Rinse them under cold water. This removes any dirt or extra salt. For blending, use a food processor. Add the soaked chickpeas, chopped onion, minced garlic, parsley, and cilantro. Include spices like cumin and coriander, plus baking powder, salt, and pepper. Pulse the mixture until it is coarsely blended. Aim for a texture that holds together when shaped into balls. If it’s too smooth, your falafel won't be fluffy. To form the falafel, take small amounts of the mixture and roll them into balls. Each ball should be about 1.5 inches wide. This size ensures they cook evenly. Preheat your air fryer to 375°F (190°C) for about five minutes. Once preheated, brush each falafel ball with olive oil. This helps them become crispy. Cook the falafel in the air fryer for 12-15 minutes. Shake the basket halfway through for even cooking. Look for a golden brown color for perfect crispiness. To get crispy falafel, brush each ball with olive oil. This step makes a big difference. The oil helps create a crunchy outer layer. Without it, the falafel may turn out soft. Cook in batches to ensure even crispiness. If you overcrowd the air fryer, they will steam instead of crisp. Cook a small amount at a time for the best results. Serve your falafel pitas on a colorful platter. Arrange toppings like sliced tomatoes and cucumbers in small bowls. This gives a DIY feel to your meal. It also lets everyone choose their favorite toppings. Garnish your dish with fresh herbs like parsley or cilantro. A sprinkle adds a pop of color and flavor. Fresh herbs make your meal look and taste better. You can customize your pitas with various toppings. Try adding avocado, radishes, or pickled vegetables. These options add crunch and extra flavor. Consider serving with sides like hummus or a fresh salad. This makes your meal more filling and fun. Everyone can mix and match to find their favorite combo. {{image_2}} If you cannot find chickpeas, you can use lentils. They work well and taste great. Black beans also make a nice swap. Just remember to adjust the spices. For toppings, you can easily switch to avocado or shredded carrots. Both add flavor and color. You can also try vegan yogurt instead of tahini sauce. This keeps the meal fresh and creamy. To spice things up, add red pepper flakes to your falafel mix. This gives it a nice kick. You can also use smoked paprika for a smoky flavor. For a Mediterranean twist, add fresh dill or mint. These herbs brighten the falafel. You could also mix in a pinch of za'atar. This spice blend adds depth and warmth. You can serve falafel as a salad. Just chop up lettuce and mix in your falafel balls. Add tomatoes and cucumbers for crunch. Drizzle with tahini sauce or your favorite dressing. If you want to change it up, try falafel wraps. Use large lettuce leaves or whole wheat tortillas. Fill them with falafel and your favorite toppings. This is a fun and portable meal option. To keep leftover falafel fresh, store them in a sealed container. Place a paper towel inside. This absorbs moisture and keeps them crispy. In the fridge, they last for about 3-4 days. If you notice any signs of spoilage, discard them. For meal prep, freezing falafel is a great idea. Allow the cooked falafel to cool completely. Arrange them in a single layer on a baking sheet. Freeze for about 1-2 hours. Then, transfer them to a zip-top bag. They can stay frozen for up to 3 months. To reheat, use the air fryer at 350°F (175°C) for about 8-10 minutes. This helps them regain their crispiness. To keep your pitas soft, store them in a sealed plastic bag or a container. Avoid refrigeration as it can dry them out. Fresh vegetables, like tomatoes and cucumbers, should be kept in the fridge in separate containers. This way, they stay crisp and fresh. Use them within a week for the best taste. Yes, you can use canned chickpeas. They save time and are easy to use. However, there are some downsides. Canned chickpeas can be softer, which may make the falafel mushy. You will also need to drain and rinse them well. Dried chickpeas give a firmer texture and better flavor. Soaking them overnight helps them hold their shape when cooking. Look for a golden brown color on the outside. The falafel should be crispy and firm to the touch. You can also gently break one open. The inside should be warm and slightly moist but not wet. If it crumbles, it is done. Cooking for 12-15 minutes at 375°F usually gives perfect results. Absolutely! You can use other beans like black beans or lentils. Each type of bean brings its own flavor. For example, black bean falafel has a rich taste. Lentils cook quickly and can add a nice texture. Feel free to experiment with spices and herbs to find your favorite combination. You learned how to make crispy falafel from scratch using simple ingredients. Soaking chickpeas is key for the best texture. Blending the right way gives you a tasty mix for forming balls. Cooking in an air fryer keeps them crispy with less oil. Try different toppings and serve styles to fit your taste. Remember, customizing your falafel is easy and fun. With these tips, you can enjoy a healthy and delicious meal anytime. Happy cooking!

Air Fryer Crispy Falafel Pitas Flavorful and Healthy Meal

Want a quick, healthy meal that’s bursting with flavor? Look no further than Air Fryer Crispy Falafel Pitas! With crispy

- 8 oz button mushrooms, sliced - 3 tablespoons unsalted butter - 4 cloves garlic, minced - 1 teaspoon fresh thyme leaves - 1 teaspoon smoked paprika These main ingredients set the stage for rich and tasty tacos. Button mushrooms are great for their mild flavor and meaty texture. When you sauté them in unsalted butter, they soak up all the flavors. Garlic adds a sharp kick, while thyme brings an earthy note. Smoked paprika gives a nice warmth and depth to the dish. - 8 small corn or flour tortillas - 1 cup shredded lettuce - ½ cup diced tomatoes - ½ cup crumbled feta or cotija cheese - Fresh cilantro leaves For the toppings, you can choose corn or flour tortillas based on your taste. Shredded lettuce adds crunch and freshness. Diced tomatoes bring color and juiciness. Feta or cotija cheese adds a salty, creamy finish. Fresh cilantro gives a bright touch that ties everything together. - Salt and pepper - Lime wedges for serving Seasoning is key in this recipe. Salt and pepper enhance all the flavors. Lime wedges are perfect for squeezing over the tacos, adding a zing that brightens each bite. The balance of flavors makes every bite delightful and refreshing. First, grab a large skillet and place it over medium heat. Add 3 tablespoons of unsalted butter. Let it melt completely. Once the butter is melted, toss in 8 ounces of sliced button mushrooms. Cook these mushrooms for 5 to 7 minutes. You want them to turn tender and golden brown. This step brings out their rich flavor. Next, it’s time to bring some zest. Add 4 cloves of minced garlic to the skillet. Sprinkle in 1 teaspoon of fresh thyme leaves, 1 teaspoon of smoked paprika, and salt and pepper to taste. Stir everything together and cook for an additional 2 to 3 minutes. You’ll know it’s ready when the garlic becomes fragrant and lightly golden. While your mushrooms are cooking, you can warm the tortillas. You can do this in a separate skillet over medium heat. Heat them for just a few seconds on each side. This will keep them pliable and flavorful. Avoid sticking by not overcrowding the pan. Once your mushroom filling is ready, take it off the heat. Grab the warm tortillas and place a generous spoonful of the garlic butter mushrooms on each one. This is where you can get creative! Add shredded lettuce, diced tomatoes, and crumbled feta or cotija cheese on top. Finish it off with fresh cilantro leaves for that burst of color and flavor. To serve these tacos, add lime wedges on the side. The lime juice will give an extra zing. You can also pair these tacos with your favorite sides or drinks for a complete meal. Enjoy every bite! To get the best flavor, choose fresh button mushrooms. Look for mushrooms that are firm and smooth. They should not have any dark spots or wrinkles. If you want variety, try cremini or shiitake mushrooms. Both add a deeper taste to your tacos. To make your tacos pop, consider adding spices like cumin or chili powder. These spices give a nice kick. You can also add lime juice for brightness. For a creamier taste, try adding avocado or sour cream. These options let you customize your tacos to your liking. To avoid soggy tacos, make sure to drain excess moisture from the mushrooms. Cooking them until golden brown helps with this. When warming tortillas, heat them quickly in a dry skillet. This keeps them soft and pliable. You can also warm them over a flame, but be careful not to burn them. {{image_2}} You can switch up the cheese in these tacos. If you're vegan or lactose-free, try using a vegan cheese alternative. Look for brands that melt well, like cashew-based cheeses. They add creaminess without dairy. If you prefer traditional cheese, feta or cotija adds a salty kick. You could also use pepper jack for a spicy twist. Consider adding different leafy greens. Arugula or spinach can give a nice bite. You can also top your tacos with sliced jalapeños for heat. A drizzle of hot sauce can enhance flavors too. If you love crunch, add some radish slices. They bring freshness and texture. For extra protein, mix in beans or lentils. Black beans or chickpeas work well with the mushroom flavor. This makes the tacos heartier. If you want a vegetarian version, skip the meat and load up on veggies. You can even add roasted sweet potatoes for a sweet contrast. To store leftover tacos, place them in an airtight container. This keeps them fresh. I recommend separating the filling from the tortillas. This way, the tortillas won't get soggy. You can use glass or plastic containers that seal well. They are perfect for storing food. Yes, you can freeze the mushroom filling. Just cool it first and then transfer it to a freezer bag. Make sure to remove as much air as possible. For reheating, thaw it overnight in the fridge. Then, warm it in a skillet over low heat. This helps keep the flavor and texture. These tacos will last about three to four days in the fridge. Check for signs of spoilage. If the mushrooms smell off or look slimy, it's time to toss them. Quality is key, so always trust your senses. You can easily make these tacos gluten-free by switching the tortillas. Use small corn tortillas instead of flour ones. They add a nice flavor and texture. Always check the package to ensure they are labeled gluten-free. Yes, you can use other mushrooms! Try cremini, shiitake, or portobello mushrooms. Each type adds a unique taste. Just make sure to slice them thinly for even cooking. If you have leftover filling, get creative! Use it in a quesadilla or on a salad. You can also mix it into pasta for a quick meal. Another idea is to top it on a baked potato for a tasty twist. You can make tasty mushroom tacos with simple ingredients like mushrooms, butter, and spices. We covered how to sauté the mushrooms and prepare tortillas for perfect assembly. Don't forget to add your favorite toppings like cheese and fresh herbs. These tacos are fun to make and can fit many diets. With a few tips and tricks, you can personalize your recipe. Enjoy your cooking, and feel free to experiment with different flavors!

Garlic Butter Mushroom Tacos 20-Minute Flavor Fix

Looking for a quick, tasty meal that packs a punch? Try these Garlic Butter Mushroom Tacos that you can whip

For this creamy pesto chicken lasagna, you will need the following: - 9 lasagna noodles - 2 cups cooked chicken, shredded - 1 ½ cups ricotta cheese - 2 cups shredded mozzarella cheese - 1 cup pesto sauce (store-bought or homemade) - 1 cup heavy cream - 1 cup cherry tomatoes, halved - 1 teaspoon garlic powder - ½ teaspoon salt - ½ teaspoon black pepper - ¼ cup grated Parmesan cheese - Fresh basil leaves for garnish You can easily swap some ingredients if needed: - Use whole wheat lasagna noodles for a healthier option. - Swap shredded chicken for cooked turkey or even diced vegetables for a vegetarian twist. - Substitute ricotta cheese with cottage cheese for a lighter texture. - For a dairy-free option, try using cashew cream in place of heavy cream. - If you can't find pesto, make a quick herb sauce using basil, olive oil, and nuts. This creamy pesto chicken lasagna offers a well-rounded meal. Here’s a quick look at the nutritional aspects per serving: - Calories: About 480 - Protein: 30g - Fat: 25g - Carbohydrates: 40g - Fiber: 2g - Sodium: 600mg This meal is hearty and packed with flavor, making it a delightful choice for family dinners. {{ingredient_image_1}} 1. Preheat the Oven: Start by preheating your oven to 375°F (190°C). 2. Cook the Lasagna Noodles: In a big pot, boil salted water. Add 9 lasagna noodles and cook them until they are al dente. Drain the noodles and set them aside. 3. Prepare the Creamy Mixture: In a mixing bowl, combine 1 ½ cups of ricotta cheese, 1 cup of heavy cream, 1 teaspoon of garlic powder, ½ teaspoon of salt, and ½ teaspoon of black pepper. Mix everything until it becomes smooth and creamy. 4. Combine Chicken and Pesto: In another bowl, mix 2 cups of shredded chicken with 1 cup of pesto sauce. Ensure the chicken is fully coated. 1. Layer the Bottom: In a greased 9x13 inch baking dish, spread a thin layer of the creamy mixture on the bottom. 2. First Layer of Noodles: Place 3 lasagna noodles over the creamy layer. 3. Add Chicken Mixture: Spread half of the chicken and pesto mixture over the noodles. 4. Add Creamy Mixture and Cheese: Next, add a layer of the creamy mixture, then sprinkle with 2 cups of shredded mozzarella cheese, and top with 1 cup of halved cherry tomatoes. 5. Repeat Layers: Repeat this layering process one more time. After that, top with the remaining 3 noodles. 6. Final Touches: Spread the rest of the creamy mixture on top and sprinkle with ¼ cup of grated Parmesan cheese for a golden finish. 1. Cover and Bake: Cover the lasagna with aluminum foil to keep it from browning too much. Place it in your preheated oven. 2. First Baking Phase: Bake for 25 minutes. 3. Remove Foil and Finish Baking: After 25 minutes, take off the foil. Bake for another 15-20 minutes until it is bubbly and golden brown. 4. Cool Before Serving: Allow the lasagna to sit for about 10 minutes before slicing. Garnish with fresh basil leaves for a nice touch. To cook your noodles just right, start with a big pot. Fill it with water and add salt. Bring it to a boil before adding the lasagna noodles. Cook them until they are al dente. This means they should be firm but not hard. Drain the noodles well and lay them flat. This keeps them from sticking together. For a creamy lasagna, blend the ricotta cheese and heavy cream well. This mix should be smooth without lumps. Adding garlic powder, salt, and pepper will boost the flavor. Make sure to spread this creamy mixture evenly between layers. This keeps each bite rich and delicious. To make this meal even better, think about sides. A green salad with light dressing goes well. You can also serve garlic bread for a nice crunch. If you want a drink, try a chilled white wine. This keeps your meal fresh and tasty. Pro Tips Use Fresh Pesto: For the best flavor, consider making homemade pesto with fresh basil, garlic, pine nuts, and olive oil. Mix Cheeses: Combine ricotta with a bit of cream cheese for an even creamier texture and richer flavor. Let it Rest: Allow the lasagna to sit for 10-15 minutes after baking to make slicing easier and to help the layers set. Add Vegetables: Enhance nutrition and flavor by adding sautéed spinach or zucchini between the layers. {{image_2}} If you want a meat-free dish, swap the chicken for vegetables. Use spinach, zucchini, or mushrooms. These veggies add flavor and texture. You can also use a mixture of roasted veggies for a hearty bite. For protein, try adding beans or chickpeas. They blend well with the creamy layers. You can easily change the protein in this dish. Try turkey or cooked shrimp instead of chicken. For a fun twist, use Italian sausage for a spicy kick. You can also use shredded beef for a rich taste. Each protein brings its own flavor to the lasagna. Add a twist to your lasagna with extra flavors. Mix in sun-dried tomatoes for a sweet touch. You can also add fresh herbs like thyme or oregano to boost the taste. A dash of red pepper flakes can give a nice heat. Experiment with different cheeses, like goat cheese or provolone, to create a unique taste. You can store leftover creamy pesto chicken lasagna in your fridge. Place it in an airtight container. It will stay fresh for about 3 to 5 days. Make sure to let it cool down before putting it away. This way, it won't steam and get soggy. If you want to keep it longer, freezing is a great option. Cut the lasagna into portions. Wrap each piece tightly in plastic wrap, then place it in a freezer-safe bag. It can last for up to 2 months in the freezer. When you're ready to eat, just take out a piece and let it thaw overnight in the fridge. Reheating is easy! For best results, use the oven. Preheat it to 350°F (175°C). Place a piece of lasagna in a baking dish. Cover it with foil to keep it moist. Heat for about 20 minutes or until hot all the way through. If you're in a hurry, you can use the microwave. Heat on medium power for 2 to 3 minutes. Enjoy your delicious meal again! Yes, you can make this lasagna ahead of time. Prepare it up to the baking step. Cover it with foil and refrigerate for up to 24 hours. When ready to bake, let it sit at room temperature for 30 minutes. Then, bake as directed. This helps keep it from getting too cold in the oven. If you do not have ricotta cheese, try cottage cheese. Blend it until smooth for a similar texture. Cream cheese also works well, but you may want to add a bit of milk to thin it. Greek yogurt can be a great option too, adding a nice tang. You’ll know the lasagna is done when it bubbles and the top is golden brown. A knife inserted into the center should come out hot. You can also check that the cheese is melted and slightly browned. If it looks like this, it is ready to eat! This blog post covered key steps to make lasagna, from ingredients to cooking tips. You learned how to pick the right ingredients and what to swap if needed. I shared important steps for preparing, assembling, and baking your dish. Tips for perfect noodles and creamy layers will enhance your meal. You can explore tasty variations and know how to store leftovers. Now, you can confidently create your lasagna masterpiece with these insights. Enjoy the process and delicious results!

Creamy Pesto Chicken Lasagna Tasty Family Meal

Get ready to impress your family with my creamy pesto chicken lasagna! This dish is rich, tasty, and easy to

- Chicken breasts - Cream cheese - Parmesan cheese - Garlic (minced and powder) - Italian seasoning - Spinach leaves - Sun-dried tomatoes (optional) - Olive oil - Chicken broth - Salt and pepper For this dish, I use two large chicken breasts. Pounding them thin makes rolling easier. Next, I soften one cup of cream cheese. It blends well with half a cup of grated Parmesan cheese. Three cloves of minced garlic and one teaspoon of garlic powder add a big flavor punch. Italian seasoning gives it that extra boost. I love adding fresh spinach leaves for color and taste. If you like, toss in a quarter cup of chopped sun-dried tomatoes for a sweet bite. For cooking, I use one tablespoon of olive oil and half a cup of chicken broth. Salt and pepper round out the flavor. - Mixing bowl - Cutting board - Baking dish - Skillet - Toothpicks (optional) You’ll need a mixing bowl to combine the cheese and spices. A cutting board is great for prepping the chicken. Use a baking dish to cook the roll-ups. A skillet is perfect for searing them before baking. Toothpicks come in handy for holding the rolls together. - Fresh parsley Fresh parsley is my go-to garnish. It adds a nice pop of color and a hint of freshness. You can sprinkle it on top right before serving. It makes the dish look fancy and inviting! 1. Preheating the oven Start by preheating your oven to 375°F (190°C). This helps cook the chicken evenly. Grease a baking dish with a bit of olive oil. This keeps the roll-ups from sticking. 2. Mixing the cheese filling In a mixing bowl, combine 1 cup of softened cream cheese, 1/2 cup of grated Parmesan cheese, and 3 minced garlic cloves. Add 1 teaspoon each of garlic powder and Italian seasoning. Season with salt and pepper. Mix until you have a smooth and creamy filling. 3. Preparing the chicken breasts Take your two large chicken breasts and pound them thin. This makes it easier to roll them up. Lay them flat on a cutting board. Spread the cheese mixture evenly over each breast. 1. Spreading the filling and assembling the roll-ups Place a few spinach leaves on top of the cheese mixture. If you like, add some chopped sun-dried tomatoes. Roll each chicken breast from the thin end to the thick end. Secure with toothpicks if needed. 2. Searing the chicken roll-ups Heat 1 tablespoon of olive oil in a skillet over medium heat. Sear each roll-up for about 2-3 minutes per side. You want them golden brown for extra flavor. 3. Baking in the oven Transfer the chicken roll-ups to your greased baking dish. Pour 1/2 cup of chicken broth over them. This keeps the chicken moist as it bakes. Cover the dish with aluminum foil and bake for 25-30 minutes. Check that the chicken is no longer pink inside. 1. Resting and garnish before serving Once baked, let the roll-ups rest for 5 minutes. This helps keep the juices in. Remove any toothpicks and garnish with freshly chopped parsley. Now, you're ready to serve this delightful dish! To pound chicken breasts evenly, place them between two sheets of plastic wrap. Use a meat mallet or rolling pin to gently pound them until they're about 1/2 inch thick. This helps them cook evenly and stay juicy. To avoid dryness in chicken roll-ups, do not overcook them. Bake just until the chicken is no longer pink. Also, adding chicken broth while baking keeps the chicken moist and flavorful. Enhance the flavor by adding fresh herbs like basil or thyme to the cheese filling. You can also mix in a pinch of red pepper flakes for a spicy kick. For sauces, consider a creamy Alfredo or a rich marinara. Both pair well with the flavors of garlic and cheese in the roll-ups. For plating, place the chicken roll-ups on a bed of sautéed spinach. This makes the dish look vibrant and inviting. For sides, serve with roasted vegetables or a light salad. These balance the richness of the roll-ups and add freshness to your meal. {{image_2}} You can easily switch up the cheese in these roll-ups. Instead of cream cheese, try ricotta or goat cheese. Both add a lovely taste. You can also use mozzarella for a melty twist. Feel free to play with the fillings. Spinach is great, but you can add other veggies, too. Try bell peppers, mushrooms, or zucchini. For meat lovers, you can include cooked bacon or ham. These swaps make the dish your own. If you want a quicker option, use an air fryer. Preheat it to 375°F. Cook the roll-ups for about 15-20 minutes. Check that the chicken is cooked through. The air fryer gives a crispy outside. You can also adapt this recipe for the Instant Pot. Brown the roll-ups in the pot first. Then, add the chicken broth and cook on high pressure for about 8-10 minutes. This method keeps the chicken juicy and tender. Looking for gluten-free options? Use gluten-free breadcrumbs to coat the chicken if you want a crunch. You can also skip the breading altogether and still enjoy a tasty meal. For low-carb variations, focus on veggies. Skip any high-carb fillings like sun-dried tomatoes. Instead, pack the roll-ups with spinach and mushrooms. This keeps the dish healthy and satisfying. To keep your Creamy Garlic Parmesan Chicken Roll Ups fresh, refrigerate them promptly. Place the roll-ups in an airtight container. This method seals in flavor and keeps them moist. Make sure they cool to room temperature before sealing. If you want to freeze them, wrap each roll-up in plastic wrap. After that, place them in a freezer-safe bag. This keeps them safe from freezer burn. To enjoy leftover roll-ups, the best method is to reheat them in the oven. Preheat your oven to 350°F (175°C). Place the roll-ups in a baking dish and cover them with foil. This helps keep moisture in and prevents drying out. Heat for about 15-20 minutes or until warm. You can also use a microwave, but it may change the texture. If you choose the microwave, heat in short bursts and cover with a damp paper towel. In the fridge, your chicken roll-ups will last about 3-4 days. After that, they may spoil. Always check for off smells or discoloration before eating. If you see any signs of spoilage, it’s best to toss them. When in doubt, throw it out! - Can I make Creamy Garlic Parmesan Chicken Roll Ups ahead of time? Yes, you can prepare these roll-ups a day in advance. Just follow the recipe until baking. Cover them and place them in the fridge. When ready to bake, add a few extra minutes to the cooking time. - Can I use other types of cheese? Absolutely! You can use mozzarella, goat cheese, or even feta. Each cheese will add a unique flavor to your roll-ups. - How do I know when the chicken is fully cooked? Check the chicken with a meat thermometer. It should reach 165°F (75°C). The meat should also be white and no longer pink inside. - What sides pair well with this dish? Serve these roll-ups with a fresh salad, garlic bread, or steamed veggies. They add nice colors and flavors to your meal. - Can I serve this as an appetizer? Yes! Cut the roll-ups into smaller pieces. They make a great finger food for parties or gatherings. - Is there a substitute for cream cheese? You can use ricotta cheese or Greek yogurt. Both will give a creamy texture and taste. - What’s the best way to cut sun-dried tomatoes? Use kitchen scissors to cut them easily. This method helps avoid a mess and gives you nice-sized pieces for your roll-ups. This blog post covered the key ingredients and steps for your Creamy Garlic Parmesan Chicken Roll-Ups. We discussed preparing the filling, cooking methods, and useful tips to enhance flavor. You now have variations to suit dietary needs and storage tips for leftovers. Remember to enjoy the cooking process and get creative with flavors. These roll-ups make a delicious meal or appetizer. Happy cooking, and enjoy your tasty creation!

Creamy Garlic Parmesan Chicken Roll Ups Delightful Dish

Are you ready for a dish that combines rich flavors and simple ingredients? In this post, I’ll show you how

To make your Caramel Apple Pie Dip, gather these simple ingredients: - 2 medium apples, diced - 1 cup cream cheese, softened - 1/2 cup brown sugar - 1 teaspoon vanilla extract - 1/4 teaspoon ground cinnamon - 1/4 cup caramel sauce (plus extra for drizzling) - 1/2 cup whipped topping (or whipped cream) - Graham crackers or apple slices for dipping For the best flavor, I suggest using Granny Smith or Honeycrisp apples. - Granny Smith apples add a nice tartness. - Honeycrisp apples bring sweetness and crunch. These choices make your dip balanced and tasty. You can make your dip even better with these garnishes: - Extra diced apples for color and texture. - A sprinkle of cinnamon for a warm touch. - A drizzle of caramel sauce on top for sweetness. These garnishes will make your dip look inviting and delicious. Start by softening the cream cheese. I find that leaving it out for 30 minutes helps. Once it's soft, place it in a mixing bowl. Use a hand mixer to beat it until it's creamy and smooth. This step is key for a great dip. Now, add the brown sugar, vanilla extract, and ground cinnamon to the cream cheese. Mix it well until everything blends together perfectly. Next, gently fold in the diced apples. I prefer Granny Smith or Honeycrisp apples for their tartness. Be careful not to break the apples while mixing. Pour in the caramel sauce and fold it in. You want the apples to be nicely coated. Lastly, add the whipped topping. Fold it in gently to keep the dip fluffy and light. Transfer your dip to a serving bowl. For a nice touch, drizzle some extra caramel sauce on top. Serve it right away with graham crackers or apple slices. I love to present it in a rustic bowl, garnished with extra diced apples and a sprinkle of cinnamon. Arrange the graham crackers and apple slices around the bowl for a fun snack platter. Enjoy your creamy, sweet treat! To get a smooth dip, beat the cream cheese well. Use a hand mixer for best results. Mix until it feels creamy and fluffy. When adding other ingredients, fold gently. This keeps the apples intact and adds crunch. Overmixing can make the dip too thin. Serve the dip in a nice bowl. A rustic bowl works well for this dip. Arrange graham crackers and apple slices around it. This makes it easy for everyone to dip in. For a fun twist, try serving with pretzels. The saltiness pairs well with the sweet dip. For added depth, try different spices. A pinch of nutmeg or allspice can enhance the taste. You can also add chopped nuts for crunch. Walnuts or pecans work great! Drizzle extra caramel sauce on top before serving. This adds a beautiful finish and extra sweetness. {{image_2}} You can change this dip with seasonal flavors. In fall, use spiced apples. Try adding nutmeg or ginger for warmth. In winter, mix in some orange zest for a bright twist. For spring, add fresh berries for a fruity kick. Summer brings ripe peaches; they add sweetness and texture. If you want a lighter dip, swap cream cheese for Greek yogurt. It gives a nice tang and cuts fat. Use honey instead of brown sugar for a natural sweetener. You can also use low-fat whipped topping. Choose whole-grain graham crackers for extra fiber. While graham crackers are great, you can try other dippers too. Apple slices work well, adding crunch and freshness. Pretzels give a salty contrast that many enjoy. Use cinnamon sugar pita chips for a sweet and crispy option. You can even use carrot sticks for a fun twist! To keep your caramel apple pie dip fresh, store it in the fridge. Place it in an airtight container. This helps prevent the dip from absorbing other smells. Make sure the dip is cooled to room temperature before covering it. This keeps it creamy and tasty. I suggest using glass containers for storing your dip. They seal well and keep flavors intact. You can also use plastic containers if they are airtight. Just make sure they are clean and dry. Label your container with the date. This way, you will know when you made it. You can enjoy the dip cold or warm. If you prefer it warm, use the microwave. Place the dip in a microwave-safe bowl. Heat it for about 15-20 seconds at a time. Stir in between to check the temperature. Be careful not to overheat it, as it can change the texture. Enjoy your tasty dip with fresh graham crackers or apple slices! Yes, you can make this dip ahead of time. Just prepare it and store it in the fridge. Keep it in an airtight container. It tastes great after a few hours or even the next day. This way, the flavors blend well. Just remember to give it a quick stir before serving. You can serve many things with this dip. Here are some tasty options: - Graham crackers - Apple slices - Pretzels - Vanilla wafers - Cinnamon sugar pita chips These dippers complement the creamy and sweet dip perfectly. Feel free to mix and match for fun! Caramel Apple Pie Dip lasts about 3 to 5 days in the fridge. Store it in a sealed container to keep it fresh. If you notice any changes in smell or texture, it’s best to toss it. Always check before enjoying your delicious dip! This article covered all you need to know about making Caramel Apple Pie Dip. You learned about the ingredients, from apples to optional garnishes. The step-by-step instructions helped you prepare the cream cheese mix and serve it. Tips for texture and flavor enhancements will improve your dish. Seasonal variations offer fun twists. Lastly, we discussed proper storage and reheating methods. Enjoy creating this tasty dip. It’s a great dessert for gatherings or a cozy night in. Your guests will love it!

Caramel Apple Pie Dip Tasty and Simple Delight

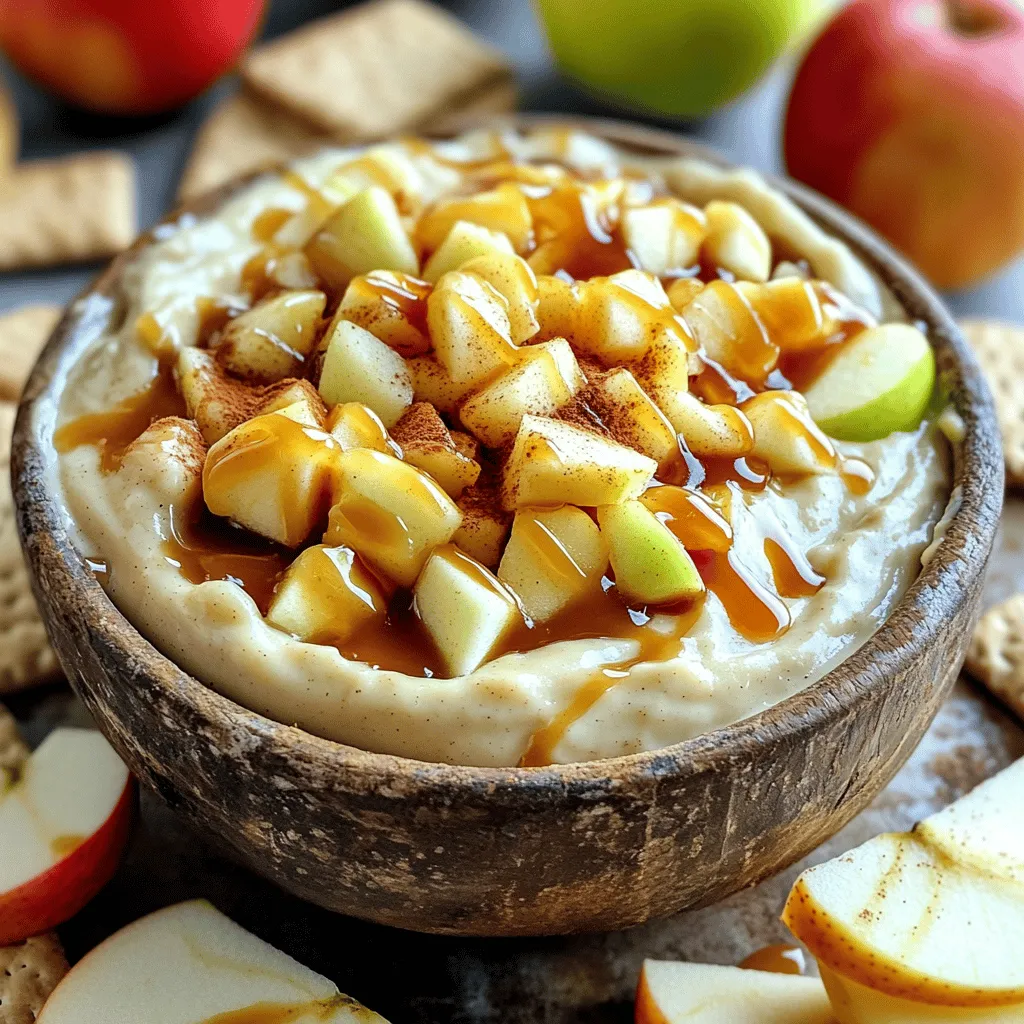
If you love sweet treats and easy recipes, you’re in for a real treat! My Caramel Apple Pie Dip is

Let’s dive right into the ingredients for Roasted Red Pepper Goat Cheese Dip. This dip is simple and packed with flavor. - 1 cup roasted red peppers, jarred or homemade - 8 oz goat cheese, softened - 1/2 cup cream cheese, softened - 2 tablespoons olive oil - 2 tablespoons lemon juice - 1 garlic clove, minced - 1 teaspoon dried oregano - Salt and black pepper to taste Feel free to explore extra flavors! You can add herbs like basil or thyme for a fresh twist. A pinch of cayenne pepper can add a nice kick, too. Garnishing your dip makes it look great. Use fresh parsley, chopped, for color and taste. You can also sprinkle some paprika for a touch of warmth. This list gives you everything you need for a tasty Roasted Red Pepper Goat Cheese Dip. Each ingredient plays a role in creating a creamy and flavorful experience. Preparation of Roasted Red Peppers If you use jarred roasted red peppers, just drain the extra liquid. This helps keep your dip from getting too watery. If you make roasted peppers at home, let them cool first. You can peel the skin if you want. This step helps make the dip smoother. Softening Cheese To get the best texture, make sure your goat cheese and cream cheese are soft. Take them out of the fridge about 30 minutes before you start. If they are too cold, blending will be harder. Soft cheese blends better and creates a creamy dip. Using a Food Processor Grab your food processor for this step. It makes mixing easy and fast. Add the roasted red peppers, goat cheese, cream cheese, olive oil, lemon juice, and minced garlic into the bowl. This combination gives the dip its rich flavor. Achieving the Right Consistency Blend the mixture until it’s smooth. You might need to scrape down the sides a few times. This ensures everything mixes evenly. If the dip looks too thick, add a little more olive oil or lemon juice. The goal is a creamy, spreadable dip that is not runny. Transfer and Garnish Options Once blended, transfer the dip into a bowl. For a nice touch, sprinkle fresh parsley on top. It adds color and a fresh taste. You can also drizzle a bit of olive oil over the dip for extra flavor. Suggestions for Dippers Serve this dip with fresh vegetables like carrot sticks, cucumber slices, and bell pepper strips. Pita chips are also a great choice. They add a nice crunch. This mix of dippers makes your dip even more fun to enjoy! To make your dip shine, adjust spices and seasonings to your taste. Start with salt and pepper. If you want a kick, add a pinch of cayenne or red pepper flakes. For a fresh touch, try adding a squeeze of lemon juice. This gives the dip a nice zing. You can also swap ingredients to change the flavor. If you do not have goat cheese, cream cheese works well. You can use feta cheese for a different taste. Fresh herbs like basil or chives can add great flavor too. Serving your dip well makes it even more fun to eat. Use a bright bowl to show off the colorful dip. A shallow dish helps people scoop it easily. For dippers, I love to use fresh veggies like carrot sticks, cucumber slices, and bell pepper strips. Pita chips add a perfect crunch. Arrange your dippers around the bowl. This makes a beautiful display for your guests. {{image_2}} You can change the cheese in this dip. Try using feta cheese for a tangy taste. Cream cheese adds a rich texture, but you can swap it with ricotta. This will make the dip lighter. Mixing and matching cheeses can create a new flavor. Want to spice it up? Add fresh herbs like basil or dill. A pinch of cayenne pepper gives it a nice kick. You can also try smoked paprika for a deeper flavor. Experiment with your favorite herbs and spices to make this dip your own. If you need a dairy-free option, use plant-based cheese. There are many brands that taste great. Cashew cream can replace cream cheese, giving a creamy texture. Make sure to check the labels for any hidden dairy. To serve this dip gluten-free, use fresh veggies or gluten-free pita chips. Carrot sticks, cucumber slices, and bell pepper strips work well. These options are colorful and healthy for dipping. Enjoy the flavors without worrying about gluten. To keep your roasted red pepper goat cheese dip fresh, use these tips: - Refrigeration Guidelines: Store the dip in an airtight container. It stays good in the fridge for up to five days. Make sure it is sealed tightly to avoid drying out. Always use a clean spoon to scoop out the dip. - Freezing the Dip: You can freeze this dip for later use. Place it in a freezer-safe container. Leave some space at the top for expansion. It can last up to three months in the freezer. Thaw in the fridge overnight before using. When you want to enjoy leftovers, follow these steps: - Best Practices After Storage: If the dip is cold, let it come to room temperature. This helps restore its creamy texture. You can also gently heat it in the microwave. Start with 15 seconds, then check and stir. - Tips for Maintaining Flavor: If the dip tastes a bit dull after storage, add a squeeze of fresh lemon juice. This brightens the flavors. You can also mix in a bit of fresh parsley right before serving. This adds a nice touch and keeps it vibrant. Roasted Red Pepper Goat Cheese Dip will stay fresh in the fridge for about four days. Store it in an airtight container. Make sure to check for any signs of spoilage before eating. If it looks or smells off, it is best to throw it away. Yes, you can use fresh red peppers! Roast them yourself for a deeper flavor. To do this, cut the peppers in half and remove the seeds. Place them skin-side up on a baking sheet and broil until the skin is charred. Then, let them cool and peel off the skin. This method gives your dip a fresh, vibrant taste. You can serve this dip with a variety of tasty options. Here are some favorites: - Fresh vegetables like carrot sticks, cucumber slices, and bell pepper strips - Pita chips for a crunchy texture - Crackers for a delightful crunch Mix and match for a fun, colorful platter! This dip can fit into several diets. It is vegetarian, which is great for plant-based eaters. However, it contains dairy, so it is not suitable for those who are lactose intolerant or vegan. To make a dairy-free version, try using a plant-based cream cheese and goat cheese substitute. Absolutely! Making this dip in advance is a great idea. Prepare it up to two days ahead of time. Just store it in the fridge in an airtight container. The flavors will meld together and taste even better when you serve it. Just give it a quick stir before serving. This blog post covered making a delicious roasted red pepper goat cheese dip. We explored the main ingredients and how to prepare them. You learned how to blend the dip to the right consistency and serve it with tasty dippers. We also shared tips for flavor, presentation, and variations, including dietary modifications. Finally, we discussed storage and reheating. I hope you feel inspired to try this easy dip. Enjoy sharing it at your next gathering!

Roasted Red Pepper Goat Cheese Dip Easy and Flavorful

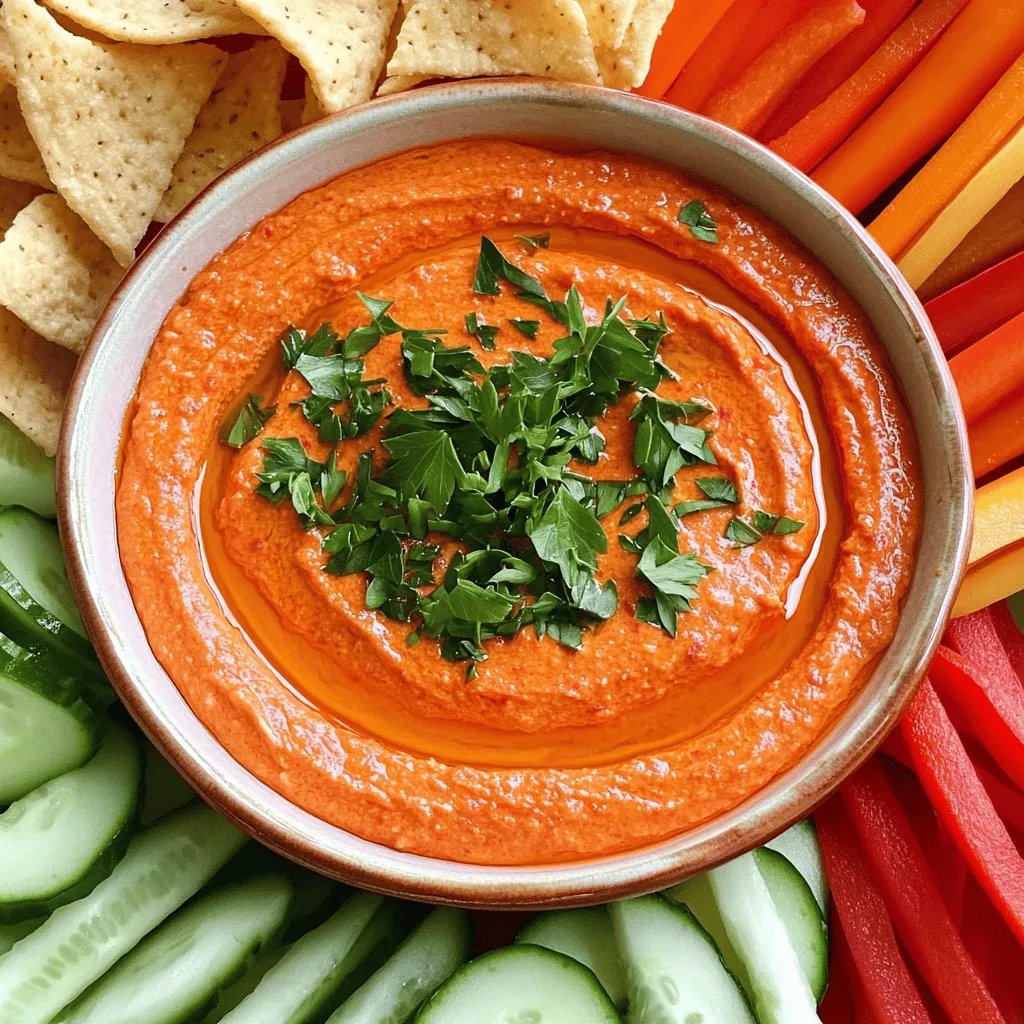
If you’re looking for a tasty treat, you’ve found it! My Roasted Red Pepper Goat Cheese Dip is easy to

Older posts
Newer posts
← Previous Page1 … Page18 Page19 Page20 … Page82 Next →

dsad

© 2026 Recipes Pursuit • Built with GeneratePress

Our Policies

  • Copyright Policy
  • Cookie Policy
  • GDPR Policy
  • Privacy Policy
  • Disclaimer
  • Terms Of Use

More Information

  • Home
  • About
  • Contact
  • Appetizers
  • Dessert
  • Dinner
  • Drinks
©2026, Recipes Pursuit About Back To Top