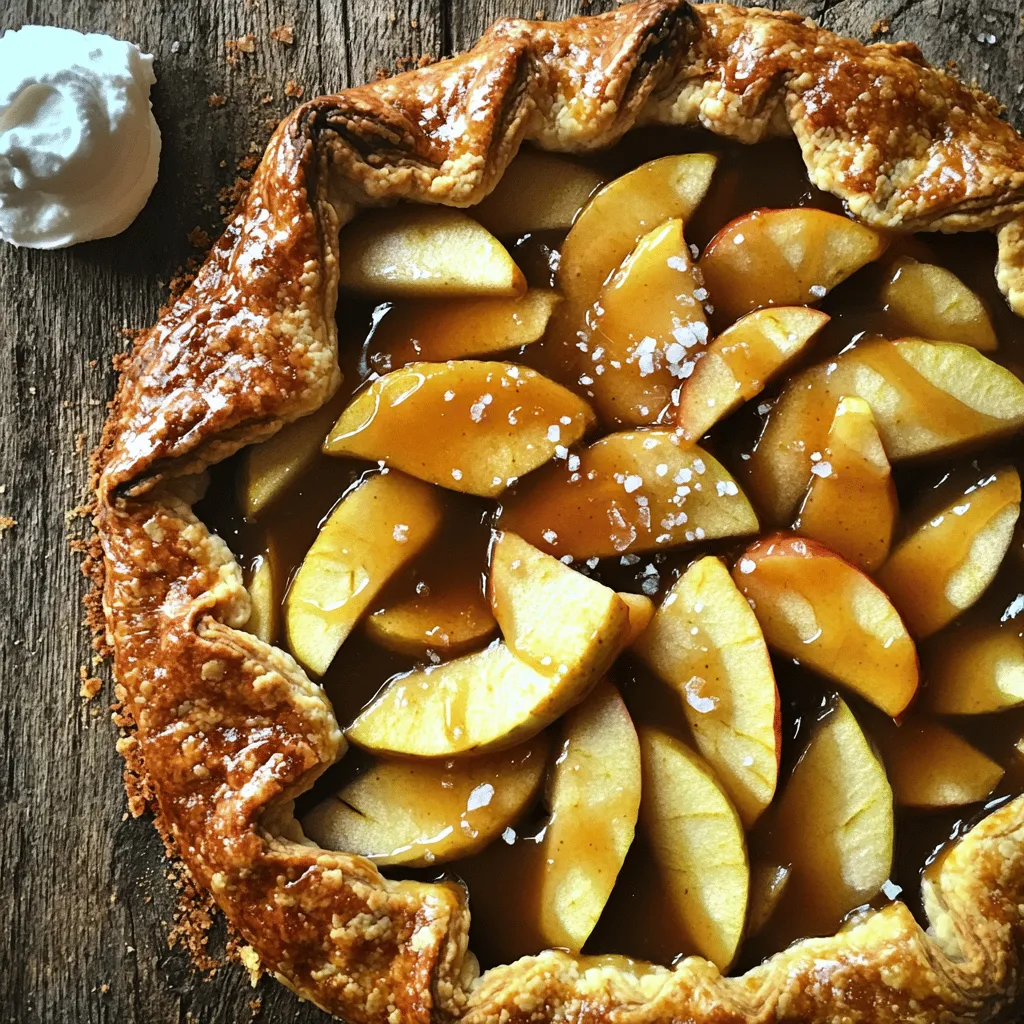
Looking for a warm, sweet treat this autumn? Try my Salted Caramel Apple Galette! This easy recipe combines juicy apples and rich caramel in a flaky crust. It’s perfect for cozy gatherings or a family dessert night. With just a few key ingredients and simple steps, you can impress everyone with your baking skills. Let’s dive into making this delightful dish together!
Ingredients
List of Ingredients
– Apples: I love using Granny Smith and Honeycrisp apples. Granny Smith adds tartness, while Honeycrisp brings sweetness. The mix gives the galette a great balance. You can choose other types too, but these work best.
– Essential baking items: You need a pie crust. You can use a store-bought one or make your own. For the salted caramel sauce, you can buy it or make it from scratch. If you make it, keep it simple with sugar, butter, and cream.
– Optional serving suggestions: Whipped cream is a classic choice to top the galette. You can also serve it with vanilla ice cream for extra creaminess. Both add a nice touch to the warm galette and make it a special treat.
Step-by-Step Instructions
Prepping the Ingredients
First, you need to prepare the apples. I use two large apples, like Granny Smith and Honeycrisp. These apples have the right mix of tart and sweet. Start by peeling the apples. Then, slice them into thin pieces. This way, they cook evenly. Place the apple slices in a bowl.
Next, add one tablespoon of lemon juice. This keeps the apples fresh. Then, sprinkle in 1/4 cup of granulated sugar. This adds sweetness. Add 1/2 teaspoon of cinnamon and 1/4 teaspoon of nutmeg for warm flavors. Finally, stir in one tablespoon of cornstarch. This will help thicken the juices. Let the apple mixture sit for 10 to 15 minutes. This lets the apples release their tasty juices.
Assembling the Galette
Now, it’s time to roll out the pie crust. If you use a store-bought crust, take it out of the fridge. Place it on a baking sheet lined with parchment. Roll the crust into a round shape. It should be about 12 inches wide.
Once rolled, transfer the apple mixture to the center. Leave a 2-inch border around the edges. Drizzle half of the salted caramel sauce over the apples. Now, fold the edges of the crust over the apples. Pleat the crust as you go. This creates a rustic look that is beautiful and tasty.
Brush the exposed edges with a beaten egg. This gives the crust a nice golden finish. Pour the rest of the salted caramel sauce over the apples in the middle. Finish by sprinkling a pinch of coarse sea salt on top. This adds extra flavor.
Baking the Galette
Before baking, preheat your oven to 400°F (200°C). This step is key for getting a nice crust. Place the galette in the oven for 25 to 30 minutes. The crust should turn golden brown, and the apples should become tender.
After baking, take the galette out and let it cool for a few minutes. It smells amazing! Slice it up and serve warm. A dollop of whipped cream or a scoop of vanilla ice cream is perfect on top. Enjoy the sweet and salty flavors in every bite!
Tips & Tricks
Perfecting the Apple Mixture
To make your apple mixture shine, balance the sweetness and acidity. I like using Granny Smith and Honeycrisp apples. Granny Smith gives that tart kick, while Honeycrisp adds sweetness. Together, they create a great flavor blend.
Cornstarch plays an important role too. It helps thicken the juices from the apples. Without it, your galette might be too runny. Add one tablespoon to your apple mix, and let it sit for 10-15 minutes. This allows the apples to release their juices and soak up the cornstarch.
Achieving a Golden Crust
For a beautiful golden crust, use an egg wash. Just beat one egg and brush it on the edges of your galette. This step makes the crust shine and adds color.
The right baking environment is key. Preheat your oven to 400°F (200°C) before baking. A hot oven helps the crust puff up and become flaky. Keep an eye on it while it bakes. Look for a golden brown color and tender apples.
Serving Suggestions
To enhance flavors, try adding toppings. Whipped cream or vanilla ice cream pair perfectly with the galette. The creaminess balances the sweet and salty notes from the caramel.
When it comes to drinks, consider warm cider or a light white wine. These beverages complement the apple and caramel flavors well. Enjoy your sweet treat with these simple pairings for a cozy autumn experience.

Variations
Flavor Combinations
You can make your salted caramel apple galette even better with extra flavors.
– Adding spices: Try ginger or cloves. They give a warm, cozy taste.
– Different fruits: Swap apples for pears or peaches. Each fruit brings its own charm.
Gluten-Free Options
If you need a gluten-free galette, don’t worry! You have choices.
– Alternative crusts: Use gluten-free pie crusts or even almond flour for a tasty base.
– Adaptations: You can still use the same apple filling. Just make sure your toppings are gluten-free too.
Different Sauces
The sauce can change your galette’s flavor profile.
– Homemade vs. store-bought: Homemade caramel is rich and creamy, but store-bought is quick and easy.
– Other options: Try chocolate sauce or fruit reductions. Both can add a fun twist to your dessert.
Storage Info
Refrigeration Guidelines
To keep your salted caramel apple galette fresh, store leftovers in the fridge. Place it in an airtight container or cover it tightly with plastic wrap. This way, it will stay tasty and moist. You can keep it in the fridge for up to three days. After that, it may lose some flavor and texture.
Reheating Tips
When you’re ready to enjoy your galette again, reheating is key. The best method is to use the oven. Preheat the oven to 350°F (175°C). Place the galette on a baking sheet and warm it for about 10-15 minutes. This helps the crust stay crispy while the apples heat up. Avoid using the microwave, as it can make the crust soggy. By following these steps, you can savor the delightful taste of your salted caramel apple galette once more!
FAQs
What is a galette exactly?
A galette is a free-form pie. It has a crust that folds over the filling. This style makes it easy to prepare and bake. The crust is often flaky and golden. You can fill a galette with many fruits. It is perfect for showing off seasonal produce. The rustic look adds charm to any dessert table.
Can I make the galette ahead of time?
Yes, you can make the galette ahead. You can prepare the apple filling and keep it in the fridge. Just store it in an airtight container. You can also roll out the crust and chill it. When ready to bake, assemble the galette. This method saves you time. It is great for gatherings or busy days.
Is salted caramel easy to make at home?
Yes, making salted caramel at home is simple. Start with sugar in a pan over medium heat. Stir until it melts and turns amber. Then, add butter and cream carefully. Mix until smooth. Finally, stir in a pinch of sea salt. This caramel enhances your galette. Store it in a jar for later use if needed.
Making an apple galette is simple and fun. We covered the key ingredients, from selecting the best apples to choosing pie crusts. I shared step-by-step instructions for prepping, assembling, and baking this dish. With tips on perfecting the mixture and achieving a golden crust, you can elevate your dessert. Remember to explore variations and storage tips for best results. An apple galette is versatile and delicious, making it a great addition to any meal. Enjoy your baking adventure!