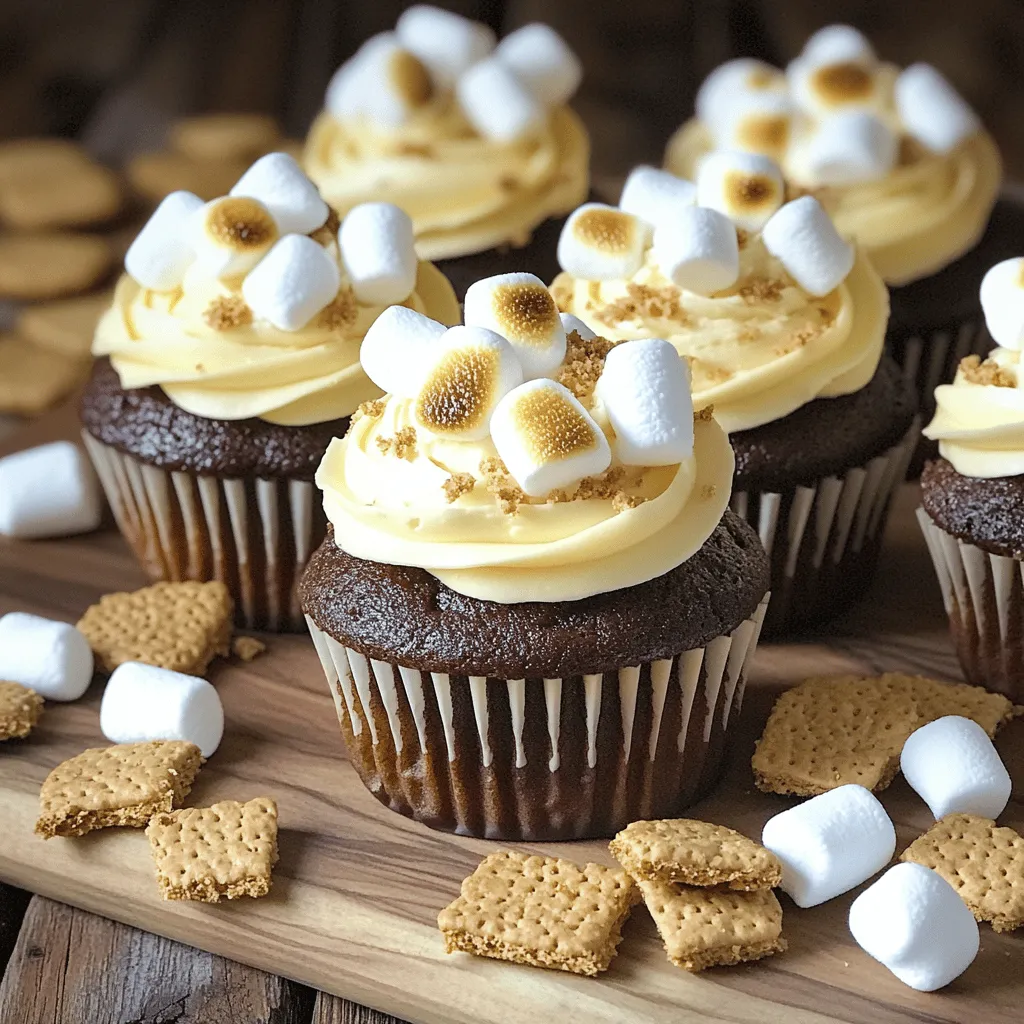
Are you ready to indulge in a treat that combines the classic flavors of s’mores into a cupcake? My Perfect S’mores Cupcakes are easy to make and filled with rich chocolate, sweet marshmallow frosting, and a crunchy graham cracker topping. Whether you want to impress friends at a party or enjoy a cozy dessert at home, these cupcakes hit the spot. Let’s dive into the delicious details and start baking!
Ingredients
Cupcake Ingredients
– 1 cup graham cracker crumbs
– 1 cup all-purpose flour
– 1 teaspoon baking powder
– 1/2 teaspoon baking soda
– 1/4 teaspoon salt
– 1/2 cup unsweetened cocoa powder
– 1/2 cup granulated sugar
– 1/2 cup brown sugar, packed
– 2 large eggs
– 1/2 cup buttermilk
– 1/4 cup vegetable oil
– 1 teaspoon vanilla extract
– 1/2 cup boiling water
Marshmallow Frosting Ingredients
– 3 egg whites
– 3/4 cup granulated sugar
– 1/4 teaspoon cream of tartar
– 1 teaspoon vanilla extract
– 1 cup mini marshmallows for topping
– Optional chocolate sauce for drizzling
Garnish Ingredients
– Extra graham cracker crumbs
– Chocolate shavings or mini chocolate chips
When making these perfect s’mores cupcakes, gathering the right ingredients is key. The cupcake base uses simple items like graham cracker crumbs and cocoa powder to bring that classic s’mores flavor to life. The addition of buttermilk makes the cupcakes moist and rich.
For the marshmallow frosting, egg whites and sugar create a fluffy texture. This frosting is like a sweet cloud on top of your cupcake. You can finish them off with mini marshmallows and a drizzle of chocolate sauce for a real treat.Be sure to have all these ingredients on hand for the best results. Enjoy your baking adventure!
Step-by-Step Instructions
Preparing the Cupcake Batter
1. Preheat the Oven: Set your oven to 350°F (175°C). Line a 12-cup muffin tin with cupcake liners. This step ensures the cupcakes bake evenly.
2. Mix Dry Ingredients: In a large bowl, combine 1 cup graham cracker crumbs, 1 cup all-purpose flour, 1 teaspoon baking powder, 1/2 teaspoon baking soda, 1/4 teaspoon salt, 1/2 cup cocoa powder, 1/2 cup granulated sugar, and 1/2 cup brown sugar. Whisk these together until they blend well.
3. Whisk Wet Ingredients: In another bowl, whisk together 2 large eggs, 1/2 cup buttermilk, 1/4 cup vegetable oil, and 1 teaspoon vanilla extract. Mix until smooth and set aside.
Combining Ingredients
1. Gradually Combine Mixtures: Slowly add the wet ingredients to the dry mix. Stir gently until just combined. This helps keep the cupcakes light.
2. Stir in Boiling Water: Carefully add 1/2 cup boiling water to the batter. Stir until you have a smooth mixture. The hot water helps the cocoa bloom, enhancing the chocolate flavor.
Baking the Cupcakes
1. Fill the Cupcake Liners: Pour the batter into the lined muffin tin. Fill each liner about two-thirds full. This gives the cupcakes room to rise.
2. Bake: Place the tin in the oven for 20-22 minutes. Check for doneness by inserting a toothpick into the center. If it comes out clean, they are ready. Remove from the oven and let them cool completely.
Making the Marshmallow Frosting
1. Prepare Frosting in a Double Boiler: In a heatproof bowl, combine 3 egg whites, 3/4 cup granulated sugar, and 1/4 teaspoon cream of tartar. Place the bowl over a pot of simmering water. Whisk constantly for about 5 minutes until the mixture is warm and the sugar dissolves.
2. Whip the Frosting: Transfer the mixture to a stand mixer. Whip on high speed for 7-10 minutes until stiff peaks form. Add 1 teaspoon vanilla extract and mix to combine. The frosting should be glossy and fluffy.
Frosting and Decorating Cupcakes
1. Frost Cooled Cupcakes Generously: Use a piping bag or spatula to spread the marshmallow frosting on each cooled cupcake. Go big; they deserve it!
2. Add Toppings: Top each cupcake with mini marshmallows, a sprinkle of graham cracker crumbs, and drizzles of optional chocolate sauce. For a fun touch, lightly toast the marshmallows with a kitchen torch for that campfire vibe!Enjoy your delicious Perfect S’mores Cupcakes!
Tips & Tricks
Achieving the Perfect Cupcake Texture
To make the best cupcakes, you must measure ingredients with care. Accurate measuring helps keep the balance of flavors and texture. For light and fluffy cupcakes, sift your dry ingredients. This adds air and helps your cupcakes rise well.
Frosting Techniques
Using a piping bag makes frosting fun and easy. Choose your favorite tip for a beautiful design. For an extra touch, you can toast the marshmallows on top. A kitchen torch works great for this. It gives a nice golden color and adds flavor.
Serving Suggestions
Present cupcakes on a rustic wooden board or a tiered cake stand. This makes them look inviting. You can also pair them with milk or hot cocoa. A scoop of vanilla ice cream beside the cupcake adds a tasty twist. Enjoy your Perfect S’mores Cupcakes!

Variations
Flavor Variations
You can mix up the flavor of your cupcakes. Try using vanilla instead of chocolate for a lighter taste. You might also use lemon or orange zest to add a fresh twist. For the frosting, consider chocolate ganache. It adds rich flavor and pairs well with the graham cracker base.
Dietary Modifications
If you need gluten-free cupcakes, use almond flour or a gluten-free blend. For a vegan version, swap eggs with flaxseed meal and use plant-based milk. You can replace butter with coconut oil. Always check ingredient labels for allergens. This way, you can enjoy these cupcakes without worry.
Seasonal Themes
You can adapt these cupcakes for holidays. For fall, add pumpkin spice to the batter. During winter, try peppermint extract for a festive touch. Change the look by using colored liners or themed decorations. Seasonal sprinkles can also add a fun pop to your cupcakes.
Storage Info
Storing Leftover Cupcakes
To keep your cupcakes fresh, store them at room temperature. Use an airtight container to prevent them from drying out. If it’s very hot, you can place them in the fridge. Just make sure they are covered well. This helps to keep the marshmallow frosting nice and fluffy.
Best Practices for Reheating
If you want to enjoy a warm cupcake, reheat it in the microwave. Heat for about 10-15 seconds. This warms the cupcake without making it dry. For best results, cover it with a damp paper towel. This keeps the moisture in and helps the cupcake stay soft.
Freezing Instructions
To freeze your cupcakes, first freeze them without frosting. Place them in a single layer on a baking sheet. After they are frozen solid, transfer them to a freezer bag. For the frosting, store it in a separate container. When you’re ready to serve, thaw the cupcakes in the fridge overnight. Frost them just before serving for the best taste. Enjoy these Perfect S’mores Cupcakes!
FAQs
How long do these cupcakes stay fresh?
These cupcakes stay fresh for about three days at room temperature. They can last up to a week in the fridge. Keep them in an airtight container to maintain moisture.
Can I make the frosting ahead of time?
Yes, you can make the frosting a day ahead. Store it in the fridge in an airtight container. Before using, let it sit at room temperature for about 30 minutes. Then, whip it briefly to restore its texture.
How do I prevent the cupcakes from sticking?
To prevent sticking, use cupcake liners. You can also grease the muffin tin lightly before adding the liners. This ensures easy removal after baking.
Can I substitute buttermilk in the recipe?
You can use milk with a splash of vinegar or lemon juice as a buttermilk substitute. Mix one tablespoon of vinegar or lemon juice into one cup of milk. Let it sit for five minutes before using it in the recipe.
In this post, we covered the ingredients, steps, and tips for making delicious cupcakes. You learned how to mix batter, bake, and create a fluffy marshmallow frosting. We shared ways to store leftovers and even offered flavor variations to try.
Now, it’s time to get in the kitchen and craft your treats. Enjoy sharing your tasty results with friends and family!