
Latest & Greatest

Irresistible Banana Nutella Stuffed French Toast Recipe
If you crave a delicious twist on breakfast, you need to try Banana Nutella Stuffed French Toast! This easy recipe
Read more…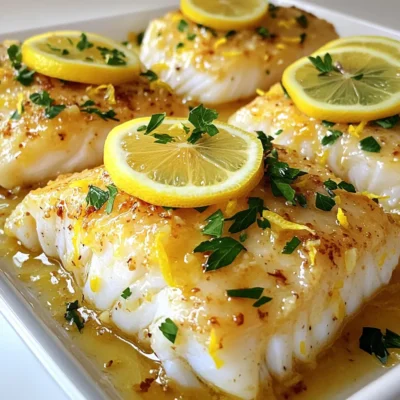
Lemon Garlic Butter Cod Flavorful Delight in Minutes
Are you craving a quick and tasty dinner? This Lemon Garlic Butter Cod recipe is your answer. With just a
Read more…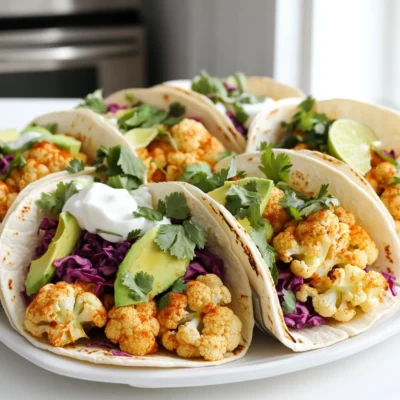
Spicy Roasted Cauliflower Tacos Fresh and Tasty Meal
Craving something fresh and tasty? Try these spicy roasted cauliflower tacos! They pack flavor and are perfect for any meal.
Read more…
Slow Cooker Hot Chocolate Creamy and Rich Delight
There’s nothing quite like a cup of hot chocolate on a chilly day. With my Slow Cooker Hot Chocolate recipe,
Read more…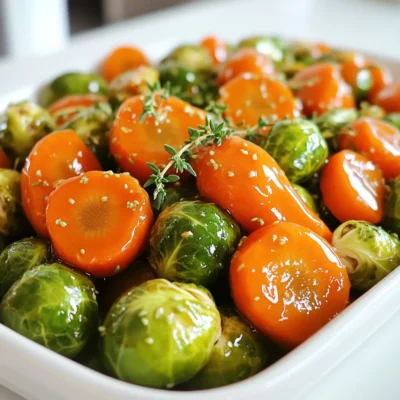
Maple Glazed Carrots & Brussels Sprouts Tasty Side Dish
Looking for a side dish that dazzles and delights? Your search ends here! Maple Glazed Carrots and Brussels Sprouts combine
Read more…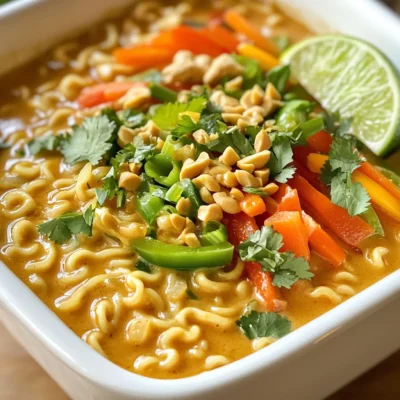
Minute Thai Peanut Ramen Quick and Flavorful Meal
Craving a quick and tasty meal? You can whip up Minute Thai Peanut Ramen in just minutes! With creamy peanut
Read more…
Air Fryer Cinnamon Roll Bites Tasty and Easy Snack
Craving a sweet snack? Let’s whip up some Air Fryer Cinnamon Roll Bites! These bites are quick and easy, perfect
Read more…
Pumpkin Spice French Toast Bake Cozy and Delicious Treat
If you love cozy fall treats, then you need to try my Pumpkin Spice French Toast Bake. It’s warm, easy
Read more…browse recipes


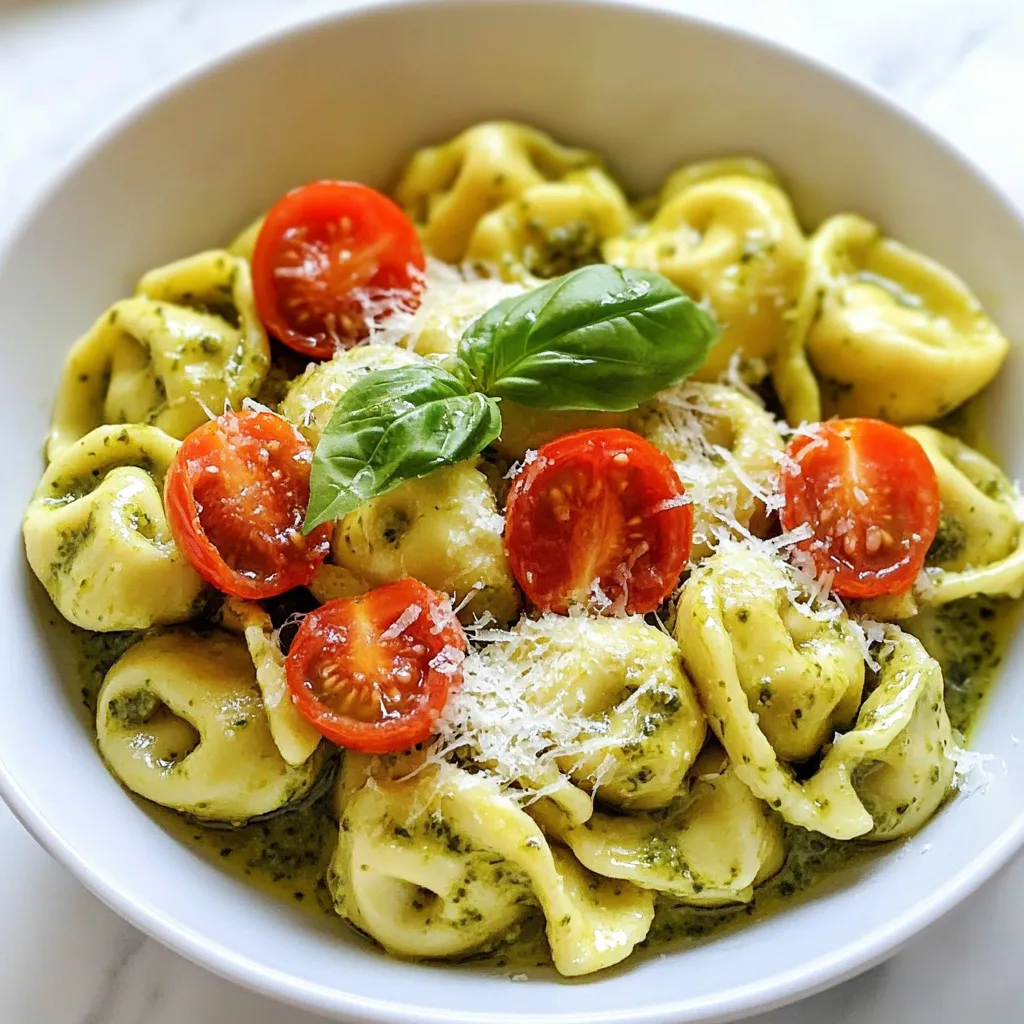
Creamy Pesto Tortellini Easy and Flavorful Recipe
Are you ready to make a dish that bursts with flavor? This creamy pesto tortellini recipe is quick, tasty, and sure to impress. With…
My Latest Desserts
My Latest Recipes

hey,
i’m !
I’m so happy you’re here!
Cooking is my love language, and I’m excited to share my best dishes with you. Hope they become your favorites too! Let’s enjoy every bite of this journey together.
![To make this tasty Sweet Potato and Black Bean Chili, gather these ingredients: - 2 medium sweet potatoes, peeled and diced - 1 can (15 oz) black beans, drained and rinsed - 1 can (14 oz) diced tomatoes with green chilies - 1 onion, finely chopped - 2 cloves garlic, minced - 1 red bell pepper, diced - 2 cups vegetable broth - 1 tablespoon chili powder - 1 teaspoon cumin - ½ teaspoon smoked paprika - ½ teaspoon cayenne pepper (adjust for spice) - Salt and pepper, to taste - 1 tablespoon olive oil - Fresh cilantro, chopped (for garnish) - Avocado slices (for serving) If you have dietary needs, you can swap some ingredients. Here are some options: - Use quinoa or lentils instead of black beans for a different protein source. - Replace vegetable broth with water or low-sodium broth for less sodium. - For a lower-carb option, skip the sweet potatoes or use zucchini. - Use green bell pepper instead of red for a milder flavor. - If you don’t have olive oil, use any cooking oil you prefer. This chili is not just delicious; it's also healthy! Here’s the nutritional info per serving (about 1.5 cups): - Calories: 320 - Protein: 13g - Fat: 6g - Carbohydrates: 58g - Fiber: 15g - Sugar: 5g - Sodium: 450mg This dish is rich in fiber and protein, making it a great meal choice. You can find the full recipe [Full Recipe]. To make this sweet potato and black bean chili, start by gathering your ingredients. In a large pot or Dutch oven, heat 1 tablespoon of olive oil over medium heat. Add 1 finely chopped onion and stir. Cook for about 5 minutes until the onion is soft and clear. Next, add 2 minced garlic cloves and 1 diced red bell pepper. Cook for 3-4 minutes until the bell pepper softens. Now, it’s time to add the star of the show: 2 medium sweet potatoes. Peel and dice them, then toss them into the pot. Stir well for about 5 minutes. This helps the sweet potatoes start to soften. Then, pour in 1 can of diced tomatoes with their juice, 2 cups of vegetable broth, and 1 can of drained and rinsed black beans. Next, sprinkle in 1 tablespoon of chili powder, 1 teaspoon of cumin, ½ teaspoon of smoked paprika, and ½ teaspoon of cayenne pepper. Add salt and pepper to taste. Stir everything together until well mixed. Bring the chili to a gentle simmer. Cover the pot and reduce the heat to low. Let it cook for 25-30 minutes, stirring occasionally. You want the sweet potatoes to be fork-tender. If you find the chili is too thin, simmer it uncovered for an extra 5-10 minutes. Taste the chili and adjust the seasoning as needed. Finally, serve the chili hot. Garnish with chopped fresh cilantro and avocado slices for a creamy touch. Sautéing is key for great flavor. Start with the onion and cook it until it’s soft. This brings out its sweetness. When you add the garlic and bell pepper, keep stirring. This keeps the garlic from burning and adds depth. Don’t rush the layers. Each step builds flavor. Keep an eye on the heat. Start at medium for sautéing, then lower it to low for simmering. This helps the sweet potatoes cook evenly without burning. Remember, cooking time is around 45 minutes total. This includes prep time. You want to enjoy the process as much as the meal. For a thicker chili, let it simmer longer without a lid. For the complete recipe, check out the Full Recipe. When making chili, you want to avoid some common mistakes. First, do not skip the sauté step. Sautéing onion and garlic builds flavor. Second, don’t rush the cooking time. Letting the chili simmer helps the flavors blend well. If you add too much liquid, your chili may turn soupy. Always start with less broth and add more if needed. Lastly, taste as you go. This helps you catch any seasoning issues early. Spices make your chili pop! Start with chili powder and cumin; they bring warmth and depth. Adding smoked paprika gives a nice, smoky touch. If you like heat, cayenne pepper is great, but adjust to your taste. Fresh herbs like cilantro add brightness at the end. You can also try adding a dash of lime juice for a zing. Experiment with spices to find your perfect mix. Cooking in bulk saves time and energy. You can double the recipe, and it freezes well. Store leftovers in airtight containers. Divide them into single servings for easy meals later. You can also prep ingredients ahead. Chop sweet potatoes, onions, and peppers a day before. This makes cooking quicker. Finally, making chili a day ahead allows the flavors to deepen. Enjoy the convenience and taste! {{image_2}} This chili is easy to adjust. You can make it vegan by using vegetable broth, which I always do. For gluten-free needs, check your canned goods. Most brands are safe, but read labels to be sure. You can also swap sweet potatoes for butternut squash if you like. It brings a nice flavor twist. If you love heat, add more cayenne pepper. Start with one teaspoon and taste as you go. You can also mix in fresh jalapeños or serrano peppers for a kick. Another option is to add hot sauce at the end. Adjust the spice level to fit your taste buds. Toppings can elevate your chili. Fresh cilantro adds brightness. Avocado slices bring creaminess. Crumbled tortilla chips add crunch. You might even try a dollop of sour cream or Greek yogurt for a rich touch. For sides, cornbread is a classic choice. It pairs well with the chili’s warmth. For the full recipe, check out the detailed instructions above! After you enjoy your Sweet Potato and Black Bean Chili, let it cool down. Use airtight containers to store leftovers. This keeps the chili fresh and tasty. If you store it right, it can last for up to four days in the fridge. Make sure to label the containers with the date. This helps you know when to use them. To keep chili longer, freeze it! Portion the chili into smaller containers. Leave some space at the top, as it will expand when frozen. You can freeze it for up to three months. When you want to enjoy it again, thaw it in the fridge overnight. Reheat it on the stove over low heat. Stir often to avoid burning. Chili can last in the fridge for about four days. If you see mold or it smells off, throw it away. Another sign is if the chili has changed color or texture. Always trust your senses. It's better to be safe than sorry. For best taste, eat it within a few days. Yes, you can make this chili ahead of time. In fact, it often tastes better the next day. The flavors blend well when it sits. Store it in an airtight container in the fridge for up to three days. Just reheat it on the stove before serving. You can also freeze it for up to three months. Thaw it in the fridge overnight before reheating. I love serving this chili with a few tasty sides. Here are some great options: - Cornbread - Rice or quinoa - Tortilla chips - A fresh green salad - Sliced avocado on top These sides add fun textures and flavors. You can mix and match based on what you like best! Yes, this chili is a healthy choice. It is full of nutrients and fiber. Sweet potatoes provide vitamins A and C. Black beans add protein and iron. The spices also have health benefits. They can help boost your metabolism. This dish is low in fat, making it a wholesome option for everyone. Enjoy it guilt-free! For the full recipe, check out the section above! You now have a complete guide to making Sweet Potato and Black Bean Chili. We covered ingredients, cooking steps, and ways to enhance the flavor. You learned tips to avoid common mistakes and how to store leftovers. This chili is flexible, allowing for swaps and adjustments to fit your needs. Try making it your way! Enjoy a nourishing meal, packed with flavor and nutrients. Happy cooking!](https://recipespursuit.com/wp-content/uploads/2025/04/cb3489e2-dfa4-4cd3-ac72-1e30361eb575-300x300.webp)


Ingredient Cinnamon Roll Bites Scrumptious and Simple
Craving something sweet and easy? These Ingredient Cinnamon Roll Bites are just what you need! With just a few simple ingredients, you can create…

