


Latest & Greatest

Simple Veggie Sushi Rolls Fresh and Tasty Treat
Looking to make a delicious, fresh treat at home? Simple veggie sushi rolls are your answer! With just a few
Read more…
Classic Stuffed Cabbage Rolls Flavorful Family Meal
Are you ready to create a meal that warms hearts and brings families together? Classic stuffed cabbage rolls are a
Read more…
Easy Chicken Tikka Masala Flavorful and Comforting Dish
Are you craving a flavorful and comforting dish? Look no further! My Easy Chicken Tikka Masala recipe will satisfy your
Read more…
Simple Buffalo Chicken Wraps Tasty and Easy Recipe
Are you craving a tasty, easy meal? Look no further than these Simple Buffalo Chicken Wraps! They combine spicy buffalo
Read more…
Classic Chicken and Dumplings Hearty Comfort Meal
Who doesn’t love a warm bowl of Classic Chicken and Dumplings? This hearty dish brings comfort and joy, especially on
Read more…
Easy Meatball Subs Tasty and Simple Recipe Guide
Craving a hearty meal that’s quick and easy? Look no further than my Easy Meatball Subs! This tasty dish combines
Read more…
Simple Baked Ziti Flavorful and Comforting Recipe
Looking for a dish that’s easy to make and packed with flavor? This Simple Baked Ziti recipe is your answer!
Read more…
Classic Vegetable Soup Hearty and Flavorful Delight
Are you ready to warm your soul with a bowl of Classic Vegetable Soup? This hearty and flavorful delight is
Read more…browse recipes


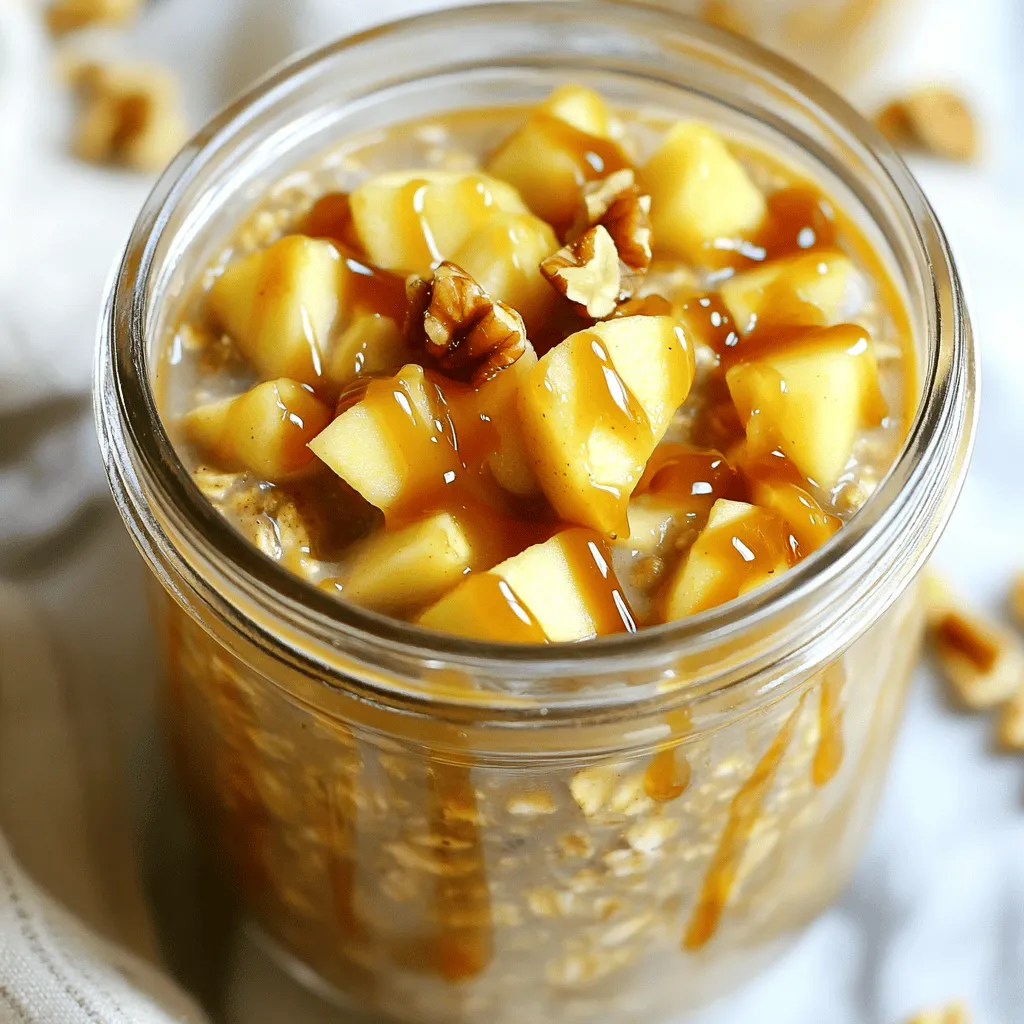
Caramel Apple Pie Overnight Oats Easy Morning Treat
Start your day with a delicious twist on breakfast! Caramel Apple Pie Overnight Oats offer a sweet, tasty treat while keeping morning prep easy.…
My Latest Desserts
My Latest Recipes

hey,
i’m !
I’m so happy you’re here!
Cooking is my love language, and I’m excited to share my best dishes with you. Hope they become your favorites too! Let’s enjoy every bite of this journey together.
![To make Cheesy Baked Gnocchi, gather these ingredients: - 1 pound potato gnocchi (store-bought or homemade) - 2 tablespoons olive oil - 1 medium onion, finely chopped - 3 cloves garlic, minced - 1 can (14 oz) crushed tomatoes - 1 teaspoon dried basil - 1 teaspoon dried oregano - Salt and pepper to taste - 1 cup ricotta cheese - 1 cup shredded mozzarella cheese - ½ cup grated Parmesan cheese - Fresh basil leaves for garnish You can swap some ingredients based on your taste. For example, use cream cheese instead of ricotta for a creamier texture. You can mix different types of cheese for varied flavors, too. If you want a bit of heat, add red pepper flakes. This recipe is flexible, so feel free to explore. Now, let’s dive into the joy of creating this dish. Each ingredient plays a role in making the gnocchi creamy and cheesy. You will enjoy the rich flavors and the comforting feel of baked gnocchi. To make Cheesy Baked Gnocchi, follow these steps carefully. 1. Preheat the Oven: Start by preheating your oven to 375°F (190°C). This ensures that it’s hot enough for baking. 2. Cook the Gnocchi: Bring a large pot of salted water to a boil. Add the gnocchi. Cook until they float, which takes about 2-3 minutes. Drain and set aside. 3. Sauté the Onion: In a large skillet, heat 2 tablespoons of olive oil over medium heat. Add a finely chopped onion. Sauté for about 4-5 minutes, until soft and clear. 4. Add Garlic: Stir in 3 minced cloves of garlic. Cook for 1 more minute, just until it smells great. 5. Prepare the Sauce: Pour in a can of crushed tomatoes (14 oz). Add 1 teaspoon of dried basil, 1 teaspoon of dried oregano, and salt and pepper to taste. Let it simmer for 5-7 minutes to blend the flavors. 6. Mix Ingredients: In a big bowl, combine the gnocchi, the sauce, 1 cup of ricotta cheese, and half of the shredded mozzarella cheese. Gently mix everything together. 7. Transfer to Baking Dish: Pour the gnocchi mix into a greased baking dish. Spread it out evenly. Top with the rest of the mozzarella and ½ cup of grated Parmesan cheese. Now it’s time to bake your dish. 1. Bake the Gnocchi: Place the dish in the preheated oven. Bake for 25-30 minutes. You want the top to be golden and bubbly. 2. Final Touches: Once it’s done, take it out and let it cool for a few minutes. This helps with serving. Before you serve, add fresh basil leaves on top for extra flavor and color. Following these steps will give you a comforting, cheesy dish that is both easy and delightful. For more details on the ingredients, check out the Full Recipe. To make your cheesy baked gnocchi even better, focus on flavor and texture. Here are some tips: - Use fresh herbs. Fresh basil adds a burst of flavor. Chop it finely before adding. - Try different cheeses. Blend cheeses like fontina or gouda for a richer taste. - Don’t overcook the gnocchi. Boil only until they float. This keeps them soft. - Add a pinch of nutmeg. This little spice can enhance the overall flavor. Common mistakes can ruin your dish. Here are a few to avoid: - Skipping the simmer. Always let your sauce simmer. This melds the flavors well. - Overloading with cheese. Too much cheese can make it greasy. Stick to the recipe. - Not greasing the dish. Grease your baking dish well to prevent sticking. When serving cheesy baked gnocchi, presentation matters. Here are my favorite ideas: - Fresh basil garnish. Sprinkle chopped basil on top for color and flavor. - Side salad. A light salad with vinaigrette pairs beautifully with the dish. - Crusty bread. Serve with garlic bread to soak up the sauce. For the best serving experience: - Use a large spoon. Serve directly from the baking dish to keep it warm. - Add a drizzle of olive oil. A light drizzle enhances the flavors and adds shine. Explore the [Full Recipe] for more details and enjoy this delightful meal! {{image_2}} You can easily change this dish to fit your taste. Try using different cheeses like feta or goat cheese for a unique twist. If you're looking for a lighter option, swap out ricotta for a low-fat version. For a gluten-free meal, use gluten-free gnocchi or even zucchini noodles. You still get that yummy taste without the gluten. Want to add more to your dish? You can mix in proteins like grilled chicken or spicy sausage. These add flavor and make your meal heartier. For veggie lovers, consider adding spinach or bell peppers. They add color and nutrition. Broccoli or mushrooms are also great choices. Each of these options will enhance the dish's taste and texture. For the full recipe, check out the [Full Recipe]. To keep your cheesy baked gnocchi fresh, store any leftovers right away. Let it cool down for about 30 minutes. Then, transfer it to an airtight container. This helps lock in moisture and flavor. You can keep it in the fridge for up to three days. If you want to save it longer, consider freezing it. For freezing, use freezer-safe containers or heavy-duty aluminum foil. This way, it can last for about two months. When it's time to enjoy your leftovers, reheating is key. For the best results, use the oven. Preheat the oven to 350°F (175°C). Place the gnocchi in an oven-safe dish. Add a splash of water or a drizzle of olive oil to keep it moist. Cover it with foil to prevent it from drying out. Heat for about 20 minutes. If you're short on time, you can use the microwave. Heat in short bursts of 1-2 minutes, stirring in between. To refresh the dish, consider adding a sprinkle of cheese or fresh herbs before serving. This will enhance the flavors and give it a fresh look. Enjoy each bite as if it were just made! For the full recipe, check out the complete guide. What is the best type of gnocchi to use? I recommend using potato gnocchi. It has a soft texture and absorbs flavors well. You can buy it at the store or make your own from scratch. Store-bought is quick and easy, while homemade adds a personal touch. Both options work great in this cheesy baked gnocchi recipe. Can I make Cheesy Baked Gnocchi ahead of time? Yes, you can prepare it in advance. Cook the gnocchi and make the sauce. Then mix them and store it in the fridge. When you’re ready, just bake it. This saves time and makes serving easy for busy nights. What to do if the dish is too dry? If your cheesy baked gnocchi is dry, add a splash of broth or a bit of olive oil. This helps bring back moisture. You can also add more cheese before baking for a creamier texture. Remember, the sauce should be a bit saucy before cooking. How do I avoid overcooking the gnocchi? To prevent overcooking, keep an eye on the gnocchi while boiling. They are done when they float to the top, usually in 2 to 3 minutes. Don’t let them sit too long in the water. Drain them right away and mix with the sauce to keep them tender. Cheesy baked gnocchi is a simple yet delicious dish. We began with a list of ingredients and how to use them. The step-by-step instructions guided you through preparation and baking to achieve a golden top. I shared tips for perfecting flavors and avoiding mistakes. You learned ways to customize the recipe and store leftovers properly. Remember, you can always adapt this dish to your taste and enjoy it fresh. Use the storage and reheating tips to savor it later. Enjoy each bite of your creation!](https://recipespursuit.com/wp-content/uploads/2025/06/b348e0cb-da27-4ddb-97f9-c6972a92ab9b-300x300.webp)

![- 200g digestive biscuits - 100g unsalted butter - 400g sweetened condensed milk - 2 large ripe bananas - 300ml heavy cream - 2 tablespoons powdered sugar - 1 teaspoon vanilla extract - Cocoa powder or chocolate shavings If you want to change things up, you can use graham crackers instead of digestive biscuits. They create a nice crust too! For the whipped cream, you can use coconut cream for a dairy-free option. It tastes great and is easy to find. When choosing bananas, look for ones that are ripe but not overripe. They should have a few brown spots. This means they are sweet and soft, perfect for your pie. For sweetened condensed milk, pick a brand that uses pure milk. This will give your pie a creamy and rich flavor. To start, grab a mixing bowl. Combine the crushed digestive biscuits with melted butter. Mix well until all the biscuits are coated. This step gives the base a rich flavor. Next, take your pie dish. Press the biscuit mixture firmly into the bottom. Make sure it is even across the dish. Refrigerate this for 30 minutes. This helps it set properly. While the base chills, it’s time to make the caramel. In a saucepan, pour in the sweetened condensed milk. Cook it over medium heat while stirring constantly. This is key! Keep stirring for about 15 to 20 minutes. You want it to turn a nice golden color. Watch closely to avoid burning it. Once it reaches the right color, remove it from heat. After the caramel cools, pour it over the chilled biscuit base. Spread it evenly so every bite has caramel. Let it cool for another 30 minutes. Now, slice your ripe bananas. Layer them over the caramel. In another bowl, whip the heavy cream with powdered sugar and vanilla extract. Whip until you see soft peaks. Spread this whipped cream over the bananas. Smooth it out with a spatula. Finally, sprinkle cocoa powder or chocolate shavings on top. This adds a lovely touch. Chill the pie for at least 2 hours. This helps all the flavors come together. For a full recipe, check out the [Full Recipe]. For the best Banoffee Pie, timing matters. Chill the biscuit base for 30 minutes. This helps it set well. After pouring the caramel, let it cool for another 30 minutes. This step ensures a smooth texture. When cooking the caramel, look for a golden color. If it turns too dark, it may burn. Stir constantly while it cooks to keep it smooth. You can prepare parts ahead of time. Crush the biscuits and melt the butter a day before. Store them in the fridge. You can also make the caramel in advance. Just let it cool and then cover it. For quick cleanup, use a mixing bowl and a spatula. These tools help reduce mess. Wipe down surfaces as you go to keep the kitchen tidy. Pair your Banoffee Pie with fresh whipped cream or vanilla ice cream. These flavors enhance the pie’s sweetness. For presentation, slice the pie and place it on dessert plates. Add banana slices on top for a pop of color. A sprinkle of cocoa powder looks nice, too. You can also use chocolate shavings to impress your guests. Serve immediately after chilling for the best taste. {{image_2}} You can make your Banoffee pie even more exciting with different flavors. Adding nuts gives a nice crunch. Chopped walnuts or pecans work well. They add texture and flavor that contrast with the creamy filling. You can also add chocolate layers. Melt some dark chocolate and pour it over the caramel before adding bananas. This makes the pie richer and more indulgent. If you need gluten-free options, use gluten-free biscuits for the base. Many brands offer these, so you can enjoy the same great taste. For vegan adaptations, swap the sweetened condensed milk with coconut cream. You can blend it with sugar for sweetness. Use coconut whipped cream instead of heavy cream. This keeps the dessert creamy and delicious without dairy. Switching up the fruits can make your pie fit the season. In the summer, add fresh berries like strawberries or raspberries. They give a nice tartness that balances the sweetness. In winter, try using spiced apples. This adds warmth to the dessert. You can also change garnishes for holidays. Use candy canes for Christmas or edible flowers for spring. These small touches can make the pie festive and fun. For the full recipe, check out the Banoffee Bliss Pie 🥧 section. To keep your Banoffee Pie fresh, store it in the fridge. Use an airtight container or cover the pie with plastic wrap. This will help prevent it from drying out. The pie is best enjoyed within three days. After that, the bananas may start to brown and lose flavor. You might wonder if you can warm up Banoffee Pie. I don’t recommend reheating it. The crust can get soggy, and the whipped cream won’t hold up well. Instead, enjoy it cold right out of the fridge for the best taste and texture. Want to make your pie last longer? You can freeze Banoffee Pie! Start by slicing it into pieces. Wrap each slice tightly in plastic wrap. Then, place them in a freezer-safe bag or container. This keeps them fresh for up to two months. To enjoy, take a slice out and let it thaw in the fridge overnight. This way, the texture stays nice and creamy. Banoffee pie is a tasty dessert. It has a crunchy base, sweet caramel, fresh bananas, and whipped cream. The crunchy base is made from crushed digestive biscuits mixed with melted butter. The caramel layer comes from cooking sweetened condensed milk until it turns golden. Then, you add sliced bananas on top of the caramel. Finally, you finish it with light whipped cream. This pie is rich and creamy, making it a favorite for many. To keep bananas fresh, slice them just before serving. You can also brush the slices with lemon juice. The acid in lemon juice slows down the browning. If you want to prepare them earlier, try using a little pineapple juice as well. This also adds a nice flavor. Another trick is to store the bananas in the fridge after slicing. They might change color but will stay fresh longer. Yes, you can make Banoffee pie ahead of time. Prepare the base and caramel layer first. Store these in the fridge for up to two days. When you're ready to serve, slice the bananas and add them on top. Then, whip the cream and spread it over the bananas. This way, your pie stays fresh and tasty. Cover it with plastic wrap to protect it while in the fridge. If you need a substitute for condensed milk, try using coconut cream. It has a similar texture and adds a nice flavor. You could also use a mixture of regular milk and sugar. Simmer them together until thickened. This takes longer but works well. For a healthier touch, consider using maple syrup or honey. These alternatives can provide sweetness and a unique taste. In this blog post, we explored how to create a delicious Banoffee Pie from simple ingredients. We covered everything from choosing the best bananas to assembling the pie and storage tips. You can customize this dessert with various flavors and dietary options to suit your needs. Making Banoffee Pie is fun and rewarding. With practice, you can impress your friends and family with this delightful treat. Enjoy every step of the process and the sweet results!](https://recipespursuit.com/wp-content/uploads/2025/04/acadb375-cdf8-4213-a255-42e0b00b93e5-300x300.webp)

Tasty Tomato Basil Mozzarella Skewers Recipe Guide
Craving a fresh and easy appetizer? You’re in the right place! In this guide, I’ll show you how to make delicious Tomato Basil Mozzarella…