

Latest & Greatest

Lemon Poppyseed Protein Pancakes Healthy Breakfast Fix
Are you looking for a healthy breakfast that’s both tasty and filling? Try my Lemon Poppyseed Protein Pancakes! These fluffy
Read more…
White Bean Spinach Quesadillas Flavorful and Healthy Meal
Looking for a tasty meal that’s both fun to make and good for you? These White Bean Spinach Quesadillas pack
Read more…
Strawberry Banana Protein Smoothie Tasty and Nutritious
Looking for a quick and tasty way to boost your nutrition? The Strawberry Banana Protein Smoothie is your perfect match!
Read more…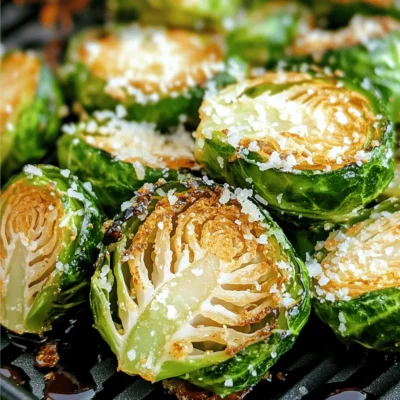
Crispy Air Fryer Brussels Sprouts Easy and Delicious Dish
If you’re looking for a tasty and healthy side dish, try these crispy air fryer Brussels sprouts! They’re easy to
Read more…
Sweet Potato Lentil Soup Cozy and Nourishing Bowl
Warm, cozy, and packed with nutrients, Sweet Potato Lentil Soup is your perfect bowl of comfort. This simple, tasty dish
Read more…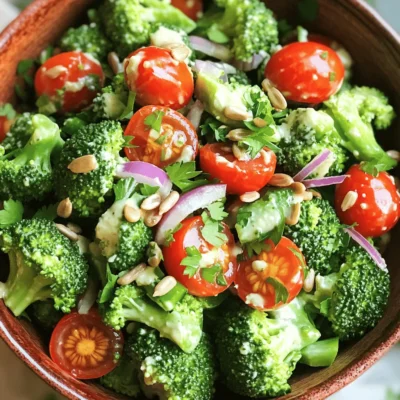
Lemon Tahini Broccoli Salad Fresh and Healthy Delight
Brighten your day with my Lemon Tahini Broccoli Salad, a fresh and healthy delight. This vibrant dish features crunchy broccoli,
Read more…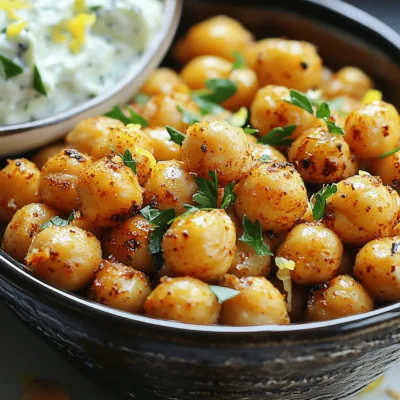
Spicy Roasted Chickpeas Crispy and Flavorful Snack
Get ready to spice up your snack game with these crispy roasted chickpeas! This recipe turns simple ingredients into a
Read more…
Carrot Cake Breakfast Cookies Flavorful Easy Treat
Craving a tasty way to kickstart your day? Try my Carrot Cake Breakfast Cookies! They pack the flavors of classic
Read more…browse recipes


![To make Parmesan Crusted Tilapia, you need simple, fresh ingredients. Here’s the list: - 4 tilapia fillets - 1 cup grated Parmesan cheese - 1/2 cup breadcrumbs (preferably panko for extra crunch) - 1 teaspoon garlic powder - 1 teaspoon onion powder - 1 teaspoon dried parsley - 1/2 teaspoon black pepper - 1/4 teaspoon salt - 2 eggs, beaten - 1 tablespoon olive oil - Lemon wedges for serving Each ingredient plays a key role. The tilapia fillets are mild and flaky, perfect for holding the crust. Parmesan cheese adds a sharp, savory flavor. Panko breadcrumbs give that delightful crunch. Garlic and onion powders boost flavor without overpowering the fish. Dried parsley adds a touch of freshness. Black pepper and salt enhance taste, while eggs help the crust stick. Olive oil aids in browning, making your fish look golden. Finally, lemon wedges brighten the dish with a zesty kick. This recipe is not just easy; it's also quick. You can find the full recipe to guide you through it step by step. Happy cooking! 1. Preheat the oven and prepare the baking sheet: Start by preheating your oven to 400°F (200°C). Line your baking sheet with parchment paper. This helps the tilapia cook evenly and prevents sticking. 2. Mixing the dry ingredients: In a mixing bowl, combine 1 cup of grated Parmesan cheese, 1/2 cup of breadcrumbs, 1 teaspoon of garlic powder, 1 teaspoon of onion powder, 1 teaspoon of dried parsley, 1/2 teaspoon of black pepper, and 1/4 teaspoon of salt. Mix them well to get an even flavor. 3. Beating the eggs for coating: In another bowl, beat 2 eggs until smooth. This will help the coating stick to the fish. 1. Dipping fillets in egg mixture: Take each tilapia fillet and dip it into the egg mixture. Make sure to let any extra egg drip off. 2. Coating with Parmesan breadcrumb mixture: Next, coat the fillet with the Parmesan breadcrumb mixture. Press down lightly to help the crumbs stick well. 1. Placement of coated fillets on the baking sheet: Place the coated fillets on the prepared baking sheet. Drizzle a little olive oil over each one to help it brown nicely. 2. Baking time and techniques for optimal crispiness: Bake the fillets for 12-15 minutes. You want them to be cooked through and the crust to be golden and crispy. 3. Serving suggestions with lemon wedges: Once done, take them out and let them rest for a couple of minutes. Serve hot with lemon wedges on the side. Squeeze the lemon over the fish for a fresh zing! For the full recipe, check out the details above. Enjoy this crispy and flavorful delight! To get that perfect crunch, I always use panko breadcrumbs. They give a light, airy texture that regular breadcrumbs can’t match. To start, preheat your oven to 400°F (200°C). Line your baking sheet with parchment paper. This helps the fish crisp up without sticking. When you coat each fillet, press lightly to ensure the mix sticks well. A drizzle of olive oil on top before baking helps too. Bake for 12-15 minutes until the crust is golden. You can take your tilapia to the next level by adding herbs and spices. Mix in dried parsley, garlic powder, or onion powder to the breadcrumbs for a flavor boost. You can also marinate the fillets in lemon juice or your favorite sauce before coating. This adds depth and makes the fish even tastier. For the full recipe, check the link above! {{image_2}} You can easily make this dish gluten-free. Instead of using regular breadcrumbs, try almond flour or gluten-free breadcrumbs. Both options give a nice crunch. Almond flour adds a light, nutty flavor. Gluten-free breadcrumbs work well too. They keep the dish tasty and safe for those with gluten issues. Want to mix things up? You can add different cheese types. Cheddar or mozzarella can change the taste. Each cheese brings its own flavor. For a kick, try a spicy Parmesan crust. Just add chili flakes to the breadcrumb mix. This gives your tilapia a nice heat. Both twists make the dish exciting and new. For the full recipe, check out [Full Recipe]. To keep your Parmesan crusted tilapia fresh, store leftovers in the fridge. Use an airtight container. Make sure the fish cools to room temperature first. This helps prevent sogginess. It will stay good for about 2 to 3 days. If you have more leftovers, consider freezing the cooked tilapia. Wrap each piece tightly in plastic wrap. Then, place them in a freezer-safe bag. This way, they can last up to 3 months. Just remember to label the bag with the date. When it's time to reheat, you want to keep that crispy texture. The oven works best for this. Preheat your oven to 350°F (175°C). Place the tilapia on a baking sheet. To keep it crispy, you can add a light drizzle of olive oil. Bake for about 10 minutes or until heated through. You can also use an air fryer for reheating. Set it to 350°F (175°C) and cook for about 5 minutes. This method keeps the crust crunchy and delicious. Enjoy your meal again just as it was! For the full recipe, check out the complete details above. How do you know when tilapia is cooked through? You know tilapia is done when it flakes easily with a fork. The flesh should be opaque and white. Use a food thermometer to check for 145°F (63°C) inside. This ensures it is safe to eat. Can I use a different fish for this recipe? Yes, you can use other fish like cod, haddock, or even chicken. Just ensure they are similar in thickness. Adjust cooking times based on the fish you choose. What are the best side dishes to serve with Parmesan Crusted Tilapia? Great sides include steamed vegetables, rice, or a fresh salad. Try serving it with roasted potatoes or quinoa for a hearty meal. These sides balance the rich flavors of the fish. How long does it take to prepare and cook Parmesan Crusted Tilapia? It takes about 10 minutes to prepare and 12-15 minutes to cook. In total, you can enjoy this dish in about 25 minutes. This makes it perfect for a quick weeknight dinner. Caloric content and serving size A serving of Parmesan Crusted Tilapia has about 300 calories. This includes one fillet and the crust. Adjust portion sizes based on your dietary needs. Health benefits of tilapia and Parmesan cheese Tilapia is a lean source of protein. It has low fat and provides essential nutrients. Parmesan cheese adds flavor and calcium, but watch the amount to keep sodium low. Suggestions for other easy fish recipes to try at home Try baked salmon with a honey glaze or fish tacos with fresh salsa. You might also enjoy lemon garlic shrimp or pan-seared scallops. Each recipe offers simple steps and great taste. For the full recipe of Parmesan Crusted Tilapia, refer to the previous section. In this post, we explored how to make delicious Parmesan Crusted Tilapia. You learned the key ingredients and steps to prepare the dish. I shared tips for achieving crispy fillets and variations for flavor. Proper storage and reheating techniques help you enjoy leftovers. This recipe is simple and satisfying, perfect for any meal. Enjoy cooking and tasting your tasty tilapia!](https://recipespursuit.com/wp-content/uploads/2025/07/93560c12-ed7a-4852-ba7a-7d0495bd197b.webp)
Parmesan Crusted Tilapia Crispy and Flavorful Delight
Are you ready to elevate your weeknight dinners? Parmesan Crusted Tilapia is your answer! This dish combines crispy texture with rich flavor, making it…
My Latest Desserts
My Latest Recipes

hey,
i’m !
I’m so happy you’re here!
Cooking is my love language, and I’m excited to share my best dishes with you. Hope they become your favorites too! Let’s enjoy every bite of this journey together.
![To make easy chocolate chip cookies, you will need the following ingredients: - 1 cup unsalted butter, softened - 3/4 cup granulated sugar - 3/4 cup packed brown sugar - 1 teaspoon vanilla extract - 2 large eggs - 2 1/4 cups all-purpose flour - 1 teaspoon baking soda - 1/2 teaspoon salt - 2 cups semi-sweet chocolate chips - 1/2 cup chopped walnuts (optional) These ingredients create a rich and delicious cookie dough. The butter gives a nice creamy texture, while the sugars add sweetness and help the cookies stay soft. The chocolate chips are the stars of the show, providing bursts of chocolate in every bite. If you like nuts, the walnuts add a nice crunch, but you can skip them if you prefer. When you gather these items, you prepare to create a treat everyone will love. For detailed instructions, check the Full Recipe. - Set oven temperature to 375°F (190°C). - Prepare the baking sheet with parchment paper. Preheating your oven first saves time. It ensures your cookies bake evenly. Lining the baking sheet with parchment helps with easy cleanup. - Beat butter and sugars until light and fluffy. In a large bowl, cream the softened butter with granulated and brown sugars. This step takes about 2-3 minutes. Your mixture should look pale and fluffy. - Add eggs and vanilla; mix well. Add each egg one at a time. Mix well after each addition. Then stir in the vanilla extract until the mixture is smooth. This adds a wonderful flavor to your cookies. - Whisk flour, baking soda, and salt before combining. In a separate bowl, whisk together your flour, baking soda, and salt. This helps to evenly distribute the baking soda. - Gradually combine dry and wet ingredients; fold in chocolate and nuts. Slowly add the dry mix to your wet mixture. Stir gently until just combined. Avoid over-mixing, as this can make cookies tough. Finally, fold in chocolate chips and nuts. - Scoop dough onto baking sheet; bake for 9-11 minutes. Using a cookie scoop or spoon, drop rounded tablespoons of dough onto the baking sheet. Leave space between each scoop. Bake for 9-11 minutes until edges are golden brown. The centers will still be soft, which is perfect! Enjoy making these easy chocolate chip cookies with the full recipe! To make your cookies great, do not over-mix the dough. Mixing too much can make them tough. Just mix until the ingredients are combined. Another trick is to chill the dough for 30 minutes. This helps the cookies stay thick and chewy. When baking, rotate the baking sheets halfway through. This helps cookies bake evenly. Also, use a cookie scoop for uniform cookie size. This makes sure all cookies bake the same, so you have perfect treats every time. To impress your friends, stack cookies on a decorative plate. It looks nice and makes them more fun to eat. For an extra flavor boost, add a sprinkle of sea salt before baking. This little touch can take your cookies to the next level. For the full recipe, check the [Full Recipe] section above. {{image_2}} You can change the type of chocolate chips you use. Try using milk chocolate or dark chocolate chips. Milk chocolate gives a sweet and creamy taste. Dark chocolate adds a rich and bold flavor. Experimenting with different chocolates can change the taste of your cookies. If you want a nut-free version, simply omit the walnuts. This makes your cookies safe for those with nut allergies. You can still enjoy a great texture without nuts. The cookies will be just as delicious and satisfying. To make your cookies even more unique, think about add-ins. You can mix in dried fruits like cranberries or raisins for a chewy bite. Coconut flakes add a sweet and chewy texture too. These add-ins will make your cookies stand out at any gathering. For the full recipe, check the main section above! Store your cookies at room temperature. Use an airtight container to keep them fresh. This will help them stay soft and tasty for up to a week. If you find they harden, you can add a slice of bread to the container. The bread will keep cookies moist. You can freeze your cookie dough too. This is a great way to save time. Just scoop the dough into balls and place them on a baking sheet. Freeze until solid, then transfer them to a freezer bag. You can keep the dough for up to three months. When you are ready to bake, take the dough out of the freezer. Let it thaw in the fridge for a few hours before baking. If you have leftover baked cookies, you can reheat them in the microwave. Just heat for a few seconds until warm. This will bring back that fresh-baked taste. For the full recipe, check out the details above. Typically, chocolate chip cookies last about 1 week at room temperature in an airtight container. For best taste and texture, eat them fresh. Yes, you can use whole wheat flour, but the texture will be denser. It may also change the flavor slightly, making it nuttier. You can use flaxseed meal or unsweetened applesauce as an egg replacer. Mix 1 tablespoon of flaxseed meal with 2.5 tablespoons of water for each egg. For applesauce, use 1/4 cup per egg. Yes, this recipe is designed to be easy and straightforward for all skill levels. The steps are simple, and the ingredients are common. You can find the Full Recipe for more detailed steps. You now have a clear path to baking delicious chocolate chip cookies. We covered the ingredients, key steps, and helpful tips to ensure your success. Remember, the right technique makes a big difference in texture and flavor. Whether you choose to add nuts or mix up the chocolate, these cookies will impress anyone. Enjoy your baking adventure, and don’t forget to share the joy with friends and family. They will love your tasty treats!](https://recipespursuit.com/wp-content/uploads/2025/05/a8ce5fdc-9496-468d-96b5-4bc1c86e9015-300x300.webp)


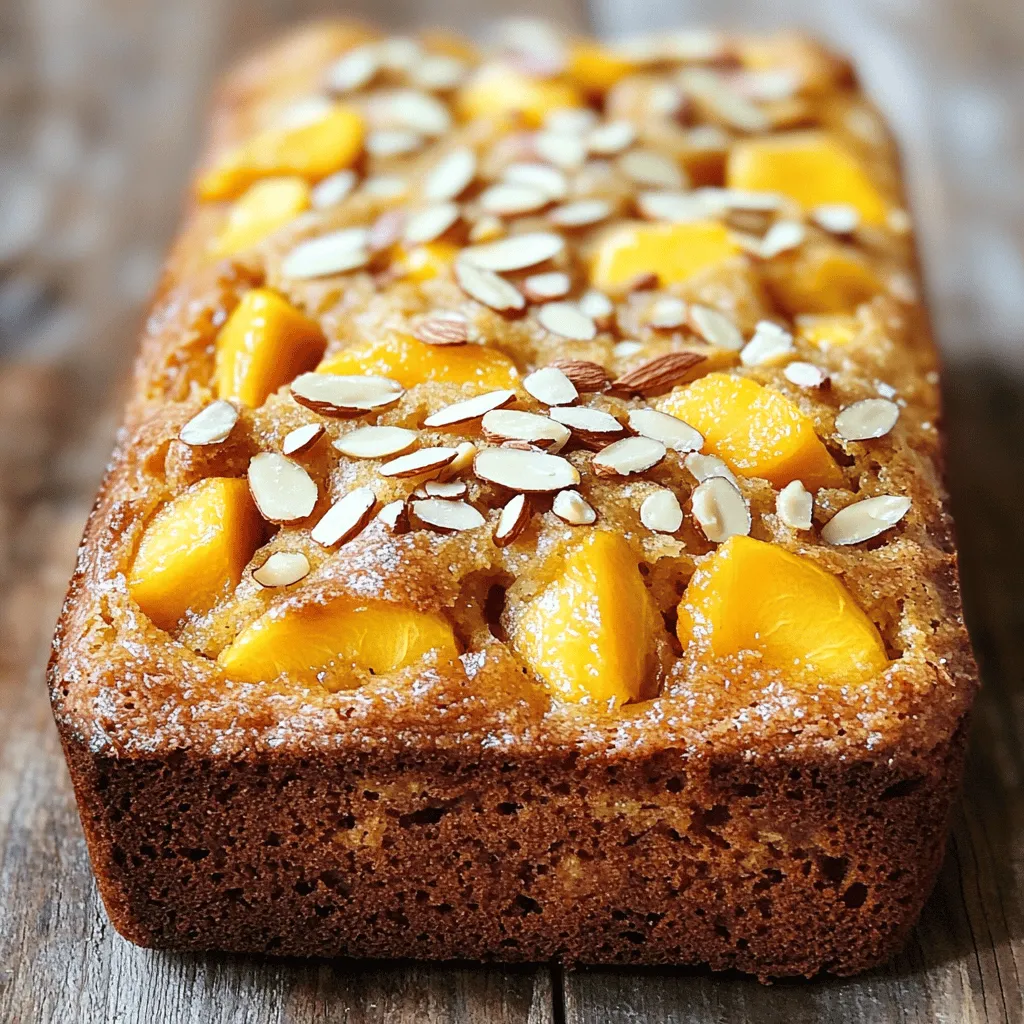
Peach Almond Breakfast Loaf Flavorful Morning Treat
Start your day with a burst of flavor! My Peach Almond Breakfast Loaf combines sweet peaches and rich almonds, perfect for a tasty morning…