Latest & Greatest

browse recipes

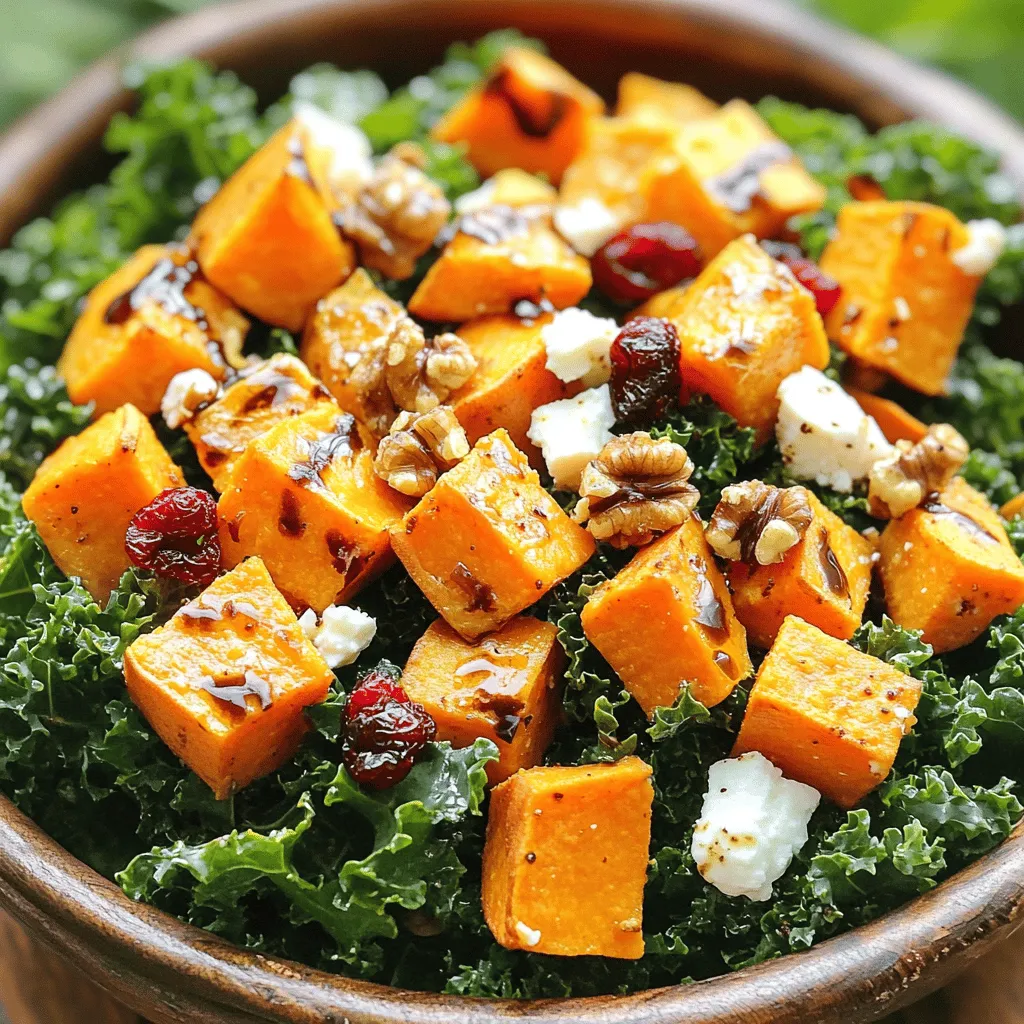
- 2 medium sweet potatoes, peeled and cubed - 1 tablespoon olive oil - Salt and pepper to taste - 4 cups kale, stems removed and torn into bite-sized pieces - 1/4 cup feta cheese, crumbled - 1/4 cup dried cranberries - 1/4 cup walnuts, roughly chopped - 1 tablespoon maple syrup - 1 tablespoon balsamic vinegar - 1 tablespoon Dijon mustard - 1 clove garlic, minced Sweet potatoes are a great source of vitamins. They are high in vitamin A, which is good for your eyes. They also provide fiber, which helps with digestion. Sweet potatoes can keep you full for longer. Kale is a superfood. It is packed with vitamins K, C, and A. Kale also has antioxidants, which help fight disease. Eating kale can boost your health and support your immune system. The other ingredients add to the salad's nutrition. Feta cheese gives protein and calcium. Dried cranberries add sweetness and vitamins. Walnuts are rich in healthy fats and protein. Maple syrup offers natural sweetness, while balsamic vinegar adds flavor without many calories. Garlic boosts flavor and has health benefits too. Together, these ingredients make a tasty and healthy meal. You will enjoy every bite and feel great after eating it. For the full recipe, check the recipe section. First, you need to preheat your oven to 400°F (200°C). While it heats, grab a baking sheet and line it with parchment paper. This makes cleanup easier. Now, take the sweet potatoes. Peel and cube them into bite-sized pieces. In a bowl, toss the sweet potatoes with one tablespoon of olive oil, salt, and pepper. Make sure they are well coated. Spread them out evenly on the prepared baking sheet. Roast the sweet potatoes in the oven for about 25 to 30 minutes. Halfway through cooking, flip them to ensure even browning. You will know they are done when they are tender and golden brown. A fork should slide easily through them. While the sweet potatoes roast, let’s prepare the kale. Tear it into bite-sized pieces and put it in a large mixing bowl. Drizzle about one teaspoon of olive oil and add a pinch of salt. Now, massage the kale for one to two minutes. This helps it soften and taste better. Once the sweet potatoes finish roasting, let them cool slightly. Then, add them to the bowl with the kale. Next, add in the crumbled feta, dried cranberries, and walnuts. Finally, drizzle your dressing over everything. Toss gently until well combined. Taste and adjust seasoning if needed. For the full recipe, refer to the earlier section. To balance flavors in your roasted sweet potato kale salad, start with salt and pepper. These basics enhance each ingredient. For a kick, add a pinch of cayenne or smoked paprika. Maple syrup adds sweetness, while balsamic vinegar brings acidity. Both help create a well-rounded flavor. You might want to swap ingredients for different tastes. Try spinach instead of kale for a milder base. If you don’t like feta, goat cheese works well too. You can also replace cranberries with raisins for a different sweet touch. Want a nutty flavor? Swap walnuts for pecans. When styling the salad, use a large bowl or platter. This allows all the colors to shine. For a fun look, layer the ingredients. Start with kale, then add sweet potatoes, followed by feta, cranberries, and walnuts. This makes the dish more appealing. Garnishing is key to a beautiful salad. Add extra walnuts and feta on top. You can also sprinkle fresh herbs like parsley for a pop of green. A drizzle of dressing on top can make it look even better. To make your salad a complete meal, pair it with proteins. Grilled chicken or chickpeas are great options. They add heartiness and make your meal more filling. You can also serve it with fish like salmon for a healthy twist. For side dishes, consider a simple soup, like tomato or butternut squash. A piece of crusty bread or a light quinoa dish will also complement the salad. These sides enhance the flavors without overpowering them. You can find the full recipe linked above for all the details. Enjoy your cooking! {{image_2}} You can easily swap ingredients in this salad to fit your diet or taste. If you're vegan, skip the feta and use avocado for creaminess. You can also add roasted chickpeas instead of walnuts for crunch. If you have nut allergies, try seeds like pumpkin or sunflower seeds. Seasonal changes can also inspire you. In fall, add roasted Brussels sprouts. In spring, toss in fresh peas or radishes. These swaps keep your salad fresh and exciting! To spice up your salad, think about adding toppings. Crushed red pepper flakes can add heat, while a sprinkle of lemon zest brightens the dish. You can also try different dressings. A tahini dressing adds a nutty flavor. A simple lemon vinaigrette gives a lighter touch. Feel free to mix and match. Each dressing brings out a new taste in the sweet potatoes and kale. This way, you can enjoy a new salad every time! To keep your salad fresh, use airtight containers. Glass or plastic containers work well. Store the salad in the fridge. It stays good for about 3 days. After that, the kale can wilt and lose its crunch. Reheat sweet potatoes in the oven or microwave. For the oven, set it to 350°F (175°C). Place sweet potatoes on a baking sheet and heat for about 10 minutes. In the microwave, warm them in short bursts. Stop to check every 30 seconds. To keep the salad fresh, add the dressing just before serving. This way, the kale stays crisp, and the flavors stay bright. If you want to eat it later, store the dressing separately. To make roasted sweet potatoes crispy, follow these tips: - Cut uniform pieces: Chop sweet potatoes into even cubes. This helps them cook evenly. - Use enough oil: Toss them with olive oil. This promotes browning and crispiness. - Don't overcrowd the pan: Spread them out in a single layer on the baking sheet. Crowding leads to steaming, not roasting. - Flip halfway: Turn the sweet potatoes once during roasting. This ensures all sides get crispy. - High heat is key: Roast at 400°F (200°C). This temperature helps them brown nicely. Yes, you can prep this salad ahead of time! Here are some tips: - Roast sweet potatoes in advance: Cook them the day before. Store them in an airtight container in the fridge. - Prepare the dressing: Make the dressing a day ahead. Keep it in the fridge until you're ready to use it. - Store kale separately: Keep the kale in a separate bowl. This keeps it fresh and crisp. - Assemble just before serving: Mix everything right before eating. This keeps the salad from getting soggy. If you need a feta cheese substitute, consider these options: - Goat cheese: It has a similar texture and tangy flavor. - Ricotta: This soft cheese can add creaminess to your salad. - Dairy-free cheese: Use coconut-based or almond-based cheese. They offer a similar taste without dairy. - Nutritional yeast: Sprinkle this on for a cheesy flavor without dairy. For the full recipe of the Roasted Sweet Potato Kale Salad, check out the provided recipe link. This blog post detailed how to create a delicious roasted sweet potato salad. We covered ingredients, step-by-step cooking, and tips for perfecting flavors. The nutritional benefits of sweet potatoes and kale shine through, making this salad a healthy choice. I hope you feel inspired to try variations and enjoy it more. Whether for a meal or a side, this salad can fit any occasion. Explore the options, share with others, and savor each bite!

Roasted Sweet Potato Kale Salad Tasty and Healthy Meal

Looking for a tasty and healthy meal? Look no further! This Roasted Sweet Potato Kale Salad packs a flavorful punch with its mix of…

My Latest Desserts

My Latest Recipes

hey,

i’m !

I’m so happy you’re here!

Cooking is my love language, and I’m excited to share my best dishes with you. Hope they become your favorites too! Let’s enjoy every bite of this journey together.

Coconut Cream Pie Bars Irresistible Dessert Delight

If you crave a sweet treat that dances on your taste buds, you’ll love these Coconut Cream Pie Bars. Simple to make and full…
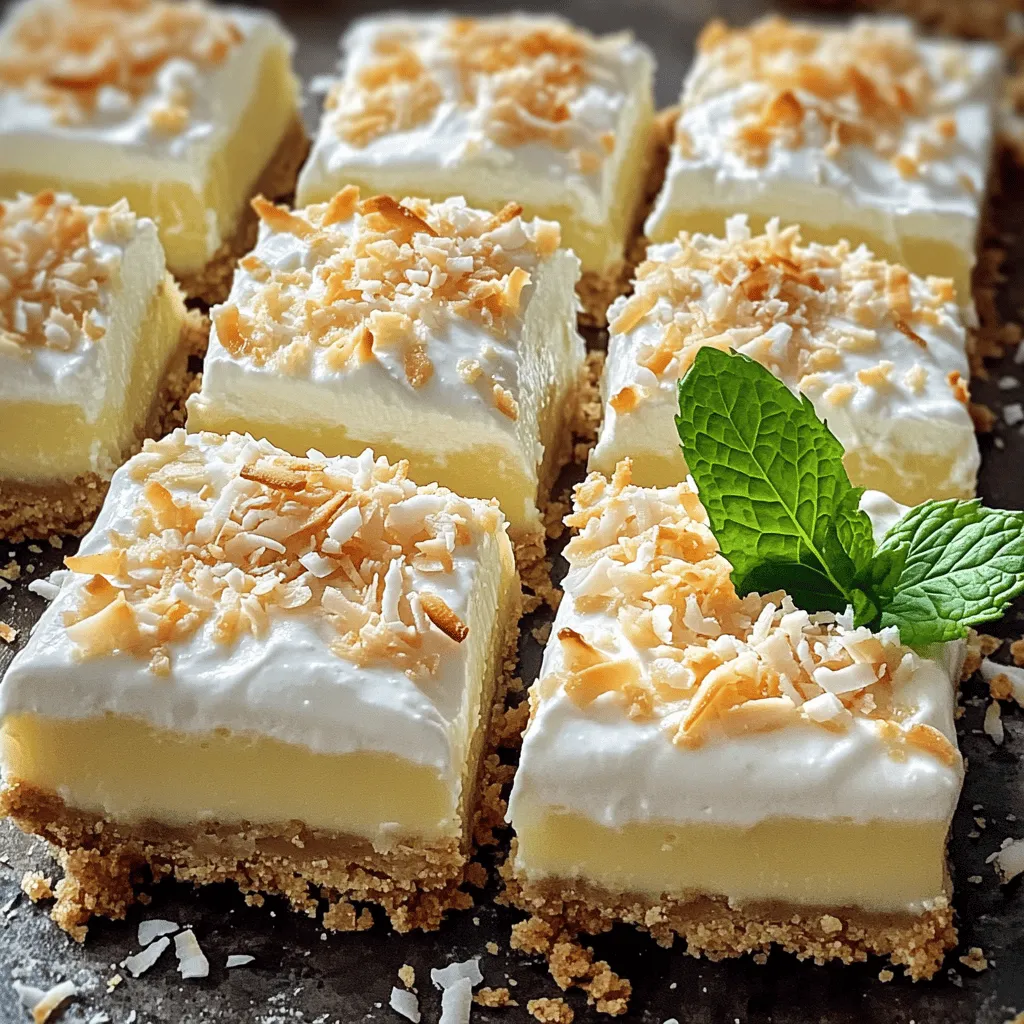
- 1 cup all-purpose flour - 1/4 cup powdered sugar - 1/2 cup unsalted butter, melted - 1 can (14 oz) coconut cream - 1 cup granulated sugar - 1/4 cup cornstarch - 1/2 teaspoon salt - 4 large egg yolks - 1 tablespoon vanilla extract - 1 cup heavy cream - 2 tablespoons powdered sugar (for whipping) - Sweetened shredded coconut (1 cup for crust and toasted flakes for garnish) To create Coconut Cream Pie Bars, you need a mix of dry and wet ingredients. First, the dry ingredients include flour and powdered sugar. These form the base of your crust. The wet ingredients consist of melted butter, coconut cream, and granulated sugar. These add moisture and sweetness to your dessert. Next, you have additional components that make the filling creamy and rich. Cornstarch helps thicken the filling, while salt enhances the flavor. The egg yolks add richness, and vanilla extract brings a warm, sweet note. Heavy cream, whipped with powdered sugar, will crown your bars perfectly. Finally, the sweetened shredded coconut gives the bars a tropical flair. These ingredients come together to create a dessert that is both delicious and visually stunning. You can find the full recipe to guide you through the steps. - Preheat oven to 350°F (175°C). - In a bowl, combine 1 cup of flour and 1/4 cup of powdered sugar. - Stir in 1/2 cup of melted butter until you have a crumbly dough. - Press this dough into the bottom of an 8x8-inch baking dish. - Sprinkle 1 cup of shredded coconut evenly over the crust. - Bake for 15-20 minutes or until the crust turns golden brown. - Once done, remove it from the oven and let it cool slightly. - In a medium saucepan, whisk together 1 can of coconut cream, 1 cup of granulated sugar, 1/4 cup of cornstarch, and 1/2 teaspoon of salt. - Cook this mixture over medium heat, stirring constantly until it thickens. - Once thickened, whisk in 4 large egg yolks for richness. - Mix in 1 tablespoon of vanilla extract before pouring it over the cooled crust. - Let the bars cool at room temperature for 1 hour. - Refrigerate for 3-4 hours to set completely. - For the topping, whip 1 cup of heavy cream with 2 tablespoons of powdered sugar until stiff peaks form. - Spread this whipped cream over the chilled coconut filling. - Garnish with toasted coconut flakes for extra flavor and crunch. For a detailed view of the steps, check the Full Recipe. - Use parchment paper for easier removal from the baking dish. - Make sure to press the crust firmly for a sturdier base. When you make the crust for your Coconut Cream Pie Bars, use parchment paper. This makes it simple to lift the bars out later. It saves time and mess. Press down the crust well. This helps it hold together and not crumble when you cut it. A sturdy crust means a better bar. - Stir continuously to prevent lumps while thickening. - Adjust sweetness based on preference by varying the sugar amount. To get a smooth filling, keep stirring as it heats. This stops lumps from forming. If you like your dessert sweeter, you can add more sugar. Taste as you go to find the right balance for you. Remember, coconut cream gives a rich flavor. - Chill the mixing bowl and beaters for better results. - Use heavy cream for a richer topping. For the best whipped cream, chill your bowl and beaters first. Cold tools help the cream whip up nicely. Use heavy cream for a thicker topping. It makes a big difference in taste and texture. Whip until you see stiff peaks. This means your cream is ready to top the bars perfectly. Enjoy your creation! {{image_2}} You can easily change the flavor of these bars. One fun option is to add lime zest. This gives your coconut cream pie bars a bright, tropical twist. Just mix in the zest when you make the filling. Another tasty idea is to add chocolate chips. This adds a rich flavor that pairs well with coconut. You can sprinkle the chips into the filling before pouring it over the crust. If you want a gluten-free option, you can swap the all-purpose flour for graham cracker crumbs. This crust still holds up well and adds a nice sweetness. For a bolder taste, try using a chocolate cookie crust. This will make your bars extra special and fun. Just crush your favorite chocolate cookies and use them as the base. Switching up the topping can also make your bars unique. Instead of toasted coconut, try crushed nuts for added crunch. Almonds or pecans work great. You can also drizzle melted chocolate on top for a fancy finish. This adds a touch of elegance and makes the bars look stunning. These variations keep your dessert exciting and allow you to impress your friends and family. For the complete recipe, check out the Full Recipe section. Store your coconut cream pie bars in an airtight container. They will stay fresh for up to 5 days. Keeping them sealed helps maintain their delicious taste and texture. If you want to save some for later, wrap each bar in plastic wrap. You can freeze them for up to 2 months. When you’re ready to enjoy, just thaw the bars in the refrigerator before serving. To keep the bars at their best, avoid adding whipped cream until you are ready to serve. This helps keep the texture nice and fluffy. If you don’t plan to serve right away, store the whipped cream separately. This way, it stays fresh and tasty! Yes, but the filling may be less rich and creamy. Coconut cream has a thicker texture. It adds a luxurious feel to the bars. If you want a lighter dessert, coconut milk works. Just know the flavor will change slightly. Ensure you cook the filling until thickened and refrigerate for the recommended time. Cooking the mixture helps it firm up. Stir constantly while cooking to avoid lumps. After pouring the filling over the crust, let it cool. Then, refrigerate for at least three to four hours to set fully. Bars are typically served in squares and have a crust with filling, while pie has a rounded crust. Bars are easy to cut and serve. Pies need a pie dish and are often deeper. Both are delicious, but bars offer a fun twist. Yes, substitute with non-dairy butter and coconut cream for a vegan version. This makes the bars dairy-free. You can still enjoy the same great taste. Use your favorite plant-based cream to keep it rich and creamy. Cut into even squares and sprinkle with additional toasted coconut or mint leaves before serving. This adds color and texture. You can also use a nice platter for serving. A little extra care in presentation makes a big difference. This recipe combines simple ingredients to make delicious coconut bars. You start by making a tasty crust and filling with coconut cream. Follow the steps carefully to get the best results. You can also explore fun variations, like adding lime zest or chocolate chips. Don’t forget about storage tips to keep your bars fresh. Enjoy experimenting with this recipe, and make it your own!