

Latest & Greatest
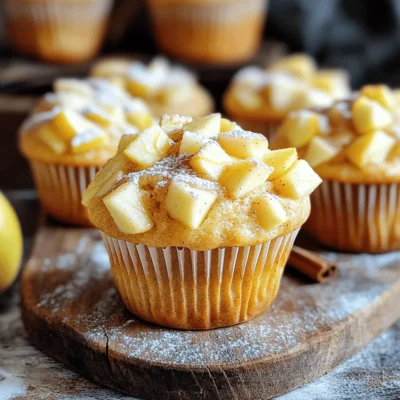
Healthy Apple Cinnamon Muffins Easy and Delicious Recipe
Are you ready to bake some joy? These Healthy Apple Cinnamon Muffins are easy to make and full of flavor.
Read more…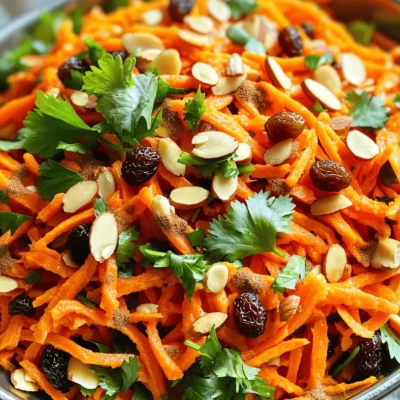
Moroccan Spiced Carrot Salad Flavorful and Healthy Dish
Are you ready to add a burst of flavor to your meals? This Moroccan Spiced Carrot Salad is not just
Read more…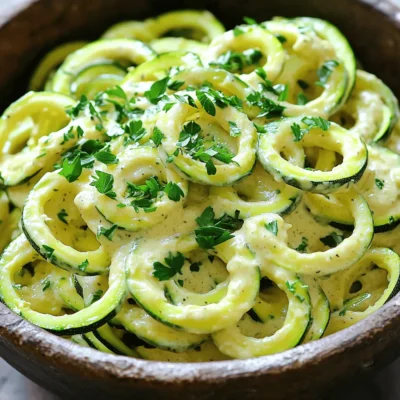
Zucchini Noodle Alfredo Creamy Guilt-Free Delight
Are you ready to enjoy a dish that’s both creamy and healthy? Zucchini Noodle Alfredo offers all the satisfaction of
Read more…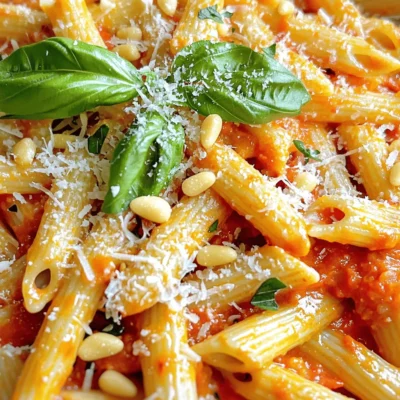
Roasted Red Pepper Pasta Flavorful and Easy Recipe
If you’re craving a dish that’s both simple and bursting with flavor, you’ve found it! Roasted Red Pepper Pasta is
Read more…
Mango Black Bean Salsa Flavorful and Simple Recipe
If you’re looking for a fresh and vibrant dish that packs a punch, Mango Black Bean Salsa is a must-try!
Read more…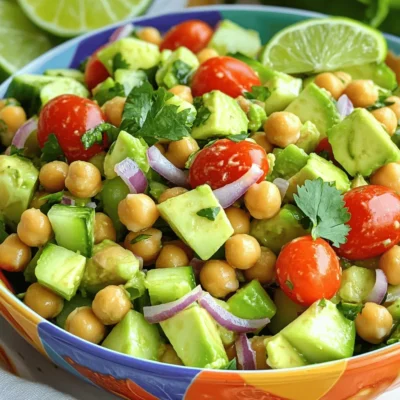
Chickpea Avocado Salad Fresh and Healthy Delight
Looking for a fresh, healthy dish? You’ve found it! This Chickpea Avocado Salad is not only vibrant but packed with
Read more…
Lemon Herb Chicken Skewers Flavorful Grilling Delight
Ready to elevate your grilling game? These Lemon Herb Chicken Skewers will have everyone coming back for more. With juicy
Read more…
Sweet Potato Quinoa Salad Nourishing and Flavorful Dish
Looking for a dish that’s both nourishing and packed with flavor? The Sweet Potato Quinoa Salad is your answer! This
Read more…browse recipes


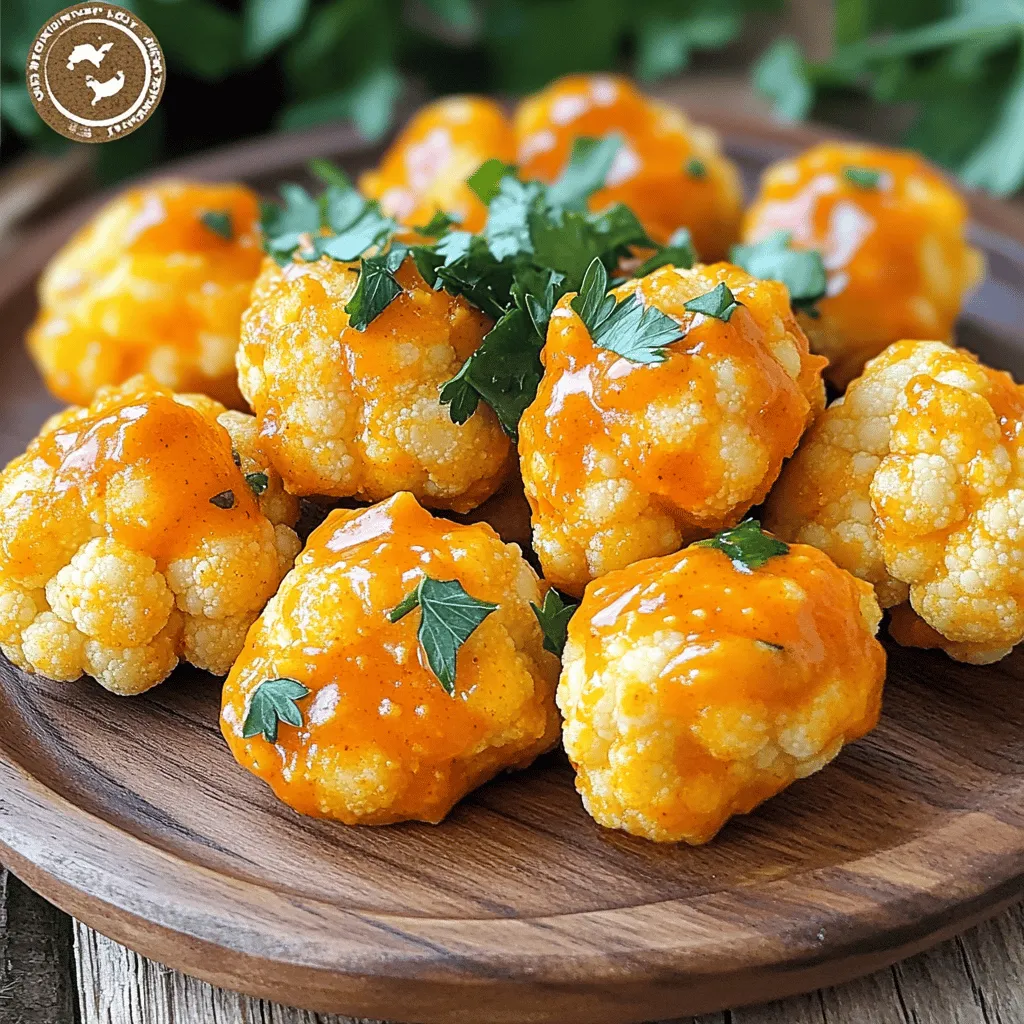
Air Fryer Cauliflower Buffalo Bites Crispy Snack Recipe
Looking for a delicious snack that’s both crispy and spicy? You’ll love these Air Fryer Cauliflower Buffalo Bites! With just a few simple ingredients,…
My Latest Desserts
My Latest Recipes

hey,
i’m !
I’m so happy you’re here!
Cooking is my love language, and I’m excited to share my best dishes with you. Hope they become your favorites too! Let’s enjoy every bite of this journey together.


![- 2 medium zucchinis, grated - 1 cup sweet corn kernels (fresh or frozen) - 1/2 cup all-purpose flour - 1/2 cup cornmeal The main ingredients are key to making these zucchini corn cakes tasty. Zucchini adds moisture and flavor. It is also low in calories. Sweet corn gives a sweet crunch. Flour and cornmeal help bind the mix. Together, they create a delicious cake. - 1/4 cup green onions, finely chopped - 1/4 cup feta cheese, crumbled (optional) - Seasoning options: salt, pepper, garlic powder, smoked paprika You can add optional ingredients for extra flavor. Green onions provide a mild onion taste. Feta cheese adds a creamy, tangy kick. You can also play with spices. Garlic powder and smoked paprika give a warm, smoky flavor. - Box grater - Non-stick skillet - Mixing bowls Having the right tools makes cooking easier. A box grater helps you grate the zucchini quickly. A non-stick skillet prevents sticking and makes flipping easy. Mixing bowls allow you to combine all the ingredients smoothly. For the full details, check the Full Recipe. Start by grating the zucchinis using a box grater. This method helps break them down nicely. Once you have a bowl full of grated zucchini, place it in a clean kitchen towel. Squeeze out the extra moisture. This step is key! Removing moisture helps the cakes stay crispy. If you skip this, the cakes may turn soggy. In a large mixing bowl, combine the grated zucchini, sweet corn, flour, cornmeal, and chopped green onions. Mix them well. In another bowl, beat the eggs and pour them into the vegetable mix. Stir until everything is blended. Now, add baking powder, garlic powder, and smoked paprika. Don’t forget to add salt and pepper to taste. If you want a creamy touch, fold in the crumbled feta cheese. This will give your cakes a tasty kick. Heat a non-stick skillet over medium heat. Add a drizzle of olive oil to the pan. Once the oil is hot, drop spoonfuls of the batter onto the skillet. Flatten them slightly with the back of the spoon. Cook for about 3-4 minutes on each side. Look for that golden brown color and crispy edges. When they’re done, remove them from the skillet and place them on paper towels to drain any excess oil. Repeat this with the rest of the batter, adding more olive oil as needed. Enjoy these tasty treats! For the full recipe, refer to the instructions above. To get crispy zucchini corn cakes, moisture removal is key. Zucchini holds a lot of water. After grating the zucchini, place it in a clean kitchen towel. Squeeze it firmly to remove excess liquid. This step helps your cakes brown nicely. If you skip this step, your cakes may turn soggy. Adding spices and herbs can boost the taste of your cakes. I love using garlic powder and smoked paprika. These spices give a warm and savory flavor. You can also try adding fresh herbs like parsley or cilantro. Just chop them finely and mix them in. This simple step makes a big difference in flavor. Pair your zucchini corn cakes with tasty dips or sides. A dollop of sour cream or Greek yogurt works great. You can also serve them with salsa for a zesty kick. If you want something lighter, a fresh salad makes a good match. These cakes can be a fun snack or a light meal. To see the full recipe, check out the [Full Recipe]. {{image_2}} If you want to make these zucchini corn cakes gluten-free, simply swap out the all-purpose flour. You can use gluten-free all-purpose flour or almond flour instead. Both options work well and give great texture. You can add other veggies to these cakes for more flavor and nutrition. Try grated carrots or chopped bell peppers. Spinach also works nicely here. Just make sure to squeeze out any extra moisture, especially if you use leafy greens. This keeps the cakes from becoming soggy and helps them hold their shape. Experimenting with spices can take your zucchini corn cakes to the next level. You might try adding cumin for a warm, earthy taste. If you love heat, a pinch of cayenne pepper or chili powder will do the trick. Fresh herbs, like cilantro or parsley, can brighten up the flavor. Don't be afraid to get creative! Each twist adds a unique touch and makes the dish your own. For the full details, check out the Full Recipe. To store leftovers, let the zucchini corn cakes cool completely. Place them in an airtight container. You can keep them in the fridge for up to 3 days. If you want to keep them fresh longer, separate layers with parchment paper. This helps prevent sticking. For freezing, make sure the cakes are fully cool. Wrap each cake in plastic wrap. Then, place them in a freezer-safe bag. You can freeze them for up to 2 months. When you want to eat them, just take out the number you need. To reheat, you can use the oven or a skillet. If using the oven, preheat to 350°F (175°C). Place the cakes on a baking sheet for about 10 minutes. For the skillet, heat it over medium. Add a small amount of oil and cook each side for about 2-3 minutes. This keeps the cakes crispy and tasty. Enjoy your delicious zucchini corn cakes! You can find the full recipe above. You can use peas or diced bell peppers. Both add nice flavor and color. Peas give a sweet taste, while bell peppers add crunch. If you're looking for a different texture, try using grated carrots. They work well with zucchini. Just adjust the amount in the recipe to keep the balance right. Yes, you can bake them! Preheat your oven to 400°F (200°C). Line a baking sheet with parchment paper. Drop spoonfuls of the batter onto the sheet. Flatten them just like in the frying method. Bake for 20-25 minutes, flipping halfway. Look for a golden color on both sides. This method cuts down on oil but still gives a tasty result. Look for a golden brown color on both sides. The edges should be crispy. You can also poke a cake with a fork. If it comes out clean, they are ready. If they feel soft or wet, cook them a bit longer. Enjoy them fresh for the best flavor! For the full recipe, check out the Zesty Zucchini Corn Cakes section. Zucchini corn cakes are easy and fun to make. We covered all the important steps, from gathering ingredients to cooking. You learned about choosing flavors and keeping them crispy. Remember, you can swap ingredients or try different spices. Proper storage keeps your cakes fresh for later. Now, you are ready to enjoy these tasty cakes any time. Dive into the kitchen and make your own delicious zucchini corn cakes!](https://recipespursuit.com/wp-content/uploads/2025/06/66bd379b-2fa9-4445-b34e-7be51fcc047b-300x300.webp)
Vegan Sweet Potato Brownies Simple and Tasty Delight
If you love sweet treats but want a healthy twist, these Vegan Sweet Potato Brownies are for you! Not only are they simple to…
![To make these vegan sweet potato brownies, you will need: - 1 cup sweet potato puree - 1/2 cup almond butter - 1/3 cup maple syrup - 1 teaspoon vanilla extract - 1/2 cup cocoa powder - 1/4 teaspoon baking soda - 1/4 teaspoon salt - 1/2 cup oat flour - 1/4 cup dark chocolate chips Sweet potato puree adds moistness and a hint of sweetness. Almond butter gives a creamy texture and rich flavor. Maple syrup acts as a natural sweetener, while vanilla extract enhances the overall taste. Cocoa powder brings that rich chocolate flavor we all love. Baking soda helps the brownies rise, and salt balances the sweetness. Oat flour adds structure, and dark chocolate chips provide delightful bursts of chocolate. If you don’t have some ingredients, you can swap them out. Here are some ideas: - Instead of almond butter, use peanut butter or sunflower seed butter. - You can replace maple syrup with agave syrup or another liquid sweetener. - If you lack cocoa powder, try carob powder for a different flavor. - For oat flour, simply blend rolled oats into a fine powder. These substitutes keep the brownies tasty and vegan-friendly. Each ingredient in these brownies brings health benefits: - Sweet potato: High in vitamins A and C, great for your skin and vision. - Almond butter: Packed with protein, healthy fats, and vitamin E. - Maple syrup: Contains antioxidants and helps with energy. - Vanilla extract: May have calming effects and boosts flavor. - Cocoa powder: Rich in antioxidants and can improve heart health. - Baking soda: Helps with digestion and balances pH levels. - Salt: Needed in small amounts for hydration and nerve function. - Oat flour: High in fiber, supports digestion, and lowers cholesterol. - Dark chocolate chips: Good source of antioxidants and may improve mood. These ingredients make your brownies not just delicious but also nutritious. Check the Full Recipe for more details on how to create these sweet treats! To start, you need sweet potato puree. Just cook one medium sweet potato. You can bake, steam, or boil it until soft. After cooling, mash it until smooth. This puree gives the brownies a sweet taste and a rich texture. You can make extra puree and use it in other dishes, like soups or smoothies. In a big bowl, mix the sweet potato puree with almond butter. Then add maple syrup and vanilla extract. Stir until it looks smooth. Next, sift in cocoa powder, baking soda, and salt. Mix everything together. Now, slowly add oat flour. Stir until it blends well. Finally, fold in vegan chocolate chips. This step makes the brownies extra yummy. Preheat your oven to 350°F (175°C). Grease an 8x8 inch baking dish or use parchment paper. Pour the brownie batter into the dish and spread it evenly. Bake for 25-30 minutes. Check if they are done by inserting a toothpick. If it comes out clean or with a few crumbs, they are ready. Let them cool in the pan for about 10 minutes. After that, move them to a wire rack to cool fully. This helps keep them soft and chewy. For the full recipe, refer back to the ingredients section for details. To get that perfect brownie texture, use the right sweet potato puree. I recommend using fresh sweet potatoes. Steam or bake them until soft, then mash until smooth. This gives a rich, moist brownie. Avoid overmixing the batter. Stir just until the flour blends in. This helps keep your brownies fudgy and not cake-like. Once your brownies cool, you can store them easily. Place them in an airtight container. Keep them at room temperature for up to three days. If you want to store them longer, pop them in the fridge. They can last up to a week this way. For longer storage, wrap them tightly in foil and freeze. They can stay fresh for up to three months. Just thaw them in the fridge when you're ready to enjoy again. You don’t need fancy tools to make these brownies. Here are some essentials: - Mixing bowls - Measuring cups and spoons - A spatula for mixing - An 8x8 inch baking dish - Parchment paper for easy removal - A whisk to blend the ingredients Using these tools makes baking fun and easy. Enjoy your time in the kitchen! For the full recipe, check out the earlier section. {{image_2}} You can make these vegan sweet potato brownies gluten-free. Just use oat flour made from certified gluten-free oats. This swap keeps the brownies soft and flavorful. You can also use almond flour for a nutty taste. Both options work great for a gluten-free treat. If you want a sugar-free version, try using mashed bananas or unsweetened applesauce instead of maple syrup. These fruits add natural sweetness and moisture. You can also use a sugar substitute like stevia or erythritol. Make sure to adjust the amount based on the product instructions. Feel free to get creative with add-ins. You can mix in nuts like walnuts or pecans for crunch. Dried fruits, like cranberries or raisins, add a nice chew. Want something special? Add a pinch of cinnamon or a dash of espresso powder. Both enhance the chocolate flavor beautifully. For a richer taste, try adding peanut butter swirls right before baking. Each variation brings a new twist to your brownies. For the full recipe, check back for the complete details! To keep your vegan sweet potato brownies fresh, store them in an airtight container. Place parchment paper between layers to prevent sticking. This helps maintain their soft texture. You can keep them at room temperature for up to three days. If you prefer, you can also store them in the fridge for a cooler treat. If you want to save some brownies for later, freezing is a great option. First, let the brownies cool completely. Then, cut them into squares. Wrap each piece in plastic wrap and place them in a freezer-safe bag. They can last up to three months in the freezer. When you're ready to enjoy, simply thaw them at room temperature or heat them in the microwave for a few seconds. When stored correctly, vegan sweet potato brownies can last about a week in the fridge. They may get a bit firmer due to the cold, but a quick trip to the microwave can bring back their gooey goodness. Enjoy them as a snack or dessert anytime! Don't forget to check out the Full Recipe for more tips. Yes, you can substitute sweet potato in this recipe. You can use pumpkin puree or even ripe bananas. Each option changes the flavor but keeps the brownies moist. Sweet potatoes add a unique taste and texture. If you choose pumpkin, the brownies will be softer. Bananas will add natural sweetness. Just make sure to use the same amount as the sweet potato puree. To make these brownies more cake-like, you can add a bit of baking powder instead of baking soda. Start with 1/2 teaspoon of baking powder. This change helps the brownies rise more. You can also mix in an extra 1/4 cup of oat flour. This will make the texture lighter and fluffier. If you want, adding a bit of almond milk can help with moisture. Yes, vegan sweet potato brownies are generally healthier than regular brownies. They have less sugar and more nutrients from the sweet potatoes. Sweet potatoes are rich in vitamins and fiber. Using nut butter instead of butter adds healthy fats. The cocoa powder gives antioxidants, too. Overall, these brownies provide better nutrition while still being a tasty treat. For the full recipe, check out the [Full Recipe]. Vegan sweet potato brownies are a tasty, healthy treat. We explored their key ingredients, substitutes, and nutrition. You learned step-by-step how to make them, tips for perfecting the texture, and storing them properly. I also covered variations like gluten-free and sugar-free options. Remember, these brownies can fit many diets and still be delicious. Enjoy experimenting with flavors and have fun baking!](https://recipespursuit.com/wp-content/uploads/2025/07/e2a289de-6c15-4df2-831a-78564a17a28c.webp)
