


Latest & Greatest

Zucchini Feta Quiche Tasty and Simple Delight
Are you looking for a quick and tasty dish? My Zucchini Feta Quiche is a simple delight! It combines fresh
Read more…
Peach Almond Breakfast Loaf Flavorful Morning Treat
Start your day with a burst of flavor! My Peach Almond Breakfast Loaf combines sweet peaches and rich almonds, perfect
Read more…
Classic Gazpacho Soup Refreshing and Simple Recipe
Looking for a fresh and tasty treat? Classic Gazpacho Soup is the answer! This chilled, no-cook dish packs bold flavors
Read more…
Sweet Potato Breakfast Hash Easy and Flavorful Recipe
Start your mornings with a burst of flavor! My Sweet Potato Breakfast Hash is easy to make and packed with
Read more…
Vegan Caesar Salad Fresh and Flavorful Delight
Craving a fresh and tasty dish that’s easy to make? Look no further! My Vegan Caesar Salad is a delightful
Read more…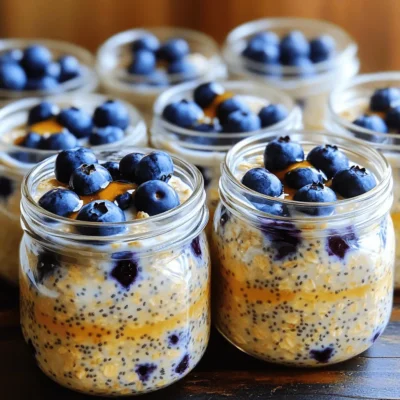
Blueberry Almond Overnight Oats Easy and Tasty Recipe
Are you ready to simplify your mornings with a delicious, healthy breakfast? Blueberry Almond Overnight Oats are not only easy
Read more…
Simple Egg Salad Sandwich Quick and Tasty Recipe
Looking for a quick and tasty meal? I’ve got the perfect solution with my Simple Egg Salad Sandwich recipe! It’s
Read more…
Roasted Veggie Quiche Flavorful and Wholesome Dish
If you’re looking for a dish that’s both flavorful and wholesome, this Roasted Veggie Quiche is your answer! Packed with
Read more…browse recipes


Mango Coconut Chia Pudding Simple and Tasty Recipe
Looking for a simple yet delicious dessert? Mango Coconut Chia Pudding is the answer! This bright and creamy treat requires minimal effort and is…
My Latest Desserts
My Latest Recipes

hey,
i’m !
I’m so happy you’re here!
Cooking is my love language, and I’m excited to share my best dishes with you. Hope they become your favorites too! Let’s enjoy every bite of this journey together.
![- 1 cup unsalted butter, softened - 1 cup powdered sugar - 1 teaspoon almond extract - 2 ½ cups all-purpose flour - 1 cup raspberry jam - 1/2 cup sliced almonds (toasted, for garnish) - 1/4 teaspoon salt Using unsalted butter is key. It lets you control the salt in your cookies. Salted butter can make your cookies too salty, which is not good for flavor. Always choose high-quality unsalted butter for the best taste. For the raspberry jam, look for one that is thick and fruity. You want a jam that has real fruit and not too much sugar. This choice will give your cookies a fresh, vibrant flavor. If you can find homemade or small-batch jams, they often taste better. Toasting the almonds adds a nice crunch and deep flavor. When you toast them, they turn golden and smell sweet. Simply place sliced almonds in a dry pan over medium heat. Stir them often and watch closely. They can burn quickly. This small step makes a big difference in taste and presentation. You can find the full recipe above for step-by-step instructions on making these delicious cookies. 1. Preheat your oven to 350°F (175°C). This step warms up the oven for even baking. 2. Prepare your baking sheets by lining them with parchment paper. This prevents cookies from sticking. 3. In a large mixing bowl, cream the softened butter with powdered sugar. I mix until the mixture is light and fluffy. This usually takes about 2 to 3 minutes. 4. Then, add the almond extract. Mix it in until you can’t see any lumps of butter. 5. Next, sift in the all-purpose flour and salt. Mix slowly until everything combines. The dough may feel crumbly but should stick together when pressed. 6. Using your hands, form tablespoon-sized balls of dough. Place these dough balls about 2 inches apart on the baking sheets. 7. Now, make an indentation in each cookie ball. I use my thumb or the back of a measuring spoon. This creates space for the jam. 8. Fill each thumbprint with about a teaspoon of raspberry jam. Make sure not to overfill. You want the jam to stay in the center. 9. Optionally, sprinkle sliced almonds around the edges of each cookie. This adds a nice crunch and more flavor. 10. Bake the cookies for 12 to 15 minutes. Look for lightly golden edges. 11. After baking, cool the cookies on the baking sheet for 5 minutes. Then, transfer them to a wire rack to cool completely. Enjoy your delicious Raspberry Almond Thumbprint Cookies! For the full recipe, check the [Full Recipe]. To keep your cookies from spreading too much, chill the dough. After mixing, wrap it in plastic and chill for 30 minutes. This helps the butter firm up. Also, make sure your baking sheets are cool before placing the dough on them. For the perfect thumbprint shape, use your thumb or the back of a small spoon. Press gently but firmly in the center. Aim for a nice, deep indentation. It should hold the jam well without overflowing. The best drinks to pair with these cookies are tea or coffee. The nutty almond flavor matches well with both. You could also try a light sparkling wine for a festive touch. To present your cookies creatively, use a decorative platter. Dust them with powdered sugar for a sweet touch. You could also arrange them with fresh raspberries or mint leaves. This adds color and makes them look inviting. If your dough feels too crumbly, add a teaspoon or two of water. Mix until it holds together better. Do this slowly so you don’t make it too wet. To avoid jam overflow, fill the thumbprint carefully. Use about a teaspoon of jam. Don’t overfill, as the jam can bubble over while baking. Keeping it neat ensures your cookies look great! {{image_2}} You can switch up the jam to create unique flavors. Try strawberry, apricot, or even blueberry jam. Each fruit brings its own charm. If you want to add more depth, use different extracts. Vanilla or coconut can give a new twist. Almond is classic, but these options can surprise your taste buds. If you need gluten-free options, use almond flour or a gluten-free blend. Both will work well in this recipe. For a vegan version, swap butter with coconut oil or vegan butter. Replace the egg with applesauce or a flax egg. These changes can keep the spirit of the cookie while meeting your dietary needs. Add a splash of fun by using food coloring in the dough. A few drops can make your cookies pop. You can also zest citrus into the dough for a fresh taste. Lemon or orange zest adds brightness and pairs well with raspberry. These small tweaks can elevate the cookie and impress your friends. For the complete recipe, check the [Full Recipe]. To keep your Raspberry Almond Thumbprint Cookies fresh, store them at room temperature. Place them in an airtight container. This helps keep the cookies soft and delicious for several days. If you want to keep them longer, consider freezing. To freeze, wrap cookies in plastic wrap and place them in a freezer-safe bag. This will help prevent freezer burn. When stored properly, these cookies stay fresh for about one week at room temperature. If you freeze them, they can last up to three months. Always check for signs of spoilage. Look for changes in texture or smell. If they feel hard or smell off, it's best to toss them. To enjoy your cookies warm, reheat them in the oven. Preheat the oven to 300°F (150°C). Place cookies on a baking sheet for about 5 minutes. This will help them regain their soft texture. Avoid using the microwave, as it can make them chewy or soggy. For best results, stick with the oven method. You can tell the cookies are done when the edges turn lightly golden. The center may still look soft, but it will firm up as they cool. Keep an eye on them around the 12-minute mark. If they look golden, they are ready to come out. Yes, you can make the dough ahead of time. Just wrap it tightly in plastic wrap and store it in the fridge. It should be good for up to three days. When you're ready to bake, let it sit at room temperature for about 15 minutes before shaping. Thumbprint cookies have roots in Europe, dating back to the Middle Ages. They are known as "Husarenkrapfen" in Germany and "biscotti di pasta frolla" in Italy. Bakers shaped the cookies with their thumbs, creating a spot for jam filling. This fun method has stuck around, making them a favorite worldwide. Absolutely! You can swap almonds for walnuts, pecans, or hazelnuts. Each nut brings a unique flavor. Just make sure to toast them for extra crunch and depth. If you prefer a nut-free option, try using seeds like sunflower or pumpkin seeds. We covered the key ingredients, preparation steps, and storage tips for delicious thumbprint cookies. I highlighted the importance of using unsalted butter and the best types of raspberry jam. Remember, toasting almonds enhances their flavor. You can also experiment with different jams or dietary options. Enjoy your baking process and the tasty results! These cookies are fun to make and share. Keep these tips in mind for your next baking session. Happy baking!](https://recipespursuit.com/wp-content/uploads/2025/07/20271375-1faf-4de6-8c9d-365e83fe239d-300x300.webp)
![To make a great classic beef chili, you need the right base. Here are the must-have items: - 1 pound ground beef - 1 medium onion, diced - 3 cloves garlic, minced - 1 green bell pepper, diced - 1 can (14.5 oz) diced tomatoes, undrained - 1 can (15 oz) kidney beans, rinsed and drained - 1 can (8 oz) tomato sauce - 2 tablespoons chili powder - 1 teaspoon cumin - 1 teaspoon smoked paprika - 1/2 teaspoon cayenne pepper (adjust to taste) - Salt and pepper, to taste - 1 cup beef broth - 1 tablespoon olive oil These ingredients create a rich and hearty flavor that warms the soul. The ground beef gives it body, while the vegetables add sweetness and texture. The spices bring the chili to life. You can add extra ingredients to make your chili even better. Here are some ideas: - Fresh cilantro, for garnish - Grated cheese, for serving - Sour cream, for serving - Jalapeños, for added heat - Corn, for sweetness - Bell peppers of different colors, for color and flavor These options let you customize your chili. They can add freshness or extra spice. Feel free to experiment with what you have on hand. To cook your classic beef chili, you need some basic tools: - A large pot or Dutch oven - A wooden spoon or spatula - A knife for chopping - A cutting board Having the right equipment makes cooking easier and more fun. It helps you create a delicious meal without stress. Use these tools to get the most out of your cooking experience. For the full recipe, follow the steps outlined above. Start by heating olive oil in a large pot over medium heat. Add the diced onion and green bell pepper. Sauté them until soft, about 5 minutes. Next, add minced garlic to the pot. Sauté for one more minute until it smells great. Increase the heat to medium-high. Add the ground beef to the pot. Cook until it turns brown, breaking it up with a spoon. This takes about 7-8 minutes. If there is too much fat, drain some off. Now it’s time to add flavor. Stir in chili powder, cumin, smoked paprika, and cayenne pepper. Mix well to coat the meat and veggies. Next, pour in the diced tomatoes, tomato sauce, kidney beans, and beef broth. Give everything a good stir to mix it. Bring the chili to a simmer, then lower the heat. Cover the pot and let it cook for at least 30 minutes. Stir occasionally to stop sticking. For even better flavor, let it simmer for up to an hour. Taste your chili and adjust the seasoning if needed. Serve hot with fresh cilantro, grated cheese, and sour cream on top. For the full recipe, check out the complete details above. To get the best flavor in your chili, start with fresh ingredients. Use ripe tomatoes and good-quality beef. Always sauté the onion and bell pepper first. This step builds a strong base. Mix in the garlic for a fragrant kick. Don't rush the cooking time. Let your chili simmer for at least 30 minutes. This helps all the flavors blend well. For a richer taste, try adding a splash of beer or a bit of dark chocolate. These ingredients add depth and surprise. Many people make mistakes when cooking chili. One common error is adding too much liquid too soon. This can make your chili watery. Always start with less broth and add more as needed. Another mistake is not seasoning enough. Taste your chili while it cooks. Adjust the spices to make it just right. Lastly, don’t skip the simmering step. Cooking longer lets the flavors shine through. Want to change the heat level? Start with a small amount of cayenne pepper. You can always add more later. If your chili gets too spicy, add a bit of sugar or more beans to tone it down. Sour cream and cheese served on top also help balance the heat. Customize your chili to suit your taste. Enjoy the process of making it your own! {{image_2}} You can make a great chili without meat. Use lentils, black beans, or chickpeas. They add protein and texture. Add extra veggies like zucchini and mushrooms for more flavor. Use vegetable broth instead of beef broth. You can still enjoy rich flavors with spices like cumin and chili powder. Try my [Full Recipe] by swapping out the beef for your favorite plant-based protein. Spice level is all about personal taste. If you love heat, add more cayenne pepper or jalapeños. For milder chili, skip the cayenne and use less chili powder. You can also remove the seeds from peppers for less spice. This way, everyone can enjoy a bowl just how they like it. Feel free to get creative with your chili. Adding extra vegetables like corn, carrots, or bell peppers boosts nutrition. You can also mix in different beans, such as black beans or pinto beans. This adds variety in texture and flavor. Just be sure to adjust cooking time if you add more ingredients. The goal is to have a hearty and filling dish that suits your taste. After enjoying your delicious chili, let it cool down. Transfer it to an airtight container. Store it in the fridge for up to four days. Make sure to cover it well. This keeps the flavors fresh and tasty. When you want to eat your leftover chili, there are easy ways to reheat it. You can use the microwave or the stove. For the microwave, place the chili in a bowl. Heat it for 1-2 minutes. Stir halfway through to warm it evenly. If you prefer the stove, pour the chili into a pot. Heat it on medium-low, stirring often. This helps keep it smooth and warm. If you want to save chili for another day, freezing is a great option. Use a freezer-safe container or a heavy-duty freezer bag. Leave some space at the top for expansion. Chili can last up to three months in the freezer. To thaw, place it in the fridge overnight before reheating. This keeps the taste and texture just right. Check out the Full Recipe for more tips and details! The best meat for classic chili is ground beef. I prefer using 80/20 ground beef. This mix gives a nice balance of flavor and fat. Other options include chuck roast or stew meat, but they take longer to cook. Ground beef cooks fast and blends well with the spices. Yes, you can make classic beef chili in a slow cooker. Start by browning the ground beef in a pan. After that, put it in the slow cooker with the other ingredients. Cook on low for 6 to 8 hours or high for 3 to 4 hours. This method makes the chili rich and tasty. Classic beef chili lasts in the fridge for about 3 to 4 days. Be sure to store it in an airtight container. If you want to keep it longer, you can freeze it. Frozen chili lasts up to 3 months. Just thaw it in the fridge before reheating. For the full recipe, check out the Spicy Classic Beef Chili 🥩 section. Classic beef chili combines essential ingredients for a rich flavor. You can tweak the recipe with optional extras or adjust the spiciness to match your taste. Remember the key steps: prepare the base, cook the beef, and combine all ingredients. Avoid common mistakes for the best result. Feel free to explore vegetarian options or try different spice levels. Store your chili well and reheat it easily. With these tips and variations, you'll make great chili every time. Enjoy your cooking!](https://recipespursuit.com/wp-content/uploads/2025/06/3ad7fbf8-58f4-4793-bef1-ae94d1a37c85-300x300.webp)


Roasted Garlic Tomato Soup Comforting and Simple Dish
If you crave a warm bowl of comfort, this Roasted Garlic Tomato Soup hits the spot. It combines ripe tomatoes and sweet garlic for…