

Latest & Greatest
Spicy Mango Avocado Shrimp Tacos That Wow Your Tastebuds
Are you ready to elevate taco night? Dive into my Spicy Mango Avocado Shrimp Tacos That Wow Your Tastebuds. These
Read more…
Air Fryer Cinnamon French Toast Sticks Delightfully Easy
Are you ready for a breakfast treat that’s easy and fun? My Air Fryer Cinnamon French Toast Sticks are here
Read more…
Cinnamon Sugar Churro Bites Irresistible Dessert Treat
Craving a sweet treat? You’re in for a delight with my Cinnamon Sugar Churro Bites! These little bites pack all
Read more…
Chocolate Covered Strawberry Smoothie Refreshing Drink
Craving something sweet yet nutritious? The Chocolate Covered Strawberry Smoothie is your answer! This creamy treat combines fresh strawberries, rich
Read more…
Salted Caramel Apple Dip Tasty and Easy Recipe
Looking for a quick and tasty treat that steals the show? This Salted Caramel Apple Dip is your answer! With
Read more…
Cranberry Orange Oat Scones Tasty and Simple Recipe
Ready to bake something delicious? My Cranberry Orange Oat Scones are easy and perfect for any time of day. These
Read more…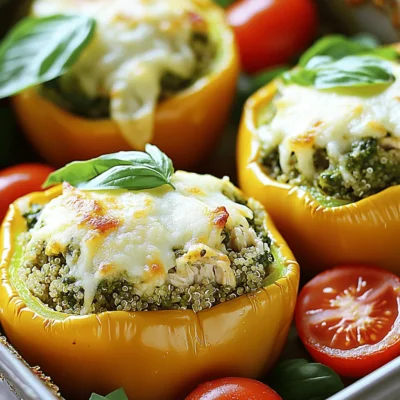
Pesto Chicken Stuffed Peppers Tasty Dinner Idea
Looking for a quick and tasty dinner idea? Pesto Chicken Stuffed Peppers are the perfect choice! This dish combines juicy
Read more…
Peach Cobbler Crumble Bars Irresistible Sweet Treat
Are you craving a sweet, fruity treat that’s easy to make? Look no further! These Peach Cobbler Crumble Bars blend
Read more…browse recipes


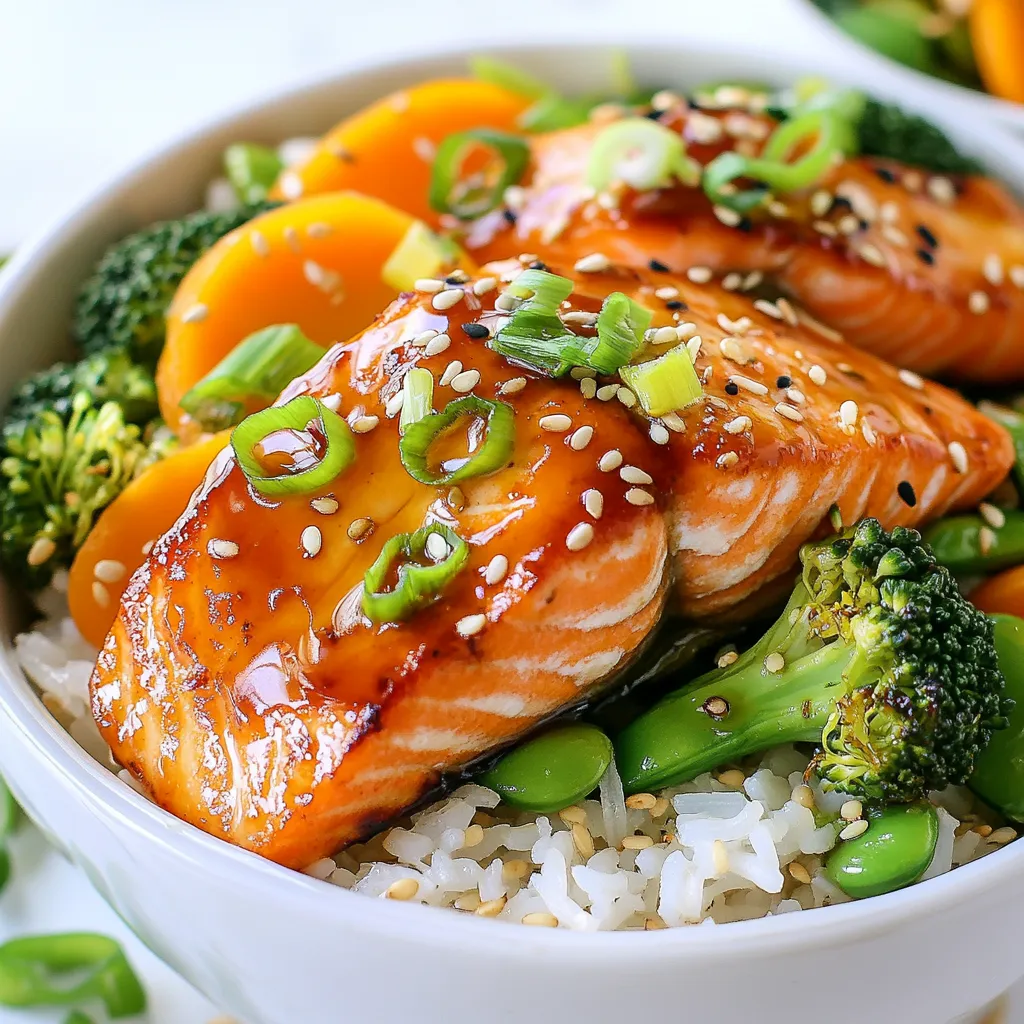
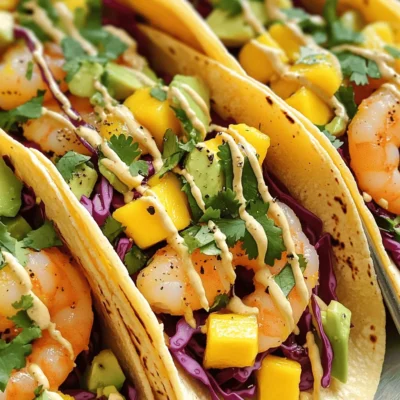
Teriyaki Salmon Rice Bowls Flavorful and Healthy Meal
Are you ready to delight your taste buds? Teriyaki Salmon Rice Bowls are packed with flavor and nutrition. This easy recipe combines tender salmon,…
My Latest Desserts
My Latest Recipes

hey,
i’m !
I’m so happy you’re here!
Cooking is my love language, and I’m excited to share my best dishes with you. Hope they become your favorites too! Let’s enjoy every bite of this journey together.
![- 1 cup blueberries - 1 cup strawberries, hulled and sliced - 1 cup pineapple, diced - 1 cup kiwi, peeled and sliced - 1 cup orange segments - 3 tablespoons honey - 2 tablespoons fresh lime juice - Zest of 1 lime - Fresh mint leaves for garnish (optional) This salad shines because of its bright, fresh fruits. Each fruit adds its own flavor and texture. Blueberries burst with sweetness. Strawberries bring a slight tartness. Pineapple offers a tropical twist, while kiwi adds a fun, tangy bite. Orange segments add juiciness and zest. To make this dish, you need simple ingredients. You can find them easily at local markets or grocery stores. Fresh, ripe fruits work best, bringing out their natural sweetness. Honey and lime juice blend smoothly, making a delightful dressing. The lime zest adds an extra kick, enhancing the taste. If you like mint, use it as a garnish. It gives a fresh aroma and looks pretty. This fruit salad is easy to make and perfect for any meal. You can serve it at brunch, a picnic, or as a dessert. The bright colors and flavors will impress your guests. For the full recipe, follow the steps ahead! Start with the fruit prep. First, rinse the blueberries under cold water. This removes dirt and keeps them fresh. Next, hull and slice the strawberries. Cut off the green tops, then slice them into thin pieces. Dice the pineapple into small cubes. For the kiwi, peel the skin and slice it into rounds. Finally, segment the oranges by cutting away the peel and pith, leaving the juicy fruit. This gives a bright pop of color to your salad. In a small bowl, it's time to make the dressing. Whisk together three tablespoons of honey, two tablespoons of fresh lime juice, and the zest of one lime. Mix until the honey dissolves completely. This honey-lime dressing adds sweetness and tang to the fruit. Now, let’s combine everything. Toss all the prepared fruits in a large bowl. Drizzle the honey-lime mixture over the fruit. Gently toss everything together, making sure every piece of fruit gets some dressing. This step is key for flavor. Allow the salad to sit for about 10-15 minutes. This lets the flavors meld together, making each bite burst with taste. Enjoy your refreshing and simple delight! For the full recipe, check [Full Recipe]. - Use ripe fruits for optimal flavor: Ripe fruits taste better and add natural sweetness. Check the color and feel of each fruit. A soft touch means it’s ready to eat. - Adjust honey based on sweetness preference: If you like your fruit salad sweeter, add more honey. If you prefer less sugar, use less honey. This lets you control the taste. - Pre-cut fruits ahead of time: Save time by cutting your fruits the night before. Store them in the fridge for easy assembly. This makes preparing the salad a breeze. - Use a serrated knife for strawberries: A serrated knife makes cutting strawberries easy. It prevents squishing and keeps your fruit looking nice. This simple trick helps you get clean cuts with less mess. For the full recipe, check out the detailed steps to create this delicious dish! {{image_2}} You can easily change the honey lime fruit salad to fit your taste. Here are some fun ideas: - Adding other seasonal fruits: Try using peaches, cherries, or watermelon! These fruits bring their own sweet flavors. You can mix and match based on what you have. The salad will still taste great with your choices. - Incorporating nuts for crunch: Adding nuts can give your salad a nice texture. Almonds, walnuts, or pecans work well. Chop them up and sprinkle them on top before serving. This adds a tasty crunch to each bite. You can also turn this fruit salad into a full meal. Here are some easy additions: - Adding yogurt for creaminess: A dollop of yogurt can make your salad creamy. Use Greek yogurt for extra protein. Just mix it in or serve it on the side for a nice touch. - Pairing with granola for a breakfast option: Granola adds a crunchy bite and helps fill you up. Just sprinkle some on top. This makes a great breakfast or snack that is both tasty and healthy. Feel free to explore these variations to find your perfect blend. You can always refer to the Full Recipe for guidance on the base salad. To keep your Honey Lime Fruit Salad fresh, you should store leftovers in an airtight container. This helps prevent moisture loss and keeps the flavors intact. Always keep it refrigerated to maintain its taste and texture. If you have extra mint leaves, add them just before serving to keep them fresh. For the best taste, consume your fruit salad within 2-3 days. After this time, the fruits may lose their crispness and flavor. You want to enjoy the salad at its peak freshness, so make sure to eat it within this window. If you notice any changes in color or texture, it's best to toss it out. Yes, you can use many fruits in this salad. Try mango, grapes, or peaches. Each fruit adds its own flavor. You can mix and match based on what you like. Seasonal fruits taste best. Feel free to get creative! To keep fruits fresh, use lemon juice. A little lemon juice on cut fruit helps slow browning. Store fruits in airtight containers to keep them fresh. Keeping them cool also helps. Remember to add the dressing right before serving. Yes, you can make this salad ahead of time. Prepare the fruits and dressing separately. Mix them just before you eat. This keeps the salad fresh and crisp. It’s great for lunch or a snack later. For the full recipe, check out the link above! This blog post shares how to make a delicious fruit salad. We covered the best ingredients, from berries to citrus. You learned how to prepare each fruit and mix in a tasty dressing. We also explored tips for easy prep and ways to customize your salad. Don’t forget to store leftovers properly for the best taste. Whether adding yogurt or nuts, feel free to make it your own. Dive in and enjoy this fresh, healthy treat!](https://recipespursuit.com/wp-content/uploads/2025/06/7bf785eb-ec9b-4296-b5de-085b3ac33368-300x300.webp)

![- 1 pound ground beef - 1/2 cup breadcrumbs - 1/4 cup grated Parmesan cheese - 1/4 cup fresh parsley, chopped - 1 clove garlic, minced - 1 egg, beaten - Salt and pepper to taste - 2 cups marinara sauce - 4 sub rolls - 1 cup shredded mozzarella cheese - Olive oil for drizzling Gather these ingredients to make the best meatball subs. Each one plays a key role in flavor and texture. The ground beef gives a hearty base. Breadcrumbs hold everything together. Parmesan cheese adds a salty kick. Fresh parsley brightens up the dish. Garlic brings in deep flavor, while the egg binds the mix. Marinara sauce coats the meatballs and keeps them moist. Sub rolls hold it all, and mozzarella melts into gooey goodness. - Spices for added flavor - Extra cheese varieties - Additional toppings (onions, peppers) Feel free to jazz up your meatball subs! Adding spices can change the flavor. Try red pepper flakes for heat or Italian seasoning for depth. Extra cheese can make it richer. You can also add toppings like sautéed onions or sweet bell peppers. These options let you customize your subs to fit your taste. Want to explore more? Check out the Full Recipe for more ideas! 1. Preheat your oven to 375°F (190°C). This step is key for cooking meatballs evenly. 2. In a large bowl, mix together the ground beef, breadcrumbs, Parmesan cheese, parsley, garlic, beaten egg, salt, and pepper. Be sure not to overmix. Just combine it well. 3. Form the mixture into meatballs, about 1 inch wide. Place them on a baking sheet. 4. Bake the meatballs for 20-25 minutes. They should be golden and cooked through. 5. While the meatballs bake, heat the marinara sauce in a saucepan over medium heat. Stir it gently as it warms. 1. Once the meatballs are done, add them to the marinara sauce. Let them simmer for 5 minutes. This adds flavor. 2. Open the sub rolls and drizzle a bit of olive oil on the inside. This gives a nice touch. 3. Spoon the meatballs and sauce into each sub roll. Use plenty of sauce for extra flavor. 4. Top each sub with shredded mozzarella cheese. The more, the better! 1. Return the subs to the oven for 5-7 minutes. Bake until the cheese melts and bubbles. 2. To get the best cheese melt, you can broil for the last minute. Keep an eye on them to avoid burning. Follow these steps for the perfect meatball subs. Enjoy the delicious flavors! - How to avoid dry meatballs To keep your meatballs moist, do not overmix the meat. Combine the ingredients gently. Adding breadcrumbs helps too. They soak up moisture and keep meatballs juicy. - Best practices when mixing meat Use your hands to mix the meat and other ingredients. This way, you control how much you mix. Just combine until mixed; don’t squeeze the meat too much. - Ensuring perfect cheese melt For a great cheese melt, place the subs in a hot oven. Bake them until the cheese bubbles. Using shredded cheese helps it melt quickly and evenly. - Garnishing options Fresh parsley adds color and flavor. You can also sprinkle some crushed red pepper for a kick. Parmesan cheese on top gives a nice finish too. - Side dishes that pair well Serve your meatball subs with a side salad for freshness. Crispy fries or sweet potato fries are also great. A warm bowl of soup can round out the meal perfectly. {{image_2}} You can switch up the meat in your meatball subs. Turkey or chicken meatballs are leaner options. They still pack great flavor. Just follow the same recipe steps. You'll get tasty results without the extra fat. If you want to try something different, go for vegetarian meatball subs. There are many great recipes using lentils or beans. These options provide a hearty texture and rich taste. You won't miss the meat at all! Sauce can make or break your meatball sub. You can use different marinara options to suit your taste. A roasted garlic marinara adds a nice touch. Or, try a basil marinara for a fresh twist. If you want some heat, consider spicy sauce additions. A dash of red pepper flakes can spice things up. You can also mix in hot sauce for more kick. Customize your sauce to make each sub unique! The bread you choose can change everything. Using different types of rolls can add fun. A soft hoagie roll is classic, but a crusty baguette works too. Don't forget about gluten-free options. There are many tasty gluten-free rolls available. They make it easy for everyone to enjoy meatball subs. No matter what bread you choose, it should hold the filling well. This keeps your subs messy-free and delicious! For the full recipe, check out the instructions above. To keep your meatball subs fresh, store them in the fridge. Use an airtight container. This helps prevent them from drying out. You should eat them within three days for the best taste. For meal prep, freezing works well. Wrap each sub tightly in plastic wrap. Then place them in a freezer bag. They can stay fresh for up to three months. When you are ready to eat, just thaw them in the fridge overnight. To reheat your meatball subs, use the oven for the best texture. Preheat the oven to 350°F (175°C). Place the subs on a baking sheet. Cover them with foil to keep them moist. Heat for about 15 minutes. This makes the bread crispy and the cheese melty. If you’re in a hurry, use the microwave. Just place the sub on a microwave-safe plate. Heat for 1-2 minutes. Check to see if it is warm throughout. Keep in mind, the bread might get soft this way. For more flavor, drizzle a bit of olive oil on top before reheating. Remember to enjoy your meatball subs with a side of extra marinara sauce for dipping. It’s a great way to add flavor back into your meal! For the full recipe, check out the earlier section. You can use crushed crackers or oats. Ground almonds work well too. For gluten-free diets, try almond flour or crushed cornflakes. These options help bind your meatballs while adding flavor. To keep meatballs moist, do not overmix the meat. Add an egg and some grated cheese. These ingredients help trap moisture. Cooking them in sauce also keeps them tender. Yes, you can make meatballs ahead. Form them and place on a tray. Freeze them before cooking for later use. You can also cook them and store in the fridge. Reheat them in sauce for quick meals. You can use provolone or gouda for a different taste. Feta adds a nice tangy touch. For a sharper flavor, try aged cheddar. Each cheese will give your meatball subs a unique twist. For the full recipe, check out the [Full Recipe]. You learned how to make easy meatball subs with simple steps. We covered main ingredients, from ground beef to marinara sauce. I shared tips on avoiding dry meatballs and suggested variations like turkey or veggie options. Remember, you can store leftovers for later use. Get creative with sauces and toppings to suit your taste. Enjoy making this dish with your own twists! Simple, fun, and delicious—meatball subs are a win for any meal.](https://recipespursuit.com/wp-content/uploads/2025/06/e71f63c9-053c-420c-bbd6-62c969497634-300x300.webp)

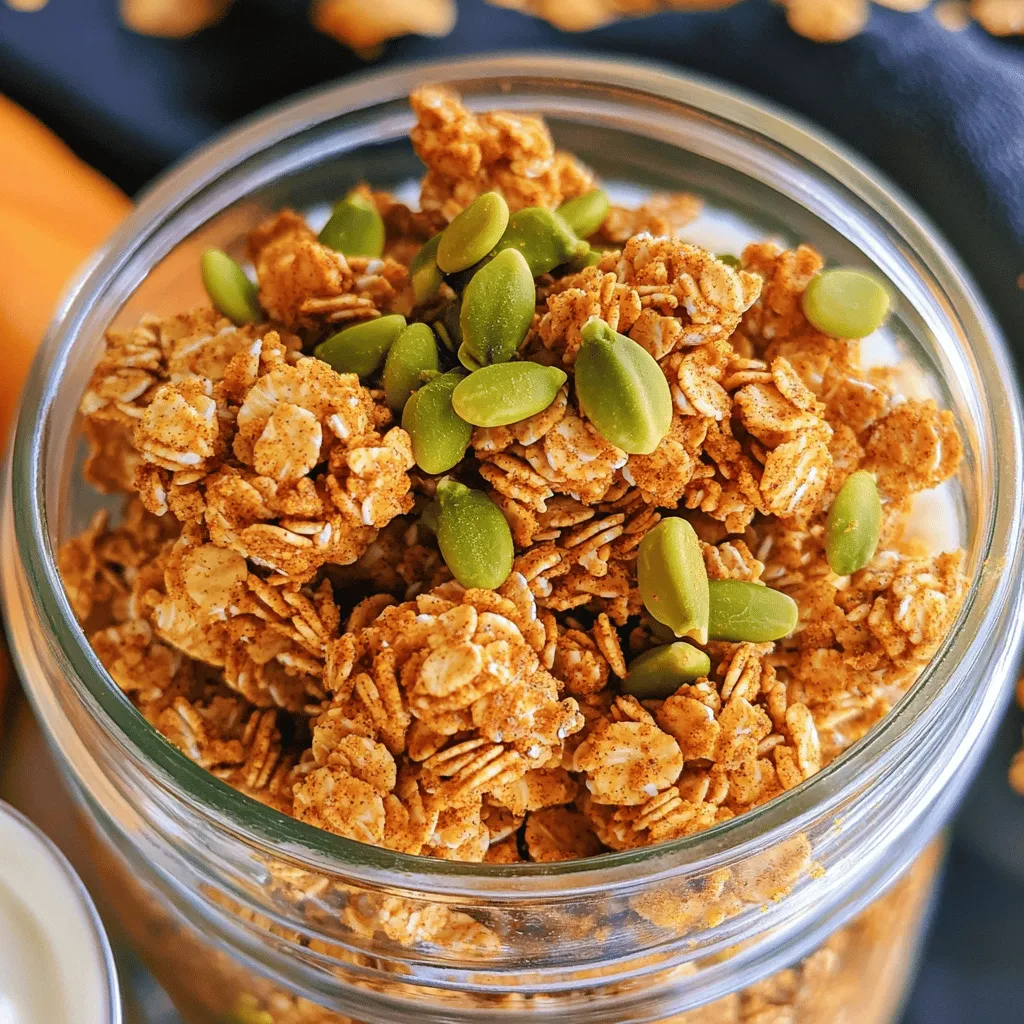
Pumpkin Spice Granola Clusters Crunchy and Flavorful Snack
Are you ready to dive into fall flavors with a tasty twist? My Pumpkin Spice Granola Clusters are the perfect crunchy and flavorful snack…