
Latest & Greatest

Cherry Pie Cheesecake Bars Irresistible Treat Recipe
Are you ready for the perfect dessert that combines two favorites into one? These Cherry Pie Cheesecake Bars are a
Read more…
Creamy Lemon Asparagus Pasta Delightful and Easy Dish
If you’re craving a dish that’s both creamy and zesty, you’re in for a treat! My Creamy Lemon Asparagus Pasta
Read more…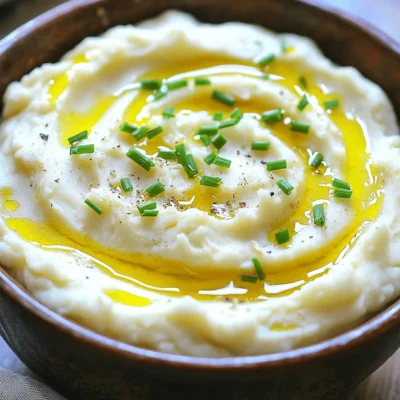
Creamy Roasted Garlic Mashed Cauliflower Delight
Are you ready to elevate your side dish game? My Creamy Roasted Garlic Mashed Cauliflower Delight is a game-changer. This
Read more…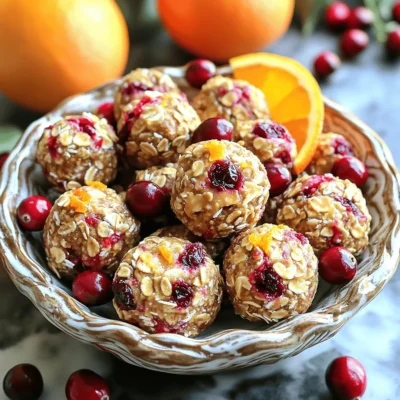
Cranberry Orange Energy Bites Healthy Snack Boost
Looking for a quick and healthy snack? Let me introduce you to Cranberry Orange Energy Bites! Packed with oats, almond
Read more…
Slow Cooker Maple Glazed Carrots Delicious Side Dish
Looking for an easy and tasty side dish? I have just the recipe for you! Slow Cooker Maple Glazed Carrots
Read more…
Triple Chocolate Brownie Cookies Irresistible Delight
If you’re craving a sweet treat that’s both chewy and rich, look no further! Triple Chocolate Brownie Cookies blend the
Read more…
One-Pot Lemon Dill Salmon Pasta Flavorful Delight
Are you craving a meal that’s easy, delicious, and quick? Look no further! This One-Pot Lemon Dill Salmon Pasta is
Read more…
Caramel Apple Cinnamon Rolls Irresistible and Soft
Ready to treat yourself to a warm, gooey delight? These caramel apple cinnamon rolls are not just desserts; they are
Read more…browse recipes


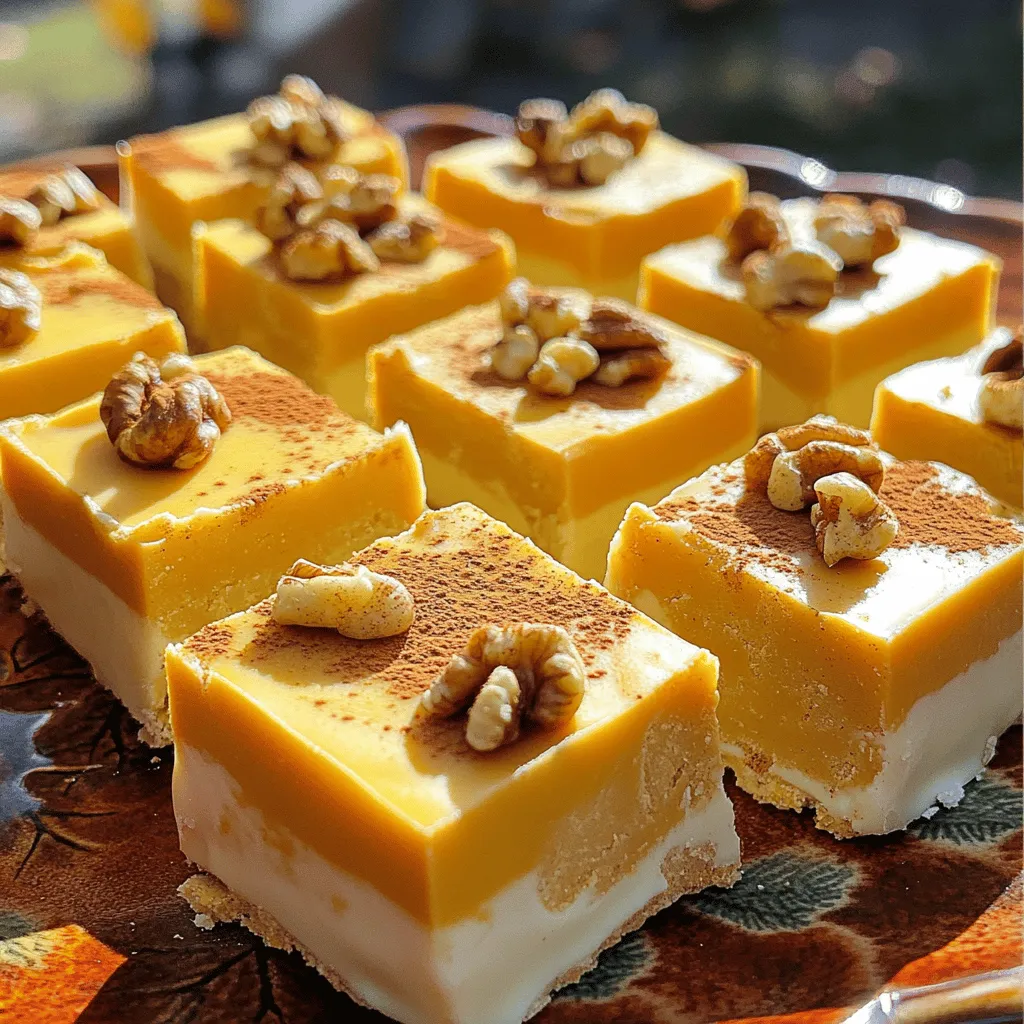
Pumpkin Spice White Chocolate Fudge Irresistible Treat
Get ready for a sweet fall treat! This Pumpkin Spice White Chocolate Fudge brings together the warm flavors of autumn with creamy white chocolate.…
My Latest Desserts
My Latest Recipes

hey,
i’m !
I’m so happy you’re here!
Cooking is my love language, and I’m excited to share my best dishes with you. Hope they become your favorites too! Let’s enjoy every bite of this journey together.

![This recipe for Greek Honey Lemon Potatoes is simple and tasty. It uses fresh ingredients, making it special. You will need baby potatoes, honey, and lemon for a bright flavor. The dish is perfect for sharing at dinner or any meal. - 1.5 pounds baby potatoes, halved - 1/4 cup olive oil - 1/4 cup honey - 3 tablespoons fresh lemon juice - 1 tablespoon lemon zest - 4 cloves garlic, minced - 1 teaspoon dried oregano - 1 teaspoon salt - 1/2 teaspoon black pepper - Fresh parsley, chopped for garnish These ingredients combine to create a delicious blend of sweet and tangy. The honey adds richness while the lemon gives zest. You can make this dish even more exciting with some tweaks. Try using red potatoes instead of baby potatoes for a new twist. If you want a spicy kick, add a pinch of red pepper flakes. You can also swap honey for maple syrup if you prefer. Fresh herbs like thyme or rosemary can replace oregano for a different flavor. These options let you play with tastes and find what you love most. Check the Full Recipe for more details on cooking this dish. First, gather your ingredients. You need 1.5 pounds of baby potatoes, olive oil, honey, fresh lemon juice, lemon zest, minced garlic, dried oregano, salt, and black pepper. I often use fresh parsley for garnish too. Preheat your oven to 400°F (200°C). In a large mixing bowl, mix the olive oil, honey, lemon juice, lemon zest, minced garlic, oregano, salt, and black pepper. Whisk this together until it’s well combined. Then, add the halved baby potatoes to the bowl. Toss them gently in the honey-lemon mixture. Make sure they are evenly coated with the sauce. Next, pour the potatoes onto a baking sheet lined with parchment paper. Spread them out in a single layer. This helps them cook evenly. Roast the potatoes in the oven for about 35 to 40 minutes. Flip them halfway through cooking for even browning. They should become tender and golden. Once cooked, take the potatoes out of the oven. Let them cool slightly on the baking sheet. It will help them firm up a bit. You can drizzle any leftover honey-lemon sauce from the baking sheet over them. Transfer the potatoes to a nice serving dish. I like to garnish with fresh chopped parsley. It adds a pop of color and fresh taste. Serve these Greek honey lemon potatoes warm. They pair well with grilled meats or fish. You can find the full recipe details in the recipe section above. Enjoy your delicious dish! To get that real Greek taste, focus on fresh ingredients. Use high-quality olive oil. It enhances the dish's richness. Fresh lemons are key for the perfect zing. Make sure to use real honey, ideally from Greece. This gives your potatoes a sweet and floral note. Finally, don’t skip the oregano. It adds a classic Mediterranean touch. One common mistake is overcooking the potatoes. Keep an eye on them while roasting. They should be golden and tender but not mushy. Make sure to flip the potatoes halfway through cooking. This helps them brown evenly. Also, do not skip the garlic. It boosts the flavor and aroma. Lastly, avoid using bottled lemon juice. Fresh juice always tastes better. To make cooking easier, use a large mixing bowl. This helps you combine the flavors well. A whisk is handy for blending the sauce smoothly. When roasting, a baking sheet lined with parchment paper saves cleanup time. A good knife is also essential for halving the potatoes. Lastly, have a sturdy spatula on hand for flipping the potatoes during roasting. For the complete recipe, check out the Full Recipe section. {{image_2}} You can use many types of potatoes for this dish. While baby potatoes are great, you can also try Yukon Gold or red potatoes. These potatoes have a creamy texture and pair well with the honey and lemon. If you want a different taste, sweet potatoes can add a nice twist. Just remember to adjust the cooking time since sweet potatoes may need extra time to cook. To make these honey lemon potatoes even better, consider adding more flavors. You can mix in some herbs like thyme or rosemary for a fresh taste. If you like spice, try adding a pinch of cayenne pepper for warmth. A sprinkle of feta cheese on top right before serving adds a salty kick. You can also drizzle a bit of balsamic glaze for added depth. This dish is quite flexible for different diets. If you want it vegan, substitute honey with maple syrup or agave nectar. For gluten-free options, feel free to use any type of potato, as they are naturally gluten-free. If you need lower carbs, try using cauliflower florets instead of potatoes. They will soak up the flavors well and create a lighter dish. Check the [Full Recipe] for exact ingredient amounts and cooking steps. To keep your Greek honey lemon potatoes fresh, let them cool down first. Once cooled, place them in an airtight container. Store them in the fridge for up to three days. This will help maintain their flavor and texture. When you want to enjoy your leftovers, preheat your oven to 350°F (175°C). Spread the potatoes on a baking sheet. Heat them for about 15-20 minutes. This will make them warm and crispy again. You can also use a microwave, but they won't be as crispy. Heat them for one to two minutes, checking often. If you want to freeze your Greek honey lemon potatoes, first let them cool completely. Then, place them in a freezer-safe bag or container. Remove as much air as you can. They can stay in the freezer for up to three months. When you want to eat them, thaw them in the fridge overnight before reheating. Check the [Full Recipe] for more details on preparation. Greek Honey Lemon Potatoes come from Greece. This dish is popular in Greek homes. It pairs well with many meals and is a side dish you can find in tavernas. The blend of honey and lemon makes it special. Greek cooks often use fresh herbs and local ingredients. This dish reflects the vibrant flavors of Mediterranean cuisine. Yes, you can make this recipe vegan. To do this, you can replace honey with maple syrup or agave nectar. Both options add sweetness without using animal products. The other ingredients, like potatoes and olive oil, are already vegan. You will still enjoy that sweet and tangy taste, just like the original! It takes about 55 minutes to make Greek Honey Lemon Potatoes. You will spend 15 minutes on prep and 40 minutes cooking. This time includes mixing, roasting, and getting those potatoes golden. It’s easy to fit this dish into your meal plan. Plus, it’s worth the wait for those tasty flavors! In this article, we explored how to make Greek Honey Lemon Potatoes. We covered essential and optional ingredients, as well as clear steps to prepare, cook, and serve. Tips for real Greek flavor and common mistakes helped improve your dish. You learned about variations, storage methods, and FAQs to enhance your cooking experience. Now, you can enjoy these delightful potatoes and impress your family or friends. Happy cooking!](https://recipespursuit.com/wp-content/uploads/2025/07/e2884337-398a-4403-a361-ea415941ed21-300x300.webp)
![To make this easy pizza dough, you need just a few simple items: - 2 ¼ teaspoons (1 packet) instant dry yeast - 1 teaspoon sugar - 1 cup warm water (about 110°F) - 2 ½ to 3 cups all-purpose flour - 1 teaspoon salt - 2 tablespoons olive oil If you lack an ingredient, don't worry! Here are some swaps you can use: - Yeast: Use 2 ¼ teaspoons of active dry yeast if you have it. - Sugar: Honey or agave syrup can replace sugar. They work well to feed the yeast. - Flour: Whole wheat flour is a healthier choice. You can also use bread flour for a chewier crust. - Olive oil: Any cooking oil, like canola or vegetable oil, is fine. Want to boost the taste of your dough? Try these additions: - Garlic powder: Add ½ teaspoon for a nice garlic hint. - Italian herbs: Dried oregano or basil gives a lovely flavor. Use 1 teaspoon. - Parmesan cheese: Mix in ¼ cup of grated cheese for a cheesy twist. These simple tips can help you create a pizza dough that suits your taste. Now, you are all set to make the easiest homemade pizza dough! For the full recipe, check out Pizza Perfection: Homemade Dough Delight. First, grab a small bowl. Pour in 1 cup of warm water. Make sure it’s around 110°F. Add 1 teaspoon of sugar and 2 ¼ teaspoons of instant dry yeast. Stir it lightly. This mixture needs to sit for about 5 to 10 minutes. Watch for bubbles or froth. This shows that the yeast is alive and ready to work. Next, take a large mixing bowl. Add 2 ½ cups of all-purpose flour and 1 teaspoon of salt. Whisk them together well. Make a well in the center of the flour. Pour in your frothy yeast mixture and 2 tablespoons of olive oil. Mix it all together with a wooden spoon or your hands. If the dough is sticky, add more flour slowly. You want the dough to come together nicely. Now, place the dough on a floured surface. Knead it for about 5 to 7 minutes. You want it to feel smooth and elastic. Once done, shape it into a ball. Put it in a lightly oiled bowl and turn it to coat. Cover it with a damp cloth. Let it rise in a warm spot for about 1 hour. It should double in size. After it rises, punch the dough down. This helps release the air. If you want two pizzas, divide it into two parts. Shape each part into a ball and let them rest for about 10 minutes. Now, you're ready to roll out the dough and make your pizza! Check the Full Recipe for more details. To get the best dough, start with warm water. The water should feel warm but not hot. If it's too hot, it can kill the yeast. When you mix the water with yeast and sugar, let it sit. This step helps the yeast wake up. After about 5-10 minutes, the mixture should look frothy. This means the yeast is active and ready to work. Use all-purpose flour for a nice texture. If the dough feels sticky, add more flour slowly. Knead the dough for about 5-7 minutes. This helps develop gluten, making the dough elastic. A smooth and soft dough is what you want. One common mistake is rushing the yeast activation. Always let the yeast mixture sit long enough. If it doesn’t foam, start again. Another mistake is adding too much flour at once. This can make the dough dry. Instead, add flour little by little until it feels right. Don’t skip kneading. It’s important for the dough. If you don’t knead enough, your dough won't rise well. Also, avoid leaving the dough in a cold place. A warm area helps it rise faster. To know if the dough is ready, look for size and texture. It should double in size after rising. You can gently press a finger into the dough. If the indent stays, it’s ready. If it springs back, it needs more time. Once ready, punch it down gently to release air. This step is key before shaping it. Then, divide the dough if needed and let it rest. This rest period makes rolling easier. For more tips, check the Full Recipe for Easiest Homemade Pizza Dough. {{image_2}} You can make a whole wheat pizza dough by swapping all-purpose flour for whole wheat flour. This change gives your crust a nutty taste and extra fiber. Use the same amount of flour, but add a bit more water. Whole wheat flour absorbs more liquid. Start with 1 cup of warm water and add more if needed. This dough will also be denser but still tasty. For a gluten-free option, use gluten-free flour or a blend of flours. Look for a mix that includes xanthan gum. This helps with the dough's texture. Replace the yeast with a gluten-free yeast blend. Mix the dry ingredients first, then add warm water and olive oil. This dough may need less kneading. Roll it out gently to keep it from breaking. To add flavor to your dough, mix in dried herbs. You can use oregano, basil, or garlic powder. Just add 1-2 teaspoons of your chosen herbs to the flour before mixing. This small change gives your crust a great taste and aroma. You can also add grated cheese like Parmesan for extra flavor. Get creative with your dough and make it your own! For the full recipe, check out the recipe section. To store unused dough, wrap it tightly in plastic wrap. This keeps it fresh. You can also place it in an airtight container. Make sure to push out any air. Store it at room temperature for up to 2 hours. If you wait longer, refrigerate it. It lasts up to 3 days in the fridge. Freezing pizza dough is easy. First, shape the dough into a ball. Then, wrap it in plastic wrap. Place the wrapped dough in a freezer bag. This protects it from freezer burn. You can freeze it for up to 3 months. When ready to use, move it to the fridge overnight. Let it thaw slowly for the best results. If you have leftover dough, refrigerate it right away. Store it in an airtight container. It will stay good for about 3 days. When you are ready to use it, take it out and let it sit at room temperature. This helps the dough get back to a nice, soft texture. You can use it for another pizza or even breadsticks. You should let the dough rise for about one hour. This time allows the yeast to work. It makes the dough light and fluffy. The dough will double in size when it’s ready. If your kitchen is cool, it might take a bit longer. You can check it after 30 minutes. If it’s not puffy yet, give it more time. Yes, you can use active dry yeast. Just remember, it needs a little more time to rise. Mix the yeast with warm water and sugar first. Let it sit for about 5-10 minutes until it bubbles. Then you can add it to your flour. This helps activate the yeast properly, just like in the recipe. The best flour for pizza dough is all-purpose flour. It gives a nice balance of chewiness and crispiness. If you want a more authentic taste, try "00" flour. This Italian flour is finer and makes great pizza. You can also mix in some whole wheat flour for extra flavor and nutrition. Just remember to adjust the water if you change the flour type. For the full recipe, check out the [Full Recipe]. In this blog post, we covered the key steps for making pizza dough, from ingredients to storage. You learned about ingredient swaps to fit your needs and how to achieve the best dough texture. I shared tips for avoiding mistakes and checking dough readiness. Don't forget the variations, like whole wheat and gluten-free options. Storing your dough properly helps you enjoy your pizza whenever you want. With these details, you’re set to make great pizza dough at home! Enjoy the process and get creative with flavors.](https://recipespursuit.com/wp-content/uploads/2025/05/8cbfd0b4-a5e1-40ea-a717-8c4cd603c146-300x300.webp)
![To make Apple Cinnamon Crumb Muffins, you need a few key ingredients. Gather these items before you start baking. - 2 cups all-purpose flour - 1 cup granulated sugar - 1 tablespoon baking powder - 1 teaspoon baking soda - 1 teaspoon ground cinnamon - ½ teaspoon salt - 1 large egg - 1 cup buttermilk - ¼ cup vegetable oil - 2 cups apples, peeled and diced (Granny Smith or Honeycrisp work best) - ¼ cup brown sugar - ¼ cup rolled oats - 2 tablespoons cold butter, cubed Each ingredient plays an important role. The flour gives shape and structure. Sugar adds sweetness and helps with browning. Baking powder and baking soda help the muffins rise. Cinnamon brings warmth and flavor, while salt enhances all the tastes. Using buttermilk makes the muffins tender and moist. The oil keeps them soft. Apples add a fresh crunch, and the brown sugar with oats creates a lovely crumb topping. These ingredients come together to make a delightful treat. You can find the full recipe above to guide you through the steps. Preheat your oven to 350°F (175°C). Line your muffin tin with paper liners or grease it with non-stick spray. This step helps the muffins bake evenly. In a large bowl, combine the following dry ingredients: - 2 cups all-purpose flour - 1 cup granulated sugar - 1 tablespoon baking powder - 1 teaspoon baking soda - 1 teaspoon ground cinnamon - ½ teaspoon salt Whisk these ingredients together until they mix well. This ensures the baking powder and soda spread evenly. In a separate bowl, whisk together these wet ingredients: - 1 large egg - 1 cup buttermilk - ¼ cup vegetable oil Mix them well until fully blended. This adds moisture and richness to your muffins. Pour the wet mixture into the dry ingredients. Gently stir with a spatula until just combined. It’s okay if there are a few lumps. Overmixing can lead to tough muffins. Next, fold in 2 cups of diced apples. Granny Smith or Honeycrisp work best for flavor. Then, spoon the batter into the prepared muffin tin, filling each cup about two-thirds full. In a small bowl, mix the crumb topping ingredients: - ¼ cup brown sugar - ¼ cup rolled oats - 2 tablespoons cold butter, cubed Use a fork or your fingers to mix this until it becomes crumbly. Sprinkle it evenly over each muffin for a delicious crunch. Place the muffin tin in the preheated oven. Bake for 18 to 20 minutes. Check with a toothpick; it should come out clean. Let the muffins cool in the pan for about 5 minutes. Then, transfer them to a wire rack to cool completely. For the complete recipe details, check out the Full Recipe. For the best flavor in your Apple Cinnamon Crumb Muffins, I suggest using Granny Smith or Honeycrisp apples. Granny Smith adds a nice tartness that balances the sweetness. Honeycrisp offers a juicy, crisp bite that enhances the muffins' texture. Both apples hold their shape well when baked, ensuring each bite is delightful. Mixing is key to fluffy muffins. When you combine wet and dry ingredients, do it gently. Stop mixing when you see a few lumps. Overmixing can make your muffins tough. Remember, a little lumpiness is okay! This technique helps keep your muffins light and airy, which is what we want. To make your muffins look as good as they taste, serve them warm. A sprinkle of powdered sugar on top adds a nice touch. You can also drizzle honey over them for extra sweetness. For a lovely display, use a decorative cake stand. This makes the muffins look inviting and perfect for sharing. For the full recipe, check out the instructions above! {{image_2}} You can take your apple cinnamon crumb muffins to the next level by adding nuts or chocolate chips. Nuts like walnuts or pecans add a nice crunch. Simply chop them up and fold them into the batter along with the apples. If you prefer chocolate, mini chocolate chips blend well with the cinnamon flavor. Just add about half a cup to the mix. Both options bring a new twist to this classic recipe. If you need gluten-free options, swap the all-purpose flour for a gluten-free blend. Many blends work well and keep the muffins moist. For low-sugar alternatives, you can use a sugar substitute like stevia or monk fruit. These options help cut down on sugar but still keep your muffins tasty. Boost the flavor with spices or extracts. Adding a pinch of nutmeg or ginger can give your muffins a warm, spicy kick. You might also want to try a splash of vanilla or almond extract. These small changes can elevate the taste and make your muffins even more delightful. For more details on making these delicious muffins, check out the Full Recipe. To keep your apple cinnamon crumb muffins fresh, store them in an airtight container. This will keep them moist and tasty. Place a paper towel in the container to absorb excess moisture. You can also wrap each muffin in plastic wrap for extra protection. Keep them at room temperature for the best results. Freezing muffins is a great way to save some for later. To freeze, let the muffins cool completely first. Then, wrap each muffin in plastic wrap and place them in a freezer bag. Make sure to remove as much air as possible. When you want to enjoy one, just take it out and thaw it at room temperature. You can also microwave it for 20-30 seconds to warm it up. Apple cinnamon crumb muffins last about 2-3 days at room temperature. If you refrigerate them, they can last up to a week. Just remember, refrigeration can make them a bit dry. For the best taste and texture, eat them fresh! To make apple cinnamon crumb muffins from scratch, start by gathering your ingredients. You will need flour, sugar, baking powder, baking soda, cinnamon, salt, an egg, buttermilk, vegetable oil, and apples. Mix the dry ingredients in one bowl and the wet ingredients in another. Combine them gently, then fold in the diced apples. For the crumb topping, mix brown sugar, oats, and cold butter until crumbly. Fill a muffin tin with the batter and add the topping before baking. Check the [Full Recipe] for detailed steps. Yes, you can use different types of flour. If you want a gluten-free option, try almond or oat flour. For whole grain muffins, whole wheat flour works great. Each type of flour may change the texture a bit, so adjust the liquid if needed. Always ensure the flour you choose matches your taste and dietary needs. To prevent your muffins from sticking, grease the muffin tin well with butter or non-stick spray. You can also use paper liners. Make sure to fill the liners only two-thirds full. This helps the muffins rise without spilling over. If you use a non-stick pan, it should reduce sticking, but greasing is still a good idea. Apple cinnamon crumb muffins pair well with many drinks. Coffee is a classic choice, enhancing the cinnamon flavor. You could also serve them with yogurt for a creamy contrast. A drizzle of honey or maple syrup adds extra sweetness. Enjoy these muffins at breakfast or as a snack! In this post, I shared the recipe for apple cinnamon crumb muffins. We covered the ingredients, step-by-step instructions, tips, variations, and storage info. With simple steps, you can create tasty muffins that impress. Remember to choose the right apples for the best flavor. Enjoy your baking and experiment with different flavors or mix-ins. Your next batch can be even more unique. Baking is all about having fun and making something delicious. Try this recipe, and let the aroma fill your kitchen. Happy baking!](https://recipespursuit.com/wp-content/uploads/2025/07/7e1e8d31-0df2-4982-badd-1bd25654b2ad-300x300.webp)
Chocolate Drizzled Rice Krispie Treats Easy Delight
Looking for a fun and easy sweet treat? Chocolate Drizzled Rice Krispie Treats are a crowd-pleaser! With just a few simple ingredients, you can…