

Latest & Greatest

Pumpkin Spice Cheesecake Stuffed Cookies Delight
Get ready for a treat that blends the best of fall flavors! In this guide, I’ll show you how to
Read more…
Sheet-Pan Teriyaki Tofu and Veggies Simple Delight
Looking for a quick and tasty meal? My Sheet-Pan Teriyaki Tofu and Veggies combines savory flavors and healthy ingredients in
Read more…
Air Fryer Cinnamon Roll French Toast Sticks Delight
Craving a fun twist on breakfast? Try my Air Fryer Cinnamon Roll French Toast Sticks! This treat combines the warm
Read more…
Slow Cooker Creamy Greek Chicken Pitas Delight
Craving a delicious and easy meal? Slow Cooker Creamy Greek Chicken Pitas are the answer! This dish is not just
Read more…
Minute Sesame Ginger Salmon Skillet Quick and Tasty
If you’re in a rush but crave something delicious, my Minute Sesame Ginger Salmon Skillet is for you. This quick
Read more…
No-Bake Chocolate Chip Cookie Dough Bars Delight
Are you craving a sweet treat that’s easy to make and requires no baking? Look no further! These No-Bake Chocolate
Read more…
Spicy Honey Garlic Chicken Bites Crispy and Flavorful
Get ready for a flavor explosion with my Spicy Honey Garlic Chicken Bites! These crispy morsels blend sweet honey, savory
Read more…
Cinnamon Sugar Pumpkin Donuts Irresistible Treat
Craving a sweet treat that captures the essence of fall? Look no further! My Cinnamon Sugar Pumpkin Donuts are moist,
Read more…browse recipes


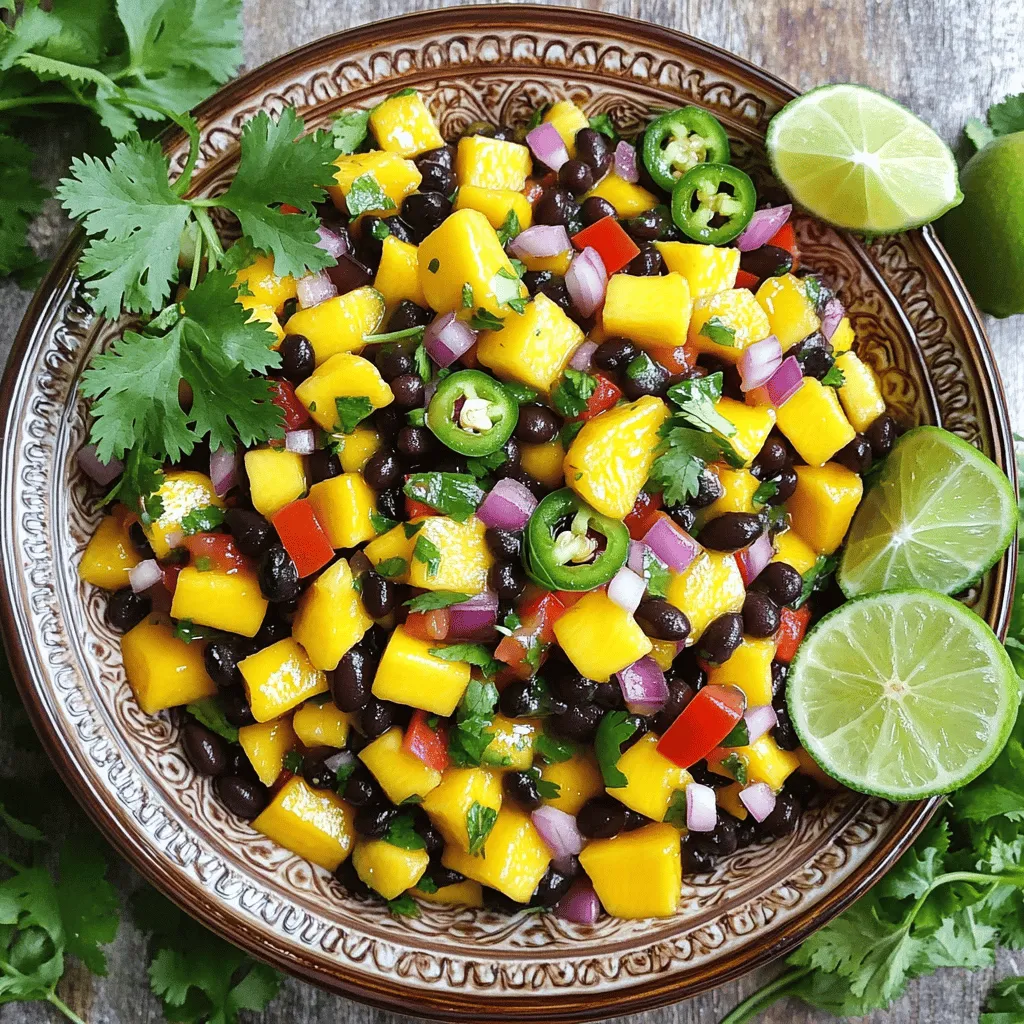
Mango Black Bean Salsa Flavorful and Simple Recipe
If you’re looking for a fresh and vibrant dish that packs a punch, Mango Black Bean Salsa is a must-try! This recipe combines the…
My Latest Desserts
My Latest Recipes

hey,
i’m !
I’m so happy you’re here!
Cooking is my love language, and I’m excited to share my best dishes with you. Hope they become your favorites too! Let’s enjoy every bite of this journey together.

. To start, choose two ripe avocados. They should feel soft but not mushy. Cut each avocado in half and remove the pit. Use a spoon to scoop the green flesh into a bowl. Discard the skin and pit. Ripe avocados blend well, giving the mousse its creamy texture. Next, put the avocado flesh into a food processor. Add the cocoa powder, maple syrup, almond milk, vanilla extract, and salt. Blend everything on high speed. Stop to scrape down the sides as you go. Blend until the mix is smooth and creamy. Taste it. If you want more sweetness, add extra maple syrup and blend again. Once blended, spoon the mousse into small cups or bowls. Chill them in the fridge for about 30 minutes. This helps the mousse firm up. When you're ready to serve, you can add fresh berries and mint leaves on top. These make the mousse look pretty and add a fresh taste. Enjoy your delicious dessert! For the full recipe, check out the reference section above. To make a smooth mousse, start with ripe avocados. Ripe avocados blend well and add creaminess. If your mousse is too thick, add more almond milk. Blend again until it is silky. Scrape down the sides of the bowl to mix evenly. This helps avoid lumps. Taste your mousse after blending. If it needs more sweetness, add more maple syrup. Blend again to mix well. You can also try honey or agave syrup for a different taste. If you want it less sweet, use less syrup. It’s all about your taste. Fresh ingredients make a big difference. Choose ripe avocados for the best flavor and texture. Check for small dark spots, which can indicate overripeness. When using berries for garnish, pick ones that look bright and firm. Fresh mint leaves should be green and crisp. Using fresh ingredients will elevate your mousse. For the full recipe, check out the other sections. {{image_2}} You can make chocolate avocado mousse even more fun with different flavors. Mint adds a fresh twist. Just add a few drops of mint extract. For espresso lovers, mix in a shot of espresso. This makes the mousse rich and bold. Coconut gives a tropical vibe. You can use coconut cream or shredded coconut. Each flavor will give your mousse a new taste adventure. If you want a vegan mousse, there are easy swaps. Use agave nectar instead of maple syrup or honey. This keeps it sweet and plant-based. For milk, try oat milk or soy milk. They blend well and keep the mousse creamy. These changes let everyone enjoy this dessert without worry. Parfaits are a fun way to serve chocolate avocado mousse. Layer mousse with toppings like granola or fresh fruit. Start with a layer of mousse in a glass. Then add a layer of granola for crunch. Top with berries for color and taste. This not only looks great but also makes each bite exciting. You can find the full recipe to get started on this treat. To store leftover mousse, first cover it tightly. Use plastic wrap or a lid. This keeps air out and prevents drying. Place the mousse in the fridge. It will stay fresh for about three days. If you plan to keep it longer, consider freezing it. Glass jars work well for storing mousse. They seal tightly and show off the layers. You can also use plastic containers with lids. Make sure they are food-safe. Small cups are great for single servings, too. Just ensure they have a good seal. Keep your mousse in the coldest part of the fridge. Avoid the door, as it can be warmer. Add a layer of plastic wrap on top of the mousse. This helps keep moisture in and air out. If you want to serve it later, don’t garnish until just before serving. This keeps the mousse looking fresh and tasty. For best results, always check for any change in smell or texture before eating. Yes, chocolate avocado mousse is healthy. It uses avocados, which are full of good fats. These fats help your heart. Plus, cocoa powder has antioxidants. This dessert is tasty and nutritious. Absolutely! You can make this mousse a day in advance. Just store it in the fridge. Cover it well to keep it fresh. This way, it’s ready when you are. If you don’t have maple syrup, honey works well. You can also use agave syrup or date syrup. Each adds a unique taste but keeps it sweet. Just swap it in the same amount. Serve the mousse in small cups or bowls. A fun idea is to layer it with fresh fruit. You can top it with berries or mint leaves for color. This makes it look fancy and inviting. For the full recipe, check out the section earlier. It has all the details you need to make this delicious dessert. Enjoy making it! Making chocolate avocado mousse is easy and fun. We covered key ingredients, helpful tips, and tasty variations. This dessert is not only creamy but also healthy. You learned how to make it, store it, and even serve it with style. Don’t hesitate to try your own flavors or garnishes. Enjoy experimenting with this delicious recipe and share it with friends. Your journey to a tasty and healthy dessert starts now. Dive in and savor every bite!](https://recipespursuit.com/wp-content/uploads/2025/06/487ebf86-b2e3-4c24-8e75-b25de946ab9c-300x300.webp)
![To make Creamy Calabrian Chili Pappardelle, gather these simple ingredients: - 12 oz pappardelle pasta - 1 tablespoon olive oil - 3 cloves garlic, minced - 2 tablespoons Calabrian chili paste (adjust to taste) - 1 cup heavy cream - 1 cup grated Parmigiano-Reggiano cheese - 1 cup fresh spinach, chopped - 1 teaspoon lemon zest - Salt and freshly cracked black pepper, to taste - Fresh basil leaves for garnish You can swap out some ingredients based on what you have: - Use fettuccine or tagliatelle if pappardelle is not available. - If you prefer a lighter option, try half-and-half instead of heavy cream. - For a nutty flavor, use nutritional yeast in place of Parmigiano-Reggiano. - Spinach can be replaced with kale or arugula, if desired. - Fresh basil can be switched for parsley or chives for a different taste. To ensure your dish is fresh and flavorful: - Choose high-quality pasta; it makes a big difference in taste. - Use fresh garlic for the best aroma and flavor. - Store chili paste in a cool, dark place to keep it fresh longer. - Buy Parmigiano-Reggiano cheese in block form and grate it fresh for the best texture. - Always wash greens like spinach just before use to maintain their crispness. For the full recipe, check out the detailed instructions that follow! To start, fill a large pot with water and add salt. Bring it to a boil. Carefully add the pappardelle pasta. Cook according to the package instructions until it’s al dente. This usually takes about 8 to 10 minutes. Once cooked, save one cup of the pasta water. Drain the pasta and set it aside. The reserved water will help your sauce later. In a large skillet, pour in the olive oil. Heat it over medium heat. Add the minced garlic and sauté it for about one minute. You want it fragrant but not brown. Next, stir in the Calabrian chili paste. Cook it for another minute to blend the flavors. Lower the heat and slowly pour in the heavy cream. Stir continuously for 3 to 5 minutes. This will help the sauce thicken slightly. Gradually add the grated Parmigiano-Reggiano cheese. Stir until it melts into the sauce. If the sauce gets too thick, add some reserved pasta water to reach your desired consistency. Once your sauce is creamy, it's time to add the chopped spinach and lemon zest. Stir until the spinach wilts, which should take about 2 to 3 minutes. Now, add the cooked pappardelle to the skillet. Toss it gently to coat the pasta with the creamy sauce. Season with salt and cracked black pepper to taste. Serve it right away. Garnish with fresh basil leaves for a delightful finish. Try this creamy Calabrian chili pappardelle with [Full Recipe] for a tasty dinner. To get the right sauce consistency, start with the heavy cream. Pour it in slowly, stirring all the time. This helps the cream mix well with the other flavors. If the sauce is too thick, use the reserved pasta water. Add it a little at a time until it reaches your desired thickness. You want a smooth and creamy sauce that clings to the pasta perfectly. Want to change the heat level? Adjust the Calabrian chili paste to your taste. If you love spice, add more. For a milder dish, use less. You can also play with lemon zest. More zest gives a brighter flavor, while less makes it richer. Taste your sauce as you cook. This way, you can adjust salt and pepper to make it perfect for you. Serve your creamy Calabrian chili pappardelle with fresh basil on top. This adds a nice touch of color and flavor. Pair it with a crisp green salad for a lovely balance. A simple arugula salad works great. You can also enjoy it with crusty bread to soak up the sauce. For drinks, try a chilled white wine. It complements the dish well. For the full recipe, check out [Full Recipe]. {{image_2}} You can make this dish even better by adding proteins. Grilled chicken works well. Just slice it thin and toss it with the pasta. Shrimp is another great option. Sauté shrimp in olive oil until pink, then mix it into the creamy sauce. You can also use cooked sausage for a heartier meal. Each protein adds a unique flavor and texture, making your creamy Calabrian chili pappardelle even more delightful. If you want a vegetarian option, skip the meat and add more veggies. Peas, bell peppers, or mushrooms bring extra color and taste. You can also use cashew cream instead of heavy cream for a vegan twist. Nutritional yeast can replace the cheese, adding a cheesy flavor without dairy. This way, everyone can enjoy a creamy dish, no matter their diet. While pappardelle is perfect for this dish, you can try other pasta types. Fettuccine or tagliatelle works nicely too. If you prefer something smaller, penne or fusilli can hold the sauce well. Whole wheat or gluten-free pasta is also an option for a healthier choice. Each pasta type brings its own charm to the meal, so feel free to explore! For the full recipe, check out the details above. After enjoying your creamy Calabrian chili pappardelle, store leftovers in an airtight container. Make sure to let the pasta cool to room temperature first. This helps keep its texture. You can keep it in the fridge for up to three days. If you won’t eat it soon, consider freezing. When it's time to reheat, use the stovetop for the best results. Heat a skillet over low heat. Add a splash of water or cream to help revive the sauce. Stir gently until warmed through. Avoid using high heat, as it can dry out the pasta. You want it creamy and delicious, just like when you first made it. If you want to freeze the dish, it's best to do so before adding fresh spinach. In an airtight container, it can last up to three months in the freezer. To thaw, place it in the fridge overnight. Reheat as mentioned, adding fresh spinach just before serving for a lovely touch. For more details, check out the Full Recipe. Yes, you can. If you can't find Calabrian chili paste, try other options. Sambal oelek or harissa can work well. Each paste has a different flavor and heat level. Adjust the amount to suit your taste. Start with less and add more if needed. Remember, the goal is to enhance, not overpower. If you need a substitute for heavy cream, try using whole milk mixed with butter. For every cup of heavy cream, use ¾ cup of milk and ¼ cup of melted butter. You can also use coconut cream for a dairy-free option. Just keep in mind that it may change the dish's taste. To reheat creamy pasta, use low heat on the stove. Add a splash of water or broth to keep it moist. Stir often to avoid sticking. You can also use the microwave. Cover the dish with a damp paper towel. This helps trap steam and keeps the pasta creamy. In this guide, we covered key ingredients for a creamy pasta dish and offered substitutions. We detailed steps for preparing pappardelle and making a rich sauce. You learned tips for perfecting sauce consistency and personalizing flavors. Variations allowed for protein choices and dietary needs. Lastly, we discussed storing and reheating leftovers effectively. Remember, cooking is about trying new things. Enjoy experimenting with ingredients and flavors. Your perfect dish awaits!](https://recipespursuit.com/wp-content/uploads/2025/05/61a9362e-1514-4a2a-9bbb-008ade81b8fc-300x300.webp)
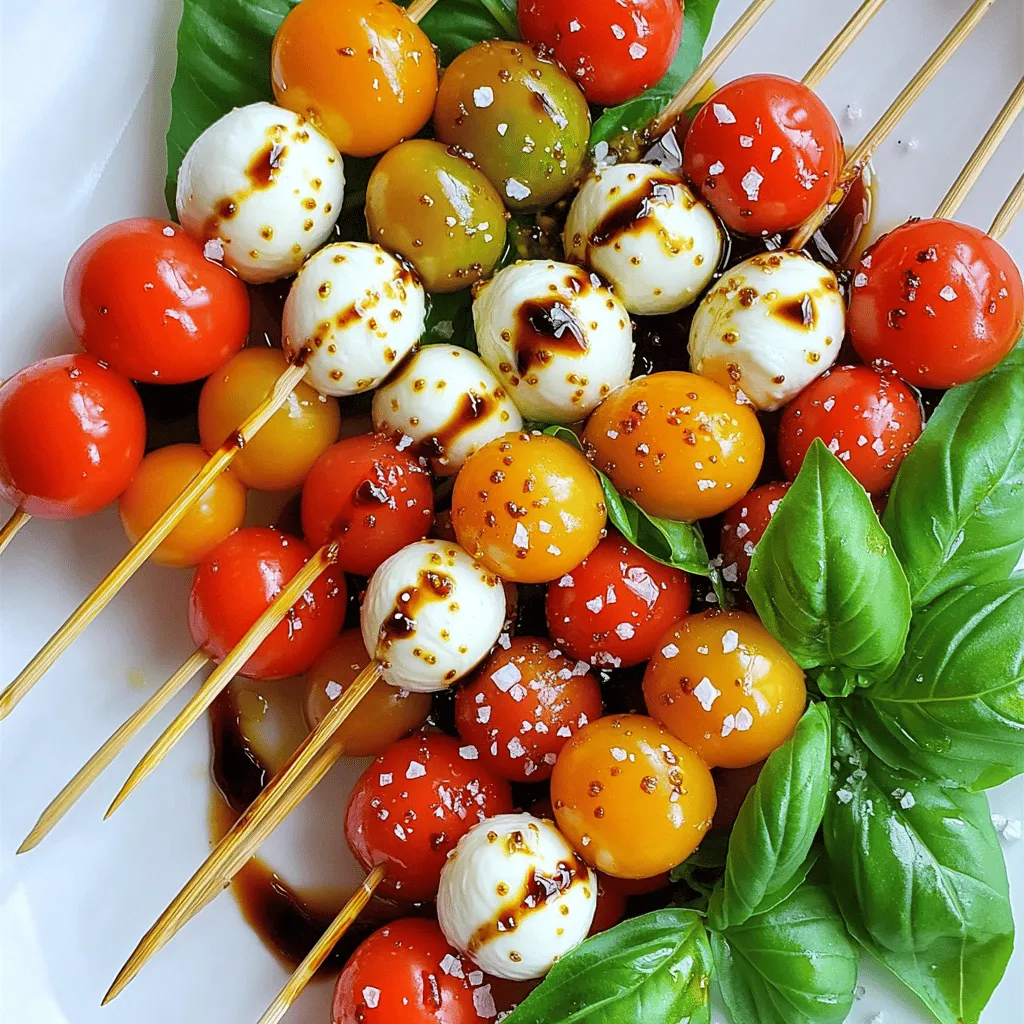
Tasty Tomato Basil Mozzarella Skewers Recipe Guide
Craving a fresh and easy appetizer? You’re in the right place! In this guide, I’ll show you how to make delicious Tomato Basil Mozzarella…