

Latest & Greatest

Caramel Pecan Sticky Bun French Toast Bake Delight
If you’re craving a sweet and rich breakfast, you’ll love my Caramel Pecan Sticky Bun French Toast Bake! This dish
Read more…
One-Pot Creamy Garlic Lemon Orzo Flavorful Delight
If you’re craving a quick, tasty meal, let’s dive into my One-Pot Creamy Garlic Lemon Orzo. This dish features creamy
Read more…
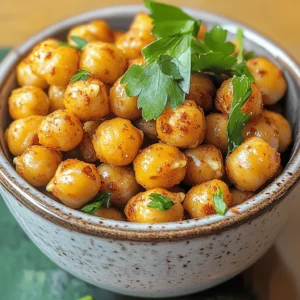
Air Fryer Nacho Cheese Chickpeas Crispy Snack Delight
Are you ready for a tasty snack that’s easy and fun to make? Air Fryer Nacho Cheese Chickpeas are the
Read more…
Garlic Herb Roasted Cauliflower Steaks Flavorful Dish
If you’re looking for a tasty, healthy meal, garlic herb roasted cauliflower steaks are a must-try. These flavorful steaks are
Read more…
Pumpkin Spice Oatmeal Chocolate Chip Cookies Delight
Are you ready to bring fall flavors to your kitchen? In this post, we’ll create mouthwatering Pumpkin Spice Oatmeal Chocolate
Read more…
Strawberry Lemonade Cupcakes Sweet and Tart Delight
Are you ready to indulge in a sweet and tangy treat? Strawberry Lemonade Cupcakes bring summer’s brightest flavors to your
Read more…
Peanut Lime Chicken Skewers Juicy and Flavorful Meal
Get ready to treat your taste buds with my Peanut Lime Chicken Skewers! These juicy, flavorful bites combine tender chicken
Read more…
Caramel Apple Muffins Tasty and Delightful Treat
Caramel Apple Muffins are a tasty treat that can brighten your day! Bursting with sweet apple chunks and rich caramel
Read more…browse recipes


Creamy Spinach Ricotta Ravioli Flavorful Comfort Dish
Craving a warm, comforting dish that bursts with flavor? Look no further than creamy spinach ricotta ravioli! This delightful recipe combines fresh spinach and…
My Latest Desserts
My Latest Recipes

hey,
i’m !
I’m so happy you’re here!
Cooking is my love language, and I’m excited to share my best dishes with you. Hope they become your favorites too! Let’s enjoy every bite of this journey together.

Cilantro Lime Rice Simple and Flavorful Dish
Craving a bright, zesty side dish? Cilantro Lime Rice is your answer! This simple recipe packs a flavorful punch and pairs well with many…

