
Latest & Greatest

Buffalo Chicken Mac and Cheese Tasty Dinner Delight
Looking for a cozy dinner that packs a punch? Buffalo Chicken Mac and Cheese merges creamy, cheesy goodness with fiery
Read more…
Strawberry Peach Crisp Easy and Delicious Dessert Recipe
Looking for a simple yet delightful dessert? This Strawberry Peach Crisp recipe is your answer! With just a few fresh
Read more…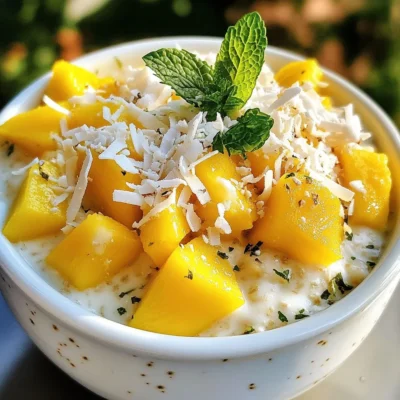
Mango Coconut Overnight Oats Tasty and Simple Recipe
Looking for a refreshing breakfast that’s simple and tasty? Try my Mango Coconut Overnight Oats! This easy recipe combines creamy
Read more…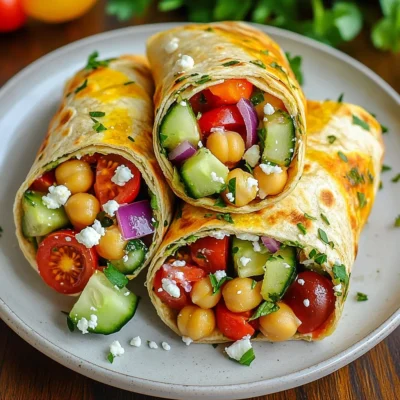
Mediterranean Chickpea Wraps Packed with Flavor
Looking for a meal that’s both delicious and easy? Mediterranean Chickpea Wraps are here to save the day! These wraps
Read more…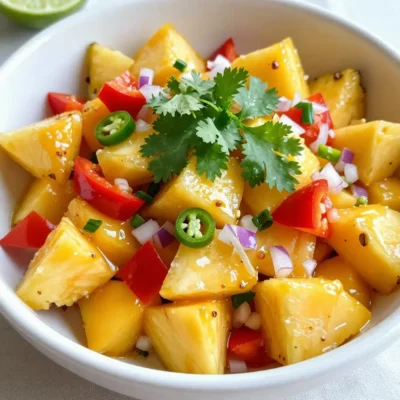
Mango Pineapple Salsa Fresh and Flavorful Delight
Are you ready to brighten up your meals? This Mango Pineapple Salsa is fresh and flavor-packed, making it a perfect
Read more…
Raspberry Dark Chocolate Muffins Soft and Tasty Treat
Craving a sweet treat that’s soft, tasty, and easy to make? You’re in for a delight with these Raspberry Dark
Read more…
Coconut Pineapple Cupcakes Delightful and Easy Treat
Welcome to my kitchen, where we’re baking some sweet magic! Today, I’ll show you how to make Coconut Pineapple Cupcakes
Read more…
Sweet Hawaiian Chicken Skillet Quick and Tasty Meal
Looking for a quick, tasty meal that’s bursting with flavor? The Sweet Hawaiian Chicken Skillet is your answer! This dish
Read more…browse recipes


![- 1 lb (450g) shrimp, peeled and deveined - 2 ripe avocados, diced - 1 red bell pepper, diced - 1 cup cherry tomatoes, halved - 1 small red onion, finely chopped - 2 cloves garlic, minced - 1 tablespoon olive oil - 1 tablespoon lime juice - 1 teaspoon chili powder - 1/2 teaspoon cayenne pepper (adjust to taste) - Salt and pepper to taste - Fresh cilantro, chopped (for garnish) You need fresh and quality ingredients for the best taste. The shrimp should be firm and smell clean. Look for bright green avocados that yield slightly when pressed. A ripe red bell pepper adds sweetness, while cherry tomatoes give a juicy burst. Red onion adds crunch and sharpness, and garlic brings a savory kick. Using lime juice brightens all the flavors. Chili powder and cayenne add heat, but you can adjust as you like. Sprinkle salt and pepper to enhance all the flavors. Finally, fresh cilantro adds a lovely touch. Check the [Full Recipe] for all the details! This salad is low in calories and high in protein. It’s packed with healthy fats from avocados, which are good for your heart. Each serving offers vitamins and minerals that keep you energized. You can change it up! Swap shrimp for chicken or tofu for a different taste. Use different veggies like corn or cucumbers for added crunch. Just keep it fresh and colorful for the best results. To start, we need to marinate the shrimp with spices. In a bowl, mix the shrimp with olive oil, lime juice, chili powder, cayenne pepper, salt, and pepper. This blend brings out the bold flavors. Let the shrimp sit for about 15 minutes. This time allows the shrimp to soak in all the tasty spices. Next, we cook the shrimp. Heat a skillet over medium-high heat. Add the marinated shrimp and cook for 2-3 minutes on each side. You will know the shrimp are cooked when they turn pink and opaque. This is a good sign that they are ready. Remove the shrimp from the heat and let them cool slightly. Now it’s time to combine all the ingredients. In a large bowl, mix the diced avocados, red bell pepper, cherry tomatoes, and red onion. Once mixed, add the cooled shrimp to the bowl. Gently toss everything together. Be careful not to mash the avocados. This light mixing makes sure all flavors blend well without losing any nice chunks. To choose ripe avocados, look for a dark green color. Gently press the skin with your thumb. If it yields slightly, it is ripe. Avoid hard avocados, as they need more time to ripen. If you find overripe avocados, they may have dark spots or feel mushy. Use ripe avocados quickly to enjoy their best flavor in your spicy shrimp avocado salad. If you have leftover shrimp, store it in the fridge. Use it in tacos or pasta dishes. Leftover vegetables can also be tossed into omelets or stir-fries. To keep avocados fresh, sprinkle lime juice on them. This will slow browning. You can also mash them for guacamole or spread them on toast. This salad tastes best when served fresh and cool. After cooking the shrimp, let it cool slightly before mixing. Serve it right away for maximum flavor. If you want to serve it later, chill it in the fridge for about 30 minutes. This will help the flavors blend nicely. Enjoy your spicy shrimp avocado salad at the perfect temperature! {{image_2}} You can switch up the shrimp for other proteins. Try grilled chicken or firm tofu. Both options pair well with avocado. You can season them the same way as the shrimp. This keeps the dish fresh and tasty. If you want more flavor, try smoked salmon. It adds a nice twist. For a veggie version of this salad, focus on beans and nuts. Black beans or chickpeas add protein and texture. You can also add nuts like almonds or walnuts. They give a nice crunch. Toss in some extra veggies like corn or cucumber. This makes the salad colorful and hearty. Herbs and spices can really boost the flavor. Fresh basil or dill works well with the avocado. You can also sprinkle some cumin for a warm touch. If you like more heat, try adding jalapeños or red pepper flakes. These small changes can make a big difference. For a citrus kick, consider adding zest from lime or lemon. Each herb or spice brings its own unique taste. For the full recipe, check out the instructions above. To keep your Spicy Shrimp Avocado Salad fresh, place any leftovers in an airtight container. This helps prevent the salad from getting soggy. Store it in the fridge for up to two days. If you notice the avocado browning, squeeze a bit of lime juice on it. This will slow down the oxidation process and keep it looking bright. You should avoid reheating this salad, as it is best served cold. If you do need to reheat the shrimp, quickly warm them in a skillet over low heat. Do not cook for too long, or the shrimp may become tough. Remember, the salad tastes great when served fresh. For the shrimp, use them within one day of purchase for the best flavor. Avocados are best when ripe, but they can last for a few days at room temperature. Keep them in the fridge to extend their life. Cherry tomatoes and bell peppers last about a week in the fridge. Always check for signs of spoilage before using any ingredient in your salad. For the full recipe, check the instructions above. Yes, you can make this salad ahead of time. Prepare the shrimp and veggies but leave the dressing out until you are ready to serve. This keeps the salad fresh. Store it in the fridge for up to a few hours. If you want to make it a day ahead, I suggest storing the shrimp and veggies separately. This way, they stay crisp and tasty. If you don't like shrimp, you have options. You can use grilled chicken, tofu, or even chickpeas. Each option brings a unique flavor. If you choose chicken, cook it just like the shrimp for the best taste. Tofu works well when marinated and grilled too. Chickpeas add a nice texture and protein. Adjusting the heat is easy! If you like it milder, cut back on the cayenne pepper. You can also skip the chili powder. For more heat, add extra cayenne pepper or some hot sauce. Just remember to taste as you go to find the right balance for your palate. Enjoy experimenting to make it your own! For the full recipe, check out the [Full Recipe]. This blog post explored a fresh shrimp salad recipe. We covered essential ingredients, cooking steps, and tips for perfecting your dish. I shared ideas for variations and explained how to store leftovers wisely. Remember, this salad is not just tasty; it’s flexible too! Feel free to swap out proteins or adjust spices. Use the tips shared to impress at your next meal. Enjoy crafting a delicious, healthy dish that fits your taste!](https://recipespursuit.com/wp-content/uploads/2025/06/84b9ddcc-681a-43f9-a947-337d510ede67.webp)
Spicy Shrimp Avocado Salad Fresh and Flavorful Dish
If you crave a lively dish that’s both fresh and packed with flavor, you’re in for a treat! My Spicy Shrimp Avocado Salad combines…
My Latest Desserts
My Latest Recipes

hey,
i’m !
I’m so happy you’re here!
Cooking is my love language, and I’m excited to share my best dishes with you. Hope they become your favorites too! Let’s enjoy every bite of this journey together.

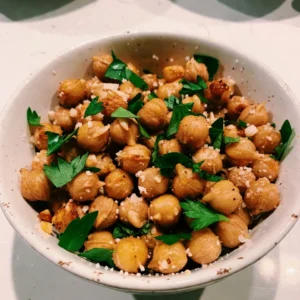

Spicy Garlic Roasted Chickpeas Crispy Flavor Boost
Are you ready to spice up your snack game? My Spicy Garlic Roasted Chickpeas are a game-changer! These crispy bites pack a flavor punch…

