Latest & Greatest

Thai Red Curry Chicken Meatballs Savory and Simple Dish
If you’re looking for a dish that packs a punch and offers comfort, Thai Red Curry Chicken Meatballs are a
Read more…
Lemon Herb Quinoa Chicken Bites Savory Delight
Are you ready for a tasty treat? In this blog post, I’ll guide you through making Lemon Herb Quinoa Chicken
Read more…
Garlic Butter Steak Skillet Flavorful Dinner Recipe
Looking for a quick and tasty dinner idea? You’ll love my Garlic Butter Steak Skillet recipe! It’s packed with flavor
Read more…
Chocolate Chip Zucchini Bread Savory and Moist Recipe
Are you ready to bake something deliciously unique? This Chocolate Chip Zucchini Bread recipe is not only moist but also
Read more…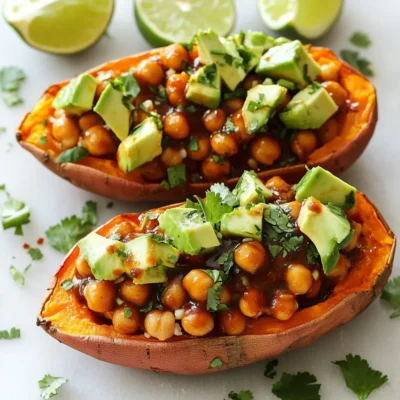
BBQ Chickpea Stuffed Sweet Potatoes Tasty and Simple
If you’re looking for a fun and healthy meal, try BBQ Chickpea Stuffed Sweet Potatoes. This dish blends sweet, savory,
Read more…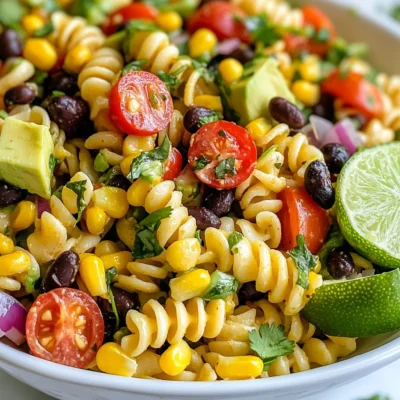
Zesty Southwest Pasta Salad Flavorful and Fresh Dish
Ready to spice up your meal routine? My Zesty Southwest Pasta Salad is bursting with flavor and freshness. In this
Read more…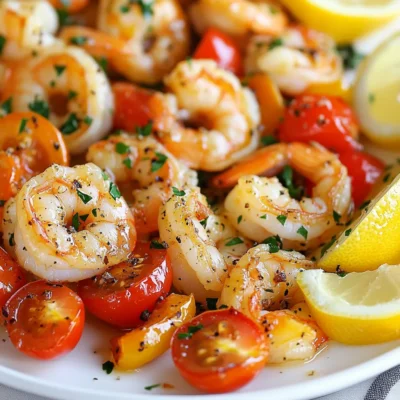
Sheet Pan Lemon Garlic Shrimp Fresh and Easy Meal
Ready to whip up a meal that’s fresh, easy, and bursting with flavor? This Sheet Pan Lemon Garlic Shrimp recipe
Read more…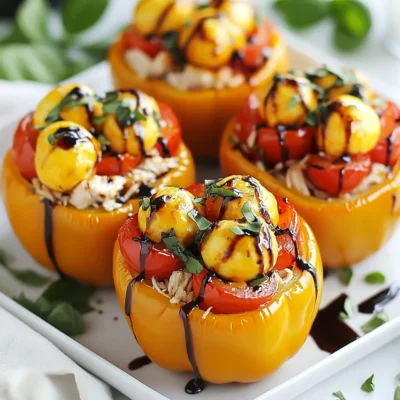
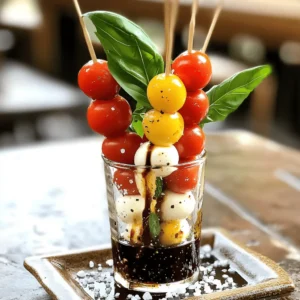
Caprese Chicken Stuffed Peppers Flavorful Delight
Are you ready to spice up your dinner routine? These Caprese Chicken Stuffed Peppers are not only colorful but packed
Read more…browse recipes


![To make Pumpkin Spice French Madeleines, you need these key ingredients: - 1 cup all-purpose flour - 1 teaspoon baking powder - 1 teaspoon pumpkin pie spice - 1/4 teaspoon salt - 1/2 cup unsalted butter, melted - 3/4 cup granulated sugar - 2 large eggs - 1/2 teaspoon vanilla extract - 1/2 cup pumpkin puree - Powdered sugar for dusting These ingredients create a soft, fluffy treat that bursts with pumpkin flavor. If you have common allergens, here are some substitutions: - For gluten-free, use a 1:1 gluten-free flour blend. - If you are dairy-free, try using coconut oil instead of butter. - For egg-free, use flax eggs (1 tablespoon flaxseed meal + 2.5 tablespoons water = 1 egg). The key tool for this recipe is a madeleine pan. This pan has unique shell shapes that give madeleines their classic form. It is important because it helps create the perfect texture. Without it, your madeleines won’t have their lovely shape. You will also need: - Mixing bowls for combining ingredients. - A whisk for mixing dry and wet ingredients well. - A spatula for folding the batter gently. - An oven to bake the madeleines evenly. These tools make the process smooth and fun! Each one plays a role in crafting delicious madeleines that you can share with friends or enjoy solo. 1. Preheat the oven: Set your oven to 350°F (175°C). This helps the madeleines bake evenly. 2. Prepare the madeleine pan: Grease the pan with butter or use non-stick spray. A well-greased pan ensures easy removal. 3. Combine dry ingredients: In a bowl, whisk together: - 1 cup all-purpose flour - 1 teaspoon baking powder - 1 teaspoon pumpkin pie spice - 1/4 teaspoon salt Mixing these ingredients is crucial. It ensures that the baking powder and spices are evenly spread throughout the batter. 4. Beat the wet mixture: In a large bowl, mix: - 1/2 cup unsalted butter, melted - 3/4 cup granulated sugar Whisk until it becomes creamy. 5. Add eggs: Add 2 large eggs, one at a time. Beat well after each egg. This helps to incorporate air, making the madeleines light and fluffy. 6. Incorporate flavors: Stir in: - 1/2 teaspoon vanilla extract - 1/2 cup pumpkin puree Mix until everything is well combined. 7. Combine wet and dry: Gradually fold the dry mixture into the wet mixture. Be gentle—some lumps are okay. Overmixing can make the madeleines tough. 8. Fill the pan: Spoon the batter into the prepared madeleine pan. Fill each mold about three-quarters full for the best shape. 9. Bake: Place the pan in the oven and bake for 10-12 minutes. Look for golden edges. The tops should spring back when you gently press them. 10. Cool down: Remove from the oven. Let the madeleines cool in the pan for a few minutes. Then, transfer them to a wire rack. 11. Final touch: Once cooled, dust with powdered sugar. This adds a nice finish and sweetness. These steps ensure you achieve that perfect texture and flavor in your pumpkin spice French madeleines. For the complete recipe, check out the [Full Recipe]. To make great madeleines, start with the batter. Mix your ingredients gently. Overmixing can ruin the fluffy texture. Just fold until you see no dry flour. It’s okay if some lumps remain. After baking, let the madeleines cool in the pan for a few minutes. This helps them keep their shape. Then, transfer them to a wire rack. Cooling them completely on the rack is key. For the final touch, dust them with powdered sugar. This adds a sweet look and taste. One common mistake is overmixing the batter. Overmixing creates a dense texture. You want them light and airy, so mix carefully. Another issue is baking time. Different ovens can change how long you bake. Keep an eye on your madeleines. They should look golden on the edges. If your oven runs hot, check them a few minutes early. Trust your instincts for the best results. {{image_2}} You can change the flavor of your madeleines easily. Adding chocolate chips can bring a rich taste. Try folding in nuts, like walnuts or pecans, for a crunchy bite. You can also mix spices. Use cinnamon or nutmeg for a twist on the classic pumpkin spice. Each option adds a unique flavor, making these treats even more fun. If you need gluten-free madeleines, swap all-purpose flour for a gluten-free blend. These blends often work well in baked goods. For a vegan version, use flax eggs instead of real eggs. To replace butter, try using coconut oil or applesauce. These changes keep the taste great while fitting your diet. To keep your madeleines fresh, store them in an airtight container. This helps prevent them from drying out. Place parchment paper between layers to avoid sticking. They stay good for up to three days at room temperature. For longer storage, you can freeze them. Freezing madeleines is easy. Let them cool completely first. Then, wrap each one in plastic wrap. Place them in a freezer bag or container. They will last for up to three months in the freezer. When you want to enjoy them, just take out what you need. To reheat madeleines, use an oven for the best results. Preheat your oven to 350°F (175°C). Place the madeleines on a baking sheet for about five minutes. This keeps them warm and soft. You can also use a microwave. Heat them for about 10-15 seconds. Be careful not to overheat, as they can dry out quickly. Serve warm, dusted with powdered sugar for a nice touch. Enjoy them with coffee or tea for a cozy treat! You can tell when madeleines are done by looking for a few signs. First, check the edges. They should be golden brown. Next, gently press the tops. They should spring back easily. If they stay dented, they need more time. The baking time is usually 10 to 12 minutes. Ovens vary, so keep an eye on them. Yes, you can use fresh pumpkin. However, the texture may change. Fresh pumpkin often has more moisture than canned. This can make your batter wetter. You may need to adjust the flour to balance it out. Cook the fresh pumpkin first to reduce moisture. Then, mash it well before adding it to your batter. You have many options for spices! Cinnamon adds warmth and sweetness. Nutmeg gives a nice kick. Ginger can add a zesty flavor. Cloves bring in a deeper spice note. Feel free to mix and match. Experimenting with spices can lead to fun new flavors in your madeleines! Madeleines are delightful, but making them takes careful steps and attention. You learned about the key ingredients needed and the tools that help you bake perfectly. We discussed mixing, baking, and ways to avoid common mistakes. You can even try different flavors, like chocolate or spices. Storage tips will help you enjoy madeleines longer. Remember, with practice, you will master this classic treat. Enjoy your journey with madeleines!](https://recipespursuit.com/wp-content/uploads/2025/07/123c6bce-9621-40e1-aa66-e5fccbcdc420.webp)
Pumpkin Spice French Madeleines Fluffy Treat Recipe
Get ready to fall in love with a sweet treat! My Pumpkin Spice French Madeleines are not just fluffy and delightful; they are the…
My Latest Desserts
My Latest Recipes

hey,
i’m !
I’m so happy you’re here!
Cooking is my love language, and I’m excited to share my best dishes with you. Hope they become your favorites too! Let’s enjoy every bite of this journey together.

. Now that you have your ingredients ready, you're one step closer to enjoying this delicious treat! - Preheat your oven to 350°F (175°C). - Grease a 9x5 inch loaf pan or line it with parchment paper. - Cream together butter and brown sugar until light and fluffy. - Incorporate mashed bananas into the mixture. - Whisk together baking soda, salt, and flour in a separate bowl. - Gradually add this dry mixture to the banana mixture, stirring gently. - Fold in chocolate chips and walnuts if you want some crunch. - Pour the batter into the prepared loaf pan and smooth the top. - Bake for 55-65 minutes until a toothpick comes out clean. This process is simple and rewarding. You will enjoy the delicious smell while baking. For the full recipe, check the earlier section. - Avoid over-mixing for a lighter loaf. This keeps the bread fluffy and soft. - Use ripe bananas for better sweetness. They add moisture and flavor to the bread. - Adding spices such as cinnamon or nutmeg can boost taste. Just a pinch can change the game. - Substituting with different types of chocolate makes it fun. Try dark, milk, or even white chocolate chips. - Dust with powdered sugar for a pretty finish. It adds a nice touch to your loaf. - Serve with a dollop of whipped cream for extra delight. It’s a treat that everyone loves. These tips will help you create the best chocolate chip banana bread. For the full recipe, check out the [Full Recipe]. {{image_2}} You can make banana bread gluten-free by using almond flour or a gluten-free blend. Almond flour gives a nice nutty flavor and moist texture. If you use a gluten-free blend, check the package for any special instructions. You may need to adjust the baking time, as gluten-free batters can cook faster or slower. Keep an eye on the bread after 50 minutes. A toothpick should come out clean when it's ready. If you're looking to cut back on sugar, you can reduce the amount in the recipe. Try using half a cup of brown sugar instead of three-fourths. This change will still give you that sweet taste without being too rich. Another option is to replace butter with applesauce. This swap will keep your bread moist while lowering fat content. Use a half cup of unsweetened applesauce for the same effect. Want to mix it up? Adding peanut butter or Nutella can create a rich and creamy twist. Just swirl it into the batter before baking. You can also get fruity by incorporating blueberries or chopped strawberries. These fruits add a fresh burst of flavor and make your chocolate chip banana bread even more delightful. Feel free to experiment with your favorite flavors! After you bake the chocolate chip banana bread, let it cool. Place it in an airtight container. This helps keep the bread moist. You can store it at room temperature for up to three days. If you want it to last longer, refrigerate it. Just remember, refrigerating may change the texture a bit. To freeze the banana bread, wrap it tightly in plastic wrap. Make sure there are no air pockets. Then, place it in a freezer-safe bag. This way, the bread stays fresh for about three months. When you're ready to eat it, thaw it overnight in the fridge. For best quality, let it sit at room temperature for a few hours before slicing. At room temperature, your chocolate chip banana bread stays fresh for about three days. If you keep it in the fridge, it can last up to a week. In the freezer, it can remain good for up to three months. Just remember to wrap it well! For more details, check the Full Recipe. Yes, you can use frozen bananas! First, thaw them in the fridge or at room temperature. Once they are soft, mash them up. The texture should be great for your bread. Frozen bananas often taste sweeter, which is a plus. Just make sure to drain any excess liquid after thawing. If you want a vegan option, there are many choices to bind your bread. You can use 1/4 cup of applesauce for each egg. Mashed bananas work too; use 1/4 cup. Another option is ground flaxseed. Mix one tablespoon of flaxseed with three tablespoons of water. Let it sit for five minutes before adding it to your mix. To check if your bread is done, use a toothpick. Insert it into the center of the loaf. If it comes out clean or with a few crumbs, it’s ready. If it’s wet, bake it longer. You can also look for a golden-brown crust and a firm top. The bread should spring back when touched lightly. Absolutely! You can add nuts like walnuts or pecans for a nice crunch. Chocolate chips are a must, but you can also mix in dried fruit or coconut. Feel free to get creative! Just remember to fold in these extras gently to keep the batter light. We explored delicious banana bread, from ingredients to baking. You learned how to mix ripe bananas with brown sugar, butter, and eggs. Adding chocolate chips or nuts makes it even better. Remember, tips like using ripe fruit and avoiding over-mixing ensure a fluffy texture. Consider variations for gluten-free or healthier options too. Finally, store your leftovers right and enjoy them later. Now you’re set to bake an amazing banana bread that everyone will love!](https://recipespursuit.com/wp-content/uploads/2025/06/9d647372-7317-4201-ad1e-be91f816df32-300x300.webp)
![- Baby carrots (or regular carrots) - Garlic - Olive oil - Grated Parmesan cheese - Dried thyme - Salt and black pepper - Fresh parsley (for garnish) To make sure your Roasted Garlic Parmesan Carrots turn out great, measure your ingredients carefully. Use a kitchen scale for weight, if possible. For volume, use measuring cups and spoons. If you have dietary needs, you can swap some ingredients: - Use low-fat cheese instead of Parmesan for fewer calories. - Replace olive oil with a spray oil to cut down on fat. - If you need a vegan option, try nutritional yeast instead of cheese. These swaps can help you enjoy this dish while meeting your needs. Don't forget to check the [Full Recipe] for detailed cooking steps. 1. Preheating the oven: Start by preheating your oven to 425°F (220°C). This helps the carrots roast quickly and evenly. 2. Tossing ingredients in the mixing bowl: In a large mixing bowl, add 1 pound of baby carrots. Then, add 4 minced garlic cloves, 2 tablespoons of olive oil, 1 teaspoon of dried thyme, 1 teaspoon of salt, and 1/2 teaspoon of black pepper. Toss everything until the carrots are coated well. This step is crucial for flavor. 3. Arranging the carrots on the baking sheet: Line a baking sheet with parchment paper. Spread the carrots out evenly. Make sure they are not overcrowded. This helps them roast nicely without steaming. 1. Roasting time and technique: Place the baking sheet in the preheated oven. Roast the carrots for 20 minutes. Be sure to stir them halfway through. This ensures they cook evenly. 2. Adding Parmesan and final roasting: After 20 minutes, take out the baking sheet. Sprinkle 1/2 cup of grated Parmesan cheese over the carrots. Return them to the oven and roast for an additional 5-7 minutes. You want the cheese to melt and turn slightly golden. - Ensuring even roasting: Stir the carrots during roasting. This helps them brown on all sides and enhances the flavor. - Checking for doneness: The carrots should be tender when pierced with a fork. If they are soft but not mushy, they are done. You want a nice balance between tenderness and texture. Following these steps will give you Roasted Garlic Parmesan Carrots full of flavor and easy to make. For the full recipe, refer to the earlier section. To enhance the flavor of roasted garlic parmesan carrots, use fresh herbs. Fresh thyme adds a nice touch. You can also try rosemary or oregano for a different taste. A squeeze of lemon juice after roasting brightens the dish. For crispiness, the key is space. Spread the carrots out on the baking sheet. This helps them roast evenly and stay crunchy. Stir them halfway through cooking. This ensures every side gets that nice golden color. One common mistake is overcrowding the baking sheet. If you pile on too many carrots, they will steam instead of roast. Aim for a single layer for the best texture. Another issue is under-seasoning. Carrots need salt and pepper to bring out their natural sweetness. Don’t skip the seasoning or the garlic. Each adds depth and flavor. For a richer taste, consider adding a bit more parmesan cheese. This will create a wonderful crust. For the full recipe, check out the details above. {{image_2}} You can play with flavors to make this dish unique. For instance, fresh herbs can change the taste. Try adding rosemary or oregano for a fresh twist. Both herbs bring a nice earthiness that pairs well with garlic. You might also swap the cheese. Feta cheese adds a tangy kick. Cheddar cheese brings a sharpness that is delightful. Experiment with these options to find your favorite flavor. If you're short on time, the air fryer is a great choice. It cooks the carrots quickly while keeping them crisp. Set the air fryer to 400°F and cook for about 15 minutes. Shake the basket halfway through for even cooking. Grilling is another fun method. It adds a nice char and smoky flavor. Toss the carrots with oil and spices, then place them on a hot grill. Cook for about 10-12 minutes, turning often. This method gives a unique taste that’s perfect for summer meals. For the full recipe, check out the earlier section. To keep your roasted garlic Parmesan carrots fresh, store them in the fridge. Place the leftovers in an airtight container. This helps stop moisture and keeps them tasty. They will stay good for up to four days. If you want to save them for longer, you can freeze the carrots. First, let them cool completely. Then, place them in a freezer-safe bag or container. Make sure to press out any air. Frozen carrots can last up to three months. When you're ready to eat, just thaw them in the fridge overnight. You can reheat your carrots in the microwave or the oven. The microwave is fast, but it may make them a bit soggy. To reheat, place them in a bowl and cover it with a damp paper towel. Heat in 30-second bursts until warm. For a better texture, use the oven. Preheat it to 350°F (175°C). Spread the carrots on a baking sheet and heat for about 10-15 minutes. This keeps them crispy and full of flavor. You want to bring back that nice roasted taste. How long do Roasted Garlic Parmesan Carrots last in the fridge? Roasted Garlic Parmesan Carrots can last for about 3 to 5 days in the fridge. Store them in an airtight container to keep them fresh. Can I use regular carrots instead of baby carrots? Yes, you can use regular carrots. Just cut them into sticks that are similar in size to baby carrots. This helps them cook evenly. What can I serve with Roasted Garlic Parmesan Carrots? These carrots pair well with grilled chicken, steak, or fish. They also complement pasta dishes and salads, adding a nice touch of flavor. Is this recipe suitable for meal prep? Absolutely! Roasted Garlic Parmesan Carrots are great for meal prep. Make a big batch and enjoy them throughout the week. How do I know when the carrots are done roasting? The carrots are done when they are tender and slightly caramelized. You can test them by poking a fork in one. If it slides in easily, they are ready. Can I make this recipe vegan? Yes, you can make it vegan by omitting the Parmesan cheese. You can also use nutritional yeast for a cheesy flavor without dairy. What is the best type of Parmesan to use? Freshly grated Parmesan cheese works best. It melts nicely and has a rich flavor. Avoid pre-grated cheese, as it may not melt as well. For the full recipe, check out the detailed instructions above! In this post, we explored how to make tasty roasted garlic Parmesan carrots. We covered essential ingredients and accurate measurements, plus step-by-step preparation and cooking instructions. Expert tips helped avoid common mistakes. Variations let you get creative, swapping herbs or cooking methods. In the end, these carrots are easy to prepare and perfect as a side dish. With a few careful steps, you’ll impress everyone at your table. Enjoy this delicious dish anytime!](https://recipespursuit.com/wp-content/uploads/2025/06/c6c33b24-b539-489d-97df-92a2b4c61db0-300x300.webp)
![To make a great vegan burrito bowl, you need a few key ingredients. Here’s what you'll use: - 1 cup quinoa, rinsed - 2 cups vegetable broth - 1 can (15 oz) black beans, drained and rinsed - 1 cup corn (fresh or frozen) - 1 bell pepper, diced (any color) - 1 avocado, diced - 1 cup cherry tomatoes, halved - 1 small red onion, finely chopped - 1 teaspoon ground cumin - 1 teaspoon chili powder - 1 tablespoon olive oil - Juice of 1 lime - Salt and pepper to taste - Fresh cilantro, chopped (for garnish) - Sliced jalapeños (optional for spice) These ingredients create a colorful and tasty meal. Quinoa serves as a healthy base. The black beans add protein, while the veggies provide crunch and flavor. Adding garnishes can elevate your bowl. Here are some ideas: - Fresh cilantro for a burst of flavor - Sliced jalapeños for heat - Lime wedges for extra zest - Avocado slices for creaminess - Vegan sour cream for richness These garnishes not only look nice but also enhance the taste. Experiment with different toppings to find what you love most. Vegan burrito bowls pack a nutritional punch. Here are some benefits: - Quinoa: A complete protein, high in fiber - Black beans: Rich in protein and iron - Avocado: Full of healthy fats - Vegetables: Provide vitamins and minerals This meal is balanced and filling. It offers a great mix of protein, fiber, and healthy fats. Plus, it’s vegan and packed with nutrients. Enjoy the flavors while nourishing your body! For the full recipe, check the section above. To start your vegan burrito bowls, rinse 1 cup of quinoa under cold water. This step removes any bitterness. In a medium saucepan, bring 2 cups of vegetable broth to a boil. Once it boils, add the rinsed quinoa. Lower the heat, cover, and let it simmer for about 15 minutes. When the quinoa is fluffy, remove it from the heat. Let it sit for 5 minutes, then fluff it with a fork. This creates a light and airy base for your bowl. While the quinoa cooks, heat 1 tablespoon of olive oil in a large skillet over medium heat. Add 1 small chopped red onion and sauté for about 3-4 minutes. You want the onion to soften and become fragrant. Next, toss in 1 diced bell pepper and 1 cup of corn. Sprinkle 1 teaspoon of ground cumin and 1 teaspoon of chili powder over the mixture. Season with salt and pepper to taste. Sauté for another 5-7 minutes. Stir often until the bell peppers are tender and vibrant. In a large bowl, combine the cooked quinoa, 1 can of black beans (drained and rinsed), and the sautéed vegetable mix. Gently fold in 1 diced avocado and 1 cup of halved cherry tomatoes. This not only adds flavor but also color to your dish. Drizzle the juice of 1 lime over the mixture and toss it gently. Taste your creation and adjust the seasoning if you need to. Serve in bowls and garnish with fresh cilantro. For those who love spice, add sliced jalapeños on top. Enjoy your flavorful and nutritious meal! For the complete recipe, check the Full Recipe section. To get great texture, cook the quinoa well. Rinse it first to remove the bitter coating. Use vegetable broth for added flavor. Simmer it on low heat until fluffy. Let it sit for five minutes after cooking. Fluff it gently with a fork. This ensures each grain stands out. Use spices like cumin and chili powder to boost flavor. Sauté your veggies in olive oil. This brings out their natural sweetness. Add lime juice just before serving for brightness. Taste your dish as you go. Adjust salt and pepper to your liking. Fresh cilantro adds a burst of freshness. Don’t skip rinsing the quinoa. It makes a big difference in taste. Avoid overcooking the vegetables; they should be tender yet crisp. If you add too much salt, it can overpower your dish. Lastly, don’t forget the garnishes! They make your bowl look and taste amazing. Check the [Full Recipe] for more details on how to create these vibrant bowls! {{image_2}} You can boost your vegan burrito bowls with protein. Tofu is a great choice. It soaks up flavors well. Just cube it, season it, and sauté it until golden. Tempeh is another tasty option. It has a nutty flavor and adds texture. Crumble it or slice it, then sauté with spices for a hearty kick. Spices can take your burrito bowl to the next level. Try adding smoked paprika for a rich taste. A pinch of cayenne can add heat. You can also mix in fresh herbs like cilantro or parsley. For dressings, a simple lime vinaigrette works well. Just mix lime juice, olive oil, and a touch of salt. You can also blend avocado with lime for a creamy dressing. While quinoa is a fantastic base, you have other options. Brown rice offers a chewy texture and nutty taste. Cauliflower rice is low in carbs and adds a light feel. Just pulse cauliflower florets in a food processor and sauté. Both choices work great with the same toppings from the full recipe. Exploring these variations keeps your meals exciting and nutritious! Store your vegan burrito bowls in airtight containers. This keeps them fresh. Let the bowls cool before sealing. If you add avocado, it may brown. To prevent this, store avocado separately. You can keep the bowls in the fridge for up to three days. When you want to eat leftovers, reheat in the microwave. Use a microwave-safe bowl and cover it. Heat in short bursts, about 30 seconds each. Stir between heating until warm. You can also heat on the stove. Just add a splash of water and stir until hot. Freezing is a great way to save time. Divide the burrito bowls into portions. Use freezer-safe containers or bags. They can last for up to three months in the freezer. To eat, thaw in the fridge overnight. Reheat as mentioned before. This keeps your meal tasty and ready to enjoy! For the full recipe, check the Vibrant Vegan Burrito Bowls. Serve Vegan Burrito Bowls in deep bowls. Place a scoop of quinoa at the bottom. Then, layer on the black beans and sautéed veggies. Add diced avocado and halved cherry tomatoes on top. Finish with a sprinkle of fresh cilantro. A slice of lime on the side adds a fresh kick. You can also serve your bowls with tortilla chips for crunch. This mix of flavors looks great and tastes amazing! Yes, you can make these burrito bowls gluten-free. The main ingredients are naturally gluten-free. Use quinoa, black beans, and fresh veggies. Just ensure that the vegetable broth is gluten-free, as some brands may contain gluten. Most canned beans and corn are also gluten-free. Always check labels to be sure. This way, everyone can enjoy a tasty meal without worry. To customize for picky eaters, keep it simple. Start with the quinoa base and offer toppings on the side. Let them choose what they want. Some may prefer just beans and avocado. Others might like extra veggies or no spice. You can add a creamy dressing for those who want more flavor. This way, each person can build their perfect bowl. Enjoy experimenting with flavors to find what works best! For a complete guide, check out the Full Recipe. To wrap it up, we explored all the key parts of making vegan burrito bowls. We looked at the essential ingredients, cooking steps, and helpful tips. We also talked about tasty variations and how to store your bowls well. Remember, you can mix things up to fit your taste. Keep it fun and don’t be afraid to experiment. With these simple steps, you can create a healthy and delicious meal anytime!](https://recipespursuit.com/wp-content/uploads/2025/06/933dea4b-35ad-40bf-99a8-b9730cacaca0-300x300.webp)
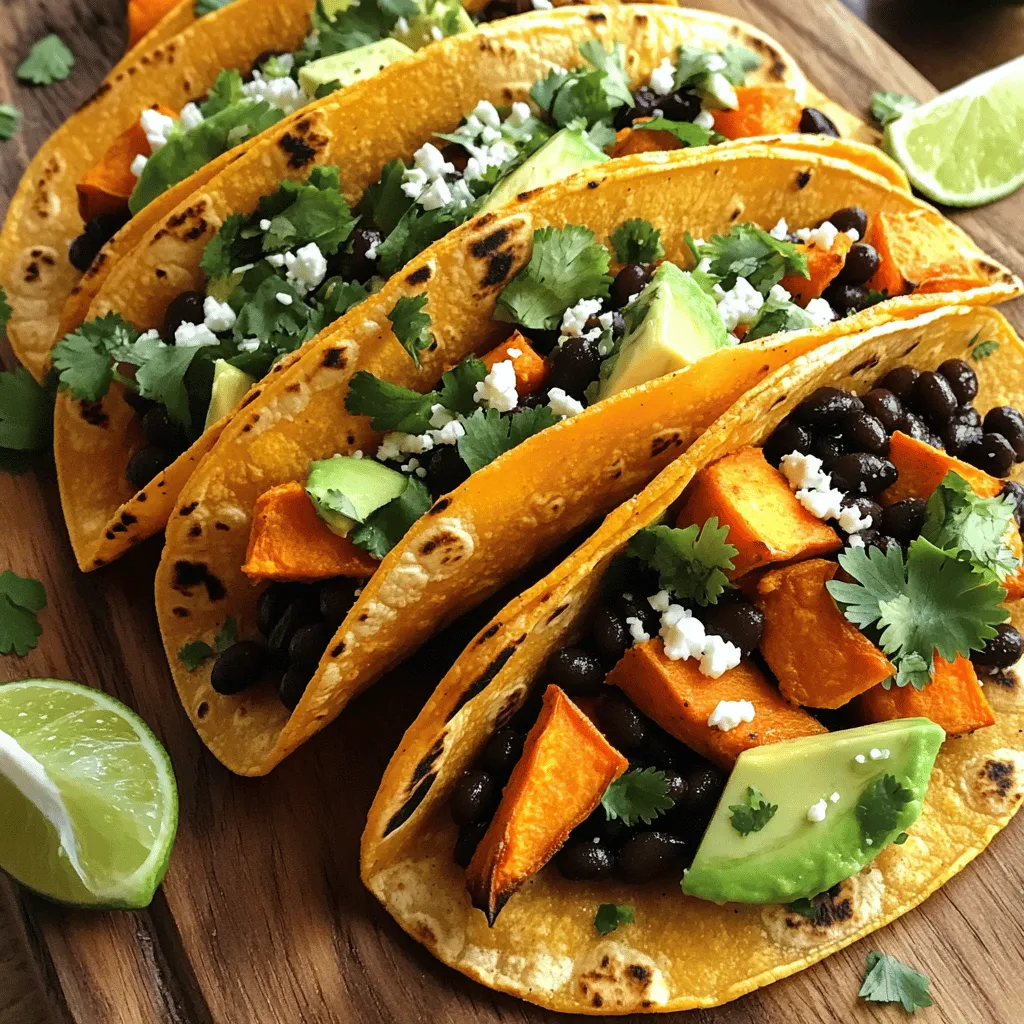
Savory Sweet Potato Black Bean Tacos Recipe
Craving a filling, tasty meal? Let me introduce you to my Savory Sweet Potato Black Bean Tacos! These delicious tacos combine roasted sweet potatoes…