
Latest & Greatest
Parmesan Herb Roasted Acorn Squash Delightful Recipe
Are you ready to impress your family with a delicious and easy dish? My Parmesan Herb Roasted Acorn Squash is
Read more…
Chocolate Covered Pretzel Bark Irresistible Treat Recipe
Are you ready to dive into a sweet and salty delight? This Chocolate Covered Pretzel Bark is an easy treat
Read more…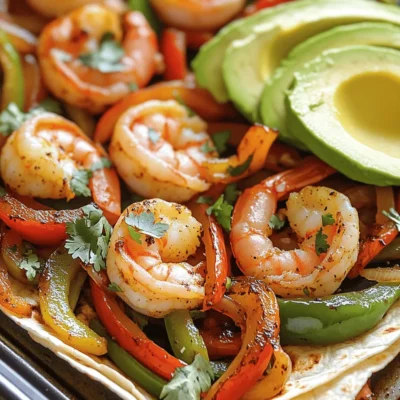
Sheet-Pan Shrimp Fajitas Quick and Flavorful Recipe
Looking for a quick and tasty dinner? Try these Sheet-Pan Shrimp Fajitas! This easy recipe brings together juicy shrimp, vibrant
Read more…
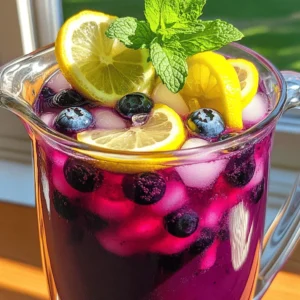
Strawberry Lemonade Cupcakes Tasty and Easy Recipe
Craving a sweet treat that bursts with flavor? Strawberry Lemonade Cupcakes are here! These delightful cupcakes blend fruity strawberries with
Read more…
Raspberry Almond Thumbprint Cookies With Flavor Boost
Dive into the delightful world of Raspberry Almond Thumbprint Cookies! These sweet treats burst with fresh flavors and a satisfying
Read more…
Loaded Baked Potato Soup Comforting and Flavorful Dish
If you crave a warm, hearty meal, Loaded Baked Potato Soup is your answer. This comforting dish combines creamy, cheesy
Read more…
Air Fryer Crispy Tofu Bites Healthy Flavorful Snack
Looking for a tasty and healthy snack? You’ll love my Air Fryer Crispy Tofu Bites! They are packed with flavor
Read more…
Peach Mango Salsa Fresh and Flavorful Dip Recipe
Are you ready to spice up your snacks? This Peach Mango Salsa recipe combines sweet peaches and juicy mangoes for
Read more…browse recipes


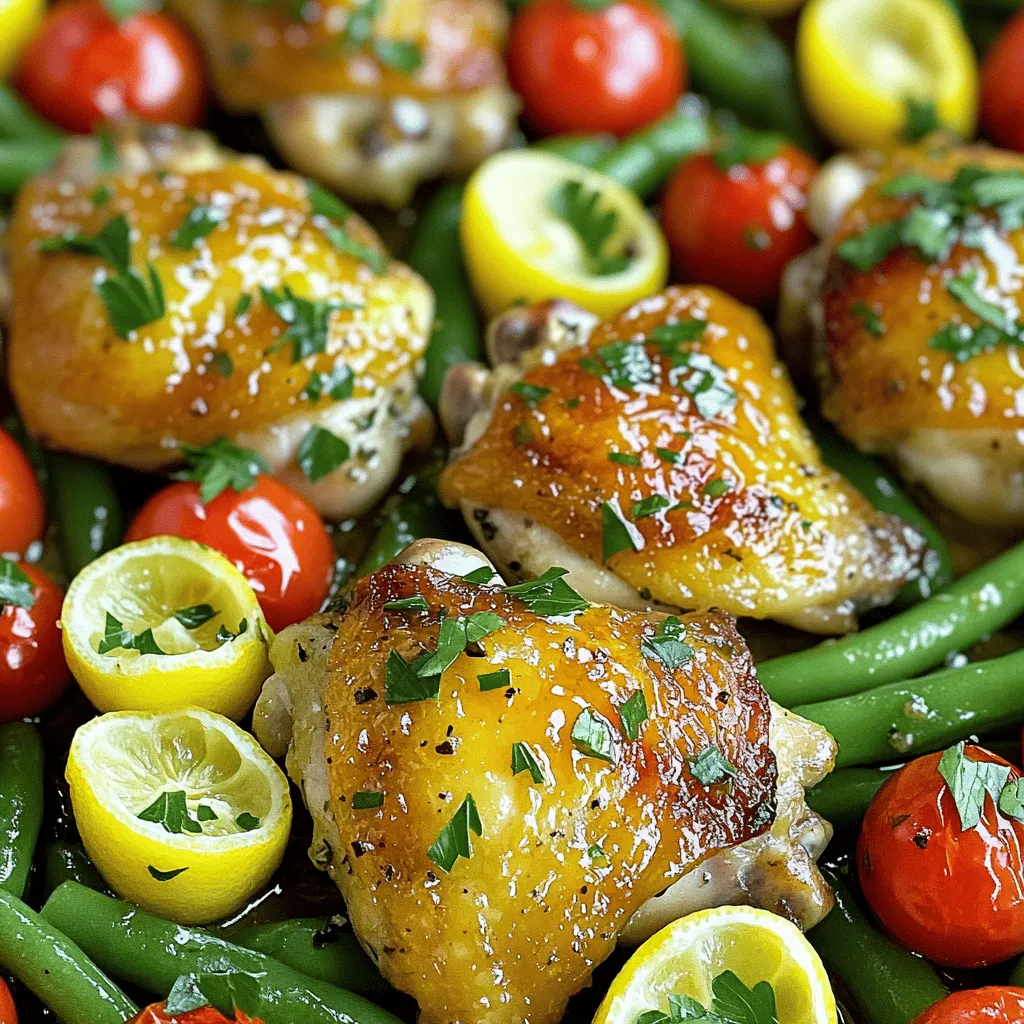
One Pan Lemon Herb Chicken Flavorful and Easy Meal
Ready for a delicious meal that’s easy to whip up? My One Pan Lemon Herb Chicken is packed with flavor and requires just one…
My Latest Desserts
My Latest Recipes

hey,
i’m !
I’m so happy you’re here!
Cooking is my love language, and I’m excited to share my best dishes with you. Hope they become your favorites too! Let’s enjoy every bite of this journey together.


![- 2 lbs Yukon Gold potatoes - 4 cloves garlic - 1 cup sharp cheddar cheese - ½ cup cream cheese - ½ cup whole milk - 4 tablespoons unsalted butter The key to cheesy garlic mashed potatoes is the Yukon Gold potatoes. They are creamy and buttery. I always peel and chop them before boiling. Garlic adds a rich flavor. I use four cloves, minced finely. For cheese lovers, sharp cheddar gives a nice kick. Cream cheese helps create a smooth texture. Whole milk thins the mixture out. Unsalted butter adds richness. - Salt and pepper - 2 tablespoons fresh chives To bring out the best flavors, I sprinkle in salt and pepper. Chives add a pop of color and fresh taste. They make the dish look great on the table. - Cream alternatives (e.g., sour cream, Greek yogurt) - Types of cheese to consider If you want to switch things up, I recommend using sour cream or Greek yogurt. These will keep the dish creamy but change the taste a bit. You can also try other cheeses. Gouda or mozzarella work well for a different flavor. For the full recipe, check out the link. First, start with 2 lbs of Yukon Gold potatoes. Peel and chop them into even pieces. Rinse the potatoes under cold water to remove any dirt. Next, place the chopped potatoes in a large pot. Cover them with cold water and add a pinch of salt. Bring the water to a boil over medium-high heat. Once boiling, lower the heat to medium-low. Cook the potatoes for 15 to 20 minutes until they are fork-tender. While the potatoes cook, take 4 cloves of minced garlic. In a small saucepan, melt 4 tablespoons of unsalted butter over medium heat. Add the minced garlic to the butter. Sauté the garlic for about 2 minutes until it smells great. Be careful not to let it brown, as this can make it bitter. Once ready, set the garlic aside to mix later. After draining the cooked potatoes, return them to the pot. Pour the melted garlic butter over the potatoes. Next, add ½ cup of cream cheese and 1 cup of sharp cheddar cheese. Pour in ½ cup of whole milk too. Season with a sprinkle of salt and pepper. Use a potato masher or electric mixer to mash the potatoes until they are smooth and creamy. If the mix feels too thick, add more milk to reach the texture you like. Once mashed, taste the potatoes and adjust the seasoning with more salt and pepper if needed. Transfer the cheesy garlic mashed potatoes to a serving dish. For a lovely finish, sprinkle 2 tablespoons of chopped fresh chives on top. This adds a nice touch and enhances the flavor. For the complete recipe, check out the [Full Recipe]. To make cheesy garlic mashed potatoes creamy, start with warm ingredients. Cold milk or butter can cool down the potatoes and make them gummy. Instead, warm the milk and butter together before adding them to the mix. When mashing, use a potato masher for a rustic feel, or an electric mixer for smoothness. Mix gently to avoid overworking the potatoes, which can make them gluey. You can boost the taste of your mashed potatoes with herbs. Fresh rosemary or thyme adds a nice touch. Just chop them finely and mix in at the end. For an extra layer of flavor, consider adding crispy bacon or roasted garlic. This creates a rich, savory taste that pairs perfectly with the cheese. Want to save time? Use a pressure cooker. It cooks potatoes quickly, cutting your prep time in half. You can also pre-cook the potatoes. Boil them in advance and store them in the fridge. When you’re ready, just reheat them and mash. This way, you can enjoy cheesy garlic mashed potatoes without the wait. For the full recipe, check out the earlier section. {{image_2}} You can change the cheese for fun flavors. Try gouda for a smoky taste. Mozzarella adds a stretchy, creamy texture. You can even mix cheeses! This makes your mashed potatoes unique. Each cheese brings its own style. Go wild with combinations to find your favorite. Want to keep it vegan? Use plant-based cream cheese. Swap regular milk for almond or oat milk. Nutritional yeast can give a cheesy flavor. It’s packed with nutrients too! These changes keep the taste great without dairy. You can enjoy cheesy garlic mashed potatoes in a new way. Feeling bold? Add jalapeños for heat. They give an extra kick. Hot sauce can also spice things up. Experiment with spices like paprika for a smoky note. These flavors can make your dish exciting. Don't be afraid to try new things! The world of flavors is at your fingertips. To store leftovers, place the mashed potatoes in an airtight container. Make sure to cool them first. They will stay fresh in the fridge for up to three days. If you notice any change in smell or appearance, it's best to toss them. If you want to freeze cheesy garlic mashed potatoes, scoop them into a freezer-safe bag. Flatten the bag to save space. They can be frozen for up to two months. When you're ready to eat, move them to the fridge overnight to thaw. You can reheat mashed potatoes on the stovetop or in the microwave. For stovetop, add a little milk and heat on low. Stir often to keep them smooth. In the microwave, heat in short bursts, stirring in between. Always add a splash of milk to keep them creamy and moist. This helps prevent dryness and makes them taste fresh. To make cheesy garlic mashed potatoes from scratch, start with Yukon Gold potatoes. Peel and chop them into even pieces. Boil them until fork-tender. While they cook, melt butter in a pan and sauté minced garlic until it smells great. Once the potatoes are done, drain them and return them to the pot. Add the garlic butter, cream cheese, sharp cheddar cheese, and milk. Mash everything together until smooth. Add salt and pepper to taste, then serve warm. You can find the full recipe [here](#). Yes, you can make cheesy garlic mashed potatoes ahead of time. Prepare them as usual, then cool them before storing. Place them in an airtight container in the fridge. They will stay fresh for up to three days. When ready to serve, reheat them on the stove or in the microwave. Add a little milk to bring back the creamy texture. Yukon Gold potatoes are the best choice for cheesy garlic mashed potatoes. They have a creamy texture and a rich flavor. Other good options include Russet potatoes, but they can be a bit drier. Yukon Golds give you the perfect creaminess without needing too much butter or cream. If your mashed potatoes turn out watery, don't worry! You can fix them. Start by placing them back in a pot over low heat. Cook them gently to evaporate some moisture. Stir them frequently to prevent sticking. If they still seem wet, mash in a little instant potato flakes. This will absorb extra liquid and help thicken them up. Absolutely! You can add other flavors for fun twists. Try mixing in roasted garlic for a deeper taste. Fresh herbs like chives or thyme add a nice touch. For a bit of heat, diced jalapeños work well. You can even stir in crispy bacon bits for extra crunch and flavor. Get creative and enjoy your mashed potatoes! Cheesy garlic mashed potatoes are simple and delicious! We covered important ingredients, step-by-step instructions, and creative variations. You can easily adapt this dish with different cheeses or make it vegan. Remember to store your leftovers properly so they stay tasty. With my tips, you can achieve a creamy texture and bold flavors. Try these mashed potatoes at your next meal for a satisfying side. Enjoy experimenting with flavors and making it your own!](https://recipespursuit.com/wp-content/uploads/2025/06/987d505d-1024-43d6-9f3b-7ed910bc57c6-300x300.webp)

Vegetarian Stuffed Acorn Squash Simple and Tasty Meal
If you’re looking for a simple and tasty meal, try my vegetarian stuffed acorn squash! This dish is not just colorful but packed with…
![- 2 medium acorn squashes - 1 cup quinoa, rinsed - 2 cups vegetable broth - 1 cup black beans, drained and rinsed - 1 cup corn, frozen or fresh - 1 red bell pepper, diced - 1 small red onion, diced - 2 cloves garlic, minced - 1 teaspoon cumin - 1 teaspoon smoked paprika - ½ teaspoon chili powder - Salt and pepper to taste - 2 tablespoons olive oil - Fresh cilantro, chopped (for garnish) - Lime wedges (for serving) These ingredients create a delicious and filling dish. Each item adds flavor and nutrition. The acorn squash serves as a tasty bowl. Quinoa is rich in protein and fiber. Black beans and corn add a nice texture. The spices bring warmth and depth. Fresh cilantro and lime finish the dish with brightness. This meal is packed with nutrients. It is low in calories and high in fiber. Here’s a quick breakdown: - Calories: About 350 per serving - Protein: 12 grams - Fiber: 8 grams - Vitamins: A, C, and several B vitamins - Minerals: Iron, magnesium, and potassium Quinoa is a complete protein, meaning it has all nine essential amino acids. It supports muscle health and keeps you full. Black beans are high in fiber and help with digestion. They also keep your heart healthy. Corn adds vitamins and minerals, while acorn squash provides antioxidants. Enjoying this dish supports your health in many ways! For the full recipe, check out the [Full Recipe] link. First, you need to preheat your oven to 400°F (200°C). While it heats, grab the acorn squashes. Cut them in half and scoop out the seeds. Place them cut-side down on a baking sheet. Roast them in the oven for about 25-30 minutes. They should become tender while cooking. Next, let's make the quinoa. In a saucepan, bring the vegetable broth to a boil. Add 1 cup of rinsed quinoa to the boiling broth. Reduce the heat to low and cover the pan. Let it simmer for about 15 minutes until all the liquid is absorbed. Fluff the quinoa with a fork when done. Now, it’s time to make the filling. In a large skillet, heat 2 tablespoons of olive oil over medium heat. Add the diced red onion and bell pepper. Sauté them for about 3-4 minutes until they soften. Then, add 2 minced garlic cloves and cook for another minute. Stir in 1 cup of black beans, 1 cup of corn, and the cooked quinoa. Add 1 teaspoon of cumin, 1 teaspoon of smoked paprika, and ½ teaspoon of chili powder. Season with salt and pepper to taste. Cook for an additional 5-7 minutes, stirring occasionally, until everything is nice and hot. Once your squashes are done roasting, carefully flip them cut-side up. Fill each half generously with the quinoa mixture. You can pack it in well. Return the stuffed squashes to the oven and bake for another 10-15 minutes. They should be hot and ready to serve. After baking, let the squashes cool slightly. Garnish with fresh cilantro and serve with lime wedges for added flavor. You can find the full recipe above to guide you through every step! When picking acorn squash, look for ones that are firm and heavy. The skin should be dark green with a few orange spots. These signs show that the squash is ripe. Avoid squash with soft spots or blemishes. Generally, acorn squash is best in the fall and winter months. During this time, you will find it fresh and tasty at local markets. To cook fluffy quinoa, rinse it well under cold water first. This step removes bitterness. Use two cups of vegetable broth for every cup of quinoa. Bring the broth to a boil, then add the quinoa. Cover and reduce the heat. Cook for about 15 minutes until all the liquid is gone. You can also use farro or brown rice if you want a change. Both grains work well in this dish. Add more depth to your dish with spices or herbs. Try adding oregano, thyme, or even a dash of cinnamon. Each of these can bring a new twist to the flavor. For a nice touch, top the stuffed squash with avocado or pumpkin seeds. These will add creaminess and crunch to your meal. You can also drizzle some balsamic glaze for an extra burst of flavor. {{image_2}} You can make this dish gluten-free easily. Instead of quinoa, try using rice or millet. Both grains cook well and add a nice texture. You can also use gluten-free breadcrumbs for added crunch. Just check the labels of your ingredients to be sure they are safe. Want to add more protein? Consider using tofu or tempeh. Tofu is soft and absorbs flavors well. You can cube it and sauté it with your veggies. Tempeh has a nutty taste and provides a hearty bite. Crumble it into your filling for extra protein. Incorporate seasonal vegetables for unique flavors. In fall, add roasted Brussels sprouts or sweet potatoes. In spring, try peas or asparagus. For holidays, think about adding cranberries for a sweet twist. These changes keep the dish fresh and fun throughout the year. To keep your stuffed acorn squash fresh, store leftovers in the fridge. Use an airtight container. This way, they stay tasty for up to four days. If you want to keep them longer, freezing is a great option. Wrap each stuffed squash in plastic wrap. Then place them in a freezer-safe bag. They can last for up to three months in the freezer. When you want to enjoy the leftovers, reheating is key. The best way is to use an oven. Preheat the oven to 350°F (175°C). Place the stuffed squash on a baking tray. Cover with foil to hold in moisture. Heat for about 20 minutes or until warmed through. This helps to keep the texture nice and the flavors intact. You can also use a microwave for quicker results. Just make sure to cover them to avoid drying out. For busy days, meal prep can save you time. You can cook the quinoa and chop the veggies ahead of time. Store each in separate containers in the fridge. When you are ready, just stuff the acorn squash and bake. This method makes it easy to enjoy this healthy meal without all the fuss. You can also prepare the filling a day before. Just mix it up and store it until you are ready to use it. Yes, you can use different squashes. Try butternut or spaghetti squash. Both have great flavors. They also roast well and hold the filling nicely. Just adjust cooking times as needed. Butternut squash may take longer to cook. Spaghetti squash will need a different cutting method. Slice it in half lengthwise for easy roasting. Each squash will give a unique taste to the dish. Yes, this recipe is vegan. It has no animal products. The filling is packed with plant-based protein from quinoa and black beans. You can easily adapt it for other diets. If you want to add cheese, feel free to sprinkle some on top. Just remember, it won't be vegan anymore. If you like heat, add more chili powder. You can also mix in diced jalapeños or red pepper flakes. If you want to keep it fresh, try adding hot sauce after cooking. A squeeze of lime with spicy sauce can brighten the dish too. Just remember to taste as you go to find the right heat for you. You can serve this as both a main dish or a side. For a main dish, serve with a salad or bread. It makes a hearty meal that fills you up. As a side, pair it with grilled vegetables or a protein. It complements many meals and adds color to your plate. Try it with roasted chicken or a veggie burger for a delicious combo. For the full recipe, check out the details above! This blog post shared a simple way to cook stuffed acorn squash with quinoa and beans. We discussed the needed ingredients, including fresh vegetables and spices, and how to prepare them. I included tips to select the best squash and variations to enhance your dish. You can enjoy a tasty, healthy meal while getting creative. Try different spices or add seasonal veggies. Cooking can be fun and rewarding. Now, gather your ingredients and start making this vibrant dish!](https://recipespursuit.com/wp-content/uploads/2025/05/6d061b47-349d-4b1e-9022-e8712b9268cf.webp)
