

Latest & Greatest

One-Pot Creamy Butternut Squash Pasta Delight
Ready to enjoy a warm bowl of One-Pot Creamy Butternut Squash Pasta Delight? This simple recipe is perfect for busy
Read more…
Instant Pot Creamy Broccoli Mac and Cheese Delight
Craving a warm, cheesy comfort food? You’ll love this Instant Pot Creamy Broccoli Mac and Cheese! It combines tender macaroni,
Read more…
Air Fryer Garlic Herb Potato Cubes Crispy and Tasty
If you crave crispy, flavorful sides, I have the perfect recipe for you! These Air Fryer Garlic Herb Potato Cubes
Read more…
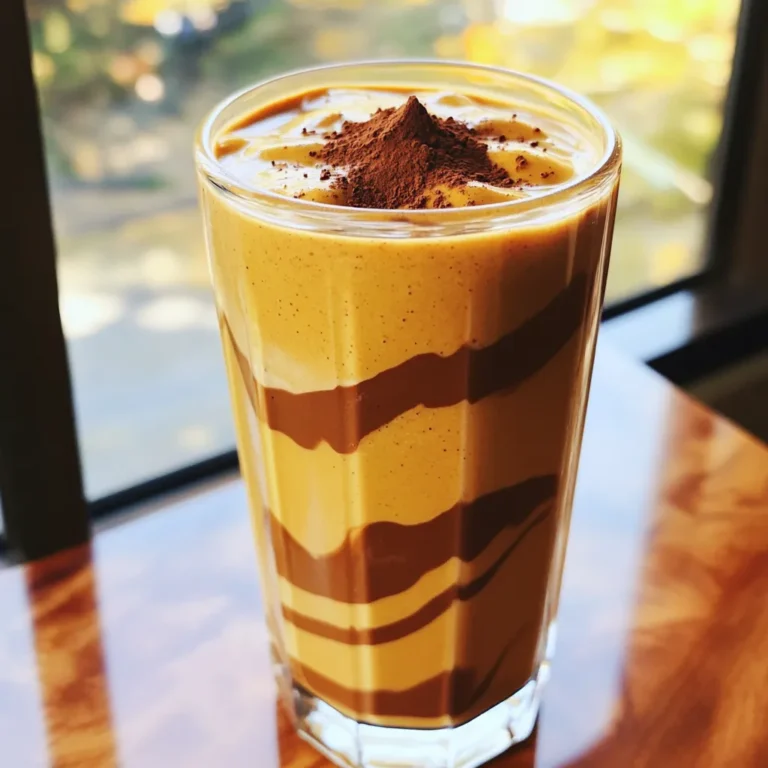
High-Protein Chocolate Raspberry Smoothie Delight
Welcome to my delightful world of smoothies! Today, I’m excited to share my recipe for a High-Protein Chocolate Raspberry Smoothie.
Read more…
No-Bake Key Lime Pie Bars Easy and Tangy Delight
Get ready to make a treat that shines with zesty delight! My No-Bake Key Lime Pie Bars are easy to
Read more…
Sheet-Pan Rosemary Chicken and Grapes Flavor Boost
Are you ready to elevate your dinner game? In this blog post, I’ll show you how to make a delicious
Read more…
Minute Korean BBQ Beef Rice Bowls Flavorful and Quick
Craving a quick, tasty meal? These Minute Korean BBQ Beef Rice Bowls are your answer! With juicy beef sirloin, rich
Read more…
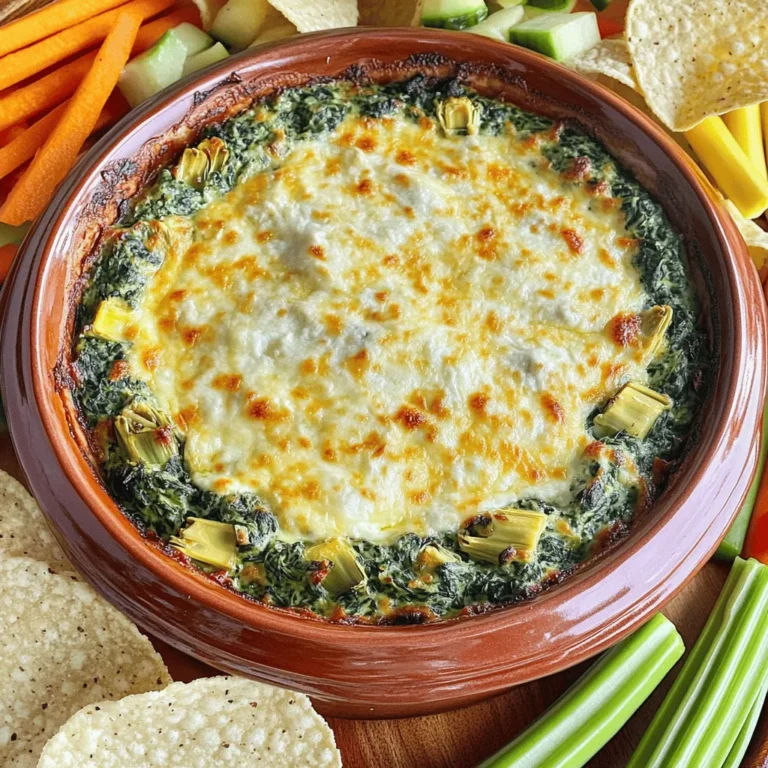
One-Pan Creamy Spinach Artichoke Ravioli Bake Delight
If you’re craving a creamy, cheesy meal that’s easy to make, you’re in the right place! My One-Pan Creamy Spinach
Read more…browse recipes


Mango Coconut Chia Pudding Simple and Healthy Treat
Are you ready to treat yourself to a simple and healthy dessert? Mango Coconut Chia Pudding combines the creamy richness of coconut milk with…
My Latest Desserts
My Latest Recipes

hey,
i’m !
I’m so happy you’re here!
Cooking is my love language, and I’m excited to share my best dishes with you. Hope they become your favorites too! Let’s enjoy every bite of this journey together.

![To make a great strawberry mango salsa, you need fresh, bright ingredients. Here’s what you’ll need: - 1 cup fresh strawberries, hulled and diced - 1 ripe mango, peeled and diced - 1/2 red onion, finely chopped - 1 jalapeño, seeded and minced (optional) - 1/4 cup fresh cilantro, chopped - Juice of 2 limes - 1 tablespoon honey (or agave syrup for a vegan option) - Salt and pepper to taste Each ingredient plays a key role. The strawberries add sweetness while the mango brings a tropical vibe. The red onion gives crunch and bite. If you like heat, add jalapeño for a kick. Fresh cilantro adds a herby note that brightens everything up. The lime juice balances the flavors with its tang. Honey brings a hint of sweetness, and salt enhances all the tastes. I recommend using fresh fruits for the best flavor. Fresh strawberries and mangoes taste sweet and juicy. They also look vibrant in the salsa. You can find these at your local grocery store or farmers' market. If fresh fruits are not available, you can use frozen fruits. They work well, too. Just make sure to thaw and drain them before using. This helps keep the salsa from getting watery. Want to make your salsa even better? Here are some fun add-ins: - A dash of cumin for warmth - Chopped bell peppers for crunch - Avocado for creaminess - A splash of orange juice for extra sweetness These optional ingredients can enhance the taste and texture of your salsa. Feel free to mix and match to suit your taste. Experimenting is part of the fun! You can find the full recipe for this delicious strawberry mango salsa [Full Recipe]. To start, gather all your ingredients. You need: - 1 cup fresh strawberries, hulled and diced - 1 ripe mango, peeled and diced - 1/2 red onion, finely chopped - 1 jalapeño, seeded and minced (optional) - 1/4 cup fresh cilantro, chopped - Juice of 2 limes - 1 tablespoon honey (or agave syrup for a vegan option) - Salt and pepper to taste Make sure your fruits are ripe for the best taste. Dice the strawberries and mango into small pieces. A sharp knife helps here. Finely chop the red onion. If you want some heat, mincing the jalapeño adds a nice touch. In a medium bowl, combine the diced strawberries and mango. Next, add in the chopped red onion and minced jalapeño if you chose to use it. Sprinkle the fresh cilantro over the top. In a small bowl, whisk together the lime juice, honey, salt, and pepper. This dressing brings everything together. Pour this dressing over the fruit mixture. Gently toss everything until it’s well coated. Adjust the salt or lime juice to fit your taste. Let the salsa sit for at least 10 minutes. This waiting time is key. It allows the flavors to blend and deepen. You can keep it in the fridge if you want to prepare it ahead of time. For the full recipe, check out the detailed instructions. Enjoy your fresh and vibrant Strawberry Mango Salsa! When you dice fruits, start with a sharp knife. A dull knife can slip and cause cuts. For strawberries, remove the green tops first. Cut them into halves or quarters, depending on their size. For mangoes, slice down each side of the pit. Then, score the flesh in a grid pattern. Finally, scoop out the cubes with a spoon. This method makes dicing easy and fun. Balancing flavors in your salsa is key. You want sweet, spicy, and tangy notes. Use ripe mangoes for natural sweetness. Add lime juice for a bright and zesty kick. If you like spice, add jalapeño. Start with a small amount and taste as you go. Honey adds sweetness but use it sparingly. Remember, you can always add more, but you can't take it out! Serve your strawberry mango salsa in a bright bowl. It looks great next to crispy tortilla chips. You can also top grilled chicken or fish with it. The salsa adds color and flavor to your plate. Try it with tacos for a fresh twist. For a fun twist, serve it as a dessert with yogurt or ice cream. You can find the full recipe [here]. {{image_2}} If you like heat, add jalapeño for a spicy kick. Start with one minced jalapeño. Taste it and add more if you dare! The spice blends well with the sweet fruit. It gives a fun contrast. You can also try using a dash of cayenne pepper for more heat. Just remember to balance the spice with lime juice or honey. Want to mix it up? Try using pineapple or kiwi instead of mango. Both fruits add unique flavors and sweetness. This gives your salsa a tropical twist. You can also add diced papaya or peach for added fun. These fruits pair well with strawberries, making your salsa even more vibrant. Fresh herbs can elevate your salsa. Basil or mint works great with the fruity mix. Just chop them finely and add to the bowl. You can also add a pinch of cumin for a warm, earthy note. Experiment with different herbs to find your favorite combination. These small changes can take your salsa to the next level. Enjoy your delicious creation! Check out the Full Recipe for more details. To store leftover salsa, place it in a bowl. Cover the bowl tightly with plastic wrap. You can also use a lid if your bowl has one. This keeps air out, helping to keep the salsa fresh. Avoid leaving it at room temperature for too long. Always put it in the fridge after serving. The best containers for salsa are glass or plastic. Use airtight containers to maintain flavor. Glass containers are great because they do not hold odors. Plastic containers are lightweight and easy to handle. Choose a size that fits your leftover salsa well. This reduces air exposure. Homemade strawberry mango salsa lasts about 3 to 5 days in the fridge. If you want it to last longer, you can freeze it. To freeze, place salsa in a freezer-safe container. Leave some space at the top because the salsa may expand. It can stay fresh for up to 3 months in the freezer. Thaw it in the fridge overnight when you're ready to use it. Enjoy your vibrant salsa anytime! For the full recipe, check out the section above. Yes, you can make Strawberry Mango Salsa ahead of time. It tastes best when fresh, but you can prepare it a few hours in advance. Just store it in the fridge to keep it cool. The flavors will mix well, making it even tastier. I suggest not adding the lime juice until just before serving. This keeps the fruits fresh and bright. You can serve Strawberry Mango Salsa with many dishes. It's great with tortilla chips for a quick snack. You can also use it as a topping for grilled chicken or fish. It adds a fresh, fruity kick to tacos or salads. Try it with quesadillas or even on a burger for a fun twist. The options are endless! Homemade salsa usually lasts about 3 to 5 days in the fridge. Make sure to store it in an airtight container. You can check for signs of spoilage, like off smells or color changes. If it looks or smells odd, it’s best to throw it away. For long-term storage, you can freeze it, but fresh flavors may change. For the best taste, enjoy it fresh or within a few days. For the full recipe, check the section above. This post covered how to make Strawberry Mango Salsa. We talked about key ingredients and whether to use fresh or frozen fruit. I shared tips on mixing and letting the flavors blend. You learned best practices for dicing and balancing flavors, with serving tips included. You can try various spicy or tropical fruit twists. Remember to store leftovers properly for lasting taste. Enjoy this fresh, zesty salsa with your meals or snacks!](https://recipespursuit.com/wp-content/uploads/2025/07/8bfaae1d-9b7f-426d-8a0b-6793a14d60f7-300x300.webp)


Roasted Garlic Parmesan Brussels Sprouts Recipe Delish
Looking for a tasty way to enjoy Brussels sprouts? Try my Roasted Garlic Parmesan Brussels Sprouts! This recipe turns a simple veggie into a…

