

Latest & Greatest
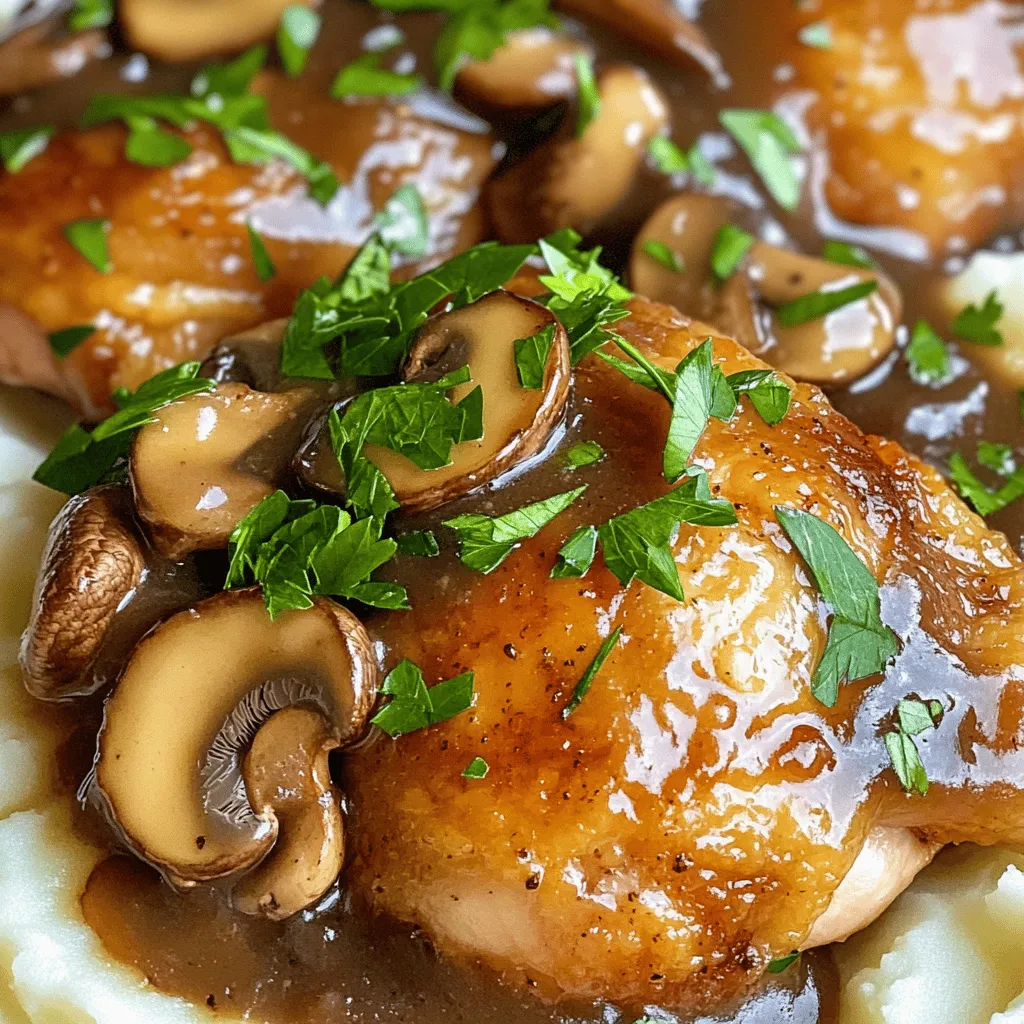
Mushroom Chicken Recipe Simple and Flavorful Meal
Are you ready to make a delicious Mushroom Chicken dish? This simple and flavorful meal comes together quickly, making it
Read more…
Crockpot Mexican Chicken Flavorful and Easy Dish
Are you ready to spice up your dinner routine? This Crockpot Mexican Chicken is a flavorful and easy dish that
Read more…
Spring Hash Brown Crust Quiche Fresh and Flavorful Recipe
Spring is here, and it’s the perfect time for a fresh and flavorful dish! Today, I’ll share my Spring Hash
Read more…browse recipes


23. Baked Lemon Herb Tilapia with Asparagus Delight
Looking for a quick, healthy meal that bursts with flavor? Try my Baked Lemon Herb Tilapia with Asparagus! This dish is simple to make…
My Latest Desserts
My Latest Recipes

hey,
i’m !
I’m so happy you’re here!
Cooking is my love language, and I’m excited to share my best dishes with you. Hope they become your favorites too! Let’s enjoy every bite of this journey together.


. In this post, I shared how to make a delicious baked ziti. I covered essential ingredients, cooking techniques, and common mistakes to avoid. Remember, using high-quality ingredients makes a big difference. You can customize your dish with add-ins and variations. Proper storage ensures you enjoy leftovers later. With these tips, you can create a tasty meal that your family will love. Check out the full recipe for Cheesy Comfort Baked Ziti to get started. Happy cooking!](https://recipespursuit.com/wp-content/uploads/2025/06/fb3e8b7e-ba25-42fb-a491-7c868a3e31e2-300x300.webp)
106. Sweet and Sour Meatballs Flavorful Dinner Option
Looking for a dinner that combines sweet and savory in every bite? You’ve found it with these Sweet and Sour Meatballs! This dish features…
![- 1 lb ground beef - 1/2 cup breadcrumbs - 1/4 cup finely chopped onion - 1 cup sweet and sour sauce - 2 tablespoons soy sauce - 1 tablespoon cornstarch (for thickening) - 2 tablespoons vegetable oil This list makes sweet and sour meatballs a fun dish. You start with ground beef, which adds flavor and protein. Breadcrumbs help give the meatballs a nice texture. The chopped onion adds sweetness and depth to the flavor. For the sauce, sweet and sour sauce shines. It balances taste with a mix of sweetness and tang. Soy sauce adds umami, enhancing the overall flavor. If you want a thicker sauce, you can use cornstarch. It makes the sauce cling better to the meatballs. Vegetable oil is needed for cooking the meatballs. It helps brown them evenly, creating a delicious crust. You can find the Full Recipe to guide you step by step. Enjoy crafting this delightful dish! 1. Mixing the meatball ingredients: In a large bowl, combine the ground beef, breadcrumbs, finely chopped onion, grated Parmesan cheese, egg, salt, and pepper. Use your hands to mix until everything is well blended. This step is important for flavor and texture. 2. Forming meatballs: Next, take small portions of the mixture and roll them into balls about 1 inch in diameter. Make sure they are evenly sized for even cooking. Place them on a plate as you form them. 1. Browning in the skillet: Heat vegetable oil in a large skillet over medium heat. Carefully add the meatballs in batches. Cook them for about 3-4 minutes on each side until they turn a nice brown color. This step adds flavor and keeps them juicy. 2. Removing and setting aside: Once browned, remove the meatballs from the skillet. Set them aside on a plate. Be gentle to avoid breaking them apart. 1. Sautéing bell pepper and pineapple: In the same skillet, add the chopped bell pepper and pineapple chunks. Sauté for 3-4 minutes until the vegetables are tender. This adds a sweet crunch to your dish. 2. Adding sauce and meatballs to skillet: Pour the sweet and sour sauce and soy sauce into the skillet. Stir to mix well. If you want a thicker sauce, dissolve cornstarch in a tablespoon of water and add it. Finally, return the meatballs to the skillet. Gently mix everything and let it simmer on low heat for 10 minutes. The flavors will meld beautifully. For the complete guide, refer to the Full Recipe. To get perfect sweet and sour meatballs, even browning is key. Start by heating your skillet on medium. If you crowd the pan, the meatballs will steam instead of brown. Cook them in batches. This way, they get that nice golden crust. Adjusting seasoning is also important. After cooking the meatballs, taste the sauce. If it needs more flavor, add a pinch of salt or a dash of soy sauce. Small changes make a big difference! When serving sweet and sour meatballs, rice or noodles are great bases. The sauce pairs well with both. Place a scoop of rice on each plate, then add a generous helping of meatballs on top. For a pop of color, use garnishes. Chopped green onions or sesame seeds add beauty and flavor. You can also sprinkle some fresh herbs for an extra touch. If you want to change the meat, use ground turkey or chicken. Both options are leaner but still tasty. They cook well with the sweet and sour sauce. For sauce variations, you can make your own sweet and sour sauce at home. Mix vinegar, sugar, and ketchup for a quick recipe. This allows you to control the sweetness and tanginess. You can also try adding different fruits like mango or peach for a unique twist. For the full recipe, check out Sweet & Sour Meatballs . {{image_2}} You can use turkey or chicken instead of beef for meatballs. These options make the dish leaner and lighter. They still taste great with sweet and sour sauce. If you prefer plant-based meals, try using plant-based meat alternatives. These options are tasty and can fit into many diets. You can choose between homemade or store-bought sauces. Homemade sauce often tastes fresher and allows for more control over flavors. If you want to adjust the sauce, you can change the sweetness or tanginess. Add more sugar for sweetness or vinegar for tang. This way, you can tailor the dish to your taste. Adding vegetables is a fun way to enhance the dish. Carrots or snap peas add color and crunch. You can also mix in different flavor profiles by using spices like ginger or garlic. Experimenting with these ingredients can create a unique twist on the classic recipe. For the full recipe, check out the [Full Recipe]. To keep your sweet and sour meatballs fresh, refrigeration is key. Place your leftovers in an airtight container. This helps keep them moist and tasty. For best results, eat them within three to four days. After that, they might lose flavor and texture. Freezing cooked meatballs is simple and great for meal prep. First, let the meatballs cool completely. Then, place them in a single layer on a baking sheet. Freeze for about one hour. Once frozen, transfer them to a freezer-safe bag or container. This way, you can grab what you need later. To thaw, move them to the fridge overnight. For reheating, place them in a skillet over low heat or microwave them until warm. Making sweet and sour meatballs ahead saves time on busy days. You can prepare the meatballs and sauce in advance. Store each in separate containers. This keeps the meatballs from getting soggy. When ready to serve, heat them up and combine. For portioning, consider using a muffin tin. This helps you make even servings. Each meatball is a perfect bite-sized treat! Check the Full Recipe for more details. It takes about 30 minutes to cook sweet and sour meatballs. You spend 15 minutes prepping and 15 minutes cooking. The meatballs brown in just 3-4 minutes per side. Let them simmer in the sauce for 10 minutes. This gives them time to soak up the flavors. Yes, you can make sweet and sour meatballs ahead of time. Prepare the meatballs and cook them. Allow them to cool and store in the fridge for up to three days. You can also freeze them for up to three months. When ready to serve, simply reheat in the sauce on the stove. Sweet and sour meatballs pair well with many sides. Here are a few ideas: - Steamed rice - Egg noodles - Quinoa - Stir-fried vegetables - A fresh salad These sides balance the sweet flavor of the meatballs. To thicken sweet and sour sauce, you can use cornstarch. Mix one tablespoon of cornstarch with a tablespoon of water. Add this mixture to the sauce while cooking. Stir well and let it simmer for a few minutes. This will give your sauce a nice thickness. You can also reduce the sauce by simmering it longer. In this blog post, we explored making sweet and sour meatballs. We covered key ingredients like ground beef, breadcrumbs, and a tasty sauce blend. I shared step-by-step cooking instructions and helpful tips for a great meal. You also learned about different meat options, sauce variations, and storage tips. With this guide, you can easily create a delicious dish. Experiment with flavors and share them with friends or family. Enjoy every bite of your homemade sweet and sour meatballs!](https://recipespursuit.com/wp-content/uploads/2025/06/ed29f278-b05c-48c6-a648-6401aabb84f7.webp)
