Latest & Greatest
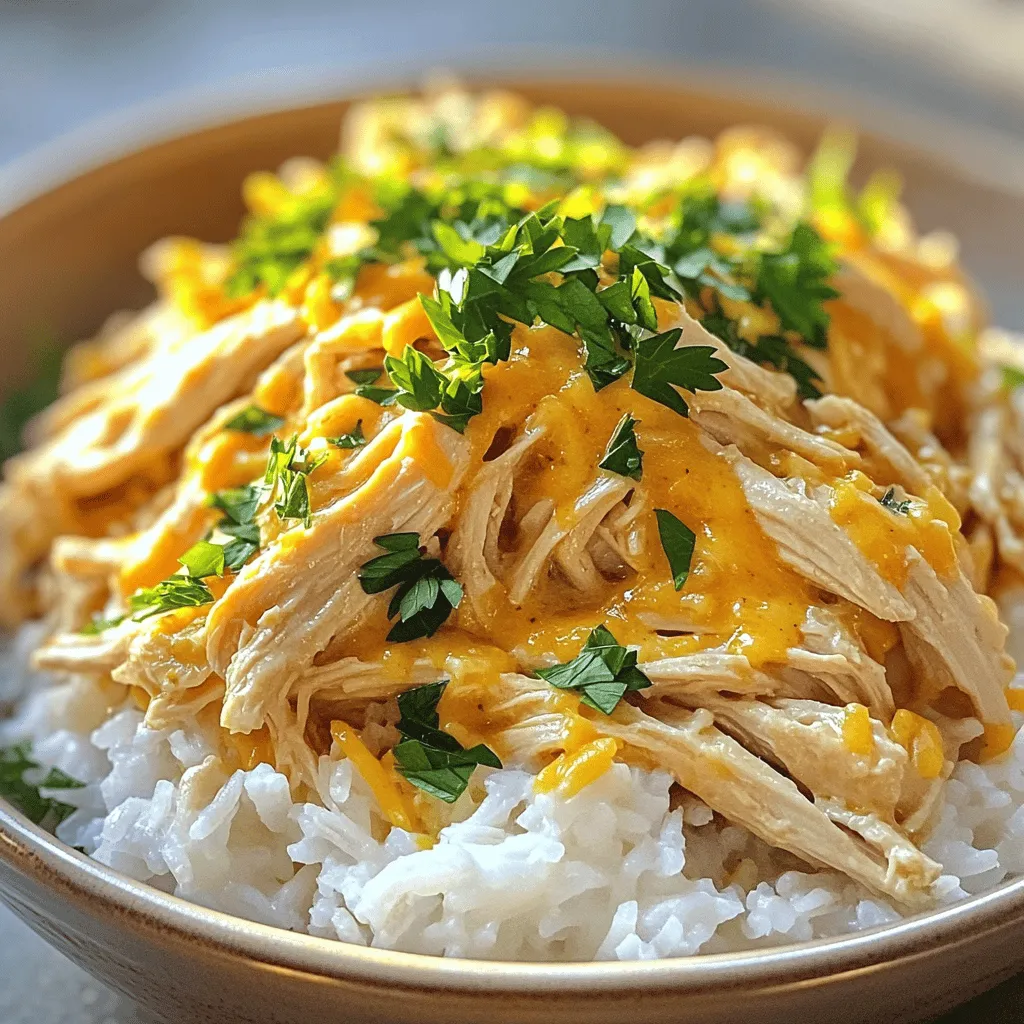
Crockpot Angel Chicken Flavorful Comfort Meal
If you crave a warm, comforting meal that practically cooks itself, you need to try Crockpot Angel Chicken. This tasty
Read more…
Vegetable Quiche Savory and Satisfying Dish
Looking for a dish that’s both savory and satisfying? You’ve come to the right place! My Vegetable Quiche recipe is
Read more…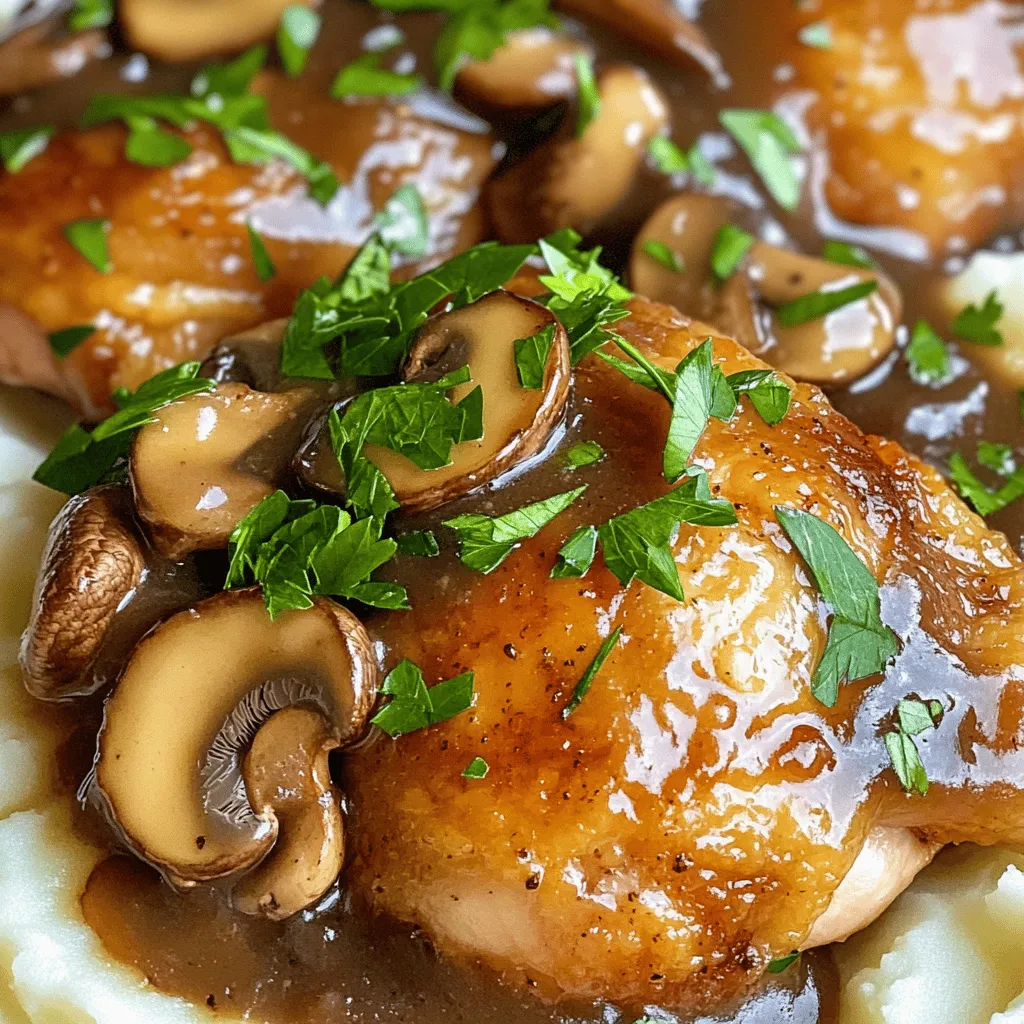
Mushroom Chicken Recipe Simple and Flavorful Meal
Are you ready to make a delicious Mushroom Chicken dish? This simple and flavorful meal comes together quickly, making it
Read more…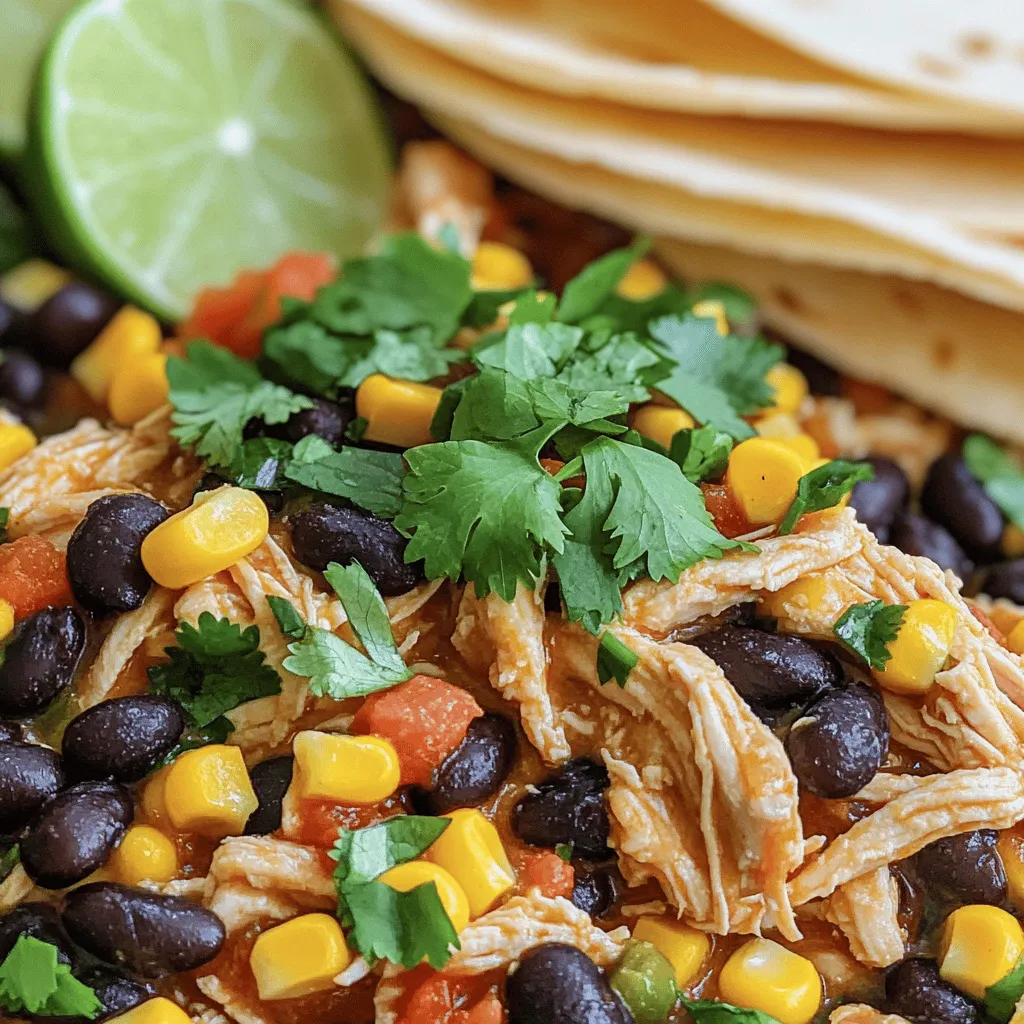
Crockpot Mexican Chicken Flavorful and Easy Dish
Are you ready to spice up your dinner routine? This Crockpot Mexican Chicken is a flavorful and easy dish that
Read more…
Spring Hash Brown Crust Quiche Fresh and Flavorful Recipe
Spring is here, and it’s the perfect time for a fresh and flavorful dish! Today, I’ll share my Spring Hash
Read more…browse recipes


. This meal is not just easy to make; it's also packed with flavor, making it a family favorite for any night of the week! Preheat your oven to 400°F (200°C). This step is key for a crispy crust. Next, line a baking sheet with parchment paper. This makes cleaning up easier. In a shallow dish, mix one cup of grated Parmesan cheese and one cup of panko bread crumbs. Panko adds great crunch. Then, add two tablespoons of chopped parsley, one teaspoon of garlic powder, one teaspoon of onion powder, and half a teaspoon of paprika. Don’t forget to season with salt and pepper to taste. Stir to combine. This mixture gives your fish a tasty coat. First, pat your tilapia fillets dry with a paper towel. This helps the coating stick. Next, sprinkle lemon zest over each fillet and drizzle with lemon juice. This adds bright flavor. Now, dredge each fillet in a shallow dish with flour. Shake off any extra flour. Then, dip the floured fillet into the beaten eggs, making sure it is fully covered. Finally, press each side into the Parmesan-panko mixture until well-coated. Place the coated fillets on the baking sheet. Drizzle two tablespoons of olive oil over the top of the fillets. Bake in the preheated oven for 12-15 minutes. The tilapia should be cooked through and the crust should be golden-brown. After baking, let the fillets cool for a couple of minutes before serving. You can find the complete details in the Full Recipe. To get a great crust on your tilapia, you need an even coating. Start by mixing the Parmesan cheese and panko bread crumbs well. This mix gives the fish a tasty crunch. When you dredge the fillets, make sure to coat every part. Press the fish firmly into the crumbs. This helps the crust stick during cooking. For the best results, set your oven to 400°F (200°C). This high heat crisps the crust while cooking the fish through. Bake the tilapia for 12 to 15 minutes. Keep an eye on it. The fish should be opaque and flake easily with a fork. A golden-brown crust shows it's ready. When serving Parmesan crusted tilapia, think about color and balance. A light salad or steamed veggies pairs well. For a pop of flavor, add lemon wedges on the side. Garnish with fresh parsley for a beautiful look. This way, your dish is not just tasty but also a feast for the eyes. For the full recipe, check back to see all the steps. {{image_2}} You can mix in fresh herbs to boost flavor. Basil, thyme, or dill work great. Just chop them finely and add to the Parmesan and panko mix. This adds a fresh twist to your dish. You can even use dried herbs if fresh ones are not handy. While tilapia is tasty, you can use other fish too. Cod, haddock, or even salmon are good picks. Each fish brings its own flavor, but they all work well with the crust. Adjust cooking time based on the thickness of the fish. Thicker fillets may need a bit more time in the oven. If you need a gluten-free option, swap panko with gluten-free crumbs. Ground almonds or crushed rice cereal also work well. For the flour, use almond flour or coconut flour. This way, you can enjoy a delicious meal without worrying about gluten. You can still achieve that crunchy texture with these options. For the complete recipe, check out the Full Recipe section. To keep your Parmesan crusted tilapia fresh, let it cool first. Place leftovers in an airtight container. Store them in the fridge for up to three days. When you’re ready to eat, check for any odd smells or changes in texture. If you want to save tilapia for later, freezing works well. Wrap each piece tightly in plastic wrap. Then place them in a freezer bag. This helps prevent freezer burn. You can freeze the fish for up to three months. When reheating, I recommend using the oven. Preheat it to 350°F (175°C). Place the fillets on a baking sheet and cover with foil. This keeps them moist. Heat for about 15 minutes. You want the crust to stay crispy. Enjoy your flavorful dish just like the first time! Bake Parmesan crusted tilapia for 12-15 minutes. This time gives you a perfectly cooked fish. Check that the crust is golden-brown and the fish flakes easily with a fork. Remember, every oven varies a bit. It’s smart to keep an eye on it towards the end. Yes, you can use frozen tilapia. Just be sure to thaw it first. Place the frozen fillets in the fridge overnight. If you need to thaw faster, seal them in a bag and submerge in cold water. Once thawed, pat them dry before seasoning and coating. This will help the crust stick better. For a great meal, pair Parmesan crusted tilapia with light sides. A fresh salad with mixed greens works well. You might also enjoy steamed broccoli or asparagus. These sides add color and balance to the dish. If you want something heartier, try roasted potatoes seasoned with herbs. For the full recipe, check out the [Full Recipe]. In this post, I shared a simple recipe for Parmesan Crusted Tilapia. We covered key ingredients, like tilapia, Parmesan, and panko. You learned how to mix coatings, coat the fish, and perfect your crust. Remember, you can adjust flavors with herbs or choose different fish. Proper storage keeps leftovers tasty. With these tips, you can enjoy a delicious meal that impresses anyone. Happy cooking!](https://recipespursuit.com/wp-content/uploads/2025/06/acae50f6-506e-498f-b3cc-8166b6fb0c01.webp)
Parmesan Crusted Tilapia Flavorful and Easy Recipe
If you’re looking for a quick and tasty dinner, look no further! This Parmesan Crusted Tilapia recipe is simple and bursting with flavor. With…
My Latest Desserts
My Latest Recipes

hey,
i’m !
I’m so happy you’re here!
Cooking is my love language, and I’m excited to share my best dishes with you. Hope they become your favorites too! Let’s enjoy every bite of this journey together.


. To make the best mango strawberry smoothie, start with ripe fruits. For mangoes, look for a smooth skin with a slight give when you press it. A ripe mango will smell sweet near the stem. For strawberries, choose bright red ones that are firm and free of spots. They should have a sweet scent too. Ripe fruits add flavor and sweetness to your drink, making it refreshing and delicious. The sweetness of your smoothie can vary based on the fruits. If you want it sweeter, add more honey or maple syrup. Start with one tablespoon and taste it. If it needs more, add a little at a time. For thickness, you can add more yogurt or banana. If it’s too thick, just add more coconut milk. Adjust until it’s just right for you. Freezing your fruits can make your smoothie thicker and colder. Just chop mangoes and strawberries, then place them in a freezer bag. Freeze them overnight for best results. When you blend them, you’ll get a creamy texture without needing ice. This tip gives your smoothie a nice chill, perfect for warm days. For a full recipe of a mango strawberry smoothie, check out the Tropical Bliss Mango Strawberry Smoothie. {{image_2}} You can easily add greens to your smoothie. Spinach or kale work great. They blend well and don’t change the taste much. Adding a handful boosts vitamins and minerals. You get more fiber too. This keeps your smoothie healthy and filling. Try adding greens for a fresh twist on your Mango Strawberry Smoothie. If you want a dairy-free option, use plant-based milk. Almond milk or oat milk are both good choices. You can skip the Greek yogurt too. Instead, use silken tofu or avocado for creaminess. These options keep your drink smooth and rich. They also make it vegan-friendly. Enjoy a tasty Mango Strawberry Smoothie that fits your diet. Don’t be afraid to mix flavors! Add a squeeze of lime for zest. You can also try a bit of ginger for warmth. If you love tropical tastes, throw in some pineapple. It pairs well with mango and strawberry. For a berry twist, mix in blueberries or raspberries. Each variation gives your Mango Strawberry Smoothie a new life. Experiment and find your favorite flavor combo! If you have leftover Mango Strawberry Smoothie, you can store it in the fridge. Pour the smoothie into a clean glass or jar. Seal it tightly with a lid. It will stay fresh for up to 24 hours. After that, it may lose some flavor and creaminess. Give it a good shake before drinking. This helps mix the ingredients again. Freezing is a great option for longer storage. Pour the smoothie into ice cube trays or freezer-safe bags. You can freeze it in portions for easy use later. When you're ready to enjoy it, just blend the frozen cubes with a splash of milk. This will bring back the creamy texture. You can freeze the smoothie for up to three months. Choose the right container for your smoothie. Glass jars are great because they do not retain smells. You can also use BPA-free plastic containers. Make sure they have tight seals to avoid spills. Label your containers with the date. This way, you’ll know how long they’ve been in the fridge or freezer. Yes, you can make this smoothie without yogurt. Just skip it in the recipe. The smoothie will still taste great and be creamy. You can add extra banana or use more coconut milk instead. This will keep the texture smooth and delicious. To make a low-sugar version, you can skip the honey or syrup. Use ripe fruits for natural sweetness. You can also try using unsweetened coconut milk. This way, you enjoy the fresh flavors without added sugar. Mango and strawberry are packed with vitamins. They are rich in vitamin C, which helps your immune system. Mango has fiber, aiding digestion. Strawberries are low in calories and high in antioxidants. Together, they make a healthy, tasty choice. To make the Tropical Bliss Mango Strawberry Smoothie, gather these ingredients: - 1 ripe mango, peeled and diced - 1 cup fresh strawberries, hulled and halved - 1 banana, sliced - 1 cup coconut milk (or any milk of your choice) - 1 tablespoon honey or maple syrup (adjust to taste) - 1/2 cup Greek yogurt (optional for creaminess) - 1/2 cup ice cubes - Fresh mint leaves for garnish Follow these steps: 1. In a blender, combine the diced mango, halved strawberries, and sliced banana. 2. Pour in the coconut milk and add the honey or maple syrup for sweetness. 3. If using, add the Greek yogurt for extra creaminess. 4. Add the ice cubes to the blender to create a refreshing chilled smoothie. 5. Blend on high speed until smooth and creamy, about 30-60 seconds. 6. Taste and adjust the sweetness if necessary by adding more honey or syrup. 7. Once blended, pour the smoothie into tall glasses. 8. Garnish each smoothie with a few fresh mint leaves on top. Enjoy your refreshing drink! In this post, we explored the best ingredients for a delicious mango strawberry smoothie. You learned how to blend the perfect mix for great texture and flavor. Tips on selecting ripe fruits and adjusting sweetness are valuable gems to ensure your smoothie shines. We also discussed storage options to keep your smoothie fresh for longer. Try different variations to keep it exciting. With these insights, creating a tasty smoothie becomes easy and fun. Enjoy blending and savoring every sip!](https://recipespursuit.com/wp-content/uploads/2025/07/9e45003d-2fc9-419f-bb88-3ad56378d483-300x300.webp)
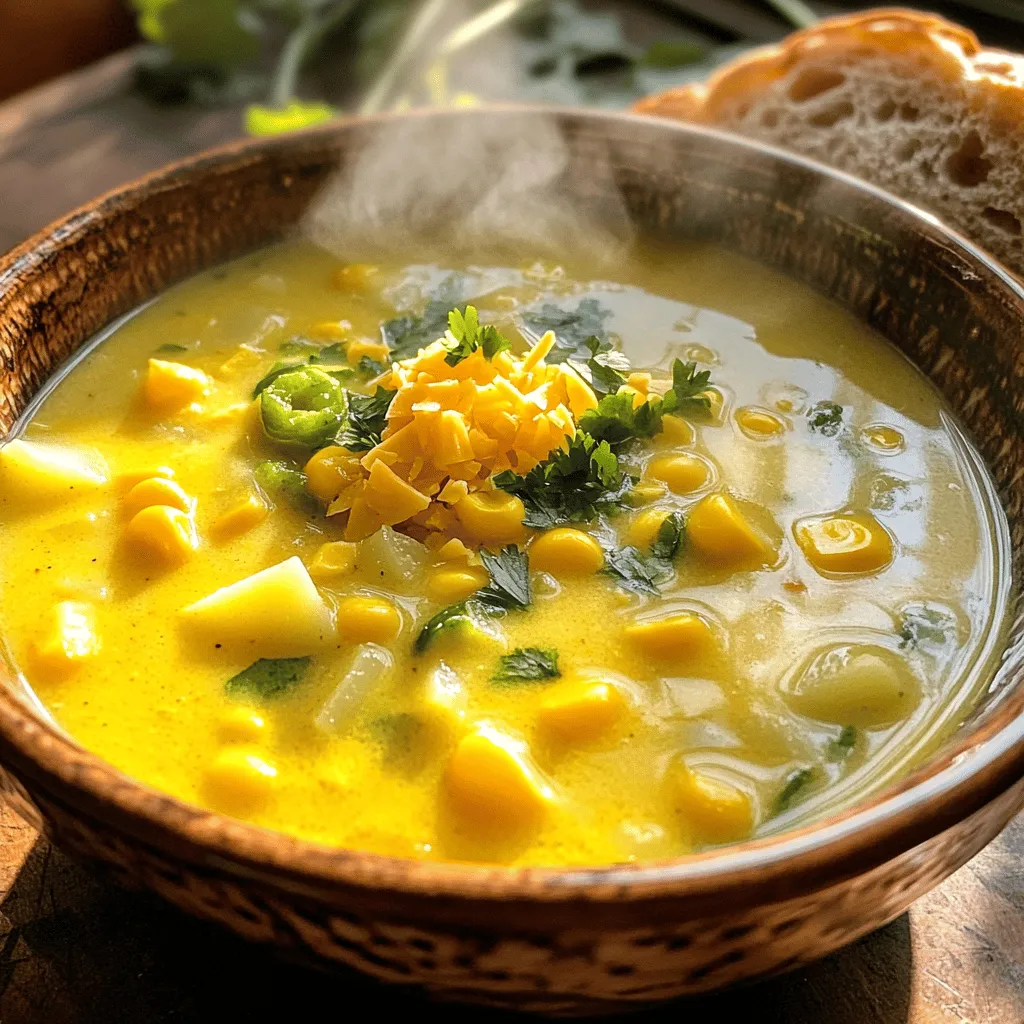
Jalapeño Cheddar Corn Chowder Creamy Flavor Delight
Get ready to enjoy a warm bowl of Jalapeño Cheddar Corn Chowder! This creamy delight bursts with fresh corn, key veggies, and zesty jalapeños.…