

Latest & Greatest

Creamy Tomato Basil Pasta Easy Flavorful Recipe
Looking for a quick and tasty meal? You’ve found the right recipe! Creamy Tomato Basil Pasta is not just easy
Read more…
Cheesy Broccoli Chicken Casserole Simple and Tasty
If you’re looking for a meal that’s both simple and tasty, this Cheesy Broccoli Chicken Casserole is for you! With
Read more…
Asian Beef with Mushrooms Flavorful Stir-Fry Recipe
Looking to spice up your dinner routine? Dive into this Asian Beef with Mushrooms stir-fry! With tender beef sirloin, savory
Read more…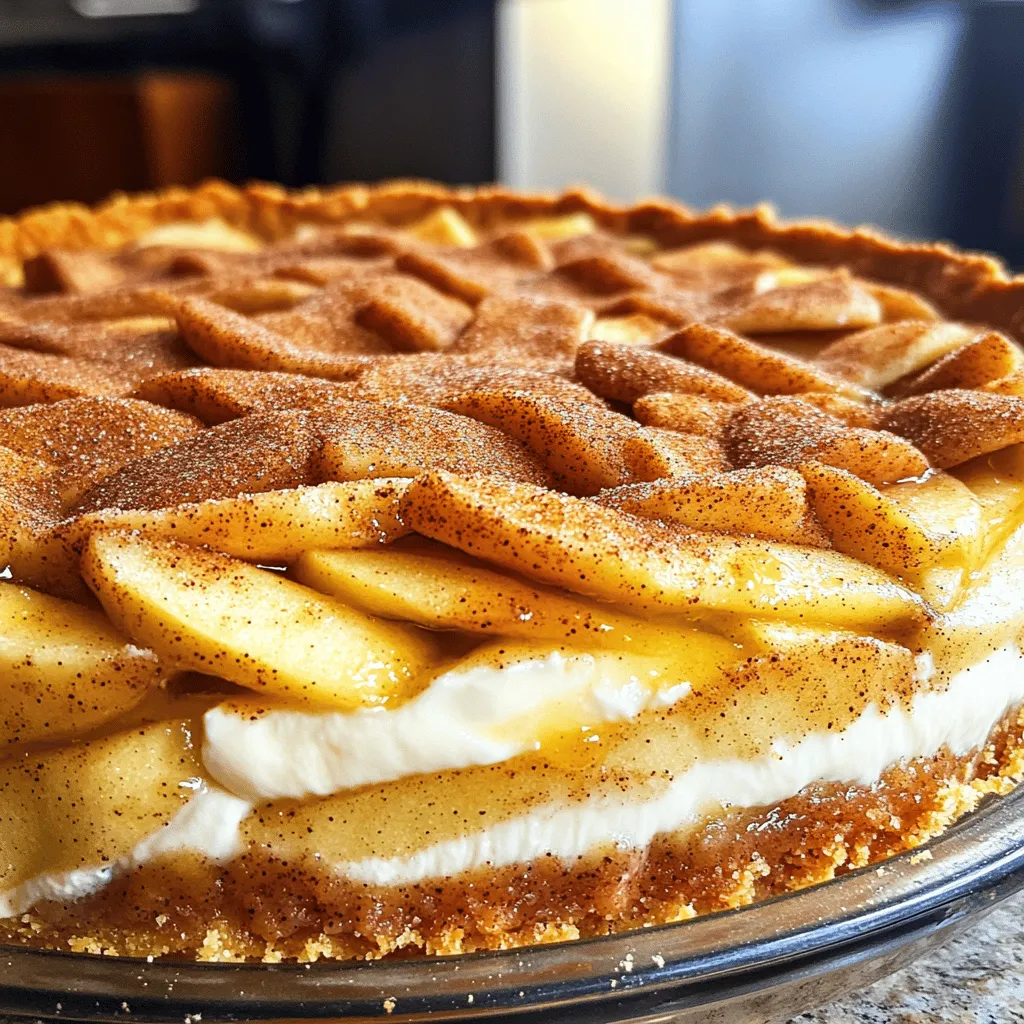
Snickerdoodle Cream Cheese Apple Pie Delight Recipe
Get ready to indulge in a dessert that combines the warm flavors of snickerdoodles with creamy apple pie. I’m here
Read more…
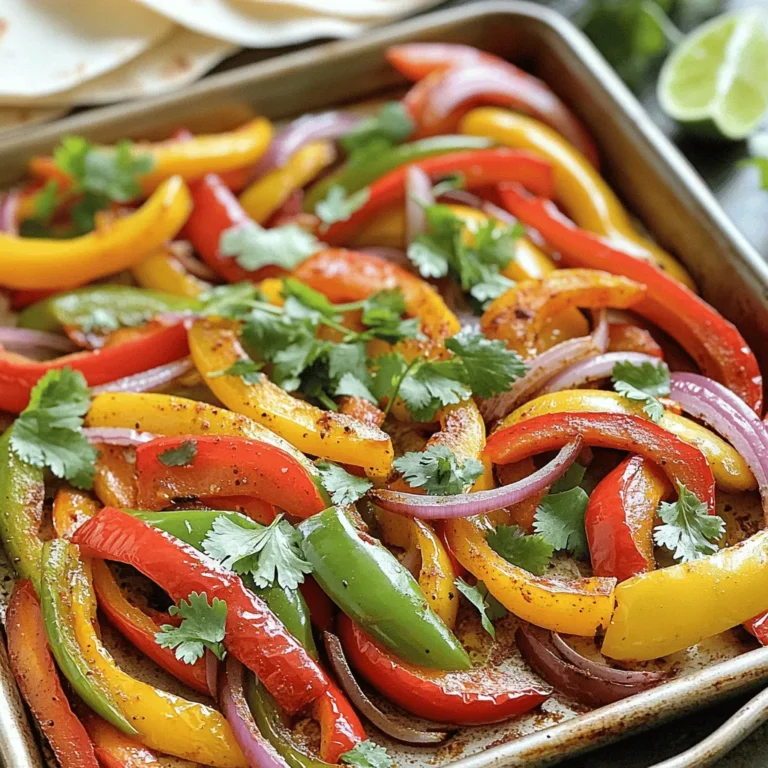
Savory Breakfast Burritos Quick and Easy Recipe
Kick-start your day with my Savory Breakfast Burritos! This quick and easy recipe combines tasty eggs, savory black beans, and
Read more…
Avocado Toast with Poached Egg Quick and Tasty Meal
Looking for a quick, tasty meal that packs a punch? Avocado Toast with Poached Egg is it! This dish combines
Read more…
Spicy Garlic Roasted Chickpeas Crispy Flavor Boost
Are you ready to spice up your snack game? My Spicy Garlic Roasted Chickpeas are a game-changer! These crispy bites
Read more…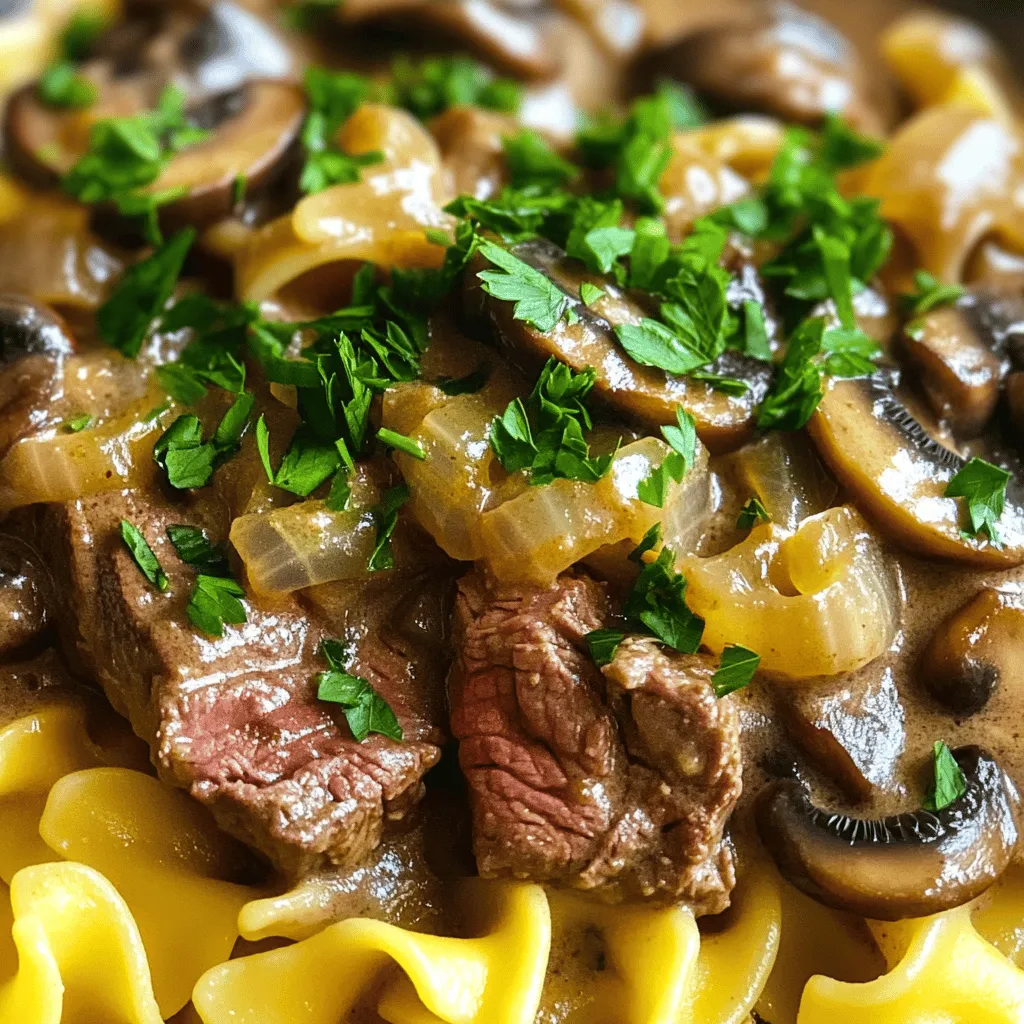
Instant Pot Beef Stroganoff Quick and Tasty Meal
Looking for a quick and tasty meal? My Instant Pot Beef Stroganoff is just the ticket! In about 35 minutes,
Read more…browse recipes


Crispy Baked Sweet Potato Chips Perfect for Snacking
Are you ready to enjoy a crunchy snack that’s both tasty and healthy? These crispy baked sweet potato chips are perfect for satisfying your…
My Latest Desserts
My Latest Recipes

hey,
i’m !
I’m so happy you’re here!
Cooking is my love language, and I’m excited to share my best dishes with you. Hope they become your favorites too! Let’s enjoy every bite of this journey together.

![- 200g digestive biscuits - 100g unsalted butter - 400g sweetened condensed milk - 2 large ripe bananas - 300ml heavy cream - 2 tablespoons powdered sugar - 1 teaspoon vanilla extract - Cocoa powder or chocolate shavings If you want to change things up, you can use graham crackers instead of digestive biscuits. They create a nice crust too! For the whipped cream, you can use coconut cream for a dairy-free option. It tastes great and is easy to find. When choosing bananas, look for ones that are ripe but not overripe. They should have a few brown spots. This means they are sweet and soft, perfect for your pie. For sweetened condensed milk, pick a brand that uses pure milk. This will give your pie a creamy and rich flavor. To start, grab a mixing bowl. Combine the crushed digestive biscuits with melted butter. Mix well until all the biscuits are coated. This step gives the base a rich flavor. Next, take your pie dish. Press the biscuit mixture firmly into the bottom. Make sure it is even across the dish. Refrigerate this for 30 minutes. This helps it set properly. While the base chills, it’s time to make the caramel. In a saucepan, pour in the sweetened condensed milk. Cook it over medium heat while stirring constantly. This is key! Keep stirring for about 15 to 20 minutes. You want it to turn a nice golden color. Watch closely to avoid burning it. Once it reaches the right color, remove it from heat. After the caramel cools, pour it over the chilled biscuit base. Spread it evenly so every bite has caramel. Let it cool for another 30 minutes. Now, slice your ripe bananas. Layer them over the caramel. In another bowl, whip the heavy cream with powdered sugar and vanilla extract. Whip until you see soft peaks. Spread this whipped cream over the bananas. Smooth it out with a spatula. Finally, sprinkle cocoa powder or chocolate shavings on top. This adds a lovely touch. Chill the pie for at least 2 hours. This helps all the flavors come together. For a full recipe, check out the [Full Recipe]. For the best Banoffee Pie, timing matters. Chill the biscuit base for 30 minutes. This helps it set well. After pouring the caramel, let it cool for another 30 minutes. This step ensures a smooth texture. When cooking the caramel, look for a golden color. If it turns too dark, it may burn. Stir constantly while it cooks to keep it smooth. You can prepare parts ahead of time. Crush the biscuits and melt the butter a day before. Store them in the fridge. You can also make the caramel in advance. Just let it cool and then cover it. For quick cleanup, use a mixing bowl and a spatula. These tools help reduce mess. Wipe down surfaces as you go to keep the kitchen tidy. Pair your Banoffee Pie with fresh whipped cream or vanilla ice cream. These flavors enhance the pie’s sweetness. For presentation, slice the pie and place it on dessert plates. Add banana slices on top for a pop of color. A sprinkle of cocoa powder looks nice, too. You can also use chocolate shavings to impress your guests. Serve immediately after chilling for the best taste. {{image_2}} You can make your Banoffee pie even more exciting with different flavors. Adding nuts gives a nice crunch. Chopped walnuts or pecans work well. They add texture and flavor that contrast with the creamy filling. You can also add chocolate layers. Melt some dark chocolate and pour it over the caramel before adding bananas. This makes the pie richer and more indulgent. If you need gluten-free options, use gluten-free biscuits for the base. Many brands offer these, so you can enjoy the same great taste. For vegan adaptations, swap the sweetened condensed milk with coconut cream. You can blend it with sugar for sweetness. Use coconut whipped cream instead of heavy cream. This keeps the dessert creamy and delicious without dairy. Switching up the fruits can make your pie fit the season. In the summer, add fresh berries like strawberries or raspberries. They give a nice tartness that balances the sweetness. In winter, try using spiced apples. This adds warmth to the dessert. You can also change garnishes for holidays. Use candy canes for Christmas or edible flowers for spring. These small touches can make the pie festive and fun. For the full recipe, check out the Banoffee Bliss Pie 🥧 section. To keep your Banoffee Pie fresh, store it in the fridge. Use an airtight container or cover the pie with plastic wrap. This will help prevent it from drying out. The pie is best enjoyed within three days. After that, the bananas may start to brown and lose flavor. You might wonder if you can warm up Banoffee Pie. I don’t recommend reheating it. The crust can get soggy, and the whipped cream won’t hold up well. Instead, enjoy it cold right out of the fridge for the best taste and texture. Want to make your pie last longer? You can freeze Banoffee Pie! Start by slicing it into pieces. Wrap each slice tightly in plastic wrap. Then, place them in a freezer-safe bag or container. This keeps them fresh for up to two months. To enjoy, take a slice out and let it thaw in the fridge overnight. This way, the texture stays nice and creamy. Banoffee pie is a tasty dessert. It has a crunchy base, sweet caramel, fresh bananas, and whipped cream. The crunchy base is made from crushed digestive biscuits mixed with melted butter. The caramel layer comes from cooking sweetened condensed milk until it turns golden. Then, you add sliced bananas on top of the caramel. Finally, you finish it with light whipped cream. This pie is rich and creamy, making it a favorite for many. To keep bananas fresh, slice them just before serving. You can also brush the slices with lemon juice. The acid in lemon juice slows down the browning. If you want to prepare them earlier, try using a little pineapple juice as well. This also adds a nice flavor. Another trick is to store the bananas in the fridge after slicing. They might change color but will stay fresh longer. Yes, you can make Banoffee pie ahead of time. Prepare the base and caramel layer first. Store these in the fridge for up to two days. When you're ready to serve, slice the bananas and add them on top. Then, whip the cream and spread it over the bananas. This way, your pie stays fresh and tasty. Cover it with plastic wrap to protect it while in the fridge. If you need a substitute for condensed milk, try using coconut cream. It has a similar texture and adds a nice flavor. You could also use a mixture of regular milk and sugar. Simmer them together until thickened. This takes longer but works well. For a healthier touch, consider using maple syrup or honey. These alternatives can provide sweetness and a unique taste. In this blog post, we explored how to create a delicious Banoffee Pie from simple ingredients. We covered everything from choosing the best bananas to assembling the pie and storage tips. You can customize this dessert with various flavors and dietary options to suit your needs. Making Banoffee Pie is fun and rewarding. With practice, you can impress your friends and family with this delightful treat. Enjoy every step of the process and the sweet results!](https://recipespursuit.com/wp-content/uploads/2025/04/acadb375-cdf8-4213-a255-42e0b00b93e5-300x300.webp)


Chicken Alfredo Zucchini Boats Flavorful and Easy Meal
If you love creamy Alfredo and fresh veggies, you’ll adore these Chicken Alfredo Zucchini Boats. This dish combines tender zucchini with rich chicken and…