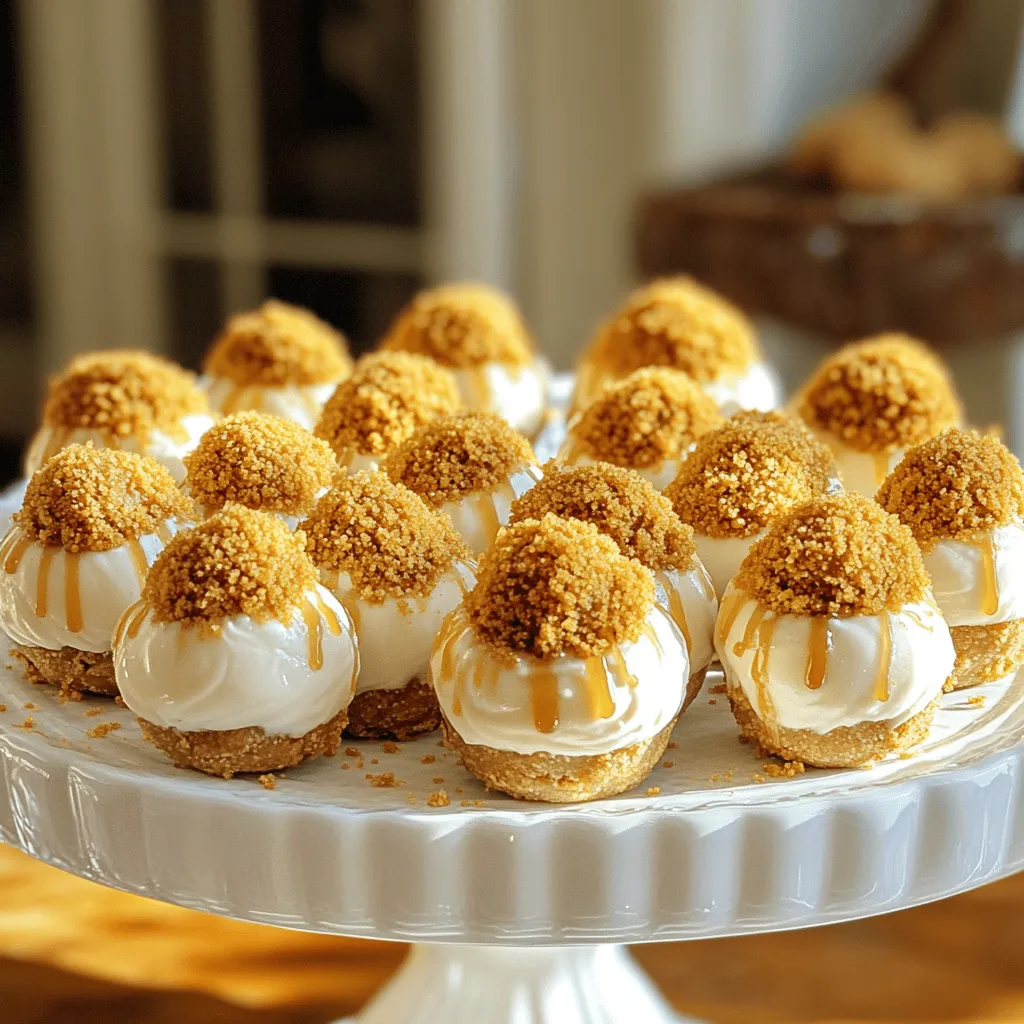
Craving a sweet treat that’s easy to make and oh-so-delicious? You’re in the right place! These No-Bake Biscoff Cheesecake Truffles are a quick way to satisfy your dessert dreams. With just a handful of simple ingredients, you can whip up creamy, dreamy bites that explode with flavor. Stick around as I guide you through each step to create these delightful little gems. Trust me, your taste buds will thank you!
Ingredients
List of Ingredients
– 1 cup Biscoff cookies, crushed
– 8 oz cream cheese, softened
– 1/2 cup powdered sugar
– 1/2 cup Biscoff spread (cookie butter)
– 1 tsp vanilla extract
– 1/4 cup chocolate chips (optional, for coating)
– Extra crushed Biscoff cookies, for rolling
Gathering the right ingredients makes all the difference in your no-bake Biscoff cheesecake truffles. The main star is Biscoff cookies. These cookies bring a rich, spiced flavor that pairs well with cream cheese.
Next, you need cream cheese. It adds creaminess and richness to the truffles. Make sure it’s softened for easy mixing. You’ll also need powdered sugar for sweetness. This ingredient balances the flavors and adds a nice texture.
Biscoff spread is key in this recipe. It’s also known as cookie butter. This spread gives the truffles that signature Biscoff taste. Adding vanilla extract enhances the overall flavor and aroma.
If you want to coat the truffles, chocolate chips are an option. They add a lovely sweetness. Finally, have extra crushed Biscoff cookies ready for rolling. This adds a crunchy exterior.
By preparing these ingredients ahead of time, you set yourself up for success. Each component contributes to the delightful flavor of these truffles.
Step-by-Step Instructions
Preparing the Mixture
First, I grab a mixing bowl. I add 1 cup of crushed Biscoff cookies and 8 oz of softened cream cheese. I use a hand mixer or spatula to mix them well. The goal is to get a smooth blend. Next, I add 1/2 cup of powdered sugar, 1/2 cup of Biscoff spread, and 1 tsp of vanilla extract. I mix again until the mixture is creamy and has no lumps. This mixture is the heart of our truffles.
Chilling the Mixture
Now, I need to chill the mixture. I cover the bowl and place it in the fridge for about 30 minutes. Chilling makes the mixture easier to handle. It helps the truffles hold their shape when I form them. This step is key for a great texture.
Forming the Truffles
After chilling, I take the bowl out of the fridge. I use a small cookie scoop or my hands to form the mixture into balls. Each ball should be about 1 inch in diameter. Once I have the balls ready, I can roll them in extra crushed Biscoff cookies. For a twist, I can melt 1/4 cup of chocolate chips and dip each truffle in chocolate before rolling them in cookies. This adds a fun layer of flavor. Finally, I place the coated truffles on a parchment-lined baking sheet. I pop them back in the fridge for another 30 minutes to set.
Tips & Tricks
Achieving the Perfect Texture
Chilling is key for the right texture. After mixing the ingredients, let the mixture chill for at least 30 minutes. This makes it easier to shape the truffles. The cold helps the mixture firm up, allowing you to roll it into perfect balls.
The consistency of the mixture is also important. You want it creamy but not too runny. It should hold its shape when you form the balls. If it feels too soft, chill it longer. If it seems too thick, add a bit more Biscoff spread to loosen it up.
Serving Suggestions
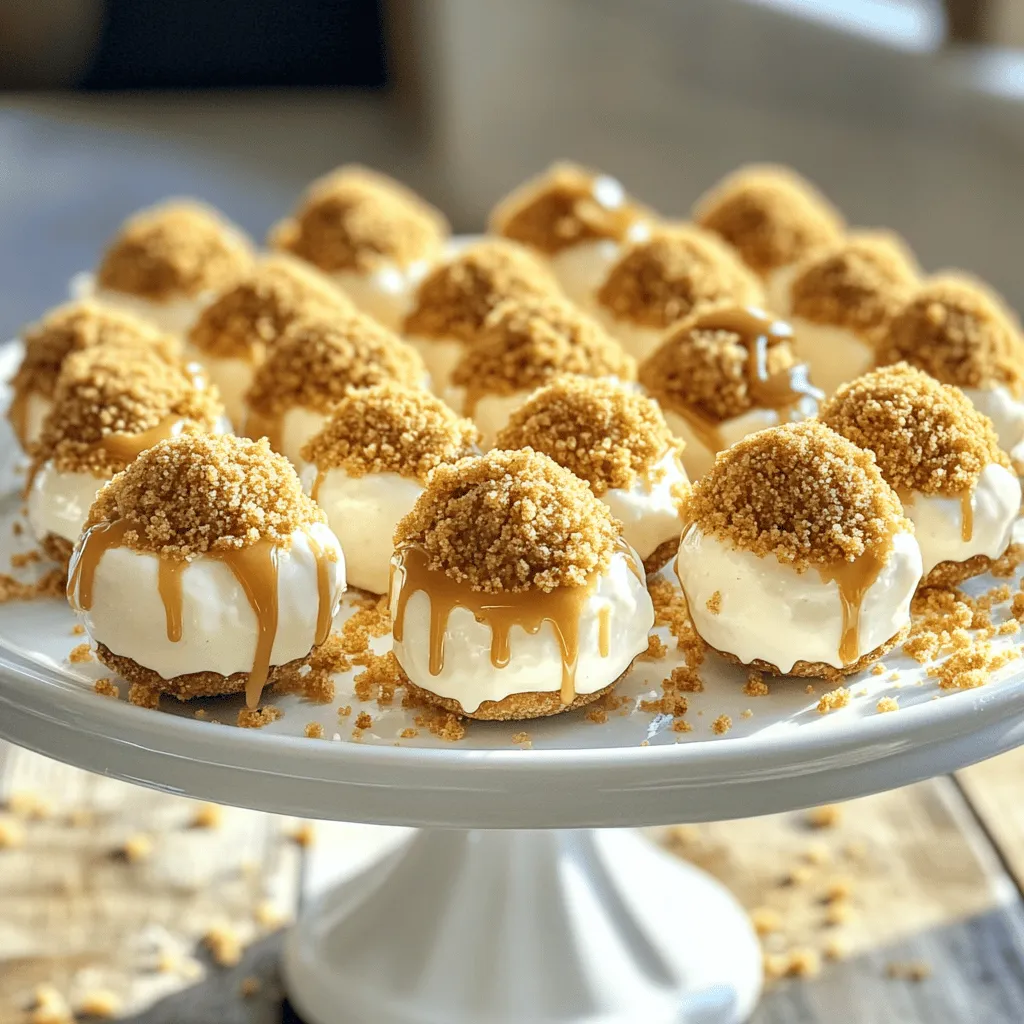
Get creative when presenting your truffles! You can arrange them in a pretty box or on a cake stand. This makes them look even more inviting. An extra touch is to drizzle some Biscoff spread over the top. It adds flavor and makes your truffles shine. You can even sprinkle some crushed Biscoff cookies on top for added crunch and flair.
Tools and Equipment
For mixing, I recommend a hand mixer for smooth blending. A spatula works well too if you prefer. You will also need a small cookie scoop for shaping the truffles. This helps keep them uniform in size.
When it comes to storage, use airtight containers to keep your truffles fresh. You can stack them with parchment paper between layers. This prevents them from sticking together.
Variations
Flavor Variations
You can play around with different flavors in your Biscoff cheesecake truffles. Try using Nutella or peanut butter instead of Biscoff spread. Both options add rich flavors and fun twists. You can also mix in flavored extracts. For example, almond or hazelnut extract can give your truffles a special touch. Just remember to adjust the amounts to keep the balance right.
Dietary Variations
Making these truffles fit your diet is easy. For gluten-free options, swap out Biscoff cookies with gluten-free cookies. Many brands offer delicious alternatives that work well. If you want vegan truffles, use plant-based cream cheese and a vegan spread. You can find many tasty cookie butters that are dairy-free. This way, everyone can enjoy these treats!
Storage Info
Short-Term Storage
To store your truffles in the fridge, place them in an airtight container. This keeps them fresh and tasty. Layer parchment paper between the truffles to prevent sticking. They will stay good in the fridge for up to one week. Just make sure to keep them cold.
Long-Term Storage
For long-term storage, you can freeze the truffles. Place them on a baking sheet first, and freeze them for about two hours. Once frozen, transfer them to a freezer-safe container. They can last for up to three months in the freezer. To enjoy them, thaw the truffles in the fridge overnight. This keeps their texture nice and creamy.
Shelf Life
The best time to eat these truffles is within one week if kept in the fridge. If you freeze them, enjoy them within three months for the best flavor. After that, they may lose their taste and texture. Always check for any signs of spoilage before eating.
FAQs
How do I make these truffles without using an oven?
You can make these truffles easily without an oven. First, combine crushed Biscoff cookies with softened cream cheese in a bowl. Use a hand mixer or spatula to mix them well. Next, add powdered sugar, Biscoff spread, and vanilla extract. Stir until the mixture is smooth and creamy. Chill the mixture in the fridge for about 30 minutes. This step helps it firm up and makes it easier to handle. Once chilled, scoop out small amounts and roll them into balls. Coat the balls in crushed Biscoff cookies or melted chocolate. Finally, refrigerate the truffles again to set.
Can I make these truffles ahead of time?
Yes, you can make these truffles ahead of time. After rolling them into balls, place them in an airtight container. Store them in the fridge for up to a week. You can also freeze them for longer storage. Just make sure to use a freezer-safe container. When you want to enjoy a truffle, take it out and let it thaw in the fridge for a few hours.
What can I use instead of Biscoff cookies?
If you do not have Biscoff cookies, there are good alternatives. You can use graham crackers, digestive biscuits, or any other spiced cookies. Each option will give a different flavor, but they all work well. For a chocolate twist, try using chocolate cookies. Just make sure to crush them finely, just like the Biscoff cookies.
In this post, we explored making delicious Biscoff truffles. We covered ingredients like Biscoff cookies and cream cheese, along with easy steps for mixing and chilling. I shared tips for getting the right texture and creative ways to present your truffles. Don’t forget the fun variations and storage tips!
You can enjoy these treats fresh or frozen. They are simple to make and satisfy every sweet tooth. Try them yourself and share your results!