Maple Walnut Granola Bars Simple and Delightful Recipe

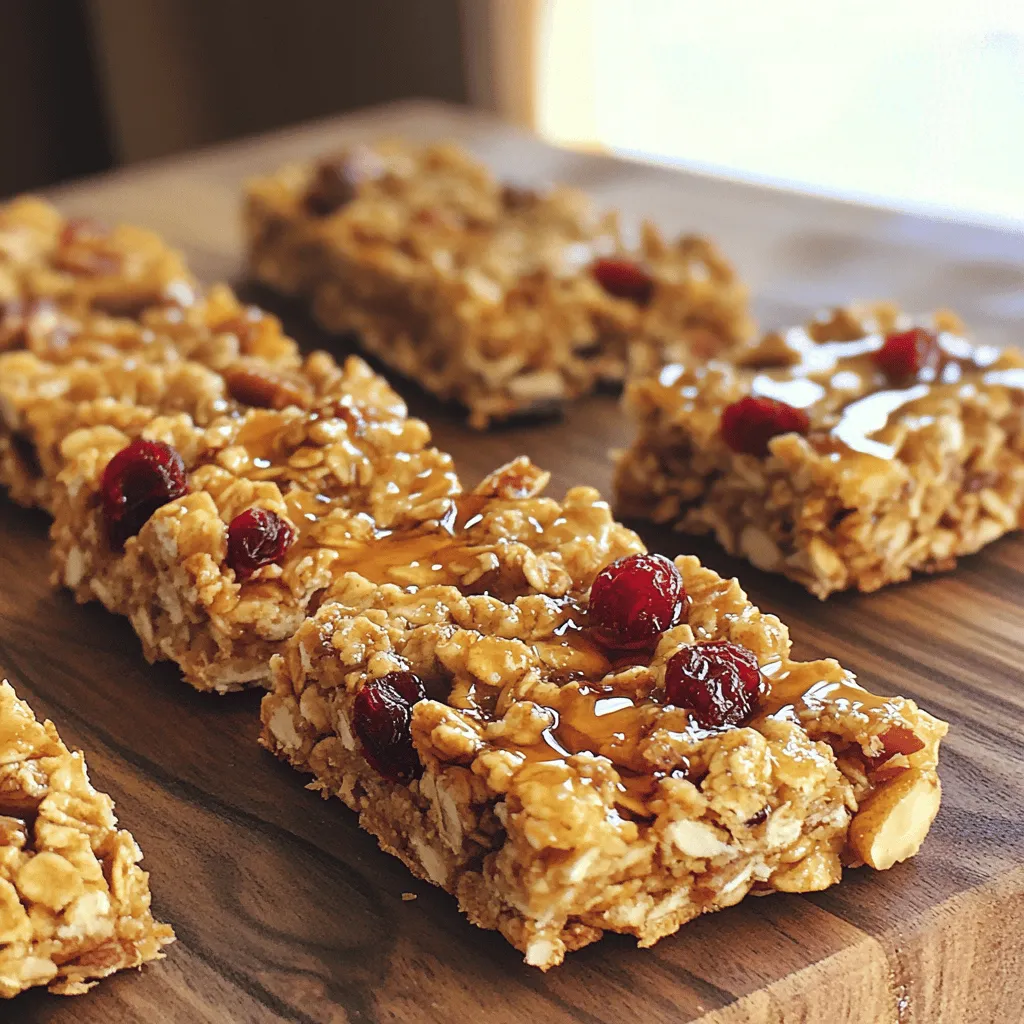
Looking for a tasty snack that’s easy to make? These Maple Walnut Granola Bars are the perfect choice! Packed with wholesome ingredients like oats, walnuts, and a touch of maple syrup, they’re both simple and delightful. In this post, I’ll walk you through the recipe step-by-step, share tips for tweaking flavors, and offer storage advice to keep them fresh. Let’s dive in and start making your new favorite snack!

Ingredients

List of Ingredients

– 2 cups rolled oats

– 1 cup walnuts, chopped

– 1/2 cup honey or maple syrup

– 1/4 cup nut butter (almond or peanut)

– 1/2 cup dried fruit (cranberries or raisins)

– 1/4 teaspoon salt

– 1/2 teaspoon cinnamon

– 1/2 teaspoon vanilla extract

Gathering the right ingredients is key to making delicious maple walnut granola bars. I love using rolled oats as my base. They give the bars great texture and hold everything together. Chopped walnuts add a wonderful crunch and rich flavor. You can choose honey or maple syrup as a sweetener. Both options work well.

When I make these bars, I always include nut butter, either almond or peanut. This adds creaminess and helps bind the mixture. Dried fruit like cranberries or raisins adds sweetness and chewiness. A pinch of salt enhances the flavors, while cinnamon brings warmth and a hint of spice. Lastly, a touch of vanilla extract rounds out the taste, making the bars extra special.

Nutritional Facts

Calories per serving: About 150

Macronutrient breakdown:

– Carbohydrates: 20g

– Protein: 4g

– Fat: 7g

These granola bars are not just tasty; they offer health benefits too. Rolled oats provide fiber, which can help keep you full. Walnuts are rich in omega-3 fatty acids, good for heart health. Honey and maple syrup give you quick energy, perfect for a snack. Nut butter adds protein, making these bars great for an active day.

Overall, these maple walnut granola bars are simple to make and pack a nutritious punch. For the full recipe, check out the link. Enjoy making your own at home!

Step-by-Step Instructions

Prep Work

1. Preheat your oven to 350°F (175°C).

2. Line an 8×8-inch baking dish with parchment paper. Leave a bit hanging over the sides for easy removal.

3. Gather all your ingredients and measure them out. This makes mixing easier.

Mixing & Baking

1. In a large bowl, combine the rolled oats, chopped walnuts, salt, and cinnamon. Stir well to mix everything together.

2. In a small saucepan, melt the honey (or maple syrup) and nut butter over low heat. Stir until smooth.

3. Remove from heat and add the vanilla extract. Pour this mixture over the dry ingredients.

4. Add the dried fruit and mix until all the ingredients are coated.

5. Transfer the mixture to your prepared baking dish. Press it down firmly with a spatula or your hands. The more tightly packed, the better they will hold together.

6. Bake in the preheated oven for 20-25 minutes. Look for a golden brown edge.

Cooling & Cutting

1. After baking, let the granola cool in the pan for about 10 minutes.

2. Use the parchment paper to lift the granola out of the pan.

3. Place it on a cutting board and let it cool completely.

4. Once cool, cut it into bars or squares. Store in an airtight container for up to a week.

For the full recipe, refer to the earlier section. Enjoy your delicious maple walnut granola bars!

Tips & Tricks

Best Practices for Texture

To get chewy bars, use more nut butter and syrup. For crunchier bars, add more oats and nuts. The key is also packing the mixture tightly. When you press it down firmly, it holds together better after baking.

Flavor Enhancements

You can add spices like nutmeg or ginger for extra flavor. I often use a dash of vanilla extract too. If you want more crunch, try adding seeds like pumpkin or sunflower. You can also swap walnuts for almonds or pecans for a different taste.

Common Mistakes to Avoid

One common mistake is overmixing. This can make your bars too dense. On the other hand, undermixing can lead to uneven flavor. Always check your baking time. If you want chewy bars, take them out when they are lightly golden. For crunchier bars, leave them in a bit longer.

For the full recipe of Maple Walnut Granola Bars, check out the recipe section.

Variations

Flavor Variations

You can easily change the flavor of your maple walnut granola bars. One fun idea is to add chocolate chips. They blend well with the maple and nuts. Just mix in about half a cup before baking. You can also switch up the dried fruits. Try using apricots, dates, or figs instead of cranberries or raisins. Each fruit offers a unique taste.

Dietary Adjustments

If you need gluten-free options, choose certified gluten-free oats. This keeps the bars safe for those with gluten sensitivities. For vegan substitutions, replace honey with maple syrup. Use almond or cashew butter to keep it plant-based. These swaps make the bars fit many diets without losing flavor.

Portion Customization

You can customize the portions based on your needs. If you want smaller snacks, make mini bars or bites. Simply spread the mixture thinner in the baking pan. This way, you can cut them into bite-sized pieces. For meal prep, think about cutting larger bars. This helps with easy grab-and-go meals. You can store them in snack bags for a quick treat during the week.

Storage Info

How to Store Granola Bars

To keep your homemade granola bars fresh, store them in an airtight container. I recommend using a glass jar or a plastic container with a tight lid. This helps keep moisture out and maintains their crunch. Place the container in a cool, dark place, like a pantry or cupboard. Avoid storing them in places with high heat or direct sunlight.

Shelf Life

If stored correctly, your granola bars can last for about a week. After that, they may lose their texture and flavor. Signs of spoilage include a change in smell or taste, or if they feel soft instead of crunchy. Always check for any signs of mold before you eat them.

Freezing Options

You can also freeze granola bars for longer storage. To freeze, wrap each bar tightly in plastic wrap. Place them in a freezer-safe bag or container. This way, they won’t stick together. When you’re ready to enjoy one, take it out and let it thaw at room temperature for about 30 minutes. You can also microwave it for a few seconds for a warm treat.

FAQs

Can I make maple walnut granola bars without nuts?

Yes, you can make these bars without nuts. Use seeds instead, like pumpkin or sunflower seeds. This keeps the texture crunchy. You can also add more dried fruit or use coconut flakes for extra flavor.

How do I substitute honey with a vegan option?

To substitute honey, use maple syrup or agave nectar. Both options provide sweetness without using animal products. They blend well with the other ingredients. Use the same amount as you would for honey.

What is the ideal baking time for chewy bars?

For chewy bars, bake them for 20 to 25 minutes. Watch for a golden edge. If you prefer crunchier bars, bake for a few extra minutes. Just be careful not to overbake, as they can dry out.

Where can I buy pre-made maple walnut granola bars?

You can find pre-made bars at most grocery stores. Look in the snack aisle or the health-food section. Many brands offer maple walnut flavors. However, homemade bars taste fresher and can be customized.

How can I enhance the flavor of my homemade bars?

To enhance flavor, try adding spices like nutmeg or ginger. You can also mix in chocolate chips or different dried fruits. Another great option is to add a bit of orange zest for freshness. Experiment with flavors to find your favorite combination.

For the full recipe of Maple Walnut Granola Bars, check out the recipe section above.

You learned how to make delicious maple walnut granola bars. We covered each step, from gathering ingredients to baking and storing. Remember, you can customize flavors or adjust for dietary needs. Making these bars lets you enjoy healthy snacks that fit your taste. Keep these tips handy to avoid mistakes and create the perfect texture. Enjoy your homemade treats; they make snacking fun and easy!

- 2 cups rolled oats - 1 cup walnuts, chopped - 1/2 cup honey or maple syrup - 1/4 cup nut butter (almond or peanut) - 1/2 cup dried fruit (cranberries or raisins) - 1/4 teaspoon salt - 1/2 teaspoon cinnamon - 1/2 teaspoon vanilla extract Gathering the right ingredients is key to making delicious maple walnut granola bars. I love using rolled oats as my base. They give the bars great texture and hold everything together. Chopped walnuts add a wonderful crunch and rich flavor. You can choose honey or maple syrup as a sweetener. Both options work well. When I make these bars, I always include nut butter, either almond or peanut. This adds creaminess and helps bind the mixture. Dried fruit like cranberries or raisins adds sweetness and chewiness. A pinch of salt enhances the flavors, while cinnamon brings warmth and a hint of spice. Lastly, a touch of vanilla extract rounds out the taste, making the bars extra special. - Calories per serving: About 150 - Macronutrient breakdown: - Carbohydrates: 20g - Protein: 4g - Fat: 7g These granola bars are not just tasty; they offer health benefits too. Rolled oats provide fiber, which can help keep you full. Walnuts are rich in omega-3 fatty acids, good for heart health. Honey and maple syrup give you quick energy, perfect for a snack. Nut butter adds protein, making these bars great for an active day. Overall, these maple walnut granola bars are simple to make and pack a nutritious punch. For the full recipe, check out the link. Enjoy making your own at home! 1. Preheat your oven to 350°F (175°C). 2. Line an 8x8-inch baking dish with parchment paper. Leave a bit hanging over the sides for easy removal. 3. Gather all your ingredients and measure them out. This makes mixing easier. 1. In a large bowl, combine the rolled oats, chopped walnuts, salt, and cinnamon. Stir well to mix everything together. 2. In a small saucepan, melt the honey (or maple syrup) and nut butter over low heat. Stir until smooth. 3. Remove from heat and add the vanilla extract. Pour this mixture over the dry ingredients. 4. Add the dried fruit and mix until all the ingredients are coated. 5. Transfer the mixture to your prepared baking dish. Press it down firmly with a spatula or your hands. The more tightly packed, the better they will hold together. 6. Bake in the preheated oven for 20-25 minutes. Look for a golden brown edge. 1. After baking, let the granola cool in the pan for about 10 minutes. 2. Use the parchment paper to lift the granola out of the pan. 3. Place it on a cutting board and let it cool completely. 4. Once cool, cut it into bars or squares. Store in an airtight container for up to a week. For the full recipe, refer to the earlier section. Enjoy your delicious maple walnut granola bars! To get chewy bars, use more nut butter and syrup. For crunchier bars, add more oats and nuts. The key is also packing the mixture tightly. When you press it down firmly, it holds together better after baking. You can add spices like nutmeg or ginger for extra flavor. I often use a dash of vanilla extract too. If you want more crunch, try adding seeds like pumpkin or sunflower. You can also swap walnuts for almonds or pecans for a different taste. One common mistake is overmixing. This can make your bars too dense. On the other hand, undermixing can lead to uneven flavor. Always check your baking time. If you want chewy bars, take them out when they are lightly golden. For crunchier bars, leave them in a bit longer. For the full recipe of Maple Walnut Granola Bars, check out the recipe section. {{image_2}} You can easily change the flavor of your maple walnut granola bars. One fun idea is to add chocolate chips. They blend well with the maple and nuts. Just mix in about half a cup before baking. You can also switch up the dried fruits. Try using apricots, dates, or figs instead of cranberries or raisins. Each fruit offers a unique taste. If you need gluten-free options, choose certified gluten-free oats. This keeps the bars safe for those with gluten sensitivities. For vegan substitutions, replace honey with maple syrup. Use almond or cashew butter to keep it plant-based. These swaps make the bars fit many diets without losing flavor. You can customize the portions based on your needs. If you want smaller snacks, make mini bars or bites. Simply spread the mixture thinner in the baking pan. This way, you can cut them into bite-sized pieces. For meal prep, think about cutting larger bars. This helps with easy grab-and-go meals. You can store them in snack bags for a quick treat during the week. To keep your homemade granola bars fresh, store them in an airtight container. I recommend using a glass jar or a plastic container with a tight lid. This helps keep moisture out and maintains their crunch. Place the container in a cool, dark place, like a pantry or cupboard. Avoid storing them in places with high heat or direct sunlight. If stored correctly, your granola bars can last for about a week. After that, they may lose their texture and flavor. Signs of spoilage include a change in smell or taste, or if they feel soft instead of crunchy. Always check for any signs of mold before you eat them. You can also freeze granola bars for longer storage. To freeze, wrap each bar tightly in plastic wrap. Place them in a freezer-safe bag or container. This way, they won’t stick together. When you're ready to enjoy one, take it out and let it thaw at room temperature for about 30 minutes. You can also microwave it for a few seconds for a warm treat. Yes, you can make these bars without nuts. Use seeds instead, like pumpkin or sunflower seeds. This keeps the texture crunchy. You can also add more dried fruit or use coconut flakes for extra flavor. To substitute honey, use maple syrup or agave nectar. Both options provide sweetness without using animal products. They blend well with the other ingredients. Use the same amount as you would for honey. For chewy bars, bake them for 20 to 25 minutes. Watch for a golden edge. If you prefer crunchier bars, bake for a few extra minutes. Just be careful not to overbake, as they can dry out. You can find pre-made bars at most grocery stores. Look in the snack aisle or the health-food section. Many brands offer maple walnut flavors. However, homemade bars taste fresher and can be customized. To enhance flavor, try adding spices like nutmeg or ginger. You can also mix in chocolate chips or different dried fruits. Another great option is to add a bit of orange zest for freshness. Experiment with flavors to find your favorite combination. For the full recipe of Maple Walnut Granola Bars, check out the recipe section above. You learned how to make delicious maple walnut granola bars. We covered each step, from gathering ingredients to baking and storing. Remember, you can customize flavors or adjust for dietary needs. Making these bars lets you enjoy healthy snacks that fit your taste. Keep these tips handy to avoid mistakes and create the perfect texture. Enjoy your homemade treats; they make snacking fun and easy!

Maple Walnut Granola Bars

Discover the delicious world of Maple Walnut Granola Bars with this easy recipe that will satisfy your cravings and keep you energized! Made with wholesome ingredients like rolled oats, walnuts, honey, and dried fruit, these bars are perfect for a healthy snack on the go. Follow our simple step-by-step instructions to whip up a batch in no time. Click through to explore these tasty treats and enjoy the crunch today!

Ingredients
  

2 cups rolled oats

1 cup walnuts, chopped

1/2 cup honey or maple syrup

1/4 cup nut butter (almond or peanut)

1/2 cup dried fruit (cranberries or raisins)

1/4 teaspoon salt

1/2 teaspoon cinnamon

1/2 teaspoon vanilla extract

Instructions
 

Preheat your oven to 350°F (175°C) and line a baking dish (8x8 inches) with parchment paper, leaving some overhang for easy removal.

    In a large mixing bowl, combine the rolled oats, chopped walnuts, salt, and cinnamon. Stir well to combine.

      In a small saucepan over low heat, combine the honey (or maple syrup) and nut butter. Stir until fully melted and smooth. Remove from heat and stir in the vanilla extract.

        Pour the melted mixture over the dry ingredients in the bowl. Add the dried fruit and mix well until all ingredients are evenly coated.

          Transfer the mixture into the prepared baking dish. Press down firmly with a spatula or your hands to create an even layer. The more tightly packed, the better they will hold together.

            Bake in the preheated oven for 20-25 minutes until the edges turn golden brown.

              Remove from the oven and allow to cool in the pan for about 10 minutes. Using the parchment paper overhang, lift the granola out and transfer it to a cutting board.

                Allow it to cool completely before cutting into bars or squares. Store in an airtight container for up to a week.

                  Prep Time: 10 minutes | Total Time: 35 minutes | Servings: 12 bars

                    Leave a Comment

                    Recipe Rating