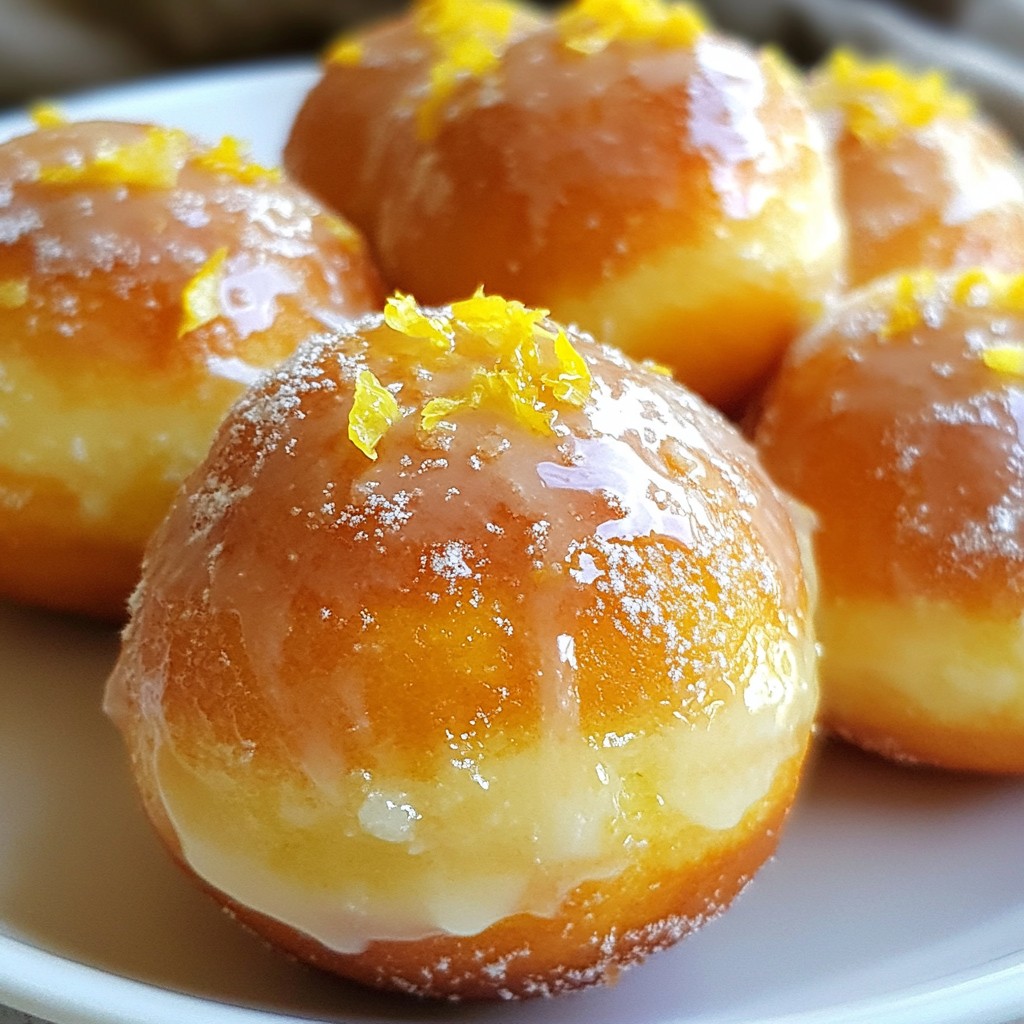
Get ready to delight your taste buds with my easy recipe for Glazed Lemon Donut Holes! These treats are soft, sweet, and bursting with lemon flavor. You don’t need to be a pro baker to make them. I’ll guide you through simple steps, tips, and flavor options. Whether you want a quick snack or a fun dessert, these donut holes are perfect for you. Let’s dive in and make something scrumptious!
Why I Love This Recipe
- Bright Flavor: The fresh lemon zest and juice bring a delightful brightness that elevates these donut holes to a whole new level.
- Easy to Make: This recipe comes together in just 30 minutes, making it perfect for a quick sweet treat any time of the day.
- Perfectly Sweet: The zesty glaze adds just the right amount of sweetness, complementing the light and fluffy donut holes.
- Versatile Options: Whether you prefer dairy or non-dairy ingredients, this recipe is easily adaptable to fit your dietary needs.
Ingredients
Main Ingredients for Donut Holes
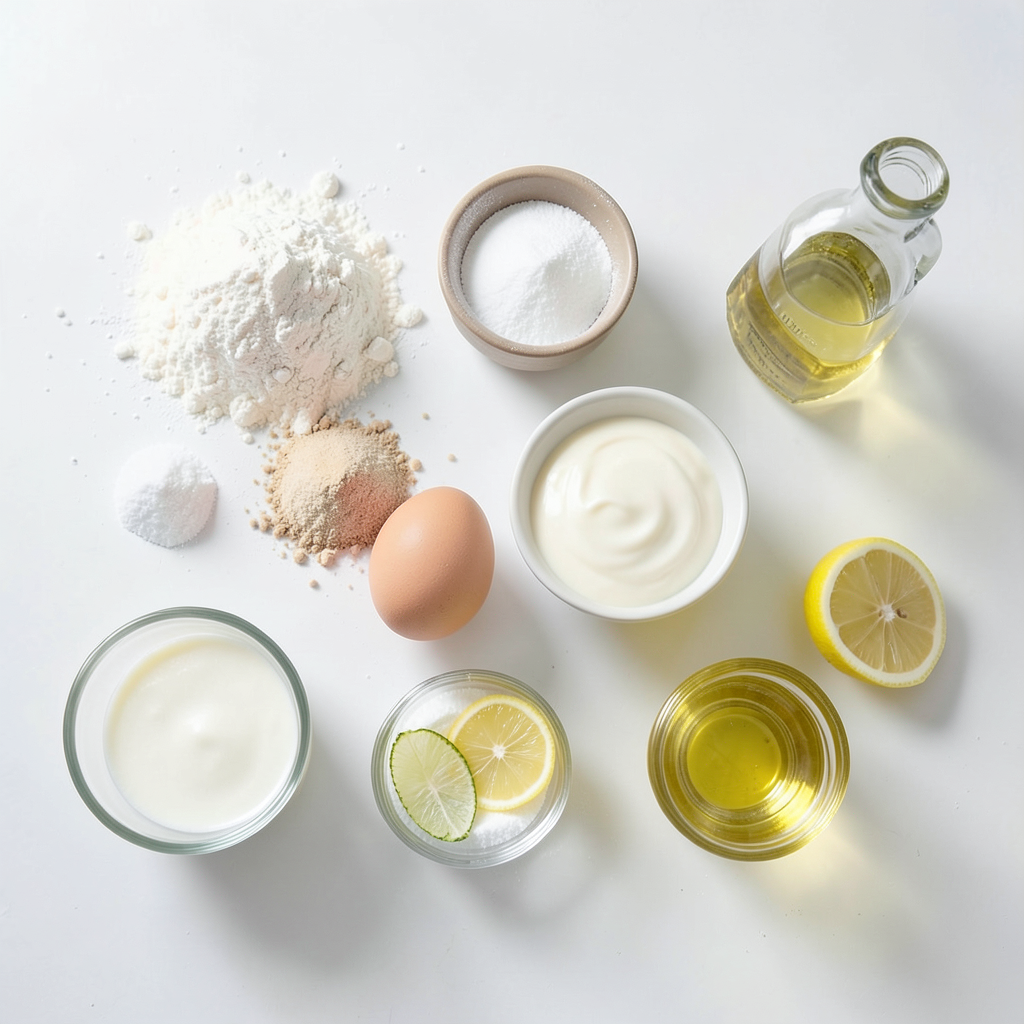
To make your donut holes, gather these key ingredients:
- 1 cup all-purpose flour
- 1/2 cup granulated sugar
- 1 teaspoon baking powder
- 1/4 teaspoon baking soda
- 1/4 teaspoon salt
- 1/4 cup milk (or non-dairy milk)
- 1/4 cup plain yogurt (or non-dairy yogurt)
- 1 large egg
- Zest of 1 lemon
- 2 tablespoons fresh lemon juice
- Vegetable oil for frying
These ingredients come together to create soft and zesty donut holes. The lemon zest and juice give them a bright flavor.
Ingredients for the Lemon Glaze
For the sweet lemon glaze, you will need:
- 1 cup powdered sugar
- 2 tablespoons fresh lemon juice
- Zest of 1 lemon
This glaze adds a shiny finish and a burst of citrus taste. It makes the donut holes irresistible.
Possible Substitutes for Key Ingredients
You can swap some ingredients if needed:
- For flour, use gluten-free flour for a gluten-free option.
- Non-dairy milk works well if you want to avoid dairy.
- Replace yogurt with applesauce for a different texture.
These substitutes still keep the donut holes tasty and fun to make. You can customize the recipe to fit your needs!
Step-by-Step Instructions
Preparation of Dry Ingredients
Start by gathering your dry ingredients. In a mixing bowl, add 1 cup of all-purpose flour, 1/2 cup of granulated sugar, 1 teaspoon of baking powder, 1/4 teaspoon of baking soda, and 1/4 teaspoon of salt. Whisk these together until they blend well. This step is key for the right texture in your donut holes.
Combining Wet Ingredients
In a separate bowl, combine your wet ingredients. Mix 1/4 cup of milk (or non-dairy milk), 1/4 cup of plain yogurt (or non-dairy yogurt), and 1 large egg. Add the zest of 1 lemon and 2 tablespoons of fresh lemon juice. Stir until smooth. This mix adds the zesty flavor that makes these donut holes special.
Frying the Donut Holes
Heat about 2 inches of vegetable oil in a deep pan over medium heat. Aim for a temperature of 350°F (175°C). Use a small cookie scoop or spoon to drop small balls of dough, about a tablespoon each, into the hot oil. Fry 3-4 at a time, turning them occasionally. They should take about 2-3 minutes to turn golden brown. Once fried, remove them with a slotted spoon and place them on a paper towel-lined plate to drain excess oil.
Tips & Tricks
Ensuring Perfectly Fried Donut Holes
To fry the best donut holes, heat oil to 350°F (175°C). Use a thermometer for accuracy. If the oil is too hot, the outside burns while the inside stays raw. If it's too cool, your donut holes soak up too much oil. Fry 3-4 donut holes at a time to keep the temperature steady. This way, they cook evenly and get that lovely golden color.
Achieving the Best Glaze Consistency
For a smooth glaze, mix the powdered sugar with fresh lemon juice and lemon zest. Start with a small amount of lemon juice, adding more until you reach the right thickness. The glaze should be thick enough to coat the donut holes but not runny. If it’s too thick, add a tiny splash of lemon juice. If it’s too thin, whisk in more powdered sugar.
Common Mistakes to Avoid
Do not overcrowd the frying pan. This causes uneven cooking and makes your donut holes greasy. Also, avoid overmixing your batter. Stir just until combined to keep the donut holes light and fluffy. Lastly, dip the warm donut holes in glaze right away. This allows the glaze to stick well and form a shiny finish.
Pro Tips
- Use Fresh Ingredients: Always opt for fresh lemons for zest and juice, as they provide the best flavor and aroma.
- Temperature Check: Ensure your oil is at the correct temperature (350°F/175°C) before frying to avoid greasy donut holes.
- Don't Overmix: When combining wet and dry ingredients, mix just until combined to keep your donut holes light and fluffy.
- Glaze It Warm: Dip your donut holes into the glaze while they are still warm for better adherence and maximum flavor.
Variations
Lemon Donut Holes with Different Flavor Profiles
You can change the taste of lemon donut holes with simple swaps. Try adding a bit of vanilla extract for a warm, sweet note. You can also mix in spices like cinnamon or nutmeg for a cozy twist. If you love fruit, add blueberries or raspberries to the dough. This will give a burst of flavor in every bite. You can also use orange zest instead of lemon zest for a different citrus taste. Each variation lets you create a new treat while keeping that zesty base.
Baked vs. Fried Lemon Donut Holes
Frying gives donut holes a crispy outside and a soft inside. This method brings out the best flavor and texture. If you prefer to bake, you can still enjoy a tasty treat. To bake, spoon the dough into a mini muffin pan. Bake at 350°F (175°C) for about 10-12 minutes. Baked donut holes will be a bit denser but still delicious. Choose frying for a classic taste or baking for a lighter option. Both methods will delight your taste buds.
Healthier Alternatives (e.g., gluten-free, sugar-free)
If you want a healthier treat, consider these swaps. For a gluten-free version, use almond flour or a gluten-free blend. This keeps the taste while making it friendly for those with gluten issues. To cut sugar, use a sugar substitute like erythritol or monk fruit. You can also cut the glaze for a less sweet donut hole. These options let everyone enjoy lemon goodness without compromising on taste. Embrace creativity to meet your dietary needs!
Storage Info
Best Practices for Storing Donut Holes
To keep your glazed lemon donut holes fresh, store them in an airtight container. Place parchment paper between layers to avoid sticking. Keep them at room temperature for up to two days. If you need to store them longer, the fridge is your best option.
Freezing Tips for Long-Term Storage
For long-term storage, freeze your donut holes. Once they cool, place them in a single layer on a baking sheet. Freeze for about an hour. After that, transfer them to a freezer-safe bag. They can stay frozen for up to three months. Just make sure to seal the bag tightly to prevent freezer burn.
Reheating Instructions for Freshness
To reheat frozen donut holes, preheat your oven to 350°F (175°C). Place the donut holes on a baking sheet. Heat for about 10 minutes. This keeps them warm and soft. If you want a quick fix, use the microwave for about 15-20 seconds. However, the oven gives a better texture. Enjoy your treat!
FAQs
How do I know when the oil is hot enough for frying?
You want your oil to reach 350°F (175°C). To check, drop a small piece of dough in the oil. If it sizzles and rises to the top, the oil is ready. This helps fry your donut holes evenly and gives them that perfect golden color.
Can I make these donut holes ahead of time?
Yes, you can prepare the dough ahead of time. Just store it in the fridge for a day. When ready, scoop and fry them. But, keep in mind that they taste best fresh. The glaze may lose its shine if stored too long.
What can I serve with glazed lemon donut holes?
These donut holes pair well with coffee or tea. You can also serve them with a fruit salad or a scoop of vanilla ice cream. Adding a dollop of whipped cream on the side can make them even sweeter. Enjoy!
In this blog post, we explored the essentials for making lemon donut holes. We covered key ingredients, step-by-step instructions, and handy tips to perfect your frying technique. We also looked at delicious variations and storage methods. Remember, practice makes perfect, so don’t be afraid to experiment. Enjoy the process and treat yourself with these tasty bites! Embrace the joy of baking and share your delicious creations. You'll amaze friends and family alike with your newfound skills.