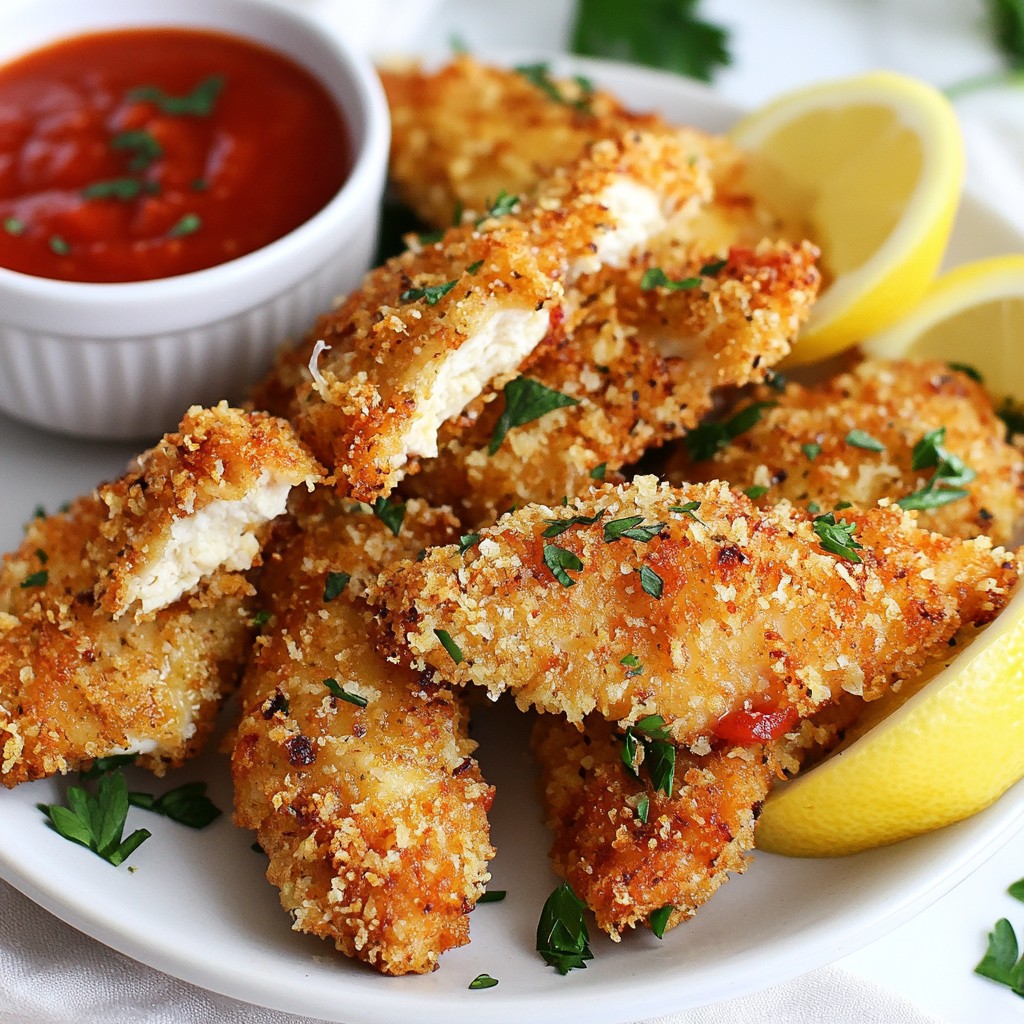
Are you ready to transform dinner with a fun and tasty twist? My Garlic Parmesan Crusted Chicken Tenders are the perfect dish for any night. With just a few simple ingredients, you'll create a crunchy, flavorful meal that everyone will love. In this recipe, I’ll guide you through every step and help you master an easy coating technique, so you can impress your family or friends. Let’s dive in and make some magic in the kitchen!
Why I Love This Recipe
- Crispy Texture: The panko breadcrumbs create an irresistible crunch that elevates the chicken tenders to a whole new level.
- Flavorful Coating: The combination of garlic and Parmesan cheese adds a rich and savory flavor that makes every bite delicious.
- Quick and Easy: This recipe is simple to follow and takes only 40 minutes from start to finish, perfect for busy weeknights.
- Customizable: You can easily adjust the seasoning or add your favorite herbs to personalize the flavor to your liking.
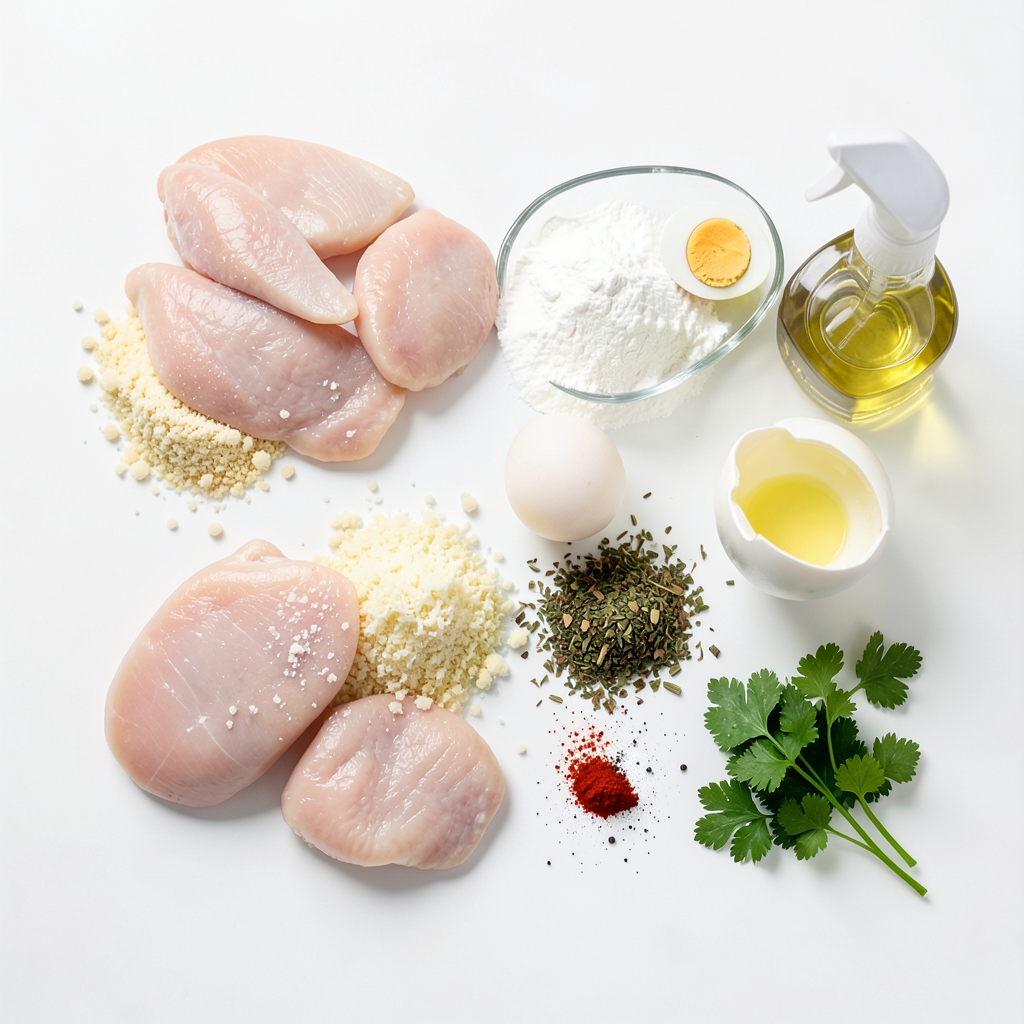
Ingredients
Main Ingredients for Garlic Parmesan Crusted Chicken Tenders
- 1 lb chicken tenders
- 1 cup breadcrumbs (preferably panko for extra crunch)
- 1/2 cup grated Parmesan cheese
- 1/4 cup all-purpose flour
- 2 large eggs
Chicken tenders are the star of this dish. They are tender and juicy, making them perfect for baking. I suggest using panko breadcrumbs for a crunchier texture. The grated Parmesan cheese adds a rich flavor that pairs well with the chicken.
Seasonings and Garnish
- 4 cloves garlic, minced
- 1 teaspoon dried Italian herbs (oregano, basil, thyme)
- 1/2 teaspoon paprika
- Salt and pepper to taste
- 1/4 cup fresh parsley, chopped (for garnish)
- Olive oil spray (or vegetable oil for frying)
Garlic gives a strong flavor to the tenders. The Italian herbs add depth, while paprika gives a nice color. Seasoning with salt and pepper is key for taste. Fresh parsley not only adds color but also a fresh touch. Using olive oil spray helps with browning while keeping the dish healthy.
This blend of ingredients creates a tasty and crunchy chicken tender that everyone will love.
Step-by-Step Instructions
Prepping the Oven and Baking Sheet
Preheating to the Right Temperature Start by preheating your oven to 400°F (200°C). This step is key for crispy chicken tenders. A hot oven helps create that perfect crunch.
Lining with Parchment Paper Next, line your baking sheet with parchment paper. This keeps the chicken from sticking. It also makes clean-up much easier after cooking.
Preparing the Coating Mixture
Combining Breadcrumbs, Cheese, and Seasonings In a shallow bowl, mix together 1 cup of breadcrumbs, 1/2 cup of grated Parmesan cheese, and 4 minced garlic cloves. Add 1 teaspoon of dried Italian herbs, 1/2 teaspoon of paprika, and a pinch of salt and pepper. Stir until all the ingredients blend well. This mixture gives the chicken a tasty crust.
Setting Up the Flour and Egg Stations In another bowl, pour in 1/4 cup of all-purpose flour. In a third bowl, crack 2 large eggs and whisk them until smooth. This setup helps with coating the chicken tenders evenly.
Coating the Chicken Tenders
Dipping and Pressing Techniques Take each chicken tender and dip it first into the flour. Shake off any extra flour so it’s not too heavy. Next, dip it into the beaten eggs. Finally, coat it in the breadcrumb mixture. Press lightly to help the coating stick well.
Arranging on the Baking Sheet Place the coated chicken tenders on the lined baking sheet. Make sure to leave some space between them. Lightly spray them with olive oil spray. This helps them brown nicely while baking.
Now you are ready to bake!
Tips & Tricks
Achieving the Perfect Crispy Crust
To get that crunchy crust, use panko breadcrumbs. They are light and airy, giving your chicken a great texture. Regular breadcrumbs just won’t cut it. For an even better crunch, spray the chicken with olive oil before baking. This helps the coating crisp up nicely and adds flavor.
Ensuring the Chicken is Cooked Properly
Cook the chicken tenders at 400°F (200°C) for the best results. This heat ensures they cook through while getting golden brown. Aim for a cooking time of 20-25 minutes. Flip them halfway through for even cooking. Always check that the chicken reaches an internal temperature of 165°F (75°C) for safety.
Serving Suggestions
Dipping sauces make a meal fun! Pair these chicken tenders with marinara or ranch dressing. You can even try honey mustard for a sweet twist. For sides, consider a fresh salad or crispy fries. These add color and balance to your plate. Serve the chicken on a wooden platter with lemon wedges for a nice touch.
Pro Tips
- Coating Consistency: Ensure your chicken tenders are completely coated by pressing the breadcrumb mixture firmly onto the surface. This will help the crust adhere better during baking.
- Use Fresh Garlic: Freshly minced garlic will provide a more intense flavor compared to pre-minced or powdered garlic, enhancing the overall taste of your chicken tenders.
- Even Cooking: To ensure even cooking, try to select chicken tenders of similar size. This helps them cook at the same rate, preventing any overcooked or undercooked pieces.
- Resting Period: Allow the chicken tenders to rest for a few minutes after baking. This helps the juices redistribute, keeping the meat tender and juicy.
Variations
Spicy Garlic Parmesan Tenders
You can make these tenders spicy. To add heat, mix in hot sauce or cayenne pepper. Start with one teaspoon of cayenne in the coating mix. If you love heat, add more to taste. This tweak gives a tasty kick. The garlic and spice blend well together for a zesty treat.
Herb Variations
Using fresh herbs can change the flavor. Instead of dried herbs, try fresh oregano, basil, or thyme. Chop them finely and mix them into your coating. Fresh herbs have a brighter taste and aroma. They make your tenders taste even more delicious and lively.
Oven vs. Frying Method
You can cook these tenders in two ways: baking or frying. Baking is healthier and easier. It keeps the kitchen clean and the tenders crispy. Frying gives a golden crust and a rich flavor. Use vegetable oil or a deep fryer for frying. Both methods work well; choose what you like best!
Storage Info
How to Store Leftover Chicken Tenders
To keep your leftover chicken tenders fresh, store them in an airtight container. Make sure the container is sealed tightly. Place it in the fridge. Consume within three days for the best taste. If you want to keep them longer, consider freezing.
Reheating Instructions
To reheat chicken tenders while keeping them crispy, use the oven or an air fryer. Preheat the oven to 375°F. Place the tenders on a baking sheet. Bake for about 10-15 minutes, flipping halfway. If using an air fryer, cook them at 375°F for about 5-7 minutes. This method helps restore the crunch.
Freezing for Later Use
To freeze chicken tenders, first, let them cool completely. Then, place them in a single layer on a baking sheet. Freeze for about an hour. Once frozen, transfer the tenders to a freezer-safe bag. Remove as much air as possible. Label the bag with the date. They can last up to three months in the freezer.
FAQs
Can I use chicken breast instead of tenders?
Yes, you can use chicken breast. Cut the chicken breast into strips. Make sure they are about the same size as tenders. This helps them cook evenly. Chicken breast will still taste great with the garlic Parmesan coating. Just be careful not to overcook them.
How do I make the coating stick better?
To help the coating stick, dry the chicken strips well. Use paper towels to remove extra moisture. Dipping in flour first helps, too. Make sure to shake off any excess flour. Press the chicken firmly into the breadcrumb mix. This will help the crumbs stay on better. A light spray of oil before baking also helps.
What size of chicken tenders should I use?
I recommend using tenders that are about 4 to 5 inches long. This size cooks evenly and stays juicy. If they are too small, they may dry out. Larger tenders may need a bit more time in the oven. Always check that the internal temperature reaches 165°F for safe eating.
You learned how to make Garlic Parmesan Crusted Chicken Tenders. We covered the ingredients, steps, tips, and variations. With a few simple methods, you can achieve a crunchy crust. Remember to store leftovers properly to keep them tasty.
Try the spicy version for a fun twist. No matter how you do it, this dish is sure to impress. Enjoy your cooking and happy eating!