Dulce de Leche Tres Leches Cake Irresistible Delight

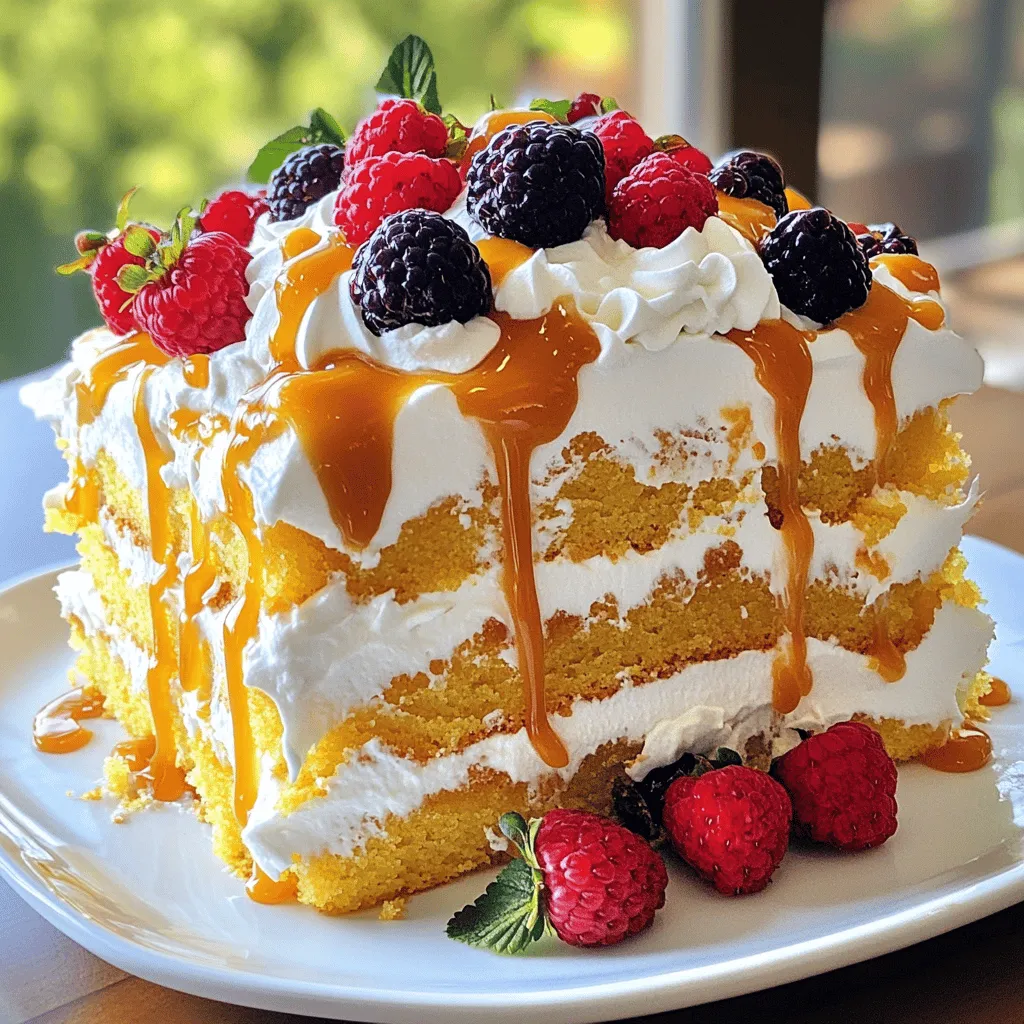
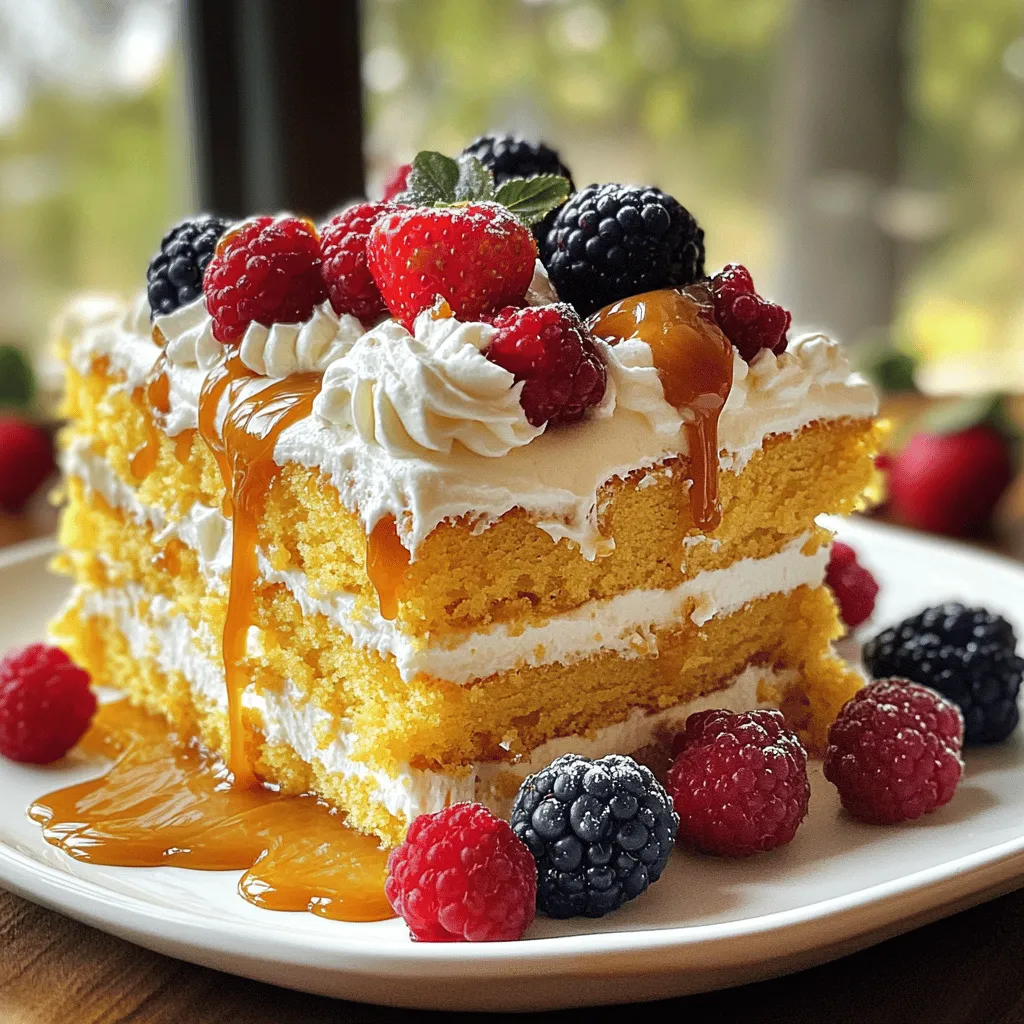
If you crave something sweet and creamy, you need to try Dulce de Leche Tres Leches Cake. This treat is a delicious twist on the classic Tres Leches, blending rich dulce de leche into every bite. Whether it’s a special occasion or just because, this cake will steal the spotlight. Follow my easy steps to create your own irresistible delight that will impress your friends and family. Let’s dive into the recipe and make magic happen!

Ingredients

List of Ingredients

– 1 cup all-purpose flour

– 1½ teaspoons baking powder

– ¼ teaspoon salt

– 5 large eggs, separated

– 1 cup sugar, divided

– ½ cup whole milk

– 1 teaspoon vanilla extract

– 1 can (12 oz) evaporated milk

– 1 can (14 oz) sweetened condensed milk

– 1 cup heavy cream

– ½ cup dulce de leche, plus extra for drizzling

– Fresh berries for garnish (optional)

Gathering the right ingredients is key for this cake. Use fresh eggs and good-quality milk for the best flavor. I prefer using whole milk, but you can also experiment with low-fat milk. The dulce de leche adds a rich, sweet note. You can find it in most grocery stores or make your own.

When measuring flour, spoon it into your measuring cup instead of scooping directly. This prevents the flour from packing down and keeps your cake light. Be sure to separate your eggs carefully. The egg whites need to be free of yolk for the best texture.

This list will help you create a sweet masterpiece. Make sure you have everything ready before you start. Check the Full Recipe for more details on how to combine these ingredients perfectly.

Step-by-Step Instructions

Preheat and Prepare

– Preheat the oven to 350°F (175°C).

– Grease and flour a 9×13-inch baking dish.

First, I make sure my oven is hot enough. Preheating helps the cake rise well. Next, I grease and flour the baking dish. This step stops the cake from sticking. It also helps with easy serving later.

Mixing the Ingredients

– Whisk dry ingredients and set aside.

– Beat egg yolks and sugar until creamy.

In a bowl, I whisk together the flour, baking powder, and salt. This mix is the base of the cake. I set it aside for now. Then, I take a larger bowl and beat the egg yolks with sugar. I mix them until they look creamy and light. Adding whole milk and vanilla extract makes it even better.

Incorporating Egg Whites

– Whisk egg whites and fold into batter.

– Bake the cake and let cool.

Now, I whisk the egg whites in a clean bowl. I keep whisking until soft peaks form. Then, I add the rest of the sugar slowly. I keep whisking until I see stiff peaks. This part is key for a fluffy cake. I gently fold the egg whites into the yolk mixture. I do this in three parts to keep it airy. Once combined, I pour the batter into the baking dish. I smooth the top and bake it for 25 to 30 minutes. I let it cool completely in the pan. This cooling time is important before the next steps.

Tips & Tricks

Perfect Cake Baking

To avoid a dry cake, follow these tips:

– Use fresh eggs, as they help retain moisture.

– Do not overmix the batter. Mix just until combined.

– Check for doneness a minute or two early.

Cooling the cake before soaking is crucial. If it’s warm, it won’t absorb the milk mixture well. Let it cool in the pan for at least 30 minutes.

Soaking Tips

For soaking the cake evenly, use these methods:

– Poke holes all over the surface with a skewer or fork.

– Pour the milk mixture slowly, letting it soak in bit by bit.

Let the cake sit for at least 30 minutes after soaking. The longer it sits, the more flavorful it becomes. Aim for one hour for the best absorption.

Whipping Cream Techniques

To achieve the perfect consistency for whipped cream:

– Use cold heavy cream and a chilled bowl.

– Whip until soft peaks form, then add flavor.

For flavor variations, try adding a splash of vanilla or almond extract. You can even fold in cocoa powder for a chocolate twist. This will elevate your cake to a new level!

Variations

Flavor Modifications

You can change the flavor of your cake easily. Adding spices can make a big impact. Try using cinnamon or nutmeg for warmth. These spices enhance the sweet taste of dulce de leche. You can also use flavored extracts. Almond or coconut extracts can give a nice twist. Just a few drops can elevate the cake’s taste.

Alternative Toppings

Toppings can add fun and color to your cake. Fresh fruit is a great choice. Berries like strawberries, blueberries, or raspberries work well. They add a tartness that balances the sweetness. You can also use chocolate shavings or nuts. They give a crunchy texture that contrasts nicely. Try a mix of toppings for a unique look.

Different Cake Bases

If you want to try something new, change the cake base. You can use gluten-free options, like almond flour. It makes the cake lighter and adds a nutty flavor. Another option is to use sponge cake. Sponge cake provides a fluffy texture that soaks up the milk well. Each base offers a different taste and experience.

For the full recipe, check out the Full Recipe section.

Storage Info

Best Storage Practices

To keep your Dulce de Leche Tres Leches Cake fresh, proper storage is key. After enjoying a slice, cover the cake tightly with plastic wrap or aluminum foil. This helps keep the moisture in. Store it in the fridge for the best results.

If you want to save some for later, freezing is a great option. Cut the cake into individual slices for easy serving. Wrap each slice in plastic wrap, then place them in an airtight container. This method helps keep the cake moist and delicious.

Shelf Life

In the fridge, your cake will last about 4 to 5 days. Make sure to check it regularly. Signs that the cake has gone bad include a sour smell or visible mold. If you see any of these signs, it’s best to toss the cake.

Reheating Tips

To enjoy your leftovers, you can reheat them gently. Place a slice on a microwave-safe plate. Heat it for about 10 to 15 seconds. This warms the cake without making it dry. You can also drizzle a bit of milk over the slice before warming it. This adds back some moisture. Enjoy the rich flavors of your Dulce de Leche Tres Leches Cake again! For the full recipe, check out the earlier section.

FAQs

What is Dulce de Leche Tres Leches Cake?

Dulce de leche tres leches cake is a rich, moist dessert. It combines three types of milk: evaporated milk, sweetened condensed milk, and heavy cream. The name “tres leches” means “three milks” in Spanish. This cake originated in Latin America and has a sweet, creamy flavor. The addition of dulce de leche makes it even more special. This thick caramel adds depth and richness to the cake. You can find many variations, but the core remains the same: a soft sponge cake soaked in milk.

Can I make this cake ahead of time?

Yes, you can make this cake ahead of time. I recommend preparing it a day before serving. This allows the cake to absorb the milk mixture fully. When you soak it overnight, the flavors deepen. Store the cake in the fridge, covered tightly. Just add the whipped cream and dulce de leche topping right before serving.

Is it possible to make this cake dairy-free?

Yes, you can make a dairy-free version of this cake. For the milk, use almond or coconut milk. Instead of heavy cream, try coconut cream or a dairy-free whipped topping. Use dairy-free dulce de leche or make your own with coconut milk and sugar. Keep in mind that the texture and flavor might change slightly, but it will still be delicious.

How can I prevent the cake from falling apart?

To prevent the cake from falling apart, handle it gently. After baking, let the cake cool completely in the pan. Use a skewer to poke holes without breaking the cake. When pouring the milk mixture, do it slowly and evenly. Allow the cake to soak well but don’t rush. When serving, use a sharp knife to cut it into squares. A gentle touch will keep it intact. For serving, place the cake on individual plates to make it easier to enjoy.

In this blog post, we covered how to make a delicious Dulce de Leche Tres Leches Cake. You learned about the key ingredients, clear steps for baking, and helpful tips to ensure your cake turns out moist and tasty. I also shared variations to customize your dessert and storage tips for leftovers. This cake is a delight to make and share. Try it, and enjoy every bite. Happy baking!

- 1 cup all-purpose flour - 1½ teaspoons baking powder - ¼ teaspoon salt - 5 large eggs, separated - 1 cup sugar, divided - ½ cup whole milk - 1 teaspoon vanilla extract - 1 can (12 oz) evaporated milk - 1 can (14 oz) sweetened condensed milk - 1 cup heavy cream - ½ cup dulce de leche, plus extra for drizzling - Fresh berries for garnish (optional) Gathering the right ingredients is key for this cake. Use fresh eggs and good-quality milk for the best flavor. I prefer using whole milk, but you can also experiment with low-fat milk. The dulce de leche adds a rich, sweet note. You can find it in most grocery stores or make your own. When measuring flour, spoon it into your measuring cup instead of scooping directly. This prevents the flour from packing down and keeps your cake light. Be sure to separate your eggs carefully. The egg whites need to be free of yolk for the best texture. This list will help you create a sweet masterpiece. Make sure you have everything ready before you start. Check the Full Recipe for more details on how to combine these ingredients perfectly. - Preheat the oven to 350°F (175°C). - Grease and flour a 9x13-inch baking dish. First, I make sure my oven is hot enough. Preheating helps the cake rise well. Next, I grease and flour the baking dish. This step stops the cake from sticking. It also helps with easy serving later. - Whisk dry ingredients and set aside. - Beat egg yolks and sugar until creamy. In a bowl, I whisk together the flour, baking powder, and salt. This mix is the base of the cake. I set it aside for now. Then, I take a larger bowl and beat the egg yolks with sugar. I mix them until they look creamy and light. Adding whole milk and vanilla extract makes it even better. - Whisk egg whites and fold into batter. - Bake the cake and let cool. Now, I whisk the egg whites in a clean bowl. I keep whisking until soft peaks form. Then, I add the rest of the sugar slowly. I keep whisking until I see stiff peaks. This part is key for a fluffy cake. I gently fold the egg whites into the yolk mixture. I do this in three parts to keep it airy. Once combined, I pour the batter into the baking dish. I smooth the top and bake it for 25 to 30 minutes. I let it cool completely in the pan. This cooling time is important before the next steps. To avoid a dry cake, follow these tips: - Use fresh eggs, as they help retain moisture. - Do not overmix the batter. Mix just until combined. - Check for doneness a minute or two early. Cooling the cake before soaking is crucial. If it’s warm, it won’t absorb the milk mixture well. Let it cool in the pan for at least 30 minutes. For soaking the cake evenly, use these methods: - Poke holes all over the surface with a skewer or fork. - Pour the milk mixture slowly, letting it soak in bit by bit. Let the cake sit for at least 30 minutes after soaking. The longer it sits, the more flavorful it becomes. Aim for one hour for the best absorption. To achieve the perfect consistency for whipped cream: - Use cold heavy cream and a chilled bowl. - Whip until soft peaks form, then add flavor. For flavor variations, try adding a splash of vanilla or almond extract. You can even fold in cocoa powder for a chocolate twist. This will elevate your cake to a new level! {{image_2}} You can change the flavor of your cake easily. Adding spices can make a big impact. Try using cinnamon or nutmeg for warmth. These spices enhance the sweet taste of dulce de leche. You can also use flavored extracts. Almond or coconut extracts can give a nice twist. Just a few drops can elevate the cake's taste. Toppings can add fun and color to your cake. Fresh fruit is a great choice. Berries like strawberries, blueberries, or raspberries work well. They add a tartness that balances the sweetness. You can also use chocolate shavings or nuts. They give a crunchy texture that contrasts nicely. Try a mix of toppings for a unique look. If you want to try something new, change the cake base. You can use gluten-free options, like almond flour. It makes the cake lighter and adds a nutty flavor. Another option is to use sponge cake. Sponge cake provides a fluffy texture that soaks up the milk well. Each base offers a different taste and experience. For the full recipe, check out the Full Recipe section. To keep your Dulce de Leche Tres Leches Cake fresh, proper storage is key. After enjoying a slice, cover the cake tightly with plastic wrap or aluminum foil. This helps keep the moisture in. Store it in the fridge for the best results. If you want to save some for later, freezing is a great option. Cut the cake into individual slices for easy serving. Wrap each slice in plastic wrap, then place them in an airtight container. This method helps keep the cake moist and delicious. In the fridge, your cake will last about 4 to 5 days. Make sure to check it regularly. Signs that the cake has gone bad include a sour smell or visible mold. If you see any of these signs, it’s best to toss the cake. To enjoy your leftovers, you can reheat them gently. Place a slice on a microwave-safe plate. Heat it for about 10 to 15 seconds. This warms the cake without making it dry. You can also drizzle a bit of milk over the slice before warming it. This adds back some moisture. Enjoy the rich flavors of your Dulce de Leche Tres Leches Cake again! For the full recipe, check out the earlier section. Dulce de leche tres leches cake is a rich, moist dessert. It combines three types of milk: evaporated milk, sweetened condensed milk, and heavy cream. The name "tres leches" means "three milks" in Spanish. This cake originated in Latin America and has a sweet, creamy flavor. The addition of dulce de leche makes it even more special. This thick caramel adds depth and richness to the cake. You can find many variations, but the core remains the same: a soft sponge cake soaked in milk. Yes, you can make this cake ahead of time. I recommend preparing it a day before serving. This allows the cake to absorb the milk mixture fully. When you soak it overnight, the flavors deepen. Store the cake in the fridge, covered tightly. Just add the whipped cream and dulce de leche topping right before serving. Yes, you can make a dairy-free version of this cake. For the milk, use almond or coconut milk. Instead of heavy cream, try coconut cream or a dairy-free whipped topping. Use dairy-free dulce de leche or make your own with coconut milk and sugar. Keep in mind that the texture and flavor might change slightly, but it will still be delicious. To prevent the cake from falling apart, handle it gently. After baking, let the cake cool completely in the pan. Use a skewer to poke holes without breaking the cake. When pouring the milk mixture, do it slowly and evenly. Allow the cake to soak well but don’t rush. When serving, use a sharp knife to cut it into squares. A gentle touch will keep it intact. For serving, place the cake on individual plates to make it easier to enjoy. In this blog post, we covered how to make a delicious Dulce de Leche Tres Leches Cake. You learned about the key ingredients, clear steps for baking, and helpful tips to ensure your cake turns out moist and tasty. I also shared variations to customize your dessert and storage tips for leftovers. This cake is a delight to make and share. Try it, and enjoy every bite. Happy baking!

Dulce de Leche Tres Leches Cake

Indulge in the rich flavors of Dulce de Leche Tres Leches Cake with this delightful recipe! Perfect for any occasion, this moist cake soaks up a creamy milk mixture and is topped with a luscious dulce de leche whipped cream. Discover step-by-step instructions to create this show-stopping dessert that will impress everyone. Click through to explore the full recipe and make your next gathering unforgettable!

Ingredients
  

1 cup all-purpose flour

1½ teaspoons baking powder

¼ teaspoon salt

5 large eggs, separated

1 cup sugar, divided

½ cup whole milk

1 teaspoon vanilla extract

1 can (12 oz) evaporated milk

1 can (14 oz) sweetened condensed milk

1 cup heavy cream

½ cup dulce de leche, plus extra for drizzling

Fresh berries for garnish (optional)

Instructions
 

Preheat the oven to 350°F (175°C). Grease and flour a 9x13-inch baking dish.

    In a bowl, whisk together the flour, baking powder, and salt. Set aside.

      In a separate large bowl, beat the egg yolks with ¾ cup of sugar until pale and creamy. Add the milk and vanilla extract, mixing until combined.

        Gradually add the dry ingredient mixture to the egg yolk mixture, folding gently until just combined.

          In another bowl, whisk the egg whites until soft peaks form. Gradually add the remaining ¼ cup of sugar and continue whisking until stiff peaks form.

            Gently fold the egg whites into the cake batter in three additions, ensuring not to deflate the mixture.

              Pour the batter into the prepared baking dish and smooth the top. Bake for 25-30 minutes or until a toothpick inserted into the center comes out clean.

                Once the cake is baked, allow it to cool completely in the pan.

                  In a separate bowl, whisk together the evaporated milk, sweetened condensed milk, and heavy cream until well combined.

                    Once the cake is cooled, poke holes all over the surface using a skewer or fork. Slowly pour the milk mixture over the cake, allowing it to soak in. Let it sit for at least 30 minutes to absorb the liquid thoroughly.

                      Before serving, whip the heavy cream until soft peaks form, then fold in ½ cup of dulce de leche until smooth. Spread this mixture over the soaked cake.

                        Drizzle extra dulce de leche on top and garnish with fresh berries if desired.

                          Prep Time: 20 minutes | Total Time: 1 hour, 30 minutes | Servings: 12

                            - Presentation Tips: Cut into squares and serve on individual plates, topped with additional dulce de leche and a sprig of mint for a pop of color.

                              Leave a Comment

                              Recipe Rating