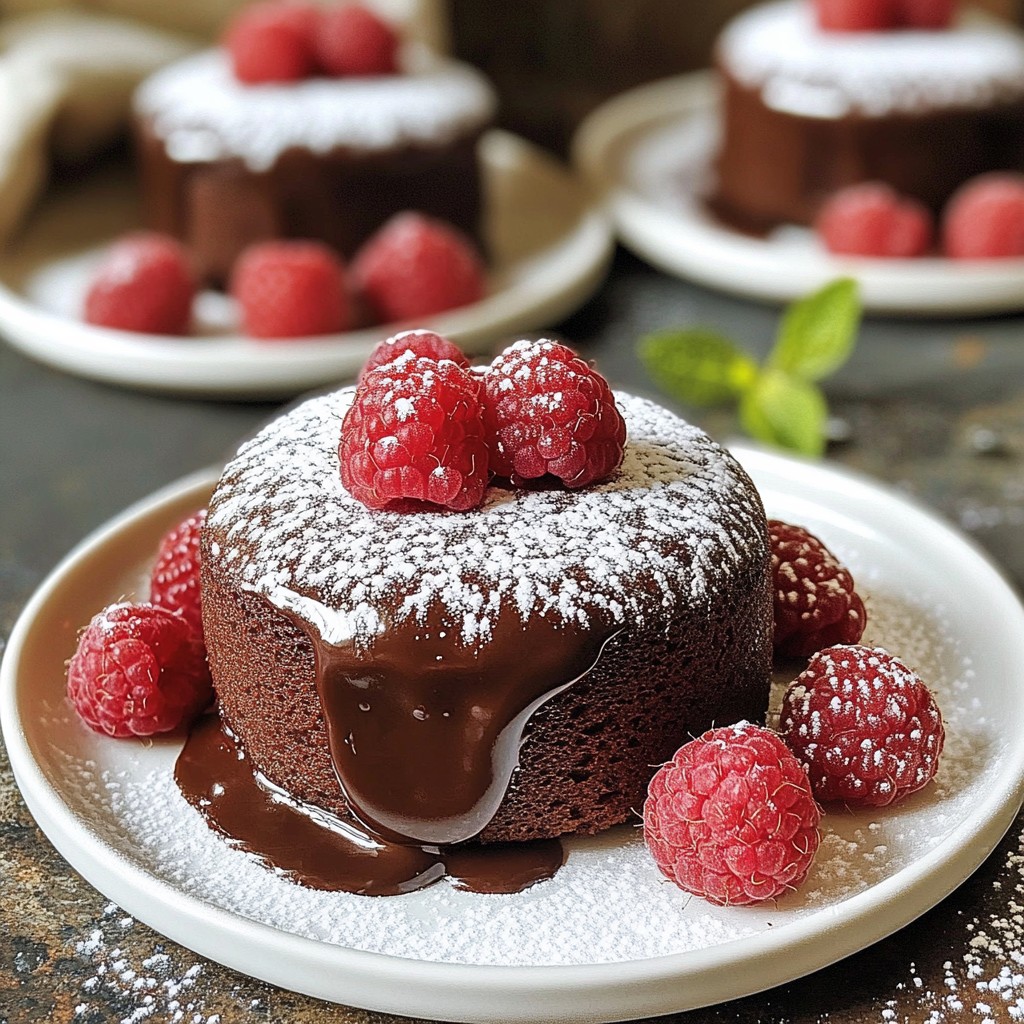
If you love rich desserts, get ready to savor Chocolate Raspberry Lava Cakes. These treats have a warm, gooey center that oozes with chocolate and raspberry goodness. In this post, I will guide you through simple steps to create these melt-in-your-mouth delights. Whether you’re a baking pro or a novice, I promise you’ll impress everyone with this sweet indulgence. Let’s dive in and make some magic!
Why I Love This Recipe
- Decadent Chocolate Flavor: This recipe features rich dark chocolate that melts beautifully, creating a luxurious dessert experience.
- Surprise Raspberry Center: The fresh raspberries provide a delightful tartness that perfectly balances the sweetness of the chocolate.
- Easy to Make: With simple ingredients and quick steps, you can impress guests without spending hours in the kitchen.
- Impressive Presentation: These lava cakes look stunning when served, especially with a dusting of powdered sugar and fresh fruit.
Ingredients
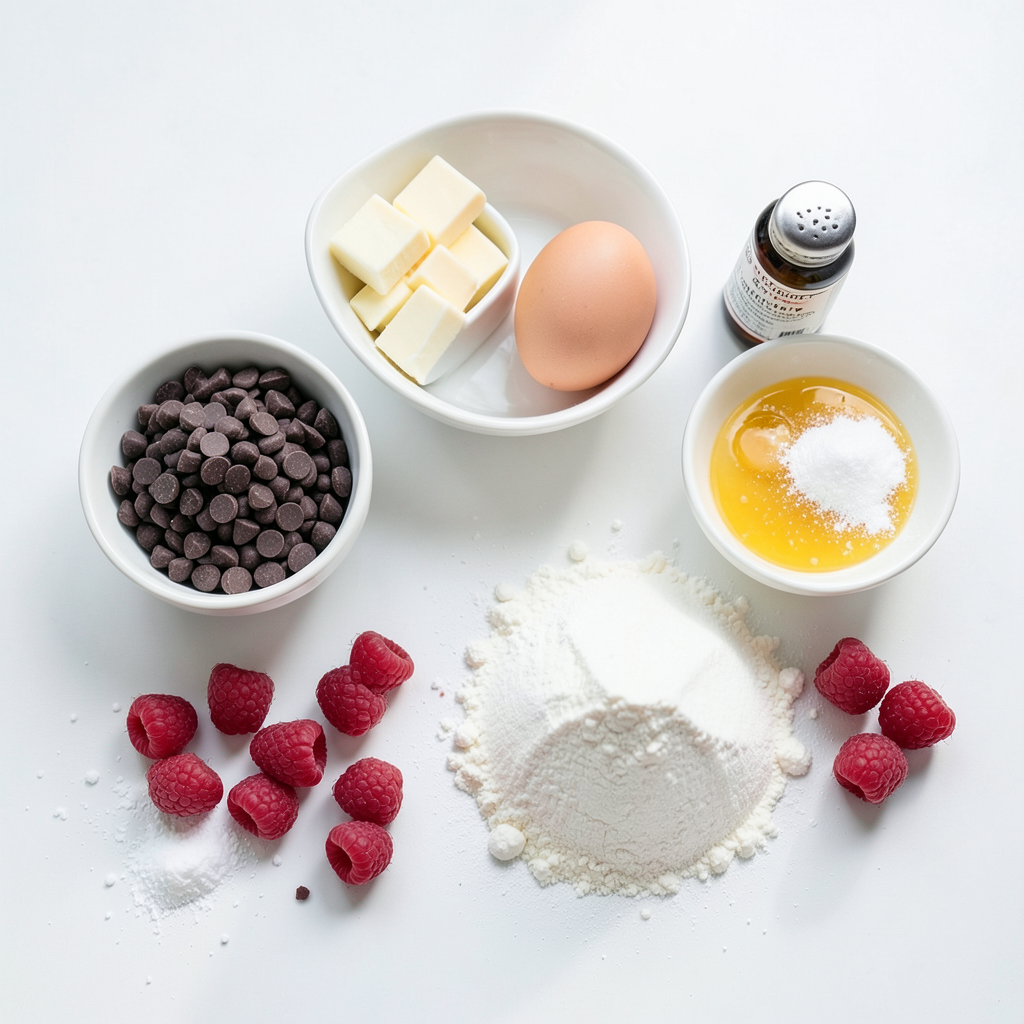
List of ingredients for Chocolate Raspberry Lava Cakes
To make these lava cakes, gather the following ingredients:
- 1 cup dark chocolate chips
- ½ cup unsalted butter
- 2 large eggs
- 2 large egg yolks
- ½ cup granulated sugar
- 1 teaspoon vanilla extract
- ¼ cup all-purpose flour
- ½ cup fresh raspberries
- A pinch of salt
- Powdered sugar for dusting
Substitutions for ingredients
If you need to swap some items, here are some ideas:
- Use milk chocolate chips instead of dark chocolate for a sweeter cake.
- Coconut oil works well in place of butter for a dairy-free option.
- You can use brown sugar instead of granulated sugar for a deeper flavor.
- For a gluten-free version, try almond flour or a gluten-free blend.
Equipment needed for preparation
You will need some tools to make these cakes:
- Four ramekins for baking
- A microwave-safe bowl for melting chocolate
- A whisk for mixing eggs and sugar
- A baking sheet to hold the ramekins
- A knife to run around the edges of the cakes
- Powdered sugar sifter for dusting
With these ingredients and tools, you are ready to start making your Chocolate Raspberry Lava Cakes!
Step-by-Step Instructions
Prepping the ramekins
Start by preheating your oven to 425°F (220°C). Grease four ramekins with unsalted butter. Dust them with cocoa powder. This helps the cakes release easily later.
Melting chocolate and butter
Next, take a microwave-safe bowl. Add 1 cup of dark chocolate chips and ½ cup of unsalted butter. Microwave in 30-second bursts. Stir between each burst until smooth.
Combining eggs and sugar
In a separate bowl, whisk together 2 large eggs, 2 large egg yolks, and ½ cup of granulated sugar. Add 1 teaspoon of vanilla extract. Whisk until the mixture is light and fluffy.
Assembling the cake batter
Slowly pour the melted chocolate mixture into the egg mixture. Stir constantly until everything is blended well. Gently fold in ¼ cup of all-purpose flour and a pinch of salt. Be careful not to over-mix.
Baking the lava cakes
Divide half of the chocolate batter evenly among the prepared ramekins. Place 3-4 fresh raspberries in the center of each ramekin. Cover them with the remaining batter. Set the ramekins on a baking sheet. Bake for 12-14 minutes, or until the edges are firm and the center is soft.
Inverting and serving the cakes
Once done, remove the ramekins from the oven. Let them cool for 1 minute. Carefully run a knife around the edges. Invert each ramekin onto a dessert plate. Dust with powdered sugar and serve right away. You can add more raspberries or a scoop of vanilla ice cream if you like.
Tips & Tricks
Achieving the perfect lava consistency
To get that ooey-gooey center, timing is key. Bake the cakes for 12 to 14 minutes. The edges should feel firm, but the center must be soft. You want a little jiggle in the middle. If you bake too long, you lose the lava effect.
Storing and reheating tips
Let the lava cakes cool for a few minutes before storing. Place them in a sealed container. They stay fresh in the fridge for up to two days. To reheat, pop them in the microwave for about 20 seconds. This way, you keep the center gooey.
Common mistakes to avoid
One mistake is over-mixing the batter. Gently fold in the flour until just combined. Another pitfall is not greasing the ramekins well. Use butter and cocoa powder to prevent sticking. Lastly, don’t skip the resting time after baking. It helps the cake hold its shape.
Pro Tips
- Use High-Quality Chocolate: The flavor of your lava cakes heavily relies on the chocolate you use. Opt for a premium dark chocolate for a richer taste.
- Don’t Overbake: The key to a gooey center is to keep an eye on the baking time. Bake just until the edges are set and the center is still soft.
Variations
Adding different fruits (e.g., strawberries, blueberries)
You can mix it up with fruits. Strawberries and blueberries work great! Slice fresh strawberries and place them in the center. Their sweet taste pairs well with rich chocolate. Blueberries add a nice pop of color and flavor. You can even combine these fruits for a fun twist. Just remember to adjust baking time if you add more fruit.
Incorporating different types of chocolate
Try using milk chocolate or white chocolate. Each chocolate gives a different taste. Milk chocolate makes the cake sweeter and creamier. White chocolate adds a lovely sweetness too. You can also mix them together. Consider using a blend of dark and milk chocolate for a richer flavor. Experiment to find your favorite combination!
Gluten-free or dairy-free options
You can make these cakes gluten-free easily. Just swap all-purpose flour with a gluten-free blend. Many blends work well in baking. For a dairy-free version, use dairy-free chocolate and vegan butter. These swaps let everyone enjoy the cake. Always check ingredients to ensure they meet your dietary needs. Now, you can delight in this treat, no matter your diet!
Storage Info
How to store leftovers
To store leftover lava cakes, let them cool first. Place them in an airtight container. Make sure to seal it tightly. You can keep them in the fridge for up to two days. This helps keep the cakes fresh. If you want to enjoy them later, freezing is a great option.
Best container options for storage
For best results, use small glass or plastic containers. These help keep the cakes moist. Avoid using metal containers, as they can react with the chocolate. If you have ramekins, you can cover them with plastic wrap. This works well too!
Freezing lava cakes for later
To freeze lava cakes, cool them completely first. Wrap each cake in plastic wrap. Then, place them in a freezer-safe bag. Remove as much air as possible. These cakes can last in the freezer for about three months. When you're ready to enjoy, thaw them in the fridge overnight. Then, reheat them in the oven for a warm, gooey treat!
FAQs
What is the ideal baking time for lava cakes?
The ideal baking time for lava cakes is 12 to 14 minutes. This range gives you the best chance for a gooey center. Check your cakes at 12 minutes. If the edges are firm but the center feels soft, they are ready.
Can I make these lava cakes in advance?
Yes, you can make these lava cakes ahead of time. Prepare the batter and fill the ramekins. Then, cover them and chill in the fridge for up to 24 hours. Just add a couple of extra minutes to the baking time when you're ready to bake them.
How do I know when lava cakes are done?
You know the lava cakes are done when the edges are set but the center jiggles a bit. It should be soft but not liquid. If the top looks shiny and slightly cracked, that’s a good sign too.
What to serve with chocolate raspberry lava cakes?
Serve your lava cakes with a dusting of powdered sugar. Fresh raspberries on the side add a nice touch. A scoop of vanilla ice cream pairs perfectly, too. The cold ice cream balances the warm cake and rich chocolate.
You now have all you need to make delicious Chocolate Raspberry Lava Cakes. We covered the key ingredients, potential swaps, and the tools needed for preparation. I shared step-by-step instructions to ensure you bake them perfectly every time. Remember to follow the tips for that gooey center and avoid common mistakes. Try out variations to suit your taste, and store leftovers properly for later. Enjoy making these treats; they are worth every bite. Happy baking!