Welcome to the world of Chocolate Peppermint Crinkle Cookies! These festive treats are not just tasty—they’re easy to make and perfect for any occasion. I'll share my favorite tips and secrets to create cookies that look great and taste even better. Get ready to fill your kitchen with the sweet scent of chocolate and peppermint. Let’s dive into the fun of making these delightful cookies together!
Why I Love This Recipe
- Decadent Flavor: The rich chocolate combined with refreshing peppermint creates a perfect balance that embodies the spirit of the holidays.
- Beautiful Presentation: The snowy powdered sugar coating gives these cookies a festive and elegant appearance, making them ideal for holiday gatherings.
- Easy to Make: With simple ingredients and straightforward steps, these cookies can be whipped up quickly, perfect for last-minute baking.
- Fun to Share: These cookies are a crowd-pleaser, perfect for sharing with family and friends during the holiday season.
Ingredients
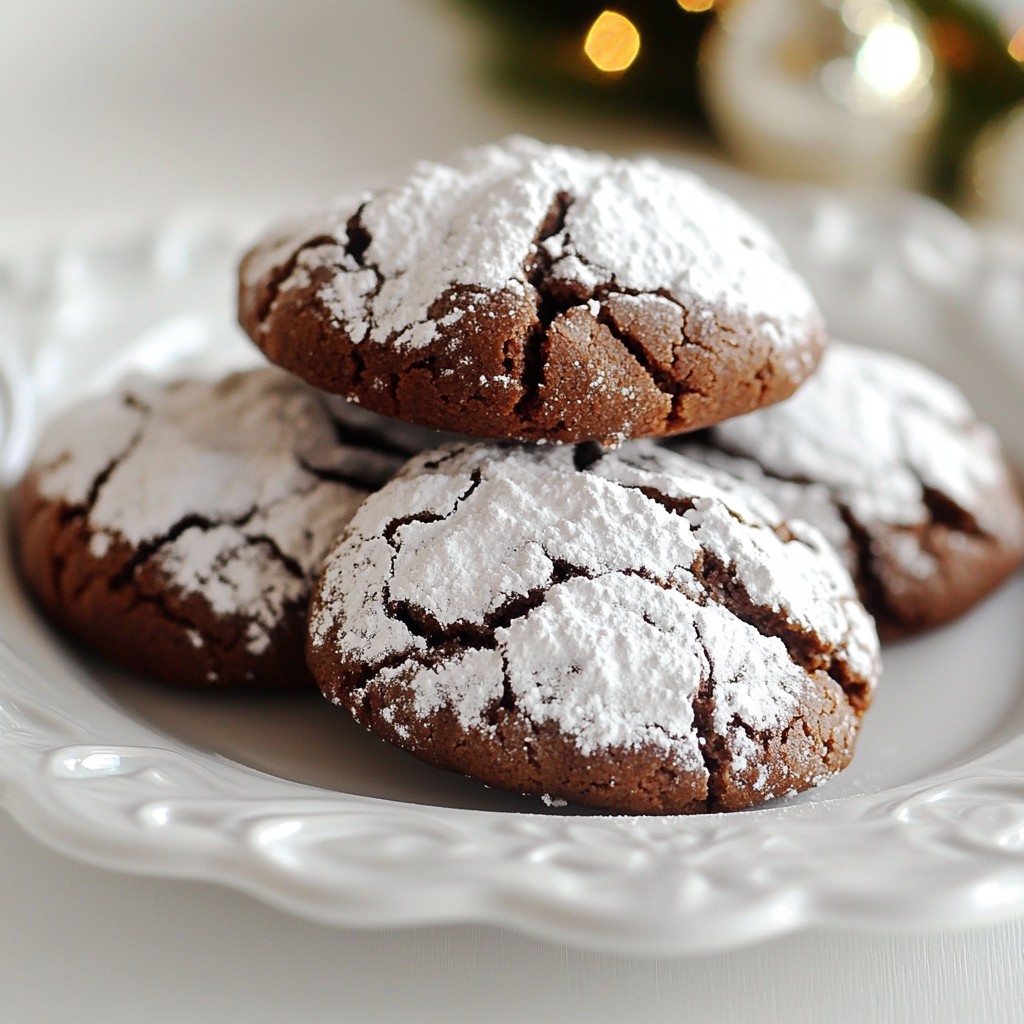
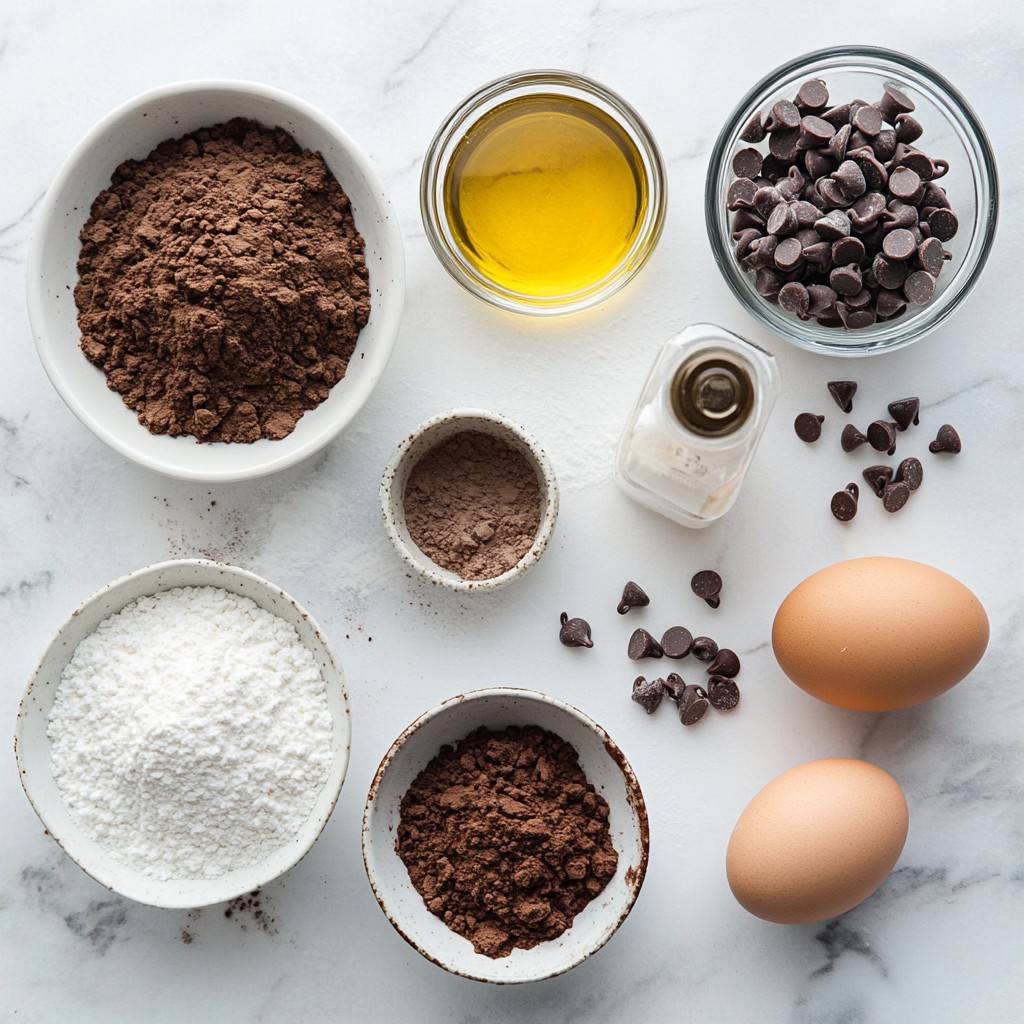
Full list of ingredients for Chocolate Peppermint Crinkle Cookies
To make these delightful cookies, gather the following ingredients:
- 1 cup all-purpose flour
- 1/2 cup unsweetened cocoa powder
- 1 teaspoon baking powder
- 1/4 teaspoon salt
- 1 cup granulated sugar
- 1/2 cup brown sugar, packed
- 1/4 cup vegetable oil
- 2 large eggs
- 1 teaspoon vanilla extract
- 1/2 teaspoon peppermint extract
- 1/2 cup powdered sugar (for coating)
- 1/4 cup dark chocolate chips (optional)
Optional ingredients for enhanced flavor
For a richer taste, consider adding dark chocolate chips. They boost the chocolate flavor. You can also sprinkle some crushed candy canes on top after baking. This adds a nice crunch and extra festive flair.
Tips for selecting quality ingredients
Choose high-quality cocoa powder for the best flavor. Look for brands that are rich and dark. Fresh eggs are key for a good texture, so check the date on the carton. When selecting peppermint extract, a pure version works best. It gives a strong minty taste without any artificial notes. Always opt for granulated and brown sugars that are free of lumps and clumps. This ensures a smooth cookie dough.
Step-by-Step Instructions
Prepping the oven and baking sheet
First, set your oven to 350°F (175°C). This helps the cookies bake evenly. Next, take a baking sheet and line it with parchment paper. This keeps the cookies from sticking and makes cleanup easy.
Mixing dry ingredients
In a medium bowl, combine the flour, cocoa powder, baking powder, and salt. Use a whisk to mix them well. This step ensures your cookies will rise nicely and have a rich chocolate flavor.
Creating the cookie dough
In a large bowl, mix the granulated sugar, brown sugar, and vegetable oil. Stir until the sugars blend well. Then, add the eggs, vanilla extract, and peppermint extract. Beat the mixture until it is smooth and creamy. Now, gradually add the dry mixture from the other bowl. Stir until everything is fully combined. If you want more chocolate flavor, fold in the dark chocolate chips now.
Chilling and shaping the dough
After mixing, chill the dough in the refrigerator for at least 30 minutes. This step is key for keeping the cookies from spreading too much while baking. Once chilled, scoop a tablespoon of dough and roll it into a ball. Repeat this step until you shape all the dough.
Baking and cooling the cookies
Roll each dough ball in powdered sugar until coated. Place them on the lined baking sheet, leaving about 2 inches between each ball. Bake for 10-12 minutes. The cookies should puff up and look crinkly when done. After baking, let them cool on the sheet for 5 minutes. Then, transfer them to a wire rack to cool completely. Enjoy the delightful aroma as they cool!
Tips & Tricks
How to ensure cookies hold their shape
To keep your cookies from spreading too much, chill the dough before baking. I recommend putting it in the fridge for at least 30 minutes. This helps the fat in the dough firm up, which keeps the cookies from flattening. Also, make sure to use the right size scoop when you form the dough into balls. A tablespoon works well. Keep the balls about two inches apart on the baking sheet. This gives them room to puff while baking.
Best practices for ingredient measurements
Accurate measurements make a big difference in cookie baking. Use a kitchen scale if you can. For flour, spoon it into the measuring cup, then level it off with a knife. This avoids packing too much flour. When measuring cocoa powder, do the same to keep the balance right. For sugars, pack the brown sugar firmly in the cup. This ensures you get the right sweetness in your cookies.
Suggestions for achieving the perfect crinkle effect
To get that classic crinkle look, roll the dough balls in powdered sugar before baking. This sugar coating will crack as the cookies bake, creating the lovely crinkle effect. I suggest using a generous amount of powdered sugar for the best results. Don't skip chilling the dough, as it helps with the crinkle formation too. Lastly, watch your baking time. Pull them out when they are puffed but still soft in the center for the perfect texture.
Pro Tips
- Chill the Dough: Chilling the cookie dough helps prevent the cookies from spreading too much during baking, resulting in thicker, chewier cookies.
- Use Fresh Ingredients: Ensure your baking powder and extracts are fresh for the best flavor and texture in your cookies.
- Perfectly Crinkly Tops: For a beautiful crinkle effect, do not overmix the dough once you add the dry ingredients; a few lumps are fine!
- Store Correctly: Keep your cookies in an airtight container to maintain their softness and flavor for longer.
Variations
Adding different flavor extracts
You can make these cookies even more fun by adding other flavor extracts. Besides peppermint, try using almond or orange extract. Just swap half of the peppermint extract for your choice. This small change can bring a new twist to the classic taste. Experiment and find your favorite mix!
Ingredient substitutions for dietary needs
If you have dietary needs, you can still enjoy these cookies. Use gluten-free all-purpose flour instead of regular flour. For a vegan option, replace eggs with flax eggs. To make these cookies dairy-free, skip the chocolate chips or use dairy-free chocolate. These swaps keep the cookies tasty while meeting your needs.
Creative topping ideas
Toppings can add a special touch to your cookies. Try drizzling melted white chocolate on top for a sweet contrast. You can also sprinkle crushed candy canes for extra peppermint flavor. Colored sprinkles can make your cookies fun for kids. Get creative and make them your own!
Storage Info
How to store chocolate peppermint crinkle cookies
Store your chocolate peppermint crinkle cookies in an airtight container. This keeps them fresh. Place parchment paper between layers of cookies. This helps stop them from sticking together. You can keep them at room temperature for up to one week.
Recommended storage containers
Use plastic containers or glass jars with tight seals. Avoid using containers that let air in. If you have a lot of cookies, stack them carefully. This way, they won't break. Label the container with the date. This helps you remember how long they have been stored.
Freezing tips for longer shelf life
To freeze your cookies, let them cool completely first. Then, place them in a single layer on a baking sheet. Freeze them for about one hour. Once frozen, transfer them to a freezer-safe bag. Squeeze out as much air as possible before sealing. You can freeze them for up to three months. When ready to eat, let them thaw at room temperature. Enjoy them fresh!
FAQs
Can I use different types of cocoa powder?
Yes, you can use different cocoa powders. Unsweetened cocoa powder is best. Dark cocoa adds a richer taste. If you prefer a milder flavor, use regular cocoa powder. Just remember, each type affects the cookie's flavor slightly.
What to do if the dough is too sticky?
If your dough is too sticky, chill it longer. Place it in the fridge for 10 to 15 more minutes. This makes it easier to handle. You can also add a bit more flour, about one tablespoon at a time. Mix well after each addition until it is manageable.
How to make these cookies ahead of time?
To make these cookies ahead of time, prepare the dough and chill it. You can store the dough in an airtight container in the fridge for up to two days. For longer storage, freeze the dough. Just roll it into balls and place them on a baking sheet. Freeze until solid, then transfer to a freezer bag. When ready to bake, no need to thaw. Just roll in powdered sugar and bake!
This blog post covered how to make delicious Chocolate Peppermint Crinkle Cookies. We discussed the ingredients, preparation steps, and tips for success. You learned how to store your cookies so they stay fresh and tasty.
Making these cookies can bring joy to your kitchen. Don’t hesitate to try the flavor variations and creative toppings. Enjoy baking and sharing these festive treats!