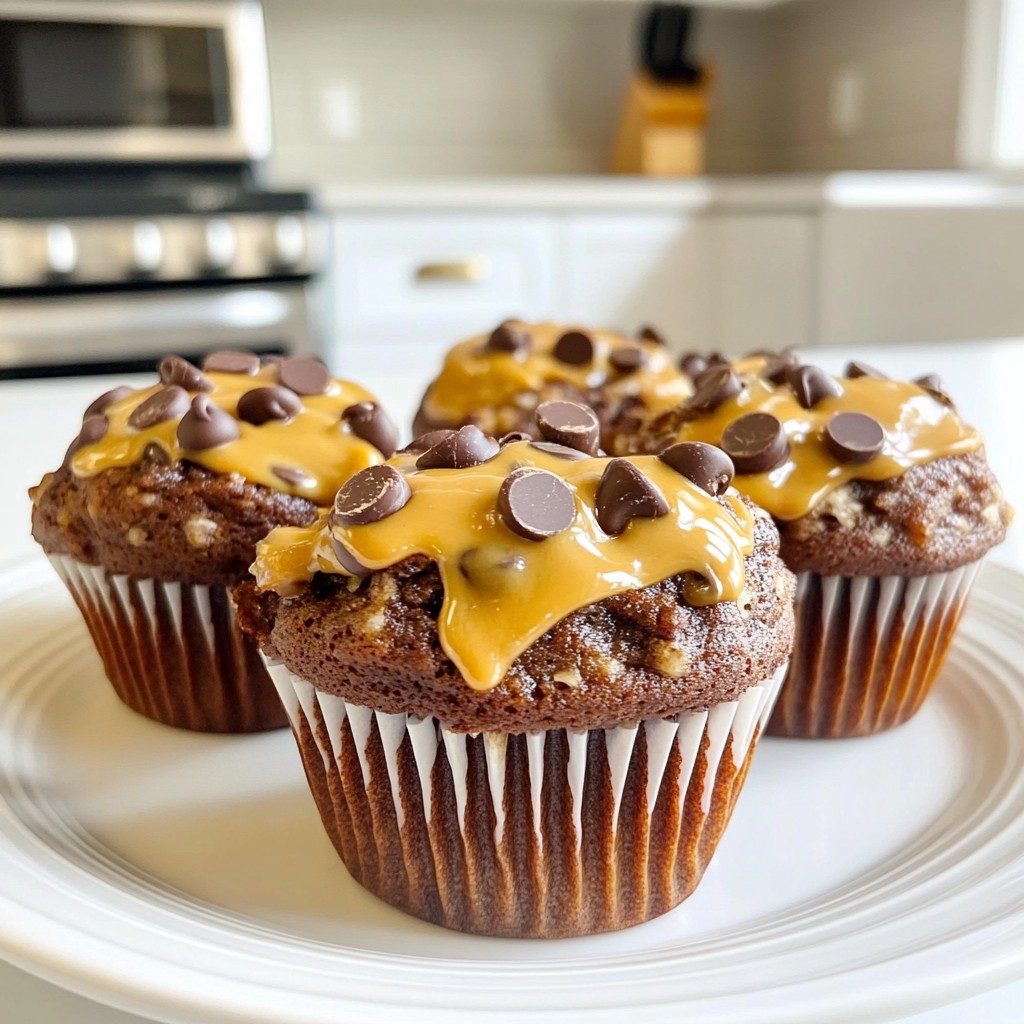
Are you ready to indulge in a sweet treat that combines chocolate, peanut butter, and banana? In this blog post, I’ll share my delightful recipe for Chocolate Peanut Butter Banana Muffins. You’ll discover easy steps to make these muffins, along with key tips and variations. Whether you want them nut-free or gluten-free, I've got you covered! So, let's dive into the tasty world of muffins that will make your kitchen smell divine!
Why I Love This Recipe
- Delicious Combination: The blend of chocolate, peanut butter, and banana creates a rich and satisfying flavor that pleases everyone.
- Nutritious Ingredients: Using ripe bananas and peanut butter not only adds flavor but also provides essential nutrients and energy.
- Easy to Make: This recipe requires simple steps and common ingredients, making it perfect for bakers of all levels.
- Perfect for Any Occasion: These muffins are great for breakfast, snacks, or even as a dessert, making them versatile for any meal.
Ingredients
Key Ingredients List
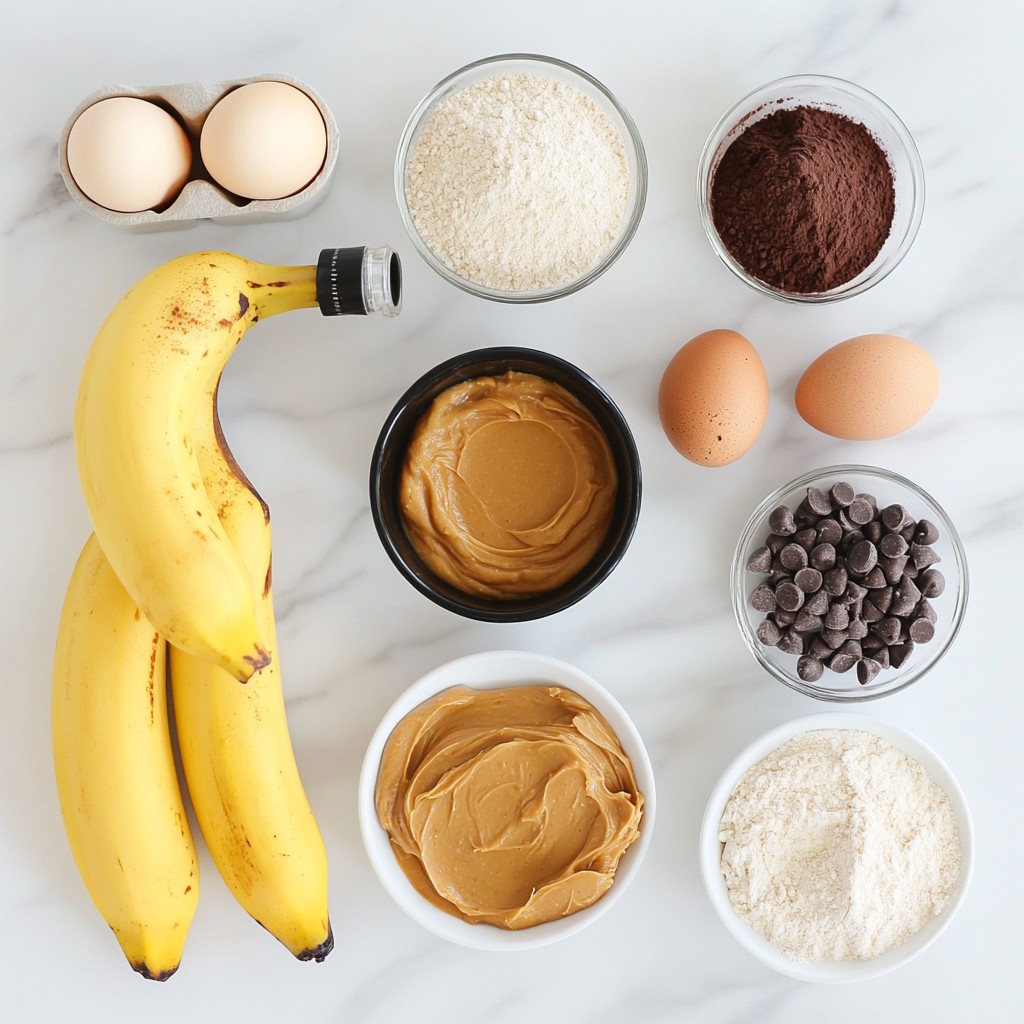
To make these tasty Chocolate Peanut Butter Banana Muffins, you'll need:
- 2 ripe bananas, mashed
- 1/2 cup creamy peanut butter
- 1/2 cup granulated sugar
- 1/4 cup brown sugar, packed
- 2 large eggs
- 1 teaspoon vanilla extract
- 1 teaspoon baking soda
- 1/2 teaspoon salt
- 1 1/2 cups all-purpose flour
- 1/2 cup unsweetened cocoa powder
- 1/2 cup chocolate chips
These ingredients blend to create a rich and moist muffin. The ripe bananas add natural sweetness. The peanut butter brings a creamy, nutty taste, while the cocoa powder gives it that chocolatey goodness that we all love.
Optional Ingredients for Added Flavor
You can enhance the flavor of your muffins with these optional ingredients:
- 1/2 cup chopped nuts (like walnuts or pecans)
- 1/2 cup dried fruit (such as raisins or cranberries)
- 1 teaspoon cinnamon or nutmeg for spice
Adding nuts gives a nice crunch, and dried fruit adds a chewy texture. A dash of spice can take the flavor to the next level.
Ingredient Substitutions
Don’t worry if you don’t have all the ingredients. Here are some swaps:
- Use almond butter instead of peanut butter for a nut-free option.
- Replace granulated sugar with honey or maple syrup. Just reduce the liquid in the recipe slightly.
- Use whole wheat flour instead of all-purpose for a healthier muffin.
These substitutions keep the spirit of the recipe while catering to your needs. Enjoy experimenting with what you have on hand!
Step-by-Step Instructions
Preheating and Preparing the Muffin Pan
First, set your oven to 350°F (175°C). This temperature helps the muffins rise just right. While the oven warms up, grab a muffin pan. You can line it with paper liners or lightly grease it. This step keeps the muffins from sticking. It also makes cleanup easy.
Mixing the Wet Ingredients
In a large bowl, mash the two ripe bananas. Use a fork for this. Then, add half a cup of creamy peanut butter. Mix until it’s smooth and creamy. Next, stir in half a cup of granulated sugar and a quarter cup of brown sugar. Mix well until the sugars blend with the banana and peanut butter.
Now, it’s time to add the eggs. Crack two large eggs into the bowl, one at a time. Beat them in well. Finally, add one teaspoon of vanilla extract. This adds a lovely flavor that pairs well with chocolate and peanut butter.
Combining the Dry Ingredients and Folding in Chocolate Chips
In a separate bowl, whisk together one and a half cups of all-purpose flour, half a cup of unsweetened cocoa powder, one teaspoon of baking soda, and half a teaspoon of salt. This mixture gives your muffins structure. Once combined, slowly add this dry mix to the wet ingredients. Stir gently until just mixed. Avoid overmixing; you want the muffins soft and fluffy.
Now, fold in half a cup of chocolate chips. Make sure they spread evenly throughout the batter for that delicious chocolatey taste in every bite.
Baking Instructions and Doneness Test
Using a scoop or spoon, fill each muffin liner about two-thirds full with the batter. This gives them room to rise without overflowing. Place the muffin pan in the preheated oven. Bake for 18 to 22 minutes. To check if they are done, insert a toothpick into the center of a muffin. If it comes out clean, they are ready.
Once baked, remove the muffins from the oven. Let them cool in the pan for five minutes. Then, transfer them to a wire rack. This cooling step helps keep the muffins from getting soggy. Enjoy your warm, delightful muffins!
Tips & Tricks
How to Achieve Perfect Muffins
To get perfect muffins, follow these tips. First, use ripe bananas. The riper they are, the sweeter and moister your muffins will be. Next, don't overmix your batter. Stir until just combined. This keeps the muffins light and fluffy. Also, fill each muffin liner about 2/3 full. This allows space for them to rise without spilling over. Lastly, bake until a toothpick comes out clean. This tells you they are done.
Avoiding Common Baking Mistakes
Many bakers make simple mistakes. One common issue is using cold eggs. Always use room temperature eggs. They blend better and help with rising. Another mistake is skipping the flour sifting. Sifting helps to aerate the flour. This makes your muffins soft. Watch your baking time closely. If you leave them in too long, they can dry out. Trust your nose; if they smell done, check them!
Serving Suggestions for Chocolate Peanut Butter Banana Muffins
These muffins taste great warm. Serve them fresh from the oven for the best flavor. You can also drizzle extra peanut butter on top. This adds a rich touch. A sprinkle of chocolate chips makes them look fancy. For a fun twist, serve them with a scoop of vanilla ice cream. This makes a delightful dessert. Enjoy them with a cup of coffee or tea for a tasty snack.
Pro Tips
- Use Overripe Bananas: The riper the bananas, the sweeter and more flavorful your muffins will be. Look for bananas with brown spots for the best results.
- Mix Gently: When combining wet and dry ingredients, mix just until combined. Overmixing can lead to dense muffins.
- Chill the Batter: For even fluffier muffins, consider chilling the batter for about 30 minutes before baking. This helps the flavors meld and creates a better texture.
- Experiment with Add-Ins: Feel free to add chopped nuts, dried fruit, or even a swirl of Nutella for a fun twist on this classic recipe.
Variations
Nut-Free Version
To make a nut-free version, just swap the peanut butter. You can use sun butter or soy nut butter. Both options give a creamy texture without nuts. This way, kids and friends with allergies can enjoy these muffins safely. You still get a great flavor and moistness with these swaps.
Gluten-Free Option
To go gluten-free, use a gluten-free flour blend instead of all-purpose flour. Many blends work well in baking. Make sure the blend contains xanthan gum for better texture. You will still enjoy soft and tasty muffins. Just check that all other ingredients are gluten-free too.
Flavor Enhancements
You can add extra flavors to make these muffins even better. Here are a few ideas:
- Nuts: Chop up walnuts or pecans for a crunchy bite.
- Dried Fruits: Add raisins or dried cranberries for a sweet surprise.
- Spices: A pinch of cinnamon or nutmeg can add warmth.
- Extracts: Try almond or coconut extract for a unique twist.
These options let you personalize your muffins to fit your taste. Mixing and matching can lead to new favorites!
Storage Info
Best Ways to Store Muffins
To keep your chocolate peanut butter banana muffins fresh, store them in an airtight container. Place a paper towel at the bottom to absorb moisture, which keeps them soft. You can store them at room temperature for up to three days. If you have more muffins than you can eat, refrigerate them for up to a week. Just remember, the fridge can dry them out a bit.
How to Freeze Muffins for Later
Freezing muffins is easy and a great way to save leftovers. First, let the muffins cool completely. Then, wrap each muffin tightly in plastic wrap or foil. Place the wrapped muffins in a freezer bag or container. This method helps prevent freezer burn. You can freeze them for up to three months. When you're ready to enjoy, just thaw them at room temperature or heat them in the microwave.
Reheating Tips for Maximum Freshness
To enjoy your muffins warm and fresh, reheating is key. If they are at room temperature, pop them in the microwave for about 10-15 seconds. For frozen muffins, microwave them for 30-45 seconds, or until warm. You can also reheat them in the oven. Preheat the oven to 350°F (175°C) and bake for about 5-10 minutes. This method keeps the outside nice and crisp while warming the inside. Enjoy your treats just like they came out of the oven!
FAQs
Can I make these muffins ahead of time?
Yes, you can make these muffins ahead of time. Bake them and let them cool. Store them in an airtight container for up to four days. You can also freeze them for longer storage. Just thaw them overnight in the fridge before serving. This way, you have a tasty treat ready to go!
What can I use instead of eggs for a vegan option?
For a vegan option, use flax eggs. To make one flax egg, mix one tablespoon of ground flaxseed with three tablespoons of water. Let it sit for five minutes until it thickens. You can also use unsweetened applesauce. A quarter cup of applesauce replaces one egg. Both options work well in this recipe.
How do I know when my muffins are done baking?
To check if your muffins are done, insert a toothpick into the center of a muffin. If it comes out clean or with a few crumbs, they're ready. If the toothpick has wet batter on it, bake for a few more minutes. Keep an eye on them, as overbaking can dry them out.
Can I use other types of flour?
Yes, you can use other types of flour. Whole wheat flour adds a nutty flavor and extra fiber. If you need a gluten-free option, try almond flour or a gluten-free flour blend. Keep in mind that the texture may change slightly, so adjust baking time if needed.
This blog covers everything about making delicious chocolate peanut butter banana muffins. You learned about key ingredients, step-by-step baking, and helpful tips. We also explored fun variations and how to store your muffins for freshness.
These muffins are easy to make and great for any time of day. With the right ingredients and techniques, you will impress everyone with your baking skills. Enjoy your tasty treats, and don’t forget to share them!