Chocolate Hazelnut Bark Simple and Tasty Treat

WANT TO SAVE THIS RECIPE?

Are you ready to indulge in a quick, simple treat that bursts with flavor? My Chocolate Hazelnut Bark combines rich chocolate with crunchy hazelnuts, perfect for any occasion. In this post, I will guide you through every step, from gathering ingredients to storing your tasty creation. Whether you’re a baking novice or a seasoned pro, this easy recipe will surely impress. Let’s get started on crafting your new favorite snack!

Why I Love This Recipe

  1. Decadent Flavor: This bark combines the rich taste of dark chocolate with the creaminess of milk chocolate, creating a perfect balance that is hard to resist.
  2. Easy to Make: With just a few simple steps, you can whip up this delightful treat in no time, making it perfect for both novice and experienced bakers.
  3. Customizable: Feel free to add your favorite nuts, dried fruits, or even a sprinkle of spices to make this bark truly your own.
  4. Perfect for Sharing: This recipe yields plenty of pieces, making it a great option for parties, gifts, or simply to enjoy with family and friends.

Ingredients

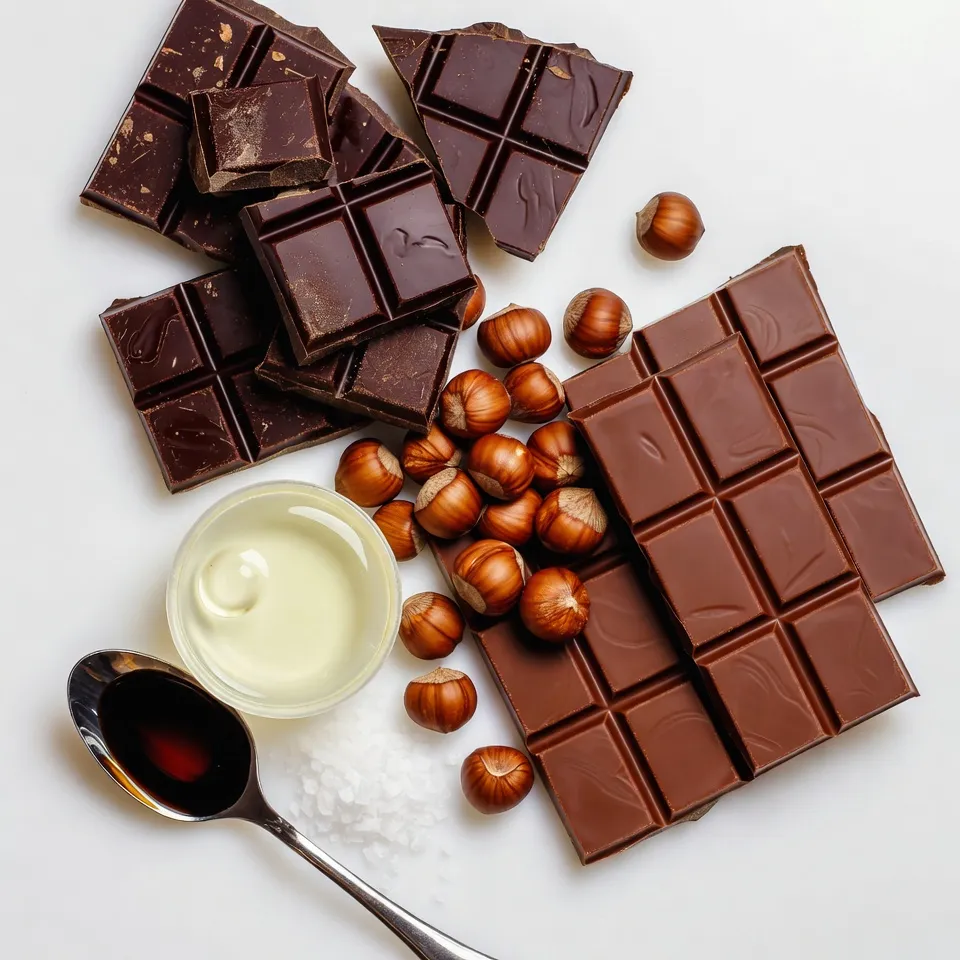
Complete List of Ingredients

Chocolate varieties:

– 200g dark chocolate (70% cocoa or higher)

– 100g milk chocolate

Hazelnuts:

– 100g hazelnuts, roasted and roughly chopped

Additional ingredients:

– 1 tablespoon coconut oil (optional, for extra shine)

– Sea salt flakes, for sprinkling

– 1 teaspoon vanilla extract (optional)

Chocolate hazelnut bark is simple yet rich in flavor. You can choose dark chocolate for depth and milk chocolate for sweetness. Roasted hazelnuts add a nice crunch and nutty taste. I love using coconut oil. It gives the bark a glossy finish. Sea salt flakes offer a sweet and salty balance. Lastly, vanilla extract boosts the overall flavor.

Feel free to customize the ingredients to fit your taste.

Step-by-Step Instructions

Preparation of the Baking Tray

To start, you need to line your baking tray. Grab an 8×8 inch tray and cut a piece of parchment paper. Make sure it hangs over the edges. This helps when you remove the bark later. If the paper is large enough, it will make lifting the bark easy and clean.

Melting the Chocolates

Now, let’s melt the chocolate. You can use two methods: a double boiler or a microwave. For the double boiler, fill a pot with water and bring it to a simmer. Place a heatproof bowl on top, ensuring it doesn’t touch the water. This method helps control the heat.

If you choose the microwave, put the chocolate in a bowl. Heat it in 30-second bursts. Stir after each burst until it’s smooth. Remember, chocolate can burn easily, so watch the temperature. Stirring is key to keeping it smooth.

Assembling the Bark

Once your chocolates are melted, it’s time to layer. First, pour the dark chocolate into the lined tray. Use a spatula to spread it evenly. Next, drizzle the milk chocolate over the dark.

Grab a toothpick or skewer and swirl it around. This creates a pretty marbled effect.

Now, sprinkle the chopped hazelnuts over the top. Press them down gently so they stick. For the final touch, add a sprinkle of sea salt. This gives a nice sweet and salty contrast.

Let it cool in the fridge for at least two hours until set. When ready, lift the bark out and break it into pieces. Enjoy your tasty treat!

Tips & Tricks

Perfecting the Chocolate Texture

To achieve the best taste and look, I suggest using dark chocolate with 70% cocoa or higher. This gives your bark a rich, deep flavor. If you want a glossy finish, add one tablespoon of coconut oil when melting the chocolate. The coconut oil adds shine and a hint of flavor. You can also mix in a teaspoon of vanilla extract for extra depth.

Troubleshooting Common Issues

Sometimes chocolate can turn grainy. If this happens, stir in a tiny bit of coconut oil while melting. This helps smooth it out. To ensure an even spread of chocolate, pour it into the tray and use a spatula to spread it into the corners. Take your time, and don’t rush this step. A smoother surface makes for better presentation.

Serving Suggestions

Chocolate hazelnut bark pairs well with many drinks. Try it with coffee or a glass of milk. It also goes great with a scoop of vanilla ice cream. When you present the bark, break it into uneven pieces for a rustic look. Place them on a nice plate, and sprinkle a few extra hazelnuts on top for a beautiful touch.

Pro Tips

  1. Use Quality Chocolate: The flavor of your bark will greatly depend on the quality of chocolate you use. Opt for high-quality dark and milk chocolate for the best results.
  2. Temperature Matters: Be sure to let the melted chocolate cool slightly before pouring it into the tray. This helps prevent the layers from mixing too much.
  3. Experiment with Toppings: Feel free to add other toppings like dried fruits, seeds, or even a drizzle of caramel for a unique twist on your bark.
  4. Storage Tips: Store the bark in an airtight container in a cool place to maintain its texture and flavor. It can last up to two weeks if kept properly.

Variations

Ingredient Swaps

You can change the chocolate types to fit your taste. Use white chocolate instead of dark for a sweeter twist. You can also try other nuts like almonds or pecans. Adding spices like cinnamon or a hint of chili can create a new flavor adventure. You can even mix in extracts like almond or orange for a fun twist.

Dietary Alternatives

If you’re looking for vegan options, use dark chocolate with no milk. You can swap the milk chocolate for a vegan chocolate brand. For a gluten-free treat, just make sure your chocolate does not contain any gluten. Most dark and milk chocolates are gluten-free, but always check the label.

Holiday and Seasonal Variations

For holidays, add colorful sprinkles or festive decorations. You can make it themed for Halloween by adding orange and black sprinkles. For Christmas, try crushed peppermint candies on top. These small changes make your bark great for parties or gifts. Get creative and let the season inspire your designs!

Storage Info

Best Storage Practices

Keep your chocolate hazelnut bark fresh by storing it in a cool place. Use an airtight container to avoid moisture. A glass jar or plastic container works well. Make sure to keep it away from heat sources, like the stove or direct sunlight.

If it’s warm, place the container in the fridge. This helps prevent melting. However, let it sit at room temperature for a bit before eating. This way, you enjoy its rich taste and smooth texture.

Shelf Life

Chocolate hazelnut bark can last up to two weeks when stored properly. After two weeks, it may start to lose its flavor. Look for signs of spoilage. If it looks dull or develops a white film, it may not taste good anymore. Discard any bark that smells off or feels sticky. Always trust your senses!

FAQs

How do I make chocolate hazelnut bark without coconut oil?

You can skip coconut oil if you want. The chocolate will still taste great. To get a nice shine, melt your chocolate slowly. Stir it well while melting. This helps keep it smooth. You can also add a little bit of butter for shine.

Can I use pre-roasted hazelnuts?

Yes, you can use pre-roasted hazelnuts. They save time and add a nice flavor. However, fresh hazelnuts can have a richer taste. Pre-roasted nuts may also have a crunchier texture. If you prefer a softer bite, roast your own nuts at home.

What other toppings can I add to chocolate bark?

You can get creative with toppings! Try adding dried fruits like cranberries or apricots. Chopped nuts like almonds or pistachios work well too. You can even sprinkle some cookie crumbs on top. These additions add flavor and fun textures.

Where can I buy chocolate hazelnut bark?

You can find chocolate hazelnut bark at many stores. Look for it in the candy aisle or gourmet section. Health food stores may also carry it. Many online shops sell high-quality bark too. Make sure to check the ingredients for the best options.

You’ve learned how to make delicious chocolate hazelnut bark. We covered the key ingredients, from dark and milk chocolate to the right hazelnuts and extras like sea salt. I shared step-by-step instructions to guide your bake time. You now have tips for perfect texture and how to fix common issues.

Don’t forget the fun variations and storage tips to keep your bark fresh. Enjoy creating your treats for any occasion. Happy bakin

- Chocolate varieties: - 200g dark chocolate (70% cocoa or higher) - 100g milk chocolate - Hazelnuts: - 100g hazelnuts, roasted and roughly chopped - Additional ingredients: - 1 tablespoon coconut oil (optional, for extra shine) - Sea salt flakes, for sprinkling - 1 teaspoon vanilla extract (optional) Chocolate hazelnut bark is simple yet rich in flavor. You can choose dark chocolate for depth and milk chocolate for sweetness. Roasted hazelnuts add a nice crunch and nutty taste. I love using coconut oil. It gives the bark a glossy finish. Sea salt flakes offer a sweet and salty balance. Lastly, vanilla extract boosts the overall flavor. Feel free to customize the ingredients to fit your taste. {{ingredient_image_1}} To start, you need to line your baking tray. Grab an 8x8 inch tray and cut a piece of parchment paper. Make sure it hangs over the edges. This helps when you remove the bark later. If the paper is large enough, it will make lifting the bark easy and clean. Now, let’s melt the chocolate. You can use two methods: a double boiler or a microwave. For the double boiler, fill a pot with water and bring it to a simmer. Place a heatproof bowl on top, ensuring it doesn’t touch the water. This method helps control the heat. If you choose the microwave, put the chocolate in a bowl. Heat it in 30-second bursts. Stir after each burst until it’s smooth. Remember, chocolate can burn easily, so watch the temperature. Stirring is key to keeping it smooth. Once your chocolates are melted, it’s time to layer. First, pour the dark chocolate into the lined tray. Use a spatula to spread it evenly. Next, drizzle the milk chocolate over the dark. Grab a toothpick or skewer and swirl it around. This creates a pretty marbled effect. Now, sprinkle the chopped hazelnuts over the top. Press them down gently so they stick. For the final touch, add a sprinkle of sea salt. This gives a nice sweet and salty contrast. Let it cool in the fridge for at least two hours until set. When ready, lift the bark out and break it into pieces. Enjoy your tasty treat! To achieve the best taste and look, I suggest using dark chocolate with 70% cocoa or higher. This gives your bark a rich, deep flavor. If you want a glossy finish, add one tablespoon of coconut oil when melting the chocolate. The coconut oil adds shine and a hint of flavor. You can also mix in a teaspoon of vanilla extract for extra depth. Sometimes chocolate can turn grainy. If this happens, stir in a tiny bit of coconut oil while melting. This helps smooth it out. To ensure an even spread of chocolate, pour it into the tray and use a spatula to spread it into the corners. Take your time, and don’t rush this step. A smoother surface makes for better presentation. Chocolate hazelnut bark pairs well with many drinks. Try it with coffee or a glass of milk. It also goes great with a scoop of vanilla ice cream. When you present the bark, break it into uneven pieces for a rustic look. Place them on a nice plate, and sprinkle a few extra hazelnuts on top for a beautiful touch. Pro Tips Use Quality Chocolate: The flavor of your bark will greatly depend on the quality of chocolate you use. Opt for high-quality dark and milk chocolate for the best results. Temperature Matters: Be sure to let the melted chocolate cool slightly before pouring it into the tray. This helps prevent the layers from mixing too much. Experiment with Toppings: Feel free to add other toppings like dried fruits, seeds, or even a drizzle of caramel for a unique twist on your bark. Storage Tips: Store the bark in an airtight container in a cool place to maintain its texture and flavor. It can last up to two weeks if kept properly. {{image_2}} You can change the chocolate types to fit your taste. Use white chocolate instead of dark for a sweeter twist. You can also try other nuts like almonds or pecans. Adding spices like cinnamon or a hint of chili can create a new flavor adventure. You can even mix in extracts like almond or orange for a fun twist. If you're looking for vegan options, use dark chocolate with no milk. You can swap the milk chocolate for a vegan chocolate brand. For a gluten-free treat, just make sure your chocolate does not contain any gluten. Most dark and milk chocolates are gluten-free, but always check the label. For holidays, add colorful sprinkles or festive decorations. You can make it themed for Halloween by adding orange and black sprinkles. For Christmas, try crushed peppermint candies on top. These small changes make your bark great for parties or gifts. Get creative and let the season inspire your designs! Keep your chocolate hazelnut bark fresh by storing it in a cool place. Use an airtight container to avoid moisture. A glass jar or plastic container works well. Make sure to keep it away from heat sources, like the stove or direct sunlight. If it’s warm, place the container in the fridge. This helps prevent melting. However, let it sit at room temperature for a bit before eating. This way, you enjoy its rich taste and smooth texture. Chocolate hazelnut bark can last up to two weeks when stored properly. After two weeks, it may start to lose its flavor. Look for signs of spoilage. If it looks dull or develops a white film, it may not taste good anymore. Discard any bark that smells off or feels sticky. Always trust your senses! You can skip coconut oil if you want. The chocolate will still taste great. To get a nice shine, melt your chocolate slowly. Stir it well while melting. This helps keep it smooth. You can also add a little bit of butter for shine. Yes, you can use pre-roasted hazelnuts. They save time and add a nice flavor. However, fresh hazelnuts can have a richer taste. Pre-roasted nuts may also have a crunchier texture. If you prefer a softer bite, roast your own nuts at home. You can get creative with toppings! Try adding dried fruits like cranberries or apricots. Chopped nuts like almonds or pistachios work well too. You can even sprinkle some cookie crumbs on top. These additions add flavor and fun textures. You can find chocolate hazelnut bark at many stores. Look for it in the candy aisle or gourmet section. Health food stores may also carry it. Many online shops sell high-quality bark too. Make sure to check the ingredients for the best options. You’ve learned how to make delicious chocolate hazelnut bark. We covered the key ingredients, from dark and milk chocolate to the right hazelnuts and extras like sea salt. I shared step-by-step instructions to guide your bake time. You now have tips for perfect texture and how to fix common issues. Don’t forget the fun variations and storage tips to keep your bark fresh. Enjoy creating your treats for any occasion. Happy baking!

Chocolate Hazelnut Delight Bark

A deliciously rich bark made with dark and milk chocolate, topped with roasted hazelnuts and a sprinkle of sea salt.
Prep Time 15 minutes
Total Time 2 hours 15 minutes
Course Dessert
Cuisine American
Servings 12
Calories 150 kcal

Ingredients
  

  • 200 g dark chocolate (70% cocoa or higher)
  • 100 g milk chocolate
  • 100 g hazelnuts, roasted and roughly chopped
  • 1 tablespoon coconut oil (optional, for extra shine)
  • none Sea salt flakes, for sprinkling
  • 1 teaspoon vanilla extract (optional)

Instructions
 

  • Line a baking tray (approximately 8x8 inches) with parchment paper, ensuring it hangs over the edges for easy removal later.
  • In a heatproof bowl, combine the dark chocolate and coconut oil (if using). Melt it over a double boiler or in the microwave at 30-second intervals, stirring until smooth.
  • Once melted, add the vanilla extract to the dark chocolate and mix well.
  • Pour the melted dark chocolate into the lined baking tray, using a spatula to spread it evenly into the corners.
  • In another heatproof bowl, melt the milk chocolate in the same way as the dark chocolate until silky smooth.
  • Drizzle the melted milk chocolate over the dark chocolate layer, then use a toothpick or skewer to swirl it lightly, creating a marbled effect.
  • Sprinkle the chopped hazelnuts generously over the surface, pressing them down gently to adhere to the chocolate.
  • Finish by sprinkling sea salt flakes over the top for a delicious sweet-salty contrast.
  • Refrigerate the bark for at least 2 hours or until completely set.
  • Once set, lift the bark out of the tray using the parchment paper, and break it into pieces of desired size.

Notes

For extra shine, use coconut oil when melting the chocolate.
Keyword bark, chocolate, dessert, hazelnuts

WANT TO SAVE THIS RECIPE?

Leave a Comment

Recipe Rating